
Related Manuals for Teldat H2


Summary of Contents for Teldat H2
- Page 1 Manual Teldat S.A. Teldat H2 Automotive Router Installation Manual Copyright© Teldat Dm687-I Version 1.4 03/2020 Teldat S.A. Teldat H2 Automotive Router...
- Page 2 This publication is subject to change. Teldat S.A. offers no warranty whatsoever for information contained in this manual. Teldat S.A. is not liable for any direct, indirect, collateral, consequential or any other damage connected to the deliv- ery, supply or use of this manual.
-
Page 3: Table Of Contents
Chapter 2 Teldat H2 Automotive Router ......3 Features........ - Page 4 Chapter 5 Teldat H2 Automotive module options ..... . 22 Interface assignment ....... . .
- Page 5 WIFI specifications ........Teldat H2 Automotive Router...
-
Page 6: About This Guide
1 About this Guide Teldat S.A. Chapter 1 About this Guide Welcome to the Teldat H2 Automotive router family installation manual, which describes how to correctly install this device in a working environment. 1.1 Supported devices All the information contained herein applies to the Teldat H2 Automotive router family. -
Page 7: Related Documentation
Email: support@teldat.com 1.8 Related documentation Teldat Dm704-I Configuration Monitoring. Teldat Dm748-I Software Updating. Teldat Dm771-I Wireless LAN Interface. Teldat Dm781-I Cellular Interface. Teldat Dm812-I GPS. Note The manufacturer reserves the right to make changes and/or improvements to any and all parts of the software and hardware of this product, and to modify the specifications of this manual without prior no- tice. -
Page 8: Teldat H2 Automotive Router
Chapter 2 Teldat H2 Automotive Router 2.1 Features 2.1.1 Power supply For further information about the different power supplies for the Teldat H2 Automotive router family, please refer to the section headed Power source on page 8 in the chapter on Components and Power Supply on page 4. -
Page 9: Components And Power Supply
3 Components and Power Supply Teldat S.A. Chapter 3 Components and Power Supply The following chapter provides detailed information on the chassis of the Teldat H2 Automotive and its compon- ents. This information includes: • Components. • Information on assembly. -
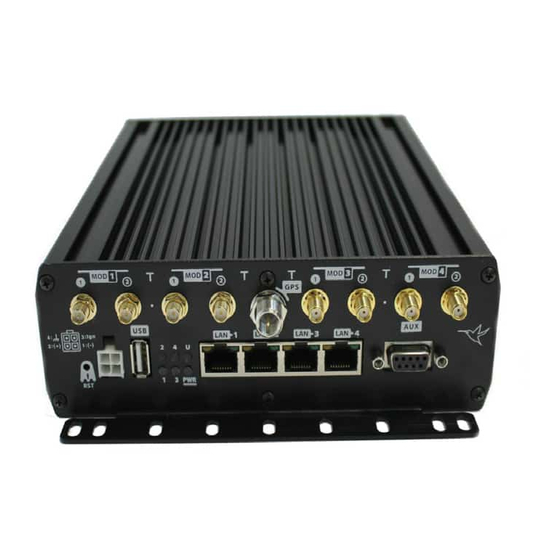
Page 10: Rear Panel
• A, B and C: explained in rear panel LEDs table. W1, W2. WiFi antennas for the Wireless LAN module. This module is optional (your device may not have any antennas). C1, C2. Antennas for the Teldat H2 Automotive cellular module. This module is Teldat H2 Automotive Router... - Page 11 The device has a MINI-PCI Monochrome green OFF -> Interface is unavail- slot where a Wireless LAN able, not installed or not es- daughter can be installed. tablished. ON -> Connecting or con- nected and communications Teldat H2 Automotive Router...
-
Page 12: Mounting Options
3.2 Mounting options The Teldat H2 Automotive device can be mounted in various vehicles on the wall, ceiling or on a horizontal surface. The front and rear panels have two openings where you can add a bracket with slots to firmly hold the device in place. -
Page 13: Outline Drawing
Outline drawing Fig. 5: 3.3 Power source The Teldat H2 Automotive router family is powered through direct current (DC). Workplace Conditions. Main Characteristics • Avoid humid and/or dusty locations. • Avoid direct exposure to sunlight and any other heat sources. Do not place the device between papers, magazines or other items that could hinder natural air circulation. -
Page 14: Connecting The Power Cable To The Device
• Locate the 12 - 24 V DC connector, which is found on the rear part of the device. • Insert the power cable connector. 3.3.2.2 Disconnecting • Disconnect the power supply cable from the device. • Disconnect the data cables. 3.3.2.3 Power connector pinout Signal ACC / IGNITION Functional Earth Teldat H2 Automotive Router... -
Page 15: Cable Features
The cable must always be 18 A WG or greater. 3.3.4 Configuring power management The power management system of the Teldat H2 Automotive : - stops the device from switching on until the vehicle has started. - when installed, the device switches off a short time after the vehicle turns off. The purpose of this slight delay is to keep the device from disconnecting during short stops. -
Page 16: Deactivating On/Off Switch
Disable ignition off power down timer Config>set ignition-off-powerdown-timer 10 Config> For further information on this command, please see manual Teldat- Dm704-I Configuration and Monitoring. 3.3.7 Deactivating On/Off switch Deactivating the On/Off Switch from the Teldat H2 Automotive is possible. When the On/Off Switch is enabled, the schema looks like the following figure, with the JP5 connector connected:... -
Page 17: Protection Fuse
Fig. 9: 3.4 Protection fuse The Teldat H2 Automotive router family has an internal protection fuse incorporated with the aim of preventing damage to the device and the surrounding area. The following image shows where the protection fuse is located (F1). -
Page 18: Reset Button
The fuse must have the characteristics indicated by Teldat S.A.. 3.5 RESET button The Teldat H2 Automotive has a button labeled RESET on the rear panel of the device. This button is physically protected to stop it from being accidentally pressed.To activate it, please use a sharp pointed object. -
Page 19: Connecting The Data
The Teldat H2 Automotive has the following data connections: 3.6.1 4-port Ethernet switch The Teldat H2 Automotive incorporates a 4-port 10/100/1000 BaseT switch with automatic MDI/MDIX to connect to a local area network (LAN). Please pay careful attention to the labeling to avoid mistaking this switch for other types of ports. -
Page 20: Wireless Lan Antenna Connection (Wi-Fi Connectors)
3.6.5 Connecting for configuration The Teldat H2 Automotive router has a DB9 female connector on the front panel labeled AUX. that can be used as a router configuration port or as a V.24 asynchronous serial port (through a configuration command). The behavior or functionality of this interface must be preconfigured. -
Page 21: Connecting To A Wwan Antenna (Cell Connectors)
For further information on GPS, please see manual "Teldat-Dm812-I GPS". 3.6.6 Connecting to a WWAN antenna (cell connectors) The Teldat H2 Automotive routers can have three or five connectors in order to connect the WWAN antennas, de- pending on the number of WWAN modules installed in the device. - Page 22 Maximum recommended distance is 25 cm. For optimum performance, use the radio frequency accessories (antennas and cables) recommended by Teldat. Teldat has a range of accessories that allow Teldat H2 Automotive routers to be installed in different locations. Note Antennas must not be directly connected to the Teldat H2 Automotive router, but at least 50 cm away.
-
Page 23: Connecting The Gps Antenna
Teldat S.A. 3.6.7 Connecting the GPS antenna When the Wireless WAN module supports this functionality, Teldat H2 Automotive have an additional connector for GPS external antennas. To assemble the antenna, simply screw its cable connector into the connector labeled GPS (located on the front panel). -
Page 24: Installing The Sim Card
There are certain services (CDMA) provided by several carriers in some countries that do not require SIM cards. In installations where a SIM card is required, you must always insert at least one. The Teldat H2 Automotive has one internal and two external SIM trays. The external trays are located on the front and rear panels. -
Page 25: Installing The Sim
(1) Press on the button so the SIM tray comes out. (2) Place the SIM on the tray. (3) Insert the tray in the slot and return the tray to its original position. Teldat H2 Automotive Router... - Page 26 4 Installing the SIM card Teldat S.A. Instructions on how to insert the SIM in the external tray Fig. 20: Teldat H2 Automotive Router...
-
Page 27: Teldat H2 Automotive Module Options
5 Teldat H2 Automotive module options Teldat S.A. Chapter 5 Teldat H2 Automotive module options &&&&&The Teldat H2 Automotive offers two mounting module options: • Two WiFi modules and only one or no cellular modules. Option 1, with two WiFi modules Fig. -
Page 28: Interface Assignment
5 Teldat H2 Automotive module options Teldat S.A. 5.1 Interface assignment Interface assignment I Label Cellular Module 2 Inter- Cellular Module 1 Inter- GPS Interface face, Antenna Connect- face, Antenna Connect- ors, Diversity ors, Diversity H2 AUTO-1LE cellular2/0, R1&R2, Yes... - Page 29 5 Teldat H2 Automotive module options Teldat S.A. H2 AUTO-2H+ 3G: 2 HSPA+ 850/900/1900/2100 H2 AUTO-1W-1H+ wlan0/0, W1&W2 3G: 1 HSPA+ 850/900/1900/2100, 1 802.11n H2 AUTO-1W-2H+ wlan0/0, W1&W2 3G: 2 HSPA+ 850/900/1900/2100, 1 802.11n H2 AUTO-2W-1H+ wlan0/0, W1&W2 wlan2/0, R1&R2...
-
Page 30: Compliance
6 Compliance Teldat S.A. Chapter 6 Compliance 6.1 Manufacturer information Brand Teldat Manufacturer Teldat S.A. Country Spain Postal Address Isaac Newton 10, Parque Tecnologico de Madrid,28760 Tres Cantos, Madrid, Spain International Phone +34 91 807 65 65 Teldat H2 Automotive Router... -
Page 31: Safety Warnings
6 Compliance Teldat S.A. 6.2 Safety warnings Connecting Disconnecting Teldat H2 Automotive Router... - Page 32 6 Compliance Teldat S.A. Teldat H2 Automotive Router...
-
Page 33: Weee Information
El símbolo del contenedor con la cruz, que se encuentra en el aparato, significa que cuando el equipo haya llegado al final de su vida útil, deberá ser llevado a los centros de recogida previstos, y que su tratamiento debe estar separado del de los residuos urbanos. Teldat H2 Automotive Router... -
Page 34: Reach
—Directive 2014/53/EU (RED) replaces Directive 1999/5/EC (R&TTE) on 13th June 2016 The EC declaration of conformity and additional product documentation can be accessed here: http://www.teldat.com 6.6 CE marking This equipment is in conformity with the CE procedures and marking. Teldat H2 Automotive Router... -
Page 35: National Restrictions
In accordance with Article 10 of 2014/53/EU, we inform you that national restrictions and requirements may apply when it comes to authorization. These can evolve with time. Teldat S.A. recommends that you check with local au- thorities what the latest status of national regulations is. -
Page 36: Appendix A Technical Information
A.3.1 Connecting through the local console (AUX connector) Teldat H2 Automotive has a DB9 female connector on the rear panel known as AUX., which provides access to the device’s CLI or operates as an asynchronous serial port. The behavior of this interface must be pre-configured. By default, this interface is configured in local console mode. -
Page 37: Connecting Through Ip Terminal (Lan 1
Fig. 32: A.3.2 Connecting through IP terminal (LAN 1...4 connectors) The Teldat H2 Automotive includes a default configuration that activates if the device has not been previously con- figured. The router’s default configuration establishes the following IP address and mask: •... -
Page 38: Connectors
• Configure the Ethernet interface on the IP terminal (normally a PC) using the IP address from the following range [192.168.1.2, 192.168.1.254] and mask 255.255.255.0. E.g. 192.168.1.2, 255.255.255.0. • Connect the IP terminal’s Ethernet interface to any of the Ethernet Switch ports on the Teldat H2 Automotive (the LAN1...4 connectors) through the Ethernet cable (RJ45) provided. -
Page 39: Gps Connector
External A.4.5 AUX connector DB9 CONFIGURATION CONF A.4.6 POWER supply connector SIGNAL IGNITION Functional Earth, optional A.5 Technical specifications A.5.1 Architecture hardware PROCESSORS Freescale QorQ. MEMORY 128 Mbytes in SDRAM. STORAGE UNIT FLASH Memory (32 Mbytes). Teldat H2 Automotive Router... -
Page 40: Lan Interface
802.11g: 1, 2, 5.5, 6, 9, 11, 12, 18, 24, 36, 48, and 54 Mbps. 802.11n: 1, 2, 5.5, 6, 9, 11, 12, 18, 24, 36, 48, 54, and m0-m15. CONNECTOR 2/3 RF SMA RP female. Teldat H2 Automotive Router... -
Page 41: Configuration Interface
- OFF: GND or not connected. CONNECTOR 4 Pin polarized connector. A.5.8 Dimensions and weight TYPE Ruggedized housing with multiple support positions. LENGTH x WIDTH x HEIGHT 216 x 210 x 50 mm. WEIGHT 2.0 kg. Teldat H2 Automotive Router... -
Page 42: Environmental Specifications
Technical Information Teldat S.A. A.5.9 Environmental specifications TEMPERATURE Operating: 0 ºC to 50 ºC. RELATIVE HUMIDITY ON: 8 % to 85 %. (non condensing). OFF: 5 % to 90 %. (non condensing). Teldat H2 Automotive Router... -
Page 43: Radio Information
Band 8 Tx: 880–915 MHz +23 dBm ± 1 dB Rx: 925–960 MHz Technology: GSM / GPRS / EDGE Bands Frequencies Conducted Transmit Power GSM 850 (850 MHz) Tx: 824–849 MHz +32 dBm ± 1 dB Teldat H2 Automotive Router... -
Page 44: Rf Gsm/Wcdma Specifications
+27 dBm ± 1 dB DCS 1800 (1800 MHz) Tx: 1710–1785 MHz +29 dBm ± 1 dB Rx: 1805–1880 MHz +26 dBm ± 1 dB PCS 1900 (1900 MHz) Tx: 1850–1910 MHz +29 dBm ± 1 dB Teldat H2 Automotive Router... -
Page 45: Wifi Specifications
(tolerance ± 2 dB) 802.11a: 5.150~5.350 GHz Band • +16 dBm at 6~24 Mbps • +14 dBm at 48 Mbps • +13 dBm at 54 Mbps 5.470~5.725 GHz Band • +16 dBm at 6~24 Mbps Teldat H2 Automotive Router... - Page 46 • +13~15dBm at MCS0/8 , 1/9 , 2/10 , 3/11 , 4/12 , 5/13, MCS6/14 • +10~12dBm at MCS7/15 5.725~5.825 GHz Band • +12~15dBm at MCS0/8 , 1/9 , 2/10 , 3/11 , 4/12 , 5/13, MCS6/14 Teldat H2 Automotive Router...
- Page 47 Radio Information Teldat S.A. • +10~12dBm at MCS7/15 Teldat H2 Automotive Router...
Need help?
Do you have a question about the H2 and is the answer not in the manual?
Questions and answers