Table of Contents
Advertisement
®
5800 ADAEZ PRO
Installation and Operation Instructions
Changes or modifications not expressly approved by the party responsible for compliance could void the
user's authority to operate this device. This device complies with part 15 of the FCC Rules. Operation is
subject to the condition that this device does not cause harmful interference.
This equipment has been tested and found to comply with the limits for a Class A digital device, pursuant to
part 15 of the FCC Rules. These limits are designed to provide reasonable protection against harmful
interference when the equipment is operated in a commercial environment. This equipment generates, uses,
and can radiate radio frequency energy and, if not installed and used in accordance with the instruction
manual, may cause harmful interference to radio communications.
To obtain the latest manual and template revisions or to view installation and programming videos go to
www.nortondoorcontrols.com. For technical support call 800-438-1951 x6030, option 4.
Copyright © 2018, ASSA ABLOY Accessories and Door Controls Group, Inc. All rights
reserved. Reproduction in whole or in part without the express written permission of ASSA
ABLOY Accessories and Door Controls Group, Inc. is prohibited.
WARNING: This product can expose you to chemicals including
lead, which is known to the State of California to cause cancer or other
reproductive harm. For more information go to
www.P65warnings.ca.gov/product.
IMPORTANT INSTALLATION INSTRUCTIONS
WARNING – To reduce the risk of severe injury or death:
READ AND FOLLOW ALL INSTALLATION INSTRUCTIONS
Operating Instructions
Note
1 of 50
®
5800 ADAEZ PRO
Installation and
TESTED TO COMPLY WITH
FCC STANDARDS
700002-Rev N 09/18
Advertisement
Table of Contents

Related Manuals for Assa Abloy 5800 ADAEZ PRO


Summary of Contents for Assa Abloy 5800 ADAEZ PRO
- Page 1 For technical support call 800-438-1951 x6030, option 4. TESTED TO COMPLY WITH FCC STANDARDS Copyright © 2018, ASSA ABLOY Accessories and Door Controls Group, Inc. All rights 1 of 50 reserved. Reproduction in whole or in part without the express written permission of ASSA 700002-Rev N 09/18 ABLOY Accessories and Door Controls Group, Inc.
-
Page 2: Table Of Contents
1: Documents, Definitions, Tools Required, Equipment and Consumables 2: Quick Programming Guide 3: ADAEZ Installation Schematics Copyright © 2018, ASSA ABLOY Accessories and Door Controls Group, Inc. All rights 2 of 50 reserved. Reproduction in whole or in part without the express written permission of ASSA 700002-Rev N 09/18 ABLOY Accessories and Door Controls Group, Inc. -
Page 3: Purpose
Mounted and Pull Side Mounted. The manual also includes instructions for installing the hardwire option (ADA1015P kit). Copyright © 2018, ASSA ABLOY Accessories and Door Controls Group, Inc. All rights 3 of 50 reserved. Reproduction in whole or in part without the express written permission of ASSA 700002-Rev N 09/18 ABLOY Accessories and Door Controls Group, Inc. -
Page 4: Prerequisites
7. The installation must comply with all local, state, and national electrical codes. Also, transformer wiring must be secured to prevent it from becoming entrapped in the moving parts of the operator or door. Copyright © 2018, ASSA ABLOY Accessories and Door Controls Group, Inc. All rights 4 of 50 reserved. -
Page 5: System Description
“PUSH TO OPERATE” and “PULL TO OPERATE” decals for use with the optional Push and Go feature. • One yellow “DAILY SAFETY CHECK” decal Copyright © 2018, ASSA ABLOY Accessories and Door Controls Group, Inc. All rights 5 of 50 reserved. - Page 6 PULL SIDE MOUNT PUSH SIDE MOUNT Figure 1 Copyright © 2018, ASSA ABLOY Accessories and Door Controls Group, Inc. All rights 6 of 50 reserved. Reproduction in whole or in part without the express written permission of ASSA 700002-Rev N 09/18...
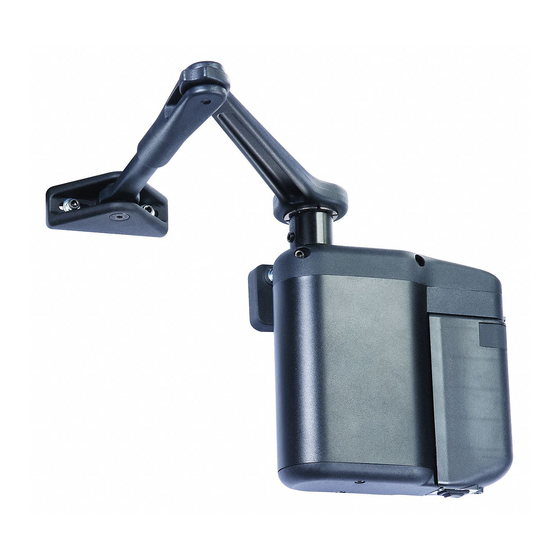
- Page 7 The paragraphs that follow describe its components: Figure 2 Copyright © 2018, ASSA ABLOY Accessories and Door Controls Group, Inc. All rights 7 of 50 reserved. Reproduction in whole or in part without the express written permission of ASSA 700002-Rev N 09/18 ABLOY Accessories and Door Controls Group, Inc.
- Page 8 RESET SELECT ENTER Figure 3 Copyright © 2018, ASSA ABLOY Accessories and Door Controls Group, Inc. All rights 8 of 50 reserved. Reproduction in whole or in part without the express written permission of ASSA 700002-Rev N 09/18 ABLOY Accessories and Door Controls Group, Inc. is prohibited.
-
Page 9: Features And Functions
8 lbs (3.6 transformer. kg) or less. Copyright © 2018, ASSA ABLOY Accessories and Door Controls Group, Inc. All rights 9 of 50 reserved. Reproduction in whole or in part without the express written permission of ASSA 700002-Rev N 09/18 ABLOY Accessories and Door Controls Group, Inc. -
Page 10: Determining The Correct Operator Application
APPLICATION DOOR OPENING DIRECTION Figure 5 Copyright © 2018, ASSA ABLOY Accessories and Door Controls Group, Inc. All rights 10 of 50 reserved. Reproduction in whole or in part without the express written permission of ASSA 700002-Rev N 09/18 ABLOY Accessories and Door Controls Group, Inc. is prohibited. -
Page 11: Operator And Door Arm Installation Instructions - Push Side Applications
Copyright © 2018, ASSA ABLOY Accessories and Door Controls Group, Inc. All rights 11 of 50 reserved. Reproduction in whole or in part without the express written permission of ASSA 700002-Rev N 09/18 ABLOY Accessories and Door Controls Group, Inc. - Page 12 ® 5800 ADAEZ PRO Installation and Operation Instructions Operator And Door Arm Installation Instructions - Push Side Applications 6. Refer to Figure 7, and ALIGN the operator mounting template to the centerline of the butt hinge, center pivot, or offset pivot as applicable.
-
Page 13: Mounting The Door Arm Pivot Bracket
® 5800 ADAEZ PRO Installation and Operation Instructions Operator And Door Arm Installation Instructions - Push Side Applications CAUTION 7. Using a center punch, MARK the mounting hole locations. To ensure proper installation, the operator must be fastened with at least four fasteners. For heavier doors 8. - Page 14 ® 5800 ADAEZ PRO Installation and Operation Instructions Operator And Door Arm Installation Instructions - Push Side Applications Determining the Door Arm Pivot Bracket Mounting Location. STOP GREATER STOP GREATER THAN 1-1/2” THAN 1-1/2” DOOR WHEN STOP IS GREATER THAN 1-1/2”...
- Page 15 ® 5800 ADAEZ PRO Installation and Operation Instructions Operator And Door Arm Installation Instructions - Push Side Applications CAUTION a. Using a 25/64″ drill, DRILL the door arm pivot bracket holes. To ensure proper installation, the door arm pivot bracket must be fastened to the underside of the b.
-
Page 16: Installing The Door Arm Pivot
® 5800 ADAEZ PRO Installation and Operation Instructions Operator And Door Arm Installation Instructions - Push Side Applications Installing the Door Arm Pivot 1. Refer to Figure 12, and SLIDE the door arm pivot 3. TIGHTEN the four set screws securing the door over the door arm pivot bracket. -
Page 17: Installing The Operator Mounting Bracket
® 5800 ADAEZ PRO Installation and Operation Instructions Operator And Door Arm Installation Instructions - Push Side Applications Installing the Operator Mounting Bracket 1. Refer to Figure 13, and DETERMINE the proper 3. Using the provided rivnut installation tool, INSTALL operator mounting bracket location. -
Page 18: Installing The Door Operator
® 5800 ADAEZ PRO Installation and Operation Instructions Operator And Door Arm Installation Instructions - Push Side Applications 4. If the door is wood or hollow metal, PERFORM the used (solid line on operator mounting following: template), ADJUST the bracket so that there •... -
Page 19: Installing The Door Arm
® 5800 ADAEZ PRO Installation and Operation Instructions Operator And Door Arm Installation Instructions - Push Side Applications Figure 14 Installing the Door Arm 1. Refer to Figure 15, and, with the door arm coupling 2. With the door arm touching the face of the door,... - Page 20 ® 5800 ADAEZ PRO Installation and Operation Instructions Operator And Door Arm Installation Instructions - Push Side Applications EVENLY TIGHTEN EACH BOLT IN A CIRCULAR PATTERN 1/4 TURN AT A TIME UNTIL ALL BOLTS ARE FULLY TIGHTENED ENSURE DOOR ARM IS...
-
Page 21: Operator And Door Arm Installation Instructions - Pull Side Applications
TO PROVIDE PRELOAD OPTIONAL WASHER Figure 17 Copyright © 2018, ASSA ABLOY Accessories and Door Controls Group, Inc. All rights 21 of 50 reserved. Reproduction in whole or in part without the express written permission of ASSA 700002-Rev N 09/18... - Page 22 ® 5800 ADAEZ PRO Installation and Operation Instructions Operator And Door Arm Installation Instructions - Pull Side Applications NOTE: A pull-mount operator always mounts on the 2. DETERMINE the type of mounting hinge (butt, continuous, or offset). outside (pull-to-open) of the door at the hinge or pivot edge of the top rail.
- Page 23 ® 5800 ADAEZ PRO Installation and Operation Instructions Operator And Door Arm Installation Instructions - Pull Side Applications 4. Refer to Figure 19, and ALIGN the operator CAUTION mounting template to the centerline of the butt To ensure proper installation, the operator must be hinge, center pivot, or offset pivot as applicable.
-
Page 24: Mounting The Door Shoe
® 5800 ADAEZ PRO Installation and Operation Instructions Operator And Door Arm Installation Instructions - Pull Side Applications Mounting the Door Shoe 1. If the door frame is steel or aluminum and rivnuts 2. If the door frame is wood, refer to Figure 18 and... -
Page 25: Installing The Operator Mounting Bracket And Cover
® 5800 ADAEZ PRO Installation and Operation Instructions Operator And Door Arm Installation Instructions - Pull Side Applications Installing the Operator Mounting Bracket and Cover CAUTION b. INSTALL and TIGHTEN the supplied through- bolts, the four ¼-20 socket head capscrews... -
Page 26: Installing The Door Operator
® 5800 ADAEZ PRO Installation and Operation Instructions Operator And Door Arm Installation Instructions - Pull Side Applications Installing the Door Operator 1. REMOVE the two capscrews securing the operator WARNING bottom cover to the operator. To avoid inadvertent activation of the operator during connection of the door arm, the battery pack should not 2. - Page 27 ® 5800 ADAEZ PRO Installation and Operation Instructions Operator And Door Arm Installation Instructions - Pull Side Applications Installing the Door Arm 1. Refer to Figure 23, and INSTALL shaft extension 3. Refer to Figure 24, and ADJUST door arm length onto operator shaft.
-
Page 28: Installing The Door Arm
® 5800 ADAEZ PRO Installation and Operation Instructions Operator And Door Arm Installation Instructions - Pull Side Applications 4. Refer to Figure 25, and , with the door arm 6. INSTALL the 5/16 – 18 flat head screw into the... -
Page 29: Miscellaneous Common Instructions
® 5800 ADAEZ PRO Installation and Operation Instructions Miscellaneous Common Insructions Installing the Pushbutton Switches NOTE: The instructions for installing the pushbutton full sight of the door when activating the switch. switches, installing the plug-in transformer, adjusting door spring tension, and replacing the battery pack •... -
Page 30: Connecting The Battery Pack
® 5800 ADAEZ PRO Installation and Operation Instructions Miscellaneous Common Insructions Connecting the Battery Pack NOTE: There are two keyed connectors on the 3. SLIDE the battery pack onto the operator, and operator. One three-position connector accepts the ENSURE that the battery pack wires do not battery pack connector plug. -
Page 31: Installing The Plug-In Transformer
GROUND (COMMON) INPUT EZ061 CHARGER INPUT Figure 29 Copyright © 2018, ASSA ABLOY Accessories and Door Controls Group, Inc. All rights 31 of 50 reserved. Reproduction in whole or in part without the express written permission of ASSA 700002-Rev N 09/18... - Page 32 ® 5800 ADAEZ PRO Installation and Operation Instructions Miscellaneous Common Insructions CONNECTOR RECEPTACLE CONNECTOR RECEPTACLE CONNECTOR COVER CONNECTOR COVER 3. Refer to Figure 30, and PLUG connector into receptacle on battery pack. CONNECTOR PLUG CONNECTOR PLUG Figure 31 EZ060 4. Refer to Figure 31, and VERIFY that the LED indicator lights GREEN.
-
Page 33: Checking Battery Voltage
® 5800 ADAEZ PRO Installation and Operation Instructions Miscellaneous Common Insructions Checking Battery Voltage 1. Refer To Figure 3, and PRESS and HOLD the • The red LED shall illuminate to indicate that battery switch in the “OPTION” position. The... -
Page 34: Programming Instructions
® 5800 ADAEZ PRO Installation and Operation Instructions Programming Instructions Programming the Operator 6. To reset the controller, PERFORM the following: NOTE: The instructions programming the operator and linking the RF pushbuttons are common regardless of • PRESS and HOLD the “ENTER” button, •... -
Page 35: Linking The Rf Pushbuttons
® 5800 ADAEZ PRO Installation and Operation Instructions Linking the RF Pushbuttons Linking the RF Pushbuttons NOTE: Only ADAEZ transmitters can be linked to the the operator accepted this RF pushbutton. c. REPEAT as necessary for additional ADAEZ RF receiver of the operator. - Page 36 ® 5800 ADAEZ PRO Installation and Operation Instructions Customizing Operator Settings (Optional) Table 1 Door Open & Close Time in seconds Door Weight (Pounds) Door Width (Inches) Table 2 Time and Force Settings POWER CLOSE FORCE OPEN FORCE Open/Cls 36" Door 42"...
-
Page 37: Setting Optional Functions
® 5800 ADAEZ PRO Installation and Operation Instructions Setting Optional Functions (Power Close, Push & Go, Dynamic Braking, Latch Assist) b. PRESS and RELEASE the “SELECT” NOTE: The ADAEZ must be plugged in to the 24VDC pushbutton to advance until OPTIONS LED Class 2 transformer if the POWER CLOSE, PUSH AND GO, or LATCH ASSIST features are enabled. -
Page 38: Closeout Instructions
® 5800 ADAEZ PRO Installation and Operation Instructions Closeout Instructions Closeout Procedure 1. Refer to Figure 36, and INSTALL door decals. 7. ENSURE the door and door trim surfaces are clean. 2. IF PUSH AND GO is enabled, APPLY “PUSH TO OPERATE”... -
Page 39: Troubleshooting Instructions
® 5800 ADAEZ PRO Installation and Operation Instructions Troubleshooting Symptom Recommended Remedy Door Too Hard To Open Manually Refer to section titled “Adjusting Door Spring Tension” and reduce the door-open spring tension. Door Arm Rubs On Door Arm Refer to section titled “Installing the Operator Mounting Bracket” and lower the Pivot Bracket bracket mounting position. - Page 40 ® 5800 ADAEZ PRO Installation and Operation Instructions Troubleshooting Symptom Recommended Remedy Door Opens Too Slow • Refer to section titled “Programming the Operator” and Auto-Setup the operator. • Refer to section titled “ Customizing Operator Settings ” and adjust the door hold open time.
- Page 41 • If the unit is powered with the hardwire kit, refer to section titled “Setting Optional Functions” and turn on Power Close. Copyright © 2018, ASSA ABLOY Accessories and Door Controls Group, Inc. All rights 41 of 50 reserved. Reproduction in whole or in part without the express written permission of ASSA 700002-Rev N 09/18 ABLOY Accessories and Door Controls Group, Inc.
-
Page 42: Attachments
® 5800 ADAEZ PRO Installation and Operation Instructions Attachments 1. Documents, Definitions, Tools, Equipment, and Consumables (Sheet 1 of 1) Documents Tools and Equipment (including, but not limited to) ANSI A156.19-2007, “American National Standard for Adjustable Wrench Power Assist and Low Energy Power Operated Doors”... -
Page 43: 2: Quick Programming Guide
® 5800 ADAEZ PRO Installation and Operation Instructions Attachments 2. Quick Programming Guide (Sheet 1 of 1) Step Operator Action Response Programming the door operator Refer to Figure 36 and, at the base of • The operator shall enter program mode. -
Page 44: 3: Adaez Installation Schematics
® 5800 ADAEZ PRO Installation and Operation Instructions Attachments 3. ADAEZ Installation Schematics (Sheet 1 of 6) ADAEZ PRO PLUS with Electric Strike and wired OR wireless Buttons and/or Handheld Remote System Description: System Requirements: • ADAEZ PRO with 12 or 24VDC power supply (by •... - Page 45 ® 5800 ADAEZ PRO Installation and Operation Instructions Attachments 3. ADAEZ Installation Schematics (Sheet 2 of 6) ADAEZ PRO PLUS with Electric Lock and Access Control Panel - No Outside Button System Description: System Requirements: • A valid card presented to the reader will unlock •...
- Page 46 ® 5800 ADAEZ PRO Installation and Operation Instructions Attachments 3. ADAEZ Installation Schematics (Sheet 3 of 6) ADAEZ PRO PLUS with Electric Lock and Access Control Panel System Description: System Requirements: • Outside Pushbutton is enabled when a valid card •...
- Page 47 ® 5800 ADAEZ PRO Installation and Operation Instructions Attachments 3. ADAEZ Installation Schematics (Sheet 4 of 6) ADAEZ PRO PLUS with Electric Lock and Handheld Transmitter System Description: System Requirements: • Handheld transmitter unlocks the door. • ADA1028W Wireless Interface Module •...
- Page 48 ® 5800 ADAEZ PRO Installation and Operation Instructions Attachments 3. ADAEZ Installation Schematics (Sheet 5 of 6) ADAEZ PRO with 700 series Wave-to-Open Switch and RF transmitters System Description: • Wave to Open switches used to activate Operator by RF Activation System Requirements: •...
- Page 49 ® 5800 ADAEZ PRO Installation and Operation Instructions Attachments 3. ADAEZ Installation Schematics (Sheet 6 of 6) ADAEZ PRO with 700 series Wave-to-Open activation switches AND Electric Lock System Description: System Requirements: • Operator is activated by Wave to Open Switch •...
- Page 50 POWER IN 12 OR 24V CH S PLUG IN 1015P HARDWIRE KIT (NOT SHOWN) Norton Door Controls ASSA ABLOY is the global 3000 Highway 74 East leader in door opening solutions, Monroe, NC 28112 dedicated to satisfying Tel: (800)-438-1951 ext. 6030 end-user needs for security, www.nortondoorcontrols.com...
Need help?
Do you have a question about the 5800 ADAEZ PRO and is the answer not in the manual?
Questions and answers