Table of Contents
Advertisement
Advertisement
Table of Contents
Troubleshooting

Related Manuals for Magma EB7-X8G2


Summary of Contents for Magma EB7-X8G2
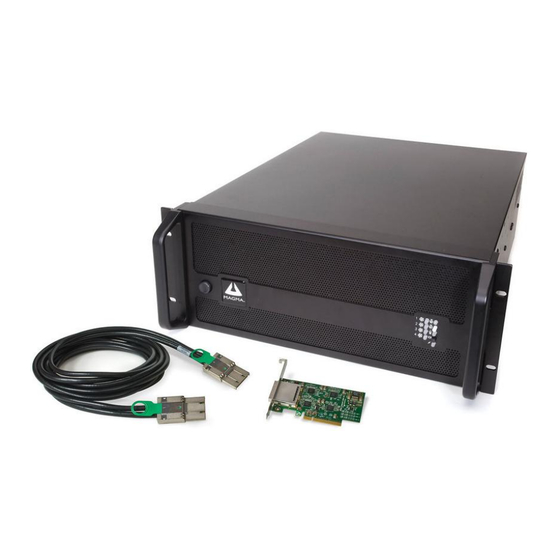
- Page 1 EB7-X8G2 User Manual PCIe to PCIe Expansion MODEL: EB7-8XG2...
-
Page 2: Table Of Contents
Windows 7, 8 and Windows 10 ..............................20 Mac OS X ....................................... 21 RedHat Linux ....................................24 Mapping Physical Slot locations to port locations using lspci ....................26 Example: lspci –vvv Output ................................ 26 Linux Commands to Use to check on Magma device ......................30 EB7-X8G2 |... - Page 3 EEPROM Loading ....................................46 EEPROM Write Protect (WP) ................................47 PCIe Switch I2C Address Setting ..............................47 PCIe Expansion Performance with the EB7-X8G2-RAS ......................... 48 High Performance Video Card expansion solutions ....................... 48 Chapter 5 Chassis Maintenance ......................49 General Chassis Cleaning ................................49 Fan replacement ....................................
- Page 4 How to Get More Help ......................64 Frequently Asked Questions (FAQ) ..............................64 Contacting Technical Support ................................ 64 PCIScope Software Utility ................................. 64 Returning Merchandise to MAGMA ............................... 66 Appendix A Need More PCIe Slots?..................... 67 Multiple PCIe Expansion System Configurations ........................... 67 The Fan-Out Configuration ................................
-
Page 5: Preface
Disclaimer: We have attempted to identify most situations that may pose a danger, warning, or caution condition in this manual. However, Magma does not claim to have covered all situations that might require the use of a Caution, Warning, or Danger indicator. -
Page 6: Protecting Against Electrostatic Discharge
Static electricity can harm system boards. Perform service at an ESD workstation and follow proper ESD procedures to reduce the risk of damage to components. Magma strongly encourages you to follow proper ESD procedures, which can include wrist straps and smocks, when servicing equipment. -
Page 7: Chapter 1 Introduction
Chapter 1 Introduction General Specifications The Magma 7 Slot PCI Express® to PCI Express® Expansion System (Model EB7) is a general-purpose bus expansion chassis for the Peripheral Component Interconnect Express (PCIe) local bus. The expansion chassis is fully compliant with the PCI Express Local Bus Specification. -
Page 8: Pre-Installation Information
Magma Pre-Installation Information Before using the Magma expansion chassis you should perform the following steps: Inventory the shipping carton contents for all of the required parts Gather all of the necessary tools required for installation Read this manual... -
Page 9: Chapter 2 Hardware Installation
Magma Chapter 2 Hardware Installation The following steps will guide you through the installation of your Magma expansion system CAUTION Hardware installation shall be performed only by qualified service personnel per UL and IEC 60950-1. Electrostatic Discharge (ESD) Warning All PCI cards are susceptible to electrostatic discharge. When moving PCI cards, it is best to carry the cards in anti-static packaging. -
Page 10: Install Expansion Interface Card (Eif)
Check inside the unit, see if the Expansion interface card is installed. If the Expansion interface card is not plugged in, go to the next step “Install Expansion Interface card”. The pictures below are showing an EB7-X8G2 with Expansion Interface card installed. -
Page 11: Sw1 And Sw2
Use the procedures for shutting down your operating system and shutting off power to your system provided in your owner’s manual or system documentation. The PCIe host card is a “half-height,” x8-capable PCIe card mounted to a “full-height” bracket as shown below. EB7-X8G2 | Chapter 2 Hardware Installation... -
Page 12: Installation Of Low Profile Bracket
PCI Express host card into a vacant x8 (or x16) PCIe slot by gently pushing the card until it is firmly seated. Then secure the card to the slot with a mounting screw. EB7-X8G2 | Chapter 2 Hardware Installation... -
Page 13: Install Pcie Cards
It is highly recommended to install third party PCIe cards / High Power PCIe cards after you have verified and tested that the Magma expansion chassis is functional and free of hardware failures. The next step is to connect the Ipass cable. -
Page 14: Connect Ipass Cable
Connect iPass Cable The 1-meter iPass cable included with your Magma expansion chassis features a x8 connector on each side. Connect the iPass cable to Expansion and Host Interface cards. For the proper way of connecting the iPass cable to Interface card, see pictures below. -
Page 15: How To Disconnect Ipass Cable
Interface card, Connect Power Cord / Cable Connect power cord to electrical outlet. Magma only provides the 110-120V power cord. It is highly recommend using a power surge. This product is provided with a power supply that automatically adjusts to input voltages between 100 to 240 Vac. -
Page 16: Power On The Unit
When done connecting the power cord, turn the power supply switch to ON position. Upon turning the power supply to ON, the 3.3V AUX on the board is illuminated. Power ON the unit You must apply power to the EB7-X8G2 expansion chassis BEFORE you power up your computer. Press the front power button. -
Page 17: Power On The Host Computer
ON and OFF. In this process we have not installed any PCIe cards, all PCIE slots are empty. Shutting Down STOP DO NOT TURN OFF THE MAGMA EXPANSION CHASSIS UNTIL YOU HAVE SHUT DOWN YOUR COMPUTER COMPLETELY! It can cause a system lockup and data loss. EB7-X8G2 | Chapter 2... -
Page 18: Hardware Check
You should see 7 LEDs that are illuminated as “orange” or “amber” behid the slots. This represents that there no cards installed in the corresponding slot. As shown from the picture below, all 7 slots are not populated with PCIe cards and the corresponding LEDs are illuminated as orange / amber. EB7-X8G2 | Chapter 2 Hardware Installation... -
Page 19: Expansion Interfafe Card Leds
D39, D34, D24, D20, D33, D25, D21>> should be ON as green, when all slots are populated with PCIe cards MASTER RST LED & Power LED The MASTER RST LED (D1217) and Power LED (D1221)on the expansion board should be OFF once the computer is linked with expansion unit. EB7-X8G2 | Chapter 2 Hardware Installation... -
Page 20: Chapter 3 Software Installation
Software Driver Installation Magma Driver is not required for Windows 7, which means no manual installation of Magma driver. Windows 7, Windows 8, Windows 10, Windows Server Operating Systems and a non-Windows OS such as Linux and Unix based Operating... -
Page 21: Mac Os X
Magma host card and expansion chassis. In Mac OS X, the Magma expansion device is transparent to the Operating System; it means that there will be no Magma hardware / device appearing in the Apple System profiler via PCI card. Only the PCIe cards will be recognized / detected. - Page 22 Mac Operating System is prompting you to choose a PCI Express profile that maximizes the performance of your attached devices. The Magma host card can communicate up to a bandwidth of x8 to and from the expansion chassis and devices. You should choose a profile that matches the configuration of all the cards installed in your Mac. Magma recommends that you install the system host card into a x8 slot in order to maximize throughput.
- Page 23 Then click the “More Info” button click on System Report select PCI as shown below: Upon selecting the “PCI Cards”, you should see all the available PCIe cards that are in the expansion unit. The Magma devices are transparent to the Operating System, you will only see the PCIe cards that are in the expansion slots.
-
Page 24: Redhat Linux
Magma RedHat Linux Once the EB7-X8G2 has been installed in a RedHat9-based system, its installation can be verified by typing the following command lines: lspci –t Displays the overall structure of the PCIe expansion system lspci –vv Lists additional information about the PCIe switch (in our case it will list the Integrated Device Technology (IDT) information. - Page 25 Magma To check the details of the Magma Upstream Port on Bus 1, Device 0, Function 0 (01:00.0), type “lspci –s 01:00.0 –vvv” command on the terminal window. The Bus number will change depending on the Server and location of host card.
-
Page 26: Mapping Physical Slot Locations To Port Locations Using Lspci
Below is an example of 7 PCI Express Upstream and Downstream Ports in our Magma Chassis. This output comes from lspci –vvv > info.txt. It has been cleaned up for this example. The Magma Chassis is located below under Bus 01. There are 7 downstream ports on Bus 2, each port has a number starting with 2, 4, …... - Page 27 MaxPayload 2048 bytes, PhantFunc 0, Latency L0s <64ns, L1 <1us ExtTag+ RBE+ FLReset- DevCtl: Report errors: Correctable- Non-Fatal- Fatal- Unsupported- RlxdOrd- ExtTag- PhantFunc- AuxPwr- NoSnoop- MaxPayload 256 bytes, MaxReadReq 128 bytes DevSta: CorrErr+ UncorrErr- FatalErr- UnsuppReq+ AuxPwr- TransPend- EB7-X8G2 | Chapter 3 Software Installation...
- Page 28 LnkSta: Speed 2.5GT/s, Width x1, TrErr- Train- SlotClk- DLActive+ BWMgmt+ ABWMgmt- SltCap: AttnBtn+ PwrCtrl+ MRL+ AttnInd+ PwrInd+ HotPlug+ Surprise- Slot #5, PowerLimit 0.000W; Interlock- NoCompl- SltCtl: Enable: AttnBtn- PwrFlt- MRL- PresDet- CmdCplt- HPIrq- LinkChg- EB7-X8G2 | Chapter 3 Software Installation...
- Page 29 AttnBtn+ PwrCtrl+ MRL+ AttnInd+ PwrInd+ HotPlug+ Surprise- Slot #7, PowerLimit 0.000W; Interlock- NoCompl- SltCtl: Enable: AttnBtn- PwrFlt- MRL- PresDet- CmdCplt- HPIrq- LinkChg- Control: AttnInd On, PwrInd On, Power- Interlock- SltSta: Status: AttnBtn- PowerFlt- MRL- CmdCplt+ PresDet+ Interlock- Changed: MRL- PresDet- LinkState- EB7-X8G2 |...
-
Page 30: Linux Commands To Use To Check On Magma Device
–s 01:00.0 -vvv | grep –Hrn “Capabilities” . The outout below shows that the 01:00.0 is assigned to Upstream Port. To check on the Magma Upstream port speed and bandwidth, type lspci -s 01:00.0 -vvv | grep –Hrn “LnkCap”... -
Page 31: Chapter 4 Install Pcie Cards
PCIe cards in the chassis. For the purpose of installation, the MAGMA expansion chassis functions exactly as a standard desktop computer chassis. Always follow the manufacturer’s instructions for installing their card or hard drive on a desktop computer. -
Page 32: Install Pci Express (Pcie) Cards
Disconnect the power cord from the AC outlet before removing the enclosure cover. Turning the system power off at the power on/off switch does not remove power to components. High voltage is still present. EB7-X8G2 | Chapter 4 Install PCIe Cards... - Page 33 When installing 3 Party PCIe cards into the Magma expansion chassis, it makes no difference which PCIe slot you place your cards in. Usually that is determined by accessibility and heat dissipation consideration as may be specified by the card manufacturer.
-
Page 34: System Should Be Up And Running
The sheer number of PCIe cards and device drivers available makes it impossible for Magma to fully test and certify all available PCIe cards for use in the MAGMA expansion chassis. Our best advice to you in this regard is to insist on full PCIe Specification compliance from your card and system vendors. -
Page 35: Snmp Configuration
IP address. In any other case you will need to use the IPsetup.exe utility to discover the IP address that was assigned to the chassis. It can be downloaded in the SNMP section of the Magma driver downloads at: http://www.magma.com/drivers.asp Double click on the utility icon after your chassis has been connected to the network and powered on. -
Page 36: Configure Network Settings
The factory settings define User name to be “default” and the password to be “magma”. Enter these values in the appropriate field and click OK. If the username and password have not been changed from the factory settings, the IP Configuration page will appear as shown below. -
Page 37: Configure Snmp Settings
EB7-X8G2-RAS chassis. Configure SNMP Settings If you are adding your EB7-X8G2-RAS chassis to an existing SNMP network, or if you are planning to trap SNMP errors, you will need to configure the SNMP settings for use with your SNMP agent. -
Page 38: Change Credentials
LED in the front control panel will turn orange (see example below concerning Main Temperature 3 exceeding its limit): Change Credentials This section allows you to change the default user name (default) and password (magma). To change the user name, simply enter your new user name in the user name field. To change your password, enter your new password in the password field. -
Page 39: Reset To Default Values
Reset to Default Values You can restore your EB7-X8G2-RAS chassis to the factory default values by pressing and holding the Alarm Reset Button for 10 seconds the Power LED will blink during this 10 second period. When all values have been restored, the LED will stop blinking and turn off. -
Page 40: Accessing The Various Snmp Functions
A snapshot from the MIB Browser by iReasoning is shown below: Under the MIB Tree, the Magma Chassis will have status information that can be read by expanding the respective folders. This information is also available in the Web interface mentioned previously. In addition, if we expand the sendAction folder (as shown above) we gain access to “writable”... -
Page 41: I/O Switching
The SNMP interface allows us to configure voluntary I/O switching so that the resources offered by PCIe cards installed in the Magma chassis can be rolled from one PC to another in real time. To access this feature, click on the I/O Failover link... -
Page 42: Finishing Touches
By design, this feature allows the host PC to gracefully remove power to a slot, so that a PCIe card can be removed and replaced. It then powers on the new card in coordination with the PC’s operating system. By default, the EB7-X8G2-RAS ships with this feature turned on. -
Page 43: Hot-Plug/Swap Procedure For Windows
Select a device and click on the “Properties button”. If the device is currently in the Magma chassis, the location will show “Magma chassis x slot y”. Where x identifies the physical chassis and y identifies the slot the device is plugged into. - Page 44 After 5-6 seconds the LED will stop flashing and remain on. After a brief period the new device will be recognized by the system, and it should be added back to the list in the “Safely Remove Hardware” dialog. EB7-X8G2 | Chapter 4 Install PCIe Cards...
-
Page 45: Hot-Plug/Swap Procedure For Linux
After the PCIe card has been removed and replaced, turning on the power to the slot is done by running: echo 1 > <./slot filename>/power Note: Different Linux versions and platforms may perform differently. Also, older versions, such as Redhat ver. 4 or (2.4.x do not support this feature). EB7-X8G2 | Chapter 4 Install PCIe Cards... -
Page 46: The Alternate Function Dip Switch
The core component in the expansion chassis—the PCIe switch— requires EEPROM loading of code for proper operation in PCIe Gen II mode. Therefore in an EB7x8G2 system, which supports Gen II speeds, J16 must be installed. In case of the EB7x8 system, J16 may remain open. EB7-X8G2 | Chapter 4 Install PCIe Cards... -
Page 47: Eeprom Write Protect (Wp)
Magma personnel, it is recommended to keep write-protection on. PCIe Switch I2C Address Setting SW9 is used to specify a different address for the PCIe switch in its secondary I2C bus. To be used by Magma personnel only. -
Page 48: Pcie Expansion Performance With The Eb7-X8G2-Ras
High Performance Video Card expansion solutions Magma’s EB7-X8G2-RAS chassis can be used to add a high end PCI express video card to a system, be it a server, a PC or a laptop that were not equipped with such a device for various reasons: cost, lack of physical space, heat dissipation considerations, etc. -
Page 49: Chapter 5 Chassis Maintenance
General Chassis Cleaning The environment where your Magma chassis is operating should be the determining factor as to how often you should perform a general cleanup of the chassis. To perform a routine general cleaning of your chassis, you will need the... -
Page 50: Fan Replacement
Finally, clean the air filter following the instructions later in this chapter. When finished, replace the cover and turn on power to the system. Fan replacement The EB7-x8G2-RAS chassis was designed to allow “hot-swappable” fan replacement while the chassis is powered on. First you will need to remove the chassis’ lid as shown in the beginning of Chapter 4. -
Page 51: Hot-Swappable" Power Supply
In spite of regular performance of routine maintenance tasks, some computer systems can experience hardware failures. Fortunately, your investment in a Magma Expansion system with a redundant power supply provides you with the ability to easily replace a power module in the event of a failure. -
Page 52: Cleaning The Air Filter
How often the filter requires cleaning depends on environmental conditions where your Magma Expansion chassis is located. To clean this filter, follow these simple steps. First, power down the chassis and then remove the screws on the side of the front panel with a Phillips screwdriver. -
Page 53: Chapter 6 Troubleshooting
Under normal operating conditions the status indicators are for internal Magma troubleshooting while the configuration switches/jumpers should remain in their default state preset by Magma for best compatibility. However, should a problem occur with the chassis (or a special mode of operation be solicited by the client) we included below... -
Page 54: Chassis Slot Power Indicators
8 Amps of current at any time. Otherwise contact Magma Technical support. Chassis Linkup and Activity Indicators: These indicators were purposely made visible at the back of the chassis in order to allow a quick verification of connectivity between Host and chassis. EB7-X8G2 | Chapter 6 Troubleshooting... -
Page 55: Snmp Power-On Source Jumper
The activity LEDs will blink occasionally whenever the host is communicating with the card is a respective slot. SNMP Power-On Source Jumper The SNMP module inside the EB7-X8G2-RAS chassis features a power-on source jumper to select between local power-on (via the master on/off switch) and remote turn-on (via the SNMP software/front end). -
Page 56: Locating The Problem
Locating the Problem If you are having trouble with the Magma expansion system, first verify that all cards and cables are seated properly. Be sure you followed the instructions in earlier sections of this Service Manual. Always remember to power On and Off correctly when rechecking your installation. -
Page 57: My Computer Can't Find The Pcie Expansion System
The ACT (activity) LEDs will light/blink only upon data transfers between host and expansion. They can be off so long as the required LINK LEDs remain on. Also verify the Magma PCI Express Host card is properly inserted into the host computer slot. In case any other LED ... -
Page 58: When Nothing Works
My Computer Can’t Find the PCIe Expansion System. If the expansion system is visible, but has a problem, try to resolve the problem (See Note above). If that fails, go Chapter 7 to get additional help. EB7-X8G2 | Chapter 6 Troubleshooting... -
Page 59: My Pcie Card Doesn't Work
If it boots up OK without the Magma expansion system attached, call Magma Technical Support. If it still hangs, the problem is in the computer and not with the Magma expansion system or the 3 Party PCIe cards. - Page 60 If the is still visible, the problem may be with the Magma expansion system. Please contact Magma Technical Support for further guidance and/or a replacement product. Next, open the Apple System Profiler and the 3 Party PCIe card(s) should now be visible.
- Page 61 On the PCI to PCI Bridge: Magma Technical Support Other Codes On the Card: Card Manufacturer’s Technical Support, after first verifying that the Magma expansion system is installed properly. If you are still having problems, contact Magma Technical Support for more help. EB7-X8G2 | Chapter 6 Troubleshooting...
-
Page 62: My System Hangs Beyond A Certain Number Of Add-In Cards
BIOS interface. Rackmounting the Chassis Locate a vacant 4U slot in your rack that is within the reach of the one-meter cable that came with your EB7-X8G2-RAS Expansion System. Install the rails in the rack as shown below: Measure the rack from front to back so you can confirm how long the rail must be to fit properly. -
Page 63: Add Screws To Rack Post
The chassis mounts into the rack from the front. Insert the chassis into the rack slide and press it forward until the chassis stops. When the chassis is completely inserted into the rack, secure the mounting brackets 2 screws on each side. EB7-X8G2 | Chapter 6 Troubleshooting... -
Page 64: Chapter 7 How To Get More Help
Our support department can be reached by fax at (858) 530-2733 or by phone at (858) 530-2511. Support is available Monday through Friday, 8:00 AM to 5:00 PM PT. When contacting Magma Technical Support, please be sure to include the following information:... - Page 65 Magma With the Magma expansion chassis powered up and connected to your computer, load and launch the PCIScope application. The PCIScope Program will be installed on your computer and a window similar to the one shown below will appear. (The example was taken from a Compaq Armada 7400).
-
Page 66: Returning Merchandise To Magma
If factory service is required, a Service Representative will give you a Return Merchandise Authorization (RMA) number. Put this number and your return address on the shipping label when you return the item(s) for service. Magma will return any product that is not accompanied by an RMA number. Please note that Magma WILL NOT accept COD packages, so be sure to return the product freight and duties-paid. -
Page 67: Appendix A Need More Pcie Slots
PCIe slots beyond the number available in your computer’s motherboard. You can easily add two or more Magma expansion systems to your current system in a "fan-out" configuration. Each of these configurations has advantages and uses. To determine which type of configuration you wish to use, you should first understand a few basic facts: In a desktop computer, the BIOS enumerates automatically behind logical PCI bridges. -
Page 68: The Fan-Out Configuration
Expansion System. For example, the following image shows the division within the Windows Device Manager display between two Expansion Systems connected in a “Fan-Out” configuration. In this case each expansion chassis offers only two slots of expansion. EB7-X8G2 | Appendix A Need More PCIe Slots? -
Page 69: Daisy-Chaining
Expansion System. For example, the following image shows the division within the Windows Device Manager display between two Expansion Systems connected in a “Fan-Out” configuration. In this case each expansion chassis offers only two slots of expansion. EB7-X8G2 | Appendix A Need More PCIe Slots? -
Page 70: Pci E Card Conflicts
Party PCIe cards might only be traceable once you have identified the expansion system containing the problem card. Below is a flow chart offering a troubleshooting approach when multiple expansion chasses are involved: EB7-X8G2 | Appendix A Need More PCIe Slots? - Page 71 If you need help to determine which PCIe card, or which expansion chassis, has the problem, you can “right-click” on the card with the and check the information contained in the “Location:” field EB7-X8G2 | Appendix A Need More PCIe Slots?
- Page 72 If you have already reinstalled and reseated everything according to instructions in Chapter 2, and the PCI to PCI Bridge is still not visible in the Apple System Profiler, call Magma Technical Support. EB7-X8G2 | Appendix A Need More PCIe Slots?
-
Page 73: Appendix B I/O Switching Via Snmp
Finally, this test was performed under VMware ESX4.1. Step 1: Make sure all systems are off – after doing so, connect both servers to the uplink EIF card in the Magma chassis. Do not turn the servers on just yet. The dual uplink is labeled Server 1 and Server 2, which correspond to the specified fiber ports, as shown below. - Page 74 Navigate to the tab labeled “I/O Failover” and you will find the default I/O configuration: In the next image note the status of the two servers indicating which physical fiber link currently has all the I/Os: EB7-X8G2 | APPENDIX B I/O Switching Via SNMP...
- Page 75 After 10 seconds or so, the page will automatically change back to the I/O Failover tab, where you should be able to note that the I/Os have been switched to Server 2: The image below shows the statuses after the switchover: EB7-X8G2 | APPENDIX B I/O Switching Via SNMP...
- Page 76 After FULLY BOOTING up server 2, connect to Server 1 via VSphere and set up a pass-through on server 2: Since both server 1 and 2 are hardware-identical, our PCIe device remains at 08:00.0 and 08:00.1. Reboot server 2 and add the PCIe device to the guest OS: EB7-X8G2 | APPENDIX B I/O Switching Via SNMP...
- Page 77 I/O allocated to it. If you so desire, you can switch the I/Os back over to the secondary server with the ease of a button without having to reconfigure any of the two servers to handle those I/Os EB7-X8G2 | APPENDIX B I/O Switching Via SNMP...
-
Page 78: Appendix C Compliance
ICES-003. Cet appareil numériqué de la classe A est conformé à la norme NMB-003 du Canada The product(s) described in this manual complies with all applicable European Union (CE) directives. Magma will not retest or recertify systems or components that have been reconfigured by customers... - Page 79 Magma Manual P/N 09-09919-02 rev A3 EB7-X8G2 |...
Need help?
Do you have a question about the EB7-X8G2 and is the answer not in the manual?
Questions and answers