Table of Contents
Advertisement
Advertisement
Table of Contents

Related Manuals for Magma PCI Expansion System


Summary of Contents for Magma PCI Expansion System
- Page 1 PCI Expansion System User's Manual 2 Slot CardBus to PCI Expansion...
- Page 2 Copyright © 2005 Mobility Electronics, Inc. This publication is protected by Federal Copyright Law, with all rights reserved. No part of this publication may be copied, photocopied, reproduced, stored in a retrieval system, translated, transmitted or transcribed, in any form or by any means manual, electric, electronic, electro-magnetic, mechanical, optical or otherwise, in whole or in part without prior written consent from Mobility Electronics, Inc.
-
Page 3: Table Of Contents
Starting Up: ....................7 Shutting Down:....................9 Install Software Drivers ................ 10 CHAPTER 3 WINDOWS DRIVER INSTALLATION ......11 Install the MAGMA CardBus Expansion Driver ........12 Uninstall the MAGMA Driver ..............14 CHAPTER 4 VERIFY INSTALLATION..........15 Windows 2000 and XP................. 15 Mac OS X..................... - Page 4 M A G M A Windows Error Codes................29 Uninstall the MAGMA Driver..............31 CHAPTER 7 HOW TO GET MORE HELP........33 Frequently Asked Questions (FAQ)............33 Contacting Technical Support .............. 33 MAGMA Debug Utility ................. 34 PCIScope Software Utility ................35 Returning Merchandise to MAGMA............
-
Page 5: Preface
M A G M A Preface Advisories Four types of advisories are used throughout this manual to provide helpful information, or to alert you to the potential for hardware damage or personal injury. They are Notes, Cautions, Warnings, and Dangers. The following is an example of each type of advisory. -
Page 6: Safety Instructions
Safety Instructions Always use caution when servicing any electrical component. Before handling the MAGMA PCI Expansion chassis, read the following instructions and safety guidelines to prevent damage to the product and to ensure your own personal safety. Refer to the “Advisories” section for advisory conventions used in this manual, including the distinction between Dangers, Warnings, Cautions, and Notes. -
Page 7: Protecting Against Electrostatic Discharge
M A G M A In addition, take note of these safety guidelines when appropriate: ♦ To help avoid possible damage to systems boards, wait five seconds after turning off the computer before removing a component, removing a system board, or disconnecting a peripheral device from the computer. - Page 8 M A G M A ♦ When transporting a sensitive component, first place it in an anti-static container or packaging. ♦ Handle all sensitive components at an ESD workstation. If possible, use anti-static floor pads and workbench pads. ♦ Handle components and boards with care. Don’t touch the components or contacts on a board.
-
Page 9: Chapter 1 Introduction
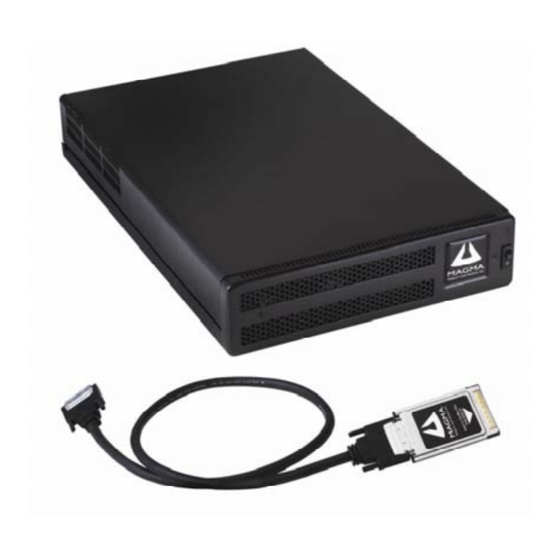
Chapter 1 Introduction General Specifications The MAGMA 2 Slot CardBus to PCI Expansion System is a general- purpose bus expansion chassis for the Peripheral Component Interconnect (PCI) local bus. The expansion chassis is fully compliant with the PCI Local Bus Specification. This MAGMA expansion system... -
Page 10: Parts List
Rubber feet (to be installed by user) Software CDROM User’s Manual The MAGMA PCI expansion cable uses a 68-pin connector; however, it is NOT an “off-the-shelf” SCSI cable. The MAGMA PCI expansion cable is a custom cable designed specifically for PCI Expansion. -
Page 11: Chapter 2 Hardware Installation
Chapter 2 Hardware Installation The following steps will guide you in completing the hardware installation of your MAGMA 2 Slot CardBus to PCI Expansion System. Electrostatic Discharge (ESD) Warning All PCI cards are susceptible to electrostatic discharge. When moving PCI cards, it is best to carry the cards in anti-static packaging. -
Page 12: Before You Begin
M A G M A Before you Begin The 90 Watt AC power supply is NOT auto-switching. These means that you MUST be sure the red Voltage Selector Switch on the back of the chassis shows the correct voltage for your location. Before you connect any cables to the expansion chassis, you need to know the voltage of your power source and slide the Voltage Selector Switch from... -
Page 13: Attach Pci Expansion And Power Cable
Refer to Appendix B for more information. Attach PCI Expansion and Power Cable Carefully position the MAGMA expansion chassis so that the supplied PCI expansion cable will conveniently reach from the connector of the CardBus card to the connector on the back of the chassis. -
Page 14: Install Cardbus Pc Card
Insert the CardBus card with the MAGMA logo side up, (gold strip up) into the PC Card slot. Gently push the card until it is seated firmly. If it doesn’t seem to fit correctly, try turning the card over, or try the other... -
Page 15: Applying Power Correctly
Applying Power Correctly Starting Up: You must apply power to the MAGMA expansion chassis BEFORE you power up your computer. This will allow the higher numbered PCI buses in the PCI bus hierarchy to be at a stable state when the host system issues its master power-on bus reset. - Page 16 M A G M A Windows XP and Windows 2000 Start Up When your Windows operating system first starts up, the following Wizard appears, select “No, not this time” and click the Next button. Windows will then identify the PCI Bridge on the CardBus card and again ask you for guidance.
-
Page 17: Shutting Down
Shutting Down: When shutting your system down, it is recommended that you first shut down the computer correctly, and then power down the MAGMA expansion chassis to avoid ‘computer lock-up’ and potential data loss. Chapter 2... -
Page 18: Install Software Drivers
M A G M A STOP DO NOT TURN ON THE MAGMA EXPANSION CHASSIS UNTIL YOU HAVE SHUT DOWN YOUR LAPTOP COMPLETELY! It can cause a system lockup and loss of any unsaved data. Install Software Drivers Driver Operating Required? -
Page 19: Chapter 3 Windows Driver Installation
Follow the Step-by-Step Instructions included in Chapter 2 prior to installing the MAGMA CardBus Expansion Driver. It is important to apply power to the expansion chassis first, and then apply power to your computer. -
Page 20: Install The Magma Cardbus Expansion Driver
WARNING Prior to installing the MAGMA CardBus Driver, you should ensure that all PCI slots in the chassis are empty. The MAGMA CardBus Expansion Driver must be installed, and the MAGMA expansion chassis installation verified, BEFORE you attempt to install any 3 Party PCI cards. - Page 21 M A G M A The following Question Window will appear: If your operating system uses Emergency Repair Disks, such as Windows 98/ME/NT4.0, make sure that you have a current Emergency Repair Disk prepared. Windows XP users should set a new System Restore Point, and then disable the Windows System Restore utility before continuing.
-
Page 22: Uninstall The Magma Driver
PCI device(s) you are installing) If prompted to reboot, do so. Uninstall the MAGMA Driver If you need to uninstall, or reinstall, the MAGMA Windows drivers, go to the Windows Control Panel Add/Remove Programs... -
Page 23: Chapter 4 Verify Installation
M A G M A Chapter 4 Verify Installation Windows 2000 and XP To verify a successful installation on Windows XP or 2000, find the ‘My Computer’ icon Right-click and select ‘Manage’ Highlight ‘Device Manager’ Click on the View Menu and select View Devices by Connection Open ACP (BIOS) Open PCI Bus... -
Page 24: Mac Os X
M A G M A If everything is OK, then the MAGMA CardBus Expansion Driver installation is complete. You can now proceed to Chapter 5 and Install Party PCI Cards. If, however, the installation was unsuccessful, you may not see the PCI to PCI Bridge, or it will have a small yellow in front of it. - Page 25 (laptop first, then the expansion chassis) and reconnect the cables and the CardBus card to ensure that you have a solid connection. Then restart the MAGMA expansion chassis followed by the laptop. Next, try to verify the installation again, as shown above.
- Page 26 M A G M A Chapter 4 Verify Installation...
-
Page 27: Chapter 5 Install 3 Rd Party Pci Cards
This chapter provides information on how to install 3 Party PCI cards into your MAGMA expansion chassis. More details on the installation of individual cards are provided by the card’s manufacturer. This chapter is provided as a simple guide to help you install your PCI cards in the chassis. -
Page 28: Install Pci Cards In Pci Expansion Chassis
To keep the cards in place, secure them in the enclosure with their retaining screws (supplied with the MAGMA expansion chassis). -
Page 29: Install Hard Drive(S)
The sheer number of PCI cards and device drivers available makes it impossible for Mobility to fully test and certify all available PCI cards for use in the MAGMA expansion chassis. Our best advice to you in this regard is to insist on full PCI Specification compliance from your card and system vendors. - Page 30 M A G M A NOTE After you remove the 5V Load Resistor, it is a good idea to place it in an ESD envelope and save it. If you ever decide to remove the hard drive, you will need to reinstall the 5V Load Resistor to ensure your Expansion chassis continues to work properly.
-
Page 31: System Should Be Up And Running
M A G M A System Should Be Up and Running Apply power to the MAGMA expansion chassis first, then power up the computer. Use the procedures detailed in Chapter 4 to confirm the card installation(s) in the Windows Device Manager or Apple System Profiler. - Page 32 M A G M A Chapter 5 Install 3rd Party PCI Cards...
-
Page 33: Chapter 6 Troubleshooting
Chapter 6 Troubleshooting Locate the Problem If you are having trouble with the MAGMA expansion system, verify that all PCI cards are seated properly and all cables are connected properly. (Remember to power On and Off correctly.) Recheck the Windows Device Manager or the Apple System Profiler. -
Page 34: Support For 3 Rd Party Pci Cards
Mobility will provide reasonable technical support to with 3 Party PCI cards. However, if you have verified a successful installation of the MAGMA PCI Expansion System (as defined in Chapter 4), but experience difficulty installing your 3 Party PCI cards, the PCI card manufacturer may be able to provide the best support. -
Page 35: Windows 2000/Xp
M A G M A Windows 2000/XP: If the PCI to PCI Bridge is visible, but contains a in front of it, it has a problem that must be fixed. To identify this problem, right-click on the line and select “Properties” from the pop-up menu. -
Page 36: My Computer Hangs During Power Up
M A G M A My Computer Hangs During Power Up Shut off the laptop (first) and then the MAGMA expansion system and verify that all cards and cables are installed correctly. If it still hangs, remove all 3 Party PCI cards and try booting up without any cards installed. -
Page 37: Windows Error Codes
M A G M A Windows Error Codes If you are having a problem with one of your devices, and the Device status box shows a Windows Error Code, refer to the following list of error codes for guidance: NOTE Do NOT click on the Driver tab and attempt to reinstall the driver. - Page 38 Mobility Technical Support. On the PCI Card: This usually means the memory, I/O, or prefetch is more than what we have allocated in the Magma CardBus Expansion Driver. Call Mobility Technical Support. The driver for the PCI Card is not installed on your system.
-
Page 39: Uninstall The Magma Driver
M A G M A Uninstall the MAGMA Driver For Windows Users Only: If you need to uninstall the MAGMA CardBus Expansion Driver: Go to the Windows Control Panel Add/Remove Programs Choose either the MAGMA CardBus Expansion Driver (or it may appear as... - Page 40 M A G M A Chapter 6 Troubleshooting...
-
Page 41: Chapter 7 How To Get More Help
Chapter 7 How to Get More Help Frequently Asked Questions (FAQ) You can visit the MAGMA Technical Support FAQ pages on the Internet www.magma.com/support/ Contacting Technical Support Our support department can be reached by fax at (858) 530-2733 or by phone at (858) 530-2511. -
Page 42: Magma Debug Utility
MAGMA Debug Utility Occasionally, Mobility Technical Support may request Windows users to produce and email a MAGMA debug log file to help them resolve your problem. This file should be emailed to support@magma.com. This file should have a “.log” file extension. To create the *.log file, follow these instructions: Locate a file called dbgview.exe on the MAGMA CDROM. -
Page 43: Pciscope Software Utility
If you are experiencing problems setting up your system, you should run PCIScope before contacting the Mobility Technical Support Group. With the MAGMA expansion chassis powered up and connected to your computer, load and launch the PCIScope application. The PCIScope Program will be installed on your computer and a window similar to the one shown below will appear. - Page 44 You should save this data as a file on your computer. Please include your name and date as part of the file name with an extension of “.bpd.” Then email this file to support@magma.com if you are experiencing configuration problems.
-
Page 45: Returning Merchandise To Magma
MAGMA will return any product that is not accompanied by an RMA number. Please note that MAGMA WILL NOT accept COD packages, so be sure to return the product freight and duties-paid. - Page 46 M A G M A Chapter 7 How to Get More Help...
-
Page 47: Bus Hierarchy
Bus Hierarchy Bus Hierarchy The following figure is representative of the PCI Bus hierarchies for the 2 Slot CardBus to PCI Expansion System. This figure pictorially conveys the overall PCI bus topology of the system. 2 Slot Topology In general, we do not know what the actual Bus numbers are. We only know how they increment starting from the CardBus card. -
Page 48: Appendix Abus Hierarchy
M A G M A Appendix A Bus Hierarchy... -
Page 49: Appendix Bdc Power Information
SUB100WDC By purchasing the DC power upgrade (Part Number SUB100WDC), MAGMA 2 slot chassis users can power their expansion chassis off a user supplied 12-volt DC power source, such as a battery set, car- lighter adapter, etc., (provided they use the proper cabling). -
Page 50: Battery Sizing/Selection
M A G M A Battery Sizing/Selection: For Batteries Rated in Amp Hours: Use the following table for matching desired operating hours to battery capacity ratings. SUB100WDC Max Rated Load (Watts): 100 Watts Margin of Safety for Battery Selection: 10% Column 2-4 Column 1 Amp Hours... - Page 51 M A G M A For Batteries Rated in Watt Hours: If the batteries are rated by the vendor in Watt Hours, then simply multiply the number of desired hours of use by 100 Watts to get total Watt Hours rating requirement. If you want to run a DC powered 2 slot chassis for up to 4 hours: 4 hours x 100 Watts = 400 Watt Hours is required for the selected battery set.
- Page 52 M A G M A Appendix B DC Power Information...
-
Page 53: Appendix Ccompliance
APPENDIX C Compliance NOTE: This equipment has been tested and found to comply with the limits for a Class A digital device, pursuant to part 15 of the FCC Rules. These limits are designed to provide reasonable protection against harmful interference when the equipment is operated in a commercial environment. - Page 54 M A G M A Appendix C Compliance...
- Page 56 Mobility California, Inc. PCI Expansion Products 9918 Via Pasar, San Diego, CA 92126, USA Phone (858) 530-2511 • Fax (858) 530-2733 Email: support@magma.com • www.magma.com Manual P/N 09-09940-03-B...
Need help?
Do you have a question about the PCI Expansion System and is the answer not in the manual?
Questions and answers