Hitachi C 8FSE Technical Data And Service Manual
Slide compound miter saw
Hide thumbs
Also See for C 8FSE:
- Handling instructions manual (102 pages) ,
- Instruction manual (96 pages) ,
- Handling instructions manual (148 pages)
Table of Contents
Advertisement
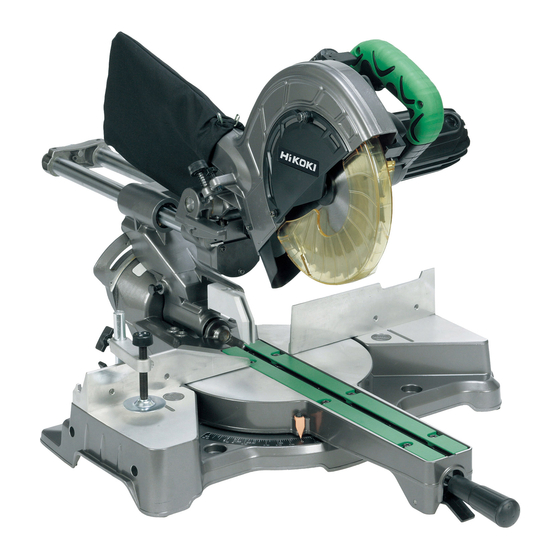
PRODUCT NAME
Hitachi Slide Compound Miter Saw
C 8FSE, C 8FSHE
Models
MARKETING OBJECTIVE
The new slide compound miter saws Models C 8FSE and C 8FSHE are developed to bring to the European
market at the prices as low as the competitors' products. The Model C 8FSHE is equipped with a laser marker
for easier alignment with the ink line and an LED light to illuminate the working surface brightly. In addition, the
Model C 8FSE that is mostly the same as the Model C 8FSHE except that it is not equipped with the laser
marker and the LED light is introduced in tandem with the Model C 8FSHE. With the new Models C 8FSE and
C 8FSHE, we aim to enhance the share of the Hitachi slide compound miter saw series.
APPLICATIONS
Cutting various types of wood workpieces
Cutting workpieces of plywood, decoration panels, soft fiberboards and hard boards
Cutting aluminum sashes
SELLING POINTS
[ NEW FEATURES ]
Laser marker (Only the Model C 8FSHE)
LED light (Only the Model C 8FSHE)
Lightweight
Positive angle stoppers
Bevel cutting range: Left 48° to right 5°
High dust collecting performance
Soft grip handle
Legible scale
<Same features as the conventional models>
Slide cutting
Press cutting
Miter cutting
Right and left bevel cutting
Compound miter and left bevel cutting
Splinter guard, also serving for cut alignment
Groove cutting
SPECIFICATIONS AND PARTS ARE SUBJECT TO CHANGE FOR IMPROVEMENT.
C 8FSHE
LIST Nos.
C 8FSE: E948
C 8FSHE: E949
Feb. 2008
International Sales Division
C
Advertisement
Table of Contents

Related Manuals for Hitachi C 8FSE


Summary of Contents for Hitachi C 8FSE
- Page 1 LED light to illuminate the working surface brightly. In addition, the Model C 8FSE that is mostly the same as the Model C 8FSHE except that it is not equipped with the laser marker and the LED light is introduced in tandem with the Model C 8FSHE.
- Page 2 REMARK: For more information about HANDLING INSTRUCTIONS, visit our website at: http://www.hitachi-koki.com/manual_view_export/ Throughout this TECHNICAL DATA AND SERVICE MANUAL, a symbol(s) is(are) used in the place of company name(s) and model name(s) of our competitor(s). The symbol(s) utilized here is(are) as follows: Competitors Symbols Utilized Company Name...
-
Page 3: Table Of Contents
-------------------------------------------------------------------------------------------------------------- 2. Ball bushing (Linear bearing) ----------------------------------------------------------------------------------------------------- PACKING ----------------------------------------------------------------------------------------------------------------------- 25 REPAIR GUIDE---------------------------------------------------------------------------------------------------------------- 26 1. Precautions in disassembly and reassembly ---------------------------------------------------------------------------- 2. Troubleshooting guide ----------------------------------------------------------------------------------------------------------------- STANDARD REPAIR TIME (UNIT) SCHEDULES-------------------------------------------------------------------- 48 Assembly diagram for C 8FSHE Assembly diagram for C 8FSE... -
Page 4: Selling Point Descriptions
Lightweight The Model C 8FSE is most lightweight (14 kg) in the class of 8” (216 mm) slide compound miter saws because the reinforcement rib of the table is placed in the most suitable position. - Page 5 Set pin High dust collecting performance The dust collecting performance of the Models C 8FSE and C 8FSHE are remarkably higher than the other models thanks to the adoption of new dust guide and gear case. Table 1...
-
Page 6: Slide Cutting
Slide cutting Unit: mm (inch) Table 2 Maker HITACHI Max. Model P1 and P2 cutting C 8FSE C 8FB2 dimension C 8FSHE 65 x 312 (2-9/16” x 12-1/4”) 65 x 305 Height x Width 75 x 262 (2-9/16” x 12”) -
Page 7: Miter Cutting
Miter cutting Unit: mm (inch) Table 4 Maker HITACHI Max. Model P1 and P2 cutting C 8FSE C 8FB2 C 8FSHE dimension 65 x 220 Right and (2-9/16” x 8-21/32”) left 45° 75 x 185 65 x 220 60 x 190... -
Page 8: Groove Cutting
Groove cutting The Models C 8FSE and C 8FSHE can cut grooves at desired depth by adjusting the 6-mm depth adjustment bolt manually. (Refer to "Groove cutting procedures" described in the Instruction Manual for details.) NOTE: The Models C 8FSE and C 8FSHE cannot cut grooves at constant depth unless the saw blade slides in parallel with the base surface. -
Page 9: Specifications
Main unit dimensions 555 mm x 790 mm x 485 mm (21-27/32" x 31-3/32" x 19-3/32") (Width x depth x height) Weight C 8FSE 14 kg (31 lbs.) C 8FSHE 14.5 kg (32 lbs.) Coating Gunmetallic silver Packaging Corrugated cardboard box... - Page 10 · 216 mm (8-1/2") TCT saw blade (15.9 mm (5/8”) bore, NT24, Code No. 998840 for USA/CAN) --------------------- for wood cutting · 216 mm (8-1/2") TCT saw blade (30 mm (1-11/64”) bore, NT24, Code No. 998859 for Europe/AUS) ----------------- for wood cutting ·...
-
Page 11: Comparisons With Similar Products
1. Specification comparisons [For Europe and others (Except for the U.S.A and Canada)] (Superior specifications: Maker HITACHI Model name C 8FSE/C 8FSHE 65 x 312 (2-9/16” x 12-1/4”) 60 x 270 60 x 270 60 x 270 0 (Right angle) 75 x 262 (2-15/16”... - Page 12 (18-1/8” x 22-1/16” (17-23/32” x 24” mm (inch) x 19-3/32") x 23-7/32”) x 23-7/32”) x 20-3/32”) C 8FSE: 14 (31) Product weight kg (lbs.) 14.5 (32) 14 (31) 15 (33.1) C 8FSHE: 14.5 (32) · 216 mm (8-1/2") TCT · 216 mm (8-1/2") TCT ·...
- Page 13 [For the U.S.A and Canada] (Superior specifications: Maker HITACHI Model name C 8FSE/C 8FSHE C 8FB2 65 x 312 (2-9/16” x 12-1/4”) 70 x 300 65 x 305 (2-9/16” x 12”) 0° (Right angle) 75 x 262 (2-15/16” x 10-5/6”) (2-3/4”...
- Page 14 (20-15/32” x 29-23/32” (22-27/32” x 28-11/32” mm (inch) x 19-3/32") x 19-11/16”) x 21-27/32”) C 8FSE: 14 (31) Product weight kg (lbs.) 17.5 (38.6) 19.5 (43) C 8FSHE: 14.5 (32) · 216 mm (8-1/2") TCT · 216 mm (8-1/2") TCT ·...
-
Page 15: Precautions In Sales Promotion
1. Safety instructions In the interest of promoting the safest and most efficient use of the Models C 8FSE and C 8FSHE Slide Compound Miter Saws by all of our customers, it is very important that at the time of sale the salesperson... - Page 16 For Taiwan Fig. 12-e (2) Warning label (A) (for the U.S.A. and Canada) Fig. 13 Warning label (A) specified by the UL is affixed on the left side of the gear case. Please instruct users to strictly observe the 11 items of precautions in warning label (A) shown above. (3) Caution labels (A) and (B) (at the front of the base) ·...
- Page 17 (4) Caution label (J) (at the front of the hinge) and caution labels (C) and (E) (at the front left of the turn table) (only the Model C 8FSHE) Do not stare into laser beam. If your eye is exposed directly to the laser beam, it can be hurt. Caution label (J) and caution labels (C) and (E) are adhered to each machine to comply with the standards for the safe use of laser equipment.
-
Page 18: Precautions Requiring Particular Attention During Sales Promotion
(1) Be sure to use the carbon brushes dedicated to the Models C 8FSE and C 8FSHE (110 V to 120 V: Code No. 999021, 220 V to 240 V: Code No. 999001). Use of other carbon brushes will adversely affect the brake performance. -
Page 19: Adjustment And Operational Precautions
ADJUSTMENT AND OPERATIONAL PRECAUTIONS 1. Confirmation of saw blade lower limit position The lower limit of the saw blade cutting depth is factory-adjusted so that when the saw blade is fully lowered, its cutting edge is 10 to 11 mm (13/32" to 7/16") below the upper surface of the turn table in order to cut workpieces completely without cutting the bottom of the turn table groove. -
Page 20: Position Adjustment Of Laser Line (Only The Model The C 8Fshe)
3. Position adjustment of laser line (Only the Model C 8FSHE) The laser line is adjusted to the width of the saw blade at the Fig. 18 time of factory shipment. Depending upon the cutting choice, align the laser line with the left side of the cutting width (saw blade) or the right side according to the following procedure. -
Page 21: How To Use The Vise Assembly
4. How to use the vise assembly Fig. 21 (1) The vise assembly can be mounted on either the left fence 6 mm wing (fence (B)) or the right fence (fence (A)) by loosening 6 mm bolt (B) wing bolt (A). (2) The screw holder can be raised or lowered according to the height of the workpiece by loosening 6 mm wing bolt (B). -
Page 22: Cutting Operation
(3) Press cutting ( 3 in Fig. 23) The Models C 8FSE/C 8FSHE can be used for press cutting of workpieces up to 65 mm square in a single operation by simply pushing the saw blade section 3 downward in the same manner as the Model C 8FB2. - Page 23 Models C 8FSE/C 8FSHE. In the cutting examples illustrated in Fig. 24, the cut surfaces on the sides marked ( A ) (cut with the...
- Page 24 grain) are better than those on the sides marked ( B ). (9) Crown molding cutting This machine can cut two types of crown molding workpieces by combining the miter and bevel cutting operations. Figure 25 shows two common crown molding types having angles of (θ) 38° and 45°. For the typical crown molding fittings, see Fig.
- Page 25 2 Tilt the motor head to the left and set the bevel angle as follows: * For 45° type crown moldings: 30° ( mark) * For 38° type crown moldings: 33.9° ( mark) 3 Position the crown molding so that the upper surface ( in Fig.
- Page 26 WARNING: Always firmly clamp or vise to secure the crown molding to the fence; otherwise the crown molding might be thrust from the table and cause bodily harm. Do not perform bevel cutting. The main body or the saw blade may contact the sub fence, resulting in an injury.
-
Page 27: Adjustment Of Components
ADJUSTMENT OF COMPONENTS 1. Bevel angle adjustment Before shipping from the factory, the height of 8-mm bolts (A) and (B) is adjusted so that the saw blade section (head) will stop at 0° (right angle), and 45° to the left. To change the head stop positions, instruct the customer to adjust the height of 8-mm bolts (A) and (B) by turning them. -
Page 28: Packing
PACKING (1) How to install packings (A) and (B) Remove the dust bag from the main body. Slide Fig. 35 Packing (A) the head section toward the operator and insert packing (A) between the slide pipe, hinge and holder (A). Push the head back and secure the slide in position with packing (A) inserted by means of the slide securing knob. -
Page 29: Repair Guide
Special attention in disassembly should be given to the following items. The circled numbers in the figures and the [Bold] numbers in the descriptions below correspond to the item numbers in the parts list and exploded assembly diagram of the Model C 8FSHE. For the Model C 8FSE, refer to the parts list separately. - Page 30 Fig. 39-a Fig. 39-b -27-...
- Page 31 2. Lower guard, link, spindle ass'y and dust guide (1) Remove the Bolt (W/Washers) M6 x 16 (Black) [207] and the Machine Screws (W/Washers) M5 x 8 [191] with the Box Wrench 10 mm [501]. Remove the Spindle Cover [192] from the Gear Case [198]. (2) Remove the Bolt (Left Hand) W/Washer M7 x 17.5 [210] with the Box Wrench 10 mm [501].
- Page 32 (6) Remove the Knob Bolt M6 x 25 [116] and the Lock Spring [117]. Remove Hinge (A) Ass'y [87] from Holder (A) [124] by sliding Hinge (A) Ass'y [87]. (7) Remove the Machine Screw M4 x 8 [81]. Lightly tap the end surface of Holder (A) [124] with a plastic hammer to remove the Ball Bushing [114].
- Page 33 4. Armature ass'y and lock lever (1) Remove the Brush Cap [161] and the Carbon Brush [160]. (2) Removing the three Machine Screws (W/Washers) M5 x 40 (Black) [157] allows you to remove the Housing Ass’y [155] together with the Handle Cover [164] from the Gear Case [198]. (3) Remove the Lock Lever [177] and the Spring [176].
- Page 34 5. Handle cover, switch, light, cord, stator ass'y and housing ass'y (1) Remove the motor section according to the above step 4-(1)(2). (2) Remove the seven Tapping Screws (W/Flange) D4 x 20 (Black) [163] and remove the Handle Cover [164]. (3) Disconnect the connectors of the Switching Power Supply Ass’y [165] and Light (H) Ass’y [175] and remove Light (H) Ass’y [175].
- Page 35 6. Laser marker Fig. 44 (1) Remove the Machine Screw M4 x 8 [81] and remove the Cover [83] from the rear of Hinge (A) Ass’y [87]. (2) Remove the three Machine Screws M4 x 8 [108] and remove Plate (A) [105] and Cover (A) [104] from Hinge (A) Ass’y [87].
- Page 36 Reassembly 1. Special attention Reassembly can be accomplished by following the disassembly procedures in reverse. However, special attention should be given to the following items. Fig. 46 (1) Prior to reassembly, measure the insulation resistance of the armature, stator, switch and other electrical components and confirm that the insulation resistance of each part is more than 5 MΩ.
- Page 37 2. Wiring diagram Carefully ensure that wiring is accomplished as illustrated below. As incorrect wiring will result in lack of rotation, reverse rotation or other malfunctions, close attention is absolutely necessary. WARNING: Be sure to turn off the two Switches (W/Cover) [167] on the side of the Housing Ass'y [155] (Model C 8FSHE) and unplug the power cord plug from the receptacle before replacing the Laser Marker [107] and the Switching Power Supply Ass’y [165].
- Page 38 Model C 8FSHE for Europe, Australia and Asia Fig. 48-b Model C 8FSE for the U.S.A. and Canada Fig. 49-a Model C 8FSE for Europe, Australia and Asia Fig. 49-b -35-...
- Page 39 (2) Actual wiring diagram Model C 8FSHE for the U.S.A. and Canada Fig. 50-a Model C 8FSHE for Europe, Australia and Asia Fig. 50-b -36-...
- Page 40 Model C 8FSE for the U.S.A. and Canada Fig. 51-a Model C 8FSE for Europe, Australia and Asia Fig. 51-b -37-...
-
Page 41: Checking Of Insulation Distance
3. Checking of insulation distance Do not remove too much of the insulation coating at the internal wire connection. Take care not to let the core of the internal wire stick out the Connector 50092 [168] or let the internal wires get caught in a joint between the Housing Ass’y [155] and the Handle Cover [164]. - Page 42 (3) Reassembly of the ball bushing Fig.55 The Ball Bushing [114] and Holder (A) [124] are maintained at a smooth fit. When placing the Ball Bushing [114] into Holder (A) [124], gently hammer it with a plastic hammer so that the Ball Bushing [114] is seated into Holder (A) [124] in parallel.
- Page 43 8. Adjustment of laser marker accuracy (1) Construction of laser marker and functions of each component The Adjuster [88] located at the side of Hinge (A) Ass’y [87] is a screw used for moving the Laser Marker [107] horizontally. The laser line can be aligned with the left side of the cutting width (saw blade) or the ink line on the right side by means of the Adjuster [88].
- Page 44 Adjustment of squareness with the fence surface Adjustment of squareness with the base surface Fig. 57-b Fig. 57-c The laser line inclines to the left by turning the Seal The laser line inclines to the right by turning the Lock Hex. Socket Set Screw M5 x 6 [103] Seal Lock Hex.
- Page 45 of the laser line. (Repeat this operation 3 or 4 times depending on the adjusting conditions of the laser marker.) Refer to the above "(1) Construction of laser marker and functions of each component" for the relation between the two Seal Lock Hex. Socket Set Screws M5 x 6 [103] and the laser line.
-
Page 46: Troubleshooting Guide
2. Troubleshooting guide Factory Item Phenomenon Cause Inspection, repair or adjustment standard Inaccurate cutting (a) Inaccurate 0.15/100 • Readjust squareness with the --- Inaccurate squareness between (Dummy disc) Nylock Bolt M8 x 25 [123]. squareness of the the turn table and the (Fig. - Page 47 Factory Item Phenomenon Cause Inspection, repair or adjustment standard • Adjust the clearance between Hinge (A) ass’y the Bushing [115] and slide Slide pipe (A) pipe (A) with the Seal Lock Hex. Socket Set Screw M6 x 10 [118]. Ensure that slide pipe section slides smoothly with a slide load of within 3 kgf.
- Page 48 Factory Item Phenomenon Cause Inspection, repair or adjustment standard Rough cut surface (a) Large deflection of • Same as Item 1- (b). /φ 0.15 Parallelism (A)= 0.02/43 saw blade. (Dummy disc) (Causes rough cut surface.) (b) Poor movement of Slide load should be •...
- Page 49 Factory Item Phenomenon Cause Inspection, repair or adjustment standard Saw blade is locked. (a) Excessively fast • Reduce cutting speed. cutting speed (b) Core diameter of • Use a thicker and shorter extension cord is too extension cord. small. (c) Excessive cutting •...
- Page 50 Factory Item Phenomenon Cause Inspection, repair or adjustment standard Laser marker does not (a) Improper wiring • Check the wiring. light. (Only Model C 8FSHE) (b) Switch failure • Check the Switch (W/Cover) [167] for conductivity. • Replace the Switch (W/Cover) [167].
-
Page 51: Standard Repair Time (Unit) Schedules
STANDARD REPAIR TIME (UNIT) SCHEDULES Variable MODEL Fixed Work Flow C 8FSHE Spindle Ass’y Bearing Spacer Ball Bearing Holder Link (6003VV) Ball Bearing Ball Bearing (606ZZ) (608VV) Lower Guard Dust Guide Guide Holder General assembly Handle Cover Ball Bearing Housing Gear Case Sleeve Cord... - Page 52 STANDARD REPAIR TIME (UNIT) SCHEDULES Variable MODEL Fixed Work Flow C 8FSE Spindle Ass’y Bearing Spacer Ball Bearing Holder Link (6003VV) Ball Bearing Ball Bearing (606ZZ) (608VV) Lower Guard Dust Guide Guide Holder General assembly Handle Cover Ball Bearing Housing...
- Page 53 LIST NO. E949 SLIDE COMPOUND SAW Model C 8FSHE (E1)
- Page 54 C 8FSHE - 2 - 2 - 08...
- Page 55 C 8FSHE - 3 - 2 - 08...
- Page 56 PARTS C 8FSHE ITEM CODE NO. DESCRIPTION REMARKS USED 935-196 MACHINE SCREW (W/WASHERS) M4X12 (BLACK) 312-488 CLAMP LEVER 329-409 BOLT (LEFT HAND) D10 965-077 SPECIAL WASHER 325-028 SET PIN 996-407 O-RING (1AP-12) 949-215 MACHINE SCREW M4X8 (10 PCS.) 949-429 BOLT WASHER M4 (10 PCS.) 320-141 HINGE SHAFT (A) 329-417...
- Page 57 PARTS C 8FSHE ITEM CODE NO. DESCRIPTION REMARKS USED SUB FENCE FOR USA, CAN 949-342 FLAT HD. SCREW M6X25 (10 PCS.) 998-844 HOLDER 949-610 BOLT M6X10 (10 PCS.) 324-400 LINER 329-419 FENCE (A) 329-414 BASE ASS'Y INCLUD. 53, 57, 58 323-606 BASE RUBBER 315-210...
- Page 58 PARTS C 8FSHE ITEM CODE NO. DESCRIPTION REMARKS USED 948-193 NYLON CLIP 329-492 SUPPORT 329-424 BALL BUSHING 326-141 BUSHING 324-418 KNOB BOLT M6X25 947-859 LOCK SPRING 307-956 SEAL LOCK HEX. SOCKET SET SCREW M6X10 949-217 MACHINE SCREW M4X12 (10 PCS.) 321-329 INDICATOR 301-575...
- Page 59 PARTS C 8FSHE ITEM CODE NO. DESCRIPTION REMARKS USED 608-VVM BALL BEARING 608VVC2PS2L 315-877 DUST SEAL 600-0VV BALL BEARING 6000VVCMPS2L 322-089 BEARING BUSHING 322-090 RUBBER BUSHING 360-839U ARMATURE ASS'Y 110V-120V INCLUD. 182-184 360-839E ARMATURE ASS'Y 220V-230V INCLUD. 182-184 360-839F ARMATURE ASS'Y 240V INCLUD.
- Page 60 STANDARD ACCESSORIES C 8FSHE ITEM CODE NO. DESCRIPTION REMARKS USED 940-543 BOX WRENCH 10MM 322-955 DUST BAG (BLACK) OPTIONAL ACCESSORIES ITEM ITEM CODE NO. CODE NO. DESCRIPTION REMARKS USED USED 963-837 NYLON NUT M6 329-465 PLATE SUB FENCE 949-342 FLAT HD. SCREW M6X25 (10 PCS.) 329-464 SUB FENCE ASS'Y INCLUD.
- Page 61 LIST NO. E948 SLIDE COMPOUND SAW Model C 8FSE (E1)
- Page 62 C 8FSE - 2 - 2 - 08...
- Page 63 C 8FSE - 3 - 2 - 08...
- Page 64 PARTS C 8FSE ITEM CODE NO. DESCRIPTION REMARKS USED 935-196 MACHINE SCREW (W/WASHERS) M4X12 (BLACK) 312-488 CLAMP LEVER 329-409 BOLT (LEFT HAND) D10 965-077 SPECIAL WASHER 325-028 SET PIN 996-407 O-RING (1AP-12) 949-215 MACHINE SCREW M4X8 (10 PCS.) 949-429 BOLT WASHER M4 (10 PCS.)
- Page 65 PARTS C 8FSE ITEM CODE NO. DESCRIPTION REMARKS USED 998-844 HOLDER 949-610 BOLT M6X10 (10 PCS.) 324-400 LINER 329-419 FENCE (A) 329-414 BASE ASS'Y INCLUD. 52, 56, 57 323-606 BASE RUBBER 315-210 SCALE (A) CAUTION LABEL (A) CAUTION LABEL (B)
- Page 66 PARTS C 8FSE ITEM CODE NO. DESCRIPTION REMARKS USED 324-372 GUARD ASS'Y INCLUD. 107 984-750 TAPPING SCREW (W/FLANGE) D4X16 938-051 CORD ARMOR D10.1 937-631 CORD CLIP 329-437 HOUSING ASS'Y INCLUD. 157, 158 NAME PLATE 322-123 MACHINE SCREW (W/WASHERS) M5X40 (BLACK) 938-477 HEX.
- Page 67 PARTS C 8FSE ITEM CODE NO. DESCRIPTION REMARKS USED 308-259 BOLT (W/WASHERS) M6X16 (BLACK) 949-260 MACHINE SCREW M6X25 (10 PCS.) 606-ZZM BALL BEARING 606ZZC2PS2L 949-455 SPRING WASHER M6 (10 PCS.) 949-425 WASHER M6 (10 PCS.) 329-463 LOCK LEVER SPRING EXCEPT FOR USA, CAN, VEN, KUW, IND,...
- Page 68 STANDARD ACCESSORIES C 8FSE ITEM CODE NO. DESCRIPTION REMARKS USED 940-543 BOX WRENCH 10MM 322-955 DUST BAG (BLACK) OPTIONAL ACCESSORIES ITEM ITEM CODE NO. CODE NO. DESCRIPTION REMARKS USED USED 963-837 NYLON NUT M6 329-465 PLATE SUB FENCE 949-342 FLAT HD. SCREW M6X25 (10 PCS.)
Need help?
Do you have a question about the C 8FSE and is the answer not in the manual?
Questions and answers
I'd Like to fix the positive angle stopper
@Randy Sauro
To fix the positive angle stopper on a Hitachi C 8FSE, you need to:
1. Loosen the clamping lever.
2. Tilt the main unit to the left.
3. Pull the adjustment pin to allow tilting.
4. Secure the stopper by tightening the 6 mm bolts.
This ensures the angle stopper is properly fixed.
This answer is automatically generated