Table of Contents
Advertisement
Available languages
Available languages
Model
C 8FSHE
Modèle
C 8FSE
Modelo
SAFETY INSTRUCTIONS AND INSTRUCTION MANUAL
IMPROPER OR UNSAFE
This manual contains important information about product safety. Please read and understand
this manual BEFORE operating the power tool. Please keep this manual available for other
users and owners before they use the power tool. This manual should be stored in safe place.
INSTRUCTIONS DE SECURITE ET MODE D'EMPLOI
Une utilisation INCORRECTE OU DANGEREUSE de cet outil mo
sérieuses blessures corporelles!
Ce mode d'emploi contient d'importantes informations à propos de la sécurité de ce produit.
Prière de lire et de comprendre ce mode d'emploi AVANT d'utiliser l'outil motorisé. Garder ce
mode d'emploi à la disponibilité des autres utilisateurs et propriétaires avant qu'ils utilisent
l'outil motorisé. Ce mode d'emploi doit être conservé dans un en
INSTRUCCIONES DE SEGURIDAD Y MANUAL DE INSTRUCCIONES
¡La utilización INAPROPIADA O PELIGROSA de esta herramienta eléctrica puede resultar en lesiones
de gravedad o la muerte!
Este manual contiene información importante sobre la seguridad del producto. Lea y comprenda este
manual ANTES de utilizar la herramienta eléctrica. Guarde este manual para que puedan leerlo otras
personas antes de utilizar la herramienta eléctrica. Este manual debe ser guardado en un lugar seguro.
DOUBLE INSULATION
DOUBLE ISOLATION
AISLAMIENTO DOBLE
(Laser Marker and Light Equipment)
(Marqueur laser et lumière)
(Equipo con marcador láser y luz)
WARNING
use of this power tool can result in death or serious bodily injury!
AVERTISSEMENT
ADVERTENCIA
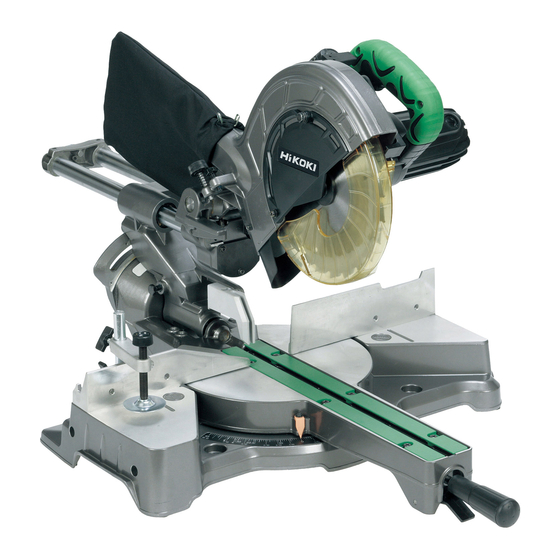
Slide Compound Miter Saw
Scie à onglets coulissante
Ingletadora telescopica
torisé peut entraîner la mort ou de
droit sûr.
Advertisement
Table of Contents

Related Manuals for Hitachi C8FSE - 8-1/2" Sliding Compound Miter Saw


Summary of Contents for Hitachi C8FSE - 8-1/2" Sliding Compound Miter Saw
- Page 1 Model Slide Compound Miter Saw (Laser Marker and Light Equipment) C 8FSHE (Marqueur laser et lumière) Modèle Scie à onglets coulissante (Equipo con marcador láser y luz) C 8FSE Modelo Ingletadora telescopica SAFETY INSTRUCTIONS AND INSTRUCTION MANUAL WARNING use of this power tool can result in death or serious bodily injury! IMPROPER OR UNSAFE This manual contains important information about product safety.
-
Page 2: Table Of Contents
CONTENTS English PAGE PAGE IMPORTANT SAFETY INFORMATION ..... 3 APPLICATIONS ............10 MEANINGS OF SIGNAL WORDS ......3 PREPARATION BEFORE OPERATION ....11 SAFETY ................3 BEFORE USING ............12 IMPORTANT SAFETY INSTRUCTIONS FOR BEFORE CUTTING ............. 13 USING ALL POWER TOOLS ........3 PRACTICAL APPLICATIONS ........ -
Page 3: Important Safety Information
Hazards that must be avoided to prevent bodily injury or machine damage are identified by WARNINGS on the power tool and in this Instruction Manual. NEVER use this power tool in a manner that has not been specifically recommended by HITACHI. MEANINGS OF SIGNAL WORDS... - Page 4 English 9. ALWAYS USE EYE PROTECTION WHEN WORKING WITH THE TOOL TO PREVENT EYE INJURY. Ordinary eyeglasses do not provide adequate protection because the lenses are not made of safety glass. Also, use a face mask for additional safety and wear a dust mask if the cutting operation produces dust.
- Page 5 English Always wear snug-fitting clothing, non-skid footwear (preferably with steel toes) and eye protection when operating the POWER TOOL. Always handle the POWER TOOL carefully. If the POWER TOOL falls or strikes against a hard object, it might become deformed or cracked or sustain other damage. Always cease operating the saw at once, if you notice any abnormality whatsoever.
-
Page 6: Replacement Parts
No load speed is 5,500/min. To reduce the risk of injury, return carriage to the full rear position after each crosscut operation. REPLACEMENT PARTS When servicing use only identical replacement parts. Repairs should be conducted only by a Hitachi authorized service center. -
Page 7: Use Proper Extension Cord
DOUBLE INSULATION FOR SAFER OPERATION To ensure safer operation of this power tool, HITACHI has adopted a double insulation design. “Double insulation” means that two physically separated insulation systems have been used to insulate the electrically conductive materials connected to the power supply from the outer frame handled by the operator. -
Page 8: Operation And Maintenance
English OPERATION AND MAINTENANCE NOTE: The information contained in this Instruction Manual is designed to assist you in the safe operation and maintenance of the power tool. Some illustrations in this Instruction Manual may show details or attachments that differ from those on your own power tool. NAME OF PARTS MODEL C8FSHE/MODEL C8FSE Gear case... -
Page 9: Specifications
English SPECIFICATIONS Model C8FSHE / C8FSE Motor Type Series commutator motor Power source Single-phase AC 60Hz Voltage (Volts) Full-load current (Amp) Laser Marker Maximum output <1mW CLASS II Laser Product (Only Model Wave length 400~700 nm C10FSH) Laser medium Laser Diode Applicable Outside Dia. -
Page 10: Accessories
5 Crown molding Vise Ass’y (Code No. 329782) (Include Crown molding Stopper (L)) 6 Crown molding Stopper (L) (Code No. 321374) 7 Crown molding Stopper (R) (Code No. 321373) NOTE: Accessories are subject to change without any obligation on the part of the HITACHI. APPLICATIONS Wood and aluminum sash. -
Page 11: Preparation Before Operation
English PREPARATION BEFORE OPERATION Make the following preparations before operating the power tool: 1. Installation Base 5/16" (8mm) Bolt 5-13/16"(148mm) 11/32" (9mm) 3 Holes 11-21/32" (296mm) Work Bench 5/16" (8mm) Nut Fig. 4 Attach the power tool to a level, horizontal work bench in accordance with Fig. 4. Select 5/16"... -
Page 12: Before Using
English 3. Releasing the locking pin When the power tool is prepared for shipping, its main parts are secured by a locking pin. Move the handle slightly so that the locking pin can be disengaged. NOTE: Lowering the handle slightly will enable you to disengage the locking pin more easily and safely. -
Page 13: Before Cutting
English 8. Check the Power Receptacle. To prevent overheating, accidental stopping or intermittent operation, confirm that the power cord plug fits properly in the electrical receptacle and does not fall out after it is inserted. Repair or replace the receptacle if it is faulty. 9. - Page 14 English (1) Turn the 8 mm depth adjustment bolt, change the height where 8mm Depth adjustment bolt the bolt head and the hinge contacts, and adjust the lower limit position of the saw blade. Gear case NOTE: Confirm that the saw blade is adjusted so that it will not cut into the turntable.
- Page 15 English 5. Oblique angle Before the power tool is shipped from the factory, it is adjusted for 0°, right angle, left 45° bevel cutting angle with the 8mm bolt (A) and 8mm bolt (B). When changing the adjustment, change the height of the 8mm bolt (A) or 8mm bolt (B) by turning them.
- Page 16 English 9. Position adjustment of laser line (Only Model C8FSHE) WARNING: * Make sure before plugging the power plug into the receptacle that the main body and the laser marker are turned off. * Exercise utmost caution in handling a switch trigger for the position adjustment of the laser line, as the power plug is plugged into the receptacle during operation.
- Page 17 English (1) Light up the laser marker and make a groove of about 3/16" Saw Blade Workpiece (5mm) deep on the workpiece that is about 25/32" (20mm) in height and 5-29/32"(150mm) in width. Hold the grooved workpiece by vise as it is and do not move it. For grooving work, refer to "11.
-
Page 18: Practical Applications
English PRACTICAL APPLICATIONS WARNING: * To avoid personal injury, never remove or place a workpiece on the table while the tool is being operated. * Never place your limbs inside of the line next to warning sign while the tool is being operated. - Page 19 English 3. Cutting Operation (1) As shown in Fig. 25 the width of the saw blade is the width of the cut. Therefore, slide the workpiece to the right (viewed from the operator’s position) when length b is desired, or to the left when length a is desired. Adjusting Line (Only Model C8FSHE) If a laser marker is used, align the laser line with the left...
- Page 20 English 5. Cutting large workpieces There may be case when a complete cutting cannot be done Auxiliary depending on the height of workpiece. In this case, mount an 6mm Flad Hd. Board Screw auxiliary board with the 6mm flat head screws and the 6mm nuts using the 7mm holes on the fence surface (two holes on each side).
- Page 21 English (3) Follow the procedures indicated in paragraphs 4,5 and 6 above. For maximum dimensions for bevel cutting, refer to “SPECIFICATIONS” table on page 9. WARNING: When the workpiece is secured on the left or right side of the blade, the short cut-off portion will come to rest on the right or left side of the saw blade.
- Page 22 English 10. Crown molding cutting procedures Fig. 33 shows two common crown molding types having angles of (θ) 38° and 45°. For the typical crown molding fittings, see Fig. 34. A upper surface Ceiling Ceiling Wall B lower surface Wall Inside corner Outside corner Fig.
- Page 23 English (2) Setting to cut crown moldings at positions 2 and 3 in Fig. 34 (see Fig. 37; tilt the head to the left): 1 Turn the turntable to the left and set the Miter Angle as follows: * For 45° type crown moldings: 35.3°...
- Page 24 English CAUTION: Always confirm that the motor head (see Fig. 1) does not contact the crown molding vise ass’y when it is lowered for cutting. If there is any danger that it may do so, loosen the 6mm knob bolt and move the crown molding vise ass’y to a position where it will not contact the saw blade.
- Page 25 English CAUTION: Do not subject the light to strong impact. Failure to observe this may result in damage to the light or a reduced life span. Only switch the light on when cutting. Do not shine the light continuously into the eyes. Failure to observe this may result in damage to the eyes.
-
Page 26: Saw Blade Mounting And Dismounting
English SAW BLADE MOUNTING AND DISMOUNTING WARNING: * To prevent an accident or personal injury, always turn off the trigger switch and disconnect the power plug from the receptacle before removing or installing a saw blade. If cutting work is done in a state where the bolt is not sufficiently tightened, the bolt can get loose, the blade can come off, and the lower guard can get damaged, resulting in injuries. -
Page 27: Maintenance And Inspection
English 2. Dismounting the saw blade Dismount the saw blade by reversing the mounting procedures described in paragraph 1 above. The saw blade can easily be removed after lifting the lower guard. CAUTION: Never attempt to install saw blades larger than 8-1/2" (216mm) in diameter. Always install saw blades that are 8-1/2"... -
Page 28: Service And Repairs
To assure that only authorized replacement parts will be used and that the double insulation system will be protected, all service (other than routine maintenance) must be performed by an AUTHORIZED HITACHI POWER TOOL REPAIR CENTER ONLY. NOTE: Specifications are subject to change without any obligation on the part of HITACHI. -
Page 29: Français
Les dangers qui doivent être évités pour prévenir des blessures corporelles ou un endommagement de la machine sont identifiés par AVERTISSEMENTS sur l’outil motorisé et dans ce mode d’emploi. NE JAMAIS utiliser cet outil motorisé d’une manière qui n’est pas spécifiquement recommandée par HITACHI. SIGNIFICATION DES MOTS D’AVERTISSEMENT AVERTISSEMENT indique des situations potentiellement dangereuses qui, si elles sont ignorées,... - Page 30 Français 7. TOUJOURS UTILISER LES OUTILS APPROPRIÉS. Ne jamais utiliser un outil ou un accessoire pour un travail pour lequel il n’est pas conçu. 8. PORTER DES VÊTEMENTS APPROPRIÉS PENDANT LE TRAVAIL. Ne jamais porter de vêtements lâches ni de gants, cravate, bagues, bracelets ni aucun autre bijou. Ils pourraient se coincer dans les pièces en rotation.
- Page 31 Français Consignes de sécurité spéciales pour cet outil électrique AVERTISSEMENT: Pour éviter tout risque de blessure, les consignes de sécurité spéciales suivantes devront être respectées lors de l’utilisation de l’outil. CHOSES A FAIRE TOUJOURS OBSERVER LES CONSIGNES SUIVANTES POUR GARANTIR UNE UTILISATION EN TOUTE SÉCURITÉ: Bien lire le manuel et se familiariser avec les consignes de sécurité...
- Page 32 Français CHOSES A NE PAS FAIRE POUR GARANTIR UNE UTILISATION EN TOUTE SÉCURITÉ, NE JAMAIS VIOLER LES CONSIGNES SUIVANTES: Ne jamais utiliser l’OUTIL ELECTRIQUE si l’on ne comprend pas bien les instructions de ce manuel. Ne jamais s’éloigner de l’OUTIL ELECTRIQUE sans débrancher auparavant son cordon d’alimentation. Ne jamais utiliser l’OUTIL ELECTRIQUE quand on est fatigué, après avoir pris des médicaments ou consommé...
-
Page 33: Pieces De Rechange
électrique. DOUBLE ISOLATION POUR UN FONCTIONNEMENT PLUS SUR Pour assurer un fonctionnement plus sûr de cet outil électrique, HITACHI a adopté une conception à double isolation. “Double isolation” signifie que deux systèmes d’isolation physiquement séparés ont été utilisés pour isoler les matériaux conducteurs d’ électrique connectés à l’outil électrique à partir du cadre extérieur manipulé... - Page 34 Français CONSERVER CES INSTRUCTIONS LES METTRE A LA DISPOSITION DES AUTRES UTILISATEURS PROPRIETAIRES DE CET OUTIL!
-
Page 35: Utilisation Et Entretien
Français UTILISATION ET ENTRETIEN REMARQUE: Les informations contenues dans ce manuel sont destinées à vous aider à utiliser et à entretenir l’OUTIL ELECTRIQUE en toute sécurité. Certaines illustrations de ce manuel peuvent montrer des détails ou des fixations qui diffèrent de ceux de votre OUTIL ELECTRIQUE. -
Page 36: Page Spécifications
Français SPÉCIFICATIONS Article Modèle C8FSHE / C8FSE Moteur Type Moteur à commutateur série Alimentation Courant alternatif monophasé 60 Hz Tension (volts) Courant à pleine charge (Amp) 9.2 Marqueur laser Puissance de sortie maximum <1 mW, appareil laser de la Classe II (Uniquement sur Longueur d'onde 400 - 700 nm... -
Page 37: Accessoires
6 Butée (L) de corniche complexe (No. de code 321374) 7 Butée (R) de corniche complexe (No. de code 321373) REMARQUE: Les accessoires sont sujets à changement sans obligation de la part de HITACHI. APPLICATIONS Cadres en bois et en aluminium. -
Page 38: Préparation Avant L'utilisation
Français PRÉPARATION AVANT L’UTILISATION Avant de mettre l’outil électrique en service, effectuer les préparations suivantes : 1. Installation Boulon de 5/16" (8mm) Socle 5-13/16"(148mm) 3 orifices de 11/32" (9mm) 11-21/32" (296mm) Etabli Ecrou de 5/16" (8mm) Fig. 4 Fixer l’outil électrique sur un établi horizontal et de niveau conformément à la Fig. 4. Sélectionner des boulons d’un diamètre 5/16"... -
Page 39: Avant L'utilisation
Français 3. Libérer la goupille de verrouillage Quand l’outil électrique quitte nos usines, ses pièces principales sont fixées à l’aide d’une goupille de verrouillage. Déplacer légèrement la poignée de façon à dégager la goupille de verrouillage. Poignée REMARQUE: La goupille de verrouillage se dégagera plus facilement et plus sûrement si l’on abaisse légèrement la poignée. -
Page 40: Avant La Coupe
Français 7. Vérifier la position de limite inférieure de la lame. Bien que la lame ait été réglée en usine, vérifier soigneusement sa hauteur. S’assurer que la lame peut être abaissée de 13/32" à 7/16" (10 à 11mm) en-dessous de la plaque d’insertion. Pour les détails, voir la section “Vérification de la limite de position inférieure de la lame”. - Page 41 Français 2. Vérification de la position limite inférieure de la lame de scie S'assurer que la lame de scie peut être abaissée de 13/32" à 7/16" (10 à 11mm) en dessous de la plaque d'insertion de table, comme le montre la Fig. 10-a. Lorsque l'on remplace une lame de scie par une lame neuve, régler la position limite inférieure de telle manière que la lame de scie ne coupe pas la plaque tournante et que la coupe complète peut être réalisée.
- Page 42 Français 4. Vérification de l'utilisation de la garde secondaire AVERTISSEMENT: Dans le cas d'une coupe en biseau à gauche, tourner la garde secondaire dans le sens contraire des aiguilles d'une montre. L'outil ou la lame de scie peuvent entrer en contact avec la garde secondaire sauf si elle est tournée dans le sens contraire des aiguilles d'une montre, ce qui peut provoquer des blessures graves.
- Page 43 Français 8. Butée pour la précision de coupe ... (La butée et le support sont des un accessoires en option.) Butée La butée facilite la précision des coupes continues sur des longueurs Pièce (accessoire en option) Support de 11" à 17-3/4" (280 à 450mm). (accessoire en Pour installer la butée, la fixer au support à...
- Page 44 Français REMARQUES: * Effectuer la coupe en faisant chevaucher le ligne tracée à l'encre et la ligne laser. * Si la ligne tracée à l'encre et la ligne laser se chevauchent, la puissance et la faiblesse de la lumière sont modifiées, ce qui permet une coupe stable car on peut alors discerner la superposition des lignes.
-
Page 45: Applications Pratiques
Français APPLICATIONS PRATIQUES AVERTISSEMENT: * Pour éviter tout risque de blessure, ne jamais retirer ni installer la pièce sur la table pendant que l’outil fonctionne. * Ne jamais amener les membres à l’intérieur de la ligne à côté du signe d’avertissement pendant que l’outil fonctionne. - Page 46 Français 3. Coupe (1) Comme indiqué à la Fig. 25, la largeur de la lame est la Ligne de réglage largeur de coupe. En conséquence, glisser la pièce vers la droite (vue de la position de l’opérateur) pour obtenir la longueur b, et sur la gauche pour obtenir la longueur (Uniquement pour le modèle C8FSHE) Si le marqueur laser est utilisé, aligner la ligne laser sur le côté...
- Page 47 Français 6. Coupe de pièces larges (Coupe avec chariot) (1) Pièces d’une hauteur allant jusqu’à 2-9/16" (65mm) et d’une Poignée 1 Tirer vers l’avant largeur allant jusqu’à 12-1/4" (312mm): Desserrer le bouton de fixation de glissière et incliner la lame vers l’avant (Voir Fig. 2). 3 Pousser vers l’arrière pour couper Puis, appuyer sur la poignée et ramener la lame vers l’arrière pour couper la pièce comme indiqué...
- Page 48 Français ATTENTION: Lorsqu’on coupe une pièce de 1-15/16" (50mm) de hauteur à la position d’angle de biseau de 45° vers la gauche, ou une pièce de 2-3/4" (70mm) de hauteur à la position d’angle de biseau de 5° vers la droite, régler la position de limite inférieure de la tête du moteur de façon que l’écart entre le bord inférieur de la tête du moteur et la pièce soit à...
- Page 49 Français Réglage d’une coupe d’onglet Si la plaque tournante est réglée sur l’un des angles décrits, déplacer la poignée latérale de réglage de la plaque tournante légèrement vers la droite ou vers la gauche pour stabiliser la position et aligner correctement l’échelle d’onglet et l’extrémité...
- Page 50 Français 3 Disposer la corniche complexe de façon que la surface supérieure (B sur la Fig. 33) touche la garde comme indiqué à la Fig. 39. Tête Tête Echelle d’angle de biseau Echelle d’angle de biseau Garde Garde Socle Echelle d’angle Socle d’onglet Echelle d’angle...
- Page 51 Français ATTENTION: Toujours s’assurer que la tête du moteur (se reporter à la Fig. 1) ne vient pas en contact avec l’ensemble d’étau de corniche complexe quand il est abaissé pour la coupe. S’il y a un risque quelconque qu’il en soit ainsi, desserrer le bouton de boulonnage de 6mm et déplacer l’ensemble d’étau de corniche complexe de telle manière qu’il ne puisse pas y avoir de contact avec la lame de scie.
- Page 52 Français ATTENTION: Ne soumettez pas la lumière à un choc important. Vous risquez sinon d’endommager la lumière ou de réduire sa durée de vie. Allumez seulement la lumière pendant la découpe. Ne dirigez pas la lumière vers les yeux pendant une longue période, sous peine de détériorer la vue.
-
Page 53: Installation Et Retrait De La Lame
Français INSTALLATION ET RETRAIT DE LA LAME AVERTISSEMENT: * Pour éviter tout risque d’accident ou de blessure, toujours couper l’interrupteur à gâchette et débrancher la fiche de la prise secteur avant de retirer ou d’installer la lame. Si le travail de coupe est effectué alors que le boulon n’est pas suffisamment serré, le boulon risque de se défaire, la lame de se détacher et le garde inférieur de s’abîmer, ce qui provoquera des blessures. -
Page 54: Entretien Et Inspection
Français ATTENTION: * Un guide poussière est installé à l'intérieur, derrière le carter d'engrenage. Lors du retrait ou de l’installation de la lame, ne pas toucher le guide-copeaux. Cela pourrait casser ou ébrécher les extrémités de la lame. * Vérifier que le verrou d’axe est revenu en position rentrée après le retrait ou l’installation de la lame. -
Page 55: Service Après-Vente Et Réparations
(autres que l’entretien de routine) exclusivement à un SERVICE APRES-VENTE D’OUTILS ELECTRIQUES HITACHI AGREE. REMARQUE : Les spécifications sont sujettes à modification sans obligations de la part d’HITACHI. -
Page 56: Español
Para evitar lesiones o el daño de la herramienta eléctrica, los riesgos están identificados con ADVERTENCIAS en dicha herramienta y en este Manual de instrucciones. No utilice NUNCA esta herramienta eléctrica de ninguna forma que no esté específicamente recomendada por HITACHI. SIGNIFICADO DE LAS PALABRAS DE SEÑALIZACIÓN ADVERTENCIA indica situaciones potencialmente peligrosas que, si se ignoran, pueden resultar en la muerte o en lesiones de gravedad. - Page 57 Español 6. NO FUERCE NUNCA LA HERRAMIENTA. La herramienta trabajará mejor y con mayor seguridad si la utiliza con el régimen para el que fue diseñada. 7. UTILICE SIEMPRE LAS HERRAMIENTAS CORRECTAS. No fuerce nunca una herramienta ni un accesorio para realizar un trabajo para el que no se haya diseñado. 8.
- Page 58 Español No levante nunca la hoja de sierra de la pieza de trabajo mientras no se haya parado completamente. Utilice siempre soportes para piezas de trabajo largas que sobrepasen la longitud de la mesa de la ingletadora telescopica. Después de cada operación de corte en cruz, devuelva el carro a la posición completamente posterior a fin de reducir el riesgo de lesiones.
- Page 59 Español Antes de utilizar la sierra, confirme que la cubierta de seguridad esté en el lugar apropiado. Antes de intentar cortar, confirme siempre que la cubierta de seguridad no obstruya el movimiento de deslizamiento de la sierra. nspeccione periódicamente el cable de alimentación de la herramienta. Antes de poner en funcionamiento la herramienta, confirme si la longitud del cable de alimentación y de los cables prolongadores, si va a utilizarlos, es apropiada.
-
Page 60: Piezas De Reemplazo
Para reducir el riesgo de lesiones, haga el retornar el carro a la posición la posición completamente hacia atrás después de cada operación de corte. PIEZAS DE REEMPLAZO Para la reparación de una herramienta, utilice solamente piezas de reemplazo idénticas. Las reparaciones solamente deberán realizarse en un centro de servicio autorizado por Hitachi. -
Page 61: Utilice El Cable Prolongador Adecuado
AISLAMIENTO DOBLE PARA OFRECER UNA OPERACIÓN MÁS SEGURA Para garantizar una operación más segura de esta herramienta eléctrica, HITACHI ha adoptado un diseño de aislamiento doble. “Aislamiento doble” significa que se han utilizado dos sistemas de aislamiento físicamente separados para aislar los materiales eléctricamente conductores conectados a la fuente de alimentación del bastidor exterior manejado por el operador. -
Page 62: Operación Y Mantenimiento
Español OPERACIÓN Y MANTENIMIENTO NOTA: La información contenida en este manual ha sido diseñada para ayudarle a realizar una operación segura y a mantener la HERRAMIENTA ELÉCTRICA. Algunas ilustraciones de este manual pueden mostrar detalles o dispositivos diferentes a los de su propia HERRAMIENTA ELÉCTRICA. NOMENCLATURA DE PARTES MODELO C8FSHE/MODELO C8FSE Caja de engranajes... -
Page 63: Especificaciones
Español ESPECIFICACIONES Ítem Modelo: C8FSHE / C8FSE Motor Tipo Motor conmutador en serie Fuente de alimentación Monofásica, CA, 60 Hz Tensión (voltios) Corriente a plena carga (amperios) Marcador láser Potencia máxima <1 mW Producto láser CLASE II (Sólo modelo Longitud de onda 400 - 700mm C10FSH) Medio de láser... -
Page 64: Accesorios
6 Tope (L) de moldura en vértice (Nº de código 321374) 7 Tope (R) de moldura en vértice (Nº de código 321373) NOTA: Los accesorios están sujetos a cambio sin ninguna obligación por parte de HITACHI. APLICACIONES Puertas corredizas de madena y aluminio. -
Page 65: Preparativos Previos A La Operación
Español PREPARATIVOS PREVIOS A LA OPERACIÓN Antes de utilizar la herramienta eléctrica, realice los preparativos siguientes. 1. Instalación Base Perno de 5/16" (8mm) 5-13/16"(148mm) 11/32" (9mm), 3 orificios 11-21/32" (296mm) Banco de Tuerca de 5/16" trabajo (8mm) Fig. 4 Coloque la herramienta eléctrica sobre un banco de trabajo nivelado horizontal, como se muestra en la Fig. -
Page 66: Antes De La Utilización
Español 3. Liberación del pasador de bloqueo Cuando la herramienta eléctrica esté preparada para transportarse, sus partes principales estarán aseguradas mediante el pasador de bloqueo. Mueva ligeramente la empuñadura de forma que el pasador de bloqueo pueda desenganchar. Empuñadura NOTA: Si baja ligeramente la empuñadura podrá... -
Page 67: Antes Del Corte
Español 7. Compruebe la posición del límite inferior de la hoja de sierra. Aunque fue ajustada antes del envío, compruebe cuidadosamente la altura de la hoja de sierra. Confirme que la hoja de sierra pueda bajarse de 13/32" a 7/16" (10 a 11mm) por debajo del inserto de la mesa. Con respecto a los detalles, consulte la sección “Comprobación de la posición del límite inferior de la hoja de sierra”. - Page 68 Español 2. Comprobación de la posición de límite inferior de la hoja de sierra Compruebe que la hoja de sierra se pueda bajar de 13/32" a 7/16" (10mm a 11mm) por debajo del inserto de la mesa, tal como se muestra en la Fig. 10-a. Cuando reemplace la hoja de sierra por una nueva, ajuste la posición de límite inferior de manera que la hoja de sierra no llegue a cortar la mesa giratoria, puesto que de lo contrario no se podrá...
- Page 69 Español 4. Confirmación sobre el uso de la escuadra de guía secundaria ADVERTENCIA: Para el corte a bisel izquierdo, gire la escuadra de guía secundaria en el sentido contrario a las agujas del reloj. De no girarla en el sentido indicado, el cuerpo principal o la hoja de sierra podría entrar en contacto con la escuadra de guía secundaria y producir lesiones.
- Page 70 Español 8. Retén para precisión de corte ... (El retén y el soporte son accesorios opcionales) El retén facilita la precisión del corte continuo en longitudes de 11" a 17-3/4" (280 a 450mm). Retén (Accesorio opcional) Pieza de trabajo Para instalar el retén, fíjelo al soporte con el perno de perilla de Soporte 6mm, como se muestra en la Fig.
- Page 71 Español NOTA: * Efectúe el corte haciendo coincidir la línea de tinta con la línea de láser. * Cuando la línea de tinta y la línea de láser se encuentran superpuestas, la intensidad y la tenuidad de la luz cambian, permitiendo una operación de corte estable debido a que será posible determinar fácilmente la coincidencia de las líneas.
-
Page 72: Aplicaciones Prácticas
Español APLICACIONES PRÁCTICAS ADVERTENCIA: * Para evitar lesiones, no quite ni remplace nunca la pieza de trabajo sobre la mesa mientras la herramienta esté en funcionamiento. * No coloque nunca sus miembros dentro de la línea cerca del signo de advertencia mientras esté... - Page 73 Español 3. Operación de corte (1) Como se muestra en la Fig. 25, la anchura de la hoja de sierra es la de corte. Por lo tanto, deslice la pieza de trabajo hacia la derecha (vista desde la posición del operador) cuando desee la longitud b, o hacia la izquierda cuando desee la longitud a.
- Page 74 Español 5. Corte de piezas de trabajo grandes Dependiendo de la altura de la pieza de trabajo, puede suceder Tabla auxiliar Tornillo de que no se pueda realizar un corte completo. En este caso, monte cabeza plana de 6mm una tabla auxiliar con los tornillos de cabeza plana de 6mm y las Tuerca de tuercas de 6mm utilizando los orificios de 7mm de la superficie de la escuadra de guía (dos orificios de cada lado).
- Page 75 Español ADVERTENCIA: Cuando la pieza de trabajo esté asegurada en la parte izquierda o derecha de la hoja de sierra, la parte de corte corto entrará en contacto con el resto de la parte derecha o izquierda de dicha hoja. Desconecte siempre la alimentación y deje que la hoja de sierra se pare completamente antes de levantar le empuña dura de la pieza de trabajo.
- Page 76 Español 10. Procedimientos de corte con moldura en vértice En la Fig. 33 se muestran los tipos de moldura en vértice con ángulos de 38° y 45°. Con respecto a las molduras en vértice típicas, consulte la Fig. 34. A Superficie superior Techo Techo Pared...
- Page 77 Español (1) Ajuste para cortar molduras en vértice a los posiciones 1 y 4 de la Fig. 34 (consulte la Fig. 36, incline la cabeza hacia la izquierda): 1 Gire la mesa giratoria hacia la derecha y ajuste el ángulo de ingletes de la forma siguiente: * Para molduras en vértice de tipo de 45°: 35.3°...
- Page 78 Español (2) El conj. de tornillo de carpintero para moldura en vértice (B) Conj. de tornillo de carpintero para moldura en vértice (accesorio opcional) puede montarse tanto en el tope-guía (accesorios opcionales) izquierdo (tope-guía (B)) como en el tope-guía derecho (tope- Perno de guía (A)).
- Page 79 Español Procedimiento de ajuste de la profundidad de corte: (1) Baje la cabeza del motor y gire el perno de ajuste en profundidad de 6mm con la mano (Donde la cabeza del perno de ajuste en profundidad de 6mm entra en contacto con la bisagra.) (2) Ajuste la profundidad de corte deseada regulando la distancia entre la hoja de sierra y la superficie de la base (consulte b de la Fig.
-
Page 80: Montaje Y Desmontaje De La Hoja De Sierra
Español 14. Forma de utilizar la bolsa para el polvo (Accesorio estándar) (1) Cuando la bolsa para el polvo esté llena de polvo, dicho polvo Bolsa para saldrá soplado de la bolsa para el polvo cuando gire la hoja de el polvo sierra. -
Page 81: Mantenimiento E Inspección
Español Seguro del eje Lllave de tubo Hoja de de 10 mm sierra Perno Apretar Arandela (D) Aflojar Perno Protector inferior Arandela (D) Arandela (D) Fig. 47-c Fig. 47-d (4) Levante el protector inferior y monte la hoja de sierra. ADVERTENCIA: Cuando monte la hoja de sierra, confirme que la marca del indicador de rotación de la misma y del sentido de giro de la caja de engranajes (consulte la Fig. - Page 82 Español Tapa del Línea límite de desgaste portaescobillas Ranura para el destornillador El número 21 indica las dos últimas cifras del 3/16" (5mm) número de código de la 15/32" (12mm) escobilla. Fig. 48 Fig. 49 3. Cómo tratar el motor (consulte la Fig. 1) El devanado del motor es el "corazón"...
-
Page 83: Servicio Y Reparaciones
(excepto el mantenimiento rutinario) deberán realizarse SOLAMENTE EN UN CENTRO DE REPARACIONES DE HERRAMIENTAS ELÉCTRICAS AUTORIZADO POR HITACHI. NOTA: Las especificaciones están sujetas a cambio sin previo aviso sin ninguna obligación por parte de... -
Page 84: Parts List
C8FSHE... - Page 85 C8FSHE...
- Page 86 C8FSHE...
- Page 87 C8FSHE ITEM ITEM PART NAME PART NAME Q'TY Q'TY MACHINE SCREW (W/WASHERS) M4 × 12 SPACE LINK CLAMP LEVER HINGE SHAFT (A) BOLT (LEFT HAND) D10 BASE RUBBER SPECIAL WASHER O-RING (P-6) SET PIN STOPPER PIN ASS’Y O-RING (1AP-12) MACHINE SCREW M4 × 8 CLUTCH SCREW CLUTCH SPRING BOLT WASHER M4...
- Page 88 SEAL LOCK HEX. SOCKET HD. BOLT M5 × 10 GEAR CASE MACHINE SCREW M6 × 25 BALL BEARING 606ZZC2PS2L SPRING WASHER M6 WASHER M6 HITACHI PLATE BOLT (W/WASHER) M6 × 16 DUST GUIDE GUIDE HOLDER BOLT (LEFT HAND) W/WASHER M7 × 17.5 TCT SAW BLADE FLAT HD.
- Page 89 C8FSE...
- Page 90 C8FSE...
- Page 91 C8FSE...
- Page 92 BASE RUBBER MACHINE SCREW (W/WASHERS) M4 × SCALE (A) SEAL LOCK HEX. SOCKET HD. BOLT M5 CAUTION LABEL (A) GEAR CASE SLEEVE HITACHI PLATE × SPRING BOLT (W/WASHER) M6 × × SEAL LOCK HEX. SOCKET SET. SCREW M8 MACHINE SCREW M6 HINGE (A) ASS’Y...
- Page 93 C8FSE ITEM PART NAME Q'TY × BOLT (LEFT HAND) W/WASHER M7 17.5 TCT SAW BLADE × FLAT HD. SCREW M4 COVER LOWER GUARD RETURN SPRING SPINDLE ASS’Y BALL BEARING 6003VVCM BEARING HOLDER BALL BEARING 608VVC2PS2L WASHER (D) × MACHINE SCREW M5 SPRING WASHER M5 WASHER (G) BOX WRENCH 10MM...
- Page 96 Issued by Hitachi Koki Co., Ltd. Shinagawa Intercity Tower A, 15-1, Konan 2-chome, Minato-ku, Tokyo 108-6020, Japan Distributed by Hitachi Koki U.S.A., Ltd.
Need help?
Do you have a question about the C8FSE - 8-1/2" Sliding Compound Miter Saw and is the answer not in the manual?
Questions and answers
saw does not cut a true 45 degree on the left side. How do I adjust rhe angle
To adjust the angle for a true 45-degree cut on the left side of the Hitachi C8FSE 8-1/2" Sliding Compound Miter Saw:
1. Pull the set pin in the direction shown in Fig. 13-a.
2. Incline the motor head to the left until it reaches the 45° mark.
3. Use the 8 mm bolt (A) or (B) to fine-tune the bevel angle if needed.
4. To return to 0°, move the motor head back and return the set pin to its initial position as shown in Fig. 13-b.
This answer is automatically generated