Roland VS-2000 Owner's Manual
Digital studio workstation
Hide thumbs
Also See for VS-2000:
- Appendices (108 pages) ,
- Owner's manual addendum (88 pages) ,
- Manual (2 pages)
Table of Contents
Advertisement
Quick Links
Advertisement
Chapters
Table of Contents

Related Manuals for Roland VS-2000


Summary of Contents for Roland VS-2000
- Page 2 • Do not excessively twist or bend the power cord, specific instructions directing you to do so). Refer nor place heavy objects on it. Doing so can all servicing to your retailer, the nearest Roland damage the cord, producing severed elements Service Center, or an authorized Roland and short circuits.
- Page 3 CD player. The resulting sound may be of a adaptor from the outlet, and request servicing by level that could cause permanent hearing loss. your retailer, the nearest Roland Service Center, or Damage to speakers or other system components an authorized Roland distributor, as listed on the may result.
- Page 4 ......................115a • Install only the specified circuit board(s) (model no. VS8F-2/VS8F-3). Remove only the specified screws (Chapter 29)......................www.Roland.com Roland VS-2000 Owner’s Manual...
-
Page 5: Important Notes
Placement regret that it may not be possible to restore the data, and Roland assumes no liability concerning such loss of data. • Using the unit near power amplifiers (or other equipment containing large power transformers) may induce hum. -
Page 6: Additional Precautions
• Do not leave the unit in any environment subject to • Use a cable from Roland to make the connection. If using temperature extremes; for example, in a closed some other make of connection cable, please note the automobile in summer or outdoors during winter. - Page 7 • It is strictly restricted to eject tray using emergency eject hall during VS-2000 is operating (while the DISK indicator of VS-2000 or access indicator of built-in CD-RW drive is lit). • Remove any disc from the drive before powering up or down.
-
Page 8: About The License Agreement
Do not wipe along circumference. About the License Agreement • Do not use benzine, record cleaner spray or solvents of • The VS-2000 and its CD-R/RW capability are designed to any kind. allow you to reproduce material to which you have copyright, or material which the copyright owner has •... -
Page 9: Table Of Contents
Table of Contents Step-By-Step Instruction Finder 1—Welcome About this Manual ................................29 How the VS-2000 Owner’s Manual is Organized ....................29 Names ..................................30 Note, Tip, Glossary and Warning Icons ....................... 30 Other Documents in the VS-2000 Box .......................... 31 Getting More Help ................................ - Page 10 “With Me” ................................. 76 The VS-2000’s Built-It Tuner ............................79 Connecting the VS-2000 to a Computer Via USB ....................... 81 Caution when using USB storage mode ....................... 81 Establishing a connection to your computer (Entering USB Storage mode) ........... 82 Terminating the connection to your computer (Exiting USB Storage mode) ..........
- Page 11 What’s a Hard Drive? .............................. 93 How a VS-2000 Hard Drive Organizes Data ....................... 93 Preparing a Hard Drive for Use ..........................94 How Audio Is Recorded on a VS-2000 Hard Drive ....................94 How Recordings Are Played Back ..........................94 Random Access ................................ 94 What’s Pointer-Based Playback? ...........................
- Page 12 Parameter View ..............................164 Assorted CH EDIT Tools .............................. 166 The CH EDIT VIEW CpyPRM Button ......................... 166 The DYN and EQ Screen RESET Buttons ......................166 The FADER Button ..............................166 CH PARAMETERS Controls ............................167 www.Roland.com Roland VS-2000 Owner’s Manual...
- Page 13 First Things ................................194 Link the Destination Tracks For a Stereo Bounce ..................... 195 Routing Tracks for a Bounce ..........................195 Listening as You Bounce ............................198 Mixing the Bounce ..............................198 Performing the Bounce ............................199 Roland VS-2000 Owner’s Manual www.RolandUS.com...
- Page 14 The FX Return Parameter View Screen ....................... 231 Routing Effects to Tracks .............................. 232 Quick Routing an FX Return Channel ........................ 232 FX Return Routing on the EZ Routing VIEW Screen ..................233 Adding Effects to a Headphone Mix .......................... 234 www.Roland.com Roland VS-2000 Owner’s Manual...
- Page 15 COMP/EXP................................... 267 IMPORT ..................................269 EXCHANGE .................................. 270 ARRANGE ..................................270 NAME ..................................... 272 21—Working with the VS-2000 Outputs The VS-2000 Outputs ..............................273 Output Pairs ................................273 Analog Output Jacks ............................. 273 Digital Output Connectors ........................... 273 Output Signal Routing ..............................274 Bus Routing ................................
- Page 16 Working with a Sync Track ..........................295 Working with a Tempo Map ..........................296 Syncing an External Device to the VS-2000 ......................298 Syncing the VS-2000 to an External Device ......................299 Synchronizing the VS-2000 and Video Equipment ................... 301 Exchanging Digital Audio Data During Synchronization ................
- Page 17 Playing Back Automix Data ............................346 Editing Automix Data ..............................347 Automix Editing Concepts ........................... 347 Automix Editing Methods ............................ 348 Automix Editing Operations ..........................349 Micro-Editing Automix Data ..........................353 Automix and V-Link ..............................354 Roland VS-2000 Owner’s Manual www.RolandUS.com...
- Page 18 Installing a VS8F-2/VS8F-3 Effect Expansion Board ....................389 Installation de la carte d’extension d’effets (French language for Canadian Safety Standard) ......392 Replacing the VS-2000’s Battery ..........................395 Remplacement de la pile du VS-2000.fs (French language for Canadian Safety Standard) ....... 397 www.Roland.com Roland VS-2000 Owner’s Manual...
- Page 19 Recording Template .............................. 400 Bouncing Template ..............................401 Mixdown Template ............................... 402 Mastering Template ............................... 403 VS-2000 Tick Resolution Table ............................ 404 MIDI Channels and Control Change Maps ......................405 Automix Parameter List ............................... 408 V-Studio Song/VS-2000 Project Compatibility ......................410 Recording Mode Tables ............................
- Page 20 Table of Contents www.Roland.com Roland VS-2000 Owner’s Manual...
-
Page 21: Step-By-Step Instruction Finder
Selecting a Track Channel for Editing .........................139 Selecting an FX Return Channel for Editing .......................140 Selecting an Input Channel for Editing .......................139 To Reset a Channel’s Fader and Pan ........................140 Designating the Master Clock for Digital Audio Input .................136 Roland VS-2000 Owner’s Manual www.RolandUS.com... - Page 22 Selecting an Effect Patch ............................221 Setting Up an External Loop Effect ........................213 Setting Up an Internal Loop Effect ........................211 Using Microphone Modeling ..........................224 Using Speaker Modeling ............................224 Exporting Tracks as WAV Files ........................... 372 www.Roland.com Roland VS-2000 Owner’s Manual...
- Page 23 Burning Exported WAV Files to CD ........................374 Exporting Phrases as WAV Files ..........................373 Exporting Tracks as WAV Files ..........................372 Exporting a VS-2000 Project ..........................114 FX Busses Adjusting and FX or Aux Bus’s Master Level ....................205 Configuring an FX or Aux Bus from a CH EDIT VIEW Screen ...............206 Configuring an FX or Aux Bus from the MASTER EDIT Screen ..............206...
- Page 24 Changing Scenes via MIDI ............................ 286 Receiving SysEx Bulk Dump Data ........................289 Remote Control of the VS-2000 with Control Change Messages ..............286 Remote Control of the VS-2000 with SysEx Messages ..................285 Sending SysEx Bulk Dump Data .......................... 288 Setting Up a MIDI Metronome ..........................
- Page 25 Creating a New Project ............................103 Entering a Project Comment ..........................104 Erasing a Project ..............................107 Exporting a VS-2000 Project ..........................114 Importing a Song from an Earlier V-Studio ......................112 Loading a Project ..............................101 Locking and Un-Locking a Project on Your Hard Drive ..................104 Marking a Project ..............................101...
- Page 26 Generating a Sync Track from Markers ......................295 Recording a Sync Track from an External Device ..................... 295 Setting Up the VS-2000 as a Sync Slave ......................299 Setting Up the VS-2000 as the Sync Master ......................299 Shaping a Tempo Map By Hand .......................... 297 Shifting the Project Start Time ..........................
- Page 27 Using the Built-In Screen Saver ...........................378 Using the CH PARAMETERS Knobs ........................167 Using the RSS Pan Feature ...........................225 V-LINK Connecting the VS-2000 and the DV-7PR ......................302 Switching V-LINK Mode Off ..........................302 Switching V-LINK Mode On ..........................301 Viewing a CH EDIT Screen ............................147 Zooming In and Out on the Playlist ........................127...
- Page 28 Step-By-Step Instruction Finder www.Roland.com Roland VS-2000 Owner’s Manual...
-
Page 29: 1-Welcome
1—Welcome Congratulations on the purchase of your Roland VS-2000 Digital Studio Workstation. The VS-2000 will allow you to take your music—or any other kind of sound—from the first spark of inspiration to completed recording. Although the VS-2000 is simple to operate, the sheer number of tools it provides do require some introduction and explanation. -
Page 30: Names
VS-2000’s features work. We highly recommend purchasing an optional VS20-VGA and connecting a VGA monitor to your VS-2000—it makes the VS-2000 even easier and more fun to use. With a VGA monitor, you can perform most VS-2000 operations onscreen using a mouse. -
Page 31: Other Documents In The Vs-2000 Box
Call 323-890-3780 for more information about using our faxback system. Roland US Product Support If you need help from a real, live person, call the Roland US Product Support team at 323-890-3740, Extension 3741. Roland VS-2000 Owner’s Manual... - Page 32 1—Welcome www.Roland.com Roland VS-2000 Owner’s Manual...
-
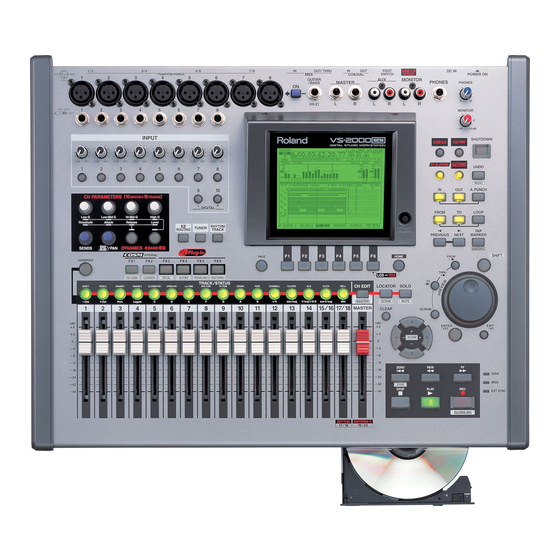
Page 33: 2-Getting Around
The Top Panel of the VS-2000 Analog Input Jacks The analog input jacks allow you to bring analog audio into the VS-2000’s 24-bit analog- to-digital (A/D) converters using balanced XLR connectors and balanced or unbalanced 1/4” connectors. We’ll explain how to correctly set an analog input’s level in “Setting Analog Input Levels”... - Page 34 This pair of analog line-level 1/4” output jacks carries the stereo MASTER bus signal to an external device. 6—AUX L/R Output Jacks Signals sent to Aux busses 1 and 2 are sent out of the VS-2000’s RCA-type L and R AUX output jacks, respectively. Each jack produces a line-level signal. 7—MONITOR L/R Output Jacks The VS-2000’s stereo MONITOR bus is sent out of the VS-2000’s RCA-type L and R AUX...
-
Page 35: Mixer Area
-∞. Mic level, line level, dBu 2—INPUT Buttons 1-10 The VS-2000 has 10 input channels that control the signals coming into its 10 inputs: • Input Channels 1-8—control signals coming into the analog XLR or 1/4” Inputs 1-8 (Page 33). - Page 36 FX bus, as described on Page 167. The RSS/PAN knob can control the channel’s stereo panning or the amount of its signal sent to the VS-2000’s RSS Pan 3D effect (Page 225). When the channel is: • not being sent to the RSS Pan effect—the knob controls the position of the channel’s signal in the MASTER bus main mix.
- Page 37 Press RHYTHM TRACK button to set up and turn on the VS-2000’s built-in drum/ percussion pattern generator, described on Page 305. 11—FX 1-6 Buttons The FX 1-6 buttons allow you to set up and control the VS-2000’s effects (AKA, “FX”). The VS-2000 can have up to six effect processors, called “FX 1-6.” •...
- Page 38 VS8F-3 Plug-In Effects Expansion Board—to use Roland and third-party plug-in effects. For an explanation of the VS-2000’s effects, see Chapter 5, starting on Page 87. When selecting effect patches for Effects 1 or 2—or any processor that’s using a VS8F-2 effect board—you can hold down SHIFT and press an FX button to jump to the type of...
-
Page 39: Display Area
2—Getting Around Display Area The LCD display and its buttons are central to everything you do on the VS-2000. The F buttons discussed in Chapter 4, on Page 68. 1—LCD Display The LCD display is your window to the VS-2000’s operations. In addition to providing you vital information, the display is central to all VS-2000 activity. - Page 40 HOME to select your main display. See Page 381 for details. 5—HOME Button Press the HOME button to return to the VS-2000’s Home screen, described in detail in Chapter 8, beginning on Page 123. Hold SHIFT and press the button to change what appears in the playlist area of the Home screen (Page 128).
-
Page 41: Control Area
Page 355. Mastering, CD-R/RW drive 3—SHUTDOWN Button To preserve your work the VS-2000 must be turned off by pressing this button for two seconds, as described on Page 85. 4—V-LINK Button Press the V-LINK button—so it lights—to configure the VS-2000 for use with a video editing or presentation system. - Page 42 AUTOMIX to view the AUTOMIX SETUP screen. See Chapter 26, starting on Page 341. 6—UNDO•REDO Button The VS-2000 allows you to reverse—or “undo”—up to 999 of your last recording or editing actions. Press the UNDO•REDO button to view the Undo dialog. After undoing any action, you can also “redo”...
- Page 43 Automix and snapshots are discussed in Chapter 26. Hold down CD-RW and press TAP MARKER•SNAPSHOT to place a CD track marker at the now line’s current location. Roland VS-2000 Owner’s Manual www.RolandUS.com...
-
Page 44: Navigation Tools
(Cursor)/ZOOM Buttons Press the cursor buttons to move the selection cursor (Page 67) around the VS-2000’s display. Also, hold down SHIFT and press the desired arrow button to zoom in and out on track data shown onscreen (Page 123): •... - Page 45 PREVIEW FROM and PREVIEW TO at the same time for the PREVIEW THRU feature. 6—SHIFT Button Many of the VS-2000’s buttons have a secondary function. When you hold SHIFT and press one of these buttons, the button performs the function shown in the label beneath the button.
- Page 46 Press STOP to halt playback at the now line’s current location—see Page 126. 14—PLAY Button Press PLAY to begin playback from the current location of the now line—see Page 126. To restart the VS-2000 during the Shutdown procedure (Page 85), hold down SHIFT and press PLAY. 15—REC•AUTOMIX REC Button Hold down REC•AUTOMIX REC and press PLAY to record audio (see Page 176).
-
Page 47: The Rear Panel Of The Vs-2000
Connect a ground cable here if necessary. 2—POWER Switch Use the POWER switch to turn the VS-2000 on. Use it to turn the VS-2000 off after performing a proper shutdown procedure. Don’t simply flip the POWER switch when you want to shut down the VS-2000—if you do this, data loss may occur. - Page 48 By default, this jack functions as a MIDI output jack—connect it to the MIDI input of any device to which you wish to send MIDI data from the VS-2000 (see Chapter 23, Page 283). You can also set the MIDI OUT/THRU jack to function as a THRU jack that passes along any MIDI data the VS-2000 receives from an external device (Page 284).
- Page 49 The VS-2000 contains a cooling fan that prevents it from overheating. The fan expels hot air through this exhaust vent. Be sure never to block the cooling fan exhaust vent. If hot air from the VS-2000 chassis isn’t allowed to escape through this vent, the VS-2000 may overheat and be damaged.
- Page 50 2—Getting Around www.Roland.com Roland VS-2000 Owner’s Manual...
-
Page 51: 3-Introduction To The Vs-2000
Input Jacks and Connectors Obviously, you’ve got to have a way to get sound into the VS-2000. Analog and digital sounds travel through the cables that bring them to the VS-2000 as electrical signals, called “input signals.” The VS-2000 provides jacks that recognize analog audio signals from microphones and from electric or electronic instruments. -
Page 52: The Mixing Console
40 Channels? In the VS-2000, each audio signal has its own set of controls with which you can manage and shape its sound. This set of controls is called a “channel.” The VS-2000’s mixer has 40 channels, all of which are always active and available:... - Page 53 The 10 input channels are found in the INPUT area. To view and adjust the settings for any of these channels, press its button. The 18 track channels are controlled by the 16 physical faders on the VS-2000. Track Channels 1-14 have their own individual channel strips. Tracks 15 and 16 share a strip, as do Tracks 17 and 18.
- Page 54 3—Introduction to the VS-2000 The Main Roles of the VS-2000 Mixer Two of the most important jobs the mixer performs in the VS-2000 are this: It helps you make an input signal sound the It helps you get the track to sound the way you way you want it to on its way to a track.
-
Page 55: The Internal Effects
Each of the VS-2000’s effects is created by subjecting an audio signal—remember, it’s just numbers while it’s inside the VS-2000—to a complex mathematical formula called an “algorithm.” The VS-2000 contains 36 algorithms. You’ll find a list of them in the VS-2000 Appendices booklet. -
Page 56: The Hard Disk Recorder
VS8F-2. A wide range of plug-ins created by some of today’s leading effect programmers are available for the VS8F-3 and the VS-2000. For a list of the plug-ins currently available for the VS8F-3, visit Roland’s Web site at www.RolandUS.com or www. Roland.com. -
Page 57: Rhythm Track
Output Jacks and Connectors You can burn your own audio CDs directly from the VS-2000 using its built-in CD-RW drive. However, you might also want to get audio out of the VS-2000 to: • send your MASTER mix to a pair of monitors so you can hear what you’re doing. -
Page 58: Projects
VS-2000 needs to do its job. For example, each recording you make uses up at least two events: one that tells the VS-2000 where on the hard drive the recording’s file starts, and one that tells it where it ends. Each project can contain roughly 30,000 events—when all of its events have been used up, the project is full, even... -
Page 59: About Direct Paths
VS-2000’s internal effects. About Direct Paths There’s another type of pathway available in the VS-2000 called a Direct path, or “DIR” for short. Unlike a bus, a Direct path can only carry one signal at a time. Each of the eight Direct paths is handy for routing a single signal to an internal effect or to an output on its way to an external device. -
Page 60: How Do I Get Good Levels
Watch the Meters The VS-2000 provides meters that let you view your signal levels at every stage in the project-creation process. The VS-2000’s various meters are described in detail in Chapter 8, which starts on Page 123. -
Page 61: The Importance Of Backing Up
The VS-2000 is a highly specialized computer designed for recording, but it is a computer, and all of your data is stored on its hard drive. As such, it’s subject to the same mishaps as any other computer. - Page 62 3—Introduction to the VS-2000 www.Roland.com Roland VS-2000 Owner’s Manual...
-
Page 63: 4-Setting Up And Basic Operations
Power You’ll need a standard AC power socket that supplies grounded AC power. If you’re going to listen to the VS-2000 through speakers, you’ll also need power for them and for their amplifier if it’s a separate component. A Way to Listen to the VS-2000 You can listen to—or “monitor”—the VS-2000 through speakers or by connecting... - Page 64 4—Setting Up and Basic Operations Install a VS20-VGA and Connect a PS/2 Mouse and ASCII Keyboard A mouse and ASCII keyboard can make operation of the VS-2000 even easier. When you install a VS20-VGA VGAMouse Expansion Board (purchased separately), the VS-2000 supports the use of a PS/2-type mouse and keyboard.
-
Page 65: Powering Up
(When you turn on the VS-2000 for the first time, this is the “U Wanna Play Me” demo or “with Me” demo.) As a project loads, the faders move to their last-saved positions and the project’s settings are restored. -
Page 66: Configuring The Vs-2000
ASCII Keyboard Parameters Parameter: What it sets: Typical setting is: PS/2 KEYBOARD Turns the keyboard on or off KEYBOARD TYPE Selects the nationality of the ASCII 101/104 (in USA); keyboard you’re using 106/109 (Japan) www.Roland.com Roland VS-2000 Owner’s Manual... -
Page 67: Setting The Vs-2000'S Clock
10. Press to select the TIME parameter. 11. Turn the Time/Value dial to select the current hour. The VS-2000 uses 24-hour time: Midnight is Hour 00, 1 am is 01, and 1 pm is Hour 13. 12. Press and turn the Time/Value dial to select the minute, and then second. -
Page 68: Switches
By holding down SHIFT and pressing the buttons, you can zoom in or out on track displays. See Page 44. If you’ve connected an ASCII keyboard to the VS-2000, you can often use its arrow keys instead of the buttons. -
Page 69: The Time/Value Dial
Tabs Press the PAGE button repeatedly to display each of the available pages. If you’ve connected an ASCII keyboard to the VS-2000, you can press its Tab key instead of the VS-2000’s PAGE button. Param 1, 2, 3 Screens In some VS-2000 menus, parameter pages are divided further into sub-pages called “Param1,”... -
Page 70: The Enter/Yes And Exit/No Buttons
If you prefer, you can always use the Enter key on your keyboard instead of ENTER/ YES, or the Esc key instead of EXIT/NO. The SHIFT Button Many of the VS-2000’s buttons perform more than one job—these Primary function buttons often have an upper label and a lower label that’s printed inside an outline box. - Page 71 Display Pop-Up Menu You can quickly jump to some of the VS-2000’s most important screens by clicking on the small rectangle in the upper left-hand corner of many of the VS-2000’s screens.
-
Page 72: Using An Ascii Keyboard
Letter and number keys enter names for projects, tracks, scenes, locators, etc. Space bar start, stop and continue project playback Arrow keys move the cursor on the VS-2000’s display SHIFT+arrow keys zoom in and out vertically and horizontally Home display the Home screen... -
Page 73: Undoing A Track Recording Or Editing Operation
Undo operation by performing a Redo. You can set the UTILITY menu’s UNDO MESSAGE parameter so that when you press UNDO, the VS-2000 instantly reverses the last operation without displaying the Undo list—see Page 380. -
Page 74: Naming
4—Setting Up and Basic Operations Naming You can assign names to a wide range of things in the VS-2000, such as: • projects (Page 103) • tracks (Page 272) • takes (Page 262) • phrases (Page 261) • effect patches (Page 223) •... -
Page 75: If You're Using Ds-Series Monitors
4—Setting Up and Basic Operations If You’re Using DS-Series Monitors If you’re using Roland DS-series Digital Reference Monitors, you’ll need to route the MONITOR bus to the digital output to which you’re connecting the monitors. (In the factory demo songs, this has already been taken care of.) When you create a new project, however, the MASTER stereo mix, not the stereo MONITOR bus, is routed to the COAXIAL OUT connector.) -
Page 76: Playing The Factory Demos
All rights reserved. Unauthorized use of this material for purposes other than private, personal enjoyment is a violation of applicable laws. No data for the music that is played will be output from the VS-2000’s MIDI OUT/ THRU jack. To save changes you’ve made to a demo, make a copy of the demo (Page 106). The demos loaded at the factory are write-protected (Page 104) and therefore not editable. - Page 77 Now line—The now line is a visual representation of the time location shown in the counters. It shows you where in the project you are right now. When data in the playlist crosses the now line, you hear it. Roland VS-2000 Owner’s Manual www.RolandUS.com...
- Page 78 3. If LOCATOR•SCENE isn’t lit green, press it so that it lights. Since Locator Bank 0 is already selected, we only need to select a locator bank. 4. Press TRACK/STATUS Button 1—the VS-2000 takes you to Locator 01, the first chorus.
-
Page 79: The Vs-2000'S Built-It Tuner
4—Setting Up and Basic Operations Recalling Scenes The VS-2000 can memorize up to 96 mix setups as “scenes.” Scenes allow you to: • store and recall multiple versions of a mix. • store and recall different versions of a project with different V-Tracks (Page 97). -
Page 80: Tuning To A Non-Standard Pitch
flat; if only the arrow on the right lights, it’s sharp. Tuning to a Non-Standard Pitch The VS-2000’s tuner allows you to tune instruments to a non-standard reference pitch, as long as that instrument is within a -23 cent-to-+23 cent range below or above concert pitch. -
Page 81: Connecting The Vs-2000 To A Computer Via Usb
4—Setting Up and Basic Operations Connecting the VS-2000 to a Computer Via USB You can exchange various files with a computer connected to the VS-2000 via a USB connection. You can: • Move recordings from the VS-2000 to the computer—VS-2000 recordings can be transferred to the computer and converted to WAV files or AIFF files for editing,... -
Page 82: Establishing A Connection To Your Computer (Entering Usb Storage Mode)
Subst command to assign virtual drives, there may be cases in which not all of the VS-2000’s internal hard disk (partitions) will be detected. • A certain amount of time may be required for the VS-2000’s internal hard disk to be detected. Establishing a connection to your computer (Entering USB Storage mode) VS-2000 is compatible with USB 2.0. - Page 83 4—Setting Up and Basic Operations Here’s how to start up USB Storage mode so that your computer and the VS-2000 will be on-line (able to communicate with each other). While USB Storage mode is active, all buttons and knobs except for F6 (EXIT) will be disabled.
-
Page 84: Terminating The Connection To Your Computer (Exiting Usb Storage Mode)
Terminating the connection to your computer (Exiting USB Storage mode) When the VS-2000 and your computer are on-line (i.e., in a state in which they can communicate with each other), you must not disconnect the USB cable or exit USB Storage mode;... -
Page 85: Turning Off The Vs-2000
VS-2000, flip its rear-panel POWER switch to its Off position. If you need to move the VS-2000 after shutting it down, wait 30 seconds or so to give its hard drive a chance to stop spinning in order to avoid damaging it. - Page 86 4—Setting Up and Basic Operations www.Roland.com Roland VS-2000 Owner’s Manual...
-
Page 87: 5-Understanding Effects
You can bring a signal into the VS-2000 that already uses an effect—from the effect processor built into a synthesizer, for example—but for our purposes, until you add a VS-2000 effect to the signal, we’ll consider it dry. -
Page 88: Insert Effects
The method you’ll choose depends on the type of effect you’re applying to your signal—the patch list in the VS-2000 Appendices shows the suggested use for each effect patch. We’ll describe how to set up insert and loop effects in Chapter 16 starting on Page 211. -
Page 89: Master Effects
CH EDIT screen (Page 139). Pre-Fader and Post-Fader Sends The VS-2000 allows you to send a signal to an FX bus from either of two places as the signal makes its way through a channel. You can send it: •... -
Page 90: External Effects
Here’s an example. If you’ve got only the factory-installed effect processing in your VS-2000 and are already using Effect 1 and 2, you don’t have any other internal effect processors available for a third effect. (This is why we recommend installing additional effect boards in your VS-2000.) - Page 91 Printing effects can also make a mix easier, since the printed effects will have already been dealt with, freeing you up to concentrate on other details during the often- complex mixing process. Roland VS-2000 Owner’s Manual www.RolandUS.com...
- Page 92 5—Understanding Effects www.Roland.com Roland VS-2000 Owner’s Manual...
-
Page 93: 6-Understanding The Hard Disk Recorder
“hard” drive—on which data is stored. A hard drive may also be referred to as a “disk drive.” In the VS-2000, your hard drive stores all of your recordings and project settings. A hard drive is a great way to store and quickly retrieve data, and provides for some amazing features, as we’ll see. -
Page 94: Preparing A Hard Drive For Use
6—Understanding the Hard Disk Recorder When we refer to a “drive” in the rest of the VS-2000 Owner’s Manual, we’ll be referring to a partition. This reflects that way the VS-2000’s software views partitions, and will make disk- and drive-related operations easier to explain and understand. (It’s also how partitions show up on your computer’s desktop when you use the VS-2000’s USB... -
Page 95: Non-Destructive, Pointer-Based Editing
This string of phrases is called a “Virtual Track,” or “V-Track” for short. From here on in the VS-2000 Owner’s Manual, we’ll refer to a string of phrases by its short name: “V-Track.”... - Page 96 The VS-2000 can also jump from one take to another during playback. In the illustration below, a phrase on one V-Track contains a great vocal performance except for the third verse.
-
Page 97: What Is A Vs-2000 Track
...then what’s a track? In the VS-2000, a track is a collection of 16 V-Tracks, any one of which can be selected at any given time. When a V-Track is selected, you can record on it or play it back. -
Page 98: Track Editing Basics
The following sections provide just a brief introduction to the editing of tracks in the VS-2000. We’ll discuss it in detail beginning in Chapter 18, which starts on Page 235. There are two basic ways you can edit the contents of a track: •... -
Page 99: 7-Project And Drive Operations
Working with the PROJECT LIST You can scroll through the items in the project list by pressing As noted in “How a VS-2000 Hard Drive Organizes Data” on Page 93, each hard drive partition is called a “drive.” The project list shows all your available drives. Your internal drives are labeled as “IDE:(partition number).”... -
Page 100: About "Store Current?" Messages
VS-2000’s memory that holds the currently loaded project—after the operation is complete, the VS-2000 re-loads the project from your hard drive. If you’ve made any changes to the project since you last stored it, press ENTER/YES in response to this message to ensure that those changes aren’t lost. -
Page 101: Project Operations
VS-2000. The SELECT button doesn’t look quite like any other VS-2000 menu button, and it acts differently, too. It’s the only button that performs its action as soon as you press it. All of the other buttons merely display the corresponding operation’s screens. -
Page 102: New
The VS-2000 Owner’s Manual assumes that your projects use the 16-bit recording mode, except as noted. Audio captured by a digital recorder such as the VS-2000 is translated into a a series of number strings for storage on your hard drive. “Numbers” equals “digits”; hence “digital recording.”... -
Page 103: Name
8. Press F5 (OK). The VS-2000 displays: 9. To proceed, press ENTER/YES, or press EXIT/NO to cancel the operation. The VS-2000 asks if you want to store the current project before creating and loading the new one. 10. Press ENTER/YES to save any changes you’ve made to the currently loaded project, or press EXIT/NO to create and load the new project without saving the old one. -
Page 104: Protect
Locked 4. Press F4 (PROTEC). Depending on whether the project is Unlocked currently locked or not, the VS-2000 asks if you’re sure you want to: ...lock the project..unlock the project. 5. Press ENTER/YES to proceed, or EXIT/NO to cancel the operation. -
Page 105: Optimize
7—Project and Drive Operations OPTIMIZE As described in “UNDO and REDO” on Page 72, the VS-2000 retains all of your recorded data so that you can undo up to 999 of your most recent actions. A project can grow quite large with audio you don’t plan to use. -
Page 106: Copy
7. Set Erase all Projects to: • Off—if you want to add what you’re copying to the list of projects already on the destination drive. • On—if you want to clear the drive so it contains only what you’re copying. www.Roland.com Roland VS-2000 Owner’s Manual... -
Page 107: Erase
EXIT/NO to simply begin copying. 11. If Erase all Projects is on, the VS-2000 asks if you’re sure you want to erase the destination drive first—press ENTER/YES to do so, or EXIT/NO to cancel copying. -
Page 108: Splitting A Project
8. When you’ve selected all of the desired V-Tracks, press F5 (OK). The VS-2000 asks: 9. Press ENTER/YES to proceed, or EXIT/NO to cancel the operation. 10. If you pressed ENTER/YES, the VS-2000 asks if you want to save recent changes to the currently loaded project before proceeding. -
Page 109: Combine
7. If you pressed ENTER/YES, the VS-2000 asks again if you’re really sure: 8. Press ENTER/YES to proceed, or EXIT/NO to cancel—the VS-2000 asks if you want to save any changes you’ve made to the currently loaded project before proceeding. -
Page 110: Backup
For details on the messages that may appear, see Page 368. 10. Press ENTER/YES to erase the CD-RW, or EXIT/NO to cancel the backup. If a project is too large to fit on the medium you’re using, the VS-2000 asks you for additional media as needed. -
Page 111: Recover
11. Set the desired CD drive speed. Try MAX. If you experience problems recovering the data, try a lower speed. 12. Press F5 (OK). The VS-2000 asks if you want to save the currently loaded project. 13. Press ENTER/YES to save the loaded project before the recovery operation, or press EXIT/NO to go straight to recovery. -
Page 112: Import
14. Press ENTER/YES to continue the recovery, or EXIT/NO to cancel. 15. If Erase All Projects is on, the VS-2000 asks if you’re sure you want to erase the destination drive first—press ENTER/YES to do so, or EXIT/NO to cancel recovery. -
Page 113: Export
The VS-2000 imports the selected song data. Depending on the amount of data, and the amount of conversion required, this can take a while. EXPORT You can export the current project from the VS-2000 so that it can be played on the: • VS-880/880EX •... -
Page 114: Exporting A Vs-2000 Project
Eight project tracks are exported. You can select Tracks 1-8, 9-16 or 17-18. • Only V-Tracks 1-8 are exported to VS-880 songs—to export data on V-Tracks 9-16, copy the data to V-Tracks 1-8. In VS-880EX songs, the VS-2000’s V-Tracks 1-8 are exported to Bank A, and V-Tracks 9-16 to Bank B. •... -
Page 115: Drive Operations
For details on the messages that may appear, see Page 368. 10. If a project is too large to fit on the medium you’re using, the VS-2000 asks you for additional media as needed. Insert the requested media and press ENTER/YES, or press EXIT/NO to abort the procedure. - Page 116 • the VS-2000’s transport begins to feel sluggish as you navigate a project. What Can Be Done About a Fragmented Hard Drive? You can de-fragment—or “defrag”—your hard drive using the same three steps we listed in “How Can I Prevent Fragmentation?”...
-
Page 117: Format Drive
“How Can I Prevent Fragmentation?” on Page 116. • when you’re de-fragging a hard drive after backing up all of the projects on it. When a hard drive is formatted for use with the VS-2000, it can’t be used by another device. What Gets Formatted When you format a drive, all of its contents are erased. - Page 118 This can take a while (30 minutes or more), but it’s a good thing to do periodically. 8. Press F5 (OK). The VS-2000 asks if you’re sure you want to format the hard drive: Selected drive 9.
-
Page 119: Clear Partition
This can take a while, but it’s a good thing to do periodically. 6. Press F5 (OK). The VS-2000 asks if you’re sure you want to clear selected drive: Selected drive 7. Press ENTER/YES to clear the drive, or EXIT/NO to cancel. -
Page 120: Drive Check
Time/Value dial to view them. Items marked with “OK” have no problems. Here’s what some of the terms in the report mean: • Cluster—the smallest chunk of disk data the VS-2000 reads and writes. • Cross link (X-Link)—a case in which audio from one project is mistakenly referenced by another. -
Page 121: Running Drive Check
7—Project and Drive Operations When you begin a Drive Check repair, the VS-2000 warns you that you’ll lose data. The fact is that the data you’ll lose is no longer any good anyway, as evidenced by the fact that you’ve been experiencing problems and that Drive Check has targeted the data for deletion. - Page 122 7—Project and Drive Operations www.Roland.com Roland VS-2000 Owner’s Manual...
-
Page 123: 8-The Home Screen
10. Clock 11. Calendar Numbers 1-3 and 8-11 in the above illustration appear on a variety of VS-2000 screens. The descriptions in the following pages explain how they work. “MST” at the bottom of the playlist stands for “mastering tracks.” We’ll explain mastering tracks in “About Mastering Tracks”... -
Page 124: Current Channel Display
The meters display can be replaced by the fader/pan display, described on Page 131. If the meters display isn’t visible, press PAGE on the VS-2000 until the meter switches appear, and then select the desired meters’ display view (Page 128). - Page 125 8—The Home Screen How the VS-2000 Meters Show Signals Levels are shown on the VS-2000’s display in a This signal’s This signal’s row of vertically oriented meters. Each meter’s volume is volume is signal is shown as a thick black bar that grows...
-
Page 126: Position Bar
Each track in the tracks display is a list of the phrases When you zoom out, some presented from left to right in the order in which they’ll track numbers are shown play. as dots in order to fit them all on the display. www.Roland.com Roland VS-2000 Owner’s Manual... -
Page 127: Zooming In And Out On The Playlist
Scroll to the type of zooming you want to set and click. Choose the number of Choose the desired power of tracks to be displayed horizontal magnification In either dialog, you can select the desired magnification by scrolling to it and clicking. Roland VS-2000 Owner’s Manual www.RolandUS.com... -
Page 128: Meter Switches
MONITOR and MASTER bus levels. 1. Input Channels 1-10 2. Stereo MONITOR bus 3. Stereo MASTER bus When you’re recording a track, the level setting of the input channel that’s routed to the track sets the track’s recording level. www.Roland.com Roland VS-2000 Owner’s Manual... - Page 129 2. Direct Paths 1-8 3. Stereo MONITOR bus 4. Stereo MASTER bus • F5 (OUTPUT)—to show the levels of signals at the VS-2000 analog and digital output jacks and connectors. 1. Stereo MASTER bus 2. Stereo Aux Output B 3. Stereo MONITOR bus 4.
-
Page 130: Input Peak Indicators
Beats Ticks At the top of many of the VS-2000’s screens is the current time location display, which consists of three project time counters. Each shows you the now line’s current location in the project using its own form of time measurement:... -
Page 131: Clock, Calendar
In order for the calendar and clock to accurately show the current date and time, you must set the VS-2000’s system clock. See Page 67. You can replace the calendar and clock with a readout that shows you how much free space remains on the selected drive. -
Page 132: About The Id Buttons
When you’ve pressed PAGE until ID PL, ID IN, ID TR, ID Mlt and ID ChV appear above the F buttons, you can use the buttons to select what’s shown on the Info Display when an optional external VGA monitor is connected and designated as the main display. www.Roland.com Roland VS-2000 Owner’s Manual... -
Page 133: 9-Working With Input Signals
After the connection’s been made, bring the MASTER fader back to its 0 marking. When connecting an instrument, mic or other sound-producing device to the VS-2000, connect one end of the device’s cable into the device, and the plug on its other end into the appropriate VS-2000 jack. -
Page 134: Phantom Power
(This instrument’s phantom power: 48 V DC, 10 mA Max) Phantom power is supplied to the VS-2000’s XLR jacks in odd/even pairs, so if you only need phantom power on one jack, make sure not to connect another mic to its odd/even partner. -
Page 135: Digital Input Signals
VS-2000. If the device uses the same or a lower bit depth, the VS-2000 will record the audio as is, at the project’s selected bit depth. -
Page 136: Designating The Master Clock For Digital Audio Input
Make sure that the device designated as the master clock source uses its internal clock as its timing reference. If the VS-2000 is the master, set its MASTER CLOCK to INT. To learn how to configure each external digital device, consult its documentation. -
Page 137: Recording Digital Input Signals
9—Working with Input Signals Recording Digital Input Signals Before you can record signals received by the VS-2000’s digital COAXIAL IN jack, you have to enable digital recording on the VS-2000. Here’s how: 1. Hold down SHIFT and press F4. 2. Press PAGE until “SYSTEM” appears above F1. - Page 138 9—Working with Input Signals www.Roland.com Roland VS-2000 Owner’s Manual...
-
Page 139: 10-Using The Digital Mixer
VS-2000’s built-in digital mixer, see Chapter 3. Channel Selection As described on Page 52, all of the VS-2000’s 40 mixer channels are active and available at all times. Each of these sets of channels has its own area on the VS-2000. -
Page 140: Selecting An Fx Return Channel For Editing
When you load a project, the VS-2000 offers you a choice of how the faders take control of the track channels’ stored levels. See “FADER MATCH” on Page 380. -
Page 141: Muting And Soloing Channel Signals
final mix. You can fade out a mix using the MASTER fader. Automix can memorize a fadeout you perform using the MASTER fader. The VS-2000’s level meters tell you how loud or soft your overall mix level is. To learn about metering in the VS-2000, see “Meters Display” on Page 124. -
Page 142: Solo Mode
To un-solo all currently soloed channels, hold down CLEAR and press SOLO•MUTE. Scenes The VS-2000 allows you to save a wide range of current mixer settings as a “scene.” Each project can contain up to 96 scenes. A scene contains all of your current: •... -
Page 143: Basic Scene Operations
To leave Scene more manually, press LOCATOR•SCENE so its light turns off. After you store or recall a scene, the VS-2000 returns the TRACK/STATUS buttons to their normal job of controlling hard disk recorder tracks (Page 176)—this is intended to Roland VS-2000 Owner’s Manual... -
Page 144: Editing Scenes
Save a new scene by selecting a blank location in the list and pressing F3 (STORE). • Press F4 (RECALL) to recall the selected scene. • Press F5 (Ch Sel) to protect channels when scenes are recalled—see Page 145. 5. Press F6 (EXIT) when you’re done to confirm your changes. www.Roland.com Roland VS-2000 Owner’s Manual... -
Page 145: Scenes In Safe Mode
“Load Scene?” appears in the window. 4. Press ENTER/YES to recall the selected scene and close the window, or just press EXIT/NO twice to leave the window without recalling a scene. Roland VS-2000 Owner’s Manual www.RolandUS.com... -
Page 146: Resetting Mixer Parameters
6. If you’re sure you want to proceed, press ENTER/YES. To cancel the operation, press EXIT/NO. The reset procedure does not initialize all of the mixer’s settings. For example, it doesn’t delete your scenes, or reset the LOCATOR/SCENE TYPE parameter described on Page 145. www.Roland.com Roland VS-2000 Owner’s Manual... -
Page 147: 11-Input And Track Channel Tools
Changing CH EDIT Screens 1. To view a specific CH EDIT screen whose F button is currently: • visible—press the screen’s F button. • hidden—press PAGE, and then press the screen’s F button. Roland VS-2000 Owner’s Manual www.RolandUS.com... -
Page 148: Introduction To The Ch Edit Screens
The remaining F buttons activate CH EDIT tools available on various CH EDIT screens. We’ll describe the role of F5 on the VIEW, DYN and EQ screens in the following sections. F6 turns on the parameter view, described on Page 164. www.Roland.com Roland VS-2000 Owner’s Manual... -
Page 149: The Ch Edit Screens
V-Track—if it’s thick, there is. Turn the Time/Value dial to select the desired V-Track and press ENTER/YES. You can also select a track channel’s V-Track with a connected mouse using the Home screen’s V-Track map. See Page 127. Roland VS-2000 Owner’s Manual www.RolandUS.com... - Page 150 The SENDS Knob switch—When this parameter is checkmarked, it designates the send to be controlled by the CH PARAMETERS SENDS knob (Page 167). The VS-2000 remembers the setting for each channel, so whenever you select a channel, the SENDS knob takes over control of the desired FX or AUX send.
- Page 151 VS-2000’s front panel using the SENDS knob—see Page 167. About FX and AUX Send Configuration In the VS-2000, each FX and Aux bus can accept pre-fader signals from all input and track channels or post-fader signals from the input and track channels—not a mix of both.
- Page 152 As shipped from the factory, all of the VS-2000’s input and track channels are sent into the MASTER mix. You may want to remove the input channels from the mix during recording so that you’re not bothered by unwanted input channel signals as you play...
- Page 153 You can control the level of the track-channel fader groups using the track channel strip faders—see Page 140. If you’ve connected a VGA to your VS-2000, you can also assign channels to groups on the fader groups’ multi-channel view page.
- Page 154 This can be handy when you want to simultaneously adjust the levels of two related channels. When you link two channels’ FADER values, the VS-2000 sets them both to 0dB, or to their last linked setting. When you un-link the values, they’re reset to 0dB.
-
Page 155: Roland Vs-2000 Owner's Manual Www.rolandus.com
To do this, cursor to “NRM” and turn the Time/Value dial to select RSS. If RSS Pan is not yet enabled, the VS-2000 will ask if you’d like to go to the screen on which it can be turned on. Press ENTER/YES to do so, or CANCEL/NO cancel the operation. -
Page 156: The Dyn Screen
DYN screen’s RESET button, see Page 166. Each VS-2000 input and track channel has its own dynamics processor that can act as a compressor or expander for the channel’s signal. What is Dynamics Processing? A dynamics processor—as its name suggests—shapes a signal by responding to changes in its level. - Page 157 As you look for the right compression ratio, start out with a lower value and gradually increase the Ratio setting until you like what you hear. If the sound of the processor turning on and off is too obvious—this is called “pumping”—lower the Ratio setting. Roland VS-2000 Owner’s Manual www.RolandUS.com...
- Page 158 Attack to a higher, longer value. Adjust the setting of the Attack parameter to help soften the audible pumping that can occur with a high Ratio value. www.Roland.com Roland VS-2000 Owner’s Manual...
- Page 159 This lets you impose a new, totally different set of dynamic changes on the channel’s signal. For example, a KeyIn percussion sound can make the channel’s signal level go up and down in rhythm. Roland VS-2000 Owner’s Manual www.RolandUS.com...
-
Page 160: The Eq Screen
Page 166. Knob labels Each VS-2000 input and track channel has its own EQ. What Is EQ? A sound wave is a repeating change in air pressure that your ear perceives as a sound. The sound wave moves between its least amount of air pressure and its greatest many, many times per second, and very quickly. - Page 161 Hi-Mid Band EQ gain control, frequency selector and Q control High Band EQ gain control and frequency selector The channel signal flows through the EQ screen from top to bottom in the chart above, or left-to-right onscreen. Roland VS-2000 Owner’s Manual www.RolandUS.com...
- Page 162 The low band EQ is a shelving-type EQ that affects the level of all frequencies below the selected frequency, as well as a narrow range of frequencies slightly above it. As such, it requires no Q setting. www.Roland.com Roland VS-2000 Owner’s Manual...
-
Page 163: The Fx Ins Screen
Q setting. The FX Ins Screen The FX Ins (“Effect Insert”) screen is discussed in Chapter 16—see Page 215. The RSSPan Screen The RSSPan screen is described in Chapter 16, on Page 225. Roland VS-2000 Owner’s Manual www.RolandUS.com... -
Page 164: The Ch Edit Assign Screen
To activate the Parameter View, press F6 (PRM.V) from any CH EDIT screen except a tracks channel’s ASSIGN screen. Also, on a track channel’s CH EDIT VIEW screen, F6 (PRM.V) is unavailable when the STATUS parameter is selected—choose another parameter to activate F6 (PRM.V). www.Roland.com Roland VS-2000 Owner’s Manual... - Page 165 Hold down SHIFT and press to view the previous or next parameter’s Parameter View screen, respectively. Hold down SHIFT and press to view the currently settings’ Parameter View screen for the previous or next channel, respectively. Roland VS-2000 Owner’s Manual www.RolandUS.com...
-
Page 166: Assorted Ch Edit Tools
The FADER Button To quickly change on channel’s level while on a CH EDIT screen, press PAGE to display the second tabbed layer and then press F2 (FADER)—the cursor jumps to the channel’s FADER parameter. www.Roland.com Roland VS-2000 Owner’s Manual... -
Page 167: Ch Parameters Controls
11—Input and Track Channel Tools CH PARAMETERS Controls The CH PARAMETERS area of the VS-2000’s front panel provides a fast way to adjust important settings for the currently selected channel while the channel’s CH EDIT parameters are being displayed. Using the CH PARAMETERS controls, you can adjust: •... - Page 168 11—Input and Track Channel Tools www.Roland.com Roland VS-2000 Owner’s Manual...
-
Page 169: 12-Working With Input Channels
VS-2000’s hard disk recorder—the most common destination for an input channel’s signal in the VS-2000. You can route as many signals to the same track as you want. Once the signal’s been routed to a track, it can be recorded on the track. -
Page 170: Routing An Input Channel Signal To A Track
When you’ve routed a signal to a track for recording, the signal can be recorded on the track’s currently selected V-Track. To learn more about V-Tracks, see Page 95. You can route an input signal to a track in any of three ways in the VS-2000: •... - Page 171 7. Repeat Steps 3 and 4 to select the input channel signal you want to send to the track. 8. When you’ve finished, press F6 (EXIT) to confirm your routing and leave Quick Routing mode. Roland VS-2000 Owner’s Manual www.RolandUS.com...
-
Page 172: Input Signal Routing On The Ez Routing View Screen
Input Channel Signals and the Main Mix Removing Input Channel Signals from the Main Mix When you create a new project, the VS-2000’s input channels are routed into the MASTER mix to help ensure that you can easily hear their signals even before you route them to tracks. -
Page 173: Adding An Input Channel's Signal To The Main Mix
The idea is to remove the input channel’s signal from the MASTER mix. This method spares you from having to disconnect the input signal’s source from the VS-2000 or lowering its input channel fader in case you’ll want to send it back into the mix later on. - Page 174 12—Working with Input Channels www.Roland.com Roland VS-2000 Owner’s Manual...
-
Page 175: 13-Operating The Hard Disk Recorder
Disk Recorder” on Page 56. To learn the fundamentals of how it records and plays back audio—and how its built-in hard disk works—see Chapter 6, starting on Page 93. You can reverse any recording action using the VS-2000’s Undo and Redo features, described on Page 72. -
Page 176: The Track/Status Buttons
STATUS button On the VS-2000, the TRACK/STATUS buttons perform a host of tasks. In this chapter, we’ll discuss their primary use. In order to the TRACK/STATUS buttons to behave as described in this chapter, the CH EDIT, LOCATOR•SCENE and SOLO•MUTE lights must be unlit, and the VS-2000’s Rhythm Track and Harmony features must... -
Page 177: Recording A New Track
REW to go to the beginning of the project’s recorded audio. 5. Press PLAY to begin playback. 6. Press STOP to halt playback. You can begin playback from anywhere in the project by placing the now line at the desired location and hitting PLAY. Roland VS-2000 Owner’s Manual www.RolandUS.com... -
Page 178: Moving Through A Project
(see Page 190.) To use the Loop feature, you must first tell the VS-2000 where you want the looped section of the project to begin and where you want it to end by setting loop FROM and TO points, respectively. -
Page 179: Clearing Loop Points
You can move the now line to an FROM or TO location by selecting FROM or TO on the screen and clicking F4 (GO TO). 2. Press EXIT when you’re done to confirm your changes. Roland VS-2000 Owner’s Manual www.RolandUS.com... -
Page 180: Preview
1. Move the now line to a location shortly before the section you’ll be looping. 2. Press LOOP so it’s lit. 3. Press PLAY—when the VS-2000 reaches the LOOP TO point, it starts over again at the LOOP FROM point, playing the looped section over and over again. -
Page 181: Scrub
9. Press PREVIEW TO. The VS-2000 previews the audio just before the now line, and sets Scrub so that it plays a tiny chunk of audio leading up to the now line. -
Page 182: Locators
6. Press F6 (EXIT) to confirm your changes. Locators The VS-2000 can memorize up to 96 locations in a project, allowing you to jump to any one of them instantly. This makes it easy to quickly get from place to place without having to slow down to hunt for the desired location. -
Page 183: Storing A Locator
“Changing Locator Banks” and press its TRACK/STATUS button in the selected bank. After the locator is recalled, the VS-2000 remains Locator mode. You can change this behavior if you wish—see “Remaining In Locator Mode” on Page 184. -
Page 184: Other Locator Operations
5. Press F6 (EXIT) when you’re done to confirm your changes. Remaining In Locator Mode You can set the VS-2000 so that it remains in Scene mode after recalling and storing scenes, or so it automatically returns to Locator mode after either action. -
Page 185: Turning On Locator Safe Mode
2. Turn the Time/Value dial to select the desired locator. 3. Press CLEAR—“Clear Locator?” appears. 4. Press ENTER/YES to clear the selected locator and close the window, or just press EXIT/NO three times to leave the window without clearing the locator. Roland VS-2000 Owner’s Manual www.RolandUS.com... -
Page 186: Markers
And with 1,000 markers, you won’t use them all up as quickly as the 100 locators in a project. When you create an audio CD on the VS-2000 (Chapter 27), you’ll place special CD track markers to identify the selections on the CD. -
Page 187: Moving The Now Line To A Marker
4. Turn the Time/Value dial to select another marker if you want to. 5. Press ENTER/YES to clear the selected marker. 6. Press EXIT/NO to leave the Clear Marker window. 7. Press EXIT/NO to close the Locate to Marker window. Roland VS-2000 Owner’s Manual www.RolandUS.com... -
Page 188: Editing Markers
When you clear all markers, every marker in the project is deleted, including all CD track markers. 1. Hold down SHIFT and CLEAR and press TAP. The VS-2000 asks if you’re sure you want to delete all of the project’s markers. -
Page 189: Monitoring During Punching
4. When you reach the place at which you want recording to start, press REC— recording begins and the REC button lights solid red. 5. To punch out, press REC again when you reach the point at which you want recording to end. Roland VS-2000 Owner’s Manual www.RolandUS.com... -
Page 190: Auto-Punching
An auto-punch begins with the placement of Auto Punch IN and OUT points that tell the VS-2000 where you want to punch in and where you want to punch out. There are a few ways different ways you can set these—use whichever method you prefer. -
Page 191: Setting Auto Punch Points Using Locators
You can move the now line to an IN or OUT location by selecting IN or OUT on the screen and clicking F4 (GO TO). 2. Press EXIT when you’re done to confirm your changes. Roland VS-2000 Owner’s Manual www.RolandUS.com... -
Page 192: Performing An Auto Punch
TRACK/STATUS and REC buttons light solidly red. When the now line gets to the punch-out point, recording automatically stops and the TRACK/STATUS and REC buttons resume flashing. 7. To turn Auto Punch off, press A.PUNCH so it’s not lit. www.Roland.com Roland VS-2000 Owner’s Manual... -
Page 193: 14-Working With Track Channels
14—Working with Track Channels The VS-2000’s track channels control the sound of its hard disk recorder’s tracks. When you’re recording a track, you listen to its source signal through the corresponding track channel to ensure you’re hearing what the hard disk recorder is capturing. When you play back a track, you play it through its track channel. -
Page 194: The Mechanics Of Bouncing
14—Working with Track Channels The Mechanics of Bouncing For most of the things you do with tracks in the VS-2000, you can think of a track in the hard disk recorder and its corresponding track channel as pretty much the same thing—the track plays through its track channel, which provides the parameters that... -
Page 195: Link The Destination Tracks For A Stereo Bounce
Step 1. When the TRACK/STATUS buttons are red, their tracks may be selected as source tracks. If any tracks are already routed to the destination track, their TRACK/STATUS buttons light solidly—all other tracks’ TRACK/STATUS buttons flash. Roland VS-2000 Owner’s Manual www.RolandUS.com... - Page 196 2. If the ROUTING VIEW screen doesn’t appear, and you see “VIEW” above F1, press F1 (VIEW). If you don’t see “VIEW” above F1, press PAGE and then F1 (VIEW). 3. Use and/or to select a source track channel’s output along the upper edge of the TRACK MIXER block. www.Roland.com Roland VS-2000 Owner’s Manual...
- Page 197 We’ve connected a combination of mono and stereo source track channels to our stereo destination linked tracks. Source Tracks 1 and 12 are mono track channels, and Track Channels 17 and 18 are linked in stereo. Roland VS-2000 Owner’s Manual www.RolandUS.com...
-
Page 198: Listening As You Bounce
By listening only to the destination track channel(s), you can be confident that what you hear is what you’ll get in the final recorded bounce. The VS-2000 helps you monitor a bounce properly by removing the source track channels from the MASTER mix when you arm your destination track or linked tracks for recording. -
Page 199: Performing The Bounce
You can punch in and out during bouncing just as you can during any other recording. Punching’s described on Page 188. Don’t erase you’re original source tracks—that way, you’ll be able to redo the bounce at a later time if you need to. Roland VS-2000 Owner’s Manual www.RolandUS.com... -
Page 200: Sending A Track Channel's Signal To A Direct Path
final mix. While a complete discussion of how to mix is far beyond the scope of the VS-2000 Owner’s Manual, here’s a very brief overview of the process to get you started, since track channel signals—the sound of your recorded tracks—are the main ingredient of most VS-2000 mixes. - Page 201 CD (see Chapter 27). • sent to any pair of the VS-2000’s analog or digital outputs for recording onto an external analog or digital device, respectively. Roland VS-2000 Owner’s Manual...
- Page 202 14—Working with Track Channels www.Roland.com Roland VS-2000 Owner’s Manual...
-
Page 203: 15-Fx And Aux Busses And Direct Paths
In this chapter we’ll explain all three, and then offer some guidance on how to use them. It’s likely you’ll use FX busses most often, since the VS-2000’s internal effects are so important in working on the VS-2000. Here’s an overview of the features each of these pathways offers. -
Page 204: When Would You Use An Fx Bus
Linked FX busses are handy when you’re sending signals to an internal effect that has discreet left and right signal paths (see the VS-2000 Appendices for the structures of its internal effects.) This is also a great tool when you’re using two Aux busses to create a stereo headphone mix for performers—when the busses are linked, you’ll have full... -
Page 205: Fx And Aux Bus Levels
AUX send controls to solve a problem, you can simply adjust the bus’s master level fader, as described below. The VS-2000’s meters display allows you to keep an eye on your overall FX and Aux bus levels—Direct path levels appear on the same display. -
Page 206: Configuring An Fx Or Aux Bus
4. Select Pre or Pst for the POSITION parameter, as desired. 5. Turn BUS LINK on or off as desired. When FX or Aux busses are linked, their controls on the CH EDIT screen change—see Page 151 for details. www.Roland.com Roland VS-2000 Owner’s Manual... -
Page 207: Creating A Headphone Mix Using An Aux Bus
You can send performers’ live input signals along with already recorded tracks to any headphone mix you create. Since you have two Aux busses in the VS-2000, you can create two separate mono, or one stereo, headphone mixes for your performers. -
Page 208: When Would You Use A Direct Path
Direct path, or to multiple Direct paths. Metering Direct Path Levels You can see each Direct path’s level on in the AUXDIR meters on the VS-2000’s home page. See Page 205 to learn how to view these meters. -
Page 209: Configuring A Direct Path
Pre-Pst 3. Adjust the final level parameter at the bottom of its control switch strip. channel The SRC readout shows the input or track channel signal Final level control currently assigned to the Direct path. Roland VS-2000 Owner’s Manual www.RolandUS.com... - Page 210 15—FX and Aux Busses and Direct Paths www.Roland.com Roland VS-2000 Owner’s Manual...
-
Page 211: 16-Using Effects
• save effects. For the basics on the VS-2000’s effects and why they’re useful, see Chapters 3 and 5. Using Loop Effects Dry signal When you want to add reverb or a delay to your input, track or FX Copy of dry signal return signals, use a loop effect. - Page 212 You can link odd/even FX busses to create a stereo send into an effect. Check out the algorithm diagram in the VS-2000 Appendices for the effect you want to use to see if accepts stereo input signals. If it doesn’t, use a single unlinked FX bus. Most VS-2000 effects use a mono input signal.
-
Page 213: Setting Up An External Loop Effect
Send Pan Return the Output of the Effect The output of each of the six internal effects has its own channel in the VS-2000’s digital mixer. These are the six FX return channels, which are the subject of Chapter 17, starting on Page 227. -
Page 214: Inserting An Effect
The signal exits the insert effect and resumes its normal signal flow through the channel just before the CH EDIT ATT parameter and the channel EQ so you can EQ the effected signal if you wish to. www.Roland.com Roland VS-2000 Owner’s Manual... -
Page 215: Inserting Effects On An Input Or Track Channel
Snd control. You can also adjust the Rtn level of the signal as it leaves the effect. With a single insert effect, you’ll typically adjust these settings only if there’s a problem with the sound of the effect. Roland VS-2000 Owner’s Manual www.RolandUS.com... - Page 216 VS-2000 Appendices to see how each algorithm works. The Ins Routing Many of the VS-2000’s effect algorithms combine their left and right inputs into a single signal for processing. The Ins routing is therefore an excellent candidate for effect patches based on these algorithms.
-
Page 217: Master Bus Insert Effects
Mastering Tool Kit (“MTK”) effect patches designed for just this purpose: to apply the finishing touches to a great mix. If your VS-2000 is connected to Roland DS-series monitors (Page 75), you can insert a Speaker Modeling effect patch on the MASTER bus—see Page 224 for details. -
Page 218: Selecting, Editing And Saving Effect Patches
When you press the EFFECT MENU button, the EFFECT VIEW screen appears. This screen shows you a menu of your effect processors, and provides basic information about each, as well as a BYPASS switch. This VS-2000 has only the factory effects installed, so Effects 3-6 are unavailable. -
Page 219: The Algorithm View Screen
To learn about using VS8F-3 effects, consult the VS8F-3’s documentation as well as the documentation accompanying your third-party plug-ins. When you press F1 (PATCH) on the Algorithm View screen for an internal or VS8F-2- based effect processor, its PATCH SELECT screen appears. Roland VS-2000 Owner’s Manual www.RolandUS.com... - Page 220 Starting from Scratch The 36 effect algorithms (Page 55) built into the VS-2000 and found on each VS8F-2 card are the foundation on which effect patches are built. To build your own effect patch from scratch, begin with one of the first 36 preset patches: P000-P035.
-
Page 221: Editing Effect Patches
3. Press F5 (SELECT) to load the selected effect patch. The VS-2000 Appendices contains an effect patch list that tells you whether a built-in or VS8F-2 patch is designed for use as a loop or insert effect. The list also tells you if the patch has stereo inputs—so it treats its left and right sides independently—or if its... -
Page 222: Editing An Effect Patch
Each algorithm provides a set of parameters with which you can change the effect processing it produces. To learn about each algorithm’s parameters, see the VS-2000 Appendices. When you edit a patch, you edit the values for the algorithm—or algorithms—on which the patch is based. -
Page 223: Saving Effect Patches
3. Press F5 (OK) to store your current patch settings as a new user patch in the selected user memory location. 4. Press F1 (NAME) and name the new patch—to learn about naming, see Page 74. 5. Press F5 (OK) when you’re done. Roland VS-2000 Owner’s Manual www.RolandUS.com... -
Page 224: Speaker Modeling
In order to create a realistic microphone model, the VS-2000 needs to know the sonic characteristics of the mic you’re really using. The VS-2000’s Microphone Modeling effect patches are designed to work with several different mics: •... -
Page 225: Rss Pan
RSS Pan can be used only with unlinked channels. The RSS Pan effect requires the use of one of the VS-2000’s effect boards. When the board is allocated to RSSPan, it can’t be used for other effects or the analyzer. - Page 226 RSS Pan positions in front of you—when the parameter’s set to Clockwise—or behind you—when it’s set to Counterclockwise, providing that the desired direction of movement woudn’t push the signal beyond the lowest or highest possible RSS Pan values. www.Roland.com Roland VS-2000 Owner’s Manual...
-
Page 227: 17-Working With Fx Return Channels
17—Working with FX Return Channels The VS-2000 has six FX return channels, one for each of its six effect processors that are available when you’ve installed optional VS8F-2 and/or VS8F-3 effect boards. The FX return channels control the stereo outputs of Effects 1-6, respectively, when they’re set up as loop effects. -
Page 228: The Main Fx Return Ch Edit Screen
4. GROUP You can assign the effect’s output to any of the VS-2000’s 12 fader groups that allow you to control the levels of multiple input, track and/or FX return channels. The parameter operates in exactly the same way as the input and track channel GROUP parameter—see Page 153. -
Page 229: Roland Vs-2000 Owner's Manual Www.rolandus.com
Direct paths (Page 207). You can use a pre- or post-fader Direct path, as explained on Page 209. Chapter 21 describes working with the VS-2000 outputs. To send an effect to a Direct path from its FX return channel: 1. - Page 230 “Adding Effects to a Headphone Mix” on Page 234. • another effect—You can create a chain of effects in the VS-2000 by sending one effect’s output to an FX bus routed into another effect’s input. If you want, you can repeat the process by sending the second effect to a third and so on.
-
Page 231: The Fx Return Parameter View Screen
The SENDS Knob switch—When this parameter is checkmarked, it designates the send to be controlled by the CH PARAMETERS SENDS knob (Page 167). The VS-2000 remembers the setting for each channel, so whenever you select a channel, the SENDS knob takes over control of the desired AUX or FX send. -
Page 232: Routing Effects To Tracks
flows up from the FX return channels to the hard disk recorder tracks. We pressed FX Processor 1’s FX 1 button. 4. If you want to break the connection, press FX 1 again. www.Roland.com Roland VS-2000 Owner’s Manual... -
Page 233: Fx Return Routing On The Ez Routing View Screen
Recording Track block. 5. Turn the dial to select the desired pair of destination linked tracks. We’ve selected linked stereo Tracks 17 and 18 as our destination. Roland VS-2000 Owner’s Manual www.RolandUS.com... -
Page 234: Adding Effects To A Headphone Mix
In Steps 4 and 5 above, you’ll be setting up both linked Aux busses simultaneously—use the linked Aux busses’ balance control to position the stereo effect as desired in the mix. You can also set the send level using the VS-2000’s CH PARAMETERS SENDS knob— see “CH PARAMETERS Controls” on Page 167. www.Roland.com... -
Page 235: 18-Editing Tracks
18—Editing Tracks This chapter provides an introduction to the editing of audio data on VS-2000 tracks. The first part of the chapter explains important editing concepts. The second part explains how to use the various available editing methods. Chapter 6 explains how audio data is recorded on the VS-2000, and provides explanations for some important terms: take, phrase, V-Track and track. -
Page 236: Edit Points
“edit points.” The IN and OUT edit points define regions of data. The FROM and TO edit points help you position phrases and regions you’re moving or copying. Use the VS-2000’s Scrub feature for the most precise positioning of the now line when you’re placing edit points. Scrub is described on Page 181. -
Page 237: Using The In, Out, From And To Buttons
Using the IN, OUT, FROM and TO Buttons You can set your IN, OUT, FROM and TO edit points using the VS-2000’s IN, OUT, FROM and TO buttons. You can also jump immediately to any of these edit points by pressing its button. -
Page 238: Performing Edits
When audio is selected, it has a dotted outline. If its track is also selected, it’s white. If not, it’s black. If you select audio on one of a pair of linked tracks, the audio on the other linked track is also selected. www.Roland.com Roland VS-2000 Owner’s Manual... -
Page 239: Where Editing Takes Place
18—Editing Tracks Where Editing Takes Place You’ll edit tracks on the VS-2000’s Home screen—see Chapter 8—or on the wave display, described below. Each screen offers a different view of a project’s audio. The Wave Display The wave display is a companion to the Home screen’s playlist and can be opened whenever the Home screen is visible. -
Page 240: Selecting Phrase Or Region Editing
You can press F6 (Reg→Ph) to switch to phrase editing. If you’re working on a connected VGA, you can click the PHRASE/REGION/AUTOMIX button at the right above the playlist on the Home screen to select the desired type of editing. www.Roland.com Roland VS-2000 Owner’s Manual... -
Page 241: Editing Methods
When you purchase and install a VS20-VGA board (Page 29), you can connect a PS/2 mouse to your VS-2000—see Page 66. A mouse provides fast access to seven of the most common phrase editing operations and region operations, and makes “drag-and-drop”... -
Page 242: Editing With An Optional Mouse
GOTO. position line’s location Set IN, OUT, FROM and TO see Page 243. Activate the VS-2000’s Scrub select SCRUB and click to checkmark it. feature (Page 181) Use Scrub to preview audio select SCRUB TO to hear the audio just before the... -
Page 243: Placing Edit Points With Your Mouse
(Page 236) at the top of the position line above the playlist. Selecting a Track with Your Mouse To select a track with your mouse, click the track in the playlist, or click the track’s number to the left of the playlist. Roland VS-2000 Owner’s Manual www.RolandUS.com... -
Page 244: Selecting Destination V-Tracks With Your Mouse
Click a track again to unselect its phrase. Click ALL to checkmark all of the tracks, or click it again to un-check all of the tracks. 5. Click EXIT when you’re done—the phrases you’ve selected are ready to be edited. www.Roland.com Roland VS-2000 Owner’s Manual... -
Page 245: Selecting Regions By Dragging Your Mouse
5. Click EXIT when you’re done—all audio that falls between the IN and OUT points on the selected tracks is now ready to be edited. If you select a region on one of a pair of linked tracks, the region on the other linked track is also selected. Roland VS-2000 Owner’s Manual www.RolandUS.com... -
Page 246: Moving Data By Dragging With Your Mouse
TRIM IN and TRIM OUT phrase editing operations (Page 257), though it’s much faster. By simply dragging the phrase edge you want to trim, you can change where a phrase begins or ends. www.Roland.com Roland VS-2000 Owner’s Manual... -
Page 247: Snapping To Grid
TO edit points to gridlines—set GRID MODE to Only TO. • snap all edit points to gridlines—set GRID MODE to ALL EDIT POINT. You can temporarily disable the grid feature by holding down CLEAR on the VS-2000 as you drag edit points or audio. Roland VS-2000 Owner’s Manual www.RolandUS.com... -
Page 248: Performing An Edit Operation From The Edit Pop-Up Menu
2. Press ENTER/YES. If edit messages—see “Edit Messages” on Page 241—are: • turned off—the selected operation is performed, and you’re done. • turned on—you can set the operation’s parameters as desired and press ENTER/ YES to proceed, or EXIT/NO to cancel the operation. www.Roland.com Roland VS-2000 Owner’s Manual... -
Page 249: Editing From The Track Menu
When you’re moving or copying phrases and regions, or if you’re swapping regions on different tracks in the TRACK menu, designate the: • source track—the track you’re moving or copying audio from. • destination V-Track—the track to which you’re moving or copying the audio. Roland VS-2000 Owner’s Manual www.RolandUS.com... -
Page 250: Performing An Edit Operation From The Track Menu
When you’re moving, copying or exchanging audio, you need to select source and destination tracks. In other edit operations, you need only select the phrase(s) or region(s) upon which you want to perform the operation. www.Roland.com Roland VS-2000 Owner’s Manual... -
Page 251: Quick-Selecting From The Track Menu
Any V-Track with a wide, flashing black box is a source. Any V-Track with a wide, flashing white box is a destination. Quick Selection always select the destination track’s currently active V-Track. To select a different destination V-Track, use the onscreen selection tools. Roland VS-2000 Owner’s Manual www.RolandUS.com... -
Page 252: Selection Using The Track Menu's Onscreen Selection Tools
If you select a phrase or region on one of a pair of linked tracks, the phrase—if it’s touching the now line—or region on the other linked track is also selected. www.Roland.com Roland VS-2000 Owner’s Manual... - Page 253 (ALL). If any phrase or regions are selected, they become unselected. If none are selected, they all become selected. If they’re all selected, they all become unselected. Press F2 (ALL) repeatedly to toggle selection on and off for all phrases or regions. Roland VS-2000 Owner’s Manual www.RolandUS.com...
- Page 254 18—Editing Tracks www.Roland.com Roland VS-2000 Owner’s Manual...
-
Page 255: 19-Phrase Editing Operations
This chapter describes the phrase-based editing operations you can perform in the VS-2000. Most of the operations can be performed using an optional mouse (Page 66) or the edit commands presented in the TRACK menu—some can be performed only from the menu. - Page 256 FROM and TO, Overlap keeps the pasted copies in time. When the phrase is shorter than the When the phrase is longer than the distance between FROM and TO. distance between FROM and TO. FROM FROM www.Roland.com Roland VS-2000 Owner’s Manual...
-
Page 257: Move
TO—sets the desired beginning of the phrase. Any part of the phrase that occurs before the TO point is trimmed from the phrase. You can also trim the front of a phrase using your mouse—see Page 246. Roland VS-2000 Owner’s Manual www.RolandUS.com... -
Page 258: Trim Out
Phrase SPLIT lets you break up longer phrases into two separate pieces to turn musical ideas, sound effects or anything else into individual objects. This makes it easier to move each element, copy it, or subject it to any other editing operation. www.Roland.com Roland VS-2000 Owner’s Manual... -
Page 259: New
If you attempt to use a CDR-recorded take on a track other than the project’s mastering tracks (Page 356)—or vice versa—the VS-2000 displays “Found Illegal Track Pair!” Press ENTER/YES to continue, and select a non-CDR take. You can identify a CDR-recorded take by the asterisk in its number, as shown on Page 357. -
Page 260: Normalize
TRACK menu automatically divides it into smaller phrases wherever the signal level F4 (DIVIDE) falls below a specified volume. Phrase DIVIDE analyzes the levels in the original phrase..and divides the phrase up into smaller phrases. www.Roland.com Roland VS-2000 Owner’s Manual... -
Page 261: Name
IN Threshold The IN Threshold sets the level at which a new phrase begins. As the VS-2000 searches for its next phrase, it considers a level higher than the IN Threshold parameter’s value to signify the start of a new phrase. -
Page 262: Take Mngr
When you delete a take, it’s permanently erased from your hard drive. Use this feature cautiously. It cannot be undone. • F5 (Previw)—to listen to the selected take. Press EXIT/NO to halt playback. • F6 (EXIT)—to return to the TRACK PHRASE EDIT MENU. www.Roland.com Roland VS-2000 Owner’s Manual... -
Page 263: 20-Region Editing Operations
If you’ve recorded mastering tracks (Page 356) using CDR mode, their audio can’t be used on other project V-Tracks. Likewise, non-CDR audio can’t be used on CDR- recorded mastering tracks. If you attempt either action, the VS-2000 displays “Found Illegal Track Pair!” and the operation will not proceed. Press ENTER/YES to resume editing. - Page 264 Off—so that the copied audio is pasted over any audio already present at the destination location. • On—so that the copied audio is inserted at the TO point, moving all subsequent audio on the track to the end of the pasted copy, or copies. www.Roland.com Roland VS-2000 Owner’s Manual...
-
Page 265: Move
IN and OUT points. Audio that had previously been F3 (INSERT) there—and all of the audio that comes after it—is slid back to the OUT point, thus lengthening the track due to the added blank space. Before region INSERT After region INSERT Roland VS-2000 Owner’s Manual www.RolandUS.com... -
Page 266: Cut
Chop out an entire unwanted section of a project by using CUT on all of its tracks. Thanks to the VS-2000’s non-destructive editing, audio you cut is still safe and sound on your hard drive if you want it back, until you optimize the project. You can use Undo to retrieve it, or create a new phrase from its original take (see Page 259). -
Page 267: Erase
Thanks to the VS-2000’s non-destructive editing, anything you erase is still on your hard drive if you want it back, until you optimize the project. Use Undo to retrieve it, or create a new phrase from its original take (see Page 259). - Page 268 Be aware that the more extreme the amount of compression or expansion, the more the region’s audio quality may degrade. TYPE The VS-2000 offers three different time compression/expansion algorithms. Select the one that most closely describes the region’s audio: •...
-
Page 269: Import
During importing, if there’s already audio on the track, the VS-2000 asks if you want to append the imported audio to its end or replace what’s there. If you choose to append the audio, it’s placed two seconds after the audio already on the track. -
Page 270: Exchange
first section—the VS-2000 can use the marker at the start of the next section as the end marker for the first section. Place the markers you need before editing—see Page 186 to learn about markers. - Page 271 6. Press F1 (CREATE) to create the next playlist segment. The VS-2000 creates a new segment with the same settings as the segment before it. Since you can’t set a Start marker number to be higher than an End marker’s number, set the new segment’s End marker number first.
-
Page 272: Name
ARRANGE screen, or F6 (EXIT) to cancel the ARRANGE operation. NAME Use: TRACK menu The VS-2000 allows you to name any of the tracks in a project. The main TRACK menu NAME screen provides a track selection display where you can select F5 (NAME) the track you want to name. -
Page 273: 21-Working With The Vs-2000 Outputs
The VS-2000 has six analog output jacks that you can connect to external devices when you want to send audio signals out of the VS-2000. You can use the jacks for the jobs suggested by their names or for any other purpose in which you need to get a VS-2000 audio signal to an external device that has analog inputs. -
Page 274: Output Signal Routing
21—Working with the VS-2000 0utputs Output Signal Routing You can route bus signals or track signals to the VS-2000’s analog and digital outputs. We’ll discuss these two topics separately. Bus Routing The VS-2000’s output jacks and connectors can transmit MASTER, MONITOR, Aux and Direct path signals from the VS-2000’s outputs to external devices. -
Page 275: Routing A Pair Of Busses To The Stereo Monitor Bus
21—Working with the VS-2000 0utputs Routing a Pair of Busses to the Stereo MONITOR Bus 1. Press EZ ROUTING. 2. If “OUTPUT” isn’t above F3, press PAGE repeatedly until it is. 3. Press F3 (OUTPUT)—the OUTPUT ASSIGN screen appears. In this illustration, we’ve... - Page 276 21—Working with the VS-2000 0utputs www.Roland.com Roland VS-2000 Owner’s Manual...
-
Page 277: 22-Ez Routing
The EZ ROUTING screens are where you go to set up the connections that allow signals to travel within the VS-2000. This chapter provides an overview of the EZ ROUTING screens we’ve been discussing all along, and describes the VS-2000’s helpful EZ Routing tools. -
Page 278: Ez Routing View Screen
Page 196 FX return channels to tracks for recording and bouncing Page 233 The EZ ROUTING OUTPUT ASSIGN Screen On the EZ ROUTING OUTPUT ASSIGN screen, you can route any of the VS-2000’s busses to output jacks or connectors. Outputs www.Roland.com... -
Page 279: The Ez Routing Loop Effect Assign Screen
The EZ ROUTING LOOP EFFECT ASSIGN Screen The EZ ROUTING LOOP EFFECT ASSIGN screen displays the FX bus that carries signals to each of the VS-2000’s internal effect processors. You can also see a symbol for each processor’s currently selected effect patch. -
Page 280: Ez Routing Tools
F4 (ClrTrA) Saving and Loading EZ Routing Templates As you use your VS-2000, you’ll spend lots of time creating routing setups for the various situations in which you’ll be recording and mixing. You can save a routing setup—along with a host of other parameters—as an EZ Routing template that you can use in any project. -
Page 281: Saving An Ez Routing Template
V-Track selection and the current settings of the hard disk recorder’s TRACK/ STATUS buttons. Saving an EZ Routing Template 1. Set up your VS-2000 as desired. 2. Press EZ ROUTING. 3. If “SAVE” isn’t visible above F6, press PAGE until it is. -
Page 282: Loading An Ez Routing Template
4. Turn the Time/Value dial to select the template you want to load. 5. Press F5 (OK). The VS-2000 asks if you’re sure you want to proceed. 6. Press ENTER/YES to load the template, or EXIT/NO to cancel the operation. If you press ENTER/YES, the template—and all of the routings and configuration settings... -
Page 283: 23-Midi And Synchronization
MIDI Operations If you’re new to MIDI, see “About MIDI” in the VS-2000 Appendices. Advanced MIDI users can find complete documentation of the VS-2000’s MIDI features—including a MIDI implementation chart—in the VS-2000 Appendices. -
Page 284: Turning Fader Control On Or Off
VS-2000, only this ID number embedded in the SysEx data lets the VS-2000 know if it’s supposed to act on a SysEx message it receives. In order to respond to a SysEx message, the VS-2000’s ID number must be the same as the ID number embedded in the message—if it’s set to another ID, the VS-2000 ignores... -
Page 285: Remote Midi Control Of The Vs-2000
When sending and receiving SysEx or Control Change messages that control the VS-2000, take care to avoid MIDI loops. In a MIDI loop, the same MIDI messages are sent and received by the connected devices over and over, spiraling into nonsensical settings in either or both devices. -
Page 286: Changing Scenes Via Midi
VS-2000, as discussed later in this chapter. To receive SysEx Data from an external MIDI device: 1. Using a MIDI cable, connect the VS-2000 MIDI IN jack to the MIDI OUT jack of the device from which you want to receive SysEx data. -
Page 287: Remote Midi Storage Of Vs-2000 Settings
4. Set MIXER CONTROL TYPE to C.C. (“Control Change”). To enable Control Change reception on the VS-2000: 1. Using a MIDI cable, connect the VS-2000’s MIDI IN jack to the external device’s MIDI OUT jack. 2. Navigate to the MIDI parameter screen (Page 283). -
Page 288: Sending Sysex Bulk Dump Data
23—MIDI and Synchronization Sending SysEx Bulk Dump Data 1. Using a MIDI cable, connect the VS-2000’s MIDI OUT/THRU jack to the device to which you want to transmit the SysEx bulk dump. 2. Navigate to the MIDI PARAMETER screen ((Page 283). -
Page 289: Midi Metronome
1. Using a MIDI cable, connect the VS-2000’s MIDI IN jack to the MIDI OUT of the device from which you want to transmit the SysEx bulk dump. - Page 290 11. Once you’ve had a chance to hear your MIDI metronome, you may want to adjust the ACCENT VELOCITY and NORMAL VELOCITY parameters to set a pleasing volume balance between the two types of notes. www.Roland.com Roland VS-2000 Owner’s Manual...
-
Page 291: Synchronization
VS-2000 tracks. The sequencer can play its MIDI instruments live through the VS-2000’s input channels during the final mixdown. As described earlier in this chapter, you can record all of your VS-2000 actions into a sequencer as SysEx data, and have the sequencer play them back during a project. A sequencer can also adjust VS-2000 parameters in realtime using Control Change messages (Page 286) as a project plays or during recording. - Page 292 The VS-2000 can record received MIDI clock information as a sync track that lets it act as a master to slave devices that understand MIDI clocks and Song Position Pointer.
-
Page 293: Roland Vs-2000 Owner's Manual Www.rolandus.com
VS-2000, this would be the position of its now line. MMC’s not a form of sync—it’s about button-presses: When you press the PLAY button on a master MMC device, an MMC slave device acts as if its PLAY button has been pressed as well. The VS-2000 can act as an MMC master or slave. - Page 294 MIDI clock/SPP synchronization data. Each VS-2000 project has its own a tempo map in which you can view and edit a project’s tempo and time signature changes. You can build a tempo map for a new or already recorded project on the VS-2000 manually or by using markers, or convert an existing sync track into a tempo map.
-
Page 295: Working With A Sync Track
Prepare the external device that’s supplying the sync track data by setting it to transmit MIDI clocks. 1. Using a MIDI cable, connect the VS-2000’s MIDI IN jack to the MIDI OUT of the device from which you want to transmit the MIDI clocks. -
Page 296: Working With A Tempo Map
On this screen—as we saw earlier in “Working with a Sync Track”—you can perform a variety of sync track and tempo map conversion operations. When you set CONVERT TYPE to the desired operation, the operation’s parameters are displayed. www.Roland.com Roland VS-2000 Owner’s Manual... -
Page 297: Shaping A Tempo Map By Hand
Beat parameter to the desired time signature. 3. Press and select the desired tempo for the map. You can’t move a map to the same measure as the previous map, or to an earlier measure. Roland VS-2000 Owner’s Manual www.RolandUS.com... -
Page 298: Syncing An External Device To The Vs-2000
A project’s audio rarely starts at Time 00h00m00s00f00, and when the tempo map starts, so will a sequencer slaved to the VS-2000. You can use the SYNC OFFSET TIME parameter on the SYNC PARAMETER screen (Page 294) to delay the start of the tempo map. -
Page 299: Syncing The Vs-2000 To An External Device
1. Navigate to the MIDI PARAMETER screen (Page 283). 2. Set MIDI OUT/THRU to Out. 3. If the device you’re syncing to the VS-2000 supports MMC (Page 293), turn on the SysEx. Tx Sw parameter and set MMC MODE to MASTER. -
Page 300: Starting Synchronized Playback With The Vs-2000 As Slave
VS-2000 now line jumps to its actual MTC/SMPTE time code location. Shifting the Project Start Time It’s not uncommon to be syncing a VS-2000 project to material on a master device that doesn’t begin at 00h00m00s00f00 MTC/SMPTE time. You might be syncing the project to a song somewhere in the middle of a digital tape, for example. -
Page 301: Synchronizing The Vs-2000 And Video Equipment
For example, by using the VS-2000 in conjunction with the Edirol DV-7PR’s “Presenter,” you can do the following things. •... -
Page 302: Switching V-Link Mode Off
1. Make sure that the power of all devices is turned off, and make the connections shown on the next page. Before connecting the VS-2000 to other devices, turn off the power to all of the devices. This will help prevent malfunctions and/or damage to speakers or other devices. - Page 303 5. If “SYNC” isn’t visible above F6, press PAGE until it is. 6. Press F6 (SYNC)—the SYNC PARAMETER screen appears. 7. Set SYNC MODE to INT. 8. Press the VS-2000’s V-LINK button—the VS-2000 asks for confirmation. 9. Press ENTER/YES. V-LINK mode is turned on, and the V-LINK button lights.
-
Page 304: Exchanging Digital Audio Data During Synchronization
CLOCK to DIGITAL IN. The received digital audio’s clocking is computed from, and controlled by, the master device’s time code. You can also send digital audio from the VS-2000 to the master device by setting the VS-2000’s MASTER CLOCK parameter to INT—with this setting, the VS-2000 generates its own master clock based on the time code received from the master device. -
Page 305: 24-Using The Rhythm Track
24—Using the Rhythm Track The VS-2000 contains a high-quality rhythm generator for you to use as a timing reference or as the rhythmic foundation of your own arrangements. This chapter describes how to use the VS-2000’s Rhythm Track feature. Rhythm Track Basics About Track 17/18 In the VS-2000’s hard disk recorder, the linked stereo Tracks 17/18 can act as:... -
Page 306: About Rhythm Patterns
The VS-2000 contains 49 preset rhythm arranges. As with patterns you can modify these and store them as new rhythm arranges or create your own from scratch. You can store your rhythm arranges as: •... -
Page 307: Playing A Rhythm Track
“Playing External Rhythm Track Sounds” on Page 321. To work on a rhythm pattern, as described on Page 313, press F1 (Pttrn). To work on a rhythm arrange, as described on Page 309, press F2 (Edit) Roland VS-2000 Owner’s Manual www.RolandUS.com... -
Page 308: The Rhythm Track Metronome
24—Using the Rhythm Track The Rhythm Track Metronome Use the VS-2000’s metronome when you want only a very simple rhythmic reference as a starting point for recording or playback. You can play the metronome internally using Rhythm Track sounds, or send the metronome out to performers’ headphones mixes as a guide. -
Page 309: Selecting, Editing And Creating A Rhythm Arrange
Rhythm Track memory. Once you begin editing an existing rhythm arrange, the VS-2000 holds it in a special temporary memory area—the display shows “TEMP” at the front of the rhythm arrange’s name. -
Page 310: Rhythm Arrange Tools
FF button, or decrease it by pressing the REW button. 9. Repeat Step 8 until you’ve finished creating or editing the rhythm arrange. 10. Save you work before selecting a new rhythm arrange or turning off the VS-2000. See “Saving a Rhythm Arrange” on Page 311. -
Page 311: Saving A Rhythm Arrange
2. Press F5 (SAVE)—the RHYTHM ARRANGE SAVE screen appears. 3. Select the type of rhythm arrange you want to save by setting the Group parameter: USER or PROJECT. (See Page 306 if you’re not clear on the difference between these two groups.) Roland VS-2000 Owner’s Manual www.RolandUS.com... -
Page 312: Rhythm Arrange Copying
“Naming” on Page 74 for details. After naming the rhythm arrange, press F6 (EXIT) to return to the RHYTHM ARRANGE SAVE screen. 6. Press F5 (OK)—the VS-2000 asks you to confirm your decision to save the rhythm arrange in the selected location. -
Page 313: Deleting A Rhythm Arrange
The selected rhythm arrange’s name appears below the Group and No. parameters. 5. Press F5 (OK)—the VS-2000 asks if you’re sure. Proceeding with the operation will permanently delete the selected rhythm arrange. -
Page 314: Working On The Rhythm Pattern Setup Screen
When a pattern is set to swing, its notes are slightly delayed as part of the swing effect, even though they haven’t actually been moved. When you edit a pattern with swing, its note positions therefore don’t correspond absolutely to where they’re heard. www.Roland.com Roland VS-2000 Owner’s Manual... -
Page 315: Copying A Pattern
Group and No. parameters. 6. Press F5 (OK)—the VS-2000 asks if you’re sure. Proceeding with the operation will replace any pattern currently residing in the selected destination location. - Page 316 ◆ )—the button turns black and the metronome starts sounding. The STATUS area shows “REC PAUSE.” The VS-2000 is ready to begin recording. Since you can now hear the pattern—but aren’t yet recording—you can practice your performance on the TRACK/STATUS buttons (or connected MIDI controller).
-
Page 317: Creating A Pattern In Step Time
The symbols in the beat boxes represent different note velocities. A note’s velocity determines how loudly it sounds. Velocity Velocity Velocity Velocity Velocity Note Roland VS-2000 Owner’s Manual www.RolandUS.com... - Page 318 In Button mode, you quickly erase all occurrences of a particular drum note in the pattern. Press F2 (ERASE)—REC MODE shows “ERASE.” Press the TRACK/STATUS button of the note you wish to delete. The VS-2000 asks you to confirm your choice. Press ENTER/YES to proceed. Press F2 (ERASE) to leave Erase mode when you’re done.
-
Page 319: Saving A Rhythm Pattern
5. If you want to name the pattern, press F1 (NAME)—see “Naming” on Page 74 for details. After naming the pattern, press F6 (EXIT) to leave the Naming screen. 6. Press F5 (OK)—the VS-2000 asks you to confirm your decision to save the rhythm pattern in the selected location. -
Page 320: Deleting A Pattern
The selected rhythm pattern’s name appears below the Group and No. parameters. 5. Press F5 (OK)—the VS-2000 asks if you’re sure. Proceeding with the operation will permanently delete the selected pattern. 6. To finish deleting the pattern, press ENTER/YES. -
Page 321: The Rhythm Track And Midi
Playing External Rhythm Track Sounds The Rhythm Track can play drum sounds on an external MIDI device. To do this: 1. With both devices turned off, connect the MIDI out of your VS-2000 to the MIDI IN jack of your MIDI device. -
Page 322: Muting The Rhythm Track
7. Press ENTER/YES to erase the CD-RW, or EXIT/NO to cancel the backup. 8. Select whether or not you’d like the VS-2000 to verify the accuracy of your backup once it’s been written on the CD. While this causes the backup to take a bit longer, we recommend turning Verify on to make absolutely sure your project data’s been... -
Page 323: Turning Off The Rhythm Track
6. If you wish to save the current state of your project, press ENTER/YES. Otherwise, press EXIT/NO. 7. When the VS-2000 pops open its CD-RW drive and asks you to insert the Rhythm Track user backup CD you wish to recover, insert the disk in the drive, close the drive, and press ENTER/YES—the RHYTHM TRACK USER BACKUP screen... - Page 324 24—Using the Rhythm Track www.Roland.com Roland VS-2000 Owner’s Manual...
-
Page 325: 25-Harmony
25—Harmony The VS-2000’s built-in Harmony feature can generate up to six harmony voices from a single recorded vocal performance. This chapter describes how to create vocal harmonies using the Harmony feature. While the Harmony feature can be used on any recorded sound, it’s optimized for use on a single human voice. -
Page 326: Harmonization
Page 336. The Harmony Sequencer The VS-2000 contains a Harmony sequencer in which you can record all of the desired Harmony notes for a hard disk recorder track as well as any changes you wish to make to Harmony module settings as your project plays. The sequencer captures and plays back all of this information as MIDI data. -
Page 327: Starting Harmony
1. Press HARMONY so the button lights and the HARMONY ASSIGN screen appears. If RSS Pan is currently active, the VS-2000 displays “Effect Processor is Used by RSS PAN.” Since RSS Pan and Harmony can’t use Board A simultaneously, press ENTER/ YES to display the RSS Pan screen, and then turn off the FX BOARD Use A Sw. -
Page 328: Harmony Algorithm Screen
Harmony. You can choose the internal effects—Board A—and any optional VS8F-2 effect boards you’ve installed. At the left of each effect board’s name, the VS-2000 shows you the Harmony parts the the board supplies to Harmony. -
Page 329: Harmony Patch Loading
Displaying the Harmony Module Parameters 1. Navigate to the HARMONY ALGORITHM screen (Page 328). 2. Press F1 (Module.) 3. To move between part and common parameters, press F1 (> PART) or F1 (< COMM). Roland VS-2000 Owner’s Manual www.RolandUS.com... - Page 330 Rate—to set the speed of the vibrato. • Detune—to set the pitch width of the vibrato. • Depth—to set the strength of the vibrato. • Delay—to program a natural-sounding pause between when a harmony note starts and when the vibrato begins. www.Roland.com Roland VS-2000 Owner’s Manual...
-
Page 331: Harmony Patch Storage
“Saving Effect Patches” on Page 223. Entering Harmony Notes You can select, or enter, the desired Harmony notes using the VS-2000’s TRACK/ STATUS buttons or a connected MIDI controller such as a MIDI keyboard. When you select a note on the TRACK/STATUS buttons or a MIDI keyboard, Harmony produces a copy of the source track’s note at the selected pitch. -
Page 332: Using The Track/Status Buttons
E in the selected octave. When both Oct buttons are lit, press F to create an F harmony note above Middle C, or F4. Otherwise, the button plays an F in the selected octave. www.Roland.com Roland VS-2000 Owner’s Manual... -
Page 333: The Track/Status Buttons In Chrd Mode
To return to the original octave, press the unlit button so both buttons are unlit. Port. This button turns portamento on (lit) or off (unlit) by changing the value of the PORTAMENTO parameter—see Page 330. Roland VS-2000 Owner’s Manual www.RolandUS.com... -
Page 334: The Track/Status Buttons In Chrd Mode, Con't
• Press b/# once—it lights red and changes the TRACK/STATUS buttons so they play Cb-Bb- rooted chords. • Press b/# twice—it lights green and changes the TRACK/ STATUS buttons so they play C#- B#-rooted chords. www.Roland.com Roland VS-2000 Owner’s Manual... -
Page 335: The Track/Status Buttons In Chrd Mode, Con't
Press sus4/aug to create a suspended 4th or augmented chord. When the button is: • red—a suspended 4th chord is created. • green—an augmented chord is created. 17/18 Press dim so it lights to create a diminished chord. Roland VS-2000 Owner’s Manual www.RolandUS.com... -
Page 336: Using A Midi Controller
To use a MIDI keyboard for Harmony note entry, connect the MIDI OUT of the controller to the VS-2000’s MIDI IN Jack (Page 48) using a MIDI cable. Set Harmony to receive MIDI on the channel the controller is using for MIDI transmission as described on Page 329. -
Page 337: Recording In The Harmony Sequencer
ENTER/YES to checkmark it. 3. To view the source track as a waveform to help you see what’s coming up, press F1 (WAVE) so it darkens. To speed up the VS-2000’s responsiveness by turning off the waveform display, press F1 (WAVE) again. -
Page 338: Sequencing Harmonies In Step Time
To delete a note or chord at the now line’s current location, press F4 (DELETE). To undo your last entry, press F5 (UNDO). To change your mind, press F5 (REDO). You can edit your sequence as described in “Editing a Harmony Sequence” on Page 339. www.Roland.com Roland VS-2000 Owner’s Manual... -
Page 339: Editing A Harmony Sequence
Harmony sound at that location in the project. You can capture the following current settings individually: • Portamento switch and time • Vibrato switch, rate, detune, depth and delay • Formant settings 1-6 Roland VS-2000 Owner’s Manual www.RolandUS.com... -
Page 340: Recording Harmonies On Hard Disk Recorder Tracks
Turning the Harmony Feature Off 1. Press HARMONY. 2. Select the USE EFFECT BOARD parameter and turn the Time/Value dial counter- clockwise to un-assign off each activate effect board. 3. Press HOME. www.Roland.com Roland VS-2000 Owner’s Manual... -
Page 341: 26-Automix
What Automix records is Automix data, not audio data, and it’s saved with the project. Automix records on its own tracks in its own area of the VS-2000’s memory. It doesn’t use any of your project’s tracks. This means two important things: •... -
Page 342: The Automix Screen
“Automix Parameter List” on Page 408. You can also automate most VS-2000 actions with MIDI SysEx messages (Page 285). Automix is easier to work with since it doesn’t require an in-depth knowledge of MIDI. - Page 343 If you select a location that already contains an Automix, the Automix you’re saving replaces the one that’s already stored there. 3. Press F5 (OK)—the VS-2000 asks “Save Automix Pattern?” 4. Press ENTER/YES to proceed or EXIT/NO to cancel the save.
-
Page 344: Activating Automix Mode
1. Press F3 (LOAD)—the Automix loading screen appears. 2. Highlight the Automix you want to load. 3. Press F5 (OK)—the VS-2000 asks “Load Automix Pattern?” When you load an Automix, it replaces the currently loaded Automix. If you don’t want to lose your current Automix, makes sure to save it before loading a different one. -
Page 345: Realtime Automix Recording
Punch with Keep • Keep—parameter values at the end of the punch-out Punch remain in effect for the rest of the project, or until you perform another punch-in later in the project. Roland VS-2000 Owner’s Manual www.RolandUS.com... -
Page 346: Snapshot Recording Of Parameter Values
1. If AUTOMIX isn’t lit solidly, press it so that it is to show that Automix mode is on. If it’s flashing, hold down AUTOMIX and press REC so that AUTOMIX lights solidly. 2. Hold SHIFT and press AUTOMIX. 3. Set each track you’ve automated to Read mode. 4. Play the project. www.Roland.com Roland VS-2000 Owner’s Manual... -
Page 347: Editing Automix Data
3. Press ENTER/YES to select the new target data, or EXIT/NO to return to the AUTOMIX EDIT screen without changing the targeted Automix data. 4. If you pressed ENTER/YES in Step 3, the newly targeted Automix tracks and data appear in the playlist. Roland VS-2000 Owner’s Manual www.RolandUS.com... -
Page 348: Automix Editing Methods
You can perform any Automix editing operation using a connected mouse or the VS-2000’s buttons. Both operate much the same as they do in track editing. Before editing Automix data, you must target the desired Automix tracks and the type of Automix data with which you want to work, as described on Page 347. -
Page 349: Automix Editing Operations
When you perfect the automation for the section, you can re-use it each time it occurs in the project. FROM is set to the same location as IN. Before After Roland VS-2000 Owner’s Manual www.RolandUS.com... - Page 350 IN point. You might cut Automix data when it occurs just a bit later than you want it to, or when you need to re-align it with audio you’ve moved forward in the project. Before After www.Roland.com Roland VS-2000 Owner’s Manual...
- Page 351 You can select as your threshold any of the parameter’s possible values, from 0 for its lowest value, to 50 for its middle value, to 100 for its maximum value. Set Expand to the amount by which you Roland VS-2000 Owner’s Manual www.RolandUS.com...
- Page 352 With descending parameter values Linear Exp+ Exp - Linear Exp+ Exp - The RSS PAN Grad. MODE parameter allows you to move between RSS Pan positions in front of you or behind you—see “RSS PAN” on Page 225. www.Roland.com Roland VS-2000 Owner’s Manual...
-
Page 353: Micro-Editing Automix Data
2. Press F3 (CREATE) to place a copy of the currently selected Automix event at the selected event’s location. 3. Edit the new Automix event’s location and value as desired. If you create a new event on an Automix track with no other events, the VS-2000 creates a Level event. Undoing an Automix Micro-Edit 1. -
Page 354: Automix And V-Link
Automix and V-Link V-Linking lets the VS-2000 work seamlessly with video editing and presentation devices—see Page 301. The VS-2000’s Automix feature allows you to program a series of video clips that a presentation device is to play. You can insert V-Link Automix events into a project on the Automix MICRO EDIT screen described on the previous page. -
Page 355: 27-Mastering And Cd-R/Rw Operations
Use your track editing tools (Chapter 18) to get rid of anything bothersome that you might forget to mix around. While the VS-2000 allows you to mix while you’re mastering, we recommend that you perfect your mix before entering the Mastering Room. This way, you’ll be able to more easily take advantage of the VS-2000’s extensive suite of mixing tools. - Page 356 Book” standards. The VS-2000 produces Red Book audio CDs. Before the VS-2000 can burn audio onto a CD, it converts the audio into a Red Book- compliant form of data called a “disk image file,” and stores the file on your internal hard drive.
- Page 357 file loads as well, ready for burning. • create a temporary disk image on the fly as you burn a CD—The VS-2000 can create a temporary disk image file as you burn an audio CD if your mastering tracks weren’t recorded using CDR mode.
- Page 358 Don’t be confused by the use of the word “track” here—a CD track is different from a track on the VS-2000. On the VS-2000, a track contains a single mono signal. On a CD, a track is a stereo audio selection or song.
-
Page 359: Working In The Vs-2000 Mastering Room
27—Mastering and CD-R/RW Operations Working in the VS-2000 Mastering Room Navigating to the Mastering Room 1. While holding down SHIFT, press CD-RW. The MASTERING ROOM screen appears. Mastering room parameters Project playlist Navigation buttons Turning On the Mastering Room To turn on the Mastering Room: 1. -
Page 360: Selecting The Mastering V-Tracks
CD burning.) To turn on this feature, set Auto Marker to On. Auto Marker places a CD track marker only at the beginning of a new selection—it doesn’t place markers after pauses in the audio within the selection. www.Roland.com Roland VS-2000 Owner’s Manual... -
Page 361: Using The Mastering Tool Kit
first selection, as described on Page 364. Using the Mastering Tool Kit In the Mastering Room, you can insert any of the VS-2000’s Mastering Tool Kit (MTK) effects onto the MASTER bus to add the final touch of processing to your mix. -
Page 362: Editing Mastering Tracks
Use phrase editing to trim any extra space from the very beginning of the mastering track. During the actual burning of your audio CD, the VS-2000 places the first CD track marker at the beginning of the mastering track—trimming its front ensures that the CD track marker lines up with the first audio you want to hear, not silence, a countoff or... - Page 363 (Page 106). Remove the markers—and burn your CD—from the copy. Place a pair of dummy markers in the first selection Since your CD burner ignores the VS-2000’s normal project markers, you can place two “dummy” markers somewhere in the middle of the first selection—it doesn’t matter where, as long as they’re at least four seconds after the start of the selection and at least...
-
Page 364: Cd-R/Rw Operations
(Remember, the first selection’s CD track marker is set automatically). Use the VS-2000’s Scrub feature (Page 181) to place the now line as precisely as you can, about 15 frames before the start of the selection’s audio. The placement of the CD track marker determines what happens when a listener selects the track on a CD player, so make sure you’ve set the CD track marker where you want it. -
Page 365: Making Sure You Have Enough Space
1. Hold down SHIFT and press F1—the VS-2000 scans your connected drives and displays information about each drive. The VS-2000 can use any free space on your internal hard drive for the creation of a disk image, not just the currently selected drive, or partition. -
Page 366: Burning An Audio Cd
Drive info Project info Disk info If you’ve got a CD-RW disc in your burner, the VS-2000 displays a reminder that that many CD players can’t play an audio CD-RW: CD-RW (ReWritable)!! Can’t be Played back with Audio CD Player. - Page 367 If you press ENTER/YES, the VS-2000 proceeds to burn the CD. When it’s finished, the VS-2000 asks if you’d like to burn another CD of the same audio material. If you do, insert a new CD in your burner and press ENTER/YES, or press EXIT/NO to complete your CD-burning session.
-
Page 368: Erasing A Cd-Rw Disk
Press ENTER/YES to erase the current contents of the CD-RW disk. The erasing procedure takes a few moments. • Once the disk’s been erased, the VS-2000 shows the same message as in Step 5 on Page 366. Press ENTER/YES to proceed or EXIT/NO to cancel. •... -
Page 369: Wav File Importing
F3 (EJECT) Turn off the CD Player feature F6 (EXIT) When the CD’s not playing, you can use the VS-2000’s REW or FF buttons to change your current location on the CD. About the CD Player Time Display To help you locate audio for CD Capture (Page 374), the CD Player shows the current playback time in two ways: •... - Page 370 27—Mastering and CD-R/RW Operations Converting WAV Files The VS-2000 converts WAV files to the current project’s recording mode when it imports them. When a WAV file is at the same sample rate as the project, this conversion can be quite quick. On the other hand, if it’s not, the conversion can take a while.
-
Page 371: Importing A Wav File
Page 370. 9. Press F5 (OK) to import the WAV file to the selected V-Track and time location. 10. When the VS-2000 displays “Done!” press F1 (<<BACK) to return to the WAV IMPORT screen. 11. Press F6 (EXIT) to leave the WAV IMPORT screen and listen to the imported audio. -
Page 372: Exporting Tracks And Phrases As Wav Files
WAV file—you can re-import the audio back into the VS-2000. When you want to export an entire track, use the Track Export feature. To export portions of a track, use the VS-2000’s phrase editing tools to fashion the audio into a phrase, and use the Phrase Export feature. -
Page 373: Exporting Phrases As Wav Files
Time/Value dial so that the now line touches the phrase. Repeatedly press F4 (INFO) to display any of three types of information about the displayed phrases: their names, dates of creation, and sizes. Roland VS-2000 Owner’s Manual www.RolandUS.com... -
Page 374: Cd Capture
You can capture an entire audio selection from a CD or a F1 (CDCapt) portion of a selection. Each track from a CD is captured by the VS-2000 in approximately 20- 30% of the track’s playing time. www.Roland.com Roland VS-2000 Owner’s Manual... -
Page 375: To Capture Audio From An Audio Cd
“CDCapt” appears above F1. 3. Press F1 (CDCapt). The CD CAPTURE screen appears, and the VS-2000 scans the audio CD. When it’s finished, the CD TRACK list shows all of the stereo CD tracks on the CD. This CD TRACK list shows all of the tracks on the CD. -
Page 376: Installing Vs8F-3 Plug-Ins
27—Mastering and CD-R/RW Operations You can use the VS-2000 CD Player’s time display to identify the time location of any audio you want to grab. See Page 369. You can set the CD TRACK CAPTURE OFFSET on the fly as you listen to the selected CD track. -
Page 377: 28-Utility Menu Parameters
28—Utility Menu Parameters The UTILITY MENU contains a wide array of parameters. Some of its screens present parameters that set the general behavior of the VS-2000—or its behavior when a particular project is loaded—while others offer detailed control of specific VS-2000 features. -
Page 378: System
See for “Recording Digital Input Signals” on Page 137. SCREEN SAVER When you’ve connected a color VGA monitor to your VS-2000, the VS-2000 offers a built-in screen saver that turns on after a specified amount of time. The attractive, animated screen saver provides a measure of privacy by hiding the current VGA screen when you’re not using it. -
Page 379: Shift Lock
Page 184 and Page 145, respectively. Rtn TO Tr STATUS Sw You can set the VS-2000 so that the TRACK/STATUS buttons default to the control of hard disk recorder tracks—automatically exiting Locator or Scene mode after a locator or scene, respectively, is selected—as described on Page 143 and on Page 184. -
Page 380: Operation Display
When you load a stored project, there’s no relation between the position of the 16 physical faders and the stored FADER parameter levels for their corresponding track channels. The VS-2000 allows you to set the method by which the faders and their corresponding FADER parameters are brought into agreement. When the FADER MATCH parameter is set to: •... -
Page 381: Vga
The external VGA shows: PS/2 MOUSE, PS/2 KEYBOARD For a description of the VS-2000’s mouse settings, see Page 66. For a description of the VS-2000’s ACSII keyboard settings, see Page 66. The use of a mouse and/or keyboard requires the purchase and installation of a VS20-VGA VGA/Mouse Expansion Board, sold separately. -
Page 382: Digital
If you’re sending audio to a connected external digital recorder that records at a lower bit depth than the VS-2000 (Page 135), you can dither the VS-2000’s output signal so that it sounds its best at the bit depth the external device is using. Dithering adds an inaudible veil of noise to the signal in order to mask audio artifacts that are introduced when bits are discarded as audio travels from a higher bit-rate device to a lower one. -
Page 383: Playrec
This parameter is explained in “Shifting the Project Start Time” on Page 300. PEAK HOLD Sw You can set the VS-2000’s level meters so that their peak lines “stick” at their highest positions, remaining there until you press HOME to release them. This allows you to look away from the display without worrying that you’ll miss problematic level peaks. -
Page 384: Midi
See “Setting the PREVIEW TO and FROM Times” on Page 180. MIDI UTILITY menu F5 (MIDI) The VS-2000’s MIDI parameters and operations are described in Chapter 23, starting on Page 283. See the VS-2000 Owner’s Manual index for page numbers of references. SYNC UTILITY menu F6 (SYNC) Synchronization parameters and operations are described starting on Page 291. -
Page 385: Locate
VS-2000’s mixer and/or UTILITY menu parameters to their default factory settings. You may want to do this to start over with a clean slate, or if your VS-2000 is behaving oddly, and you suspect that some unknown parameter value may be the cause. -
Page 386: Rss Pan Setup
FADER ASSIGN Sw To activate fader control of you video device from the VS-2000 when using V-LINK, set FADER ASSIGN Sw to On. The faders can control a range of behaviors, as described below. - Page 387 A variety of settings on a V-LINK-connected video device can be controlled using the VS-2000’s faders when V-LINK is active and FADER ASSIGN Sw (see above) is turned on. To assign a fader to the control of a setting, select the corresponding FADER parameters and dial in: •...
- Page 388 28—UTILITY Menu Parameters www.Roland.com Roland VS-2000 Owner’s Manual...
-
Page 389: 29-Expanding The Vs-2000
When installing a VS8F-2/VS8F-3 effect expansion board, remove only the specified screws. • Be careful that the screws you remove do not drop into the interior of the VS-2000. • Re-attach the VS-2000’s bottom cover after the installation—do not leave its internal components exposed. -
Page 390: Installation Procedure
1. Before installing the VS8F-2/VS8F-3, turn off the power of the VS-2000 (Page 85) and all connected devices, and disconnect all cables from the VS-2000. 2. Turn the VS-2000 over onto its back, and remove only the screws shown in the following diagram. - Page 391 29—Expanding the VS-2000 7. After powering up the VS-2000, hold down SHIFT and press F3 (EFFECT). INTERNAL EFFECT EFFECT B EFFECT C 8. Verify that the VS8F-2/VS8F-3 are installed correctly. If they are installed correctly, the effects corresponding to the EFFECT B/C section(s) will be displayed as follows.
-
Page 392: Installation De La Carte D'extension D'effets (French Language For Canadian Safety Standard)
Pour resserrer, tourner dans le sens des aiguilles d’une montre. desserrer resserrer • Veillez à ne pas laisser tomber de vis dans le châssis du VS-2000. • Ne pas laisser le panneau de protection avant détaché. S’assurer de l’avoir rattacher après avoir installé le disque dur. - Page 393 EFFECT C Pile au lithium 3. À l’intérieur du VS-2000, il existe deux connecteurs et 6 goupilles en plastique pour la carte VS8F-2/VS8F-3. Glissez les connecteurs de la carte VS8F-2/VS8F-3 dans les connecteurs internes et insérez simultanément les goupilles en plastique dans les trous de la carte pour la retenir en place.
- Page 394 29—Expanding the VS-2000 7. Après avoir redémarré le VS-2000, tenez la touche Maj enfoncée et appuyez sur la touche F3 (EFFECT). INTERNAL EFFECT EFFECT B EFFECT C 8. Vérifier que les cartes VS8F-2 ou VS8F-3 sont installées correctement. Si les cartes sont installées correctement, les effets correspondant aux sections EFFECT B/C...
-
Page 395: Replacing The Vs-2000'S Battery
1. Power down the VS-2000 (Page 85), saving any recent changes you’ve made to the currently loaded project. 2. Turn off all connected devices, and disconnect all cables from VS-2000. 3. Turn the VS-2000 over onto its back, and remove only the screws shown in the following illustration. Should you remove battery and screws, make sure to put them in a safe place out of children’s... - Page 396 Press the battery down until it is retained by the tabs. 6. Use the screws that you removed in Step 3 to re-fasten the VS-2000’s bottom cover. This completes the process of exchanging the lithium battery. 7. Connect the cables that you disconnected earlier.
-
Page 397: Remplacement De La Pile Du Vs-2000.Fs (French Language For Canadian Safety Standard)
(French language for Canadian Safety Standard) Le VS-2000 renferme une pile au lithium qui alimente ses dispositifs de chronométrage; la pile alimente aussi les secteurs de la mémoire du VS-2000™fs où sont stockées certaines valeurs des paramètres. Lorsque la pile faiblit, les dispositifs de chronométrage du VS-2000™fs ne peuvent pas fonctionner correctement et il est... - Page 398 Appuyer sur la pile jusqu'à ce que les languettes la retiennen. 6. Remettez en place et fixez le couvercle inférieur du VS-2000™fs à l’aide des vis retirées à l’étape 3. Le changement de pile au lithium est terminé. 7. Rebranchez les câbles que vous avez débranchés.
-
Page 399: Supplemental Information
Hold SHIFT and press: show more of the project on the display. ZERO store the current project. move to the start of project audio move to the end of project audio PLAY restart the VS-2000 during shutdown Roland VS-2000 Owner’s Manual www.RolandUS.com... -
Page 400: Factory Ez Routing Templates
Supplemental Information Factory EZ Routing Templates The VS-2000 ships with four EZ Routing templates—see Page 280 for information on EZ Routing templates. The settings contained in the factory templates are as follows. Recording Template TRACK/STATUS: TR17/18 www.Roland.com Roland VS-2000 Owner’s Manual... -
Page 401: Bouncing Template
Supplemental Information Bouncing Template TRACK/STATUS: PLAY TR14 PLAY TR17/18 PLAY TR15/16 PLAY TR10 PLAY TR11/12 TR17/18 (TR17/18 is used only as Rhythm Track) Roland VS-2000 Owner’s Manual www.RolandUS.com... -
Page 402: Mixdown Template
Supplemental Information Mixdown Template TRACK/STATUS: PLAY TR17/18 PLAY PLAY TR12 PLAY TR13 TR15/16 TR17/18 (TR17/18 is used only as Rhythm Track) www.Roland.com Roland VS-2000 Owner’s Manual... -
Page 403: Mastering Template
Supplemental Information Mastering Template TRACK/STATUS: PLAY TR17/18 PLAY PLAY TR12 PLAY TR13 TR15/16 TR17/18 (TR17/18 is used only as Rhythm Track) Others: MASTERING Sw MASTERING MODE FX1 Patch P231:MTK:Mixdown Roland VS-2000 Owner’s Manual www.RolandUS.com... -
Page 404: Vs-2000 Tick Resolution Table
Supplemental Information VS-2000 Tick Resolution Table Use this table to convert beats to ticks when using the Measures and Beats counter. Traditional Name: Length of Note: Number of Ticks: Whole Note One Whole Bar 1920 Half Note Half of a Bar... -
Page 405: Midi Channels And Control Change Maps
FX 3 Send Level FX 4 Send Level FX 5 Send Level FX 6 Send Level Aux 1/2 Send Pan FX 1/2 Send Pan FX 3/4 Send Pan FX 5/6 Send Pan Offset Fader Level Offset Pan Roland VS-2000 Owner’s Manual www.RolandUS.com... - Page 406 TRACK/STATUS Buttons—The Effects of Control Change Values You can change the current setting of a TRACK/STATUS button by sending Control Change messages to the VS-2000. Tracks 1-16 respond to Control Change 35. Tracks 17-18 respond to Control Change 67. The following table shows how a TRACK/STATUS button’s setting changes in response to various received Control Change values .
- Page 407 FX 6 Level Direct 1/2 Balance Aux 1/2 Balance Direct 3/4 Balance FX 1/2 Balance Direct 5/6 Balance FX 3/4 Balance Direct 7/8 Balance FX 5/6 Balance MIDI Channel 16 MASTER Level MASTER Balance MONITOR Balance Roland VS-2000 Owner’s Manual www.RolandUS.com...
-
Page 408: Automix Parameter List
Supplemental Information Automix Parameter List The VS-2000’s Automix feature can record and playback changes to the values of the following parameters. Input and track channel parameters Automix name: Description: Automix name: Description: LEVEL(Fader) Mix Send Level EQ Sw EQ Switch *7... - Page 409 COLOR Cb Color Cb Control CLIP Clip Select DISSOLVE Dissolve Time BRIGHTNESS Brightness Control PLAY SPEED Play Speed COLOR Cr Color Cr Control *7 Can’t record when realtime recording or snapshot *8 Recorded when snapshot Roland VS-2000 Owner’s Manual www.RolandUS.com...
-
Page 410: V-Studio Song/Vs-2000 Project Compatibility
Supplemental Information V-Studio Song/VS-2000 Project Compatibility Recording Mode Tables A project using the following recording modes can be converted into a VS-2000 project using the project IMPORT operation. Recording mode: VS-880/ VS-890/ VS-1680: VS-1880/1824/ VS-2400CD/ 880EX: VSR880: 1824CD: 2480/2480CD: —... - Page 411 * Speaker Modeling and the Mastering Tool Kit effects are available in the current VS-880EX and VS-1680 operating system versions. Visit www.rolandus.com or call Roland Product Support for more info. Attenuator When an earlier V-Studio’s song is imported, and when a VS-2000 project is exported, attenuator values are translated as follows. Earlier V-Studio:...
- Page 412 Supplemental Information www.Roland.com Roland VS-2000 Owner’s Manual...
-
Page 413: Glossary
An Aux bus—short for “Auxiliary bus”—is a pathway that can carry multiple signals to a destination. The VS-2000’s two Aux busses can carry signals to outputs on their way to external devices such as headphone amplifiers and external effect processors. - Page 414 CD-RW and write new data onto the disk. Channel A channel is a set of tools for managing and shaping an audio signal. The VS-2000 has input channels, track channels, Aux master channels and FX return channels. Channel strip A channel strip is a physical set of channel controls.
-
Page 415: Hard Drive
FX Bus In the VS-2000, an FX bus acts as the pathway input and track channel signals travel to get to the VS-2000’s internal effects. GPI is short for “General Purpose Interface,” a control jack found on some video editing devices. - Page 416 96 locators. Loop As a verb, the act of playing the same project section over and over until STOP is pressed. As a noun, the section of the project that’s played when the VS-2000’s Loop feature is turned on. Low Impedance Impedance is the amount of force with which analog audio voltages are sent into jacks or accepted by jacks.
- Page 417 On the Home screen, a playlist presents the project’s phrases. On the AUTOMIX EDIT screen, Automix data is listed. Project All of the audio and settings for a recorded work in the VS-2000, stored as a project disk file on the VS-2000’s hard drive. Roland VS-2000 Owner’s Manual...
-
Page 418: Sample Rate
Recover To reload a project you’ve backed up, use the project RECOVER operation. When you recover backup data, the VS-2000 re-converts it back to its original form. Routing The connection of a component’s output to the input of another component. For example, you can route input channels to tracks, FX channels to tracks, and so on. - Page 419 The process of coordinating the timing of two devices. Take In the VS-2000, a take is an audio file recorded on your hard drive. In general studio usage, “take” refers to an attempt to record a performance, successful or otherwise.
- Page 420 Glossary Undo The VS-2000’s Undo feature allows you to reverse up to 99 of your most recent recording and editing actions in a project. The act of reversing an action is referred to as “undoing” the action. V-Track A V-Track (“Virtual Track”) is a string of phrases arranged one after another in the order in which they’re to be played back by the VS-2000’s hard disk recorder.
-
Page 421: Index
..............343 Attenuation naming ............. 162 ..............343 channel EQ saving ......151 ........346 input and track channel signals playback of Automix data ..............345 punching ......... 345 merging new and old data Roland VS-2000 Owner’s Manual www.RolandUS.com... - Page 422 ............. 110 ............... 368 performing CD player ........395 Backup battery replacement concepts ................229 ..........358 CD track markers ............365 Balance. See Panning Disk at Once ............356 Band. See EQ disk images www.Roland.com Roland VS-2000 Owner’s Manual...
- Page 423 ........44, 143, 183, 187 ChLink CLEAR button ............. 166 CpyPRM Clearing ..............154 ............119 DIR 1-8 a drive/partition ............157 ..........190 DYN Type Auto Punch points ..........151 ............237, 243 DYNAMICS on/off edit points Roland VS-2000 Owner’s Manual www.RolandUS.com...
- Page 424 Control Change messages ........382 DIGITAL COPY PROTECT ..........405 received by VS-2000 ..............382 DITHER ........285 remote control of VS-2000 ..........382 MASTER CLOCK ..........284 CONTROL LOCAL Sw Digital inputs ..........49 Cooling fan exhaust vent .............. 135...
- Page 425 ......250 selecting tracks and phrases ..............156 overview operations ................. 157 ratio phrases ............159 release speed .............. 255 COPY ..............166 resetting ............258 DELETE ..............159 sidechain ............260 DIVIDE ..............158 threshold Roland VS-2000 Owner’s Manual www.RolandUS.com...
- Page 426 ............213 ..............267 loop effects regions ..........208 ..............267 using direct paths tracks ..........361 ............300 Mastering Tool Kit ERROR LEVEL ........... 224 ......368 Microphone Modeling Error messages during CD burning www.Roland.com Roland VS-2000 Owner’s Manual...
- Page 427 ................. 154 FX INS ........ 153 input and track channels to ................222 FX Lvl ............131 Fader/pan display FX master channels ................37 Faders ............... 205 using ..........230 CH EDIT parameter FX return channels Roland VS-2000 Owner’s Manual www.RolandUS.com...
- Page 428 ..............331 storing Hard disk recorder ..........340 recording to tracks ..............193 bouncing sequencer concepts ..............339 editing ........94 how audio’s played back ............337 recording .......... 94 how audio’s recorded ............337 realtime www.Roland.com Roland VS-2000 Owner’s Manual...
- Page 429 UTILITY parameters ................280 IniTrA Keyboard Input channels ..............66 activating .......... 173 adding to MASTER mix ............... 66 configuring .............. 52 introduction ..............64 connecting ..............150 linked ............... 72 shortcut list Roland VS-2000 Owner’s Manual www.RolandUS.com...
- Page 430 ..............213 external effects ......... 227–234 ............. 217 FX return channels inserting ............212 ............89 mechanics of introduction ............ 230 ............. 59 metering returns introduction ............228 ..........361 mono or stereo Mastering Tool Kit www.Roland.com Roland VS-2000 Owner’s Manual...
- Page 431 ............... 361 ............284 using OUT or THRU ..............283 Mastering tracks overview ........285 CD track markers remote control of VS-2000 ............... 364 ......... 286 clearing Control Change messages ............363 ....286 numbering Program Changes and Bank Selects ..........
- Page 432 ID numbers snapping to grid ........... 287 ..........246 bulk storage of data trimming phrases ......... 285 ........... 64 remote control of VS-2000 hardware requirements ..........70 MIDI beat clock right- or left-handed ..............292 described using ............. 241...
- Page 433 PEAK HOLD Sw ..............125 Peak lines Pedal. See FOOT SWITCH ASSIGN Offset ............134 Phantom power ........... 299 with VS-2000 as master ......49 PHANTOM POWER 1/2, 3/4, 5/6, 7/8 ..........300 with VS-2000 as slave ................ 153 PHASE ............. 299 OFFSET TIME ........
- Page 434 ..............56 ............31 defined Product Support ..............89 described Program Changes and Bank Selects ......285, 286 Plug-in effects. See VS8F-3 remote control of VS-2000 ................. 383 ............ 99–121 PlyRec PROJECT menu ............66 ..............110 POINTER SPEED BACKUP ...........
- Page 435 Release .............. 177 a new track ........... 380 REMAIN DISPLAY TYPE ..............193 bouncing ......... 285 Remote control of VS-2000 ..........275 busses, listening to ........286 Control Change messages concepts ...... 286 Program Changes and Bank Selects ........94 how audio’s played back...
- Page 436 Sel Phr (Pop-Up menus) ..........340 Harmony to tracks ..........242 Sel Trk (Pop-Up menus) ............169 input channels ..............101 SELECT ..............169 linked ....... 244 SELECT PHRASE Pop-Up menu ........... 173 to Direct paths www.Roland.com Roland VS-2000 Owner’s Manual...
- Page 437 ............... 142 ..........292 Solo mode MIDI beat clock ............... 292 Song Position Pointer ..............292 ............292 described SMPTE ..............299 Songs dropouts ..........113 ........304 exporting projects to exchanging digital audio Roland VS-2000 Owner’s Manual www.RolandUS.com...
- Page 438 .............. 288 ..............150 sending linked ........288 ............. 147 MIDI BULK DUMP screen parameters ........285 remote control of VS-2000 routing ............286, 299 ........... 200 SysEx. Rx Sw to Direct paths ............285, 299 SysEx. Tx Sw to tracks .............
- Page 439 ........379 using PREVIOUS/NEXT Sw .............. 37 ........379 TUNER button Rtn TO Tr STATUS Sw ..........85 ............379 Turning Off the VS-2000 SHIFT LOCK ..........268 ..........380 TYPE (time-stretching) UNDO MESSAGE ..............381 ..........381 H.POSITION ..........381 REFRESH RATE ................
- Page 440 V-Track map ............373 for WAV export ............127 Home screen ............. 360 mastering tracks ........... 108 splitting a project V-Tracks ..............149 activating ..............193 bouncing ..............95 explained ............. 97 the power of www.Roland.com Roland VS-2000 Owner’s Manual...
- Page 441 Memo Roland VS-2000 Owner’s Manual www.RolandUS.com...
-
Page 442: Information
Information When you need repair service, call your nearest Roland Service Center or authorized Roland distributor in your country as shown below. AFRICA PHILIPPINES COSTA RICA TRINIDAD ITALY ISRAEL G.A. Yupangco & Co. Inc. JUAN Bansbach Instrumentos AMR Ltd Roland Italy S. p. A. -
Page 443: Federal Communications Commission
Compliance Information Statement Model Name : VS-2000 Type of Equipment : DIGITAL STUDIO WORKSTATION Responsible Party : Roland Corporation U.S. Address : 5100 S. Eastern Avenue, Los Angeles, CA 90040-2938, U. S. A. Telephone : (323) 890-3700 For Canada NOTICE This Class B digital apparatus meets all requirements of the Canadian Interference-Causing Equipment Regulations. - Page 444 03456878 ’04-11-3KS...
Need help?
Do you have a question about the VS-2000 and is the answer not in the manual?
Questions and answers