Table of Contents
Advertisement
Quick Links
COLOUR VIDEO COPY PROCESSOR
MODEL
CP710E
OPERATION MANUAL
CP710
MONITOR
MEMORY
POWER
REMOTE
THIS OPERATION MANUAL IS IMPORTANT
TO YOU.
PLEASE READ IT BEFORE USING YOUR
COLOUR VIDEO COPY PROCESSOR.
This video copy processor complies with the requirements of the EC
Directive 89/336/EEC, 73/23/EEC, 93/42/EEC and 93/68/EEC.
The electro-magnetic susceptibility has been chosen at a level that
gains proper operation in residential areas, on business and light
industrial premises and on small-scale enterprises, inside as well as
outside of the buildings. All places of operation are characterised by
their connection to the public low voltage power supply system.
PRINT
OPEN
Advertisement
Table of Contents

Related Manuals for Mitsubishi CP710E


Summary of Contents for Mitsubishi CP710E
- Page 1 COLOUR VIDEO COPY PROCESSOR MODEL CP710E OPERATION MANUAL CP710 MONITOR MEMORY PRINT POWER OPEN REMOTE THIS OPERATION MANUAL IS IMPORTANT TO YOU. PLEASE READ IT BEFORE USING YOUR COLOUR VIDEO COPY PROCESSOR. This video copy processor complies with the requirements of the EC Directive 89/336/EEC, 73/23/EEC, 93/42/EEC and 93/68/EEC.
-
Page 2: Protective Measures
2. Precautions In the interest of safety, please observe the following precautions: POWER REQUIREMENT This Colour Video Copy Processor is designed for operation on 220V-240V, 50Hz AC. Never connect to any outlet or power supply having a different voltage or frequency. WARNNG: THIS APPARATUS MUST BE EARTHED. -
Page 3: Installation Locations
2. Precautions BE CAREFUL WITH THE PRINTING UNIT Don't move the unit while the printing unit is sliding out. This may cause injury. Be careful not to catch your finger in the printing unit while the printing unit is being retracted into the unit. CONNECTION CABLES Use the provided power cord and the composite video signal cable. -
Page 4: Safety Checks
2. Precautions CAUTION ON RELOCATING When transporting this unit, make sure it is not likely to be subjected to impacts. They can be a prime cause for damage. Further, make sure to disconnect the power cord from the power outlet, and the cables from the connected devices. SAFETY CHECKS Periods: According to the recommendations of the manufacturer of medical device. -
Page 5: Preparations Before Operation
3. Preparations before operation 1 1 1 1 1 Removing the fixed screw on the printing unit and protective cushion Pages 4-5 2 2 2 2 2 Installing the print paper and ink cassette Pages 5-8 • Install the print paper. •... - Page 6 3. Preparations before operation Remove the protective cushion. Note: Unplug the power cord from outlet for safety. 1 Press the OPEN button on the front panel. Printing unit advances to the front. Attention • Do not touch the thermal head. Fingerprints or dust on the thermal head will degrade the print quality.
- Page 7 3. Preparations before operation 3 Insert the print paper between roller 1 and 2. 4 Insert the edge of the print paper to roller 3. Be sure to insert the paper straight. Roller Roller Roller Roller Roller Roller Paper Paper Paper Print paper INCORRECT...
- Page 8 3. Preparations before operation Install the ink cassette 1 Eliminate any slack of the ink sheet. Hold the roller A and B and turn the white roller. 2 Insert the ink cassette with the ink sheet into its compartment. Insert the ink cassette with the knob side toward you until it is locked into place. •...
- Page 9 3. Preparations before operation Print paper and ink sheet Attention • Listed below is the print paper and ink sheets available for the CP710E. Make sure you use only these consumables. Ink sheet Product name Ink sheet size Number of prints...
-
Page 10: Connection With External Equipment
4. Connection with external equipment The functions of this unit can be set with the menu screens displayed on the monitor. 1 1 1 1 1 Connection with Monitors Page 9 Explains how to connect with a monitor. 2 2 2 2 2 Connection with VIDEO/S-VIDEO (Y/C separate VIDEO) signal equipment Page 10 Explains how to connect with a video signal equipment. - Page 11 4. Connection with external equipment (VIDEO/S-VIDEO) 2 2 2 2 2 Connection with VIDEO signal, S-VIDEO (Y/C separate VIDEO) signal equipment When connecting the unit with another equipment, make sure to set the power of each equipment to "OFF". VIDEO signal To VIDEO IN terminal VIDEO ( REMOTE...
-
Page 12: Features And Functions
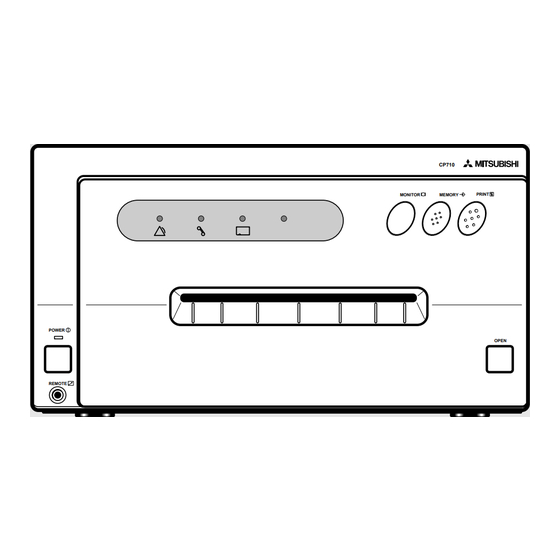
5. Features and functions 1 1 1 1 1 FRONT PANEL pages 11 - 12 Explains the buttons and terminals, etc. on the front panel. 2 2 2 2 2 INSIDE OF PRINTING UNIT page 12 Explains the installation of the ink cassette and print paper inside the unit. 3 3 3 3 3 REAR PANEL page 13 Explains input/output terminals on the rear panel. - Page 13 5. Features and functions 6 6 6 6 6 Monitor button [MONITOR] Switches the display on the monitor. When this button is pressed, the picture on the monitor screen switches between the picture of the input signal (source image) and the memorized image. 7 7 7 7 7 MEMORY button [MEMORY] This enables memorization of the image to be printed.
- Page 14 5. Features and functions 3 3 3 3 3 REAR PANEL Potential equalization connector This is used to equalize the potential of the REMOTE equipment connected to the unit. For details, refer to the installation instruction of the equipment to be connected. S-VIDEO VIDEO AC LINE...
- Page 15 5. Features and functions 4 4 4 4 4 REMOTE CONTROL DISPLAY COLOR FIELD PROG. ADJUST /FRAME PRINT Q' ty MENU CLEAR STOP MEMORY MONITOR PAGE MEMORY PRINT 1 1 1 1 1 COLOR IMAGE ADJUSTMENT button [COLOR ADJUST] When this button is pressed, a screen for adjusting the video image is displayed. Use this button to set the various functions of this unit.
- Page 16 5. Features and functions 8 8 8 8 8 PRINT button [PRINT] Press this button to print the image memorized by the MEMORY button. 9 9 9 9 9 PROGRAM button [PROG.] Press this button to select the images memorized in the program of this unit and various settings such as printing. Each time this button is pressed, the program is switched.
-
Page 17: Printing Procedures (Basic Prints)
6. Printing procedures (Basic prints) One picture image can be printed on one sheet. S size printing L size printing 1 1 1 1 1 Printing Pages 17 - 23 Explains storing an image in the memory and printing 2 2 2 2 2 Continuous printing Page 24 Explains the continuous printing of the same image. - Page 18 6. Printing procedures (Basic prints) 1 1 1 1 1 Printing Selecting FIELD or FRAME 1 Press the FIELD/FRAME button on the remote control to select FIELD or FRAME. DISPLAY COLOR FIELD PROG. ADJUST /FRAME FIELD/FRAME button PRINT Q' ty MENU CLEAR STOP...
-
Page 19: Selecting Input Signal
6. Printing procedures (Basic prints) Selecting input signal • Select " VIDEO " or " S-VIDEO " according to the input signal. • The input signal can be set on the menu screen displayed on the monitor. • It is not necessary to select the input signal every time you print unless the input signal is changed. M E N U 1 Press the MENU button •... - Page 20 6. Printing procedures (Basic prints) 5 Press the SET button. • " CHANGE : OK " is selected. When changing the input signal selected at step 4 , press the RIGHT • shift button to select " CANCEL " . Press the SET button to select "INPUT"...
- Page 21 6. Printing procedures (Basic prints) Setting print size (S/L) • Set the print size to "S" or "L" according to the ink sheet installed. • The print size can be set on the menu screen displayed on the monitor. • It is not necessary to set the size every time you print unless the size of the ink sheet is changed. 1 Press the MENU button.
- Page 22 6. Printing procedures (Basic prints) 5 Press the SET button. • " CHANGE : OK " is selected. When changing the size setting selected at step 4 , press the RIGHT • shift button to select " CANCEL " . Press the SET button to select "MODE : S/L"...
-
Page 23: Memory Page
6. Printing procedures (Basic prints) MEMORY PAGE The following image memorization function is available. When storing one image in the memory: • When FRAME is selected, one image can be memorized in FRAME mode. • When FIELD is selected, each one image can be memorized in FIELD A and FIELD B. One image in FIELD A One image in FIELD B •... - Page 24 6. Printing procedures (Basic prints) Image memorizing with PAGE INC (Page Increment) function PAGE INC (Page Increment) : When the “automatic memory page turning” function is valid, the image memorizing is done as follows: • After selecting FIELD, the image is stored in “A” first. After that, each time the MEMORY button is pressed, the images will be memorized in the order of B, A, B..
- Page 25 6. Printing procedures (Basic prints) 2 2 2 2 2 Continuous printing The desired number of memorized images can be printed continuously when the desired number is set before printing. The number of prints can be changed during printing. The continuous printing also can be cancelled by setting the number of prints to 1 during printing.
-
Page 26: Setting The Functions
7. Setting the functions Setting each function on the menu display. There are 2 functions menus. 1 1 1 1 1 " MAIN MENU " Sub menu 2 2 2 2 2 " MEMORY SW MENU " Sub menu MAIN MENU is used to open the sub menu. Setting the following with the sub menu. When selecting "SAVE", the setting can be stored. - Page 27 7. Setting the functions Operation Monitor displaly 3.ADDITIONAL STOROBE : OFF/1/15 sec MULTI : OFF/ON The menu is selected by MODE : SAME/DIFF/PHOTO IMAGES : 2/4/16 pressing the shift buttons SEPARATE OFF/ON CHANGE : OK/CANCEL Changing a value, selecting mode, switching ON or OFF is switched by pressing 1.COLOR ADJ CONT...
- Page 28 7. Setting the functions shows the reference page. ANALOG ADJ 1 . KEY SETTING CONT KEY LOCK : OFF COLOR : 12 MEM&PRINT : OFF CENTER : OFF/ON MEM&STOP : OFF MEM&MON : OFF PRINT&CLR : OFF CHANGE: OK/CANCEL POWER CHANGE: OK MEMORY CLEAR KEY : ONE...
- Page 29 7. Setting the functions Displaying menu screen • All functions are operated with the remote control. 1 1 1 1 1 Main menu – sub menu display M E N U • Press the MENU button to display Main menu. 2 2 2 2 2 MEMORY SW MENU –...
- Page 30 7. Setting the functions Press the SET button. • " CHANGE : OK/CANCEL " is selected. • Select "OK" to close the menu. Select "CANCEL" to cancel the setting again by the RIGHT or LEFT shift button. Press the SET button.
- Page 31 7. Setting the functions (Main menu) Function 1 1 1 1 1 MAIN MENU Open the sub-menu from Memory menu. e.g. Monitor display 1. COLOR ADJ Items and setting displayed are shown below. 1.COLOR ADJ ..Adjust color of printing image 2.SIGNAL SET ..
- Page 32 7. Setting the functions (Main menu) 1 1 1 1 1 COLOR ADJ Adjusting the color of the image • With this menu, the color of the source image and memorized image can be adjusted. COLOR ADJUST • This menu is also displayed by pressing COLOR ADJUST button.
- Page 33 7. Setting the functions (Main menu) ANALOG ADJ The adjustment image of analog input signal display • This menu is used to adjust the image of analog input signal display before storing in the memory. • This menu is opened when pressing RIGHT shift button on "ANALOG ADJ : PUSH [ ] ".
- Page 34 7. Setting the functions (Main menu) 2 2 2 2 2 SIGNAL SET Signal selecting menu INPUT Function Select the signal from inputting signal terminal on the rear panel. VIDEO ..Signal from VIDEO input terminal S -VIDEO ..Signal from S-VIDEO input terminal FIELD Function The odd/even field lines will be reversed depending on the input interlaced signal.
-
Page 35: Additional Special Print Setting
7. Setting the functions (Main menu) 3 3 3 3 3 ADDITIONAL Special print setting STROBE Function This function is used to repeat storing the image in the memory according to the selected time interval. When MULTI is set to "ON", the image is stored in order of image number . When MULTI is set to "OFF", every one image is stored in the memory. - Page 36 7. Setting the functions (Main menu) SEPARATE Function Switching the white frame Separate the each image in multi-image print with white frame ON ....White frame print OFF ....Normal print • When "MULTI" is set to "ON", this function is displayed. 4 4 4 4 4 PRINT Print setting 1 MODE...
- Page 37 7. Setting the functions (Main menu) COMMENT Function Selecting the comment Selecting the comment on printing from 5 types. OFF ..Comment is not printed. ON ..Print the made comment. • The following is displayed only when COMMENT is set to ON. SELECT COM ..
- Page 38 7. Setting the functions (Main menu) 5 5 5 5 5 COMMENT Making a comment Function Making a comment on print Refer to pages 39-42 for details. 6 6 6 6 6 SYSTEM System setting 1 SIZE Function Selecting a print area of printing image Selecting the print size and user print size setting printing size Picture element...
- Page 39 7. Setting the functions (Main menu) USER SIZE ADJ Setting the image size The printing area can be changed and stored in memory as a user setting. When selecting " USER ADJ " on the "6.SYSTEM "menu . Press the RIGHT shift button, then, USER SIZE ADJ menu is displayed.
- Page 40 7. Setting the functions (Making a comment) Making a comment Select the making a comment menu "COMMENT". This functions are operated with the remote control using the menus displayed on the monitor screen. Explanation 5.COMMENT POSITION SELECT 0 1 2 3 4 5 6 7 8 9 + - / = ( ) < > [ ] { } ! \ # $ % &...
- Page 41 7. Setting the functions (Making a comment) Comment making procedure Press the RIGHT or LEFT shift button to select the position where a letter is inputted. 5.COMMENT • Select position is indicated in red. POSITION SELECT 0123456789+- / = ( ) < > [ ] { } ! \ # $ % &...
- Page 42 7. Setting the functions (Making a comment) Changing character type M E N U Press the MENU button. 5.COMMENT • Comment editing display is shown. 456789 PAGE 0123456789+- /= ( ) < > [ ] { } ! \ # $ % & ? @ " ' , . : ; ^ CHANGE: OK/CANCEL Press the UP or DOWN...
- Page 43 7. Setting the functions (Making a comment) Close the comment menu 5.COMMENT Press the SET button to select " CHANGE : OK/CANCEL" . POSITION 4 5 6 7 8 9 • " CHANGE : OK/CANCEL " is displayed in red. SELECT 0123456789+- /= ( ) <...
- Page 44 7. Setting the functions (Memory SW menu) SETTING FUNCTIONS 2 2 2 2 2 MEMORY SW MENU When pressing the POWER button while pressing the MEMORY button on the front panel with the POWER turned off the MEMORY SW MENU is displayed. (e.g.) MEMORY SW MENU 1.
-
Page 45: Key Setting
7. Setting the functions (Memory SW menu) 1 1 1 1 1 KEY SETTING Setting the buttons' function KEY LOCK Function The function on the remote control buttons and all of the buttons of the unit except POWER button are not available. - Page 46 7. Setting the functions (Memory SW menu) 2 2 2 2 2 REMOTE SETTING Remote terminal setting display CONNECT Function Setting the No. 2 pin function of the remote terminal 2 on the rear panel. NORMAL ....No. 2 pin functions as "MEMORY". PRE-CUT ....
-
Page 47: Print Setting
7. Setting the functions (Memory SW menu) • The signal defined in BUSY 1 is output from Remote terminal 1. External remote terminal 1 External remote terminal 2 • The two signals defined in BUSY 1 and 2 are output from Remote terminal 2. -
Page 48: System Setting
7. Setting the functions (Memory SW menu) V POSITION Function Adjusting the vertical position of printing image. Setting area - 28 to +28 ( Change each 2 lines) When 2-image printing ( selected "2" in IMAGES) on L size print paper, the top and bottom of the image may not be fully printed depending on memory size. -
Page 49: Printing Procedures (Special Prints)
8. Printing procedures (Special prints) The following printing is available. 1 MULTI prints SAME or DIFF ......Pages 50 - 53 2, 4, or 16 images can be printed on a sheet. 2-image 4-image 16-image S-size paper L-size paper S-size paper L-size paper S-size paper L-size paper 2 PHOTO prints... - Page 50 8. Printing procedures (Special prints) Storing multi-image in memory The multi-image can be stored in memory as follows. SAME (The same two images are printed on a sheet.) 2-image mode • 1 image is stored in FIELD A. • 1 image is stored in FIELD B. SAME DIFF •...
- Page 51 8. Printing procedures (Special prints) 1 1 1 1 1 MULTI PRINTS 2, 4 or 16 images can be printed on a sheet. • The following prints are available. Setting of S size prints L size prints the No. of images image printing...
- Page 52 8. Printing procedures (Special prints) 3 Press the DOWN or UP shift button to select "MULTI : OFF/ON ". Then, press the RIGHT shift button to select "ON". • "MODE : SAME/DIFF/PHOTO " is displayed on the menu screen. • "IMAGES : 2/ 4/ 16 " is displayed on the lower line. 4 Press the DOWN shift button to select "...
- Page 53 8. Printing procedures (Special prints) Storing images in memory 1 Press the DISPLAY button to display the set conditions. 2 Press the FIELD/FRAME button on the remote control to select FIELD or FRAME. 3 Press the MONITOR button and select the source image ("LIVE" is displayed on the monitor.) to display the image to be stored in memory.
- Page 54 8. Printing procedures (Special prints) Storing an image in any position When "MODE" is set to "DIFF" and "IMAGES" to 4 or 16 1 Press the DISPLAY button to display the set conditions. 2 Press the MONITOR button. Select source image ("LIVE" is displayed on the monitor.) to display the image to be stored in memory.
- Page 55 8. Printing procedures (Special prints) 2 2 2 2 2 PHOTO PRINTS PHOTO print is a function to print the images on the photo size (3x4cm, 3x3.5cm, 5x5cm) and card size. • CARD size print is suited to stick on a business card. •...
- Page 56 8. Printing procedures (Special prints) Selecting the size 1 Press the DOWN shift button to select " IMAGES : CARD / 3*4/ 5*5 / 3*3.5 " menu. 2 Press the RIGHT shift button to select " CARD " , " 3*4 " , " 5*5 " or " 3*3.5 ". Displaying the image from input signal (source image) or the memorized image 1 Press the SET button.
- Page 57 8. Printing procedures (Special prints) Printing the images 1 Press the MONITOR button to display the memorized image. ("MEMORY" is displayed on the monitor.) • A blue frame is indicated on the displayed image. • The image within the blue frame is photo-printed. PRG.
- Page 58 8. Printing procedures (Special prints) Refer to pages 50-53 (16-Multi-image) and pages 54-57 (PHOTO PRINTS) for storing image in memory. The menu only for pre-cut PHOTO size printing can be used. • Set the function of No. 2 pin of the remote terminal 2 on the rear panel to "HIGH" level. Refer to page 65. (When the remote terminal 2 is not used, "HIGH"...
-
Page 59: Operation
8. Printing procedures (Special prints) OPERATION Setting the multi-print and photo-print menus Setting multi-print and photo-print functions 1 Press the MENU button. Then, press the UP or DOWN shift button to select " 3. ADDITIONAL PUSH [ ] ". 2 Press the RIGHT shift button to select "3. - Page 60 8. Printing procedures (Special prints) 5 Press the SET button. • The source image (image from the input signal) or memorized image is displayed. Storing images in memory / Printing the images 1 Store the images to be printed in memory. •...
- Page 61 8. Printing procedures (Special prints) Setting 1-image/multi-image memory When memorizing 1 image in STROBE mode This setting is used to memorize 1 image in FRAME, FIELD A or FIELD B. 1 Set the mode to 1-image. Select "OFF" in "MULTI : OFF" in "3. ADDITIONAL". 2 Set the page increment function to ON.
- Page 62 8. Printing procedures (Special prints) 3 Press the SET button. • "SAVE 1/2/3" is selected. • This menu is used to store the setting in any one of 3 programs (1, 2 or 3). 4 Press the RIGHT or LEFT shift button to select the program number 1, 2 or 3 to store the setting. •...
- Page 63 8. Printing procedures (Special prints) Setting the automatic interval printing By combining STROBE printing and MEMORY printing, automatic interval printing is available. This is the function where the images are stored in memory at the set interval and printed repeatedly. Automatic interval prints (1 image ) This is the function to store the image in memory page FRAME, FIELD A or FIELD B in order at set interval and print repeatedly.
- Page 64 8. Printing procedures (Special prints) Displaying the source image (image from the input signal) or the memorized image 1 Press the SET button. • " CHANGE : OK/CANCEL " is selected. • When changing the setting, select "CANCEL" and press the SET button.
- Page 65 8. Printing procedures (Special prints) External remote 1 or 2 terminals on the rear panel The images can be stored in memory and printed by sending the remote signal through the external remote terminal on the rear panel. When "MEM & PRINT" function is set to "ON", the images can be printed after storing.
- Page 66 8. Printing procedures (Special prints) External REMOTE 2 terminal • Make out the necessary circuit to use this function by referring to the following. External remote terminal Signal allocation Connector MINI DIN8PIN Pin No. Pin No. Function Transmission/ Description Destination Ground Earth MEMORY...
- Page 67 8. Printing procedures (Special prints) Circuit inside the VCP User side DC5V To VCP CMOS 2 MEMORY / PHOTO mode input DC5V DTC124EK From VCP 3 BUSY2 DC5V DTC124EK From VCP 4 BUSY1 DC5V To VCP CMOS 5 PRINT To VCP 6 REMOTE Pin No.
-
Page 68: Troubleshooting
9. Troubleshooting Error messages and countermeasures If for some reason printing is not possible or error occurs during printing, the error message will be displayed on the monitor screen. In this case, follow the procedure described below. Error messages Causes Countermeasures DOOR OPEN The printing unit is not... - Page 69 9. Troubleshooting Other messages MECHA INITIALIZE REQUEST Indicated when the power is turned on after turning off during printing. Press the MEMORY button for more than on second while pressing the MONITOR button. *Note : 3 MECHA INITIALIZE Indicated during initializing. PRINT STOP In the case of pressing the STOP button on the remote control during printing, this unit is initialized.
- Page 70 9. Troubleshooting Before calling for service Symptom Check and Remedy No power Is the power cord plug disconnected form the outlet? Connect the power cord plug to the outlet firmly. After turning the power off, wait for approx. 2 minutes. Then turn the power ON.
- Page 71 9. Troubleshooting Symptom Check and Remedy The stored image in the memory cannot be Is the SMALL size ink-sheet installed when selecting “S” in “MODE : enlarged to fill the maximum print area. S/L”? Or is the LARGE size ink-sheet installed when selecting “L” in “MODE : S/L”? Check the current setting.
- Page 72 10. Cleaning Cleaning thermal head When the thermal head is dirty with dust, etc., white spots or stripes may appear on the print. In this case, clean the thermal head in the following procedure. 1 Open the door. 2 Remove the ink-cassette and print paper. 3 Wipe off stains on the bottom of the thermal head 2 or 3 times with a soft cloth (cleaning cloth for Thermal head...
- Page 73 11. Options The following products are sold separately. Ink sheet Product name Ink sheet size No. of prints Usage PK700S S size For 3 color use PK700L L size For 3 color use Print paper Product name Ink sheet size No.
-
Page 74: Specifications
12. Specifications Class Colour Video Copy Processor Model CP710E Printing method Sublimation Dye Thermal 3 color faces progressive printing ( yellow, magenta and cyan) Print quality Dot resolution max.1200 x 600 pixels Number of grades 256 for each color Printing time Approx.39 sec./ sheet... - Page 75 Polígono Industrial "Can Magí", Calle Joan Bucallà 2-4, Apartado de Correos 420, 08190 Sant Cugat del Vallês, Barcelona, Spaín Phone (3) 589-3900 FAX (3) 589-4448 Manufactured by Mitsubishi Electric Corporation 1 Zusho Baba, Nagaokakyo-City, Kyoto Japan Made from recycled paper 871C954C9 PRINTED IN JAPAN...
Need help?
Do you have a question about the CP710E and is the answer not in the manual?
Questions and answers