Intermec EasyCoder PM4i User Manual
Bar code label printer (fingerprint version)
Hide thumbs
Also See for EasyCoder PM4i:
- User manual (180 pages) ,
- Installation instructions manual (40 pages) ,
- Safety instructions (24 pages)
Table of Contents
Advertisement
Quick Links
Advertisement
Table of Contents

Subscribe to Our Youtube Channel
Related Manuals for Intermec EasyCoder PM4i


Summary of Contents for Intermec EasyCoder PM4i
- Page 1 User’s Guide EasyCoder® PM4i Bar Code Label Printer (Fingerprint Version)
- Page 2 Intermec Technologies Corporation. Information and specifications contained in this document are subject to change without prior notice and do not represent a commitment on the part of Intermec Technologies Corporation. © 2004-2008 by Intermec Technologies Corporation. All rights reserved.
- Page 3 -001 January Revised to bring into Adobe Framemaker 7.2 2008 from InDesign and updated all graphics. Version -00 to -09 are original versions in US English. Version -50 to -59 are Chinese translations. EasyCoder PM4i Printer User’s Guide (Fingerprint Version)
- Page 4 EasyCoder PM4i Printer User’s Guide (Fingerprint Version)
-
Page 5: Table Of Contents
Description of EasyCoder PM4i Printer ........ - Page 6 Intermec Direct Protocol ........
- Page 7 Entering Setup Mode at Installation ........70 EasyCoder PM4i with Intermec Shell ......70 Easycoder PM4i With A Custom-made Application Program.
- Page 8 Intermec Shell v8.2 Overview ........
- Page 9 Intermec Ready-to-Work Indicator ........
- Page 10 Recommended Paper Type Settings (Europe)......152 EasyCoder PM4i Printer User’s Guide (Fingerprint Version)
- Page 11 Setup Mode; Serial Communication "uart1:" ......158 (Intermec Fingerprint v8.70) ........158 Setup Mode;...
-
Page 12: Before You Begin
Your safety is extremely important. Read and follow all warnings and cautions in this document before handling and operating Intermec equipment. You can be seriously injured, and equipment and data can be damaged if you do not follow the safety warnings and cautions. -
Page 13: Safety Icons
Global Services and Support Warranty Information To understand the warranty for your Intermec product, visit the Intermec web site at www.intermec.com and click Support > Returns and Repairs > Warranty. The Intermec Global Sales &... -
Page 14: Telephone Support
• Inquire about repair billing or other service invoicing questions. Outside the U.S.A. and Canada, contact your local Intermec representative. For technical support in South Korea, see the next section. To search for your local representative, from the Intermec web site, click Contact. -
Page 15: Who Should Read This Manual
This manual provides you with information about the features of the EasyCoder PM4i printer, and how to install, configure, operate, maintain, and troubleshoot it. Before you work with the EasyCoder PM4i printer, you should be familiar with your network and general networking terms, such as IP address. - Page 16 Before You Begin EasyCoder PM4i Printer User’s Guide (Fingerprint Version)
-
Page 17: Introduction
Introduction This chapter introduces the EasyCoder PM4i printer. The chapter covers the following topics: • Description of EasyCoder PM4i • Safety summary • Product identification EasyCoder PM4i Printer User’s Guide (Fingerprint Version) -
Page 18: Description Of Easycoder Pm4I Printer
Chapter 1 — Introduction Description of EasyCoder PM4i Printer The EasyCoder PM4i is a sturdy thermal transfer printer with a printhead resolution of 8 dots/mm = 203.2 dots/in or 11.81 dots/mm = 300 dots/in (option)and a maximum print width of 104 mm (4.095 in)or 105.7 mm (4.161 in) respectively. -
Page 19: Safety Summary
Chapter 1 — Introduction A version of EasyCoder PM4i, that supports the Intermec Programming Language (IPL), is described in a special User’s Guide. Safety Summary Intermec assumes no responsibility regarding the CE Directive if the printer is handled, modified, or installed in any way other than that described in Intermec’s manuals. - Page 20 Chapter 1 — Introduction EasyCoder PM4i Printer User’s Guide (Fingerprint Version)
-
Page 21: Installation
• Parts on the printer’s front • Parts on the printer’s rear plate • Parts in the media compartment • Parts in the print mechanism • Connecting the printer • Using the controls and understanding the indicators EasyCoder PM4i Printer User’s Guide (Fingerprint Version) -
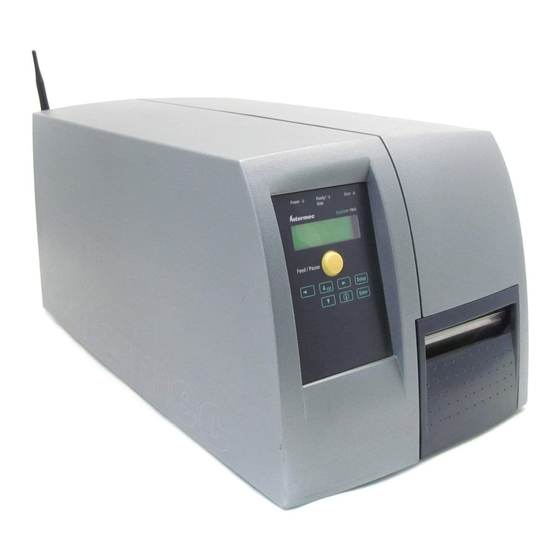
Page 22: Front View
The printed labels, tickets, or tags are presented at the front of the print mechanism, which is covered by a door. Indicator lamps Display window Print button Keyboard Side door Print mechanism Front door EasyCoder PM4i Printer User’s Guide (Fingerprint Version) -
Page 23: Rear View
(option) Memory card slot Provision for two optional interface boards On/off switch (not used) RS-232 serial interface (”uart1:”) USB interface (”usb1:”) AC power cord socket Machine label Intake slot for external media supply EasyCoder PM4i Printer User’s Guide (Fingerprint Version) -
Page 24: Media Compartment
Also see “Options” on page Side door Lock (option) Thermal transfer mechanism Inspection window Media supply roll post with edge guide Keyboard Front Integral liner door takeup Slack Print absorber mechanism EasyCoder PM4i Printer User’s Guide (Fingerprint Version) -
Page 25: Media Supply Roll Post
Setup Mode. There are also a 3-in adapter and a label roll retainer. Another option is an internal guide for media placed behind the printer (for example fanfolds). For illustrations, see “Options” on page EasyCoder PM4i Printer User’s Guide (Fingerprint Version) -
Page 26: Print Mechanism
Ribbon supply Ribbon break shaft Thermal printhead Pressure Finisher interface Tear bar Edge (tear upwards) guide Platen Label stop sensor roller position adjustment Printhead Tear bar lift lever (tear downwards and peel-off ) EasyCoder PM4i Printer User’s Guide (Fingerprint Version) -
Page 27: Connections
RS-232 Serial Interface ("uart1:") Use the serial interface with Intermec LabelShop or the Intermec InterDriver. Also use it with the Intermec Direct Protocol or the Intermec Fingerprint programming language because you can receive error messagesn from your printer. Before you can use the serial interface, you may need to set up the communication parameters, such as baud rate, parity, etc. -
Page 28: Controls And Indicators
This facility ("auto") can be selected in Intermec Shell (see Chapter 8) or using the Intermec Fingerprint instruction SETSTDIO, see Intermec Fingerprint Command Reference Manual (P/N 937-005- XXX). -
Page 29: Indicator Lamps
™ determine the readiness of the Intermec device individually and as part of a solution. The Intermec Ready-to-Work Indicator has three different states: On, Blinking, and Off. When the Indicator is off, the device is not ready to operate individually or as part of a solution. -
Page 30: Keyboard
Since one key is assigned as shift key, up to 44 different key combinations are possible. An audible signal, which can be turned off if so desired, acknowledges that a key has been pressed. EasyCoder PM4i Printer User’s Guide (Fingerprint Version) -
Page 31: Beeper
Beeper The beeper notifies the operator when an error has occurred and acknowledges that a key has been pressed. The Intermec Fingerprint programming language allows the key acknowledge signal to be turned off. The frequency and duration of signals can be specified. - Page 32 Chapter 2 — Installation EasyCoder PM4i Printer User’s Guide (Fingerprint Version)
-
Page 33: Starting Up
This chapter explains how to start up the printer after installation or after having been switched off. It covers the following topics: • Startup files • Memory cards • Switching on the printer • Display messages at startup EasyCoder PM4i Printer User’s Guide (Fingerprint Version) -
Page 34: Startup Files
2 In addition to Intermec Shell, the printer is also fitted with a custom-made application program that is design to perform a specifi c task, for example to print tickets, baggage tags, or product labels for a certain company. - Page 35 Note: Always switch off the power before inserting or removing a memory card! The card will only fit in one way. A memory card is only detected if it is inserted before the printer is started. EasyCoder PM4i Printer User’s Guide (Fingerprint Version)
-
Page 36: Switching On The Printer
A. Intermec Shell Startup Program Refer to Chapter 8 for more information on Intermec Shell. The digits in the lower right corner of the display indicate the version of Intermec Shell. -
Page 37: Media Load
• Cut-Off (requires optional cutter) • External supply (fanfolds), fanfold guide available as option Note: For information on how to load the printer with RFID media, please refer to the documentation that came with your RFID kit. EasyCoder PM4i Printer User’s Guide (Fingerprint Version) -
Page 38: Tear-Off (Straight-Through)
Chapter 4 — Media Load Tear-Off (Straight-Through) The EasyCoder PM4i can print on labels, tickets, tags, and continuous stock in various forms. This section describes the case when the media is torn off manually against the printer’s tear bar. This method is also known as “straight-through printing.”... - Page 39 Chapter 4 — Media Load To load tear-off media 1 Open the front and side doors. 2 Turn the printhead lift lever clockwise to raise the printhead. EasyCoder PM4i Printer User’s Guide (Fingerprint Version)
- Page 40 Remove any empty core from the media supply roll post. 4 Fit a new roll of media on the supply post. Fold up and adjust the edge guide so the roll becomes flush with the center section. EasyCoder PM4i Printer User’s Guide (Fingerprint Version)
- Page 41 5 Route the media through the print mechanism and push it towards the center section as far as it goes. 6 This diagram shows the media path. 7 Turn the printhead lift lever count. EasyCoder PM4i Printer User’s Guide (Fingerprint Version)
- Page 42 9 Adjust the position of the edge guide on the label slack absorber according to the width of the media. 10 Close the front and side door, making sure that the media runs through the slot in the front door. EasyCoder PM4i Printer User’s Guide (Fingerprint Version)
-
Page 43: Peel-Off (Self-Strip)
Tear off the media by pulling it downwards. Peel-Off (Self-Strip) The EasyCoder PM4i can print on labels, tickets, tags, and continuous stock in various forms. This section describes the case when self-adhesive labels are separated from the liner immediately after printing, which requires optional integral self- strip unit with liner takeup. - Page 44 To perform the peel-off (self-strip) procedure 1 Open the front and side doors. 2 Turn the printhead lift lever clockwise to raise the printhead. EasyCoder PM4i Printer User’s Guide (Fingerprint Version)
- Page 45 4 Pull out the edge guide as far as it goes and fold it down to as far as it goes and fold it down to a horizontal position. Remove any empty core from the media supply roll post. EasyCoder PM4i Printer User’s Guide (Fingerprint Version)
- Page 46 6 Remove labels from the first 50 cm (20 in) of the liner. Route the liner through the print mechanism and push it inwards towards the center section as far as it goes. EasyCoder PM4i Printer User’s Guide (Fingerprint Version)
- Page 47 8 Insert the start of the liner under the lip of the takeup hub, then rotate the hub counterclockwise a few turns to wind up some of the liner. EasyCoder PM4i Printer User’s Guide (Fingerprint Version)
- Page 48 10 Turn the printhead lift lever counterclockwise to engage the printhead. 11 Adjust the position of the green edge guide so the media is guided with a minimum of play. Lock with the nut. EasyCoder PM4i Printer User’s Guide (Fingerprint Version)
- Page 49 Chapter 4 — Media Load 12 Adjust the position of the edge guide on the label slack absorber according to the width of the media. 13 Close the front and side doors. EasyCoder PM4i Printer User’s Guide (Fingerprint Version)
-
Page 50: Cut-Off
14 Press the Feed button to advance the media and adjust the media feed. Cut-Off The EasyCoder PM4i can print on labels, tickets, tags, and continuous stock in various forms. This section describes the case when the media is to be cut off by an automatic paper cutter (option). - Page 51 The cutter can be fitted with an optional tray for collecting cut- off labels. To perform the cut-off procedure 1 Open the cutter and the side door. 2 Turn the printhead lift lever clockwise to raise the printhead. EasyCoder PM4i Printer User’s Guide (Fingerprint Version)
- Page 52 Remove any empty core from the media supply roll post. 4 Fit a new roll of media on the supply post. Fold up and adjust the edge guide so the roll becomes flush with the center section. EasyCoder PM4i Printer User’s Guide (Fingerprint Version)
- Page 53 5 Route the media through the print mechanism and cutter. Then push it towards the center section as far as it will go. 6 This diagram shows the media path. 7 Turn the printhead lift lever counterclockwise to engage the printhead. EasyCoder PM4i Printer User’s Guide (Fingerprint Version)
- Page 54 8 Adjust the position of the green edge guide so the media is guided with a minimum of play. Lock with the nut. 9 Close the side door and the cutter while pulling the media tight. EasyCoder PM4i Printer User’s Guide (Fingerprint Version)
- Page 55 Chapter 4 — Media Load 10 Press the Feed button to advance the media and adjust the media feed. The labels can be collected on an optional tray. EasyCoder PM4i Printer User’s Guide (Fingerprint Version)
-
Page 56: External Supply (Fanfold)
Chapter 4 — Media Load External Supply (Fanfold) The EasyCoder PM4i can print on labels, tickets, tags, and continuous stock in various forms. This section describes the case when the media supply is placed behind the printer, usually in the form of fanfolded tickets or tags. External supply can be used with tear-off (straight-through) and cut-off printing. -
Page 57: Rotating Media Supply
Chapter 4 — Media Load Rotating Media Supply The EasyCoder PM4i can, as an alternative to the standard media supply roll post, use an optional rotating media supply hub, regardless of tear-off, cut-off, or peel-off operation. The rotating media supply hub can be supplemented by an... - Page 58 Chapter 4 — Media Load EasyCoder PM4i Printer User’s Guide (Fingerprint Version)
-
Page 59: Thermal Transfer Printing
Thermal Transfer Printing This chapter explains how to load the printer with ribbon for thermal transfer printing. EasyCoder PM4i Printer User’s Guide (Fingerprint Version) -
Page 60: Ribbon Load
Chapter 5 — Thermal Transfer Printing Ribbon Load The EasyCoder PM4i can print on labels, tickets, tags, and continuous stock using either direct thermal printing on special heat-sensitive media or thermal transfer printing using a special ink-coated ribbon. Thermal transfer printing makes it possible to use a wide range of receiving face materials and gives a durable printout less vulnerable to fat, chemicals, heat, sunlight etc. - Page 61 Chapter 5 — Thermal Transfer Printing To perform the ribbon load procedure 1 Open the front and side doors. 2 Turn the printhead lift lever clockwise to raise the printhead. EasyCoder PM4i Printer User’s Guide (Fingerprint Version)
- Page 62 Chapter 5 — Thermal Transfer Printing 3 In case of ribbon reload, remove any used ribbon and empty ribbon core. 4 Unpack a roll of original Intermec thermal transfer ribbon. EasyCoder PM4i Printer User’s Guide (Fingerprint Version)
- Page 63 6 Route the ribbon through the print mechanism above the transparent upper LSS guide and pull out approximately 20 cm (8 in) of ribbon leader. EasyCoder PM4i Printer User’s Guide (Fingerprint Version)
- Page 64 7 Without releasing the ribbon, turn the printhead lift lever counterclockwise to engage the printhead and lock the ribbon. 8 Slide the empty cardboard core onto the ribbon rewind hub so the ribbon is wound up when the hub rotates counterclockwise. EasyCoder PM4i Printer User’s Guide (Fingerprint Version)
- Page 65 9 Turn the printhead lift lever clockwise to raise the printhead and release the ribbon. 10 Manually advance the ribbon until all of the transparent leader has passed the printhead and the ribbon becomes tight. EasyCoder PM4i Printer User’s Guide (Fingerprint Version)
- Page 66 Chapter 5 — Thermal Transfer Printing 11 Turn the printhead lift knob counterclockwise to engage the printhead. 12 Close the front and side doors. EasyCoder PM4i Printer User’s Guide (Fingerprint Version)
-
Page 67: Setting Up The Printer
Convert as follows: 8 dots/mm (203.2 dots/in) printhead: 1 dots = 0.125 mm = 0.0049 in (4.9 mils) 11.81 dots/mm (300 dots/in) printhead: 1 dot = 0.085 mm = 0.0033 in (3.3 mils) EasyCoder PM4i Printer User’s Guide (Fingerprint Version) -
Page 68: Description
Setup Mode • Press the Setup key on the printer’s built-in keyboard to enter the Setup Mode, or • select the Setup option in Intermec Shell to enter the Setup Mode, or • execute the Intermec Fingerprint SETUP instruction to enter the Setup Mode, or •... -
Page 69: Intermec Direct Protocol
X-start (11.81 dots/mm = 300 dpi) Width (8 dots/mm = 203.2 dpi) 832 dots 1248 dots Width (11.81 dots/mm = 300 dpi) Length (8 dots/mm = 203.2 dpi) 1200 dots 1800 dots Length (11.81 dots/mm = 300 dpi) EasyCoder PM4i Printer User’s Guide (Fingerprint Version) -
Page 70: Reading The Current Setup
Setup Mode. You can list the printer’s current setup values by printing test label “Setup Info” in the Setup Mode or by using Intermec Shell. The current setup values can be sent to the host via the standard serial communication channel using a SETUP WRITE "uart1:"... -
Page 71: Baud Rate
Characters ASCII 000 to 255 decimal (default) Parity The parity decides how the firmware will check for transmission errors. There are four options: • None (default) • Even • Odd • Mark • Space EasyCoder PM4i Printer User’s Guide (Fingerprint Version) -
Page 72: Stop Bits
(host sends XON/XOFF). XOFF is sent from the printer when its receive buffer is filled to 75%, and the transmission from the host is held, waiting for an XON character. EasyCoder PM4i Printer User’s Guide (Fingerprint Version) -
Page 73: New Line
• A positive start adjustment means that the specified length of media will be fed out before the printing starts. Thus, the origin is moved further back from the forward edge of the copy. EasyCoder PM4i Printer User’s Guide (Fingerprint Version) -
Page 74: Stop Adjust
-480 dots 40.6 Stop adjust: +240 dots +354 dots 30.0 1.18 Cut fix and variable length strip Start adjust: -340 dots -502 dots 42.5 1.67 Stop adjust: +340 dots +502 dots 42.5 1.67 EasyCoder PM4i Printer User’s Guide (Fingerprint Version) -
Page 75: Media
SDRAM SIMM on the printer’s CPU board as described in the Service Manual. • The length setup also decides the amount of media feed when using “fix length strip.” EasyCoder PM4i Printer User’s Guide (Fingerprint Version) -
Page 76: Media Type
Any object or field extending outside the print window in any direction will either be clipped or cause an error condition (Error 1003 “Field out of label”), see the Intermec Fingerprint Developer’s Guide (P/N 934-019-XXX). 10.3 mm (0.41 in) max. -
Page 77: Paper Type
Labels, tickets, tags, strip, and ribbons for various types of application are available from Intermec. For the best printout quality and maximum life of the printhead, use Intermec supplies. Setup recommendations for Intermec supplies offered in Europe and North America are listed in Appendix D. - Page 78 • Ribbon Sensor (autoadjustment) • Low Diameter (range 25 to 80 mm) When adjusting the image darkness for non-Intermec media and transfer ribbons, set the Ribbon Factor to the recommended value for the type of thermal transfer ribbon. Set the Ribbon...
- Page 79 SYSVAR(26) is read by a Fingerprint program. However, Error 1083 “Ribbon Low” is reported at every tenth printing operation. By default, the low diameter is 0, that is, the ribbon low function is disabled. EasyCoder PM4i Printer User’s Guide (Fingerprint Version)
-
Page 80: Contrast
LSS. At the same time, the front edges of the labels, tickets, etc. are detected so the feed control can position the media according to the Feedadjust parameter (same as the Intermec Fingerprint statement TESTFEED). Four values used for troubleshooting the LSS are displayed (read-only information). -
Page 81: Testprint
The function on the label stop sensor (LSS) can be tested automatically or manually as described in Chapter 12 “Adjustments.” LTS (Label Taken Sensor) The sensitivity of the LTS can be tested and adjusted as described in Chapter 12 “Adjustments.” EasyCoder PM4i Printer User’s Guide (Fingerprint Version) -
Page 82: Test Labels
Chapter 6 — Setting Up the Printer Test Labels 702 ohms/8 dots Diamonds Chess Bar Codes #1 EasyCoder PM4i Printer User’s Guide (Fingerprint Version) - Page 83 Chapter 6 — Setting Up the Printer Bar Codes #2 Setup Info Hardware Info EasyCoder PM4i Printer User’s Guide (Fingerprint Version)
-
Page 84: Returning To Factory Default Setup
This means that EasyLAN Wireless settings (SSID, keys, etc.) will retain their values from the previous start. However, the next reboot will reset them to factory default. EasyCoder PM4i Printer User’s Guide (Fingerprint Version) -
Page 85: Setup Mode
Setup Mode This chapter describes how to navigate in the setup mode, and provides overviews of the Setup Mode. EasyCoder PM4i Printer User’s Guide (Fingerprint Version) -
Page 86: Entering Setup Mode At Installation
• Press Setup (this facility can be used anywhere within Intermec Shell). • Set up the printer as described in this chapter. • Return to Intermec Shell by pressing Setup. Easycoder PM4i With A Custom-made Application Program • Normally, there is no need to enter the Setup Mode for custom-made application programs. - Page 87 Testfeed menu, or print test labels in the Test label menu. Exit the Setup Mode. Can be used anywhere in Setup Mode. 1 “Left”, “right”, “up”, and “down” refer to the overviews later in this chapter. EasyCoder PM4i Printer User’s Guide (Fingerprint Version)
- Page 88 SETUP: SETUP: SER-COM, UART5 MEDIA Option SETUP: NET-COM, NET1 SETUP: SETUP: Option FEEDADJ NETWORK Option Legend: Dotted boxes and lines indicate options. Thick boxes indicates default options. Values inside brackets indicate default settings. EasyCoder PM4i Printer User’s Guide (Fingerprint Version)
-
Page 89: Intermec Shell Startup Program
Intermec Shell Startup Program This chapter describes the Intermec Shell startup program and covers the following topics: • Introduction • Starting with Intermec Shell • Intermec Shell Overview • Line Analyzer EasyCoder PM4i Printer User’s Guide (Fingerprint Version) -
Page 90: Introduction
• LINE_AXP.PRG (line analyzer program) • Other application programs in the printer’s memory. A prerequisite for a program to appear as an option in Intermec Shell is that the program is provided with the extension “.PRG” and is stored in the root of the directory "/c" or "card1:". -
Page 91: Starting With Intermec Shell
The lower line tells you how much time you have left. Should the time run out before you have taken any action, the last selected application in Intermec Shell will be opened. If you use the same application all the time, you will only need to switch on the power, once the application has been selected. -
Page 92: Selecting An Application
• Press Enter to go to menus where you can select an application program. • Press < > to go to the Facilities part of Intermec Shell. Selecting an Application In Intermec Shell, the menus present the options in infinite loops. -
Page 93: Selecting Other Facilities
Using the Zmodem communication tool, files can be downloaded from a PC, either to be stored on a standard CompactFlash memory card or to upgrade the printer’s firmware. The following options are available: EasyCoder PM4i Printer User’s Guide (Fingerprint Version) -
Page 94: Reboot
Intermec distributor. Reboot Corresponds to cycling the power to the printer. To exit Intermec Shell without having selected any application, select Reboot. Then wait for the 5 seconds countdown to finish, and the last selected application will be opened. -
Page 95: Intermec Shell V8.2 Overview
DEFAULT SETUP YES=ENTER/NO=ESC PERFORMED SHELL UPDATE: TRANSFER FILE COMPACT FLASH? SOFTWARE UPDATE USING ZMODEM TRANSFER COMPLETED SHELL UPDATE: TRANSFER FILE FIRMWARE? USING ZMODEM REBOOT Printer rebooted Restarts the printer (same as power off/on) automatically. EasyCoder PM4i Printer User’s Guide (Fingerprint Version) -
Page 96: Line Analyzer
Chapter 8 — Intermec Shell Startup Program Line Analyzer The Line Analyzer (LINE_AXP.PRG) is a program written in the Intermec Fingerprint programming language and is intended to help solving possible communication problems. As the name implies, the Line Analyzer captures all incoming characters on a specifi ed communication channel and prints them on one or more labels. - Page 97 7 = "uart4:" 8 = "uart5:" If the printer is not fitted with the specified port, an error message appears in the display and you can select another port: Line Analyzer Error: 56 EasyCoder PM4i Printer User’s Guide (Fingerprint Version)
- Page 98 Chapter 8 — Intermec Shell Startup Program EasyCoder PM4i Printer User’s Guide (Fingerprint Version)
-
Page 99: Options
Options This chapter describes the options available for the EasyCoder PM4i printer. The options can be factory installed, field-installed by an authorized service technician, or in some cases installed by the operator. EasyCoder PM4i Printer User’s Guide (Fingerprint Version) -
Page 100: Introduction
The EasyCoder PM4i provides a high degree of flexibility because it has a modular design. By adding options to the basic printer, the EasyCoder PM4i can be adapted for a variety of applications. Most options should be installed by an authorized service technician or are only available as factory-installed options. -
Page 101: Integral Liner Takeup Unit
The cut-off labels, tickets, or tags can be collected on an optional tray.The paper cutter can be controlled using the instructions CUT, CUT ON, and CUT OFF in Intermec Fingerprint and the Direct Protocol. For more information, see Chapter 4, “Media Load.” Media Supply Hub The rotating media supply hub is designed to fit media roll cores with an internal diameter of 38-40 mm (1.5 in). -
Page 102: 76 Mm (3-In) Adapter
Real Time Clock The Real Time Clock circuit (RTC) relieves the operator or the host from having to set the clock/calendar using the Intermec Fingerprint instructions DATE$ and TIME$ after each power up. The RTC has its own backup battery backup that will last 10 years or more. -
Page 103: Font Card
See Chapter 3 for illustration. Can be installed by the operator. RFID Kit The EasyCoder PM4i can be equipped with the capability to read and write data to labels fitted with RFID (Radio Frequency IDentification) inlays. RFID Kits come either factory installed or as a field-installable option. -
Page 104: Interface Boards
Interface Boards A number of interface boards are available for use with the EasyCoder PM4i printer. The interface boards are either factory- fitted or can easily be fitted by an authorized service technician. The EasyCoder PM4i can accommodate one EasyLAN interface board plus one IEEE 1284 Parallel Interface Board. -
Page 105: Troubleshooting
Troubleshooting This chapter describes how the Intermec Ready-to-Work Indicators work. It also lists various possible cases of inferior printout quality, describes possible causes, and suggests remedies. EasyCoder PM4i Printer User’s Guide (Fingerprint Version) -
Page 106: Intermec Ready-To-Work Indicator
The printer will also return error messages to the host, provided there is a working two-way communication. Refer to the Intermec Fingerprint Developer’s Guide (P/N 934-019-XXX). Provided the printer is connected to a network, all conditions that prevents printing are reported to the Easy ADC Console. - Page 107 Set at startup until operational Printer crash See note 3 and 9 Printer turned off Off Maintenance Set when upgrading Power supply Over 1718 temperature Printhead too hot Off 1088 See note 10 EasyCoder PM4i Printer User’s Guide (Fingerprint Version)
- Page 108 85°C must be handled by the application program. • In the Direct Protocol, the printing is paused but will be automatically resumed when the printhead has cooled off to 85°C. Meanwhile, the printer is able to receive instructions EasyCoder PM4i Printer User’s Guide (Fingerprint Version)
- Page 109 Wrong media Change Chapter 6, printout grade parameter Appendix D Contrast value Change Chapter 6 too high parameter Printhead Adjust Chapter 11 pressure too high Wrong printhead Replace CPU Call Service voltage board EasyCoder PM4i Printer User’s Guide (Fingerprint Version)
- Page 110 Chapter 5 breaks correctly Wrong media Change Chapter 6, grade parameter, then Chapter 10 clean printhead Bad energy Adjust Call Service control Transfer ribbon Faulty ribbon Adjust Chapter 11 wrinkles break shaft adjustment EasyCoder PM4i Printer User’s Guide (Fingerprint Version)
- Page 111 Wrong label rest Check/change Chapter 6 dots parameter Wrong Media Check/change Chapter 6 Type parameter Wrong LSS Check/change Chapter 11 position Dirty sensors Clean media Chapter 10 guides Faulty sensors Replace Call Service EasyCoder PM4i Printer User’s Guide (Fingerprint Version)
- Page 112 Chapter 10 — Troubleshooting EasyCoder PM4i Printer User’s Guide (Fingerprint Version)
-
Page 113: Maintenance
The chapter covers the following topics: • Printhead cleaning • External cleaning • Cleaning the media guides • Printhead replacement • Media jams When cleaning or replacing the printhead, take ample precautions to avoid electrostatic discharges. EasyCoder PM4i Printer User’s Guide (Fingerprint Version) -
Page 114: Printhead Cleaning
Isopropyl alcohol [(CH CHOH; CAS 67-63-0] is a highly flammable, moderately toxic, and mildly irritating substance. To clean the printhead 1 Open the front and side doors. EasyCoder PM4i Printer User’s Guide (Fingerprint Version) - Page 115 Chapter 11 — Maintenance 2 Turn the printhead lift lever clockwise to raise the printhead. 3 Remove any media and transfer ribbon. EasyCoder PM4i Printer User’s Guide (Fingerprint Version)
- Page 116 Chapter 11 — Maintenance 4 Open the cleaning card envelope and pull out the cleaning card. Read the warning text. 5 Insert most of the cleaning card under the printhead (1). Engage the printhead (2). EasyCoder PM4i Printer User’s Guide (Fingerprint Version)
- Page 117 Chapter 11 — Maintenance 6 Pull out the cleaning card (1) and raise the printhead (2). ‘ 7 Wait for approximately 30 seconds to allow the cleaning fluid to dissolve the residue. EasyCoder PM4i Printer User’s Guide (Fingerprint Version)
- Page 118 Chapter 11 — Maintenance 8 Insert most of the cleaning card under the printhead again (1). Engage the printhead (2). 9 Pull out the cleaning card. If necessary, repeat the process with a fresh cleaning card. EasyCoder PM4i Printer User’s Guide (Fingerprint Version)
-
Page 119: External Cleaning
Chapter 11 — Maintenance 10 Allow the cleaned parts to dry before loading any media (and ribbon). External Cleaning 1 Always remove the power cord before cleaning! EasyCoder PM4i Printer User’s Guide (Fingerprint Version) - Page 120 Chapter 11 — Maintenance 2 Wipe external surfaces with a soft cloth slightly moistened with water or a mild detergent. 3 Never spray the printer. Protect it from water when cleaning the premises. EasyCoder PM4i Printer User’s Guide (Fingerprint Version)
-
Page 121: Cleaning The Media Guides
4 Never use any sharp tools for removing stuck labels. The printhead and rollers are delicate. Cleaning the Media Guides Some Intermec RFID option kits use the media guide to house the RFID antenna. Be extra careful not to damage the antenna when following the procedure described below. -
Page 122: Printhead Replacement
While replacing the printhead, the power must be off. The firmware will not detect the new printhead resistance until the printer has been restarted. EasyCoder PM4i Printer User’s Guide (Fingerprint Version) - Page 123 To replace the printhead 1 Open the front and side doors. 2 Turn the printhead lift lever clockwise to raise the printhead. EasyCoder PM4i Printer User’s Guide (Fingerprint Version)
- Page 124 4 Pull the printhead bracket away from the magnet in the pressure arm. 5 Disconnect the printhead bracket from the print mechanism as indicated by the arrows and pull out the printhead as far as the cables allow. EasyCoder PM4i Printer User’s Guide (Fingerprint Version)
- Page 125 Chapter 11 — Maintenance 6 Disconnect the cables from the printhead. Note the snap-lock on the inner connector. Pull at the connectors—not at the cables! 7 Connect the two cables to the replacement printhead. EasyCoder PM4i Printer User’s Guide (Fingerprint Version)
- Page 126 9 Turn the printhead lift lever counterclockwise so the magnet engages the printhead bracket. 10 Load a new supply of media and ribbon, as described earlier in this manual. EasyCoder PM4i Printer User’s Guide (Fingerprint Version)
-
Page 127: Media Jams
CHOH; CAS 67-63-0] is a highly flammable, moderately toxic, and mildly irritating substance. • Reload the media as described in Chapter 4. • Switch on the power. • Readjust the media feed by pressing the Feed button. EasyCoder PM4i Printer User’s Guide (Fingerprint Version) - Page 128 Chapter 11 — Maintenance EasyCoder PM4i Printer User’s Guide (Fingerprint Version)
-
Page 129: Adjustments
This chapter describes how the operator can adjust the printer. The chapter covers the following topics: • Narrow media adjustment • Label stop sensor position adjustment • Printhead pressure adjustment • Ribbon break shaft adjustment • Label taken sensor adjustment EasyCoder PM4i Printer User’s Guide (Fingerprint Version) -
Page 130: Narrow Media
• After having centered the arm, lock it by tightening the nut. • Remember to adjust all edge guides too. Upper label stop sensor Pressure arm Center of media Edge guide EasyCoder PM4i Printer User’s Guide (Fingerprint Version) -
Page 131: Label Stop Sensor
• Rotate the screw clockwise to move the sensor towards the center section. • Rotate the screw counterclockwise to move the sensor outwards, away from the center section. Point of detection Adjustment screw EasyCoder PM4i Printer User’s Guide (Fingerprint Version) -
Page 132: Lss Auto
• Enter the Setup Mode (For help, see “Setup Mode” on → → page 69.) and go to Setup Mode Test/Service → Test LSS Auto. • The menu should look like this with the cursor placed in the center: EasyCoder PM4i Printer User’s Guide (Fingerprint Version) - Page 133 • Does the media have some kind of preprint that can disturb the detection? • Is there too little difference between the black marks and the surrounding areas? • Does the liner have too little transparency? EasyCoder PM4i Printer User’s Guide (Fingerprint Version)
- Page 134 Chapter 12 — Adjustments • Does the LSS work with another type of media? (Remember to change the Media Type setup, lift and lower the printhead, and then press the Feed/Pause TESTFEED button.) EasyCoder PM4i Printer User’s Guide (Fingerprint Version)
-
Page 135: Printhead Pressure
(-) four full turns. Do not use a higher printhead pressure than necessary, because it may increase the wear of the printhead and shorten its life. Adjustment screw EasyCoder PM4i Printer User’s Guide (Fingerprint Version) -
Page 136: Ribbon Break Shaft
(bw) to move the outer end of the break shaft backward. Before readjusting the break shaft, make sure that there is no other cause for the wrinkling of the ribbon. (See “Troubleshooting” on page 89.) Adjustment screw Ribbon break shaft EasyCoder PM4i Printer User’s Guide (Fingerprint Version) -
Page 137: Lts (Label Taken Sensor)
LTS works properly. Then press Enter to stop and exit. LTS Value Press Enter. You can enter a new value in the range indicated in the LTS Adjust menu (see above). Min/max values are in the range 0 to 10. EasyCoder PM4i Printer User’s Guide (Fingerprint Version) - Page 138 Chapter 12 — Adjustments EasyCoder PM4i Printer User’s Guide (Fingerprint Version)
-
Page 139: Technical Data
Technical Data This appendix lists the technical data for the printer. Please note that Intermec reserves the right to change without prior notice and that this information does not represent a commitment on the part of Intermec. EasyCoder PM4i Printer User’s Guide (Fingerprint Version) - Page 140 450 m (1475 ft) of Diameter (outer), ribbon max. Ribbon Roll Core 25.4 mm (1.00 in) Diameter (inner) Print Directions Modes of Operation Tear-Off (Straight- through) Peel-Off (Self-strip) Option Cut-Off Option With cutter EasyCoder PM4i Printer User’s Guide (Fingerprint Version)
- Page 141 1 socket for 8 MB or Std. 8 MB SIMM 16 MB Power Supply AC Voltage 90 to 265 VAC, 45 to 65 Hz PFC Regulation IEC 61000-3-2 Power Consumption Standby 15W; Peak 300W EasyCoder PM4i Printer User’s Guide (Fingerprint Version)
- Page 142 Compact Flash cards Adapter Accessories and Options Special Printheads 8 dots/mm (202.3 See Chapter 9 dpi): 2 types 11.81 dots/mm (300 dpi): 2 types Integral Self-strip Option For peel-off operation Unit with Liner Takeup EasyCoder PM4i Printer User’s Guide (Fingerprint Version)
- Page 143 8 MB-1 GB RFID Kit Option CompactFlash Option Protection Plate The max. print length is also restricted by the amount of free SDRAM memory. Latin, Greek, and Cyrillic fonts according to Unicode standard are included. EasyCoder PM4i Printer User’s Guide (Fingerprint Version)
- Page 144 Appendix A — Technical Data EasyCoder PM4i Printer User’s Guide (Fingerprint Version)
-
Page 145: Media Specifications
Media Specifications This appendix specifies the physical measures for various types of media. EasyCoder PM4i Printer User’s Guide (Fingerprint Version) -
Page 146: Media Roll Size
Roll Millimeters/Inches Max. diameter (B): 213 mm (8.38 in) Max. width (C): 114.3 mm (4.50 in) Min. width, standard (C): 25 mm (1.00 in) Min. width, fanfold guides (C): 40 mm (1.57 in) EasyCoder PM4i Printer User’s Guide (Fingerprint Version) -
Page 147: Media
When printing on RFID media, special consideration must be taken to the position and shape of the tag. Specific recommendations for different kinds of Intermec-approved RFID media can be found on the Intermec website. Additional information is provided in the documentation that came with your RFID kit. - Page 148 Appendix B — Media Specifications EasyCoder PM4i Printer User’s Guide (Fingerprint Version)
-
Page 149: Self-Adhesive Strip
⇐ c ⇒ Media Width (excluding liner) Maximum: 112.7 mm (4.43 in) Minimum: 23.8 mm (0.94 in) Media Type Setup • Fix length strip • Var length strip EasyCoder PM4i Printer User’s Guide (Fingerprint Version) -
Page 150: Self-Adhesive Labels
(e) to be larger than 7 mm (0.28 in), that batch printing is used, and that no pull back of the media is performed. Intermec does not guarantee that such short labels will work, but it is up to the user to test this in his unique application. -
Page 151: Tickets With Gaps
(e) to be larger than 7 mm (0.28 in), that batch printing is used, and that no pull back of the media is performed. Intermec does not guarantee that such short tickets will work, but it is up to the user to test this in his unique application. -
Page 152: Tickets With Black Mark
The detectable width of the black mark should be at least 5.0 mm (0.2 in) on either side of the LSS detection point. ⇐ e ⇒ Black Mark Length Maximum: 21.3 mm (0.83 in) EasyCoder PM4i Printer User’s Guide (Fingerprint Version) - Page 153 • Ticket (w mark) Note: Preprint that may interfere with the detection of the black mark should be avoided. However, the Intermec Fingerprint statement LBLCOND allows the sensor to be temporarily disabled during a specified amount of media feed in order to avoid unintentional detection, see Intermec Fingerprint manuals.
- Page 154 Appendix B — Media Specifications EasyCoder PM4i Printer User’s Guide (Fingerprint Version)
-
Page 155: Interfaces
Interfaces This appendix describes the interface connectors found on the printer’s rear plate. It covers the following topics: • RS-232 interface • USB interface • Bar Code Wand Interface • Optional interface EasyCoder PM4i Printer User’s Guide (Fingerprint Version) -
Page 156: Rs-232 Interface
Receive data Data set ready Ground Data terminal ready Clear to send Request to send – Not used *The external +5V is limited to 500 mA and is automatically switched off at overload. EasyCoder PM4i Printer User’s Guide (Fingerprint Version) -
Page 157: Interface Cable
Other devices, like a keyboard and a mouse, can be connected to the same hub. If you need to connect more than one Intermec USB printer to a host, you should use different USB ports. -
Page 158: Bar Code Wand Interface
"wand:" device. The buffer is small, so it is recommended to use short bar code data (max. 16 characters) and read the buffer regularly to avoid overflow. EasyCoder PM4i Printer User’s Guide (Fingerprint Version) -
Page 159: Optional Interfaces
Appendix C — Interfaces For more demanding applications or for reading bar codes other than Code 128, choose a regular bar code scanner from Intermec’s wide product range and connect it to a serial port. Bar code wand interface (”wand:”) - Page 160 Double Serial Interface Board Industrial interface 8 digital In ports 8 digital Out ports 4 relay ports “uart2:” RS-232 RS-422 non isolated, RA-422 isolated, or RS-485 Serial/Industrial Interface Board “centronics:” IEEE 1284 Parallel Interface Board EasyCoder PM4i Printer User’s Guide (Fingerprint Version)
- Page 161 Double Serial uart2: + uart3: IEEE 1284 Centronics Serial/ uart2: Industrial IEEE 1284 Centronics RFID uart2: RFID uart2: Double Serial uart4: + uart5: RFID uart2: IEEE 1284 Centronics RFID uart2: Serial/ uart4: Industrial EasyCoder PM4i Printer User’s Guide (Fingerprint Version)
- Page 162 • The left-hand slot is the slot closest to the center section. • Always start by fitting an interface board in the left-hand slot. • RS-485 is only supported by "uart2:" “net1:” EasyLAN Ethernet Interface “net1:” EasyLAN Wireless Interface EasyCoder PM4i Printer User’s Guide (Fingerprint Version)
-
Page 163: Intermec Supplies
Intermec Supplies This appendix describes the supplies offered by Intermec for use with this printer, that is, direct thermalmedia, thermal transfer ribbons, and receiving face materials for thermal transfer printing. EasyCoder PM4i Printer User’s Guide (Fingerprint Version) -
Page 164: Rfid Media
Visit the Intermec website or contact your Intermec representative to find the RFID media best suited to your needs. Direct Thermal Media Intermec offers two quality grades of direct thermal media for the Easy-Coder printers: Premium Quality Top-coated media with high demands on printout quality and resistance against moisture, plasticizers, and vegetable oils. -
Page 165: Thermal Transfer Media
Appendix D — Intermec Supplies Thermal Transfer Media Intermec offers stock labels for thermal transfer printing in a wide range of quality grades. Uncoated Papers Economical high-volume printing. To be used with GP/TMX 1100/TMX 1500 ribbons. Examples: Europe North America TTR Uncoated –... -
Page 166: Transfer Ribbons
Appendix D — Intermec Supplies Transfer Ribbons Intermec offer three ranges of thermal transfer ribbons optimized for different purposes: • General Purpose (GP/TMX 1500) transfer ribbons allow highspeed printing and give a good printout, but are somewhat sensitive to smearing. They may be the best choice for uncoated and coatedpapers. -
Page 167: Bar Code Directions
(see “Print Speed” in Chapter 6). The illustration below shows how the two type of bar code directions relate to the media feed direction. Dir 1 & 3 Picket Fence Dir 2 & 4 Ladder Feed Direction EasyCoder PM4i Printer User’s Guide (Fingerprint Version) -
Page 168: Recommended Paper Type Settings (Europe)
TTR Uncoated TTR Coated TTR Premium HP66 TTR Coated TTR Premium TTR Premium Board TTR High Gloss White Polyethylene TTR Gloss Polyethylene HP07 TTR Coated TTR Premium TTR Premium Board Polyethylene TTR Gloss Polyethylene EasyCoder PM4i Printer User’s Guide (Fingerprint Version) - Page 169 Max Rec. Dir. Print Speed Speed Name Constant Factor Dir. 1&3 Dir. 2&4 Thermal Top Coated/ Board Standard Thermal Top Non Top Thermal Eco Coated/ Thermal Eco Standard Board Thermal Top Coated/ High Speed High EasyCoder PM4i Printer User’s Guide (Fingerprint Version)
- Page 170 +15°C (+59°F), decrease print speed by 50 mm/sec. 2 Applies to printing of text, lines, boxes, images, and picket fence bar codes. 3 Applies to ladder bar codes. 4 Requires high printhead pressure (see Chapter 12 “Adjustments, Printhead Pressure”). EasyCoder PM4i Printer User’s Guide (Fingerprint Version)
-
Page 171: Recommended Paper Type Settings (North America)
If the ambient temperature is lower than +15°C (+59°F), decrease print speed by 50 mm/sec. 2 Applies to printing of text, lines, boxes, images, and picket fence bar codes. 3 Applies to ladder bar codes. EasyCoder PM4i Printer User’s Guide (Fingerprint Version) - Page 172 If the ambient temperature is lower than +15°C (+59°F), decrease print speed by 50 mm/sec. 2 Applies to printing of text, lines, boxes, images, and picket fence bar codes. 3 Applies to ladder bar codes. EasyCoder PM4i Printer User’s Guide (Fingerprint Version)
-
Page 173: Setup Mode Overviews
Setup Mode Overviews This appendix provides overviews of the parametersand messages available for the standard printer and with various interface boards. EasyCoder PM4i Printer User’s Guide (Fingerprint Version) -
Page 174: Setup Mode; Serial Communication "Uart1
DATA TO HOST: DATA FROM HOST: ENABLE ENABLE Scroll forward Scroll forward Scroll back Scroll back Legend: Dotted boxes and lines indicate options. Thick boxes indicates default options. Values inside brackets indicate default settings. EasyCoder PM4i Printer User’s Guide (Fingerprint Version) -
Page 175: Setup Mode; Feed Adjust
Appendix E — Setup Mode Overviews Setup Mode; Feed Adjust (Intermec Fingerprint v8.70) Continued from the Continued on SETUP: previous page the next page FEEDADJ FEEDADJ: FEEDADJ: STARTADJ STOPADJ: STARTADJ: STOPADJ: [0]: [0]: EasyCoder PM4i Printer User’s Guide (Fingerprint Version) -
Page 176: Setup Mode; Media
TESTFEED MODE LEN (SLOW MODE) TESTFEED: TESTFEED MODE: LEN (SLOW MODE): [0]: [26 28 0 10] FAST TESTFEED MODE: SLOW Press <Enter> to per- form a testfeed. Scroll forward Values are read-only. Scroll back EasyCoder PM4i Printer User’s Guide (Fingerprint Version) -
Page 177: Setup Mode; Print Defs
Sensor) is installed in the printer. LTS: LTS: LTS: LTS ADJUST LTS TEST LTS VALUE REMOVE LABEL AND REMOVE LABEL LTS VALUE: PRESS ENTER ENTER TO STOP [10]: SENSITIVITY 10 OUT OF 9-10 EasyCoder PM4i Printer User’s Guide (Fingerprint Version) -
Page 178: Setup Mode; Serial Communication "Uart2:" (Option)
Setup Mode; Serial Communication "uart2:" (option) (Intermec Fingerprint v8.70) SETUP:SETUP: SER-COM, UART2 SER-COM, UART2: BAUDRATE BAUDRATE; 9600 BAUDRATE; 19200 BAUDRATE; 38400 BAUDRATE; 57500 BAUDRATE; 115200 BAUDRATE; BAUDRATE; BAUDRATE; 1200 BAUDRATE; 2400 BAUDRATE; 4800 EasyCoder PM4i Printer User’s Guide (Fingerprint Version) -
Page 179: Setup Mode; Serial Communication "Uart3:" (Option)
Setup Mode; Serial Communication "uart3:" (option) (Intermec Fingerprint v8.70) SETUP:SETUP: SER-COM, UART2 SER-COM, UART2: BAUDRATE BAUDRATE; 9600 BAUDRATE; 19200 BAUDRATE; 38400 BAUDRATE; 57500 BAUDRATE; 115200 BAUDRATE; BAUDRATE; BAUDRATE; 1200 BAUDRATE; 2400 BAUDRATE; 4800 EasyCoder PM4i Printer User’s Guide (Fingerprint Version) -
Page 180: Setup Mode; Serial Communication "Uart4:" (Option)
Appendix E — Setup Mode Overviews Setup Mode; Serial Communication "uart4:" (option) (Intermec Fingerprint v8.70) EasyCoder PM4i Printer User’s Guide (Fingerprint Version) -
Page 181: Setup Mode; Serial Communication "Uart5:" (Option)
Appendix E — Setup Mode Overviews Setup Mode; Serial Communication "uart5:" (option) (Intermec Fingerprint v8.70) EasyCoder PM4i Printer User’s Guide (Fingerprint Version) -
Page 182: Setup Mode; Network Communication "Net1:" (Option)
Appendix E — Setup Mode Overviews Setup Mode; Network Communication "net1:" (option) (Intermec Fingerprint v8.70) EasyCoder PM4i Printer User’s Guide (Fingerprint Version) -
Page 183: Setup Mode; Rfid (Option)
Continued on RFID previous page previous page the next page RFID: RFID: RFID: RETRIES VOIDTEXT MODE MODE: MODE: RETRIES: VOIDTEXT: ENABLE DISABLE [1]: [VOID]: Read-Only RFID: RFID: TAGADJUST FIELDSTRENGTH TAGADJUST: FIELDSTRENGTH: [0]: [100]: EasyCoder PM4i Printer User’s Guide (Fingerprint Version) - Page 184 Appendix E — Setup Mode Overviews EasyCoder PM4i Printer User’s Guide (Fingerprint Version)
- Page 186 Wo rldwide Headquar ters 6001 36th Av enue W est Everett, Wa shington 98203 U. S.A. te l 425.348.2600 fax 425.355.9551 www .intermec.com EasyCoder PM4i Bar Code Label Printer User's Guide (Fingerprint Version) *934-022-001* P/N 934-022-001...
Need help?
Do you have a question about the EasyCoder PM4i and is the answer not in the manual?
Questions and answers