Intermec CK30 Installation Manual
Intermec ck30: install guide
Hide thumbs
Also See for CK30:
- Programmer's manual (448 pages) ,
- User manual (210 pages) ,
- Service manual (113 pages)
Table of Contents
Advertisement
Quick Links
Advertisement
Table of Contents

Related Manuals for Intermec CK30


Summary of Contents for Intermec CK30
- Page 1 EasyADC™ System Installation Guide...
-
Page 2: Table Of Contents
Intermec. Information and specifications contained in this document are subject to change without prior notice and do not represent a commitment on the part of Intermec Technologies Corporation. -
Page 3: Your Easyadc System
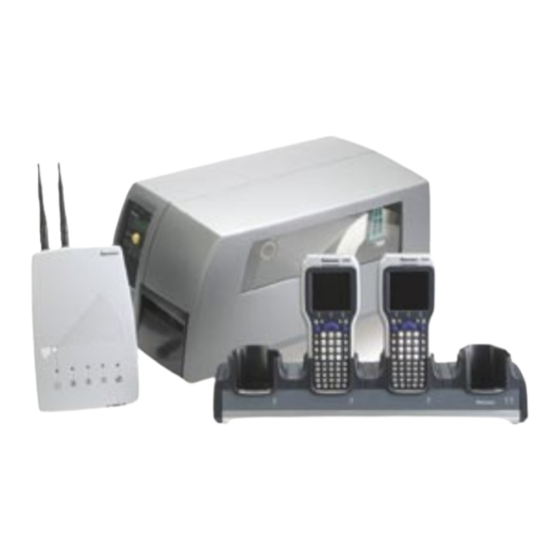
This illustration shows how the components of your EasyADC System work with your Great Plains ® application. CK30 Scans bar code data and transmits it wirelessly to the WA22. Recharges in the AC2 Charging Dock (not pictured). EasyCoder® PM4i EasyADC PC... -
Page 4: Easyadc System Requirements
EasyADC System Requirements Before you begin installing your EasyADC System, you need these items: Completed Great Plains questionnaire Version number of your Great Plains software Location of your Great Plains client’s dex.ini file (typically located at C:/Program Files/Microsoft Business Solutions/Great Plains/dex.ini) Name of and path to your Great Plains server ... -
Page 5: Step 1: Unpacking The Easyadc System
CK30 computer Rechargeable AB1 battery Packet including documentation and labels For a complete list of the packet contents, see the CK30 Handheld Computer Quick Start Guide in the packet. AC2 4-Bay Charging Dock AC2 charging dock ... -
Page 6: Step 2: Installing The Wa22
Installing the WA22 Before you perform this step, choose a location for the WA22 based on these guidelines: • Place the WA22 horizontally on a desk or counter, or mount it vertically on a wall with the included mounting bracket. •... - Page 7 Installing the WA22 (continued) Route the Ethernet cables through the cable routing channels in the bracket. Mount the WA22 in the bracket by inserting the shoulder screws into the keyhole slots in the bracket. Slide the WA22 down until it is firmly seated. Cable routing Mounting channels...
-
Page 8: Step 3: Installing The Software
Installing the Software Get the EasyADC CD from the shipping box. Insert the EasyADC CD into the CD drive on your designated EasyADC PC. This is the same PC that is currently running the Microsoft Great Plains Client. The installation begins and you are prompted to install components of the Microsoft .NET Compact Framework. - Page 9 Installing the Software (continued) Click Next. A browse screen appears showing the location of the dex.ini file. Click Open. Progress screens appear showing you the status of the installation. When this part is done, the SQL Server Setup screen appears. Choose your Great Plains server from the Server drop-down list.
- Page 10 Installing the Software (continued) Click the arrow on the lower right side of the screen. The Scan Unit of Measure screen appears. Choose Yes or No, and then click the right arrow to continue to the next screen. Continue through each of the software configuration screens to choose settings and enter information from your Great...
- Page 11 Installing the Software (continued) Click Next. The Network Discovery screen appears as the system looks for the WA22. When this is complete, the Configure IP Addresses screen appears with the EasyADC PC IP address in the Host IP Address field. Enter a range of IP addresses for your EasyADC System.
- Page 12 Installing the Software (continued) Click Next. The Security Level screen appears. Click OK to choose a minimum security level for now. You will set the security level later in the installation. A message box appears informing you that the software installation is complete. Click OK.
-
Page 13: Step 4: Setting Up The Ac2 And Ck30S
Step 8. Get an AL2 handstrap from the Accessories box and follow the instructions in the shipping bag to install the handstrap on the CK30. You will need to unhook the bottom of the handstrap to remove and install the AB1 battery. -
Page 14: Step 5: Configuring The Ck30S
finished, the Setup - Complete screen appears. Press Enter. After the CK30 reboots, the blue light starts blinking as the CK30 tries to establish contact with the WA22. This will take a few minutes. When contact is established, the EasyADC login screen appears and the blue light stays solid. -
Page 15: Step 6: Installing The Pm4I
Installing the PM4i Unpack the PM4i and its box of printer accessories. Get these items from the Printer Accessories box: • high edge guide (teal) • AC power cord The other items in the Printer Accessories box are described in the user’s guide. Set these items aside for now. - Page 16 Installing the PM4i (continued) Remove the wrapper from the ribbon and set the cardboard takeup roll aside. Slide the ribbon onto the supply hub so the shiny side faces up when the ribbon is routed through the print mechanism. Route the ribbon through the print mechanism under the transparent upper LSS guide.
- Page 17 Installing the PM4i (continued) Bring the end of the ribbon back over the printhead and around the cardboard takeup roll. Press the adhesive end of the ribbon onto the roll, making sure to line up the sides of the ribbon with the edges of the core. Turn the printhead lever clockwise to release the ribbon.
- Page 18 Installing the PM4i (continued) Install the high edge guide by reversing Step 17. For help, see “Media Supply Roll Post” in Chapter 2 of the EasyCoder PM4i Bar Code Label Printer User’s Guide. Get a roll of 4x6-inch media from the EasyADC shipping box. Place the roll on the supply post and push it all the way to the bottom of the post.
- Page 19 Installing the PM4i (continued) Adjust the position of the green edge guide so the media is guided with a minimum of play and lock the nut. Adjust the position of the edge guide on the label slack absorber according to the width of the media. Close the front and side doors, making sure that the media runs through the front door slot.
- Page 20 Installing the PM4i (continued) The EasyADC Console screen appears. Double-click the Discovered Devices folder. The Discovered Devices screen appears showing the components of the EasyADC System and their IP addresses. Right-click the printer icon and choose Delete. Right-click the EasyADC Console icon on the taskbar and choose Configure >...
-
Page 21: Step 7: Setting Security
For more information on operating your Intermec hardware products, see the user’s manual or quick start guide for that product. Complete manuals for your Intermec products are available as PDF files on the EasyADC CD. On the CD, browse to Training >... -
Page 22: Uninstalling The System
Press B and then C. b. Choose 1 (Configuration Utility) and then choose 6 (Restore Defaults). c. Press Enter to select Yes and restore the defaults. The CK30 cold boots. After the cold boot, the Setup Assistant screen appears. - Page 23 Caution: Do not remove the Great Plains SQL Server file! Close the ODBC Data Source Administrator screen. Open My Computer on the EasyADC PC and browse to C:\\Program Files. Locate the Intermec folder and delete the folder and all its contents. The EasyADC System is now uninstalled.
-
Page 24: For More Information
You may need additional information when working with your EasyADC System. Please visit www.intermec.com to download PDF files of our current manuals. To order printed versions of the Intermec manuals, contact your local Intermec representative or distributor. Service and Support See the EasyADC Service and Support Card for specific information about... - Page 25 6001 36th Avenue West Everett, WA 98203 U.S.A. www.intermec.com © 2004 Intermec Technologies Corp. All Rights Reserved EasyADC System Installation Guide *074830-001* P/N 074830-001...
Need help?
Do you have a question about the CK30 and is the answer not in the manual?
Questions and answers