
Related Manuals for VeEX MTX150x Lite


Summary of Contents for VeEX MTX150x Lite
- Page 1 MTX150x Lite User Manual Multi-Gigabit Internet Services & Ethernet Services Speed Test Set P/N D07-00-160P Rev. A00...
- Page 2 Please direct all questions to your local VeEX® Sales Office, Representative, or Distributor. Or, contact VeEX tech- nical support at www.veexinc.com. No part of this user manual may be reproduced, translated into a foreign language, or be transmitted electronically without prior agreement and written consent of VeEX Incorporated as governed by International copyright laws.
- Page 3 MTX150x Lite Connector Panel Hard Buttons and Interfaces Special Functions Touch-Screen Display Home Menu and Navigation Platform Screen Icons LEDs Home Menu and Screen Icons Mode/Port Selection Ethernet Setup Port Setup Table of © VeEX Inc. All Rights Reserved. Contents...
- Page 4 Ping Results Layer 4+ Applications TCP Protocol and Overview Layer 4+ Applications Configuration V-Perf Server/Client - Unidirectional Configuration and Results Bi-Directional Configuration and Results (VeEX Enhanced Testing Methodology Implementation) V-TEST Basic V-TEST Full V-TEST V-FTP Platform Functions Results & Files...
- Page 5 Connecting an External OLTS Device Using OLS (Optical Light Source) Menu Setup and Measurements Results Web Browser LAN & Connectivity LAN (USB OTG Adapter) Setup IP Connection Status Ping Trace Route Bluetooth Bluetooth Setup Table of © VeEX Inc. All Rights Reserved. Contents...
- Page 6 On Battery Power Brightness Power Standby Mode Touch Screen Calibration Date and Time Help Software Update Process Certifications and Declarations What is CE? RoHS ComplianceVeEX QUALITY AND ENVIRONMENTAL POLICY About VeEX Table of © VeEX Inc. All Rights Reserved. Contents...
- Page 7 Server Selection Modes Speed Test Modes Step 4: Save Results Step 5: View Results and Generate Test Reports Other Test Features Related Topics What Does Layer4+ Refer To? How Does Speedtest.net Works? Table of © VeEX Inc. All Rights Reserved. Contents...
- Page 8 VeEX Inc., and to use it solely as intended and described in this manual. The purchaser is prohibited from copying, reverse engineering, decompiling, or disassembling the software. ...
- Page 9 For warranty information on VeEX Inc. products, go to www.veexinc.com. To activate the warranty, please register your production at www.veexinc.com/Support/ProductRegistration. Patent Information VeEX Inc. product hardware and software may be protected by one or more patents on file with the United States Patent Office. Documentation Conventions...
- Page 10 Do not operate the instrument in the presence of flammable gases or fumes or any other combustible environment. VeEX Inc. assumes no liability for the customer's failure to comply with safety precautions and requirements. Lithium-ion Battery Precautions Lithium-ion (Li-ion) battery packs are compact and offer high capacity and autonomy, which make them ideal for demanding applications, like providing long lasting power to portable test equipment.
- Page 11 General Safety Guidelines NEVER use any other charger (e.g., for NiCd, NiMH, or Li-ion) other than the one supplied by VeEX to charge the Li-Po batteries in this product. Only use chargers designed for Lithium Polymer (Li-Po) batteries.
- Page 12 When storing batteries for extended periods, store at a half charged state. Optical Connectors The test sets display a laser warning icon when the laser source is active to alert the user about a potentially dangerous situation. It is recommended to: Safety Information © VeEX Inc. All Rights Reserved.
- Page 13 Perform all work at a workplace that is protected against electrostatic build-up and discharging. Never touch any exposed contacts, printed circuit boards or electronic com- ponents. Always store test modules in ESD protected packaging. © VeEX Inc. All Rights Reserved. Safety Information...
- Page 14 Wear ESD protection and grounding gear when: Inserting, extracting, or handling test modules. Inserting or removing SFPs, XFPs, QSFPs, or CFPs from the platform. Connecting or disconnecting cables from modules or platform. Safety Information © VeEX Inc. All Rights Reserved.
- Page 15 Introduction The MTX150x Lite is an optimized Quality of Experience (QoE) test solution (Layer 4+ applications) for multi- Gigabit services from 100 Mbps to 10 Gbps on copper and fiber interfaces. This rugged and ultra-portable hand-held test set helps field technicians install, verify, maintain and troubleshoot high-speed Residential and Business services, Internet Access and other packet- base services up to 10 Gbps.
- Page 16 Basic Operation MTX150x Lite Chassis Overview When powered on the test set automatically loads the V-TEST (VeEX Internet Speed Test) application. See "V-TEST" on page 53 for more information on running a V-TEST. MTX150x Lite Connector Panel Basic Operation © VeEX Inc. All Rights Reserved.
- Page 17 Although most common optical transceivers are considered safe, please follow standard eye safety procedures and common sense (e.g., avoid using optical scopes or looking directly at active connectors). Hard Buttons and Interfaces © VeEX Inc. All Rights Reserved. Basic Operation...
- Page 18 C. Home: Returns the screen to the home menu. Pressing the Home key for 3 seconds puts the unit ins sleep mode. Once in Sleep Mode, press the Home key for 3 seconds to return to normal operation. More about sleep mode This is not full power shutdown. Basic Operation © VeEX Inc. All Rights Reserved.
- Page 19 More about side buttons Side buttons on the left and right of the unit can reveal menus or other functions depending on the unit D. LED: Power ON and battery charge LED indicator © VeEX Inc. All Rights Reserved. Basic Operation...
- Page 20 E. Micro-B USB: Use an USB-A OTG cable (included with purchase) to connect a USB to the micro-B USB port. The port supports memory drives and USB add-on devices such as fiberscopes. An optional Micro-B OTG to Ethernet adapter is also available for network connection. (only VeEX approved OTG to Ethernet Cables can be used) G.
- Page 21 Touch-Screen Display The LCD supports touch-screen operation. To operate the touch-screen, use the stylus located in the top cover to navigate the menus and tabs. Please observe the following precautions: © VeEX Inc. All Rights Reserved. Basic Operation...
- Page 22 F: Connection Status Displays the status of external connections, i.e. Bluetooth, WiFi, power supply. Platform Screen Icons File: Provides general internal storage information. indicates the presence/detection of com- patible USB memory stick and provides proper memory stick ejection function (before remov- ing). Basic Operation © VeEX Inc. All Rights Reserved.
- Page 23 Fiberscope: Indicates that a fiberscope is connected to the unit. Tap the icon to go to the Fiber- scope application. LEDs Soft LEDS are supported on several test modes: Single Port LED Status Lights © VeEX Inc. All Rights Reserved. Basic Operation...
- Page 24 Yellow: An error or alarm was detected during the measurement interval but is no longer present or active Grey: Status not applicable or the test has not begun yet For test modes that support dual ports, P1 and P2 indicates the port in operation. Basic Operation © VeEX Inc. All Rights Reserved.
- Page 25 On screen soft buttons are used to control tests, alarms and error settings. Refer to the chart below for a description of each soft button. Testing, Alarm and Error Soft Buttons Mode/Port Selection © VeEX Inc. All Rights Reserved. Basic Operation...
- Page 26 The MTX150x Lite has a default RJ45 port selected with 1000M/2.5G/5G/10G Base-T Test Mode. If the port is connected to a switch it acquires IP address automatically (if DHCP is set up). But you can always manually switch the test mode Ethernet test modes are accessed by selecting the Test Application button .
- Page 27 In the example below, the 10 G Ethernet port is active. Turning the Laser On Activates the Test Port for Fiber Channel © VeEX Inc. All Rights Reserved. Basic Operation...
- Page 28 Port Setup Port setup or test interface configurations are accessed via the Setup menu located on the Home page. The available configuration settings depend on the interface selected in the Test Mode selection. Ethernet © VeEX Inc. All Rights Reserved.
- Page 29 When flow control is Off, the test set ignores all incoming pause frames from the link partner and continues transmitting at the configured transmit rate Clock Offset (1000 Mbps only): The frequency may be offset in parts per million © VeEX Inc. All Rights Reserved. Ethernet...
- Page 30 Status tab for 10/100/1000Base-T The Status tab lists current port settings. Please note that the Status tab is only available if a fiber port option is selected from the Test Port Selection menu. Ethernet © VeEX Inc. All Rights Reserved.
- Page 31 Mode: Manual, timed, or auto mode are available. Manual mode: Starts and stops the measurements manually. Timed mode: Defines the duration of the test; after the test is started, the test will run for the configured duration and stop automatically. © VeEX Inc. All Rights Reserved. Ethernet...
- Page 32 Gratuitous ARP: ON or OFF. If set to ON, a gratuitous ARP is performed. When the test port has an IP connection, an ARP request will be transmitted at regular intervals to keep the router/gateway Ethernet © VeEX Inc. All Rights Reserved.
- Page 33 Select PPoE, IPv4, or IPv6 from the Mode menu. Point-to-Point Protocol over Ethernet (PPoE) Authentication: PAP, CHAP, or CHAP & PAP. VLAN: Off or 1 Tag. ID: VLAN ID. Enter value 0 to 4095. Pri: VLAN priority 0 to 7. © VeEX Inc. All Rights Reserved. Ethernet...
- Page 34 CIDR (IPv6 only): The user can enter a Classless Inter -domain Routing Network Subnet (IPv4 only): The user can enter a subnet mask Gateway and DNS: Enable/Disable. Enables entering the Gateway and DNS. Ethernet © VeEX Inc. All Rights Reserved.
- Page 35 Trace Route is a common method used to find the route to the destination IP address or URL. It is often used to identify routing problems and unreachable destinations. All the remote IP addresses and their response times are displayed indicating possible network congestion points. © VeEX Inc. All Rights Reserved. Ethernet...
- Page 36 Time Out: Enter the maximum time allowed between an ICMP echo and response at each hop Max Hop: Enter the maximum number of network devices the packet is allowed to transit Once the parameters are configured, press Start to begin the test. Trace Route - Results Ethernet © VeEX Inc. All Rights Reserved.
- Page 37 Profile: Default, Delete, Save, or Save As... Start IP: Starting IP Address. End IP: Ending IP Address. Time Out(s): Range from 1-99 seconds. Input using the numeric keypad. © VeEX Inc. All Rights Reserved. Ethernet...
- Page 38 Ping is a popular computer network tool used to test whether a particular host is reachable across an IP net- work. A ping is performed by sending an echo request or ICMP (Internet Control Message Protocol) to the echo response replies. Ethernet © VeEX Inc. All Rights Reserved.
- Page 39 ICMP ping and echo response. Once the parameters are configured, press Start to begin the test. Ping Results Pressing Ping will take you to the Result tab and start the Ping test. © VeEX Inc. All Rights Reserved. Ethernet...
- Page 40 TCP parameters in the network were set up correctly. The optional V-PROBE is used as remote server to establish TCP connections and validate that the network is configured correctly for Ethernet © VeEX Inc. All Rights Reserved.
- Page 41 Transmission Control protocol is the most widely used transport layer protocol. TCP is used by most applic- ation protocols: HTTP, FTP, Telnet. It provides the following services: End-to-end connection Multiplexing/Demultiplexing of separate sessions Flow control © VeEX Inc. All Rights Reserved. Ethernet...
- Page 42 3. If data is lost, the window size is decreased and less data is sent prior to acknowledgment Step 1: Client sends a SYN message with SYN flag set in the TCP header. The Sequence number specifies the number assigned to the first segment. Ethernet © VeEX Inc. All Rights Reserved.
- Page 43 Based on RTT and BB results, the BDP is computed to estimate the optimal window size that should be used for testing (Auto mode). User can also specify fixed window size. Key Metrics: © VeEX Inc. All Rights Reserved. Ethernet...
- Page 44 Segments can be retransmitted more than once. There is no direct correlation between the number of Ethernet frames lost at the physical layer and the number of TCP retransmission, since a single lost acknowledgment could trigger many retransmission. Ethernet © VeEX Inc. All Rights Reserved.
- Page 45 2. For testing on SFP ports, turn the laser on. 3. Tap the IP icon. Configure a static IP address for testing. If you are in an environment that supports DHCP, select DHCP from the IP Address menu, then tap Connect. © VeEX Inc. All Rights Reserved. Ethernet...
- Page 46 Web UI. Refer to "File Manager" on page 64 V-Perf TCP/UDP-based business Internet speed performance test based on RFC6349 and compatible with RTU-300 hardware-based centralized test heads as well as iPerf and iPerf3 servers. Ethernet © VeEX Inc. All Rights Reserved.
- Page 47 Round Trip Time Measurement Configurable TCP Window Multi-Window size tests Measurements: TCP Throughput rate (min, max, average), Transfer file size and duration, Transfer time ratio, TCP Efficiency %, Buffer Delay % TCP Throughput Test Diagram © VeEX Inc. All Rights Reserved. Ethernet...
- Page 48 2. Set the other test set as a Client for FTP Mode. On the bottom of the screen, go to Page 2 to con- figure the Throughput Test Mode type. MTU Search, Round Trip Time Search, Bottleneck Bandwidth, and Window Size options are also on Page Ethernet © VeEX Inc. All Rights Reserved.
- Page 49 3. Connect the two test sets to the Near End (NE). Press Start on the Client unit. Status: Global Client - Results - Status The Status tab displays test progress and pass/fail results for MTU Search, RTT Search, and TCP Test. © VeEX Inc. All Rights Reserved. Ethernet...
- Page 50 Graph display options can be modified in the following ways: Change the Mbps range with the - and + buttons. Display all window sizes on one graph or individual window sizes using the drop-down menu. Ethernet © VeEX Inc. All Rights Reserved.
- Page 51 TCP Status displays test progress and pass/fail results for RFC 6349 measurements identical to the Summary (Global Results) tab. TCP Graphs displays per stream graphs identical to the Graphs (Global Results) tab. Server Results The Status tab displays the Client IP and current test event. © VeEX Inc. All Rights Reserved. Ethernet...
- Page 52 Summary results per stream are viewable in the Per Stream tab. Server Results - Summary Bi-Directional Configuration and Results (VeEX Enhanced Testing Methodology Imple- mentation) The Bi-Directional TCP testing methodology is unique as it allows two separate tests to run simultaneously on the same link in different directions.
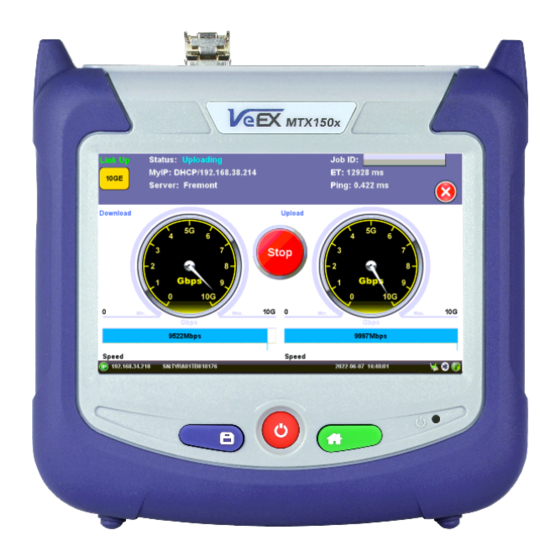
- Page 53 The V-TEST feature qualifies network TCP/HTTP protocol performance by testing Internet speeds up to a full line rate against a server to verify the maximum download and upload data rates attainable by subscribers' high-speed or Gigabit Internet services. © VeEX Inc. All Rights Reserved. Ethernet...
- Page 54 The test set will take a few seconds to boot up, automatically start the V-TEST (VeEX Internet Speed Test) application, detect the link, auto-configure and get an IP address. The Basic V-Test defaults to use Ookla's speedtest.net servers for the speed test.
- Page 55 (from test set to server) and displays the results. 3. Once finished, the GO button will turn back to green. It is ready to save the results and/or run more tests. MTX150x Lite Auto Basic V-TEST Full V-TEST Press to switch to the Full V-TEST screen and access more test details. The different tabs provide access to detailed test Results (Summary, Status, Graphs), Setup (manual configuration), and offers buttons for direct access to other related troubleshooting test tools.
- Page 56 ID and server information (URL/IP, location, and ISP) are also provided. VeEX Managed – Perform internet speed tests by manually selecting servers from lists cre- ated and maintained by VeEX. These non-public lists are created for specific customers.
- Page 57 The option to add the profile to an existing server list is also available. Server Named FREMONT Can Be Added to server1 © VeEX Inc. All Rights Reserved. Ethernet...
- Page 58 FREMONT and server1 appearing in User Managed Starting a V-TEST Select a server from User Managed or VeEX Managed. Enabling Ping mode simultaneously runs a Ping test. Ping Response results will appear under the Results tab. Tap Start to initiate testing. The download test starts first, followed by the upload test. ...
- Page 59 1000T: 1 Gbit/s, 1000BASE-T copper interface (RJ45 UTP) 100T: 100 Mbit/s, 100BASE-T copper interface (RJ45 UTP) 10T: 10 Mbit/s, 10BASE-T copper interface (RJ45 UTP) FDX: Full Duplex HDX: Half Duplex UTP: Unshielded Twisted (copper) Pairs cable V-FTP © VeEX Inc. All Rights Reserved. Ethernet...
- Page 60 5. Tap Files to open up the FTP file selection window and view all the files on the server. Select a file to transfer and tap Start to run the test. V-FTP - Setup - Download Ethernet © VeEX Inc. All Rights Reserved.
- Page 61 V-FTP - Setup - Upload V-FTP - Download - Results © VeEX Inc. All Rights Reserved. Ethernet...
- Page 62 Platform Functions To access platform functions tap on tools icon System Utilities LAN & Connectivity Platform Functions © VeEX Inc. All Rights Reserved.
- Page 63 Platform Tools Results & Files © VeEX Inc. All Rights Reserved. Platform Functions...
- Page 64 Guides and Manual Use a tablet or smartphone to scan the QR code on the testset screen to access the manual and Guides Results & Files File Manager File Manager, Advanced Platform Functions © VeEX Inc. All Rights Reserved.
- Page 65 Tap any column header to sort the table in ascending or descending order by the column selected. Up and down arrow keys indicate that the table is sorted in ascending and descending order respectively. © VeEX Inc. All Rights Reserved. Platform Functions...
- Page 66 Unlocks or Locks test reports. Locked reports are identified by a red padlock icon. Locked test reports cannot be deleted or renamed. Generates a PDF copy of the test report and stores it in an attached USB memory stick (required) for distribution (e.g., via email). Platform Functions © VeEX Inc. All Rights Reserved.
- Page 67 3. When all files have been copied to the USB, tap the folder icon (top-right corner) and select Remove USB Drive to make sure all cached data is transferred to the USB drive, especially when trans- ferring small files. Bluetooth (BT) File Transfer requires a compatible USB dongle. © VeEX Inc. All Rights Reserved. Platform Functions...
- Page 68 HTML: Launches the browser to display its content TXT: Launches a basic text viewer to display its content PCAP: Launches the built-in Wireshark® protocol analyzer MTIE: Launches the optional built-in Wander Analysis tool Platform Functions © VeEX Inc. All Rights Reserved.
- Page 69 File Manager to backup files to USB, then delete selected files. The Format function is exclusively a maintenance tool. Use ONLY when instructed by a VeEX Customer Care representative. It erases all the information stored in the test set! The internal SD Card contains the System OS, all the Test Applications (Apps) and user’s data.
- Page 70 "DI-3000 Auto-Focus Digital Fiber Inspection Microscope" on page 77 The VeEX digital fiber inspection scopes evaluate fiber optic connectors for dirt and end face quality. The hand- held probe design enables easy inspection of patch cords and difficult to reach bulkhead or patch panel con- nectors.
- Page 71 When paired with a VeEX Optical Light Source (OLS) or as part of a VeEX Optical Loss Test Set (OLTS), which includes both, WaveID can be used to quickly test several wavelengths without having to adjust the OPM settings.
- Page 72 This functionality allows the test platform to open and analyze standard OTDR .SOR files created by supported VeEX test sets. It can also be used to control the OPX-BOX OTDR via Bluetooth, Wireless or USB connection, offering full-featured OTDR test functionality.
- Page 73 Inspection Tip: a front-end component inserted to view the connector endface Capture Button: a button that starts and stops (play or pauses) the video stream of the fiber end- face to save an image at the current frame. © VeEX Inc. All Rights Reserved. Platform Functions...
- Page 74 DI-1000MPO Digital Fiber Inspection Microscope for Single and Multi-Fiber Connectors DI-1000MPO Digital Fiber Inspection Microscope for Single and Multi-Fiber Connectors WiFi support requires VeEX Power Bank/WiFi Bridge accessory and host device/test set has built-in WiFi capability. See the test set's data sheet on www.veexinc.com or contact...
- Page 75 MPO fiber # at the start matches the MPO fiber # at the end (not flipped). When using the adapter, fibers will be in the opposite orientation of the camera. In the below example, fiber #1 is on the right. © VeEX Inc. All Rights Reserved. Platform Functions...
- Page 76 To view results on the unit, on the Results tab navigate to the mpo heading on the saved trace and press Load. Tap each individual screenshot to view the individual MPO fibers. MPO results (Scope image appears on bottom right corner of the screen.) Platform Functions © VeEX Inc. All Rights Reserved.
- Page 77 Fiberscope MPO endface test viewed in an HTML browser DI-3000 Auto-Focus Digital Fiber Inspection Microscope © VeEX Inc. All Rights Reserved. Platform Functions...
- Page 78 The operator is assumed to have received basic training in fiber optics and related testing and measurement practices. Read the "Safety Information" on page 10 "Optical Connectors" on page 12 sections before beginning using optical features of the test set. Platform Functions © VeEX Inc. All Rights Reserved.
- Page 79 (tip faced away). Remove a tip by rotating the locknut counterclockwise (tip faced away). With the correct tip fastened and secured, launch the Fiberizer application (PC, mobile, VeEX test set) and plug into an available USB interface or connect to the WiFi network.
- Page 80 See the WiFi Wiz section for more information on setting up a WiFi Access Point if automatic scan- ning fails. The WiFi Access Point password is: "veex" plus the last six digits of the serial number of the DI- 3000 to connect with e.g. "veexA00700", where the serial number is SN:LA-3KA00700.
- Page 81 When Ask Before Save is selected, the Save menu will display with naming and comment options. The details entered in the following fields can be used to pre-set the filename automatically and increment the fiber or test number automatically. © VeEX Inc. All Rights Reserved. Platform Functions...
- Page 82 Increment: Increments the selected ID name if an Auto Save option is selected. Saved image files can be retrieved from "File Manager" on page 64 or managed from the Results tab. Fiber Scope Setup - Page 2 Fiber Scope Setup - Page 3 Platform Functions © VeEX Inc. All Rights Reserved.
- Page 83 LC APC short extended A6 female: Use when inspecting hard to reach LC/APC connector coupler/bulkhead. MPO PC female: Use when inspecting SM ribbon cables with MPO/MTP via coupler. MPO APC female: Use when inspecting SM ribbon cables with MPO/MTP angle polished con- nector via coupler. © VeEX Inc. All Rights Reserved. Platform Functions...
- Page 84 The radio buttons on the right panel do not indicate the current state or setting, they indicate the action that would take place if pressed. For example, if “Analysis OFF” is tapped, the analysis function is turned OFF and the button displays “Analysis ON”. Platform Functions © VeEX Inc. All Rights Reserved.
- Page 85 To save the image on the screen, tap the screen after freezing. After saving, go to Results or > Utilities > FilesFiles to view the report and export to PDF or USB. © VeEX Inc. All Rights Reserved. Platform Functions...
- Page 86 Pass/Fail criteria, according to the IEC 61300-3-35 standard. (Scratch requirements refer to width.) This table will also be included in the reports. Pass/Fail IEC analysis table (Measured scratches and defects compared with threshold criteria for each fiber layer) Platform Functions © VeEX Inc. All Rights Reserved.
- Page 87 In the Fiber Scope Analysis Result Files example above when choosing to retain the tree format, the highlighted 022-tst001 results file can be found in the following directory after exporting: >fx150build64_rc > sc-apc-m b01. © VeEX Inc. All Rights Reserved. Platform Functions...
- Page 88 PC Internet browser to register before proceeding with these directions. Go to http://fiberizercloud.com to register. After registering, tap Modify > Settings to enter login information for Fiberizer Cloud. Platform Functions © VeEX Inc. All Rights Reserved.
- Page 89 After pushing results to the Fiberizer Cloud project, check the Jobs folder to which the saved cable folder was uploaded. Use Fiberizer Cloud to create professional reports or serve as an online storage backup. The example below shows MPO results on Fiberizer Cloud. MPO Fiber View on Fiberizer Cloud © VeEX Inc. All Rights Reserved. Platform Functions...
- Page 90 When paired with a VeEX Optical Light Source (OLS) or as part of a VeEX Optical Loss Test Set (OLTS), which includes both, WaveID can be used to quickly test several wavelengths without having to adjust the OPM settings.
- Page 91 270 Hz, 330 Hz, 1000 Hz, 2000 Hz: Modulate the laser at the specified frequency Turn On/Turn Off: Toggle laser power Loop: Cycle through all available wavelengths (3 seconds per wavelength) OPM Menu © VeEX Inc. All Rights Reserved. Platform Functions...
- Page 92 Setup and Measurements Wavelength: Matches the calibrated wavelength to the signal being measured. Wave ID: Detects the incoming wavelength automatically from a supported VeEX OLS. Use when operating the OLS in continuous wave (CW) mode with or without Loop enabled.
- Page 93 1. Select the OPM tab. Verify the insertion loss (IL) values are acceptable, then tap Acquire to load val- ues into the Table tab. The Table tab title shows how many fiber records have been saved in the format Table*-n NEW, where n is the number of new records. © VeEX Inc. All Rights Reserved. Platform Functions...
- Page 94 The built-in web browser uses the management port IP connection. An active IP connection can be established either through Ethernet or Wifi. The web browser defaults to VeEX's test website. Use the Web browser's navigation bar to enter the name of the website you wish to reach. Navigation capabilities may be limited.
- Page 95 An IP connection needs to be estab- lished in order to perform a Ping or Trace Route test. An (optional) external USB OTG to 10/100BASE-T adapter is required for LAN connection. © VeEX Inc. All Rights Reserved. Platform Functions...
- Page 96 Network configuration settings are available in the Setup menu. Additional fields will vary depending on Static or DHCP connection: IP Address: Select from Static or DHCP Static: If Static is selected, the user will manually enter the IP address parameters (local IP, Gateway IP and DNS Platform Functions © VeEX Inc. All Rights Reserved.
- Page 97 Status DHCP: PASS indicates that an IP address has successfully been assigned. IP: PASS indicates that the IP address assigned has been verified to be unique in the network. © VeEX Inc. All Rights Reserved. Platform Functions...
- Page 98 If Continuous Ping is selected, the user is not required to enter the number of pings. The test set will continuously ping the target host until the user presses Stop. Length: Enter the length of the ICMP echo request packet transmitted. Ping/Sec: Enter the Ping repetition rate (Ping/second). Platform Functions © VeEX Inc. All Rights Reserved.
- Page 99 Average: The average time recorded for a Ping request to be answered. Max: The maximum time recorded for a Ping request to be answered. Min: The minimum time recorded for a Ping request to be answered. © VeEX Inc. All Rights Reserved. Platform Functions...
- Page 100 Time Out: Enter the maximum time allowed between an ICMP echo and response at each hop Max Hop: Enter the maximum number of network devices the packet is allowed to transit Once the parameters are configured, press Start to begin the test. Platform Functions © VeEX Inc. All Rights Reserved.
- Page 101 Bluetooth details will be displayed including the MAC address of the device and the last 4 digits of the test set serial #. The last 4 digits of the test set will be the pairing code between the unit and the external device. © VeEX Inc. All Rights Reserved. Platform Functions...
- Page 102 Bluetooth Setup / Info Scan Platform Functions © VeEX Inc. All Rights Reserved.
- Page 103 (PC or Mobile Phone) in order to pair successfully. Enter the last 4 digits of the test set's serial number as shown in the Connection tab. © VeEX Inc. All Rights Reserved. Platform Functions...
- Page 104 Bluetooth details will be displayed including the MAC address of the device and the last 4 digits of the test set serial #. The last 4 digits of the test set will be the pairing code between the unit and the external device. Bluetooth Setup / Info Platform Functions © VeEX Inc. All Rights Reserved.
- Page 105 Scan Bluetooth - Connection - Passcode © VeEX Inc. All Rights Reserved. Platform Functions...
- Page 106 4 digits of the test set's serial number as shown in the Connection tab. 3. Once paired, click the Services button at the bottom of the screen to check the service attributes. To upload test results via Bluetooth, full data upload service will be required. Platform Functions © VeEX Inc. All Rights Reserved.
- Page 107 Tap on the Scan tab to scan the list of available WiFi APs. AP List The following information is displayed for each AP: SSID name of the AP BSSID (MAC address) of the AP AP's radio channel number © VeEX Inc. All Rights Reserved. Platform Functions...
- Page 108 Edit Settings, press Connect AP to connect to the AP. If the encryption menu was accessed via Connect AP, the test set will automatically connect to the AP after hitting Apply. WiFi Wiz - AP Encryption Settings Platform Functions © VeEX Inc. All Rights Reserved.
- Page 109 Connection Status ESSiD: Name connected to BSSiD: MAC address of wireless router/device connected to Channel: WiFi Channel # connected to Encryption: Encryption type Mode Signal: Radio signal level (dBm) Link quality score © VeEX Inc. All Rights Reserved. Platform Functions...
- Page 110 IP tests like Ping, Trace Route etc. WiFi Wiz Connect IP AP Mode In AP Mode, the unit emulates a WiFi access point/DHCP server and allows WiFi Clients (PC/Phone/Tablet) to connect to the unit. Platform Functions © VeEX Inc. All Rights Reserved.
- Page 111 ReVeal Software This VeEX application allows the test set to connect, using the platform’s IP address. ReVeal CX300 is used for cable test sets, ReVeal FX300 for fiber test sets,ReVeal MTX for MTX, WX, RXT, MTTplus or TX series and transport test sets.
- Page 112 After configuring these settings in the Remote Access menu, run VNC on the PC. A message box will prompt the user to enter a Server number, which is the test set IP address. Enter the VNC Super/Regular password when prompted by the message box for a password. Platform Functions © VeEX Inc. All Rights Reserved.
- Page 113 VNC Viewer - Password Prompt EZ Remote The EZ Remote functionality allows users to quickly and securely connect to VeEX test sets all over the world, without the need for VPN, port forwarding or public IP addresses. This VeEX hosted service and user interface take care of all the complex tasks required, and present users with a simple application.
- Page 114 Use it for remote control, collaboration, technical support or training purposes. The basic EZ Remote service is offered by VeEX free of charge. It provides public registration servers to help users and test sets establish remote sessions, without having to get IT departments involved. All you need is internet access for the test set and a remote user.
- Page 115 (without www.), and tap on Apply to connect and establish a session with the EZ Remote server. 4. Provide the resulting URL and Session IDor scan the QR codes to Email or SMS/Test to the inten- ded remote user. © VeEX Inc. All Rights Reserved. Platform Functions...
- Page 116 GUI image and mouse control. This is not recommended since it is equivalent to having multiple users trying to operate one test set at the same time (also known as “mouse fight”). Nonetheless, it may be effective for training purposes with one or two extra users. Platform Functions © VeEX Inc. All Rights Reserved.
- Page 117 5. Once the remote GUI appears, you can use the Remote Control tab to operate the test set in the same way you would control a local unit from its touch screen. © VeEX Inc. All Rights Reserved. Platform Functions...
- Page 118 Platform Functions © VeEX Inc. All Rights Reserved.
- Page 119 Test Profiles are configurations saved by the user that can be retrieved and reapplied to the test set. For example, commonly used configurations and test limits/threshold can be saved as test profiles, for different types of services. © VeEX Inc. All Rights Reserved. Platform Functions...
- Page 120 Download selected files to the local computer or convert them to PDF and download. To open a test results file, select it from the list and tap on View. Files can be downloaded by clicking on Download (original file format) or PDF. Platform Functions © VeEX Inc. All Rights Reserved.
- Page 121 >System Utilities>Global Settings>Save Settings R-Server Part of VeEX’s VeSion® centralized monitoring and management solutions, the R-Server Workflow and Asset Management system provides crucial tools to manage fleets of technicians, test equipment, standardized test profiles, thresholds, centralized test results collection, reporting, jobs/ticketing, and software update delivery to create coordinated and efficient disciplined workforce and test procedures.
- Page 122 Customer Suport. The Software Option tab provides a list of software licenses (optional test features) currently loaded in the test set. About Tab Platform Functions © VeEX Inc. All Rights Reserved.
- Page 123 Audible Alarm: When enabled, the test set's buzzer will sound (beep) when alarms and errors are being detected (if supported by the test application). Show Password: Hides/unhides username and password information associated with FTP and related IP functions. © VeEX Inc. All Rights Reserved. Platform Functions...
- Page 124 USB using the "USB Memory Browser" on page 68 in the File Manager. To directly transfer saved files to a PC, refer to the Share Results function. Utility Settings - General Setting Platform Functions © VeEX Inc. All Rights Reserved.
- Page 125 Once the timer is active and the backlight turned off, any action on the test set (touch screen, keypad) will turn on the backlight again. © VeEX Inc. All Rights Reserved. Platform Functions...
- Page 126 This section provides information about current power source and information about the battery's charge level and estimated autonomy (under current load conditions) . Tap on the battery icon, on the top bar, to bring bat- tery charge and estimated autonomy information. Platform Functions © VeEX Inc. All Rights Reserved.
- Page 127 LED will blink. Press Home to view battery life and standby mode run time. Pressing and holding Home for 3 seconds again will return the unit to normal operation. © VeEX Inc. All Rights Reserved. Platform Functions...
- Page 128 Date and Time This screen allows the date, time and time zone to be set. Daylight time savings must be adjusted manually, by changing the new DST time zone.. Platform Functions © VeEX Inc. All Rights Reserved.
- Page 129 If the NTP Time Service, in >System Utilities >General Setting, is turned ON, the test set automatically updates to the standard time and adjusts it to local time (using the time zone information), whenever connected to a LAN or WLAN (WiFi) with Internet access. © VeEX Inc. All Rights Reserved. Platform Functions...
- Page 130 Tap on the question mark and use a tablet or smartphone to scan the QR code that appears on the LCD screen, to access the User Manual and Quick Guides specific to the product. The manual and user guides can be accessed on-line or downloaded as a .pdf file. Help © VeEX Inc. All Rights Reserved.
- Page 131 In both instances, press and hold the buttons for at least 3 seconds, then release. The unit will automatically locate and load the software file from the USB flash drive. Wait for the upgrade pro- cess to finish. Software Update Pro- © VeEX Inc. All Rights Reserved. cess...
- Page 132 After the software upgrade is completed, go to the Utilities > About menu to confirm the software version. Software Version is displayed in the About section. Software Update Pro- © VeEX Inc. All Rights Reserved. cess...
- Page 133 Our quality and environmental policy is to limit and progressively eliminate the use of hazardous substances and chemicals in the design and manufacture of our products. VeEX products are classified as Monitoring and Control Instruments under Article 2, Section (1), Category 9 of the WEEE 2002/96/EC Directive.
- Page 134 Additional RoHS substance restrictions for the Monitoring and Control Instruments were adopted by EU Dir- ective 2015/863 (March 31, 2015). These new restrictions will take effect from July 22, 2021. VeEX has estab- lished a program to ensure that from July 22, 2021, all its products to be sold and shipped into the EU market will conform with (EU) 2015/863.
- Page 135 With a blend of advanced technologies and vast technical expertise, VeEX products address all stages of network deploy- ment, maintenance, field service turn-up, and integrate service verification features across copper, fiber optics, CATV/DOCSIS, mobile 4G/5G backhaul and fronthaul, next generation transport network, Fibre Channel, car- rier &...
- Page 136 When powered on the test set automatically loads the V-TEST (VeEX Internet Speed Test) application. The MTX150x Lite is an optimized Quality of Experience (QoE) test solution (Layer 4+ applications) for multi-Gigabit ser- vices from 100 Mbps to 10 Gbps on copper and fiber inter- faces.
- Page 137 C. Home: Returns the screen to the home menu. Pressing the Home key for 3 seconds puts the unit ins sleep mode. Once in Sleep Mode, press the Home key for 3 seconds to return to normal operation. More about sleep mode This is not full power shutdown. MTX150x Lite Quick © VeEX Inc. All Rights Reserved. Guide...
- Page 138 More about side buttons Side buttons on the left and right of the unit can reveal menus or other functions depending on the unit D. LED: Power ON and battery charge LED indicator MTX150x Lite Quick © VeEX Inc. All Rights Reserved. Guide...
- Page 139 I. Stylus (use when finer touch screen control is required). J. DC power socket: (use VeEX-supplied AC/DC chargers only). MTX150X Light Connector Panel's Test Ports (top view) Follow the instructions below to use the MTX150x Lite to start testing high-speed and multi-gigabit Internet access services. MTX150x Lite Quick ©...
- Page 140 Step 2: Power on Test Set Press and hold the Power button for two seconds, until a confirmation tone (beep) is heard, and the VeEX logo appears on the screen, then release the power button. MTX150x Lite Quick ©...
- Page 141 The test set will take a few seconds to boot up, automatically start the V-TEST (VeEX Internet Speed Test) application, detect the link, auto-configure and get an IP address. The Basic V-Test defaults to use Ookla's speedtest.net servers for the speed test.
- Page 142 (from test set to server) and displays the results. 3. Once finished, the GO button will turn back to green. It is ready to save the results and/or run more tests. MTX150x Lite Auto Basic V-TEST More about IP Addresses MyIP MyIP (also known as 'Home IP') is the IP address assigned to the active Test Port and the one used for testing purposes.
- Page 143 ID and server information (URL/IP, location, and ISP) are also provided. VeEX Managed – Perform internet speed tests by manually selecting servers from lists cre- ated and maintained by VeEX. These non-public lists are created for specific customers.
- Page 144 1000T: 1 Gbit/s, 1000BASE-T copper interface (RJ45 UTP) 100T: 100 Mbit/s, 100BASE-T copper interface (RJ45 UTP) 10T: 10 Mbit/s, 10BASE-T copper interface (RJ45 UTP) FDX: Full Duplex HDX: Half Duplex UTP: Unshielded Twisted (copper) Pairs cable MTX150x Lite Quick © VeEX Inc. All Rights Reserved. Guide...
- Page 145 When the Advanced Saving option in the System Utilities>Global Settings>Storage Settings is turned ON, additional information to the results file can be appended to test results/report. More about Advanced Saving MTX150x Lite Quick © VeEX Inc. All Rights Reserved. Guide...
- Page 146 Locked test reports cannot be deleted or renamed. Generates a PDF copy of the test report and stores it in an attached USB memory stick (required) for distribution (e.g., via email). MTX150x Lite Quick © VeEX Inc. All Rights Reserved. Guide...
- Page 147 The Cable Check function provides basic diagnostics for the UTP cable pairs' pin-out (straight, crossed, low impedance mismatch, short, high impedance mismatch, open) and as well as their length. Update: MTX150x Lite Quick © VeEX Inc. All Rights Reserved. Guide...
- Page 148 Perform internet speed tests by manually selecting servers from lists created and maintained by VeEX. These non-public lists are created for specific customers. The Update button is used to update the servers' list. Inter- net access is required to receive the server lists maintained by VeEX.
Need help?
Do you have a question about the MTX150x Lite and is the answer not in the manual?
Questions and answers