Table of Contents
Advertisement
Quick Links
Advertisement
Table of Contents

Related Manuals for KaVo STERIclave B 2200


Summary of Contents for KaVo STERIclave B 2200
- Page 1 Operating Instruction STERIclave B 2200 / 2200 P Always be on the safe side.
- Page 2 Sales: Manufacturer: KaVo Dental GmbH Kaltenbach & Voigt GmbH Bismarckring 39 Bismarckring 39 D-88400 Biberach D-88400 Biberach Tel. +49 7351 56-0 www.kavo.com Fax +49 7351 56-1488...
-
Page 3: Table Of Contents
Operating Instruction STERIclave B 2200 / 2200 P Contents Contents Contents ................................1 1 User instructions ............................4 1.1 User guide ..............................4 1.1.1 Abbreviations ........................... 4 1.1.2 Symbols ............................4 1.1.3 Target group ............................. 4 1.2 Service ..............................5 1.3 Warranty terms and conditions ........................ 6 1.4 Transportation and storage ........................ - Page 4 Operating Instruction STERIclave B 2200 / 2200 P Contents 6 Operation ..............................40 6.1 Operation in general ..........................40 6.1.1 Control panel ..........................40 6.1.2 Button functions ..........................40 6.1.3 Display ............................41 6.2 Switching the STERIclave B on and running a self-diagnosis ............... 42 6.3 Inserting instruments ..........................
- Page 5 Operating Instruction STERIclave B 2200 / 2200 P Contents 11 Certificates ..............................76 11.1 EC statement of conformity ........................76 11.2 EN 13060:2004 / Annex B (informative)/process evaluation system ........... 77 3/78...
-
Page 6: User Instructions
Operating Instruction STERIclave B 2200 / 2200 P 1 User instructions 1.1 User guide 1 User instructions 1.1 User guide Requirement Read these instructions before the initial startup to prevent misuse and damage. 1.1.1 Abbreviations Short Explanation form Instructions for use... -
Page 7: Service
Operating Instruction STERIclave B 2200 / 2200 P 1 User instructions 1.2 Service 1.2 Service Direct questions regarding the product, service and maintenance to the following address. Please indicate the product serial number in all requests. Service hotline: +49 7351 56-1500 Service.Instrumente@kavo.com... -
Page 8: Warranty Terms And Conditions
24 months from data of purchase or 2,,500 cycles, subject to the following con‐ ditions: Upon justified complaints of flaws or a short delivery, KaVo will make good its war‐ ranty by replacing the product free of cost or repairing it according to the customer's wishes. -
Page 9: Transportation And Storage
1.4.1 Currently valid packaging ordinance Note Only applicable for the Federal Republic of Germany. KaVo transport packaging must be disposed of and recycled by local disposal ser‐ vice providers and recycling companies in accordance with Dual System require‐ ments. For more information about disposal and recycling, and an up-to-date list of local disposal service providers and recycling companies, please visit the following In‐... -
Page 10: Storage
Operating Instruction STERIclave B 2200 / 2200 P 1 User instructions 1.4 Transportation and storage Outside of Germany Note KaVo is not liable for damage arising from transportation. Immediately inspect the delivery after receipt! If external damage to the packaging is visible upon delivery, follow the procedure below: 1. - Page 11 Operating Instruction STERIclave B 2200 / 2200 P 1 User instructions 1.4 Transportation and storage Humidity 5% to 95% Air pressure 700 to 1060 hPa 9/78...
-
Page 12: Safety
Operating Instruction STERIclave B 2200 / 2200 P 2 Safety 2.1 Description of safety instructions 2 Safety 2.1 Description of safety instructions 2.1.1 Warning symbol Warning symbol 2.1.2 Structure The introduction describes the type and source of the hazard. This section describes the potential consequences of non-observance. -
Page 13: Purpose - Proper Use
▪ the applicable health and safety regulations. ▪ the applicable accident prevention regulations. This KaVo product is intended only for use in the field of dentistry. It is impermissible to use the product for a purpose for which it was not intended. - Page 14 Operating Instruction STERIclave B 2200 / 2200 P 2 Safety 2.2 Purpose – Proper use This steriliser meets the requirements of EN 13060:2004 for small steam sterilisers. It contains operating programs for class B sterilisation processes and operating programs for class S sterilisation processes.
-
Page 15: Safety Instructions
CAUTION ▶ Only use original KaVo spare parts. The KaVo product is not permitted to be used in areas subject an explosion hazard. The unit may only be operated in enclosed spaces by competent personnel. Users have a duty to: ▪... -
Page 16: Product Description
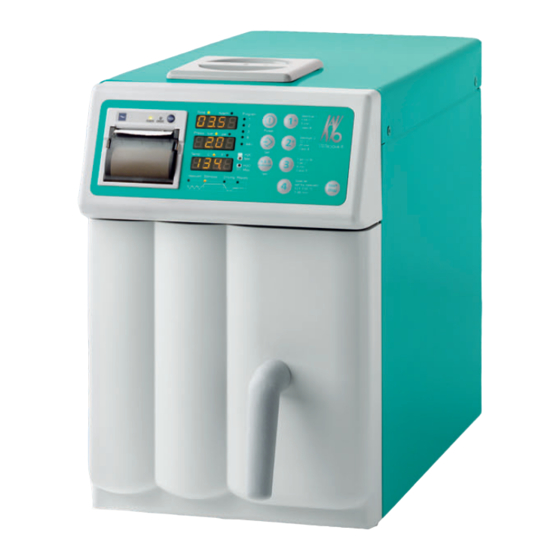
Operating Instruction STERIclave B 2200 / 2200 P 3 Product description 3.1 STERIclave B 2200/2200 P 3 Product description 3.1 STERIclave B 2200/2200 P 3.1.1 Front ① Internal printer ⑧ Control panel (STERIclave B 2200 P only) ② Door ⑨ Bacteriological filter ③... -
Page 17: Rear
Operating Instruction STERIclave B 2200 / 2200 P 3 Product description 3.1 STERIclave B 2200/2200 P 3.1.2 Rear ① Main switch ⑥ Air outlet for intercepting tank ② Fuse ⑦ Power supply cable ③ Rating plate ⑧ Air grille ④ PC port (RJ 45/for technicians only) ⑨... -
Page 18: Rating Plate
Operating Instruction STERIclave B 2200 / 2200 P 3 Product description 3.2 Rating plate 3.2 Rating plate Manufacturer Type Unit type STERIclave B 2200/2200 P Serial number Material number GOST R certification CE mark Note: Read and note the content of accompanying documents. -
Page 19: Technical Data
Operating Instruction STERIclave B 2200 / 2200 P 3 Product description 3.3 Technical Data 3.3 Technical Data Dimensions Width 280 mm Depth (incl. door handle) 590 mm Height 430 mm Width of footprint 205 mm (distance between feet) Depth of footprint... - Page 20 Operating Instruction STERIclave B 2200 / 2200 P 3 Product description 3.3 Technical Data Fresh water tank 2.6 l Foul water tank 2.6 l Transportation and storage conditions Transportation and storage temperature 0ºC to 60ºC Relative humidity 5% to 95 %...
-
Page 21: Scope Of Delivery
Operating Instruction STERIclave B 2200 / 2200 P 3 Product description 3.4 Scope of delivery 3.4 Scope of delivery Figure Description STERIclave B 2200 Mat. no. 1.000.1200 STERIclave B 2200 Mat. no. 1.000.1400 Tray holder (1x) (Mat. no. 1.004.9264) Tray (6x) (Mat. - Page 22 Operating Instruction STERIclave B 2200 / 2200 P 3 Product description 3.4 Scope of delivery Figure Description Cleaning tabs (2x) (Mat. no. 1.004.8678 for 10) Printer paper (Mat. no. 1.004.9529) Instructions for use (1x) 20/78...
-
Page 23: Safety Equipment
Operating Instruction STERIclave B 2200 / 2200 P 3 Product description 3.5 Safety equipment 3.5 Safety equipment The STERIclave B features the following safety equipment: Safety equipment Function Two micro switches to secure the door The sterilisation chamber can only be seal opened when the chamber is depressu‐... -
Page 24: Acoustic Signals
Operating Instruction STERIclave B 2200 / 2200 P 3 Product description 3.6 Acoustic signals 3.6 Acoustic signals During operation, acoustic signals tell the user about the major phases in the steri‐ lisation process and indicate errors. Signal Meaning 1 short tone A button has been pressed. -
Page 25: Signs On The Product
Operating Instruction STERIclave B 2200 / 2200 P 3 Product description 3.7 Signs on the product 3.7 Signs on the product Caution, hot surfaces! 23/78... -
Page 26: Installation
Operating Instruction STERIclave B 2200 / 2200 P 4 Installation 4.1 Unpacking 4 Installation 4.1 Unpacking ▶ Open the cardboard box at the top. ▶ Carefully lift out the unit. 24/78... -
Page 27: Location
Operating Instruction STERIclave B 2200 / 2200 P 4 Installation 4.2 Location 4.2 Location Bear the following factors in mind when selecting a location for the unit: ▪ Even surface ▪ No flammable gases and extreme humidity in the vicinity ▪... - Page 28 Operating Instruction STERIclave B 2200 / 2200 P 4 Installation 4.2 Location Note The feet are pre-adjusted. ▶ Even out by adjusting the feet. Make sure that the chamber is inclined slightly to the rear in order to facilitate water drainage during the drain phase.
-
Page 29: Installing The Unit In A Cupboard
Operating Instruction STERIclave B 2200 / 2200 P 4 Installation 4.2 Location 4.2.1 Installing the unit in a cupboard When installing the unit inside a cupboard, maintain a clearance of approx. 10 cm on all sides. 27/78... -
Page 30: Connections
Operating Instruction STERIclave B 2200 / 2200 P 4 Installation 4.3 Connections 4.3 Connections 4.3.1 Connect the electrical power supply voltage. Requirement The characteristics of the mains supply must tally with the characteristics indicated on the rating plate. ▶ Connect the STERIclave B to the mains supply. -
Page 31: Preparations
Operating Instruction STERIclave B 2200 / 2200 P 4 Installation 4.4 Preparations 4.4 Preparations 4.4.1 Fill the fresh water tank Note For technical reasons, the STERIclave B tank is empty on delivery. Average water consumption per program sequence: 150 to 260 ml. -
Page 32: Main Switch For Switching The Stericlave B On
Operating Instruction STERIclave B 2200 / 2200 P 4 Installation 4.4 Preparations 4.4.2 Main switch for switching the STERIclave B on. ▶ Press the main switch to switch the STERIclave B on. Note The main switch should always be left switched on in order to provide a power supply to the internal battery. -
Page 33: Settings
Operating Instruction STERIclave B 2200 / 2200 P 4 Installation 4.5 Settings 4.5 Settings Note The STERIclave B is normally set with the units for temperature and pressure for Germany. The following settings are made one after the other: ▪ Date and time ▪... -
Page 34: Setting The Language Or Making Settings For Recording Cycle Data
Operating Instruction STERIclave B 2200 / 2200 P 4 Installation 4.5 Settings 4.5.3 Setting the language or making settings for recording cycle data Note Either a language for the pressure report or recording of cycle data (for service engineers only) can be set. The default printer language is 5 (German). -
Page 35: Loading Example
134℃ + - 1℃, two pre-vacuum phases, holding time: 4 min The example loads represent the loads which are most difficult to sterilise according to KaVo in the field of dental medicine. it is not possible or recommendable to vali‐ date all the loads conceivable in practice. - Page 36 Operating Instruction STERIclave B 2200 / 2200 P 5 Loading example ▶ Was the drying time long enough? These questions should be answered with reference to the information provided by KaVo under item 8 in this instructions for use. If the answer to one of these questions is no, the sterilisation should be considered unsatisfactory, and a malfunction should be displayed.
- Page 37 Operating Instruction STERIclave B 2200 / 2200 P 5 Loading example ▪ 1 INTRAmatic LUX reducing shank 7 LN ▪ 2 INTRA LUX Head 61 LR ▪ 1 GENTLEforce LUX 7000 B ▪ 1 INTRAmatic LUX reducing shank 20 LN ▪...
- Page 38 Operating Instruction STERIclave B 2200 / 2200 P 5 Loading example 5. Example load of special instruments, 1015 g ▪ 1 CORONAflex 2005 ▪ 1 pliers ▪ 1 loop holder ▪ 2 adhesive clamps 6. Example load of special instruments, 290 g ▪...
- Page 39 Operating Instruction STERIclave B 2200 / 2200 P 5 Loading example ▪ 1 SUPERtorque LUX MULTIflex Turbine 650 A ▪ 1 mouth mirror ▪ 1 INTRA LUX Head 68 LH ▪ 1 INTRAmatic LUX reducing shank 20 LN ▪ 1 GENTLEpower LUX angle piece 25 LP 8.
- Page 40 Operating Instruction STERIclave B 2200 / 2200 P 5 Loading example 10. Example load of solid instruments, 136 g ▪ 1 scalpel holder ▪ 1 scissors ▪ 1 Spanner ▪ 1 Scaler ▪ 1 tweezers ▪ 1 mirror 11. Example load of special instruments, 264 g ▪...
- Page 41 Operating Instruction STERIclave B 2200 / 2200 P 5 Loading example ▪ 1 DIAGNOdent pen sleeve ▪ 1 DIAGNOdent probe ▪ 1 DIAGNOdent pen holder ▪ 1 DIAGNOdent sleeve ▪ 1 HealOzone handpiece 13. Example load of special instruments, 37 g ▪...
-
Page 42: Operation
Operating Instruction STERIclave B 2200 / 2200 P 6 Operation 6.1 Operation in general 6 Operation 6.1 Operation in general 6.1.1 Control panel ① Internal printer ③ Buttons (STERIclave B 2200 P only) ② Display 6.1.2 Button functions Button names Primary functions B&D button... -
Page 43: Display
Operating Instruction STERIclave B 2200 / 2200 P 6 Operation 6.1 Operation in general Button names Primary functions Button 3 - Select Fast cycle program Button 4 - Select Special S1 to S4 programs Note Do not exert excessive pressure on the buttons. -
Page 44: Switching The Stericlave B On And Running A Self-Diagnosis
Operating Instruction STERIclave B 2200 / 2200 P 6 Operation 6.2 Switching the STERIclave B on and running a self-diagnosis 6.2 Switching the STERIclave B on and running a self-diagnosis Note To abort self-diagnosis, simply press any button immediately after switching the STERIclave on. - Page 45 Operating Instruction STERIclave B 2200 / 2200 P 6 Operation 6.2 Switching the STERIclave B on and running a self-diagnosis A temperature of "100°C" will appear on the display to indicate that the STERIclave B has heated up. Note During the heating phase, the temperature indicated on the display will not be a precise value due to the absence of steam in the chamber.
-
Page 46: Inserting Instruments
Operating Instruction STERIclave B 2200 / 2200 P 6 Operation 6.3 Inserting instruments 6.3 Inserting instruments Dirty instruments Premature wear due to staining, encrustation and gradual blocking of filters, valves and hydraulic lines. CAUTION ▶ Clean instruments prior to sterilisation. -
Page 47: Selecting And Starting A Program
Operating Instruction STERIclave B 2200 / 2200 P 6 Operation 6.4 Selecting and starting a program 6.4 Selecting and starting a program 6.4.1 Overview of programs Display Program Total cycle test Parameter Load Type (Including drying) (test according to DIN EN... -
Page 48: Starting Sterilize 1
Operating Instruction STERIclave B 2200 / 2200 P 6 Operation 6.4 Selecting and starting a program Display Program Total cycle test Parameter Load Type (Including drying) (test according to DIN EN (DIN EN 13060:2004) 13060:2004) Test Bowie & Dick test 16 min 134 ℃... -
Page 49: Start Special S1, S2 Or S3
Operating Instruction STERIclave B 2200 / 2200 P 6 Operation 6.4 Selecting and starting a program such as for program 1 ① Sterilisation time ③ Sterilisation temperature ② Number of vacuum phases 6.4.5 Start Special S1, S2 or S3 ▶ Press the Start/Stop button to start the selected program. -
Page 50: Programming And Starting Special S4
Operating Instruction STERIclave B 2200 / 2200 P 6 Operation 6.5 Programming and starting Special S4 6.5 Programming and starting Special S4 6.5.1 Programming Special S4 Untested sterilisation cycle Sterilisation values may differ from those typical of conventional sterilisation cycles. -
Page 51: Starting Special S4
Operating Instruction STERIclave B 2200 / 2200 P 6 Operation 6.5 Programming and starting Special S4 6.5.2 Starting Special S4 ▶ Press and hold down 4 and use 1 or 2 to select the Special S4 program. ▶ Press 4 and the Start/Stop button at the same time to start the selected program. -
Page 52: Tracking The Program Sequence
Operating Instruction STERIclave B 2200 / 2200 P 6 Operation 6.6 Tracking the program sequence 6.6 Tracking the program sequence Phase Display/LED/ Time display Pressure display Temperature display Acoustic signal Program display Duration of selected Pressure of selected Temperature of se‐... -
Page 53: Removing Instruments
Operating Instruction STERIclave B 2200 / 2200 P 6 Operation 6.7 Removing instruments 6.7 Removing instruments Instruments and the chamber are very hot. Touching hot objects may result in burns to the skin. ▶ Do not take hold of hot objects. -
Page 54: Interrupting A Program
Operating Instruction STERIclave B 2200 / 2200 P 6 Operation 6.8 Interrupting a program 6.8 Interrupting a program In the event of errors during program execution, the red Alarm LED will light up and the error code will appear on the left-hand display. -
Page 55: Documenting The Sterilisation Process
6.9 Documenting the sterilisation process 6.9 Documenting the sterilisation process 6.9.1 Using the internal printer to document the sterilisation process Note Only the STERIclave B 2200 P features an internal printer. ① LED ③ Flap ② Paper roll The internal printer will print the most important parameters to paper automatically at the start of each new sterilisation cycle. -
Page 56: Changing The Water
Operating Instruction STERIclave B 2200 / 2200 P 6 Operation 6.10 Changing the water 6.10 Changing the water 6.10.1 Emptying the foul water tank Requirement The H O max. LED will light up if there is too much water in the used water tank. -
Page 57: Filling The Fresh Water Tank
Operating Instruction STERIclave B 2200 / 2200 P 6 Operation 6.10 Changing the water 6.10.2 Filling the fresh water tank Requirement The H O min. LED will light up if there is not enough water in the fresh water tank. -
Page 58: Maintenance
7.1 Maintenance schedule 7 Maintenance Note KaVo would like to point out that the STERIclave B keeps a record of the number of sterilisation and maintenance processed completed. Failure to carry out sufficient or any maintenance operations can lead to premature defects which will not be covered by the warranty. -
Page 59: Using The Stericlave B After Servicing
Operating Instruction STERIclave B 2200 / 2200 P 7 Maintenance 7.2 Using the STERIclave B after servicing 7.2 Using the STERIclave B after servicing To ensure that the STERIclave B works properly after it is serviced, the following steps must be performed to restart it: ▶... -
Page 60: Regular Checks
7.3.2 Vacuum test Note KaVo recommends performing the test at the start of every working day with the unit cold unit (below 35°C) and in standby mode. Note that the test takes 16 mi‐ nutes. During the test phase, "Test" appears on the display. This text also appears on the printout. -
Page 61: Safety Check
The test report template can be downloaded for free from www.stericop.com. Microbiological tests Note When carrying out microbiological tests, KaVo recommends positioning the biolo‐ gical indicators in various places in order to test for homogenous sterilisation throughout the chamber. 7.3.4 Safety check A safety check needs to be run every two years according to VDE 0701-1. - Page 62 Operating Instruction STERIclave B 2200 / 2200 P 7 Maintenance 7.3 Regular checks Measuring point for the safety check: 60/78...
-
Page 63: Regular Total Cleaning
Operating Instruction STERIclave B 2200 / 2200 P 7 Maintenance 7.4 Regular total cleaning 7.4 Regular total cleaning Proper cleaning and care is essential to the error-free operation of the STERIclave B. The following cleaning and care operations must be carried out on completion of 60 cycles. -
Page 64: Clean The Chamber
The unit is in "OFF" mode. Note Only KaVo cleaning tabs (Mat. no. 1.004.8678) may be used. ▶ Place a detergent tab inside the chamber and close the doors. ▶ Hold down the Start/Stop button, and then pressure the Power button. -
Page 65: Cleaning Or Replacing The Fresh Water Tank
Operating Instruction STERIclave B 2200 / 2200 P 7 Maintenance 7.5 Cleaning or replacing the fresh water tank 7.5 Cleaning or replacing the fresh water tank Requirement The unit must be switched off. "OFF" appears on the display. ▶ Empty the fresh water tank. To do this, connect the drain hose to the right-hand quick connection and drain the water into a container (min. -
Page 66: Carrying Out Repairs
A special test program which is available to all authorised customer service centres can be used to test all main components and identify problems quickly. Note Only technicians trained by KaVo may do repairs. After the repair, the performance of the steriliser must be restored by function checks. 64/78... -
Page 67: Troubleshooting
Operating Instruction STERIclave B 2200 / 2200 P 8 Troubleshooting 8.1 Error messages and faults 8 Troubleshooting 8.1 Error messages and faults The electronic control system on the STERIclave B will check the various phases of the sterilisation process whilst they are in progress and monitor each component for error-free operation. -
Page 68: Need Test" Error Messages
The error messages listed in the table below indicate faults which need to be che‐ cked but will not cause a program to be aborted. Note KaVo recommends checking the fault and taking the recommended action quickly. Malfunction Cause Remedy... -
Page 69: Fail" Error Messages
Operating Instruction STERIclave B 2200 / 2200 P 8 Troubleshooting 8.3 "FAIL" error messages 8.3 "FAIL" error messages The error messages listed in the table below will cause a program abort. Sterilisation has not been completed. The Alarm LED lights up. -
Page 70: Class B Error Messages
Operating Instruction STERIclave B 2200 / 2200 P 8 Troubleshooting 8.4 Class B error messages 8.4 Class B error messages The error messages listed in the table below are only relevant for the Sterilize1, Sterilize 2, Special S1, Special S2 and Special S3 programs. -
Page 71: Non-Specific Error Messages
Operating Instruction STERIclave B 2200 / 2200 P 8 Troubleshooting 8.5 Non-specific error messages 8.5 Non-specific error messages Malfunction Cause Remedy OPEN DOOR The door was not opened at the end ▶ Open the door. of the program sequence. Started with door not closed proper‐... -
Page 72: Accessories
Operating Instruction STERIclave B 2200 / 2200 P 9 Accessories 9 Accessories (ordered separately) Figure Description STERIclave bags (Mat. no. 0.411.9912 250 items according to DIN EN 868-5) Helix test (Mat. no. 1.005.0548 for 10) Handle for removing trays (Mat. no. 1.004.9279) Tank drain hose (Mat. -
Page 73: Electromagnetic Compatibility
Operating Instruction STERIclave B 2200 / 2200 P 10 Electromagnetic compatibility 10.1 Electromagnetic Transmissions 10 Electromagnetic compatibility 10.1 Electromagnetic Transmissions The STERIclave B has been designed for use in an environment like the one cited below. The customer or user of the STERIclave B should ensure that it is used in the correct environment. -
Page 74: Electromagnetic Immunity
Operating Instruction STERIclave B 2200 / 2200 P 10 Electromagnetic compatibility 10.2 Electromagnetic Immunity 10.2 Electromagnetic Immunity The STERIclave B has been designed for use in an environment like the one cited below. The customer or user of the STERIclave B should ensure that it is used in the correct environment. -
Page 75: Electromagnetic Immunity
Operating Instruction STERIclave B 2200 / 2200 P 10 Electromagnetic compatibility 10.3 Electromagnetic Immunity 10.3 Electromagnetic Immunity The STERIclave B has been designed for use in an environment like the one cited below. The customer or user of the STERIclave B should ensure that it is used in the correct environment. - Page 76 Operating Instruction STERIclave B 2200 / 2200 P 10 Electromagnetic compatibility 10.3 Electromagnetic Immunity Within the frequency range of 150 kHz to 80 MHz, the field strength should be less than 3V V/m. 74/78...
-
Page 77: Recommended Safe Distance Between Portable And Mobile Hf Telecommunications Equipment And The Stericlave B
Operating Instruction STERIclave B 2200 / 2200 P 10 Electromagnetic compatibility 10.4 Recommended safe distance between portable and mobile HF telecommunications equipment and the STERIclave B 10.4 Recommended safe distance between portable and mobile HF telecommunications equipment and the STERIclave B The STERIclave B is intended for use in an electromagnetic environment in which HF disturbances are controlled. - Page 78 Operating Instruction STERIclave B 2200 / 2200 P 11 Certificates 11.1 EC statement of conformity 11 Certificates 11.1 EC statement of conformity 76/78...
- Page 79 Operating Instruction STERIclave B 2200 / 2200 P 11 Certificates 11.2 EN 13060:2004 / Annex B (informative)/process evaluation system 11.2 EN 13060:2004 / Annex B (informative)/process evaluation sys‐ 77/78...
- Page 80 Operating Instruction STERIclave B 2200 / 2200 P 11 Certificates 11.2 EN 13060:2004 / Annex B (informative)/process evaluation system 78/78...
Need help?
Do you have a question about the STERIclave B 2200 and is the answer not in the manual?
Questions and answers