Table of Contents
Advertisement
Quick Links
Advertisement
Table of Contents

Related Manuals for Viavi Seeker X


Summary of Contents for Viavi Seeker X
- Page 1 Seeker X Digital Leakage Detection System User’s Guide...
- Page 2 Copyright/Trademarks © Copyright 2020 VIAVI Solutions Inc. All rights reserved. No part of this guide may be reproduced or transmitted, electronically or otherwise, without written permission of the publisher. VIAVI Solutions and the VIAVI logo are trademarks of VIAVI Solutions Inc. (“Viavi”). All other trademarks and registered trademarks are the property of their respective owners.
- Page 3 (1) This device may not cause harmful interference, and (2) This device must accept any interference received, including interference that may cause undesired operation. Any changes or modifications not expressly approved by VIAVI could void the user's authority to operate the equipment.
- Page 4 VIAVI has established a take-back process in compliance with the EU Waste Electrical and Electronic Equipment (WEEE) Directive, 2012/19/EU, and the EU Battery Directive, 2006/66/EC. Instructions for returning waste equipment and batteries to VIAVI can be found in the WEEE section of the VIAVI Standards and Policies web page.
- Page 5 California and the state’s drinking water and environment from excessive exposure to chemicals known to the state to cause cancer, birth defects or other reproductive harm. For the VIAVI position statement on the use of Proposition 65 chemicals in VIAVI products, see the Hazardous Substance Control section of the VIAVI Standards and Policies web page.
- Page 6 Seeker X User’s Guide 22137808, Rev. 001 Feb 2020...
-
Page 7: Table Of Contents
Multiple frequency plan ................21 Signal compatibility..................21 Squelch operation ..................22 Source localization ..................22 Optional software ....................22 A guided tour of your Seeker X ................. 23 Front view ......................23 Back view ......................24 Right side view ....................25 Bottom view ....................25 Seeker X User’s Guide... - Page 8 Display screen ....................26 A guided tour of your Mobile Mount ...............28 Front view ......................28 Rear view ......................29 About the battery of your Seeker X ..............30 USB charging ....................30 Mobile Mount charging .................31 Charging with the optional Seeker MCA III ........31...
- Page 9 Chapter 4 Appendix Specifications ......................58 Ordering information ...................59 Feature matrix ......................59 Display messages ....................61 Messages and warnings ................61 Error messages ....................62 Limited warranty ....................65 Technical assistance ....................65 Additional information ..................65 Seeker X User’s Guide Feb 2020 22137808, Rev. 001...
- Page 10 Contents Seeker X User’s Guide 22137808, Rev. 001 Feb 2020...
-
Page 11: About This Guide
About this Guide Thank you for purchasing the Seeker X. This guide provides setup and operating instructions to get you up and running as soon as possible. Purpose and scope The purpose of this guide is to help you successfully use the product features and capabilities. -
Page 12: Safety And Compliance Information
A vertical bar | means “or”: only one option can appear in a single platform [a|b|e] command. Square brackets [ ] indicate an login [platform name] optional argument. Slanted brackets < > group <password> required arguments. Seeker X User’s Guide 22137808, Rev. 001 Feb 2020... -
Page 13: Keyboard And Menu Conventions
This symbol represents a risk of a hot surface. It may be associated with either a DANGER, WARNING, CAUTION, or ALERT message. See the “Safety definitions” on page 14 for more information. Seeker X User’s Guide Feb 2020 22137808, Rev. 001... -
Page 14: Safety Definitions
Indicates that there is an action that must be ALERT performed in order to protect equipment and data or to avoid software damage and service interruption. Seeker X User’s Guide 22137808, Rev. 001 Feb 2020... -
Page 15: Precautions
About this Guide Precautions WARNING: Pursuant to FCC 15.21 of the FCC rules, changes not expressly approved by VIAVI might cause harmful interference and void the FCC authorization to operate this product. CAUTION: Do not use the instrument in any manner not specified by the manufacturer, the protection provided by the equipment may be impaired. - Page 16 About this Guide NOTE: This hand-held instrument is not intended to be body worn, or operated while held against the body. Seeker X User’s Guide 22137808, Rev. 001 Feb 2020...
-
Page 17: What Ships With The Seeker X
Mapping – Adds a Seeker MCA III, and GPS receiver Preparation for use This section explains how to start using the Seeker X. When you unpack your instrument, do the following: Inspect the unit for damage. If the instrument is damaged, put it back in the box and contact VIAVI customer service (see “Technical Assistance”... - Page 18 About this Guide Seeker X User’s Guide 22137808, Rev. 001 Feb 2020...
-
Page 19: Quick Tour
“About the Seeker X” on page 20 “Features” on page 21 “Optional software” on page 22 “A guided tour of your Seeker X” on page 23 “A guided tour of your Mobile Mount” on page 28 “About the battery of your Seeker X” on page 30 Seeker X User’s Guide... -
Page 20: About The Seeker X
CT-4 taggers are swapped out for Seeker-D compatible CT-X units. The Seeker X may be used in its Mobile Mount for driveouts, or removed from the mount for leakage troubleshooting on foot with the WFS-1 adjustable dipole or WFS-2 wideband log periodic. -
Page 21: Features
Multiple frequency plan Your Seeker X can be set up to operate on up to 4 different frequency plans with up to 4 unique frequencies each, which makes it easier to monitor and maintain multiple cable systems. These plans define the leakage monitoring frequencies and, if desired, the tag detection frequency as well. -
Page 22: Squelch Operation
Chapter 1 Quick Tour Squelch operation Squelch level is the RF signal threshold that the Seeker X uses to determine the validity of the signal. The signal “breaks squelch” when the RF leakage is greater than the squelch level and tag qualifiers are met as well. The receiver will not alarm for signals below the squelch level. -
Page 23: A Guided Tour Of Your Seeker X
Chapter 1 Quick Tour A guided tour of your Seeker X Front view DISTANCE button Changes the distance from the vehicle to the cable plant VOLUME button Changes the speaker volume of the leakage tone. Brief presses increase the volume to maximum, then starts again at minimum. -
Page 24: Back View
Chapter 1 Quick Tour Back view Antenna connection Connects to the Mobile Mount antenna connection Seeker X User’s Guide 22137808, Rev. 001 Feb 2020... -
Page 25: Right Side View
Bottom view Mobile Mount interface When the meter is in the Mobile Mount, charges the meter and allows communication between the Seeker MCA III and the meter. Seeker X User’s Guide Feb 2020 22137808, Rev. 001... -
Page 26: Display Screen
Hold feature is turned off. 4. FREQ – Indicates the number of the currently selected frequency plan. 5. Tag – Shown when tagged signal leakage is detected. 6. NOISE – Shown when noise is detected. Seeker X User’s Guide 22137808, Rev. 001 Feb 2020... - Page 27 9. Antenna – Flashes when the signal mode is selected. This is the normal mode for leakage detection. 10. Bar graph – Shows the level of various Seeker X and Seeker GPS parameters, and its function depends on the current display mode selection.
-
Page 28: A Guided Tour Of Your Mobile Mount
X, allowing the use of low and high-band vehicle mounted antennas. Spring loaded cradle The cradle is spring loaded to ensure that the Seeker X is held securely in the Mobile Mount. To place the Seeker X into the Mobile Mount, place the bottom of the Seeker... -
Page 29: Rear View
DC power cable input Connects to your vehicle’s power NOTE: For detailed vehicle installation instructions, see the Seeker X and MCA III Install Guide and the separate MCA III Install Guide Seeker X User’s Guide Feb 2020 22137808, Rev. 001... -
Page 30: About The Battery Of Your Seeker X
Seeker X and a working power outlet before AC charging can begin. Connecting the Mini-USB vehicle cable and charger from the vehicle power jack to the Seeker X. The Mini-USB charge / data cable must be connected to both the Seeker X and vehicle power jack before USB charging can begin. -
Page 31: Mobile Mount Charging
The Mobile Mount DC power cable must be connected to the Mobile Mount and the vehicle power supply before charging can begin. When the Seeker X is off and it is placed in the Mobile Mount, the device will charge and nothing will be shown on the display. - Page 32 Chapter 1 Quick Tour Seeker X User’s Guide 22137808, Rev. 001 Feb 2020...
-
Page 33: Using Your Seeker X
“Seeker X setup” on page 34 “Basic operation” on page 34 “Using the display” on page 37 “Using your Seeker X” on page 38 “Distance correction adjustment” on page 45 “Speaker volume level” on page 47 “Saving measurement snapshots” on page 48 “Seeker MCA III display screens (optional)”... -
Page 34: Seeker X Setup
Chapter 2 Using Your Seeker X Seeker X setup You must configure the settings of the Seeker X using the Seeker Setup software. The Seeker X comes from the factory with default settings, but it is likely they will need to be customized. -
Page 35: Pc Communications Mode
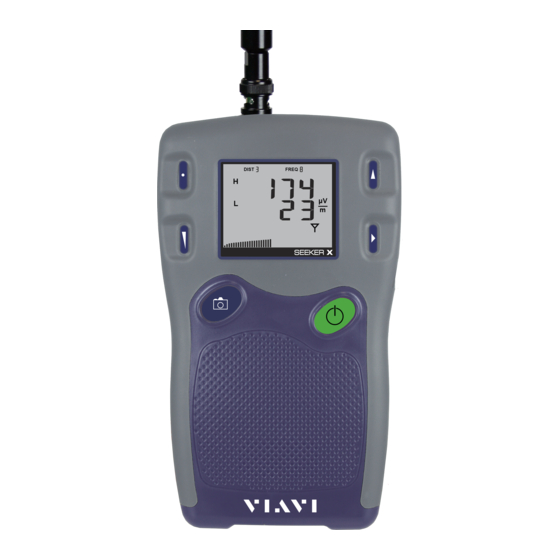
Seeker X. PC is displayed when connected. NOISE μV Connect the Seeker X to your computer using a mini-USB charge / data cable and then open Seeker Setup. SEEKER X PC communication mode RF signal measurement mode... - Page 36 Chapter 2 Using Your Seeker X The screen to the right indicates detected leakage values of 174 µV/m on the frequency the user has selected to show at the top; DIST FREQ and 23 µV/m on the frequency the user has selected to show on NOISE the bottom.
-
Page 37: Using The Display
Chapter 2 Using Your Seeker X Using the display Your Seeker X will operate differently, depending on whether it is in the Mobile Mount or if you are using it outside the vehicle in walkout mode. In the Mobile Mount... -
Page 38: Using Your Seeker X
(press once to view, twice to change). Viewing the battery charge level To check the battery level, turn your Seeker X on and press the SELECT button once. When the battery charge level display is selected, the Battery icon flashes as shown here. -
Page 39: Low Battery
Chapter 2 Using Your Seeker X Low battery If the battery is getting low and needs to be recharged DIST FREQ soon, the Battery icon blinks constantly on all screens. An NOISE example of a low battery warning while performing a level measurements is shown here. -
Page 40: Checking The Battery Charging Status
If the Seeker X is not completely seated in the Mobile Mount, the charge screen will not be available. To view the charging status of the battery, turn your Seeker X on and press the SELECT button twice. The Charge icon will flash to show you are in the Battery... -
Page 41: Enable/Disable Peak Hold
Chapter 2 Using Your Seeker X Enable/Disable peak hold To enable/disable the Peak Hold function, turn your Seeker X on and press the SELECT button repeatedly until the arrow appears under the PK icon, as shown here. When the Peak Hold display is selected, pressing the... -
Page 42: Selecting A Frequency
Selecting a frequency The Preset Frequencies display is used to select the RF signal level measurement frequency plan used by the Seeker X. The preset frequencies 1–4 can be configured using the Mobile Tech application, StrataSync, or Seeker Setup software. -
Page 43: Preset Frequency Toggle
Chapter 2 Using Your Seeker X Preset frequency toggle To quickly toggle within the selected frequency plan: 1. Press the CHANGE button to show the current preset setting. 2. Press the CHANGE button repeatedly to quickly toggle through the frequencies. -
Page 44: Antenna Selection
Chapter 2 Using Your Seeker X Antenna selection When the Seeker X is either removed from the Mobile Mount, turned on, or the selected preset frequency is changed to another frequency band (High to Low, Low to High), the following will occur: An suggestion is displayed that tells you which antenna should be used based on the selected preset frequency as shown in the following images. -
Page 45: Distance Correction Adjustment
While testing for leaks, you may want to adjust the distance correction value to account for differences in distance between the Seeker X and the cable plant. Use the DISTANCE button to display the Distance Correction mode. -
Page 46: Selecting A Distance Correction Preset
Chapter 2 Using Your Seeker X Selecting a distance correction preset The Distance Correction display is used to select the distance correction preset used by the Seeker X. The preset distances 1–8 can be configured using StrataSync or the Seeker Setup software. NOTE:... -
Page 47: Speaker Volume Level
Chapter 2 Using Your Seeker X Speaker volume level While testing for leaks, you may need to adjust the volume of the leakage tone. DIST FREQ NOISE μV Use the VOLUME button to adjust the volume. The bar graph at the bottom SEEKER X will show the level. -
Page 48: Saving Measurement Snapshots
Chapter 2 Using Your Seeker X Saving measurement snapshots While testing for leaks, you may need to record the pre-fix and post-fix leakage information recorded by the Seeker X. Use the SNAPSHOT button to display the Snapshot mode. The Snapshot modes will appear in the same order in which they are discussed in this section. -
Page 49: No Snapshot
Chapter 2 Using Your Seeker X No snapshot To cancel the snapshot of the information recorded by the Seeker, DIST FREQ press the SNAPSHOT button when this screen is displayed. NOISE μV SEEKER X No snapshot NOTE: In Snapshot mode, the display will cycle through the screens displayed above until you make a selection. -
Page 50: Data Synchronization With Seeker Mca Iii (Optional)
Data synchronization with Seeker MCA III (optional) If you do not have a network connection for LAW uploads when using the Seeker X with the Seeker MCA III, the data recorded in the Seeker MCA III can be synchronized with the internal memory of the Seeker X for later upload through a PC. -
Page 51: Seeker Mca Iii Display Screens (Optional)
NOTE: When the Mobile Mount is not connected to a Seeker MCA III, the GPS icon is not shown on the display. When the Seeker X is placed in the Mobile Mount, the GPS icon is DIST FREQ used to display the status of the GPS Signal as follows:... - Page 52 Chapter 2 Using Your Seeker X Seeker X User’s Guide 22137808, Rev. 001 Feb 2020...
-
Page 53: Chapter 3 Leakage Testing
Leakage Testing This chapter provides an overview of the steps needed to perform leakage testing using the Seeker X., including the following: “Before you begin leakage testing” on page 54 “Testing for leaks” on page 54 Seeker X User’s Guide Feb 2020 22137808, Rev. -
Page 54: Before You Begin Leakage Testing
Before you begin leakage testing A low battery may cause the Seeker X to NOT turn on. Try charging your battery for 3 hours to see if that fixes the problem, or use the Seeker X while in the Mobile Mount. - Page 55 5. Turn OFF the Seeker X. When testing is complete, turn off the Seeker X by holding down the POWER button until you hear 3 descending tones. This step is not required if you leave the Seeker X in the Mobile Mount.
- Page 56 Chapter 3 Leakage Testing Seeker X User’s Guide 22137808, Rev. 001 Feb 2020...
- Page 57 Appendix This appendix includes troubleshooting and supplemental information, including the following: “Specifications” on page 58 “Ordering information” on page 59 “Feature matrix” on page 59 “Display messages” on page 61 Seeker X User’s Guide Feb 2020 22137808, Rev. 001...
-
Page 58: Chapter 4 Appendix
Seeker MCA III (Optional) Standard Communications 10/100 RJ45 connection to fleet management systems Interfaces WiFi (802.11 a/b/g/n) to operator-controlled and configured hot-spot Early Detection Notification (EDN) Email notification of threshold exceeding leaks Seeker X User’s Guide 22137808, Rev. 001 Feb 2020... -
Page 59: Ordering Information
Description Part # Only TRI-LKG-SKR-X- Seeker X Mobile Mount — VEH-MOUNT TRI-LKG-SKR-X- Seeker X Mobile Mount Wiring Kit — MM-WIRE-KIT AC Travel Charger and USB Cable — Wideband VHF/UHF Antennas WFS-1 Low-band adjustable dipole 130 MHz – 450 TRI-LKG-ANT- —... - Page 60 Carrying bag with strap for meter and accessories — MEDIUM Digital Channel Tagger CT-X Channel Tagger TRI-LKG-CTX Available Software Seeker Setup Configuration Software TRI-LKG-SW-SEEKER-PC Hosted Leakage Analysis Software (support for 5–1000+ instruments) Seeker X User’s Guide 22137808, Rev. 001 Feb 2020...
-
Page 61: Display Messages
Database is full on the meter. Sync to the MCA or LAW. SYNC DONE Sync from the MCA to meter is complete. No vehicle power or low power. Check connections to vehicle CAR BAT battery. CAL DUE Calibration is out of date. Seeker X User’s Guide Feb 2020 22137808, Rev. 001... -
Page 62: Error Messages
Reboot the unit and retry. If it doesn’t fix, return to the factory for CLOC SYN repair. Reboot the unit and retry. If it doesn’t fix, return to the factory for FPGA BOOT repair. Seeker X User’s Guide 22137808, Rev. 001 Feb 2020... - Page 63 Calibration file is missing. Try to recover from StrataSync or Seeker NO CAL Setup. File system is corrupted. Contact VIAVI at 1-844-GO-VIAVI / FILE CORR 1.844.468.4284 for assistance. Reboot the unit and retry. If it doesn’t fix, return to the factory for SYNC FAIL repair.
- Page 64 Chapter 4 Appendix Error messages Descriptions File system is corrupted. Contact VIAVI at 1-844-GO-VIAVI / BAD APP 1.844.468.4284 for assistance. Reboot the unit and retry. If it doesn’t fix, return to the factory for FPGA DONE repair. Reboot the unit and retry. If it doesn’t fix, return to the factory for FPGA INT repair.
-
Page 65: Limited Warranty
Limited warranty For the latest warranty information, visit https://www.viavisolutions.com/literature/viavi-solutions-inc-general-terms-en.pdf https://www.viavisolutions.com/en-us/literature/viavi-manufacturer-warranty-nse- products-en.pdf Technical assistance If you require technical assistance, call 1-844-GO-VIAVI / 1.844.468.4284. For the latest TAC information, visit http://www.viavisolutions.com/en/services-andsupport/support/technical-assistance Additional information For more detailed information, contact us at Trilithic.support@viavisolutions.com for these additional documents. - Page 66 22137808 Rev. 001, Feb 2020 English VIAVI Solutions North America 1.844.GO VIAVI / 1.844.468.4284 Latin America +52 55 5543 6644 EMEA +49 7121 862273 APAC +1 512 201 6534 All Other Regions viavisolutions.com/contacts email Trilithic.support@viavisolutions.com...
Need help?
Do you have a question about the Seeker X and is the answer not in the manual?
Questions and answers