Viavi OneExpert CATV User Manual
Hide thumbs
Also See for OneExpert CATV:
- Connection manual (5 pages) ,
- Extended quick start manual (240 pages)
Table of Contents
Advertisement
Quick Links
Advertisement
Table of Contents
Troubleshooting

Related Manuals for Viavi OneExpert CATV


Summary of Contents for Viavi OneExpert CATV
- Page 1 OneExpert CATV User’s Guide ...
- Page 2 ...
- Page 3 ...
- Page 4 OneExpert CATV User’s Guide VIAVI Solutions 1-844-GO-VIAVI www.viavisolutions.com ...
- Page 5 VIAVI Solutions Inc. (“VIAVI”). The Bluetooth® word mark and logos are registered trademarks owned by Bluetooth SIG, Inc. and any use of such marks by VIAVI is under license. All other trademarks and registered trademarks are the property of their respective owners.
- Page 6 Open Source Disclaimer - IMPORTANT READ CAREFULLY The OneExpert CATV includes third party software licensed under the terms of separate open source software licenses. By using this software you agree to comply with the terms and conditions of the applicable open source software licenses.
- Page 7 EEC as amended by 93/68/EEC. Conformity with this directive is based upon compliance with the harmonized safety standard, EN60950. Japan Radio Law The GITEKI Mark can be found on the meter in the “System -> File Browser -> Documents” folder. OneExpert CATV User’s Guide Page iv 22121055-001, Rev000...
- Page 8 2012/19/EU, and the EU Battery Directive, 2006/66/EC. Instructions for returning waste equipment and batteries to VIAVI can be found in the WEEE section of VIAVI’s Standards and Policies web page. If you have questions concerning disposal of your equipment or batteries, contact VIAVI’s WEEE Program Management team at...
-
Page 9: Table Of Contents
Purpose and scope ................xv Assumptions ..................xv Safety and compliance information ..........xv Conventions ..................xvi What ships with the OneExpert CATV? ........... xix Preparation for use ................xix Attaching or removing a test module ..........xx Quick Tour Exploring the front panel ..............2 ... - Page 10 Troubleshooting Upgrade Process ........... 43 Viewing hardware/software versions and options ..... 44 Installing options ............... 45 Synchronizing to the StrataSync server .......... 46 Generating reports ..............49 Saving a report ................49 OneExpert CATV User’s Guide 22121055-001, Rev000 Page vii...
- Page 11 Review Test Results ............... 63 CATV Testing CATV Test Options ................ 67 OneCheck ..................67 Ingress Scan .................. 69 ChannelCheck ................71 DOCSIS Check ................73 Spectrum ..................75 Quick Check ................... 77 OneExpert CATV User’s Guide Page viii 22121055-001, Rev000...
- Page 12 Registering and unregistering devices ........... 103 Updating the WiFi Advisor firmware ..........105 Configuring the OneExpert with StrataSync Accessing Configuration Templates ..........107 Limit Plans ..................108 Limit Plan Configuration ............108 OneExpert CATV User’s Guide 22121055-001, Rev000 Page ix...
- Page 13 DQI Over Time ............... 149 Upstream - 4 Bonded ............. 149 Transmit Over Time ..............150 Upstream ICFR ............... 150 Upstream EQ Analysis ............150 Registration ................151 Throughput (DOCSIS) ............152 OneExpert CATV User’s Guide Page x 22121055-001, Rev000...
- Page 14 Maintenance and Troubleshooting Cleaning the instrument ..............169 Resolving problems ............... 169 General testing ................ 169 Data testing ................170 WiFi Advisor ................171 Additional information ..............172 Getting Technical Assistance ............172 OneExpert CATV User’s Guide 22121055-001, Rev000 Page xi...
- Page 15 Contents Specifications Physical specifications ..............174 Connector specifications ............... 174 Environmental specifications ............175 Power specifications ..............176 Index OneExpert CATV User’s Guide Page xii 22121055-001, Rev000...
- Page 16 Contents OneExpert CATV User’s Guide 22121055-001, Rev000 Page xiii...
-
Page 17: About This Guide
This chapter describes how to use this guide. Topics discussed in this chapter include the following: • Purpose and scope on page xv • Assumptions on page xv • Safety and compliance information on page xv • Conventions on page xvi OneExpert CATV User’s Guide 22121055-001, Rev000 Page xiv... -
Page 18: Purpose And Scope
Assumptions This guide is intended for novice, intermediate, and experienced users who want to use the OneExpert CATV effectively and efficiently. We assume you have basic computer and mouse/track ball experience and are familiar with basic telecommunication concepts and terminology. -
Page 19: Conventions
A vertical bar | means “or”: only one platform [a|b|e] option can appear in a single command. Square brackets [ ] indicate an login [platform name] optional argument. Slanted brackets < > group <password> required arguments. OneExpert CATV User’s Guide Page xvi 22121055-001, Rev000... - Page 20 Table 4 for more information. This symbol represents a risk of a hot surface. It may be associated with either a DANGER, WARNING, CAUTION, or ALERT message. See Table 4 for more information. OneExpert CATV User’s Guide 22121055-001, Rev000 Page xvii...
- Page 21 ALERT Indicates that there is an action that must be performed in order to protect equipment and data or to avoid software damage and service interruption. OneExpert CATV User’s Guide Page xviii 22121055-001, Rev000...
-
Page 22: What Ships With The Oneexpert Catv
Before using the OneExpert CATV for the first time, do the following: • Turn the OneExpert CATV ON (use the green button on the front of the instrument), and then verify that it is operating properly by navigating through a few menus. -
Page 23: Attaching Or Removing A Test Module
Before removing or attaching a test module, the instrument must be powered down and all cables must be disconnected. CAUTION: STATIC SENSITIVE Static shock may damage the instrument. Observe anti-static precau- tions when handling the module. OneExpert CATV User’s Guide Page xx 22121055-001, Rev000... -
Page 24: Quick Tour
Exploring the front panel on page 2 • Exploring the bottom panel on page 7 • Exploring the right side panel on page 8 • Navigating the user interface on page 10 OneExpert CATV User’s Guide 22121055-001, Rev000 Page 1... -
Page 25: Exploring The Front Panel
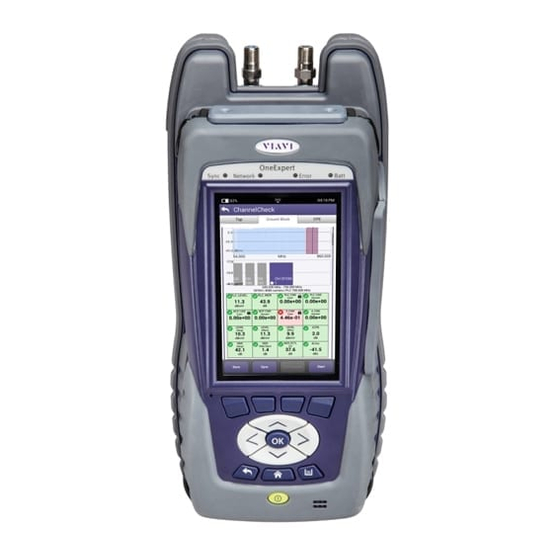
Exploring the front panel The controls and LEDs on the front panel, shown in Figure 1, are used to operate the OneExpert CATV, set up tests, and view data. Figure 1 OneExpert CATV front panel The following sections describe each of the controls and LEDs on the front panel. -
Page 26: Status Leds
Exploring the front panel Status LEDs The controls and LEDs on the front panel, shown in Figure 1, are used to operate the OneExpert CATV, set up tests, and view data detailed in Table Table 5. Status LEDs Function Sync Reports the status of modem synchronization. -
Page 27: Lcd
Android device), where you swipe to go to the next page or zoom in/out by pinching or opening your fingers. Function keys Use the function keys to select screen-specific options or to select pop-up menus associated with each key. OneExpert CATV User’s Guide Page 4 22121055-001, Rev000... -
Page 28: Arrow Keys
Tray – Launch the Tray menu. From the Tray Menu you can save test reports, turn on/off Bluetooth, or enable/disable Remote Operation. Power key Use the power key to turn the OneExpert CATV power on or off by pressing the key until the unit beeps. OneExpert CATV User’s Guide... -
Page 29: Exploring The Top Panel
Chapter 1 Quick Tour Exploring the top panel Exploring the top panel The OneExpert CATV RF port connectors are located on the top end of the instrument. Figure 2 OneExpert CATV Top Panel Port 1 – RF US/DS Analysis Port 2 –... -
Page 30: Exploring The Bottom Panel
Exploring the bottom panel Exploring the bottom panel The OneExpert CATV +12VDC connector is located on the bottom end of the instrument. This connector is used to power the OneExpert CATV and to charge the lithium battery inside. Figure 3... -
Page 31: Exploring The Right Side Panel
Exploring the right side panel The connector panel, located on the right side of the instrument (under a rubber flap), provides the ports required to connect your OneExpert CATV to the line under test. When the connectors are not being used, place the rubber flap over the connector panel to keep out dust and rain. -
Page 32: Usb Connectors
Ethernet testing (such as hub flash, port discovery, and ping), synchronize with StrataSync, upgrade software, and remotely connect to the OneExpert. Rings The rings on the corners of the instrument can be used to attach a carry strap. OneExpert CATV User’s Guide 22121055-001, Rev000 Page 9... -
Page 33: Oneexpert Catv User's Guide 22121055-001, Rev000
OneExpert, and configure test parameters. When you power up the OneExpert CATV, the HomeScreen appears. The Home Screen indicates the options enabled on your instrument. The header area provides the battery status (using a graphic of the battery charge remaining), indicates whether the adapter is plugged in (using a lightning bolt next to the battery), and displays the current time. -
Page 34: Expanding A Menu
Use the arrow navigation keys to high-light the desired menu item (CATV is highlighted in Figure 3 above), and then press the OK key. The triangle to the right of the menu item points down after the menu is expanded. OneExpert CATV User’s Guide 22121055-001, Rev000 Page 11... -
Page 35: Selecting A Menu Option
The process is similar to data entry on a mobile device. To enter data Touch the desired item. A data entry box appears. Tap in the box. OneExpert CATV User’s Guide Page 12 22121055-001, Rev000... - Page 36 The left pointing arrow with the x in it is the backspace key. Touch the enter/return key (the fourth system key) on the screen keypad or press the OK key. The data is entered and stored. OneExpert CATV User’s Guide 22121055-001, Rev000 Page 13...
-
Page 37: Creating Or Removing A Shortcut
Touch and hold the icon for the function and then drag it to the bottom of the screen to create a shortcut. To remove a shortcut • Touch and hold the icon and then drag it off of the shortcut bar. OneExpert CATV User’s Guide Page 14 22121055-001, Rev000... -
Page 38: Utilities
Specifying user information on page 25 • Restoring factory defaults on page 26 • Establishing network connections on page 27 • Establishing a Bluetooth connection on page 36 • Updating the instrument’s firmware on page 37 • OneExpert CATV User’s Guide 22121055-001, Rev000 Page 15... - Page 39 Synchronizing to the StrataSync server on page 46 • Managing files on page 51 • Viewing the User’s Guide on your instrument on page 54 • Remotely operating the instrument on page 54 OneExpert CATV User’s Guide Page 16 22121055-001, Rev000...
-
Page 40: Accessing System Utilities
ONX 620 meter and complete USB Software updates. To display the System Settings menu From the Main menu, touch the System menu item. Figure 2 System Menu The System Menu appears. Touch the System Settings icon. OneExpert CATV User’s Guide 22121055-001, Rev000 Page 17... - Page 41 Chapter 2 Utilities Accessing system utilities The System Settings menu appears. Figure 4 System Settings menu OneExpert CATV User’s Guide Page 18 22121055-001, Rev000...
-
Page 42: Displaying The Tray Menu
To display the Tray menu • Do one of the following: – Press the Tray function key – Swipe downward from the top of the screen. Figure 5 Tray Menu OneExpert CATV User’s Guide 22121055-001, Rev000 Page 19... -
Page 43: Setting Up Your Instrument
Francais, the measurement system to Metric (for example, the unit of distance will be expressed in meters and the cable size will be expressed in millimeters), the unit of temperature to Celsius. OneExpert CATV User’s Guide Page 20 22121055-001, Rev000... -
Page 44: Setting The Date And Time
Turn the dials to select the hour, minutes, and AM or PM. Press OK. Set the date by doing the following: Touch Date. Use the arrows to set the month and year. Select the day on the calendar. Press Set. OneExpert CATV User’s Guide 22121055-001, Rev000 Page 21... - Page 45 0.us.pool.ntp.org) The instrument indicates whether it is synchronized with the NTP server under Synchronization State. 10 Press the Back/Cancel function key to exit the menu. The date and time are set. OneExpert CATV User’s Guide Page 22 22121055-001, Rev000...
-
Page 46: Changing Screen And Power Settings
15 minute test, the unit will not power down during the test because there is activity on the line (as a result of the test). NOTE: The OneExpert CATV will not automatically power down when connected to the AC adapter To specify screen and power management settings Go to the System Settings menu (see Displaying the System Settings menu on page 17), then select Screen &... -
Page 47: Setting The Volume
Either touch the + / - buttons on the screen or swipe your finger across the bar to move the line on the bar, adjusting the volume. Press the Back/Cancel function key to exit the menu. The volume is set on your instrument. OneExpert CATV User’s Guide Page 24 22121055-001, Rev000... -
Page 48: Specifying The Location For Saved Files
Specifying user information The User Information menu allows you to enter specific information related to the technician using the OneExpert CATV. This includes the technician name and ID, and the StrataSync account ID. This information is used when synchronizing with the StrataSync server. -
Page 49: Restoring Factory Defaults
Press the Back/Cancel function key to exit the menu. The user information is specified. Restoring factory defaults The following procedure describes how to reset the OneExpert CATV to factory default settings. NOTE: Restoring factory defaults resets test application settings and system ... -
Page 50: Establishing Network Connections
Touch the Network icon. The icon will be green when connectivity is enabled. Network connectivity is enabled. NOTE: The Bluetooth and WiFi interfaces cannot be ON at the same time. OneExpert CATV User’s Guide 22121055-001, Rev000 Page 27... -
Page 51: Establishing An Ethernet Connection
To establish an Ethernet connection to the instrument Using an Ethernet cable, connect the instrument to the LAN: Connect one end of the Ethernet cable to the OneExpert CATV Ethernet connector located on the side panel (see Figure 1 on page Connect the other end of the Ethernet cable to the LAN. - Page 52 Enter the address for the gateway that is used to route packets that are not on the same subnet. IPv4 DNS Server – Enter the address of the DNS server. OneExpert CATV User’s Guide 22121055-001, Rev000 Page 29...
- Page 53 – Manual. If you select Manual, you must specify the IPv6 DNS Server address. IPv6 DNS Server – Enter the address of the DNS server. OneExpert CATV User’s Guide Page 30 22121055-001, Rev000...
-
Page 54: Establishing An Rf Connection
To Sync via RF Port 1 please use the “Connection” app in the CATV section at the top of the Home screen to establish a live connection with the CMTS prior to syncing to StataSync. OneExpert CATV User’s Guide 22121055-001, Rev000 Page 31... -
Page 55: Establishing A Wifi Connection
(based on signal strength and/or encryption supported). The instrument can save up to 32 WiFi network profiles. NOTE You instrument will automatically save a profile after successfully connecting to a new WiFi network. OneExpert CATV User’s Guide Page 32 22121055-001, Rev000... - Page 56 The SSID (Service Set Identifier) of the WiFi network. Password The password required to authenticate to the network. A password is not required if Key Management is set to None. Key Management Open, WEP, or WPA/WPA2 Personal OneExpert CATV User’s Guide 22121055-001, Rev000 Page 33...
-
Page 57: Connecting To A Wifi Network
Verify that network connectivity is enabled (see Enabling network connectivity on page 27). Go to the System, then touch Network. The System Network menu appears. Select the WiFi button at the bottom of the menu. OneExpert CATV User’s Guide Page 34 22121055-001, Rev000... - Page 58 The status of the connection (Network Up), and details concerning the connection (IP address, netmask, gateway, and DNS server) appear at the top right of the menu. The instrument is connected to the WiFi network. OneExpert CATV User’s Guide 22121055-001, Rev000 Page 35...
-
Page 59: Establishing A Bluetooth Connection
Go to the System Settings menu (see Displaying the System Settings menu on page 17), then select Bluetooth. The Bluetooth Settings menu appears. Touch the box next to Enabled. A check mark appears. OneExpert CATV User’s Guide Page 36 22121055-001, Rev000... -
Page 60: Updating The Instrument's Firmware
Software (SW) and Firmware (FW) releases are the best way to ensure your VIAVI OneExpert ONX is functioning at its best. The OneExpert CATV firmware can be upgraded in the field using 1) a wired network or intranet connection, 2) a WiFi connection, or 3) a USB drive with a copy of the firmware. - Page 61 Copy the downloaded file ONXCBL.xxx.xxx.xxx.oxu to the root directory of a USB thumb drive. Press Cancel once the download has completed and you have placed the file on the USB thumb drive. OneExpert CATV User’s Guide Page 38 22121055-001, Rev000...
- Page 62 USB drive. – Press the Update button and the upgrade will begin. – Press Update again to confirm. – The meter will power off when the upgrade is complete. OneExpert CATV User’s Guide 22121055-001, Rev000 Page 39...
- Page 63 NOTE: This setting does not select the communication interface – Ethernet or RF/DOCSIS. This setting must be made via the CATV screen - Connection icon. • Server Address - stratasync.jdsu.com stratasync.viavisolutions.com • Server Port = 443 OneExpert CATV User’s Guide Page 40 22121055-001, Rev000...
- Page 64 Figure 4 StrataSync Upgrade Process If the update doesn’t start automatically, select the Update system key. The update status appears on the screen. OneExpert CATV User’s Guide 22121055-001, Rev000 Page 41...
- Page 65 Updating the instrument’s firmware NOTE: Verify that there are no connected Ethernet cables before attempting USB Firmware upgrade of the ONX-CATV. The instrument automatically turns power off after the update is complete OneExpert CATV User’s Guide Page 42 22121055-001, Rev000...
-
Page 66: Troubleshooting Upgrade Process
Syncing to StrataSync server for an upgrade or running a DOCSIS test with this IP address has a higher chance of failure. The ONX uses this address internally which may cause the data to be delivered to an incorrect device. OneExpert CATV User’s Guide 22121055-001, Rev000 Page 43... -
Page 67: Viewing Hardware/Software Versions And Options
To review the status of available options, select Options. A list of available options appears with the status for each option (Enabled or Upgradeable). Hardware and software versions, and available options have been reviewed. OneExpert CATV User’s Guide Page 44 22121055-001, Rev000... -
Page 68: Installing Options
8. Optional. Touch the System menu and then select File Browser to verify that the option file was copied to the unit. 9. Reboot the instrument (turn off the power, then turn it back on). The option is installed. OneExpert CATV User’s Guide 22121055-001, Rev000 Page 45... -
Page 69: Synchronizing To The Stratasync Server
To obtain the latest configuration settings, software options and updates, and ownership registration information, the OneExpert CATV can synchronize with a VIAVI server via the internet. The synchronization also stores any user files saved on the unit to the StrataSync server. - Page 70 CMTS prior to syncing to StataSync. Server Address Enter the DNS address for the server. The default address is: “https://stratasync.viavisolutions.com” Server Port Enter the server port number. The default port is: 443 Touch the Start button. OneExpert CATV User’s Guide 22121055-001, Rev000 Page 47...
- Page 71 Copy (“clone”) the configuration settings for the base unit, as well as any company-specific configurations such as custom filters, web bookmarks, and FTP passwords. This can be used to create a “golden” unit. OneExpert CATV User’s Guide Page 48 22121055-001, Rev000...
-
Page 72: Generating Reports
3. If you want to include custom fields in the report, enable, then specify values for the fields. 4. Do one of the following: – To view the report immediately, touch Save and View. OneExpert CATV User’s Guide 22121055-001, Rev000 Page 49... -
Page 73: Viewing A Report
To capture a screen shot 1. Access the Tray menu and then touch Screen Shot. 2. Enter a name for the screen shot. The PNG file is saved to the internal file manager. OneExpert CATV User’s Guide Page 50 22121055-001, Rev000... -
Page 74: Managing Files
Browser button. – To view and manage files on a connected USB flash drive, touch the USB File Browser button. The File Browser menu appears listing all folders (or files). OneExpert CATV User’s Guide 22121055-001, Rev000 Page 51... -
Page 75: Selecting Files Or Folders
Accessing the file browser on page 51). 2. Select the file or folder (see Selecting files or folders above). 3. Touch Open. The contents of the folder appear or the file is displayed on the screen. OneExpert CATV User’s Guide Page 52 22121055-001, Rev000... -
Page 76: Copying And Pasting Files Or Folders
The Upload settings appear.Specify the Upload URL, Username, and Password. 4. Touch Apply. The upload starts. When the upload finishes, a message appears stating that the selected files were uploaded. Press OK to close the message. OneExpert CATV User’s Guide 22121055-001, Rev000 Page 53... -
Page 77: Viewing The User's Guide On Your Instrument
To use this feature, 1) you must have a VNC viewer program on the PC, 2) the OneExpert CATV must be connected to the same network as the PC or laptop, and 3) you must know the IP address of the OneExpert CATV. -
Page 78: Viewing The Device Interface On The Pc
VNC program to view the device interface. To view the device interface on the PC 1. Launch the VNC viewer on the PC. 2. In the viewer’s server address field, type the OneExpert CATV IP address, and then select OK. 3. A password entry box appears. -
Page 79: Using A Pc Keyboard
Chapter 2 Utilities Remotely operating the instrument Using a PC keyboard After you have connected to the OneExpert CATV from a laptop or PC using the VNC viewer, you can use the computer’s mouse or keyboard to control the OneExpert CATV... - Page 80 Chapter 2 Utilities Remotely operating the instrument OneExpert CATV User’s Guide 22121055-001, Rev000 Page 57...
-
Page 81: Menus And Workflow
OneExpert. Topics discussed in this chapter include the following: • Main Screen Selections on page 59 • Testing Workflow on page 60 • Review Test Results on page 63 OneExpert CATV User’s Guide 22121055-001, Rev000 Page 58... -
Page 82: Main Screen Selections
WiFi For detailed information on this menu item, see WiFi Tests on page System For detailed information on this menu item, see Displaying the System Settings menu on page OneExpert CATV User’s Guide 22121055-001, Rev000 Page 59... -
Page 83: Testing Workflow
All test Setups have the option to assign the test to a Work Order Number. This is highly recommended because the data analysis performed by the OneExpert CATV compares to previous data from the current location as defined by the Work Order number. Activated Work Order ID also allows faster Auto Channel plan build functionality. - Page 84 To Run a test without entering any Work Order in a new location On Setup screen for the test you are running, select the Work Order ID button. The following screen will usually appear. OneExpert CATV User’s Guide 22121055-001, Rev000 Page 61...
- Page 85 Chapter 3 Menus and Workflow Testing Workflow Press the Clear Session button to ignore the warning and run the test anyway. OneExpert CATV User’s Guide Page 62 22121055-001, Rev000...
-
Page 86: Review Test Results
When results are not within the parameters expected for a test, the background on the screen area will change to light red and a fail icon will appear in the upper left corner of the screen area. OneExpert CATV User’s Guide 22121055-001, Rev000 Page 63... - Page 87 Chapter 3 Menus and Workflow Review Test Results Live Analysis Live analysis displays will show the status of various parameters of the signal being monitored in real-time. OneExpert CATV User’s Guide Page 64 22121055-001, Rev000...
- Page 88 If the overall result of the test is not acceptable a red will appear in the header of the screen. OneExpert CATV User’s Guide 22121055-001, Rev000 Page 65...
-
Page 89: Catv Testing
CATV Testing This chapter describes the CATV tests that are accessed via the CATV menu item on the main screen of the OneExpert CATV. Topics discussed in this chapter include the following: • CATV Test Options on page 67 •... -
Page 90: Catv Test Options
OneCheck conducts comprehensive and automated testing of Ingress, Downstream & DOCSIS with SessionExpert™ from a chosen demarcation point utilizing both ports on the ONX 620. The Session Expert feature provides solutions to the problems discovered. OneExpert CATV User’s Guide 22121055-001, Rev000 Page 67... - Page 91 Start the test by selecting the Start button at the bottom of the screen. Results The results screen dashboard is comprised of four areas for each of the demarcation points: • Upstream Ingress • Downstream Full Scan • DOCSIS Test • Session Expert OneExpert CATV User’s Guide Page 68 22121055-001, Rev000...
-
Page 92: Ingress Scan
1. Select the Ingress Test icon from beneath the CATV menu header. The “Ingress Scan Setup” window appears. The graphic displayed shows that Port 2 should be connected to the upstream test point. OneExpert CATV User’s Guide 22121055-001, Rev000 Page 69... - Page 93 Select the button below Work Order ID and the list of available work orders will appear. Select one. 3. Start the test by selecting the Start button at the bottom of the screen. OneExpert CATV User’s Guide Page 70 22121055-001, Rev000...
-
Page 94: Channelcheck
Select the desired demarcation point to be tested- Tap, Ground Block or CPE. A graphic showing the appropriate connection schematic for this test will appear along with appropriate instructions for the port to be used. OneExpert CATV User’s Guide 22121055-001, Rev000 Page 71... - Page 95 Results chapter. Saving results To capture a snapshot of the results for review, press the Stop button. To save for later review, press the Save button and then give them a name. OneExpert CATV User’s Guide Page 72 22121055-001, Rev000...
-
Page 96: Docsis Check
Assign this test to a saved work order (optional but recommended). Select the button below Work Order ID and the list of available work orders will appear. Select one. OneExpert CATV User’s Guide 22121055-001, Rev000 Page 73... - Page 97 Results chapter. Saving results To capture a snapshot of the results for review, press the Stop button. To save for later review, press the Save button and then give them a name. OneExpert CATV User’s Guide Page 74 22121055-001, Rev000...
-
Page 98: Spectrum
4. Select the button below Work Order ID and the list of available work orders will appear. Select one. 5. Start the test by selecting the Start button at the bottom of the screen. The live spectrum analysis graph will appear for your inspection. OneExpert CATV User’s Guide 22121055-001, Rev000 Page 75... - Page 99 Chapter 4 CATV Testing Spectrum Results For a detailed discussion of the results produced by this test, see the Results chapter. OneExpert CATV User’s Guide Page 76 22121055-001, Rev000...
-
Page 100: Quick Check
Select one. 5. Configure the carrier to be checked by adding or removing the carrier frequency and type. 6. Start the test by selecting the Start button at the bottom of the screen. OneExpert CATV User’s Guide 22121055-001, Rev000 Page 77... - Page 101 Chapter 4 CATV Testing Quick Check Results Quick Check results window displays a graph of the specified channel’s signal strength along with its type. OneExpert CATV User’s Guide Page 78 22121055-001, Rev000...
- Page 102 Chapter 4 CATV Testing Quick Check OneExpert CATV User’s Guide 22121055-001, Rev000 Page 79...
-
Page 103: Ethernet Testing
Ethernet Testing This chapter provides task-based instructions for using the Ethernet testing features of the OneExpert CATV. Topics discussed in this chapter include the following: • About Ethernet testing on page 81 • Selecting Ethernet mode on page 81 •... -
Page 104: About Ethernet Testing
Chapter 5 Ethernet Testing About Ethernet testing About Ethernet testing With the Ethernet test application, you can use the OneExpert CATV to connect to a port on the customer's modem. After connecting to the circuit, you can then test for connectivity and throughput. -
Page 105: Specifying Ethernet Settings
1. Touch the Load button. (If no profiles have been saved, the button is grayed out.) A list of Setting profiles appears. 2. Select the profile to load. The settings are loaded. OneExpert CATV User’s Guide Page 82 22121055-001, Rev000... -
Page 106: Configuring A New Ethernet Profile
Any time the Network settings are changed, the network layer resets. If you change these settings during a test, you may cause errors in the test. Only change them before you begin a test. You are finished specifying Ethernet settings. OneExpert CATV User’s Guide 22121055-001, Rev000 Page 83... -
Page 107: Saving Test Profiles
Connect one end of an Ethernet cable to the Ethernet jack on the right side of the unit. Connect the other end of the cable to an Ethernet jack. OneExpert CATV User’s Guide Page 84 22121055-001, Rev000... -
Page 108: Catv Ethernet Testing
5. Specify the URL of the Downstream throughput test server and the name of the file to be transferred. 6. Specify the URL of the Upstream throughput test servers. 7. Select the Back icon in the header. 8. Select the Start button. OneExpert CATV User’s Guide 22121055-001, Rev000 Page 85... -
Page 109: Viewing Results
To save a test report, press the utility (i) key and then select Save Report, and then specify the report settings such as report name, report format, technician ID, location, and other settings as needed. To clear the results, use the asterisk (*) key. OneExpert CATV User’s Guide Page 86 22121055-001, Rev000... -
Page 110: Truespeed Testing
Chapter 5 Ethernet Testing TrueSpeed testing TrueSpeed testing The OneExpert CATV’s optional TrueSpeed test provides a repeatable, standards-based test methodology to resolve complaints about poor network performance. With TrueSpeed, you can quickly evaluate the customer experience of their network and provide actionable information to resolve problems. - Page 111 If the test fails, an error message appears (for example, Server Busy or Aborted Due to Excessive Loss). 7. If you wish to test again with a different profile, select the Profiles system key, select the profile, and then touch Start. OneExpert CATV User’s Guide Page 88 22121055-001, Rev000...
- Page 112 3. To edit or delete a profile, select the check box next to the profile, and then do one of the following: To edit the profile Select Edit. Change the profile as necessary. Touch OK. To delete the profile, select Delete. OneExpert CATV User’s Guide 22121055-001, Rev000 Page 89...
-
Page 113: Optical Tools
This chapter provides task-based instructions for using the optional USB optical accessories. Topics discussed in this chapter include the following: • About the optical tools on page 92 • Inspecting fiber on page 92 OneExpert CATV User’s Guide 22121055-001, Rev000 Page 90... -
Page 114: About The Optical Tools
These features are available from the Fiber Tools menu. NOTE: The Fiber Tools menu is not viewable until a supported tool is connected to the OneExpert CATV USB Cconnector.. OneExpert CATV User’s Guide 22121055-001, Rev000 Page 91... -
Page 115: Inspecting Fiber
Chapter 6 Optical Tools Inspecting fiber Inspecting fiber The optional VIAVI P5000i Probe microscope accessory is used to view a live video of a simplex fiber to determine if the fiber is clean. It can also capture a snap-shot and provide pass/fail analysis. - Page 116 Adjust the focus or centering using the controls on the P5000i. 4. To select the inspection profile, touch Profiles. If you have a custom profile, you can use it on the OneExpert CATV by putting the file into the configs/Microscope folder. For more...
- Page 117 — even if it was put back in the original spot on the OneExpert CATV — you can no longer view the file because there is a temporary capture file included with the save that goes away when the file is moved.
- Page 118 Chapter 6 Optical Tools Inspecting fiber OneExpert CATV User’s Guide 22121055-001, Rev000 Page 95...
-
Page 119: Wifi Tests
WiFi Troubleshooting using a single ended application on page 101 • Managing WiFi Advisor Devices on page 102 • Registering and unregistering devices on page 103 • Error! Reference source not found. on page 105 OneExpert CATV User’s Guide 22121055-001, Rev000 Page 96... -
Page 120: About The Wifi Tests
Chapter 7 WiFi Tests About the WiFi tests About the WiFi tests The WiFi testing features of the OneExpert CATV include the following: • Quickly determine the available SSIDs, level and channel of WiFi networks visible from any location. The test set can attach to a customer's network and provide assessment of the signal strength throughout the premises. -
Page 121: Scanning For Wifi Networks
The Bluetooth and WiFi interfaces cannot be ON at the same time. Scanning for WiFi networks The WiFi Scan is used to determine whether any WiFi networks are available, and provides the SSIDs, level and channel of any networks detected. OneExpert CATV User’s Guide Page 98 22121055-001, Rev000... -
Page 122: Verifying Ip Connectivity
IP connectivity behind the RG in the customer premise. To verify IP connectivity Connect the OneExpert CATV to the receiver or residential gateway using an Ethernet cable. OneExpert CATV User’s Guide... -
Page 123: Providing Wifi Access
CO, or even configuring (or reconfiguring) the RG as required. To provide WiFi access Connect an Ethernet cable from either of the OneExpert CATV’s Ethernet jacks to the broadband access point. If you haven’t already done so, configure the WiFi connection on the mobile device. -
Page 124: Wifi Troubleshooting Using A Single Ended Application
If you have previously used a WiFi Advisor device with this OneExpert CATV, it appears in the list of devices. If it does not appear, you may need to register the device with the OneExpert CATV and pair to it. Registering... -
Page 125: Managing Wifi Advisor Devices
WiFi Advisor unit (enabling the pairing mode). When the WiFi Advisor unit successfully pairs with the OneExpert, it will prompt for a label and then the device is displayed. OneExpert CATV User’s Guide Page 102 22121055-001, Rev000... -
Page 126: Registering And Unregistering Devices
Chapter 7 WiFi Tests Registering and unregistering devices Registering and unregistering devices After pairing the device(s) with the OneExpert CATV, the device must be registered in the OneExpert CATV’s WiFi Advisor application. To register WiFi Advisor devices with the OneExpert CATV From the WiFi menu, select the WiFi Advisor icon, and then select Device Management. - Page 127 Chapter 7 WiFi Tests Registering and unregistering devices To unregister WiFi Advisor devices with the OneExpert CATV From the WiFi Advisor application, select Device Management. Select the WiFi Advisor with the label (or serial number) of your device. In the pop-up menu, select Unregister Device.
-
Page 128: Updating The Wifi Advisor Firmware
Updating the WiFi Advisor firmware The firmware on the WiFi Advisor can be upgraded over Bluetooth using the OneExpert CATV. The WiFi Advisor must be paired and registered with the OneExpert CATV. To update firmware on a registered WiFi Advisor From the WiFi Advisor application, select Device Management. -
Page 129: Configuring The Oneexpert With Stratasync
Accessing Configuration Templates on page 107 • Limit Plans on page 108 • DOCSIS Service Plans on page 114 • Off-Air Ingress Plans on page 120 • Measurement Settings on page 125 OneExpert CATV User’s Guide 22121055-001, Rev000 Page 106... -
Page 130: Accessing Configuration Templates
Upon entering the Template screen it will be blank. To display a particular type of template, select one of the options under Global Archives. OneExpert CATV User’s Guide 22121055-001, Rev000 Page 107... -
Page 131: Limit Plans
Accessing Limit Plans The Limit Plans are accessed through the Global Archives pane on the left side of the StrataSync Manage Templates Screen OneExpert CATV User’s Guide Page 108 22121055-001, Rev000... -
Page 132: New Limit Plans
Creating New Limit Plans From the Global Archive: Limit Plan screen: 1. Select the New Limit Plan button in the upper right corner of the screen. The Create Limit Plan window appears. OneExpert CATV User’s Guide 22121055-001, Rev000 Page 109... - Page 133 For each item a value can be entered that corresponds to the limits of that measurement at that location. The Type of limit is also selectable – Error = Pass if results meet the limit requirements or Fail if results OneExpert CATV User’s Guide Page 110 22121055-001, Rev000...
- Page 134 From the Global Archive: Limit Plan screen: Check the box in front of the desired Limit Plan. 2. Select the Action button above the left side of the list pane. The Actions dropdown appears. OneExpert CATV User’s Guide 22121055-001, Rev000 Page 111...
-
Page 135: Limit Plan Deployment
Right-click or press the Actions button above the upper left side of the list window. Select Deploy from the list. The meter selection list appears. 4. Select the meter(s) to which you would like to deploy the plan. OneExpert CATV User’s Guide Page 112 22121055-001, Rev000... - Page 136 To deploy to all meters in the list, select the checkbox in the header of the first column. 5. After all desired meters have been checked, press the Next button A message will appear confirming the deployment. OneExpert CATV User’s Guide 22121055-001, Rev000 Page 113...
-
Page 137: Docsis Service Plans
Creating a New DOCSIS Service plan 1. Open the Limit Template Screen via the Assets –Manage Templates – OneExpert CATV menu items. 2. Select DOCSIS service plan from the Global Archives list on the left. The DOCSIS Plan list appears. - Page 138 3. Select the New DOCSIS Service Plan button on the upper right of the screen. The DOCSIS Details screen appears. 4. Enter the Name (required) and description if desired. 5. Press the Create button. The DOCSIS Service Plan template appears. OneExpert CATV User’s Guide 22121055-001, Rev000 Page 115...
- Page 139 Minimum Upstream Throughput • Maximum Packet Loss Percentage • Packet Quality Maximum Delay • Packet Quality Maximum Jitter For each item a value can be entered that corresponds to the limits of that OneExpert CATV User’s Guide Page 116 22121055-001, Rev000...
- Page 140 • Average Packet Loss • Maximum Packet Loss • Average Jitter • Maximum Jitter • Average Delay • Maximum Delay Saving DOCSIS Service Plan When all values have been entered, press Save. OneExpert CATV User’s Guide 22121055-001, Rev000 Page 117...
- Page 141 2. Select the Action button above the left side of the list pane. The Actions dropdown appears. 3. Select View, Edit, Rename, or Delete from the drop-down list and change or confirm from the following screen. OneExpert CATV User’s Guide Page 118 22121055-001, Rev000...
-
Page 142: Docsis Service Plan Deployment
To deploy to all meters in the list, select the checkbox in the header of the first column. 6. After all desired meters have been checked, press the Next button. A message will appear confirming the deployment. OneExpert CATV User’s Guide 22121055-001, Rev000 Page 119... -
Page 143: Off-Air Ingress Plans
StrataSync Manage Templates Screen The Off-Air Ingress Plan window appears. New Off-Air Ingress Plans There are two pieces of data identifying an Off-Air Ingress Plan: • Name • Description OneExpert CATV User’s Guide Page 120 22121055-001, Rev000... - Page 144 The Create Off-Air Ingress Plan window appears. 2. Enter the desired Name and optional Description. 3. When the desired data has been entered, press the Create button. The Off-Air Ingress Plan template appears. OneExpert CATV User’s Guide 22121055-001, Rev000 Page 121...
- Page 145 For each item a value can be entered that defines the ingress interferers to be tested. To add or delete Off-Air Ingress bands from the list. Use the green (+) or red (-) buttons. OneExpert CATV User’s Guide Page 122 22121055-001, Rev000...
- Page 146 The Actions dropdown appears. 3. Select View, Edit, Rename, or Delete from the drop-down list and change or confirm from the following screen. For Off-Air Ingress Plan deployment see Off-Air Ingress Plan Deployment below. OneExpert CATV User’s Guide 22121055-001, Rev000 Page 123...
-
Page 147: Off-Air Ingress Plan Deployment
To deploy to all meters in the list, select the checkbox in the header of the first column. 6. After all desired meters have been checked, press the Next button. A message will appear confirming the deployment. OneExpert CATV User’s Guide Page 124 22121055-001, Rev000... -
Page 148: Measurement Settings
Name • Description Both of these data fields are user-defined. The Name field is mandatory but the Description is optional. Creating New Measurement Setting From the Global Archive: Measurement Settings plans screen: OneExpert CATV User’s Guide 22121055-001, Rev000 Page 125... -
Page 149: Measurement Settings Configuration
Disable – the OneCheck test will only run the Ingress and Downstream channel tests DOCSIS Service Tests - – determines whether a OneCheck test should also perform IP Service (throughput & packet loss) tests. Only available if OneExpert CATV User’s Guide Page 126 22121055-001, Rev000... -
Page 150: Saving Measurement Settings
From the Global Archive: Measurement Plan screen: 1. Check the box in front of the desired Measurement Plan. 2. Select the Action button above the left side of the list pane. The Actions dropdown appears. OneExpert CATV User’s Guide 22121055-001, Rev000 Page 127... -
Page 151: Measurement Settings Deployment
1. Check the box in front of the Measurement Settings in the list you would like to deploy. 2. Right-click the Actions button above the upper left side of the list window. 3. Select Deploy from the list. 4. The meter selection list appears. OneExpert CATV User’s Guide Page 128 22121055-001, Rev000... - Page 152 To deploy to all meters in the list, select the checkbox in the header of the first column. 6. After all desired meters have been checked, press the Next button. A message will appear confirming the deployment. OneExpert CATV User’s Guide 22121055-001, Rev000 Page 129...
-
Page 153: Test Results
Spectrum results on page 156 • TrueSpeed results on page 131 • WiFi Scan results on page 159 • WiFi Advisor results on page 163 • Spectral results on page 165 OneExpert CATV User’s Guide 22121055-001, Rev000 Page 130... -
Page 154: Onecheck Results
• DOCSIS • Session Expert Each area has an associated detailed results view accessible by double tapping within its dashboard area. Upstream Results The expanded OneCheck Upstream results screen is accessible by OneExpert CATV User’s Guide 22121055-001, Rev000 Page 131... -
Page 155: Downstream Details
Downstream Details The expanded OneCheck Upstream results screen is accessible by double-tapping on the Upstream area of the OneCheck results dashboard. All the results displayed are similar to those described in Channel Check OneExpert CATV User’s Guide Page 132 22121055-001, Rev000... -
Page 156: Docsis Details
146 with the exception that OneCheck does not display live results. Session Expert Details The expanded OneCheck Session Expert results screen is accessible by double-tapping on the Session Expert area of the OneCheck results dashboard. OneExpert CATV User’s Guide 22121055-001, Rev000 Page 133... - Page 157 The first three provide the bulk of the information that the technician will need to identify the source of a problem in an installation and the likely solution or starting place for repair. OneExpert CATV User’s Guide Page 134 22121055-001, Rev000...
- Page 158 (items that currently are outside of confiigured limits). Suggested Actions The suggested actions area provides suggestions for actions to improve the functioning of the network being tested. OneExpert CATV User’s Guide 22121055-001, Rev000 Page 135...
- Page 159 These charts display the measurements of various paramters relating to Downstream, SmartScan, Off-Air Ingress and DOCSIS performance of the circuit at the Tap, Ground Block and CPE demarcation points to assist the OneExpert CATV User’s Guide Page 136 22121055-001, Rev000...
- Page 160 Chapter 9 Test Results OneCheck results technician in the identification of the source of a network impairment. Downstream Comparison panel SmartScan Comparison panel OneExpert CATV User’s Guide 22121055-001, Rev000 Page 137...
-
Page 161: Channelcheck Results
The expandable windows details information on the following: Limits Deviation (Dashboard) Channel View Spectrum/IUC Level Over Time MER Over Time BER Over Time DQI Over Time ICFR Tilt Smartscan OneExpert CATV User’s Guide Page 138 22121055-001, Rev000... - Page 162 Data values for the focused channel are provided for • Level • • • • Echo • • ICFR • OneExpert CATV User’s Guide 22121055-001, Rev000 Page 139...
- Page 163 The Adjacent Channels graph indicates the selected channel and its adjacent channels. The Measurements table provides values for the parameters under test, indicating their condition in comparison to the configured limits. OneExpert CATV User’s Guide Page 140 22121055-001, Rev000...
- Page 164 The Spectrum / IUC screen provides live spectral data and a view of Ingress Under Channel interference. Level over Time The Level Over Time screen displays a graph and key parameters of the historical level of interference measured up to the present. OneExpert CATV User’s Guide 22121055-001, Rev000 Page 141...
- Page 165 The MER Over Time screen displays a graph of the historical MER performance up to the present. BER Over Time The BER (both pre- and post) Over Time screen displays a graph of the historical BER performance up to the present. OneExpert CATV User’s Guide Page 142 22121055-001, Rev000...
- Page 166 The DQI Over Time screen displays a graph of the historical DQI performance up to the present. ICFR (IN CHANNEL FREQUENCY RESPONSE) The In-Channel Frequency Response (ICFR) screen shows the flatness of the selected channel. TILT The Tilt screen shows the (??) OneExpert CATV User’s Guide 22121055-001, Rev000 Page 143...
- Page 167 Chapter 9 Test Results ChannelCheck results SMARTSCAN The SmartScan screen shows the (??) OneExpert CATV User’s Guide Page 144 22121055-001, Rev000...
- Page 168 The Favorites screen shows the Level and MER of channels selected for monitoring by the user in both graphical and table format. CONSTELLATION The Constellation screen shows the constellation diagram for quick analysis of interference and distortion. OneExpert CATV User’s Guide 22121055-001, Rev000 Page 145...
-
Page 169: Docsischeck Results
Upstream EQ Analysis • Registration • Throughput (DOCSIS) • PING/Traceroute (over DOCSIS) • Packet Quality Dashboard The Dashboard displays condition, status and upstream and downstream performance data for the selected demarcation point. OneExpert CATV User’s Guide Page 146 22121055-001, Rev000... -
Page 170: Downstream - 16 Bonded
• QAM level (VERIFY) • Msym/s (VERIFY) • Level • • • Level Over Time The Level Over Time screen displays a graph of the historical Level performance up to the present. OneExpert CATV User’s Guide 22121055-001, Rev000 Page 147... -
Page 171: Mer Over Time
The MER Over Time screen displays a graph of the historical MER performance up to the present. BER Over Time The BER Over Time screen displays a graph of the historical BER performance up to the present. OneExpert CATV User’s Guide Page 148 22121055-001, Rev000... -
Page 172: Dqi Over Time
The Upstream – 4 Bonded - results screen displays the specification and performance data for the currently selected Upstream DOCSIS Carrier. To change active carrier selection, just click on a new carrier. The data displayed is- • Carrier Frequency • QAM level OneExpert CATV User’s Guide 22121055-001, Rev000 Page 149... -
Page 173: Transmit Over Time
Upstream EQ Analysis Displays a graph of the Upstream EQ Analysis with the Footage to Impedance Mismatch. Data pertaining to the focused signal is displayed at the bottom of the screen. OneExpert CATV User’s Guide Page 150 22121055-001, Rev000... -
Page 174: Registration
Chapter 9 Test Results DOCSISCheck results Registration The registration screen displays the registration and configuration information for the Modem, CPE and Server connections in the current test setup. OneExpert CATV User’s Guide 22121055-001, Rev000 Page 151... -
Page 175: Throughput (Docsis)
The meter must be provisioned for data service to be able to conduct this test. For throughput testing, ONX meters are defaulted to public servers that have limited bandwidth capabilities. Other servers are configurable via StrataSync. OneExpert CATV User’s Guide Page 152 22121055-001, Rev000... -
Page 176: Ping/Traceroute (Over Docsis)
The packet Quality screen allows for the initiation of a packet quality test through the cable modem. The meter must be provisioned for data service to be able to conduct this test. OneExpert CATV User’s Guide 22121055-001, Rev000 Page 153... -
Page 177: Ingress Scan Results
Zooming To activate the Zoom feature, press the Zoom button. The signal can now be expanded in the vertical and/or horizontal axes OneExpert CATV User’s Guide Page 154 22121055-001, Rev000... -
Page 178: Quick Check Results
Quick Check results Quick Check results window displays a graph of the specified channel’s signal strength at the selected demarcation point along with its type. OneExpert CATV User’s Guide 22121055-001, Rev000 Page 155... -
Page 179: Spectrum Results
To add a second marker for delta measurements, just double tap the screen and it will appear. Drag to the desired location and the displayed measurements will automatically update to delta intervals. OneExpert CATV User’s Guide Page 156 22121055-001, Rev000... -
Page 180: Changing The Display
TrueSpeed results The summary result screen reports the round trip time and the actual upload and download rates. Pressing the Results soft key provides more detailed results. Table 7 OneExpert CATV User’s Guide 22121055-001, Rev000 Page 157... - Page 181 The IP address and port number of the server. The round trip time, specified in milliseconds The maximum segment size, measured in bytes The test report is available on both the ONX-VTS client and VTS-Server. OneExpert CATV User’s Guide Page 158 22121055-001, Rev000...
-
Page 182: Wifi Scan Results
Time Graph AP List To view the list of available APs, select the AP List button at the bottom of the screen. The list of all detected WiFi networks is shown. OneExpert CATV User’s Guide 22121055-001, Rev000 Page 159... - Page 183 To select those APs that you would like to be include in the graphs, select the checkbox in front of its entry. To include all APs in the list, select he Graph all checkbox in the header. OneExpert CATV User’s Guide Page 160 22121055-001, Rev000...
-
Page 184: Channel Graph
5.0MHz tab at the top of the screen. To stop the graphing of the selected network signals, press the Stop button. Time Graph To view a color-coded graph of the selected APs signal level over time, OneExpert CATV User’s Guide 22121055-001, Rev000 Page 161... - Page 185 Chapter 9 Test Results WiFi Scan results select the Time Graph button at the bottom of the screen. To stop the graphing of the selected network signals, press the Stop button. OneExpert CATV User’s Guide Page 162 22121055-001, Rev000...
-
Page 186: Wifi Advisor Results
To view other results, either scroll up or down, or touch a result to minimize or maximize the view. RSSI view The RSSI view provides quick visibility into the wireless networks active in the current environment, It provides a visual representation of overlap in OneExpert CATV User’s Guide 22121055-001, Rev000 Page 163... -
Page 187: Utilization Graph
If the channel view shows utilization in the wrong channels, the likely issue is that a high energy 802.11 transmitter is very close to the OneExpert CATV. For example, a high energy 802.11ac transmitter is using channels 149, 153, 157, and 161. -
Page 188: Spectral Results
• Spectrum – specifies whether to you want a 2.4 GHz or the 5.0 GHz spectrum display. Pressing the button at the right end of the bottom bar, toggles between the two. OneExpert CATV User’s Guide 22121055-001, Rev000 Page 165... - Page 189 Bluetooth will impact throughput. Channels can “bleed over” into adjacent channels. The width of the signal (due to RF considerations) can affect nearby channels. This bleed over is treated as noise. OneExpert CATV User’s Guide Page 166 22121055-001, Rev000...
- Page 190 Chapter 9 Test Results Spectral results OneExpert CATV User’s Guide 22121055-001, Rev000 Page 167...
-
Page 191: Maintenance And Troubleshooting
Maintenance and Troubleshooting This chapter describes how to identify and correct problems related to the OneExpert CATV. Topics discussed in this chapter include the following: • Cleaning the instrument on page 169 • Resolving problems on page 169 •... -
Page 192: Cleaning The Instrument
Cleaning with chemicals could cause damage to the plastic case, buttons, or removal of markings. Resolving problems If you are having trouble with the OneExpert CATV, the following sections describe common problems and solutions. You should verify whether your problem is listed here before contacting technical assistance. -
Page 193: Data Testing
Make sure that the Ethernet interface cabling is correct. If the Ethernet cable is not hooked up, or is hooked up incorrectly, a packet will not be sent. Thus the Ethernet statistics will not increment. OneExpert CATV User’s Guide Page 170 22121055-001, Rev000... -
Page 194: Wifi Advisor
– Slow a/b/g PHY rates occupy the channel gear longer than modern PHY rates for the same amount of information transfer. – Old security types (WEP/WEPA1) limit connection to lower 802.11 rates OneExpert CATV User’s Guide 22121055-001, Rev000 Page 171... -
Page 195: Additional Information
Press and hold the power button for 5 unresponsive (locked- seconds. Additional information For additional information, visit the OneExpert CATV section of the following web page: Getting Technical Assistance If you require technical assistance, call 1-844-GO-VIAVI. For the latest TAC information, go to http://www.viavisolutions.com/en/ services-and-... -
Page 196: Specifications
Specifications This appendix contains specifications for the OneExpert CATV. Topics discussed in this appendix include the following: • Physical specifications on page 174 • Connector specifications on page 174 • Environmental specifications on page 175 •... -
Page 197: Physical Specifications
Table 27. Physical specifications Connector Specification Connector specifications Table 28 provides the connector specifications. Table 28. Connector specifications Connector Specification USB 2.0 AC Adapter “Power specifications” Ethernet 8-pin modular (RJ-45) OneExpert CATV User’s Guide Page 174 22121055-001, Rev000... -
Page 198: Environmental Specifications
10% to 90% RHNC Maximum operating 4000 meters (13,123 feet) altitude Vibration sinusoidal vibration testing per IEC 60068-2-6 (Sinusoidal Vibration) Shock shock testing to IEC 60068-2-29 Ed. 2.0 “Continuous Bumps.” OneExpert CATV User’s Guide 22121055-001, Rev000 Page 175... -
Page 199: Power Specifications
5 hours for a fast charge; for a full charge, allow to trickle charge overnight Power supply input 100-240VAC, 1.5A, 50-60 Hz Power supply output 12VDC, 5.0A Max Power supply 0to +40C (-22to 104F) operating temperature range OneExpert CATV User’s Guide Page 176 22121055-001, Rev000... -
Page 200: Index
Dashboard, 83 BER Over Time, (DOCSISCheck), 170 Dashboard (ChannelCheck), 161 Best Channels, 186 Dashboard, (DOCSISCheck), 168 bleed over, 188 Date Format, 42 Bluetooth, 35, 56 date, Setting the, 41 Bluetooth Option, 117 Daylight Savings Time (DST), 42 Bluetooth, interference, 188 Device Management (WiFI), 117 bottom panel, 27 DHCP, 49 BSSID results, 185 DOCSIS Check, 93 DOCSIS Service Plan Deployment, 139 DOCSIS Service Plans, configuring, 134 CATV Ethernet testing, 105 DOCSISCheck results, 168 CATV Test Options, 87 Downstream – 16 Bonded, 169 CATV Testing, 86 DQI Over Time, 171 Channel Graph, 183 Drill Down, 83 Channel results, 185 Dual Stack, 51 Channel Score, 186 Channel View (ChannelCheck), 161 ChannelCheck, 91 OneExpert CATV User’s Guide 22121055-001, Rev000 Page 177... - Page 201 Home Screen, 30 Network c onnectors, 29 Network LED, 23 Network Time Protocol (NTP), 42 Noise graph, 186 ICFR (IN CHANNEL FREQUENCY RESPONSE) (ChannelCheck), 165 IETF RFC 6349, 107 Ingress Scan, 89 Off‐Air Ingress Plan Deployment, 144 Ingress Scan results, 176 Off‐Air Ingress Plans, configuring, 140 Inspecting f iber, 112 OK key, 25 Interference, Microwave ovens, 188 OneCheck, 87 international s ettings, 40 OneCheck results, 151 IPv4, 49 Opening files, 72 IPv6, 50 operating temperature, power supply, 198 OneExpert CATV User’s Guide Page 178 22121055-001, Rev000...
- Page 202 Quick Check, 97 StrataSync, configuration templates, Quick Check results, 177 127 StrataSync, configuring, 126 StrataSync, updating with, 60 RBW, 179 Sync LED, 23 Registering, WiFi Advisor, 116, 121, 123 System keys, 25 Registration, 173 System Settings menu, 37 Remote Operation, 74 report, saving, 69 report, viewing, 70 Tap, 80, 130 reports, generating, 69 Technical Assistance, 194 RF Connection, 51 test location, 80 right side panel, 28 test profiles, saving, 104 Rings, 29 Test Results, 150 RSSI view, 185 Test Results, Review, 83 Throughput (DOCSIS), 174 TILT (ChannelCheck), 165 saved files, 45 Time Format, 42 OneExpert CATV User’s Guide 22121055-001, Rev000 Page 179...
- Page 203 TrueSpeed testing, 107 WiFi Advisor, 117 WiFi Advisor firmware, 125 WiFi Advisor results, 185 unregistering, WiFi Advisor. See, See, WiFi Advisor, managing, 116, 122 See WiFi Advisor, problem resolution, 193 Uploading files, 73 WiFi connection, 52 Upstream ‐ 4 Bonded, 171 WiFi network connection, 54 Upstream EQ Analysis, 172 WiFi network profile, 52 Upstream ICFR, (DOCSISCheck), 172 WiFi networks, Scanning for, 118 USB c onnectors, 29 WiFi Scan results, 181 USB drive, updating with, 59 WiFi Tests, 116 user information, 45 WiFi Troubleshooting, 116, 117, 121 user interface, 30 Work Order, 80 User’s Guide, 36, 74 OneExpert CATV User’s Guide Page 180 22121055-001, Rev000...
- Page 204 Rev 008, March 2017 English VIAVI Solutions North America: 1.844.GO VIAVI / 1.844.468.4284 Latin America +52 55 5543 6644 EMEA +49 7121 862273 APAC +1 512 201 6534 All Other Regions: viavisolutions.com/contacts email TAC@viavisolutions.com OneExpert CATV User’s Guide 22121055-001, Rev000 Page 181...
Need help?
Do you have a question about the OneExpert CATV and is the answer not in the manual?
Questions and answers