
Related Manuals for M&C EC-30C


Summary of Contents for M&C EC-30C
- Page 1 EC® Ultra Low Gas Cooler EC-30C Instruction Manual Version 1.00.02 Software Version 1.00...
- Page 2 M&C order or invoice number „ Germany service center: „ +49 2102 935 - 888 service-DE@mc-techgroup.com US service: „ +1 805-654-6970 info-usa@mc-techgroup.com For online service and support information go to: www.mc-techgroup.com „ EC-30C | 1.00.02 +49 2102 935 888 www.mc-techgroup.com...
-
Page 3: Table Of Contents
7.2 LED color coding and possible color combinations 7.3 Self-monitoring after powering-on the unit 7.4 Self-monitoring during operation 7.4.1 Power consumption readjustment 7.4.2 Pre-warning messages 7.5 Display during start-up of the EC-30C 7.6 Overview screen 7.7 Alarm and warning history 7.7.1 Error codes 7.7.2 Warning symbols 7.7.3... - Page 4 8 Installation instructions and mounting of the EC-30C 8.1 Installation instructions 8.2 Wall and rack mount 8.3 Mounting instructions for SR25.2 peristaltic pump (optional) 8.4 Tubing without heat exchanger purging (standard tubing) 8.4.1 Heat exchanger connections for tubing without purging 8.5 Tubing with heat exchanger purging for special requirements (optional)
- Page 5 13 About us 13.1 M&C‘s group of companies 13.2 The quality-oriented M&C catalog 13.3 Technical consulting services 13.3.1 Ideas, suggestions and feedback EC-30C | 1.00.02 +49 2102 935 888 www.mc-techgroup.com...
- Page 6 Table of Illustrations Fig. 1: Application example of the EC-30C Fig. 2: Jet-Stream heat exchanger Fig. 3: Front view: dimensions including optional peristaltic pumps Fig. 4: Side view: dimensions including optional peristaltic pumps Fig. 5: Graphic user interface Fig. 6: Smiley symbols during self-test Fig.
-
Page 7: About This Instruction Manual
About this instruction manual Welcome to the M&C product manual. The goal of this document is to give a broad over- view of the main functions of the EC-30C. It will help you to get started with using the EC-30C. -
Page 8: Important Safety Information
Important safety information Please read this important safety information carefully before installing the EC-30C. Follow these safety precautions during commissioning, start-up and regular operation. Intended use This product is designed to be used as an ultra-low cooler to reduce the dew-point of humid sample gas to provide a stable and very low dew point. -
Page 9: Safety Instructions
2.4 Safety instructions Please follow these safety directions and instructions regarding installation, commission- ing and operation of the EC-30C. Installation, commissioning, maintenance, inspections and any repairs Qualified of all M&C products and components must be carried out by quali- personnel fied personnel in compliance with the current regulations. -
Page 10: Working On Electrical And Electronic Devices
When replacing parts, use only original M&C spare parts. If there is any indication that safe operation of the EC-30C is no Pull Main longer possible, turn off the power and disconnect the device from Plug! the power supply immediately. -
Page 11: Introduction
Introduction Congratulations on your purchase of the EC-30C ultra-low cooler. We know from experi- ence that you surely will enjoy this reliable and durable M&C product. M&C is one of the premium and performance-driven companies in the business. With this in mind, our customers benefit from a number of significant advantages. -
Page 12: Product Overview
Product overview 4.1 Application The M&C ultra-low cooler EC-30C is used in the gas analysis technique to reduce the dew point of humid sample gases and to provide a stable and very low dew point. This elimi- nates condensate built-up and aerosol formation in the analyzer. -
Page 13: Principle
The micro processor-controlled electronics of the EC-30C in combination with the graphi- cal display, offers a high degree of functionality, convenience in use, and safe operation. The EC-30C is built for 24/7 hours of operating time. The cooling capacity of 130 kJ/h is constant, even under maximum allowed ambient temperature. - Page 14 The EC-30C switches automatically every 3 hours between the two deep freezer units. The deep freezer which is currently not in use, will be defrosted to prevent freezing of the heat exchanger and clogging of the gas lines. Upon special request, this cycle of 3 hours can be reduced directly at your facility by M&C personnel.
-
Page 15: Technical Data
39.34 kg (86.73 lbs) * (a)Addition to the part number for EC-30C with 115 V ** For the given input conditions, please have a look at the table on page 15 chapter ‘5.1 Max. possible water vapor dew point input [°C] / [°F]’ . -
Page 16: Max. Possible Water Vapor Dew Point Input [°C] / [°F]
Part-No.: 02 K 9710 FM 40 (Flow meter, 25-250 Nl/h) * (a)Addition to the part number for EC-30C with 115 V 5.1 Max. possible water vapor dew point input [°C] / [°F] This table shows the max. possible water vapor dew point input (°C) / (°F) depending on the incoming gas temperature and the flow rate. -
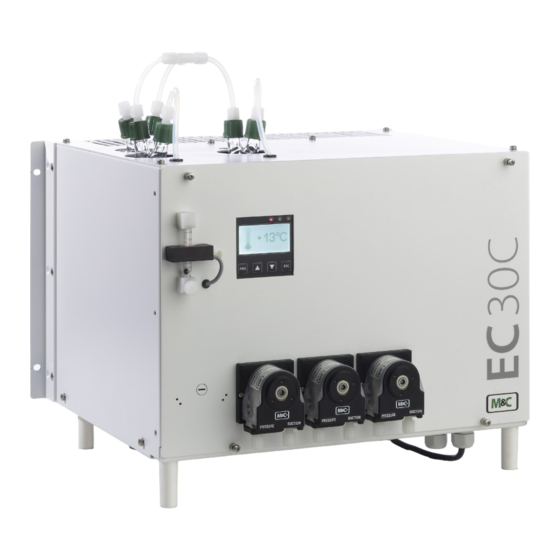
Page 17: Dimensions
Fig. 3: Front view: dimensions including optional peristaltic pumps You will find mounting directions on page 40 chapter ‘8 Installa- Note tion instructions and mounting of the EC-30C’ . Dimensions in mm [Inch] Fig. 4: Side view: dimensions including optional peristaltic pumps EC-30C | 1.00.02... -
Page 18: Receiving The Ec-30C
6.1 Product label and serial number There are two product labels on the EC-30C. One of them is located on the right side of the cooler and the second one is inside the cooler housing on the bottom plate. Please refer to this serial number if you have any questions about the device or if you need to order spare parts or consumables. -
Page 19: Using The Ec-30C
Using the EC-30C 7.1 Graphical user interface (GUI) The EC-30C has a graphical, icon-based intuitive menu navigation. The graphic user inter- face includes three LED indicators, the display and the operating buttons. The figure be- low shows the screen, where the deep cooling unit has reached its target temperature of -30 °C (~-22 °F), and describes the components of the user interface. -
Page 20: Self-Monitoring After Powering-On The Unit
Fig. 6: Smiley symbols during self-test ‘Test passed’-symbol ‘Test failed’-symbol Please switch on the EC-30C. After powering-on the unit starts the self-testing. After suc- cessful self-testing the display shows the following picture. Fig. 7: The smileys on the display after self-testing... -
Page 21: Self-Monitoring During Operation
Over time the signs of aging of the Peltier elements increase gradually the value of the internal resistance. As a consequence the power necessary to keep the target temperature constant can not be supplied anymore. The projected capacity reserve compensates this unavoidable aging effect and maximizes the service life of the EC-30C. 7.4.2 Pre-warning messages If the capacity reserve has been exhausted up to a critical value, the unit will show a warn- ing message about the upcoming failure. -
Page 22: Display During Start-Up Of The Ec-30C
0 °C (32 °F), which means that the target temperature has not been reached yet, and the EC-30C is still in alarm modus. The red LED shows the status of the alarm relay. Operation mode of... -
Page 23: Fig. 10: Start-Up Phase: Tks Reaches And/Or Exceeds '0 °C / 32 °F'-Limit
The clock in its center stands for the start-up phase of the active DCU. The EC-30C is still in alarm modus (red LED is on), because the DCU has not reached its target temperature yet. -
Page 24: Overview Screen
As soon as the EC-30C reaches the target temperature of DCU 1, including the alarm hys- teresis of 5 °C (41 °F), it changes from alarm modus to OK modus. The red LED goes out and the green LED turns on. -
Page 25: Alarm And Warning History
7.7 Alarm and warning history The alarm and warning history shows in detail all warnings and alarms occurred. The EC-30C is able to record 768 messages. In case of more than 768 messages the oldest messages will be deleted and replaced automatically. -
Page 26: Fig. 15: Alarm And Warning History
After pressing the PRG button the last line of the alarm and warning history screen will be displayed inverted (highlighted). With the UP and DOWN buttons you can scroll through the stored messages. You will reach the highlighted message in Fig. 17 by pressing the UP button two-times. EC-30C | 1.00.02 +49 2102 935 888 www.mc-techgroup.com... -
Page 27: Fig. 17: How To Scroll Through Stored Messages
A slider on the right side of the display indicates the current position Note in the alarm and warning history. Fig. 18: Detailed information for a selected message Time of the selected message Slider Temperature icon EC-30C | 1.00.02 +49 2102 935 888 www.mc-techgroup.com... -
Page 28: Error Codes
Is the message an ‚alarm‘ or a ‚warning‘ message? • Which error code is being displayed on the screen? The following table shows the symbols that can occur in case of a warning and explains their meaning. EC-30C | 1.00.02 +49 2102 935 888 www.mc-techgroup.com... - Page 29 0 - 20 V Module Module 2 deteriorated ≥ U +0.5 V OUT, set > 45 min. Heating/ Thermal load maybe Temperature cooling takes too high or ambient too long temperature too high EC-30C | 1.00.02 +49 2102 935 888 www.mc-techgroup.com...
-
Page 30: Alarm Symbols
Is the message an ‚Alarm‘ or a ‚Warning‘ message? • Which error code is being displayed on the screen? The following table shows the symbols that can occur in case of an alarm, and explains their meaning. EC-30C | 1.00.02 +49 2102 935 888 www.mc-techgroup.com... - Page 31 ≥ 19.7 V Peltier- No cooling despite element(s) defect the FET, relay etc. OK ≤ U -1 V OUT, set 0 - 20 V defect Module 2 ≥ U +1 V OUT, set EC-30C | 1.00.02 +49 2102 935 888 www.mc-techgroup.com...
- Page 32 1 defect heats up, but does not cool down Cools down, but H/K Relay unit does not heat up, or 2 defect heats up, but does not cool down EC-30C | 1.00.02 +49 2102 935 888 www.mc-techgroup.com...
-
Page 33: Temperature Diagrams
7.8 Temperature diagrams The EC-30C shows the temperature diagrams of the pre-cooling unit and the two deep-cooling units. The temperature diagrams display a time period of 6 hours. You can reach the temperature diagrams from the alarm and warning history screen by pressing the DOWN button. -
Page 34: Diagram Of The Deep Cooling Units (Dcu 1 And Dcu 2)
Broken temperature lines are caused by switching the unit off and on again. Note When the EC-30C is turned off, and for excample after 2 hours turned on again, the temperature of the deep-cooling units will have changed. This leads to a broken line in the diagram. -
Page 35: Parameter Menu
You can reach the parameter menu from the temperature diagram of the deep-cooling units by pressing the DOWN button. Fig. 22: How to reach the parameter menu (screen 1) The first parameter screen shows the following information: Operating time of the EC-30C „ Requested service interval „... -
Page 36: Fig. 24: Parameter Menu, Screen 2
Setting of the required service interval Setting of the mA-output and of the correlated temperature interval Setting the required deep-cooling temperature Information: current date Information: current time EC-30C | 1.00.02 +49 2102 935 888 www.mc-techgroup.com... -
Page 37: Parameter Settings
Second: 00 to 59 To reach the program level for setting the parameters please start from the corresponding parameter screen and press the PRG button. Fig. 25: How to reach the parameter settings EC-30C | 1.00.02 +49 2102 935 888 www.mc-techgroup.com... -
Page 38: Device Information
You can exit this program level by pressing the ESC button. Please find more details about the program levels on page 67 Note chapter ‘12.1 Overview of the EC-30C screens’ . 7.10 Device information Please start from the parameter menu (screen 2) and press the DOWN button to change to the device information screen. -
Page 39: Fig. 27: Device Information
Software version number „ The symbols used on the device information screen are as follows: Symbol Description Device temperature Serial number of the display controller Days left until service Software version number EC-30C | 1.00.02 +49 2102 935 888 www.mc-techgroup.com... -
Page 40: Service-Reset (Qualified Personnel Only)
Fig. 28: Activating Service Reset (Qualified personnel only) After activating service reset all messages from the error memory will be deleted. The service time will also be reseted. Fig. 29: Reset screen (Qualified personnel only) EC-30C | 1.00.02 +49 2102 935 888 www.mc-techgroup.com... -
Page 41: Installation Instructions And Mounting Of The Ec-30C
Do not lift, move or carry the device without help. A second person is required to lift, move or carry the device. The cooler EC-30C is suitable for both: wall and 19“ rack mounting. 8.1 Installation instructions Follow these installation instructions: The operating position of the cooler is exclusively upright. -
Page 42: Wall And Rack Mount
Min. installation space below the EC-30C Please follow these instructions for mounting of the EC-30C (numbers correspond to Fig. 30 on page 41): For heated gas sample lines, the insulated part of the line must end at least 200 mm (7.87“) before the line reaches the device. -
Page 43: Fig. 31: Mounting Rail For Wall Or Rack Mounting
15 mm (0.6“) behind the front of the mounting bracket To mount the EC-30C with the provided mounting rails, please follow these instructions (numbers correspond to Fig. 31 on page 42): The mounting rails can be attached to the side panels close to the rear of the housing. -
Page 44: Mounting Instructions For Sr25.2 Peristaltic Pump (Optional)
The minimum distance avoids damages to the pump motor and the maximum distance prevents the motor shaft from getting loose. Fig. 32: SR25.2: Mounting distance between pump motor and front panel Pump head (outside the EC-30C housing) Front panel of the EC-30C Recommended mounting distance Pump motor (inside the EC-30C housing) For more mounting instructions, see the SR25.2 instruction manual. -
Page 45: Tubing Without Heat Exchanger Purging (Standard Tubing)
To ensure free removal of the condensate, the stated diameters for the condensate removal lines can not be decreased! The standard version of the EC-30C is equipped with tubing without heat exchanger purg- ing. This standard tubing includes one solenoid valve (valve 1), to switch between the two deep-cooling units. -
Page 46: Fig. 34: Heat Exchanger Connectors (Device With Four Optional Peristaltic Pumps)
Route the gas outlets of the DCU heat exchangers through the top panel of the EC-30C to the inside of the housing. Inside of the device connect the gas outlets of the DCU to the inlet connectors of the solenoid valve 1. -
Page 47: Tubing With Heat Exchanger Purging For Special Requirements (Optional)
Gas OUT is the connector at the solenoid valve 1, which sticks out of the bottom plate of the cooler on the left-hand side. OUT2 is the optional connection to the fourth peristaltic pump, the gas outlet for the heat exchanger purging. EC-30C | 1.00.02 +49 2102 935 888 www.mc-techgroup.com... -
Page 48: Heat Exchanger Connections For Tubing With Purging
1 and 2 with a tee. Route the gas outlet of DCU 2 (on the left) through the top panel of the EC-30C to the in- side of the housing. Inside of the device connect the gas outlet of DCU 2 to the back- ward-facing connectors of solenoid valve 1 and 2 with a tee. -
Page 49: Duran-Glass Heat Exchanger With Gl-Connections
„ Push the ferrule with the thick bulb facing the nut onto the tubing. „ Push the tubing onto the support nipple in the screw-connection. „ Tighten the union nut hand-tight. „ EC-30C | 1.00.02 +49 2102 935 888 www.mc-techgroup.com... -
Page 50: Electrical Connections
You can open the front of the EC-30C by loosening the four front screws. The front of the cooler is hooked into the bottom plate with a guide rail and can be tilted to up to 90°... -
Page 51: Fig. 37: Electrical Connections
PIN 6 PIN 7 Power IN Alarm Relais NO Warn+Ak.St. W:COM W:NO A.St:COM A.St:NO mA+LA+FA mA:+ mA:- LA:In LA:GND FA:+5V FA:IN FA:GND M&C BUS x: M&C BUS configuration, only for M&C service personnel. EC-30C | 1.00.02 +49 2102 935 888 www.mc-techgroup.com... -
Page 52: Ma-Output
The EC-30C connected to the LA gives an alarm signal which will be registered in the alarm and warning history. The cooler switches the alarm relay to stop the gas supply by either turning off the sample gas pump or triggering a solenoid shut off valve. -
Page 53: Gas Flow Sensor Fa 20 And Gas Flow Meter Fm 40 (Optional)
The gas flow sensor allows both internal and external mounting. In case of internal mounting of the FA20, it is necessary to mount into the EC-30C an addi- tional flow meter FM40 with a scale of 0 to 250 l/h. -
Page 54: Start-Up
Do not extract gas when the EC-30C is turned off or when the LED light is red! When the EC-30C is started, one of the gas lines through the deep-cooler is always open. The outlet status contact must be connected to an external sample gas pump or a valve in the sample gas line to protect the entire analysis system by immediately cutting off the gas supply in the event of error messages of the cooler. -
Page 55: Temperature Chart Of The Start-Up Stages
9.2 Temperature chart of the start-up stages When started up, the EC-30C carries out a self-test to check the main components of the unit. The self-test consists of six testing steps. Each of the test steps is symbolized by a smiley icon. -
Page 56: Fig. 38: Temperature Chart Of The Start-Up Stages
Fig. 38: Temperature chart of the start-up stages EC-30C | 1.00.02 +49 2102 935 888 www.mc-techgroup.com... - Page 57 Description of the start-up stages: EC-30C is turned off. „ EC-30C is turned on. The pre-cooling unit PCU is cooling down to the target „ temperature +2 °C (+35.6 °F). Deep-cooling unit DCU 1 (green line) and deep-cooling unit DCU2 (purple line) are cooled passively by the pre-cooling unit.
- Page 58 DCU 1 reaches the target temperature of -30 °C (~-22 °F). EC-30C switches „ the gas flow to DCU 1. DCU 2 turns off for 20 minutes. From this point on the cooling stages of the EC-30C keep on repeating themselves starting with stage . Unlike the restart phase, stage will take a longer time period during the operation process.
-
Page 59: Maintenance
Depending on the operating conditions, the flexible tubing needs to be checked and, if necessary, changed every three to six months. The service interval of the EC-30C can be set according to the re- quired maintenance interval of the peristaltic pump. You can find the Note details about setting the service interval on page 36 chapter ‘7.9.1... -
Page 60: Changing The Pump Tubing
(see chapter 7.4.1 on page 20). Put the new tubing with the tube bushing into the guides of the conveying „ belt EC-30C | 1.00.02 +49 2102 935 888 www.mc-techgroup.com... -
Page 61: Changing The Contact Pulley And Springs
Press conveying belt at the recessed grips and simultaneously turn the S-bolt „ anticlockwise until it snaps; Switch on the EC-30C. „ 10.1.2 Changing the contact pulley and springs While mounting, make sure that the center of rotation and the driver Note are aligned. -
Page 62: Changing The Heat Exchanger
Check the PTFE/Silicon locking rings for damage. In assembly, the locking rings „ must have the PTFE side facing the medium, otherwise the required degree of sealing cannot be guaranteed! Fasten the green GL-connection hand-tight by turning them to the right. „ EC-30C | 1.00.02 +49 2102 935 888 www.mc-techgroup.com... -
Page 63: Changing The 0-20 V-Module
If the self-test during start-up of the EC-30C fails and the fourth icon shown on the screen is a ‘Test failed’-icon, or if an alarm signal with the codes 14 or 24 is issued during operation, the 0-20 V-Module has to be changed. -
Page 64: Changing The Buffer Battery
10.4 Changing the buffer battery The EC-30C uses a type CR2032 buffer battery. To change the buffer battery please carry out the steps indicated below: Disconnect the EC-30C from the power supply. „ Unscrew and open the front panel, but keep it hinged to the rail at the bottom „... -
Page 65: Checking The Temperature Sensors
Unscrew the faulty temperature sensor. „ When the EC-30C has been in operating mode before, please wait until the „ temperature of the PT100 has adapted to the ambient temperature. Check the resistance of the PT100 with an ohmmeter. -
Page 66: Changing The Compressor Unit
X35. Connect the wires to the corresponding numbers and letters. Connect wires in the correct order! ATTENTIO Make sure to pay attention to the order of the printed numbers and letters! EC-30C | 1.00.02 +49 2102 935 888 www.mc-techgroup.com... -
Page 67: Decommissioning
In case of an alarm message this can protect the whole analyzing system by immediate interruption of the gas supply. The alarm relay of the EC-30C can be used to interrupt the gas supply either by turning off the sample gas pump or by triggering the shut-off solenoid valve. -
Page 68: Appendix
12 Appendix 12.1 Overview of the EC-30C screens Level 1 Level 2 Level 3 (Main menus) (Parameter) (Values) Using the UP and DOWN button to scroll through the alarm and warning messages Choose: ‚service interval‘ or Set service interval Set mA-output (0-20 mA ‚mA-output‘... -
Page 69: How To Configure The Ma-Output
− 20 offset ���� − 20 m���� m���� , wenn m���� when − 20 offset , wenn m���� when ∆I − 20 m���� , wenn m���� when , wenn m���� m���� when EC-30C | 1.00.02 +49 2102 935 888 www.mc-techgroup.com... -
Page 70: How To Calculate Ma-Value Based On Measured Temperature
Set: 4-20 mA for -30 °C to +30 °C (~-22 °F to 86 °F) The resolution of the mA-output is: [30 °C - (-30 °C)] / 320 = 0.1875 °C (0.34 °F) EC-30C | 1.00.02 +49 2102 935 888 www.mc-techgroup.com... -
Page 71: Spare Parts And Consumables
The quantities recommended in the following table are based on experience. Your replacement intervals will be based on your operating conditions. The product label with the serial number is located on the back of the EC-30C. Type and name of the product (C) Consumables... -
Page 72: Additional Information
* Fuse set EC-30C includes fuses for main, power supply and rectifier electronics. ** The O-ring set Silicone EC-30C for the deep-cooling units DCU 1 and DCU 2 includes 2 x Ø 60 mm and 3 x Ø 16 mm O-rings. -
Page 73: Certificates
Copy of this document or of its content is not allowed without explicit approval of M&C. With the release of this version all older instruction manual versions will no longer be valid. M&C is a registered trademark of M&C TechGroup Germany GmbH. © EC-30C | 1.00.02 +49 2102 935 888 www.mc-techgroup.com... -
Page 74: Storage
At the end of the life cycle of our products, it is important to take care of the appropriate disposal of obsolete electrical and non-electrical devices. To help protect our environ- ment, please follow the rules and regulations of your country regarding recycling and waste management. EC-30C | 1.00.02 +49 2102 935 888 www.mc-techgroup.com... - Page 75 With our focus on premium services, we are reliable, innova- tive and an overall cost effective market partner worldwide. To learn more about M&C, please visit our website: www.mc-techgroup.com For even quicker access, please use our QR-code: EC-30C | 1.00.02 +49 2102 935 888 www.mc-techgroup.com...
- Page 76 A broad variety of products with high sis at different locations. for a 19” enclosure or a plate struc- measuring accuracy. ture. Direct measuring is based on para- magnetic measuring principle (dumb- bell-type). EC-30C | 1.00.02 +49 2102 935 888 www.mc-techgroup.com...
- Page 77 Please let us know what kind of new improvements and innovations you would like to see at M&C. Tell us, what you like about M&C and what needs improvement. Please send us an email or feel free to just call us ... We appreciate your comment. EC-30C | 1.00.02 +49 2102 935 888 www.mc-techgroup.com...
-
Page 78: Ec-30C
„ service-DE@mc-techgroup.com Service e-mail: „ M&C TechGroup North America 6019 Olivas Park Drive, Suite G Ventura CA 93003 +1 805 654 6970 Phone: „ info-usa@mc-techgroup.com E-mail: „ Your M&C contacts world-wide http://www.mc-techgroup.com/en/Locations-and-regions/ EC-30C | 1.00.02 +49 2102 935 888 www.mc-techgroup.com...
Need help?
Do you have a question about the EC-30C and is the answer not in the manual?
Questions and answers