Table of Contents
Advertisement
Quick Links
Download this manual
See also:
User Manual
Advertisement
Table of Contents

Subscribe to Our Youtube Channel
Related Manuals for TIPTEL Ergophone C


Summary of Contents for TIPTEL Ergophone C
- Page 1 (en) Programming instructions Ergonomic telephones Ergophone C Ergophone CR tiptel...
-
Page 2: Table Of Contents
Table of contents How to use the documentation ............4 Safety information .................5 Initial operation ................8 Scope of supply ....................8 Connecting the telephone ..................9 Insert name plates ....................10 Prepare radio pendant ..................12 Put on dial pad cover ..................12 Wall mounting ..................... - Page 3 Table of contents Activate/deactivate emergency call mode ..............28 Determine number of emergency call dialling sequences ...........28 Determine pause after unsuccessful emergency call dialling sequence ......28 Duration of the active connection .................29 Emergency call identification code ................30 Emergency announcement ..................30 Distress radio call operation ................31 Distress radio call numbers ..................32 Register radio pendant ....................33 Test the coverage of the pendant .................34...
- Page 4 Table of contents Vital sign function ....................42 Set safety timer for the vital sign function ..............42 Set vital sign function on/off ..................43 Operation at a PABX ..................43 Program recall key .......................43 Program EIC/PSIC .......................43 Program pause duration after dialling EIC/PSIC ............44 Appendix ..................45 Short troubleshooting guide ................
-
Page 5: How To Use The Documentation
How to use the documentation How to use the documentation This guideline is designated for the person who will set up the telephone. Normally, the programming steps are only entered once or in very few cases. The documentation comprises 4 parts: 1. -
Page 6: Safety Information
Safety information Safety information Please follow the safety information in the operating instructions on page 4. Intended use This telephone is designed for connection to analogue line interfaces of public switched telephone networks. DANGER - Never try to unscrew the screws and open the device. You could get in contact with current-carrying parts. - Page 7 Safety information - Only plug the connecting cables into the designated receptacles. - Make sure that the connecting cables are laid in a way that accidents are prevented. - If necessary, install additional sockets. Some furniture lacquers or furniture cleaning products may attack the rubber at the feet of the telephone and thus cause patches.
-
Page 8: Emergency Call Function
Safety information Emergency call function DANGER In rare cases, the function of sending out an emergency call cannot be guaranteed. This might be the case if e.g. the telephone network fails or if the radio transmission from the transmitter to the telephone is subject to interference. -
Page 9: Initial Operation
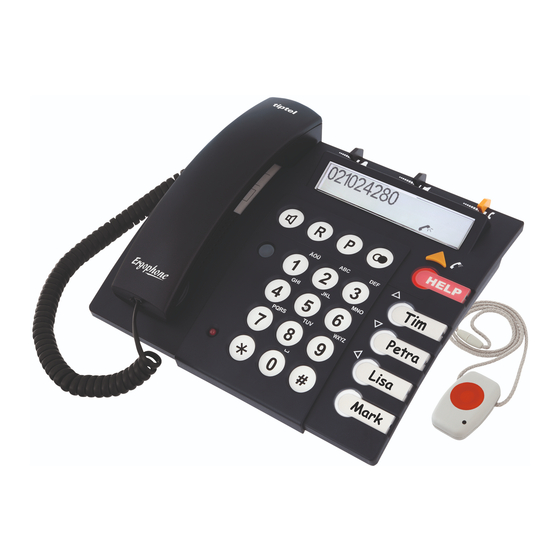
Initial operation Initial operation Scope of supply The content of the package is: • 1 telephone • 1 telephone connecting cable to connect the device to the telephone access • 1 curled cable (handset cable) • 1 AC adapter • 1 dial pad cover •... -
Page 10: Connecting The Telephone
Initial operation Connecting the telephone Illustration 1... -
Page 11: Insert Name Plates
Initial operation • Insert/exchange batteries For safety reasons, disconnect the telephone from the telephone network and the power supply system by unplugging the telephone plug and the AC adapter. Unscrew the battery compartment screws. Remove the cover using the two tabs. Now, insert or exchange the batteries and consider the correct polarity when inserting them. - Page 12 Initial operation Example: Illustration 2 • Write the name or function on the name plates. If you assign the emergency call func- tion to speed dialling key 1, please use a red name plate (the colour will act as a signal). Illustration 3 •...
-
Page 13: Prepare Radio Pendant
Initial operation • Exchange inlay plate: Take the plastic cover at the top left side (handset rest) and pull it in an upward direction. The cover comes out of the holder. • If you intend to wall-mount the telephone, you have to remove the detent (removable part of the upper housing) on the lower side of the pre-printed inlay plate, turn it round and replace it in this position (see page 14). -
Page 14: Wall Mounting
Initial operation Illustration 5 Illustration 6 • Use your fingers or a suitable tool to remove the caps (see illustration 5). The caps might be reused later so keep them in a safe place. • Place the dial pad cover (illustration 6) on the housing. Press the two plastic hooks of the dial pad cover into the corresponding housing slots and tighten the cover. - Page 15 Initial operation Adjust handset rest for wall-mounting telephone operation. Illustration 7 Detent positioned as in the factory pre-set • Press the detent in the direction of the arrow as shown in the illustration (you might use a suitable tool as e. g. a screwdriver). •...
- Page 16 Initial operation Fix metal holder for wall mounting Illustration 9 • Position the metal holder on the wall (you may possibly place the round opening of the holder on a concealed telephone wall socket directly). • Mark the position of the required drill holes on the wall. •...
- Page 17 Initial operation How to hook the telephone: • Take the telephone at its sides with both hands and hook the device on the two hooks at the bottom of the metal holder. • Take both hands to push the telephone towards the top until the two hooks snap into space.
-
Page 18: Programming
Programming Programming Programming process You can easily program your telephone by function codes. Basically, two different ways of programming the device are differentiated: a) Settings that only have to be made in rare cases can be changed via a simple proce- dure. -
Page 19: Store Speed Dialling Numbers
Programming Press the P key. Your entries are stored. You can now enter the three-digit function code of another function or press the P-key again to exit the programming menu. General information on the programming process: - If you enter a “wrong key” (related to the corresponding function) during the program- ming process, the procedure is aborted without saving the changes. -
Page 20: Store Abbreviated Numbers
Programming Press the P key. The telephone number is stored. Remarks: - You can erase a number within the programming process by pressing the redial key. - You can enter dialling pauses by pressing the lower speed dialling key. Store abbreviated numbers You can store up to 10 abbreviated numbers. -
Page 21: Enter Names
Programming Enter code 150 for storing phone book entry. Enter name (up to 16 characters). See next chapter. Press the P key. The name is stored. Enter the telephone number (up to 20 digits) Press the P key. The entry is stored. Remarks: - If you would like to store further entries, enter the code 150 to open the menu again. -
Page 22: Edit A Phone Book Entry
Programming To delete individual characters, use the key . To delete the complete name, use the redial key. Edit a phone book entry Press the P key and afterwards, press the # key (longer than 1 sec.). Enter 4-digit-PIN. Enter code 151 for “Editing a phone book entry“. Search an entry: Press the key with the first character of the searched name and press the keys When the name appears: Press the P-key. -
Page 23: Setting The Handset Volume
Programming Enter code 997 for “Deleting the phone book entries completey”. Press the P-key. The phone book entries are completely deleted. Setting the handset volume You can choose between two basic settings: a) Handset volume “very loud” (for people who are hard-of-hearing) and b) Handset volume “normal loud”... -
Page 24: List Of Released Numbers For Ringing Signals
Programming Press the P key. The entry is stored. List of released numbers for ringing signals Storing telephone numbers in the list of released numbers for ringing signals You can assign telephone numbers to 10 list entry locations (see also page 26 of the user manual). -
Page 25: List Of Restricted Numbers For Ringing Signals
Programming Press the P key and afterwards press the # key briefly. Enter code 30 for “standard ringing signal operation” code 31 for „list of released numbers for ringing signal ON“ Press the P key. The entry is stored. List of restricted numbers for ringing signals Storing telephone numbers in the list of restricted numbers for ringing signals You can assign telephone numbers to 10 list entry locations (see also page 26 of the user... -
Page 26: Ringing Melody
Programming Press the P key and afterwards press the # key briefly. Enter code 30 for „standard ringing signal operation“ code 32 for „list of restricted numbers for ringing signal ON“ Press the P key. The setting is stored. Ringing melody Your telephone provides 10 different ringing melodies. -
Page 27: Emergency Call Process
Programming b) Emergency call operation mode ON: You can send emergency calls by pressing the SOS key (or, as for the variant with distress radio call system via a radio pendant). Please be aware that different emergency call locations are applied, depending on whether you use the SOS key or the radio pendant. -
Page 28: Storing Emergency Call Numbers
Programming Remarks: If the connection quality is insufficient in the hands-free mode, you can also switch to a „two-way communication“: - Press key 4: The recipient of the emergency can hear the person seeking help. - Press key 6: The person seeking help speaks. The recipient of an emergency call can switch back and forth by pressing the keys 4 and 6. -
Page 29: Activate/Deactivate Emergency Call Mode
Programming Activate/deactivate emergency call mode Please be aware, that the emergency numbers must be programmed before you activate the emergency call mode. You can apply the following procedure to set the emergency call operation mode (and the distress radio call for the variant with distress radio call system): Press the P key and afterwards, press the # key (longer than 1 sec.). -
Page 30: Duration Of The Active Connection
Programming Press the P key and afterwards, press the # key (longer than 1 sec.). Enter 4-digit-PIN. 3 min Enter code 351. Enter duration of the pase (minutes) via the key pad (1 - 9). Press the P key. The entry is stored. Remark: During the pause - after completion of one emergency call dialling sequence - the red LED blinks. -
Page 31: Emergency Call Identification Code
Programming Emergency call identification code When an emergency call service is called, the recipient of the emergency call can use an identification code to get immediate information on the person seeking help. This is done via a number sequence of multifrequency dialling tones. Press the P key and afterwards, press the # key (longer than 1 sec.). -
Page 32: Distress Radio Call Operation
Programming Press triangular key. The announcement is being played back. Press the P key. Distress radio call operation The following description refers to the variant with distress radio call system. Here, the scope of supply comprises a radio pendant which can be worn either with a strap like a wristwatch or around the neck with a cord (see page 12). -
Page 33: Distress Radio Call Numbers
Programming Distress radio call numbers You can program and store up to 9 distress radio call numbers (on memory locations 1 - 9). The memory locations can be assigned to the individual pendants in a variable sequence. The length of the distress radio call numbers is limited to 20 digits as a maximum. Memory location Distress radio call number Storing distress radio call numbers: Press the P key and afterwards, press the # key (longer than 1 sec.). -
Page 34: Register Radio Pendant
Programming Register radio pendant Register the pendant only after having connected the telephone to the power supply system! You need to register the pendant so that the pendant can address the receiving equipment integrated in the telephone. At the same time, this procedure is applied to assign the dis- tress radio call numbers to the pendants. -
Page 35: Test The Coverage Of The Pendant
Programming Remark: You can erase a location within the programming process by pressing the redial key. Internal distress radio call Memory location 0 triggers off an internal distress radio call, i.e. the telephone rings with a special ringing melody. The internal distress radio call is useful, e. g. if a nurse is present in the house but not in the same room as the person seeking help. -
Page 36: Store Restricted Numbers
Programming Enter code 400. Enter direct call number. Press the P key. The direct call number is stored. Remarks: - You can erase a number within the programming process by pressing the redial key. - You can enter dialling pauses by pressing the lower speed dialling key. Store restricted numbers You can assign restricted numbers to 5 memory locations (1 - 5). -
Page 37: Basic Settings
Programming Press the P key and afterwards, press the # key (longer than 1 sec.). Enter 4-digit-PIN. Enter code 430 for „no dialling restriction“ code 431 for „direct call ON“ code432 for „restricted numbers ON“ code 433 for „full restriction ON“ Press the P key. -
Page 38: Adjust Display Brightness
Programming striction is on. Basically, the two telephone numbers are saved without any local area code and, when connected to a PABX, without an EIC (Exchange Identification Code). Example: In Germany, enter 110 for the police and 112 for the fire service. Press the P key and afterwards, press the # key (longer than 1 sec.). -
Page 39: Set Display Language
Programming Set display language The messages and information shown in the display can be set to different languages, i. e. German, English, Netherlands or French. Press the P key and afterwards, press the # key (longer than 1 sec.). Enter 4-digit-PIN. Enter code 630 for German code 631 for English... -
Page 40: Program Automatic Redialling Settings
Programming Enter code 640 for „recording via speed dialling key 5 OFF“ or code 641 for „recording via speed dialling key 5 ON“. Press the P key. The setting is stored. Remarks: - If you deactivate the function „two-way conversation recording via speed dialling key 5“, you still have the option to record passages of a telephone conversation by the key combination „P key and triangular key“... -
Page 41: Program Pauses Between The Redialling Sequences
Programming Press the P key. The length of the redialling sequence is stored. Program pauses between the redialling sequences Press the P key and afterwards, press the # key (longer than 1 sec.). Enter 4-digit-PIN. 60 sec Enter code 651 Enter ength of the pause between the redialling sequences via the keypad (1 - 99 seconds). -
Page 42: Activate/Deactivate Room Monitoring
Programming Press the P key and afterwards, press the # key (longer than 1 sec.). Enter 4-digit-PIN. R-PIN Enter code 660. Enter 4-digit access code (r-PIN) (entry „0000“ not allowed) Enter 4-digit access code (r-PIN) again for confirmation. Press the P key. The setting is stored. Remark: It is not allowed to enter „0000“... -
Page 43: Programm Number Of Rings
Programming Programm number of rings The telephone in the room to be monitored rings once in the basic setting and after the access code has been entered switches into hearing mode at the other telephone. For special applications it can be usefull to allow the telephone in the room to ring several times (for example, this allows a normal call to be accepted, although the telephone is in room monitoring mode). -
Page 44: Set Vital Sign Function On/Off
Programming Set vital sign function on/off After setting the timer, the vital sign function has to be switched on by a code additionally. If you do not need the function anymore, switch it off. Press the P key and afterwards press the # key briefly. Enter Code 80 for „vital sign function off“... -
Page 45: Program Pause Duration After Dialling Eic/Psic
Programming tion, you need to program your telephone for dialling an external telephone number and for dialling PABX extension numbers. You can enter 1 EIC number (1 - 4 digits) and 1 PSIC number (1 - 4 digits). Please also refer to the PABX user manual. Press the P key and afterwards, press the # key (longer than 1 sec.). -
Page 46: Appendix
Appendix Appendix Short troubleshooting guide In most cases, you can detect error causes and resolve occurring problems or malfunc- tions by the following troubleshooting table. Problem Possible cause Action You do not hear a dialling tone Telephone connecting cable, Check all cable connections, after having picked up the handset cable, telephone check telephone access by... -
Page 47: Reset To Factory Pre-Set
Appendix Reset to factory pre-set In the overview of function codes for programming (as of page 48), the factory pre-set parameter is indicated (F). Resetting the telephone settings to the factory pre-set is only useful under some specific circumstances. Problem Solution Result You have frequently activated... -
Page 48: Overview Of Codes For Programming
Appendix Overview of codes for programming Programming without PIN protection Settings that need to be adjusted only in rare cases can be made via a simple procedure. The factory pre-set is indicated by the symbol (F). You can access the programming level by pressing the P key and the # key consecutively. Then, enter the two-digit function code. - Page 49 Appendix Code Feature Factory pre- Page set (F) Volume of handset „very loud“ Volume of handset „normal loud“ Storing phonebook entries Edit phonebook entries Ringing signal 200-209 List of released numbers for ringing signal, memory locations 0 - 9 210-219 List of restricted numbers for ringing signal, memory locations 0 - 9 Ringing melody F: 3...
- Page 50 Appendix Restricted numbers ON Full restriction ON Basic settings Brightness of display 0-9 Change PIN (F: 0000) „Police“ memory location „Fire service“ memory location Handset operation Headset operation Display language = German Display language = English Display language = Netherlands Display language = French Recording of call passages “Recording via speed dialling key 5“...
-
Page 51: Overview Of Programmed Telephone Numbers
Appendix EIC (Exchange Identification Code) PSIC (Primary Station Identification Code) Duration of the dialling pause F: 3 sec. Reset to factory pre-set Delete all phonebook entries Reset (all memory entries are retained) Reset (all memory entries are erased) Overview of programmed telephone numbers Speed dialling number Other function Emerg. -
Page 52: Technical Data
Appendix List of released numbers for List of restricted numbers for ringing ON/OFF ringing ON/OFF List entry Telephone number Telephone number No. 3 Restricted numbers No. 1 No. 4 No. 2 No. 5 Technical Data Dimensions: About 235 x 215 x 85 mm (W x D x H) Weight: About 850 g Housing material:... -
Page 53: Service
Service You have purchased a modern product of Tiptel. The high-tech manufacturing facili- ties grants a continuous level of the highest quality. This is even underlined by our certification according to DIN EN ISO 9001. If, however, problems occur or you... -
Page 54: Guarantee
Tiptel will grant a guarantee of 2 years from the date of handover for the material and for the manufacturing of the telecommunications terminal unit. Initially, the purchaser shall have only the right of subsequent performance. -
Page 55: Environmental Impact
Tiptel hereby declares that the device complies with all fundamental requirements of the European directive 1999/5/EC. This conformity is confirmed by the CE sign on the device. -
Page 56: Index
Index Index Dialling restrictions 34 Baby call 34 Abbreviated numbers 19 Restriction ON/OFF 35 Store 19 Store direct call numbers 34 AC adapter 6 Store restricted numbers 35 Access code for room monitoring 40 Dialling sequences 28 Activate / deactivate room monitoring Dial pad cover 12 Direct call 34 Adjust display contrast 37... - Page 57 Index Register radio pendant 33 EIC (Exchange Identification Code) 43 Emergency operation in the case of a Pause duration after dialling EIC / PSIC 44 PSIC(Primery Station Identification Code) power failure 46 Environmental impact 54 Recall key 43 Out of operation 7 Overview of codes for programming 47 Factory pre-set 46 Overview of programmed telephone...
- Page 58 Index Store Direct call numbers (baby call) 34 Recall key 43 Distress radio call numbers 32 Recording of call passages 38 Emergency call numbers 27 Redialling sequence 39 Police / fire service numbers 36 Reset to factory pre-set 46 Restricted numbers 35 Restricted numbers 34 Restrictions 34 Ringing melody 25...
- Page 59 Tiptel.com GmbH Business Solutions Halskestraße 1 D - 40880 Ratingen Tel.: 0900 100 - 84 78 35* Vanity Tel.: 0900 100 - TIPTEL* Internet: www.tiptel.de International: Internet: www.tiptel.com *(1,49 Euro/Min. aus dem Festnetz der Deutschen Telekom, abweichende Mobilfunkpreise möglich) Tiptel GmbH...
Need help?
Do you have a question about the Ergophone C and is the answer not in the manual?
Questions and answers