
Related Manuals for TIPTEL Ergophone 1300


Summary of Contents for TIPTEL Ergophone 1300
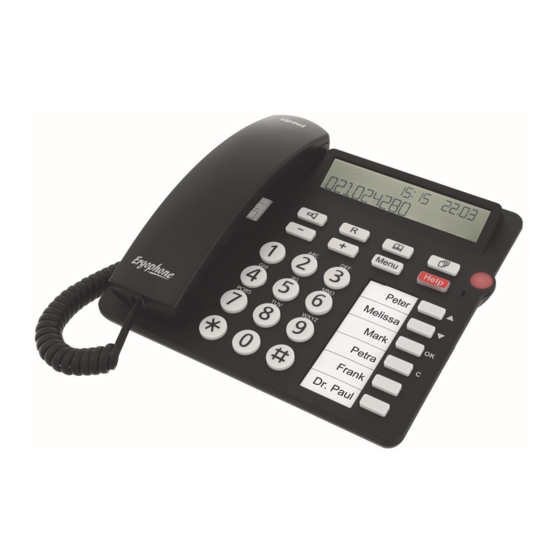
- Page 1 Operating instructions (en) User-Friendly Phone with Emergency Call Function tiptel Ergophone 1300...
- Page 2 Cover...
-
Page 3: Table Of Contents
Contents Contents Contents ..................3 Safety information ..............5 Assignment of buttons ............. 6 Controls ..................8 Getting started ................9 Deliverables ................9 Setting up ................9 Wall bracket (accessory) ............9 Labelling and inserting the Direct dial name insert ....10 Connecting ................ - Page 4 Contents Settings ..................25 Setup options ................ 25 Advanced setting options ............. 26 Setup menu ................27 Adjusting the volume ............28 Emergency call function ............29 Emergency call settings ............29 Emergency call menu ............30 Making an emergency call ............ 31 Cancelling an emergency call ..........
-
Page 5: Safety Information
Safety information Safety information Carefully read through the instructions before use and keep them for later reference. Intended use - the phone is suitable for connecting to the public, analogue phone network and to the analogue ports of phone sys- tems. -
Page 6: Assignment Of Buttons
Assignment of buttons Assignment of buttons Loudspeaker button: Starts to dial a telephone number entered or selected. Enables/disables the line with the hands-free function. Switches to loudspeaker mode during a conversation using the receiver. R button: Is used for transferring calls within a telephone system. Initiates special functions in many networks. - Page 7 Assignment of buttons OK button: It is used to accept settings and takes the user to a lower-level menu. It is used as a direct dial button in the top-level menu. C button: Deletes the entry selected. For input boxes, deletes the position under the cursor.
-
Page 8: Controls
Controls Controls 1 Display Loudspeaker 2 LED Function buttons 3 Microphone 10 Insert for phone numbers 4 Emergency call button 11 Receiver 5 Menu and direct dial buttons 6 Direct dial name insert 7 Numeric keypad... -
Page 9: Getting Started
Getting started Getting started Deliverables Included with your telephone: Telephone including receiver Spiral cable (receiver cord) Phone connector cable and TAE adapter User guide Spare inserts for phone numbers Setting up Before setting up your phone, please read and following the safety instructions. -
Page 10: Labelling And Inserting The Direct Dial Name Insert
Getting started Labelling and inserting the Direct dial name insert Remove the plastic cover by using a suitable tool to extend into • the lower opening of the cover and pulling it from the phone un- til it jumps out of its retainer. Write the direct dial names on the label and place it into the re- •... - Page 11 The language selection menu is displayed after connecting the first time. Use the control buttons (Up/Down) to select a lan- guage and confirm with the OK button. Socket TAE adapter Connector cable tiptel Menu Help PQRS WXYZ Ergophone ...
-
Page 12: Telephone Functions / Making Calls
Telephone functions / making calls Telephone functions / making calls The ring tone set, and also the flashing LED, signal an incoming call. During a call, the call duration display shows the time the line has been busy. This enables you to see at all times how long you have been on the phone. -
Page 13: Non-Immediate Dialling (Dial Preparation)
Telephone functions / making calls Non-immediate dialling (dial preparation) Here the digits entered are not dialled immediately, meaning cor- rections can be made before dialling. Use the numeric keypad to The digits pressed are displayed enter the numbers required. but not yet dialled. …... -
Page 14: Transferring Calls / Flash (R Button)
Telephone functions / making calls To end the call, press the The line is disconnected. Loudspeaker button again (same as putting down the receiver). Transferring calls / Flash (R button) On most telephone systems, the R button can be used to transfer calls. -
Page 15: Call Log
Call log Call log General Your phone stores the last 20 calls with date and time. If a caller's phone number is sent during a call, it is also stored. If the tele- phone number matches one from the phone book, the name of the caller is displayed. - Page 16 Call log Press the C button to delete The call is deleted after acknowl- the call selected. edging the prompt. To delete the entire list, keep All entries are deleted after ac- the C button pressed for knowledging the prompt. three seconds.
-
Page 17: Text Entries
Text entries Text entries Text entry from the numeric keypad When your phone is in text entry mode, you can enter names from the digit buttons. Refer to the printing on the case and the "Over- view of possible characters" table to see which letters can be en- tered with which buttons. -
Page 18: Overview Of The Characters Supported
Text entries Overview of the characters supported Button Assignment Button Assignment . , ? 1 ’ “ ( ) = + - / < > M N O 6 A B C 2 P Q R S 7 D E F 3 T U V 8 G H I 4 W X Y Z 9... -
Page 19: Phone Book
Phone book Phone book General The phone book manages the names and telephone numbers of your contacts. A maximum number of 50 entries can be stored. An entry comprises a name (search term) and telephone number. The name must start with a letter. The telephone number should always start with the area code (prefix) so that the appropriate button lights up when the incoming telephone number matches the number stored. -
Page 20: Dialling From The Phone Book
Phone book Use the numeric keypad to The digits pressed are displayed. enter the telephone number. … Use the Plus button to insert A "P" is shown on the display. a pause of three seconds du- ration. A flash can be entered with An "F"... -
Page 21: Editing And Deleting Entries
Phone book Establish connection: Press The connection is established the Loudspeaker button. and hands-free mode is enabled. Simply pick up the receiver. The connection is established and you can hold your conversa- tion. Press the Loudspeaker but- The line is disconnected and the ton to end the call. - Page 22 Phone book Press “Phone book” for three The first letter of the name flash- seconds to edit an entry. Use the control buttons (Up/Down) to navigate, and the numeric keypad and C button to make corrections. Press OK to confirm your in- The changes are stored and the put.
-
Page 23: Direct Dial Buttons
Direct dial buttons Direct dial buttons General You can save six frequently used numbers under the buttons on the right- dial each of them by pressing the button. hand side of the phone, and Enter the call recipients in the fields next to the relevant buttons. Programming direct dial buttons Press and hold down the re- The display changes and the... -
Page 24: Dialling With A Direct Dial Button
Direct dial buttons Press OK to confirm your in- The entry is accepted and the put. top-level menu is shown again on the display. To clear a direct dial button, perform a save without the phone number. Dialling with a direct dial button Press the direct dial button The loudspeaker is enabled and required. -
Page 25: Settings
Settings Settings Setup options Language ...... Set a language here so that all the oper- ating instructions are displayed in your language. LCD contrast ....Five levels for the contrast can be set here, enabling you to adjust the contrast to your particular viewing angle. -
Page 26: Advanced Setting Options
Settings Advanced setting options Change PIN ....This is where you can change the current PIN. The PIN is a 1 to 3-digit number in range 0 to 999. Please ensure to memo- rise the new PIN as it is required for the next PIN prompt. -
Page 27: Setup Menu
Settings Keypad lock ....Enabling the keypad lock locks all the buttons. The emergency call button and direct dial buttons can continue to be used however. Dialling international emergency number 112 is another ex- ception. Exception no. 1 ....You can enter here another number which can be dialled despite the keypad being locked (such as another emergen- cy number). -
Page 28: Adjusting The Volume
Settings Use the C button to clear or The last digit is deleted each time. correct phone numbers. Press OK to accept the set- The setting is accepted. ting. Change other settings the same way. Press the “Menu” button to The display switches to the top- exit the settings. -
Page 29: Emergency Call Function
Emergency call function Emergency call function Up to three numbers can be dialled automatically with the emer- gency call function at the press of a button. When the call recipient answers, the following announcement is played: “This is an emer- gency call, please press 5 to accept the call”. -
Page 30: Emergency Call Menu
Emergency call function Emergency call menu With the receiver down, keep The display switches and the the Emergency call button phone prompts for the 3-digit PIN pressed for six seconds. (factory setting = 000). Use the numeric keypad to The digits pressed are shown on enter your PIN. -
Page 31: Making An Emergency Call
Emergency call function Making an emergency call After an emergency call is made, it can still take a few seconds until the first number is called. Press the Emergency button The Emergency button flashes on the phone. and signals an active emergency call. -
Page 32: Appendix
Your specialist retailer will be glad to provide more information. Guarantee Tiptel provides a voluntary guarantee on the device, the conditions of which are published on http://www.tiptel.com. The guarantee conditions applicable at the time of purchase apply. The original sales slip (receipt, bill) with serial number and/or IMEI number is used as proof of purchase. -
Page 33: Disposal
CE mark. We hereby declare that the phone satisfies all fundamental re- quirements of European directives. Visit www.tiptel.com for more details on the declaration of conformity. Disposal Packaging: Dispose of paper, card and cardboard boxes in the used paper container and throw plastic parts into a recycling con- tainer. - Page 34 Appendix Problem Possible cause Solution/recommendat No display, no dial Connector cable not making Check all cables and tone. contact. connectors. Display too light or too Contrast not set correctly. Adjust the contrast. dark. No incoming calls No call signal connected. Check the programming being indicated in the of the...
-
Page 35: Default Settings
Appendix Default settings The following list shows the factory settings for your telephone. All of these defaults can be changed. Language English LCD contrast Date 01/01/2015 Time 12:00 Call signal Ring tone Call volume Outside line ------ Flash Short New calls LED Maximum volume Return call Keypad lock... -
Page 36: Information For Administrators
> 10 years Clock Quartz 16-segment display LCD, 16-digit, alphanumeric Information for administrators Please contact Tiptel Support to enable special functions. The following settings/functions can be changed and used by Ad- ministrators: Firmware version (for information only) Default settings ... - Page 40 Tiptel.com GmbH Business Solutions Halskestraße 1, D - 40880 Ratingen Tel.: 02102 - 428 520 Internet: www.tiptel.de International: Internet: www.tiptel.com Tiptel GmbH Ricoweg 30/B1, A - 2351 Wiener Neudorf Tel.: 02236/677 464-0 Fax: 02236/677 464-22 E-mail: office@tiptel.at Internet: www.tiptel.at Tiptel AG Pumpwerkstrasse 40 –...
Need help?
Do you have a question about the Ergophone 1300 and is the answer not in the manual?
Questions and answers