Table of Contents

Subscribe to Our Youtube Channel
Related Manuals for TIPTEL VP 28


Summary of Contents for TIPTEL VP 28
- Page 1 10/2010 Version 1...
-
Page 2: About This Guide
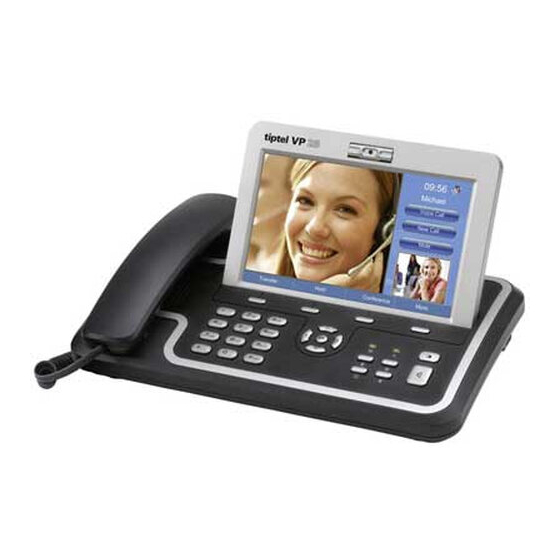
IP broadband communication applications and open the door to the world of multimedia. tiptel VP 28 is an innovative IP media phone equipped with the most advanced video compression technology. It offers unrivalled super voice and picture quality, innovative functional richness, friendly user interface, stylish and elegant design, enhancing the instant, face-to-face communication experience even at low bandwidth. -
Page 3: Table Of Contents
Tables of Contents Getting Started ..................- 1 - Packing List ..................- 1 - Assembling the Phone ................- 2 - Configuration and Registration ..............- 4 - Configuring via Web Page ..............- 5 - Configuring via keypad ..............- 6 - Overview .................... - Page 4 Dial back from the call history ............- 42 - Add a record from call history ............- 43 - Delete the call history ..............- 43 - Clear the call history ..............- 44 - Media....................- 45 - Photo ...................
- Page 5 Guarantee ....................- 68 - Service ..................- 68 - Guarantee ........Fout! Bladwijzer niet gedefinieerd. Copyright Tiptel © ................. - 69 - Remove unit correctly ..............- 69 - Declaration of conformity ..............- 69 -...
-
Page 6: Getting Started
VP 28 Getting Started Getting Started Packing List The following components are included in your package: IP Video Phone tiptel VP 28 Power Adapter Handset & Handset Cable - 1 -... -
Page 7: Assembling The Phone
VP 28 Getting Started Ethernet Cable Quick Installation Guide Please unpack the product package with caution; inspect the items closely. If you find any damaged item, please contact your IP Video phone reseller immediately. Also, please keep the box and packing material for future use in the event of future shipments. - Page 8 VP 28 Getting Started Note: Headset is not included in the packing list. Should be purchased separately. 2) Connect Network and Power There are two ways for network and power source connections. You can connect the phone to the AC Power directly using the power adapter or to a PoE compliant switch or hub.
-
Page 9: Configuration And Registration
VP 28 Getting Started Note: If inline power is provided, do not install AC adapter. Make sure the Ethernet cable and switch/hub is PoE compliant. The Internet Port can be also connected to Hub/Switch/IP PBX or other internet devices. -
Page 10: Configuring Via Web Page
VP 28 Getting Started Configuring via Web Page Press <OK> button on the keypad of the phone to enter the status page and find out the IP address of the IP video phone. Enter the IP (for example http://10.1.3.204) into the address bar of web browser. -
Page 11: Configuring Via Keypad
VP 28 Getting Started Note: Should the IP PBX (SIP register) require an authentication, you will be prompted to enter the correct password. Make sure you are using the appropriate input method or enter the password via the web user interface. -
Page 12: Overview
VP 28 Overview Overview Keypad Instruction You can check the following list which introduces the IP phone’s keypad in detail: Event Indication LED It will show the event status of the video phone. It will blink when registration failed, the network is unavailable, there is a missed call or voicemail to the extension or hold/ mute the call or firmware Update. - Page 13 VP 28 Overview The specific function is assigned by the internal logic of the videophone and varies from menu to menu. For example, pressing a soft key corresponding to the Directory function will to enter the Contacts menu directly.
-
Page 14: Led Instruction
VP 28 Overview Hard Feature Keys The feature keys provide a quick way to invoke a feature or a function. Press to turn on video privacy, the videophone start to send your video to the recipient. Press again to turn off video privacy;... -
Page 15: Icon Instruction
VP 28 Overview Icon Instruction The IP Phone displays different kinds of icons on its LCD; you can refer to the following table for their meanings: Icon Description Network Status: Available Network Status: Unavailable Network Status: Limited Account register successful... -
Page 16: User Interface
VP 28 Overview Default 1 Default 2 Default 3 Default 4 User Interface There are two ways to customize specific options on your phones: Using keypad and display on the phone; Using web user interface in an Internet browser from your PC; please refer to “Configuration and Registration”... - Page 17 VP 28 Overview √ --Reboot √ --Auto provision Other Features --Call History √ √ --Directory √ --Message Note: The above table only indicates most of phone functions rather than all of them. Please refer to the relating parts for more details.
-
Page 18: Customizing Your Phone
VP 28 Customizing Your Phone Customizing Your Phone Powering Up the Videophone 1) Plug a Network cable into the network port. 2) Plug in power. 3) It takes about 2 minutes to boot up the videophone. During this period, please do not touch any keys or turn off the videophone. -
Page 19: Basic Settings
VP 28 Customizing Your Phone Open the web browsers and input the IP Address http://WAN-ip-address; Enter the account and password (default account and password are “admin/admin”); choose Status directly to check the status. Basic Settings Personalize This option includes the following parameters Language: English, Dutch, Turkish, French, German, ect;... - Page 20 VP 28 Customizing Your Phone The language appears on the graphic display will be changed to the one you chose. 4) Press Exit soft key to return to the previous screen. Note: The settings of Call Option and Local Video are the same as language .
-
Page 21: Sound
VP 28 Customizing Your Phone Local Video Define whether to open the local video. To change the call option via phone interface 1) Click Setting->Personalize->Local Video. 2) Press <OK> to pop up the pull-down menu, choose Open or Close the Local Video. - Page 22 VP 28 Customizing Your Phone 3) Ring Volume: Choose Ring Tone -> Volume option, then click button to adjust the ring volume; 4) Talking Volume: Choose Volume -> Talking option, then click button to adjust the talking volume; 5) Press Save softkey to save the changes, and get back to Setting page.
-
Page 23: Date & Time
VP 28 Customizing Your Phone Note: The volume can only be adjusted via phone interface. Date & Time The time and date appears on the idle screen of the IP video phone. If the phone cannot obtain the time and date from the time server, please contact your system administrator to check whether the date and time server are correct. -
Page 24: Security
VP 28 Customizing Your Phone 2) Click the Time Zone option to pop up the pull-down menu, then choose the correct Time Zone in the list; Press Save button to save the changes; Note: You can follow the above steps to set Time Format. -
Page 25: Screen Saver
VP 28 Customizing Your Phone 2) Choose and fill in the Old Password , New Password and Re-enter . The default password is Admin. 3) Press Save to save the change, or press Back to cancel the operation and return to the “Setting Page”. -
Page 26: Wallpaper Manage
VP 28 Customizing Your Phone menu, then click the Save button to save your changes. 3) Follow the same way to choose and set the Screen Type and Sleep options. 4) Click the Wallpaper Manager option, and make your choice in the pull-down menu, the chosen picture will be shown on the right side for you. -
Page 27: Call Feature
VP 28 Customizing Your Phone Note: 1. If there is USB flash device plugged into the USB port, and there is a AD folder under the root, and the folder of video files that meet the conditions, it will automatically play the video files in the USB after you opened the video screen saver, or manually play it. -
Page 28: Call Waiting
VP 28 Customizing Your Phone To configure Call Forward via web interface: Choose Phone->Feature to do the relating changes. Please refer the above configuration information. Call Waiting Call Waiting lets you know who is calling you when you are busy. Don't feel like answering the other line? Don't worry, just let the call go to voicemail and respond at your convenience. -
Page 29: Auto Answer
VP 28 Customizing Your Phone 2) Click the icon to enable/disable Call Waiting function; Press <OK> to confirm the change; 4) Press Save to save the changes and get back to the “Call Features” page. Note: If Call Waiting is enabled by the called extension, when a new call is coming during an active call, the device will sound a “Du…”, and the LCD indicates the incoming call, the... -
Page 30: Dial Plan
VP 28 Customizing Your Phone 2) Click the icon to enable/disable auto answer function; 3) If auto answer is enabled, users can choose different types. Click the Auto Answer Type to pop up the pull-down menu and choose a proper type. - Page 31 VP 28 Customizing Your Phone 2) Press <F1> to add a record, enter “Prefix” and “Replace” parameters on the right, the click to save the changes; Then the record will appear in the dial plan list on the left.
-
Page 32: Speed Dial
VP 28 Customizing Your Phone 2) Enter the desired Prefix and Replace. 3) Press Insert button to add the rule. 4) Then click the confirm key to save the changes. 5) You can also delete a specific one from the Dial Replace list by clicking the Delete button. - Page 33 VP 28 Customizing Your Phone 2) On the left, there are 20 DSS keys available, make your choice in the list. 3) On the right, set the Type, account and extension for the chosen DSS key. 4) For the Type option, Line and Speed Dial options are available for choose. The default configuration for each key is N/A which means the key hasn’t been set for...
-
Page 34: Key As Send
VP 28 Customizing Your Phone 81 button to call out directly. dial-up interface 9) Click the corresponding line key (for example 60) to enter the enter the number to dial out. Key As Send Users can set a specific button (“#” or “*”) to active as the send button. -
Page 35: Add Contact
VP 28 Customizing Your Phone will display both Local Directory and XML phonebook. Add a XML phonebook via web interface: 1) Choose Contacts -> Remote Phonebook 2) Enter the Phonebook URL and Phonebook Name, and then click the Insert button to add the record. - Page 36 VP 28 Customizing Your Phone 2) Press Up/Down button to choose and fill in different options, in the Ring Group options, press <OK> to pop up the pull-down menu, choose your preferred options, then press <OK> to confirm. 3) Select an image for the contact.
-
Page 37: Search Contact
VP 28 Customizing Your Phone Add a contact via web interface: 1) Choose Contacts->Local Phonebook. 2) Enter the Display Name, Office Number, Mobile Number, Family Number and Group Name, and then click the Insert button to add the record. -
Page 38: Edit Contact
VP 28 Customizing Your Phone 2) Enter the contact name by the keypad, for example “5”, then the screen will show all the contacts whose name begins with “5”. 3) Press Back button to get back to Contacts page. - Page 39 VP 28 Customizing Your Phone 3) Press Up/Down button to choose and fill in different options, in the Ring and Group options, press <OK> to pop up the pull-down menu, choose your preferred options, then press <OK> button to confirm.
- Page 40 VP 28 Customizing Your Phone Click the Save button to save your changes. Move a contact to the blacklist via phone interface: 1) Click Directory , then use the Up/Down navigation keys to choose a record you want to move to the blacklist and press the <OK> button to enter.
-
Page 41: Delete Contact
VP 28 Customizing Your Phone Note: If a contact has been moved to the blacklist, then the call from this contact will not get through. Move a contact to the blacklist via web interface: 1) Click Contacts option to enter the configuration page. -
Page 42: Clear Phonebook
VP 28 Customizing Your Phone Click to confirm the operation, or click to cancel the operation. Delete a contact via web interface: 1) Click Contacts option to enter the configuration page. 2) Choose a contact, then click the Delete button to delete it. -
Page 43: Group Manage
VP 28 Customizing Your Phone 2) Click to confirm the operation, or click to cancel the operation. Note: When you click to confirm clear all contacts, the phone default is clear the current group. Group Manage Add group Add groups via phone interface: 1) Click Directory ->... - Page 44 VP 28 Customizing Your Phone 2) Enter the Group Name and choose the Group Ring of the new group. Then click to confirm the operation, or click to cancel. Edit group Edit a group via phone interface: 1) Click Directory -> Options -> Group Manager option to enter the configuration page.
-
Page 45: Export Contact List
VP 28 Customizing Your Phone side, then the input box on the right will show the corresponding Group Name and Group ring information. 3) Click the input box of Group Name, then press <F3> to delete the original name, then input the new name by keypad. -
Page 46: Call Out
VP 28 Customizing Your Phone Click the Export button to export the contact list. Note: Export Contact List can only be set via web interface. Call Out 1) Click Directory -> Account option to enter the configuration page. - 41 -... -
Page 47: Call History
VP 28 Customizing Your Phone 2) The registered accounts will be shown on the right side, clicking the corresponding one to dial out the chosen contact directly by this account. In the list if there are too many records, the screen will display the icon Then you can click the icon to show the following records. -
Page 48: Add A Record From Call History
VP 28 Customizing Your Phone Add a record from call history 1) Click Call History option to enter the call list interface. 2) Choose a record you want to edit and click Add button to enter the edition interface. -
Page 49: Clear The Call History
VP 28 Customizing Your Phone 4) Click to confirm the delete operation, or click to cancel. Clear the call history Clear the call history via phone interface: 1) Click Call History -> Options -> Clear option to pop up the dialog reminding “Clear all records?”. -
Page 50: Media
VP 28 Using the Basic Call Functions Note: When you click to confirm clear all records , the phone default is clear the current group. Media In the idle status, click Media option to enter the menu interface. There are two operations for users choose to use. One is Photo, another is Video. You can manage the photo and video. -
Page 51: Video
VP 28 Using the Basic Call Functions Video The operation of video is the same as photo - 46 -... - Page 52 VP 28 Using the Basic Call Functions - 47 -...
-
Page 53: Using The Basic Call Functions
VP 28 Using the Basic Call Functions Using the Basic Call Functions Making a call Call Devices You can make a phone call via the following devices: 1) Pick up the handset, the icon will be shown in the Dial-up interface. -
Page 54: Answering A Call
VP 28 Using the Basic Call Functions Answering a call Answering an incoming call 1) If you are not on an active call, lift the handset to answer it using the handset, or press the Speaker button to answer it using the speakerphone, or inset the headset to answer it using the headset. -
Page 55: During An Active Call
VP 28 Using the Basic Call Functions During an Active Call Audio/Video Switch There are several ways to operate the current audio/video conversation: 1) Shift between audio and video: During a call, click Voice Call or Video Call shift between Voice call and Video call;... -
Page 56: Call Transfer
VP 28 Using the Basic Call Functions Call Transfer You can click Transfer button to customize your phone on an conversation is transferred to the third party such as another extension, mobile phone number, etc. There are three ways to transfer the call: Blind Transfer, Attended Transfer and Semi-Attend Transfer. -
Page 57: Message
VP 28 Using the Basic Call Functions Message Your voice mailbox messages, which are usually stored on a media server of your local or hosted VoIP telephony system, can be accessed from your phone. New voice messages can be indicated both acoustically and visually as described below: The idle screen indicates a new voice messages coming. - Page 58 VP 28 Using the Basic Call Functions To retrieve the new voicemail via phone interface: 1) Click the Message icon directly. 2) You may be prompted to enter the password which is needed to connect to your VoIP telephony system. It depends on your system.
-
Page 59: Using The Advanced Phone Functions
VP 28 Trouble Shooting Using the Advanced Phone Functions Account Settings Basic Settings Configure account information via phone interface: 1) Click Setting->Account option, choose a account to enter the configuration page. 2) Click the icon on the left to enable this line;... -
Page 60: Audio Codecs
VP 28 Trouble Shooting Audio codecs Select Account->Voice to set the audio codecs via web interface: There are 8 voice codecs, press the Up/Down button to choose the right priority. Video codecs Select Account->Video page to set the video codecs via web interface:... -
Page 61: Advanced Settings
VP 28 Trouble Shooting Please check the following table for more information about video configuration. 1) Video Codecs: there are 3 video codecs, press the Up/Down button to choose the right priority. 2) Bandwidth and Frame Rate: To set the Bandwidth and Frame Rate parameters. The default value of Bandwidth is Auto, and the Frame Rate is 30fps. - Page 62 VP 28 Trouble Shooting The following table lists the instruction of the field about the advanced Account Setting. Field Name Description Keep-alive Defines whether to active the phone UDP Keep-alive mechanism. Message The default is Enabled. Keep-alive This parameter specifies how often the phone will send a packet to Interval the SIP server.
-
Page 63: Network Setting
VP 28 Trouble Shooting Network Setting Configure WAN information via phone interface: 1) Click Setting-> WAN option to enter configuration page; 2) Click the corresponding icon to active the proper IP assignment type. 3) If you choose DHCP type, Press <F1> to save the changes;... -
Page 64: Bandwidth
VP 28 Trouble Shooting BandWidth Configure Bandwidth and Frame Rate via web interface: 1) Choose Account->Video. 2) Choose Bandwidth and Frame Rate option to do the relating settings. - 59 -... -
Page 65: Maintenance Tasks
VP 28 Trouble Shooting Maintenance Tasks Administrator Mode The phone allows two modes to configure the phone: User Mode Administrator Mode Administrator mode grants unlimited access to the phone configuration on both web and phone interface. User Mode cannot set the parameters such as: Accounts, Network, Factory, Reboot and some other phone settings by the Phone interface. - Page 66 VP 28 Trouble Shooting 2) Choose and fill in the Old Password , New Password and Re-enter input frame. 3) Press <F1> to save the change, or press <F4> to cancel the operation and return to the “Setting” page.
-
Page 67: Factory
VP 28 Trouble Shooting Factory You should reset the phone only in this case: the phone configuration was changed and the phone is not functioning anymore. To maintain the configuration of the phone, you need your system administrator or service provider’s advice. -
Page 68: Firmware Update
VP 28 Trouble Shooting 2) It will pop up a warning frame asking whether confirm to reset to factory settings. Click to confirm the changes, or to cancel the operation. To reset to factory via web interface: 1) Choose Upgrade page. -
Page 69: Reboot
VP 28 Trouble Shooting 4) You can also update immediately by pressing Autoprovision Now button. The parameters of the Auto-provision Parameter Description Update Protocol The phone can be updated via TFTP, FTP ,HTTP or HTTPS. TFTP Server If you choose TFTP as protocol TFTP, you need to enter the TFTP server IP address and port. -
Page 70: System Log Export
VP 28 Trouble Shooting to confirm the changes, or to cancel the operation. System Log Export If there are any errors happened in your phone, you can export the system log and send to your system administrator for diagnosis. -
Page 71: Trouble Shooting
VP 28 Trouble Shooting Trouble Shooting Network Link Status shown as unavailable? 1) If the internet cable doesn’t plug into the Internet port. Please connect the cable first. 2) If the WAN port’s type is DHCP, the server has been shut down, or there is no available IP address. - Page 72 VP 28 Trouble Shooting During a call, I can not hear any voice? 1) Make sure your handset is tightly connected with the phone. 2) Check whether you have muted the conversation or not. 3) Consult the outbound server details with your ISP.
-
Page 73: Guarantee
036 – 53 678 81 Warranty The tiptel VP 28 comes with an extended warranty of 12 months to the exclusion of damages, changes or other requirements. With regard to the guarantee we give free replacement or repair of the components by manufacturing or material defects are formed. -
Page 74: Copyright Tiptel
Copyright Tiptel © This edition is published by Tiptel in November 2008. No part of this publication may be duplicated without permission from Tiptel eg. Tiptel e.g. reserves the right to amend without prior notice. Tiptel e.g. can not be held liable for damage or injury caused by misuse or use that does not correspond to the instructions in this manual. -
Page 75: Declaration Of Conformity
Declaration of conformity according to regulation 2004/108/EC Hiermee wordt verklaard dat het volgende product Declares hereby for the following product tiptel VP 28 Voldoet aan de essentiële en andere relevante eisen volgens artikel 3 van de Europese Richtlijnen voor Radio en Telecommunicatie eindapparatuur (R&TTE Directive 1999/5/EC).
Need help?
Do you have a question about the VP 28 and is the answer not in the manual?
Questions and answers