Abus Secvest User Manual
Hide thumbs
Also See for Secvest:
- Installer manual (400 pages) ,
- Installation instructions and user manual (181 pages) ,
- Installation instructions and user manual (61 pages)
Table of Contents
Advertisement
Quick Links
Download this manual
See also:
Installation Manual
Advertisement
Table of Contents

Related Manuals for Abus Secvest


Summary of Contents for Abus Secvest
- Page 1 Secvest User guide V2.01.08...
-
Page 2: Table Of Contents
3. Installation example ..................... 4. Overview of the system and control panel ..............5. Overview of the numerical keypad ................6. Secvest display ....................7. Menu navigation and operation ................8. Arming and disarming the system ................8.1 Arming/disarming keys .................. - Page 3 10.9.1 Alarm panel ..................10.9.2 Communication ..................11. Advanced system operation ................... 11.1 Remote control ....................11.2 Wireless cylinder lock (“Secvest key”) ..............11.3 Additional door lock (FU7010/7025E) ..............11.4 Operation via telephone .................. 12. Operation via web (app/browser) ................
-
Page 4: Scope Of Delivery
Everything possible has been done to ensure that the content of these instructions is correct. However, neither the author nor ABUS Security-Center GmbH & Co. KG can be held liable for loss or damage caused by incorrect or improper installation and operation or failure to observe the safety instructions and warnings. -
Page 5: General
2. General 2.1 Safety information The alarm panel and its connected components must not under any circumstances come into contact with water, such as in the bathroom. Using the device for purposes other than those described may damage this product and may also lead to hazards such as short circuits, fire or electric shock. The power supply unit is suitable for operation on the public electrical grid with 230 V AC/50 Hz. -
Page 6: Information On User Guide
2.5 Declaration of conformity ABUS Security-Center hereby declares that this type of wireless system FUAA50xxx, complies with RED Directive 2014/53/EU. The full EU Declaration of Conformity text can be found at: www.abus.com Artikelsuche FUAA50xxxx/Downloads The Declaration of Conformity can also be obtained from the following address: ABUS Security-Center GmbH &... -
Page 8: Installation Example
The following components are installed in this example: 8 x magnetic contacts at the windows and doors 1 x Secvest key (wireless cylinder lock) at the doors for easy arming/disarming 1 x Secvest alarm panel 2 x motion detectors indoors... -
Page 9: Overview Of The System And Control Panel
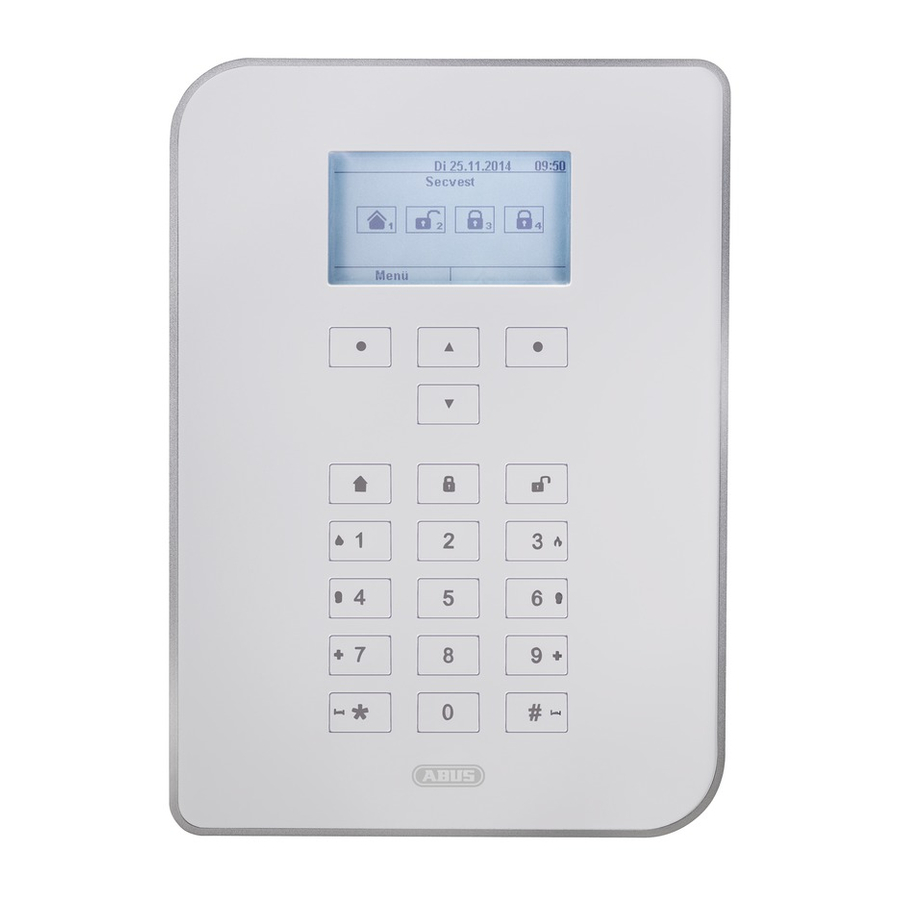
4. Overview of the system and control panel Graphical display for status, menus and additional information Keys for menu navigation (see "Menu navigation") Quick disarm key for disarming the complete system (code entry required) Microphone opening Proximity chip key reader area Numerical keypad (see following page) "Internal arm"... -
Page 10: Overview Of The Numerical Keypad
5. Overview of the numerical keypad The numerical keypad is used to enter values in certain menus. Letters and special characters are also stored on the keypad for entering things like user names or email addresses. The numerical keypad can be used to input various information. For example, a name can be entered when creating a new user (see "Users"). - Page 11 Fire alarm Press both fire alarm keys at the same time to manually trigger a fire alarm (for example, if you notice a fire and wish to warn others in the household). The system beeps twice in cycles as a way of providing acoustic feedback.
-
Page 12: Secvest Display
6. Secvest display Voice message This symbol is displayed when a voice message has been recorded (for example, a reminder from another user). Aft er the alarm panel has been disarmed the user receives the following audio message: "You have a message". The message can then be played back and deleted if desired. -
Page 13: Menu Navigation And Operation
Additional arming options are covered in detail below. In the standard configuration, Secvest is armed on a time delay, meaning it is only armed after the exit delay programmed by your specialist installation contractor has expired. -
Page 14: Graphical Display Of Arming/Disarming On The Display
This key is used to quickly arm the complete system. No user code is required for this. Note that when this key is pressed ALL detectors including those in all sub-areas (if there are any) are activated. This function will only work if the key has been enabled in consultation with your specialist installation contractor. - Page 15 8.4 Arming via the user code The system can be armed by directly entering a user code. The system has either been confi gured with a 4 or 6-digit user code in consultation with your specialist installation contractor. This code should be changed during commissioning, however. If a new user is added, a separate code is created for this user.
-
Page 16: Arming Sub-Areas
8.5 Arming sub-areas In addition to the option of arming a sub-area via a user code, the system can also arm additional sub-areas. The procedure for this is given here using the user code entry example. This function must be preconfi gured by your specialist installation contractor. -
Page 17: Individual Sub-Areas
2. Click on "Done" and system sub-areas 1 & 3 are armed, while sub-areas 2 & 4 remain disarmed. Aft er the arming time, the Secvest display then looks like the example given in the fi gure on the left . -
Page 18: Internal Arming Via Chip Key
The procedure for internal arming via the chip key is virtually the same as arming the complete system: Hold the chip key in close proximity to the ABUS logo and swipe it over the logo briefly. A prompt appears, requesting confirmation on the type of arming required. -
Page 19: Arming Via Chip Key
The reader area for the chip key is located at the height of the ABUS logo. You only have to swipe the chip in the proximity of the reader area to arm the system – you do not have to touch the housing. -
Page 20: Preventing Arming Of The System
After the start, a continuous tone sounds. Make your way out of the building and open and close the doors in time. The continuous tone is replaced by a pulsed tone when the door is opened/closed. It will then return to a continuous tone. -
Page 21: Responding To An Alarm
• Entry delay exceeded • Exit delay exceeded The Secvest has four diff erent types of alarm. Depending on the status of the system (disarmed, armed, internally armed), the following alarms are available (depending on the setup or programming of the alarm panel): 9. -
Page 22: Alarm Forwarding
üopt. 9.2 Alarm forwarding If the communication interface of the Secvest has been programmed (speak to your specialist installation contractor), the following alarm forwarding options are available (depending on the configuration of your system and the connection used, such as IP, PSTN): •... -
Page 23: Alarm Forwarding To A Monitoring Station
9.2.3 Alarm forwarding via email If the Secvest is connected to the internet (e.g. via a router), it can also forward an alarm via email. The alarm panel text (e.g. "Intrusion Z01 alarm") is sent to a predefined email address. If you are also using the Secvest PIR camera, the alarm image can also be attached to the email. -
Page 24: User Menu
3. To add a new user, select "Add user". You are then guided through the setup options for a new user step by step. 4. User name: Using the Secvest keypad, enter the name of the user. 5. Select which user level the new user will have: Normal user: a normal user has limited options compared to an administrator. - Page 25 8. Additional components can be assigned to the new user. The fi rst prompt is for a chip key. Take the chip and swipe it across the ABUS logo in close proximity to the housing. If no chip key is desired, select "No chip key".
- Page 26 Proceed as follows via the web interface: Log in as an "administrator", click on “Users” on the right hand side and then click on “Add user”. You can now specify a name, type, code and sub-area. Then login with the access details that have been set or the user details for this user and add “Chip key”, “Remote control”, “Panic alarm”, “Medical pendant”...
-
Page 27: Voice Memo
10.2 Voice memo This function is used to leave someone else a message ("Memo function"). Record a short reminder, for example, and then arm the system. The next person to disarm the system is notifi ed with the text "You have a message" and a corresponding symbol. -
Page 28: System Configuration
10.4 Outputs on/off If your installer has confi gured the outputs as the “user defi ned” type, you can switch them on and off here. 10.5 System configuration The following settings can be defi ned in the system confi guration: •... - Page 29 "presence" is not detected after a certain time due to a fainting spell or something similar. Display contrast Change the contrast of the Secvest display here. Backlighting brightness Change the display brightness setting. You can select "low", "medium" or "high".
- Page 30 ⋅ “On” turns the illumination on in order to keep the complete touch front lit constantly. Note: LCD backlighting and all backlighting of the keys are always turned on. The wakeup function is deactivated.In case of a power failure, the illumination switches to “When active” in order not to use unnecessary electricity from the battery.
- Page 31 During an alarm ⋅ Voice dialler Following an “individual message” and “Message x”, the zone first triggered will be announced in addition. ⋅ Alarm panel The zone first triggered will be announced with each sub-area. The sub-area with the lowest number will be first. Example: Alarms were triggered in the following zones in the following order: Zone 226...
- Page 32 Only visible if the touch front is installed. The brightness regulation is an option for dynamic light control. If the “Dynamic backlighting” menu item is set to “Off”, it will behave similarly to the Secvest with a key front with a fixed “high”, “medium” or “low” value.
-
Page 33: Date & Time
10.5.2 Date & time Only visible to the administrator. Set the time and date here. Both can be entered directly using the number keys. Click on "Next" to navigate through the menu. Then defi ne whether the system automatically adjusts for daylight saving time or whether you wish to adjust the system manually yourself. -
Page 34: Edit Outputs
User menu -> Configuration -> Date & time SNTP Time sync. SNTP active Sync on start-up Sync daily Manual sync (synchronises date/time immediately) NTP server name ntp.exnet.com* Name: ntp.exnet.com pool.ntp.org* Name: pool.ntp.org <empty> <empty> <empty> (A list of 5 configurable NTP-server names in order of priority.) Manual mode Set date... -
Page 35: Remote Controls
10.5.4 Remote controls Only visible to the administrator. Assigned remote controls can be edited or removed here. The following options are available: • Edit: press the * key of the remote control to reprogram it. The standard setting of the key is "Internal arming". -
Page 36: Remote Updates
Only visible to the administrator. You can manage your contacts in this menu. Use the telephone/IP interface or similar of your Secvest, for example, to forward alarms. The contacts can be adjusted here or new data entered. Not all fi elds must be completed. - Page 37 Important: only make changes to contact entries, such as when a number has changed or the contact can no longer be reached. The assignment of sub-areas is only applicable to voice diallers, text messages and email, and not to ARC/ESCC connection. Events not directly relating to a single sub-area (e.g.
-
Page 38: Test
10.7 Test Only visible to the administrator. The test menu provides the option of testing the various functions of your system to ensure they are working properly. Depending on the setup level of your alarm panel, certain functions may not be available. Select "Test"... -
Page 39: Sirens & Sounders
If your system has a proximity chip key and you wish to test its function, take the key and swipe it over the chip key reader area in the lower area of the alarm system (at the height of the ABUS logo). If the chip key is read successfully, the display indicates which user the chip key is assigned to. -
Page 40: Remote Controls
The user assignment is also displayed and the signal level of the triggered remote control, e.g. RSSI:9. RSSI stands for "received signal strength indication". An RSSI value of "9" indicates an excellent received signal strength, as the scale for the Secvest runs from 1–9, where 9 is the maximum strength. 10.7.7 Emergency call button An existing emergency call button (for nursing, panic alarm or medical emergency) can be tested here by pressing the emergency call button. -
Page 41: Information
10.9 Info Only visible to the administrator. This menu is used to check the soft ware version of the wireless alarm panel and query the communication interfaces. You cannot change any confi gurations in this menu. 10.9.1 Alarm panel • Version: soft ware version, e.g. -
Page 42: Communication
Output voltage to the power supply output terminal 10.9.2 Communication PSTN: Info => Communication => PSTN PSTN link status query. The Secvest then checks the installed landline. If it is not enabled or is disrupted, the error message "Error" appears. Otherwise the message "Test successful" appears. - Page 43 IP address If the Secvest is located on a network the IP address is shown here, e.g. 192.168.178.23. If (DCHP) is shown aft er this in brackets, the Secvest automatically obtains its IP address from a DHCP server, for example, in a router.
-
Page 44: Advanced System Operation
11.3 Additional door lock (FU7010/7025E) If a wireless additional door lock from ABUS is installed, you can arm and disarm the system in a way similar to the wireless cylinder lock. The additional door lock provides... -
Page 45: Operation Via Telephone
Disarm To disarm the alarm panel unlock the additional door lock accordingly. Unlocking the lock automatically disarms the alarm panel. 11.4 Operation via telephone If the alarm panel is connected via the A/B interface, the wireless alarm panel can call you to report an alarm. -
Page 46: Operation Via Web (App/Browser)
If you can access your home network from a computer, smartphone or tablet and the Secvest is also located on this network, you can access the web interface of the Secvest by entering the IP address of the Secvest in your browser (e.g. -
Page 47: Operation Via Web Browser
Firefox. This section discusses how to operate the system via the web browser. 13.1 Setting the Secvest IP address 1. First you must know the IP address of your Secvest. This can most easily be found in the Secvest user menu under "Info": select "Communication" -> "Ethernet". -
Page 48: Overview Of The Web Interface
Important! Automatic log out function: Based on the Secvest’s automatic log out function, this is now also possible on the web interface and Secvest app. • Normal user or administrator is logged in. The automatic log out occurs aft er 1 minute of inactivity. -
Page 49: Arming & Disarming
13.3 Arming & disarming The following button can be used to arm and disarm the system. The symbols have the following meanings: Internally arm system Disarm system Arm system These commands can be implemented individually for each sub-area. First click on the sub-area in question and then on the corresponding arm/disarm key: If there is an error in the system, the... -
Page 50: Hide Zones
Acknowledge an alarm by selecting the red sub-area and confi rming the prompt for whether the alarm should be acknowledged. To reset the alarm panel, select the ! symbol that appears aft er acknow- ledgement in the triggered sub-area. This action must also be confi rmed via a prompt from the alarm panel. -
Page 51: Additional Web Interface Options
Only the "Time schedules active/inactive" menu item is described in more detail in this section. ABUS recommends confi guring the time schedules via the web interface if possible, simply because it is easier and clearer to do so this way. More information can be found in the next section, "Configuring Secvest time schedules". - Page 52 Then switch to "User". Just like in the user menu you can create new users here and manage and remove existing users. Click on "Add user", for example, and follow the instructions. Important: for S/W<2.00.00, remote controls, chip keys, etc. cannot be added via the web interface.
- Page 53 Under "Keypad" you will fi nd the "Virtual control panel" function. You can use this function to view the Secvest menu via the web interface and assign a created user to a remote control, for example. Move the virtual cursor keys using the mouse and go to the "User"...
-
Page 54: Configuring Secvest "Time Schedules
To defi ne "Time schedules" for the Secvest, confi guration via the web interface is strongly recommended. 13.5 Configuring Secvest "time schedules" Basic procedure: Your alarm panel’s time schedule function is especially useful in places which have recurring routines, for example, a doctor’s surgery with regular opening and closing times. A time schedule is used to automatically arm or disarm the Secvest. - Page 55 If there is an arming fault If there is an error which would normally prevent the system from being armed then the system is not armed via week planner events either. Ten minutes before a week planner arming event is due the alarm panel starts the warning tone for week planner arming as usual, but when the event is due the alarm panel is not armed.
- Page 56 Carry out the following steps: For a time schedule to be active, it must fi rst be "Enabled". Defi ne when the time schedule should be active. The following options are available: Monday/Tuesday/ Wednesday/Thursday/Friday/Saturday/Sunday/Monday – Friday/Saturday to Sunday/Daily/Exceptions. In this example we are choosing "Daily".
-
Page 57: Datasets
13.6 Datasets For each arming scheme (e.g. "Monday", "Daily", etc.) you can choose any number of 16 "datasets". You can therefore confi gure 16 diff erent actions. For example, you could confi gure your system so that it disarms in the morning, arms at midday, disarms aft er lunch and then arms again in the evening. This requires 4 individual datasets. -
Page 58: Terms And Definitions
14. Terms and definitions Active intrusion protection Even an attempt to break in is reported. This can be done using alarm components that not only combine wireless technology with mechanical intrusion protection (mechatronic detectors), but also monitor attempts to open a door or window using a lever via magnetic field sensors. Alarm panel The switching instance of the entire alarm system, which processes all information, forwards it and responds as necessary. - Page 59 Bidirectional 2-way wireless (2WAY) Bidirectional: Bidirectional components can also receive feedback from the alarm panel and evaluate it (e.g. via LED displays). Certifications Inspection seal from an independent body that ensures the high quality and safety of alarm systems (in Germany the following are relevant: certification as per POS in accordance with accident prevention regulations and VdS loss prevention) Chip key/proximity Electronic “key”...
- Page 60 Flood detector For detecting water damage and flooding, existing of a basic device and water sensor. The sensor is always mounted at a point where flooding would first start to occur in order to incur water damage. Glass breakage detectors These detectors respond to breaking glass.
- Page 61 Opening detector A detector that identifies when a window, door, shutter, garage door, etc. is opened. Outdoor siren Sounder for outdoor use, usually designed as a combination sounder (siren + flashing light). Perimeter protection All points of access to the premises are monitored, including house doors, terrace doors, cellar doors, skylights and all windows.
- Page 62 Sabotage See “Tampering” Security frequency band These frequency ranges (433 MHz or 868 MHz) are approved by the authorities (RegTP) for the security field. Signals from wireless earphones, mobile phones, garage door openers, etc. cannot interfere with devices operating in these ranges. Seismic sensor See “Shock detector”.
- Page 63 Status Alarm panel status: either armed or disarmed. Sub-area An alarm system can be divided into sub-areas (partitions), each of which functions separately as an individual alarm system. Each sub-area (e.g. apartment, workshop) can be operated and configured separately and can contain any number of zones/detectors.
- Page 64 Wireless alarm system Alarm system with detectors that are connected to the alarm panel wirelessly (advantages: quick and easy installation, high flexibility). Wireless alarm zone, wireless zone Zone of the wireless alarm panel that is used to identify and monitor every individual wireless detector. Wireless control panel For convenient arming/disarming of the alarm panel, e.g.
-
Page 65: Technical Data
90 g one battery Capacity Zones 6 (software version 1.01.00 and higher) IP zones for the ABUS camera models specified see the appendix to the instructions for installers titled “Compatible equipment” Wireless Zones 4 (2-wire FSL/DEOL or 2-wire CC) Wired Zones 2 (4-wire CC) - Page 66 Door locks Repeater Outputs IP Outputs Radio Outputs Wired Outputs Partitions Four (each with internal arming) User User names 50 (plus installer name) User Codes 50 (plus installer code) Proximity tags (chip keys) 50 (one per user) Remote controls 50 (one or several per user) Panic alarm transmitter 50 (one per user) Medical emergency call transmitter...
- Page 67 Internal clock Loudspeaker Microphone 33 voice messages for each language installed on the alarm panel 5 messages recorded by the user (Installer mode voice dialler) 12 second site message 8 seconds for each message 1–4 1 memo message (user menu) Voice messages 30 seconds 58/56 zone names (user menu)
- Page 68 30,000 differentiation Door locks Additional door lock FUFT50010-20, 7010E 7025E Mechanical key 30,000 differentiation Secvest Key FUSK53030-58080, FUBE5XXXX Mechanical key 789,024 differentiation Web user name length 12 characters (215,671,155,821,681,003,462,656, 88^12, >1,000,000) All characters can be alphanumeric symbols or special symbols.
- Page 69 Power supply Type A (EN 50131-1 Section 9 and EN 50131-6 Section 4.1) Secvest has an integrated power supply unit (Type A). This power supply unit supplies different internal voltages to the circuit board to supply Type of power supply power to the circuitry.
- Page 70 Backup power supply Rechargeable battery Polymer lithium ion, 7.4 V Capacity 2500 mAh, 18.5 Wh Minimum running time in More than 12 hours emergency power mode More than 24 hours with optional second battery (standby time) Maximum recharging time Less than 72 hours (EN 50131-1 Section 9 Table 24) Maximum time to recharge 24 hours) the battery to 80%...
- Page 71 Fuses Miniature fuse (micro fuse) Mains fuse (AC in) removable Name T1AL250V Characteristic T = slow blow Operating current Breaking capacity L = low Operating voltage 250 V Design Glass tube 5x20 mm Wireless signal transmission Operating frequency 868.6625 MHz In accordance with: EN 50131-5-3 Grade 2 EN 300 220-1 V.2.1.1 EN 300 220-2 V.2.1.1...
- Page 72 RFID proximity keyfob reader Operating frequency 13.56 MHz In accordance with: EN 300 330-2 Special features Individual identification Connections Mains connection 110 V/230 V AC, 50/60 Hz, (85-265 V AC, 50/60 Hz) L – line, single phase (black or brown) – protective earth (yellow/green) N – neutral (blue) External PSU input - DC IN + 13.8 V DC, external PSU at least 1.7 A...
- Page 73 Interface for analogue telephone connection to the public telephone network, a private branch exchange or an integrated access device (IAD [router] e.g. Vodafone Easybox xyz or FRITZ!Box vwxy) Approved for telecommunications in accordance with TBR-21/CTR21 (ETSI ES203021) > 18 V REN rating 1 PSTN data rates up to 1200 bps (V.22) Secure Digital Memory Card Micro SD...
- Page 74 10/100 LAN Plug-in module, optional Quad-band GSM: 850/900/1800/1900 MHz Communication methods Web server Web access, app and ABUS server ARC/ESCC reporting Receiver 2 Tel, 2 IP Analogue Fast Format, Contact ID (CID), SIA 1, SIA 2, Ex SIA 3, Ex SIA 3 V2,...
- Page 75 Voice dialler Receiver 8 Tel or VoIP/SIP ID DTMF detection VoIP/SIP RFC 2833 Acknowledgement PCM G711 A law (RTP AV Profile 8) Codec VoIP/SIP ITU-T G.711 PCM A-Law audio 64 kbit/s Reference RFC 3551 Receiver PSTN SMS protocol TAP 8N1, TAP 7E1, UCP 8N1, UCP 7E1, ETSI Protocol 1 Email Receiver Remote control by telephone...
- Page 76 Security level: Grade 2 Environmental class: Class II If the alarm panel has been installed correctly, the Secvest will be compliant with EN50131 Grade 2. The Secvest is compliant with EN50131-1 and EN50130-5 environmental class II. Power supply is compliant with EN50131-1:2006+A1 2009 Section 9 and EN50131-6 if the alarm panel has been installed correctly.
- Page 77 The FUMO5000X GSM module can be used as a supplementary communicator for Grade 2. The alarm panel supports options A, B and C for grade 2 as given in Table 10 in EN50131-1:2006+A1:2009. If the installer selects a non-compliant configuration the compliance label must be removed or corrected. Third party verification of compliance was carried out by ANPI.
-
Page 78: Troubleshooting
16. Troubleshooting 16.1 Manual restart (switching off and switching back on) S/W >=1.01.00 This is helpful for some problems, to reset the alarm panel to a defined initial state. All the settings and configurations are retained. Note A restart is only possible when all partitions are "disarmed"... - Page 79 Click on "Restart alarm panel". You are prompted for confirmation. Click on "Restart alarm panel" again. At this point you can still cancel the restart. Click on "Cancel restart". The restart is displayed as shown below. 78 78 16. Troubleshooting...
- Page 80 After the restart you are automatically logged out of the web server. If you wish to continue working on the web server, please log in again with your user name and password. [3] Alarm control panel – "Up" and "Down" navigation keys Hold down the "Up"...
- Page 81 16.2 GSM manual test call, prepaid Danger Note If you use a prepaid SIM card on a prepaid tariff , e.g. CallYa, Xtra or Magenta Mobil-Start, Please carry out a GSM test call and/or send a GSM test text message every month or every three months. If you do not use the GSM network for a long time it can be that: the GSM alarm call does not work the GSM alarm text message does not work...
- Page 82 ABUS Security-Center GmbH & Co. KG Linker Kreuthweg 5 86444 Affing Germany Tel. +49 82 07 959 90 0 +49 82 07 959 90 100 info.de@abus-sc.com abus.com V2.01.08...
Need help?
Do you have a question about the Secvest and is the answer not in the manual?
Questions and answers