Table of Contents
Advertisement
™
™
Table of Contents
Section Code
Section
1
1
1
1
1
1
1
1
1
1
1
Service Procedures
2
3
Part Replacement
4
Replace the Adjustment Arm Shrouds
5
6
7
8
9
10
11
12
13
14
15
16
17
18
19
20
21
Nautilus, Inc., www.NautilusInc.com, 5415 Centerpoint Parkway, Groveport, OH 43125 U.S.A. - Customer Service: North America (800) 605-3369, csnls@nautilus.com | outside U.S. www.nautilusinternational.com
United States and other countries. Polar® and Google Play™ are trademarks of their respective owners. App Store is a service mark of Apple Inc. The Bluetooth
owned by Bluetooth SIG, Inc., and any use of such marks by Nautilus, Inc. is under license. | ORIGINAL DOCUMENT - ENGLISH VERSION ONLY
8018911.091519.B
™
™
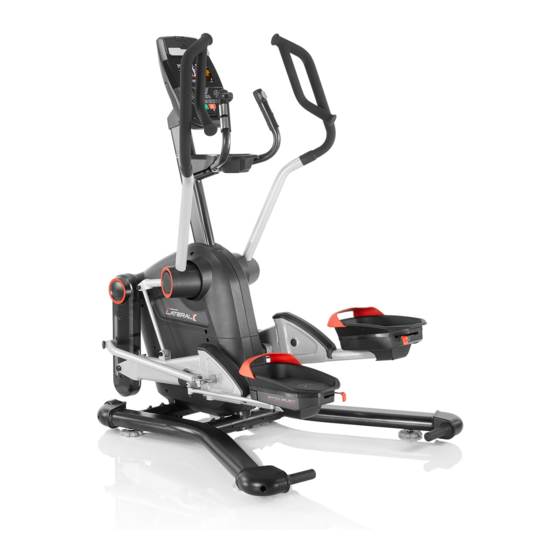
Bowflex
LateralX
LX5/LX5i Lateral Trainers
Service Manual
Page Number
2
3
4
5
5
6
7
8
10
11
12
13
29
34
38
43
45
49
62
76
83
85
90
99
105
111
113
117
120
129
134
1
Service Manual
8018879.091519.B
word mark and logos are registered trademarks
®
Advertisement
Table of Contents
Troubleshooting

Related Manuals for Bowflex LateralX LX5


Summary of Contents for Bowflex LateralX LX5
-
Page 1: Table Of Contents
™ ™ Bowflex LateralX LX5/LX5i Lateral Trainers Service Manual ™ ™ Service Manual 8018879.091519.B Table of Contents Section Code Section Page Number Important Safety Instructions Safety Warning Labels and Serial Number Moving Your Machine Leveling the Machine Connectivity Maintenance Maintenance Parts Troubleshooting Machine Settings Mode Electrical Wiring Diagram... -
Page 2: Important Safety Instructions
Important Safety Instructions and General Troubleshooting Service Procedures Information for the LateralX ™ ™ ™ ™ 8018912.091519.B LX5/LX5i Lateral Trainers NOTICE: ™ ™ If you need assistance, please contact Customer Service (if purchased in US/Canada) or your local distributor (if purchased outside This icon means a potentially hazardous situation which, if not avoided, could result in death or serious injury. -
Page 3: Safety Warning Labels And Serial Number
SAFETY WARNING LABELS AND SERIAL NUMBER WARNING! • Injury or death is possible if caution is not used while using this machine. • Not intended for children under 14 yrs. of age. • Keep children & pets away. • Read and follow all warnings on this machine. •... -
Page 4: Moving Your Machine
FCC Compliance authority to operate the equipment. The machine and power supply comply with Part 15 of the FCC rules. Operation is subject to the following two conditions: (1) This device may not cause harmful interference, and (2) this device must accept any interference received, including interference that may cause undesired operation. Note: This machine and power supply have been tested and found to comply with the limits for a Class B digital device, pursuant to Part 15 of the FCC Rules. -
Page 5: Leveling The Machine
Injury to you or damage to the machine can occur. 3. Adjust until the machine is level. Tighten the locking nuts. CONNECTIVITY Bluetooth Connectivity with the “Bowflex LateralX™” Fitness App ® ® for quick reference. Track your results and share with friends and family. Play™. -
Page 6: Maintenance
MAINTENANCE Read all maintenance instructions fully before you start any repair work. In some conditions, an assistant is required to do the necessary tasks. done. Worn or damaged components must be repaired or replaced immediately. Only manufacturer supplied components can be used to maintain and repair the equipment. -
Page 7: Maintenance Parts
Maintenance Parts Item Description Item Description Item Description Item Description Console Pivot Bolt Cover Static Handlebar Data Cable, Lower Lateral Console Mast Pedal Arm, Right Cupholder Servo Motor, Resistance Engine Assembly Pedal Arm, Left Contact HR Sensor Resistance Flywheel Base Assembly, Right Pedal Arm Topcap Telemetric HR Receiver Crank... -
Page 8: Troubleshooting
TROUBLESHOOTING Condition/Problem Things to Check Solution No display/partial display/unit Check electrical (wall) outlet Make sure unit is plugged into a functioning wall outlet. will not turn on Check power adapter Check for visual sign that power adapter is damaged. Replace power adapter if damaged. - Page 9 Condition/Problem Things to Check Solution Fan will not turn on, but Console Check for blockage of fan Unplug unit from electrical outlet for 5 minutes. Remove material from fan. If operates necessary, detach the Console to help with removal. Replace the Console if unable to remove blockage.
-
Page 10: Machine Settings Mode
MACHINE SETTINGS MODE The Machine Settings Mode lets you view the total run hours for the machine and the current versions of the main systems. Hold down the STOP/PAUSE button and Right arrow button together for 3 seconds while in the Power-Up Mode to access the Machine Settings Mode. -
Page 11: Electrical Wiring Diagram
ELECTRICAL WIRING DIAGRAM CONSOLE CONSOLE RIGHT LEFT SPEAKER SPEAKER HR cable, 4Pin MAST HEART RATE GRIPS WIRELESS HR TELEMETRY HR telemetry wire, 3Pin RESISTANCE ADJUST, RIGHT Resistance wire, 3Pin LATERAL STRIDE Lateral stride wire, 3Pin ADJUST. LEFT ENGINE SLIM PCBA SPEED/DIRECTION SENSOR (DUAL SWITCH TACH) -
Page 12: Replacement Procedure Skill Level
PCBA slim control board and cable connections Actuator Actuator power control Absolute lateral position potentiometer Upper limit Lower limit switch switch Power inlet Data to Console Replacement Procedure Skill Level Level II : Level III : Disconnect all power to the machine before you service it. When disposing of old parts, obey the applicable local and provincial requirements. -
Page 13: Adjust The Belt Tension
Replacement Procedure Adjust the Belt Tension on the ™ ™ Skill Level: III ™ ™ Bowflex LateralX LX5/LX5i Lateral Trainers 8018913.091519.B ™ ™ NOTICE: If you need assistance, please contact Customer Service (if purchased in US/Canada) or your local distributor (if purchased outside US/ This icon means a potentially hazardous situation which, if not avoided, could result in death or serious injury. - Page 14 Disconnect all power to the machine before you service it. Some components of the machine can be heavy or awkward. Use a second person when doing the assembly steps involving these parts. Do not do steps that involve heavy lifting or awkward movements on your own. This procedure requires removal of the Mid Pedal Arms.
- Page 15 4. Using a #2 Phillips screwdriver, remove the 6 indicated screws (arrows) Shrouds at the push fasteners. Remove the Shrouds and Mast Gasket, and set them safely aside. Lateral Link out of the way. Lateral link Parallel Links.
- Page 16 7. Remove the Pedal Arm Topcaps. Pedal Arms and Collars.
- Page 17 10. Using a 24mm or 15/16” socket wrench (inside of arm) and 24mm or 15/16” open end wrench or adjustable wrench (outside of arm), remove the indicated screw and nut. Note: The hardware is very tight (factory installed). Mid Pedal Pivot the Adjustable Arms toward the front.
- Page 18 12. To remove the Mid Pedal Arm, use the dead blow hammer (or mallet) to strike it on the surface closer to the main frame alternately on either side of the bearing housing until you drive it off the Crank arm. Set the old Mid Pedal Arm safely aside.
- Page 19 15. Using a 17mm open end wrench, loosen and remove the indicated nut from the Left Lower Shroud. Carefully pull the Power Inlet plug out of the hole toward the inside of the Shroud. 16. Using a #2 Phillips screwdriver, remove the 5 indicated screws from the Left Lower Shroud.
- Page 20 18. Use a 17mm open-end wrench to loosen the indicated nut (arrow) two turns. illustration for two turns. 20. Use a 17mm open-end wrench to loosen the indicated nut.
- Page 21 22. Turn the crank 3 to 5 turns in the direction of the arrow, and check the tension. On the lower part of the belt, twist the belt at the midpoint between the pulleys. The belt should not twist more than 45 degrees. pinch hazards when you turn the Crank.
- Page 22 25. Using a 17mm open-end wrench, fully tighten the illustrated nut. 26. Turn the crank 3~5 turns in the direction of the arrow to make the belt rotate smoothly. turn the Crank.
- Page 23 Second stage belt tension check 27. To test the Left Drive Belt tension: On the upper part of the belt, twist the belt at the midpoint between the pulleys. The belt should not twist more than 90 degrees (vertical). If the tension is correct, go to Step 33. If the tension is too loose, adjust.
- Page 24 30. Turn the crank 3 to 5 turns in the direction of the arrow, and check the tension. On the upper part of the belt, twist the belt at the midpoint between the pulleys. The belt should not twist more than 90 degrees (vertical).
- Page 25 Reassembly 33. Using a Phillips screwdriver, attach the Left Lower Shroud, to the main frame. First, lock the screw in position A, then lock the screw in position B, and then tighten the screws in the other positions. M4 x 40 M5 x 40 34.
- Page 26 36. Install the Lower Shroud to the Frame Assembly with the screws. Use a Phillips screwdriver to lock the screw in position A, then lock the screw in position B, and then tighten the screws in the other positions. M4 x 40 M5 x 40 37.
- Page 27 39. Finger tighten the screw and washer to attach the Mid Pedal Arm. Using the appropriate tool, tighten the hardware to secure the Mid Pedal Arm to the Crank. Install the Endcap. 40. Move the Adjustable Arm end into the Mid Pedal Arm bracket. Using a 24mm or 15/16”...
- Page 28 42. The remaining assembly steps are the reverse procedure. Note: Shroud with the Push Fasteners and move the Right Shroud into position. Push the Shrouds together so that the Push Fasten- ers are fully seated. Using a #2 Phillips screwdriver, install the 6 screws.
-
Page 29: Advanced Troubleshooting With Multimeter
Replacement Procedure Advanced Troubleshooting with a Digital Multimeter ™ ™ Skill Level: III ™ on the Bowflex LX3 and LX5 Lateral trainers 8025566.011520.A NOTICE: distributor, go to: www.nautilusinternational.com This icon means a potentially hazardous situation which, if not avoided, could result in death or serious injury. Read and understand all Warnings on this machine. - Page 30 Advanced Diagnostics If a Digital Multimeter (DMM) is available then advanced troubleshooting can be performed for certain issues. Console Mast cap Mast assembly Main Body of Machine NO POWER/CONSOLE DOES NOT LIGHT UP A. If voltage is not reaching the console, use the following multimeter tests to troubleshoot: 1.
- Page 31 To get access to the Lower Wiring Harness, remove the Right Upper Shroud from the main body of the machine. (Refer to the “Replace the Lower Data Cable” procedure in the LX3 or LX5 Service Manual.) h. Check Lower Wiring Harness •...
- Page 32 G. Locate Green and Orange Wires (tach sensor 2, see image). H. Verify DMM is set to measure continuity. I. Connect one probe to Green Wire Pin 5. J. Connect the other probe to Orange Wire Pin 6. Tach Signal 2 Orange Wire Pin 6 Tach Signal 2 Green Wire Pin 5...
- Page 33 G. Locate Green and Orange Wires (tach sensor 2, see image). H. Verify DMM is set to measure continuity. I. Connect one probe to Green Wire Pin 5. J. Connect the other probe to Orange Wire Pin 6. Tach Signal 2 Green Wire Pin 5 Tach Signal 2 Orange Wire Pin 6...
- Page 34 Replacement Procedure Replace the Adjustable Arm Shrouds ™ ™ Skill Level: II ™ ™ on the Bowflex LateralX LX5/LX5i Lateral Trainers 8018914.091519.B ™ ™ NOTICE: Lateral Trainers. If you need assistance, please contact Customer Service (if purchased in US/Canada) or your local distributor (if purchased outside This icon means a potentially hazardous situation which, if not avoided, could result in death or serious injury.
- Page 35 Disconnect all power to the machine before you service it. Some components of the machine can be heavy or awkward. Use a second person when doing the assembly steps involving these parts. Do not do steps that involve heavy lifting or awkward movements on your own. Note: It is only necessary to remove parts from the side that you are replacing.
- Page 36 3. Using a #2 Phillips screwdriver, remove the 2 screws from the Adjust- able Arm Shroud. Note: Mid Pedal Arm bracket not shown. the push fasteners. Carefully remove the outer Adjustable Arm Shroud. NOTICE: Pull mainly on the outer Shroud to avoid damage to the inner Shroud and the electronic parts in it.
- Page 37 8. Align the new outer Adjustable Arm Shroud with the push fasteners on the inner Shroud and move the outer Shroud into position. Carefully push the outer Shroud onto the inner Shroud so that the Push Fasteners are fully seated. 9.
-
Page 38: Replace The Cable (Lateral) Actuator
Replacement Procedure Replace the Cable (Lateral) Actuator on the ™ ™ Skill Level: II ™ ™ Bowflex LateralX LX5/LX5i Lateral Trainers 8024430.091519.A ™ ™ NOTICE Trainers. If you need assistance, please contact Customer Service (if purchased in US/Canada) or your local distributor (if purchased outside This icon means a potentially hazardous situation which, if not avoided, could result in death or serious injury. - Page 39 Disconnect all power to the machine before you service it. Some components of the machine can be heavy or awkward. Use a second person when doing the assembly steps involving these parts. Do not do steps that involve heavy lifting or awkward movements on your own. Note: Your machine may not match the image.
- Page 40 4. Using a #2 Phillips screwdriver, remove the 6 indicated screws (arrows) Shrouds at the push fasteners. Remove the Shrouds and Mast Gasket, and set them safely aside. 5. Carefully disconnect the Actuator Power cable and Actuator Control cable from the PCBA Slim Control Board. PCBA cover NOTICE: Do not cut or pinch the wires.
- Page 41 the Cable Actuator and set them safely aside. 8. Carefully remove the Cable Actuator from the Cable Transmission Housing. Be sure the Cable Transmission Housing stays in position on the frame. Set the old Cable Actuator safely aside. Actuator 9. Carefully put the new Cable Actuator in position on the Cable gear Transmission Housing.
- Page 42 11. Using a Phillips screwdriver, install the 2 indicated screws in the top of the Cable Actuator. 12. Carefully connect the Actuator Power cable and Actuator Control cable to the PCBA Slim Control Board. NOTICE: Do not cut or pinch the wires. PCBA cover Actuator...
-
Page 43: Replace The Console Assembly
Replacement Procedure Replace the Console on the ™ ™ Skill Level: III ™ ™ Bowflex LateralX LX3/LX3i/LX5/LX5i Lateral Trainers 8024125.091519.A ™ ™ NOTICE: If you need assistance, please contact Customer Service (if purchased in US/Canada) or your local distributor (if purchased outside This icon means a potentially hazardous situation which, if not avoided, could result in death or serious injury. - Page 44 Disconnect all power to the machine before you service it. Some components of the machine can be heavy or awkward. Use a second person when doing the assembly steps involving these parts. Do not do steps that involve heavy lifting or awkward movements on your own. Note: reference only.
-
Page 45: Replace The Console Mast
Replacement Procedure Replace the Console Mast on the ™ ™ Skill Level: III ™ ™ Bowflex LateralX LX3/LX3i/LX5/LX5i Lateral Trainers 8024126.091519.A ™ ™ NOTICE: If you need assistance, please contact Customer Service (if purchased in US/Canada) or your local distributor (if purchased outside This icon means a potentially hazardous situation which, if not avoided, could result in death or serious injury. - Page 46 Disconnect all power to the machine before you service it. Some components of the machine can be heavy or awkward. Use a second person when doing the assembly steps involving these parts. Do not do steps that involve heavy lifting or awkward movements on your own. Note: reference only.
- Page 47 4. Using a #2 Phillips screwdriver, remove the 3 indicated screws (arrows) Shrouds at the push fasteners. Remove the Left Shroud and set it safely aside. 5. Remove the Mast Endcap and set it aside. Disconnect the Mast Cables from the Console Cables. NOTICE: Do not crimp the cables.
- Page 48 8. Disconnect the cables from the Engine Assembly and the Console washers (arrows). Remove the Console Mast assembly. NOTICE: Do not crimp the cables. Do not allow the cable to fall down into the Engine Assembly. This step may require two people. 9.
-
Page 49: Replace The Crank
Replacement Procedure Replace the Crank on the ™ ™ Skill Level: III ™ ™ Bowflex LateralX LX5/LX5i Lateral Trainers 8018915.091519.B ™ ™ NOTICE Lateral Trainers. If you need assistance, please contact Customer Service (if purchased in US/Canada) or your local distributor (if purchased outside This icon means a potentially hazardous situation which, if not avoided, could result in death or serious injury. - Page 50 Disconnect all power to the machine before you service it. Some components of the machine can be heavy or awkward. Use a second person when doing the assembly steps involving these parts. Do not do steps that involve heavy lifting or awkward movements on your own. This procedure requires removal of the Mid Pedal Arms.
- Page 51 4. Using a #2 Phillips screwdriver, remove the 6 indicated screws the Shrouds at the push fasteners. Remove the Shrouds and Mast Gasket, and set them safely aside. Lateral Link out of the way. Lateral link the Parallel Links.
- Page 52 7. Remove the Pedal Arm Topcaps. Pedal Arms and Collars.
- Page 53 10. Using an 24mm or 15/16” socket wrench (inside of arm) and 24mm or 15/16” open end wrench or adjustable wrench (outside of arm), remove the indicated screw and nut. Note: The hardware is very tight (factory installed). Pivot the Adjustable Arms toward the front. Mid Pedal 11.
- Page 54 12. To remove the Mid Pedal Arm, use the dead blow hammer (or mallet) to strike it on the surface closer to the main frame alternately on either side of the bearing housing until you drive it off the Crank arm. Set the old Mid Pedal Arm safely aside.
- Page 55 If you are only replacing the Right Crank arm, go to step 17. If you are replacing the Left Crank arm, continue to step 15. 15. Using a 17mm open end wrench, loosen and remove the indicated nut from the Left Lower Shroud. Carefully pull the Power Inlet plug out of the hole toward the inside of the Shroud.
- Page 56 from the Crank arms. 19. Insert the M8 washer from step 16 in the gap in the Crank arm. Using open the gap in the Crank arm. M10 x 50 washer screw 20. Remove the old Crank arm from the Crank pulley. the Crank arm to open the gap in the Crank arm.
- Page 57 22. Put the new Crank arm in position on the Crank pulley. screw hole through the gap and tighten securely. washer into the crankshaft and tighten securely. Reassembly If you only replaced the Right Crank, go to step 27. If you replaced the Left Crank, continue to step 25.
- Page 58 25. Using a Phillips screwdriver, attach the Left Lower Shroud, to the main frame. First, lock the screw in position A, then lock the screw in position B, and then tighten the screws in the other positions. M4 x 40 M5 x 40 26.
- Page 59 28. Install the Lower Shroud to the Frame Assembly with the screws. Use a Phillips screwdriver to tighten the screw in position A, then tighten the screw in position B, and then tighten the screws in the other positions. M4 x 40 M5 x 40 29.
- Page 60 31. Finger tighten the screw and washer to attach the Mid Pedal Arm. Using the appropriate tool, tighten the hardware to secure the Mid Pedal Arm to the Crank. Install the Endcap. 32. Move the Adjustable Arm end into the Mid Pedal Arm bracket. Using a 24mm or 15/16”...
- Page 61 34. The remaining assembly steps are the reverse procedure. Note: with the Push Fasteners and move the Right Shroud into position. Push the Shrouds together so that the Push Fasteners are fully seated. Using a #2 Phillips screwdriver, install the 6 screws. Self-tapping screws attach the Shrouds to the Frame.
-
Page 62: Replace The Drive Belts And Flywheel
Replace the Drive Belts and Flywheel on the Replacement Procedure ™ ™ Skill Level: III ™ ™ Bowflex LateralX LX3/LX3i/LX5/LX5i 8024127.091519.A Lateral Trainers ™ ™ NOTICE: If you need assistance, please contact Customer Service (if purchased in US/Canada) or your local distributor (if purchased outside This icon means a potentially hazardous situation which, if not avoided, could result in death or serious injury. - Page 63 Disconnect all power to the machine before you service it. Some components of the machine can be heavy or awkward. Use a second person when doing the assembly steps involving these parts. Do not do steps that involve heavy lifting or awkward movements on your own. This procedure requires removal of the Mid Pedal Arm.
- Page 64 4. Using a #2 Phillips screwdriver, remove the 6 indicated screws (arrows) Shrouds at the push fasteners. Remove the Shrouds and Mast Gasket, and set them safely aside. Lateral Link out of the way. Lateral link Lateral links not shown Parallel Links.
- Page 65 7. Remove the Pedal Arm Topcaps. Pedal Arms and Collars. 10. Remove the indicated screw and nut: Note: The hardware is very tight (factory installed). LX3/LX3i—Use two 8” or longer adjust- able wrenches (or 24mm socket wrench Swing Arms toward the front.
- Page 66 LX5/LX5i—Use an 24mm or 15/16” socket wrench (inside of arm) and 24mm open end wrench or adjustable wrench (outside of arm). Pivot the Adjustable Arms toward the front. 11. Remove the Endcaps from the Mid Pedal Arms. Using the appropriate tool, remove the indicated hardware.
- Page 67 13. Using a #2 Phillips screwdriver, remove the 5 indicated screws from the Right Lower Shroud. Carefully remove the old Right Lower Shroud and set it safely aside. If you are only replacing the Right Drive Belt, go to step 16. If you are replacing the Left Drive Belt or Flywheel, continue to step 14.
- Page 68 16. Slowly turn the Crank Assembly backward and carefully ease the Right Drive Belt off the Crank pulley to the outside. the Crank pulley. Crank pulley 17. Remove the old Right Drive Belt and set it safely aside. Right drive belt If you are only replacing the Right Drive Belt, go to step 34.
- Page 69 19. Using a #2 Phillips Screwdriver, remove the 4 screws that attach the the top screws (5b). Set the screws safely aside. Servo wheel 5b (X2) 5a (X2) Flywheel cable 20. Using an 8mm open end wrench, loosen the indicated nut (1) on the Flywheel cable two turns.
- Page 70 21. To remove the hardware from the Flywheel, use the 17mm open end wrench to hold the Flywheel lock nut (5) on one side steady and remove the nut on the opposite side with the 17mm socket and wrench. Set them safely aside for reassembly.
- Page 71 30. Carefully put the “barrel” end (3) of the Flywheel cable in the slot (4) on the servo wheel on the Servo Motor. Be sure the cable’s path around the servo wheel is the same as it was before removal. Carefully push the cable into position in the mounting bracket (2).
- Page 72 34. Put the Right Drive Belt onto the Crank pulley. Put the Drive Belt in position around the Tensioner Pulley (6) and Second Stage Crank belt pulley (7). Be sure that the upper portion of the Drive Belt is under the bearings on the Tensioner Pulley.
- Page 73 37. Insert the Power Inlet cable connector into the Left Lower Shroud. Using a 17mm wrench, tighten the nut to secure the power cable connector. 38. Align the Right Lower Shroud with the push fasteners on the Left Lower Shroud and move the Right Lower Shroud into position. Push the Shrouds together so that the Push Fasteners are fully seated.
- Page 74 41. Put the new Left Mid Pedal Arm on the Crank and push it on by hand, wiggling it until it goes on as far as possible. Mid Pedal Arm 42. Finger tighten the screw and washer to attach the Mid Pedal Arm. Using the appropriate tool, tighten the hardware to secure the Mid Pedal Arm to the Crank.
- Page 75 45. The remaining assembly steps are the reverse procedure. Note: Shroud with the Push Fasteners and move the Right Shroud into position. Push the Shrouds together so that the Push Fasten- ers are fully seated. Using a #2 Phillips screwdriver, install the 6 screws.
-
Page 76: Replace The Engine Assembly
Replacement Procedure Replace the Engine Assembly on the ™ ™ Skill Level: III Bowflex ™ LateralX ™ LX3/LX3i/LX5/LX5i 8018908.091519.C Lateral Trainers ™ ™ NOTICE: If you need assistance, please contact Customer Service (if purchased in US/Canada) or your local distributor (if purchased outside This icon means a potentially hazardous situation which, if not avoided, could result in death or serious injury. - Page 77 Disconnect all power to the machine before you service it. Some components of the machine can be heavy or awkward. Use a second person when doing the assembly steps involving these parts. Do not do steps that involve heavy lifting or awkward movements on your own. Note: Your machine may not match the image.
- Page 78 and remove the Handlebar Links. 5. Using a #2 Phillips screwdriver, remove the 6 indicated screws (ovals rate the Shrouds at the push fasteners. Remove the Shrouds and Mast Gasket, and set them safely aside. 6. Disconnect the cables from the Engine Assembly and the Console Mast ers (arrows).
- Page 79 the indicated hardware. Using the Lateral Link Puller tool, remove the Lateral Links. Parallel Links. 9. Remove the Pedal Arm Topcaps.
- Page 80 the Pedal Arms and Collars. safely aside.
- Page 81 Remove the Base Assemblies one at a time and set them safely aside for reassembly. Set the old Engine Assembly safely aside. This step requires two people. Note: It may be helpful to tilt the machine to the side or put a static order to slide the Base Assemblies off the mount tubes.
- Page 82 16. Install the Base Assemblies on the new Engine Assembly one at a time. Tilt the Engine Assembly to the side and slide the correct Base Assembly into position and install the hardware. It may be helpful to put screws and holes. This step requires two people.
-
Page 83: Replace The Lateral Links
Replacement Procedure Replace the Lateral Links on the ™ ™ Skill Level: I Bowflex ™ LateralX ™ LX3/LX3i/LX5/LX5i 8024432.091519.A Lateral Trainers ™ ™ NOTICE: If you need assistance, please contact Customer Service (if purchased in US/Canada) or your local distributor (if purchased outside This icon means a potentially hazardous situation which, if not avoided, could result in death or serious injury. - Page 84 Disconnect all power to the machine before you service it. Some components of the machine can be heavy or awkward. Use a second person when doing the assembly steps involving these parts. Do not do steps that involve heavy lifting or awkward movements on your own. Note: Your machine may not match the image.
-
Page 85: Replace The Lower Data Cables
Replacement Procedure Replace the Lower Data Cables on the ™ ™ Skill Level: II ™ ™ Bowflex LateralX LX5/LX5i 8024434.091519.A Lateral Trainers ™ ™ NOTICE: Lateral Trainers. If you need assistance, please contact Customer Service (if purchased in US/Canada) or your local distributor (if purchased outside This icon means a potentially hazardous situation which, if not avoided, could result in death or serious injury. - Page 86 Disconnect all power to the machine before you service it. Some components of the machine can be heavy or awkward. Use a second person when doing the assembly steps involving these parts. Do not do steps that involve heavy lifting or awkward movements on your own. Note: Your machine may not match the image.
- Page 87 4. Using a #2 Phillips screwdriver, remove the 6 indicated screws the Shrouds at the push fasteners. Remove the Shrouds and Mast Gasket, and set them safely aside. 5. Carefully disconnect the Lower Resistance Data Cable (engine wire harness) from the Speed/Direction Sensor wire,Servo Motor wire and the Power wire.
- Page 88 6. Bend the edges of the PCBA cover to disengage the inside tabs from the mounting plate, and remove the cover from the PCBA Slim Control PCBA cover Board. 7. Carefully disconnect the Lower Lateral Data Cable from the PCBA Slim Control Board, noting the location of the PCBA slim control board connection for reassembly.
- Page 89 9. Connect the Console Mast cables to the new Lower Lateral Data Cable and Lower Resistance Data Cable. NOTICE: Align the clips on the cable connectors and make sure the connectors lock. Do not crimp the cables. Lower Resistance Data Cable 10.
-
Page 90: Replace The Lower Shrouds
Replacement Procedure Replace the Lower Shrouds on the ™ ™ Skill Level: III ™ ™ Bowflex LateralX LX3/LX3i/LX5/LX5i 8018909.091519.C Lateral Trainers ™ ™ NOTICE: If you need assistance, please contact Customer Service (if purchased in US/Canada) or your local distributor (if purchased outside This icon means a potentially hazardous situation which, if not avoided, could result in death or serious injury. - Page 91 Disconnect all power to the machine before you service it. Some components of the machine can be heavy or awkward. Use a second person when doing the assembly steps involving these parts. Do not do steps that involve heavy lifting or awkward movements on your own. This procedure requires removal of the Mid Pedal Arm.
- Page 92 4. Using a #2 Phillips screwdriver, remove the 6 indicated screws (arrows) Shrouds at the push fasteners. Remove the Shrouds and Mast Gasket, and set them safely aside. Lateral Link out of the way. Lateral link Lateral links not shown Parallel Links.
- Page 93 7. Remove the Pedal Arm Topcaps. Pedal Arms and Collars. 10. Remove the indicated screw and nut: Note: The hardware is very tight (factory installed). LX3/LX3i—Use two 8” or longer adjust- able wrenches (or 24mm or 15/16” wrench). Pivot the Swing Arms toward the front.
- Page 94 LX5/LX5i—Use an 24mm or 15/16” socket wrench (inside of arm) and 24mm or 15/16” open end wrench or adjustable wrench (outside of arm). Pivot the Adjustable Arms toward the front. 11. Remove the Endcaps from the Mid Pedal Arms. Using the appropriate tool, remove the indicated hardware.
- Page 95 13. Using a #2 Phillips screwdriver, remove the 5 indicated screws from the Right Lower Shroud. Carefully remove the old Right Lower Shroud and set it safely aside. If you are only replacing the Right Lower Shroud, go to step 18. If you are replacing the Left Lower Shroud, continue to step 14.
- Page 96 16. Using a Phillips screwdriver, attach the new Left Lower Shroud to the main frame. First, tighten the screw in position A, then tighten the screw in M4 x 40 position B, and then tighten the screws in the other positions. M5 x 40 17.
- Page 97 20. Put the new Left Mid Pedal Arm on the Crank and push it on by hand, wiggling it until it goes on as far as possible. Mid Pedal Arm 21. Finger tighten the screw and washer to attach the Mid Pedal Arm. Using the appropriate tool, tighten the hardware to secure the Mid Pedal Arm to the Crank.
- Page 98 24. The remaining assembly steps are the reverse procedure. Note: Shroud with the Push Fasteners and move the Right Shroud into position. Push the Shrouds together so that the Push Fasten- ers are fully seated. Using a #2 Phillips screwdriver, install the 6 screws.
-
Page 99: Replace The Mast Cables
Replacement Procedure Replace the Mast Cables on the ™ ™ Skill Level: III ™ ™ Bowflex LateralX LX5/LX5i Lateral Trainers 8018916.091519.B ™ ™ NOTICE: If you need assistance, please contact Customer Service (if purchased in US/Canada) or your local distributor (if purchased outside This icon means a potentially hazardous situation which, if not avoided, could result in death or serious injury. - Page 100 Disconnect all power to the machine before you service it. Some components of the machine can be heavy or awkward. Use a second person when doing the assembly steps involving these parts. Do not do steps that involve heavy lifting or awkward movements on your own. Note: Your machine may not match the image.
- Page 101 4. Using a #2 Phillips screwdriver, remove the 3 indicated screws from the the push fasteners. Remove the Left Shroud and set it safely aside. 5. Disconnect the cables from the Engine Assembly and the Console Mast cables. Tie one piece of string to the Mast Cable end at the base of the Console Mast.
- Page 102 6. Remove the Mast Endcap and set it aside. Disconnect the Mast Cables from the Console Cables. NOTICE: Do not crimp the cables. Do not allow the cables to fall down into the Console Mast. remove the Static Handlebar and disconnect the cables. Set the Static Handlebar and hardware aside for reassembly.
- Page 103 10. Connect the Static Handlebar cables to the new Mast Cables at the handlebar mount opening. Reinstall the Static Handlebar on the Console Mast. NOTICE: Align the clips on the cable connectors and make sure the connectors lock. Do not crimp the cables. 11.
- Page 104 14. Be sure the Handlebar Link is tilted forward. Put the Wave Washer on the pivot rod. Be aware that the Handlebar Arms are top heavy, and will want to pivot when attached onto the Pivot Rod. Be sure to stay out of the path of the Handlebar.
-
Page 105: Replace The Mid Pedal Arm
Replacement Procedure Replace the Mid Pedal Arms on the ™ ™ Skill Level: III Bowflex ™ LateralX ™ LX3/LX3i/LX5/LX5i 8024132.091519.A Lateral Trainers ™ ™ NOTICE: If you need assistance, please contact Customer Service (if purchased in US/Canada) or your local distributor (if purchased outside This icon means a potentially hazardous situation which, if not avoided, could result in death or serious injury. - Page 106 Disconnect all power to the machine before you service it. Some components of the machine can be heavy or awkward. Use a second person when doing the assembly steps involving these parts. Do not do steps that involve heavy lifting or awkward movements on your own. This procedure requires removal of the Mid Pedal Arm.
- Page 107 LX3 shown (no Upper Shrouds) Rotate the Lateral Links out of the way. Set the screws safely aside. Lateral link the Parallel Links. 6. Remove the Pedal Arm Topcaps. LX3 (Lateral Links and Upper Shrouds not shown)
- Page 108 Remove the Pedal Arms and Collars. Set them safely aside. LX3 shown (no Upper Shrouds) 8. Remove the indicated screw and nut: Note: The hardware is very tight (factory installed). LX3/LX3i—Use two 8” or longer adjustable wrenches (or 24mm or 15/16”...
- Page 109 9. Remove the Endcaps from the Mid Pedal Arms. Using the appropriate tool, remove the indicated hardware. Note: The hardware is very tight (factory installed). Mid Pedal Arm 10. To remove the Mid Pedal Arm, use the dead blow hammer (or mallet) to strike it on the surface closer to the main frame alternately on either side of the bearing housing until you drive it off the Crank arm.
- Page 110 13. Install the indicated screw and nut: LX3/LX3i—move the Swing Arm end into the Mid Pedal Arm bracket. Using two 8” or longer adjustable wrenches (or 24mm or 15/16” socket nut. LX5/LX5i—move the Adjustable Arm to engage the Mid Pedal Arm bracket.
-
Page 111: Replace The Parallel Links
Replacement Procedure Replace the Parallel Links on the ™ ™ Skill Level: I ™ ™ Bowflex LateralX LX3/LX3i/LX5/LX5i 8024133.091519.A Lateral Trainers ™ ™ NOTICE: If you need assistance, please contact Customer Service (if purchased in US/Canada) or your local distributor (if purchased outside This icon means a potentially hazardous situation which, if not avoided, could result in death or serious injury. - Page 112 Disconnect all power to the machine before you service it. Some components of the machine can be heavy or awkward. Use a second person when doing the assembly steps involving these parts. Do not do steps that involve heavy lifting or awkward movements on your own. Note: Your machine may not match the image.
-
Page 113: Replace The Pcba Slim Control Board
Replacement Procedure Replace the PCBA Slim Control Board ™ ™ Skill Level: II on the Bowflex ™ LateralX ™ LX5/LX5i 8024435.091519.A Lateral Trainers ™ ™ NOTICE: If you need assistance, please contact Customer Service (if purchased in US/Canada) or your local distributor (if purchased outside This icon means a potentially hazardous situation which, if not avoided, could result in death or serious injury. - Page 114 Disconnect all power to the machine before you service it. Some components of the machine can be heavy or awkward. Use a second person when doing the assembly steps involving these parts. Do not do steps that involve heavy lifting or awkward movements on your own. Note: Your machine may not match the image.
- Page 115 4. Using a #2 Phillips screwdriver, remove the 6 indicated screws the Shrouds at the push fasteners. Remove the Shrouds and Mast Gasket, and set them safely aside. 5. Bend the edges of the PCBA cover to disengage the inside tabs from the mounting plate, and remove the cover from the PCBA Slim Control PCBA cover...
- Page 116 7. Using a #2 Phillips screwdriver, remove the indicated screws from the PCBA Slim Control Board, and remove the PCBA board. Set the screws and the old PCBA board safely aside. 8. Installation is the reverse procedure. Using a #2 Phillips screwdriver, attach the new PCBA Slim Control Board. NOTICE: Carefully align and connect each wire to the corresponding connector on the new PCBA Slim Control Board.
-
Page 117: Replace The Pedal Arms And Pedal Shrouds
Replacement Procedure Replace the Pedal Arms and Pedal Shrouds ™ ™ Skill Level: II on the Bowflex ™ LateralX ™ LX5/LX5i 8024433.091519.A Lateral Trainers ™ ™ NOTICE: If you need assistance, please contact Customer Service (if purchased in US/Canada) or your local distributor (if purchased outside This icon means a potentially hazardous situation which, if not avoided, could result in death or serious injury. - Page 118 Disconnect all power to the machine before you service it. Some components of the machine can be heavy or awkward. Use a second person when doing the assembly steps involving these parts. Do not do steps that involve heavy lifting or awkward movements on your own. Note: If you are only replacing one Pedal Arm, it is only necessary to remove parts from the side that you are replacing.
- Page 119 Remove the Pedal Arms and Collars from the Mid Pedal Arms. Set them safely aside. 5. Remove the Footpads from the Pedals. 6. Using a #2 Phillips screwdriver, remove the screws from the Pedal Shrouds. Remove the Pedal Shrouds, and set the parts safely aside. 7.
-
Page 120: Replace The Power Inlet
Replacement Procedure Replace the Power Inlet on the ™ ™ Skill Level: III Bowflex ™ LateralX ™ LX5/LX5i 8024431.091519.A Lateral Trainers ™ ™ NOTICE: If you need assistance, please contact Customer Service (if purchased in US/Canada) or your local distributor (if purchased outside This icon means a potentially hazardous situation which, if not avoided, could result in death or serious injury. - Page 121 Disconnect all power to the machine before you service it. Some components of the machine can be heavy or awkward. Use a second person when doing the assembly steps involving these parts. Do not do steps that involve heavy lifting or awkward movements on your own. This procedure requires removal of the Mid Pedal Arm.
- Page 122 Note: For steps 4-9 it is only necessary to remove parts and hardware on the left side of the machine. LX3 shown Left Lateral Link out of the way. Lateral link the Left Parallel Link. 6. Remove the Left Pedal Arm Topcap. Upper Shrouds not shown...
- Page 123 Remove the Left Pedal Arm and Collar. Set them safely aside. 8. Remove the indicated screw and nut, using a 24mm or 15/16” socket wrench (inside of arm) and 24mm or 15/16” open end wrench or adjust- able wrench (outside of arm). Pivot the Adjustable Arms toward the front. Note: The hardware is very tight (factory installed).
- Page 124 10. To remove the Left Mid Pedal Arm, use the dead blow hammer (or mallet) to strike it on the surface closer to the main frame alternately on either side of the bearing housing until you drive it off the Crank arm. Set the old Mid Pedal Arm safely aside.
- Page 125 13. Using a 17mm open end wrench, loosen and remove the indicated nut from the Left Lower Shroud. Carefully pull the Power Inlet plug out of the hole toward the inside of the Shroud. NOTICE: Observe the routing of the 2 Power Inlet wires to the Servo Motor on the right side of the frame and the PCBA Slim Control Board at the front of the frame.
- Page 126 15. Bend the edges of the PCBA cover to disengage the inside tabs from the mounting plate, and remove the cover from the PCBA Slim Control Board. Carefully disconnect the Power Inlet wire from the PCBA Slim Control Board. PCBA cover Power Inlet wire 16.
- Page 127 20. Using a #2 Phillips screwdriver, re-install the Crank Shroud. 21. Put the new Left Mid Pedal Arm on the Crank and push it on by hand, wiggling it until it goes on as far as possible. Mid Pedal Arm 22.
- Page 128 23. Move the Adjustable Arm end into the Mid Pedal Arm bracket. Using a 24mm or 15/16” socket wrench (inside of arm) and 24mm or 15/16” open end wrench or adjustable wrench (outside of arm), install the indicated screw and nut. Completely tighten the nut, or torque to 120 Nm (89 ft-lb). 24.
-
Page 129: Replace The Servo Motor
Replacement Procedure Replace the Servo Motor (Resistance) on the ™ ™ Skill Level: II ™ ™ Bowflex LateralX LX3/LX3i/LX5/LX5i 8024137.121519.B Lateral Trainers ™ ™ NOTICE: If you need assistance, please contact Customer Service (if purchased in US/Canada) or your local distributor (if purchased outside This icon means a potentially hazardous situation which, if not avoided, could result in death or serious injury. - Page 130 Disconnect all power to the machine before you service it. Some components of the machine can be heavy or awkward. Use a second person when doing the assembly steps involving these parts. Do not do steps that involve heavy lifting or awkward movements on your own. NOTICE: Before starting the procedure, make sure that the Resistance level of the machine is set to 1.
- Page 131 4. Using a #2 Phillips screwdriver, remove the 3 indicated screws (arrows) from the Right Upper Shroud. Set the screws safely aside for reassembly. Remove the Right Shroud, and set it safely aside. 5. Carefully disconnect the Servo Motor wire from the engine wire harness.
- Page 132 6. Using a #2 Phillips Screwdriver, remove the 4 screws that attach the the top screws (5b). Set the screws safely aside. Servo wheel 5b (X2) 5a (X2) Flywheel cable Flywheel cable routing 7. Using an 8mm open end wrench, loosen the indicated nut (1) on the Flywheel cable two turns.
- Page 133 11. The remaining assembly steps are the reverse procedure. Note: Put the Right Upper Shroud in position. Align the Push Fasteners. Push the Shrouds together so that the Push Fasteners are fully seated. Using a #2 Phillips screwdriver, re-install the 3 screws. Self-tapping screws attach the Shroud to the Frame.
-
Page 134: Replace The Speed/Direction Sensors
Replacement Procedure Replace the Speed/Direction Sensor on the ™ ™ Skill Level: II Bowflex ™ LateralX ™ LX3/LX3i/LX5/LX5i 8024139.090119.A Lateral Trainers ™ ™ NOTICE: Trainers. If you need assistance, please contact Customer Service (if purchased in US/Canada) or your local distributor (if purchased outside This icon means a potentially hazardous situation which, if not avoided, could result in death or serious injury. - Page 135 Disconnect all power to the machine before you service it. Some components of the machine can be heavy or awkward. Use a second person when doing the assembly steps involving these parts. Do not do steps that involve heavy lifting or awkward movements on your own. NOTICE: Before starting the procedure, make sure that the Resistance level of the machine is set to zero (0).
- Page 136 4. Using a #2 Phillips screwdriver, remove the 3 indicated screws (arrows) from the Right Upper Shroud. Set the screws safely aside for reassembly. Remove the Right Shroud, and set it safely aside. 5. Carefully disconnect the Speed/Direction Sensor wire from the Lower Data Cable.
- Page 137 6. Using a #2 Phillips Screwdriver, remove the 2 screws that attach the Speed/Direction Sensor to the frame, and set them safely aside. Remove the old Speed/Direction Sensor and set it safely aside. 7. Using a #2 Phillips Screwdriver, attach the new Speed/ Direction Sensor to the frame.