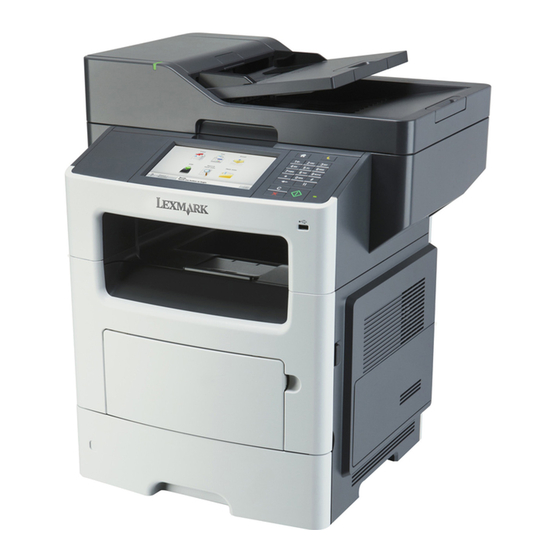
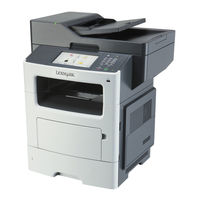
Sign In
Upload
Manuals
Brands
Lexmark Manuals
Printer
MX61 SERIES
Lexmark MX61 SERIES Manuals
Manuals and User Guides for Lexmark MX61 SERIES. We have
2
Lexmark MX61 SERIES manuals available for free PDF download: Service Manual, Administrator's Manual
Lexmark MX61 SERIES Service Manual (527 pages)
Brand:
Lexmark
| Category:
Printer
| Size: 36.9 MB
Table of Contents
Product Information
2
Edition Notice
2
Table of Contents
3
Notices and Safety Information
15
Laser Notices
15
Safety Information
18
Preface
23
Service Manual Conventions
23
Change History
23
General Information
31
Media Guidelines
31
Paper Guidelines
31
Using Recycled Paper and Other Office Papers
33
Using Specialty Media
34
Supported Paper Sizes, Types, and Weights
36
Data Security Notice
39
Tools Required for Service
39
Diagnostic Information
41
Troubleshooting Overview
41
Performing the Initial Troubleshooting Check
41
Power-On Reset (POR) Sequence
42
Using Safe Mode
42
Fixing Print Quality Issues
43
Initial Print Quality Check
43
Gray Background or Toner Fog Check
44
Repeating Defects Check
45
Blank Pages Check
45
Solid Black Pages Check
46
Shadow Images Check
47
Skewed Print Check
48
Streaked Horizontal or Vertical Lines Check
50
Toner Smear Check
50
Toner Specks Check
51
Paper Jams
52
Avoiding Jams
53
Understanding Jam Messages and Locations
54
[X]-Page Jam, Clear Standard Bin. [20Y.XX]
55
[X]-Page Jam, Open Front Door. [20Y.XX]
55
[X]-Page Jam, Open Rear Door. [20Y.XX]
59
[X]-Page Jam, Remove Tray 1 to Clear Duplex. [23Y.XX]
60
[X]-Page Jam, Open Tray [1]. [241.XX]
61
[X]-Page Jam, Open Tray [X]. [24Y.XX]
62
[X]-Page Jam, Clear Manual Feeder. [25Y.XX]
63
[X]-Page Jam, Open Automatic Feeder Top Cover. [28Y.XX]
65
[X]-Page Jam, Remove All Pages from the Output Bin. Leave Paper in Bin. [45Y.XX]
65
[X]-Page Jam, Remove All Pages from the Finisher's Accumulator. Leave Paper in Bin. [45Y.XX]
70
200 Paper Jams
73
201 Paper Jams
79
202 Paper Jams
80
23Y Paper Jams
81
241 Paper Jams
83
242-244 Paper Jams
86
25Y Paper Jams
93
28Y Paper Jams
95
29Y Paper Jams
98
45Y Paper Jams
100
Understanding the Printer Messages
108
Cartridge, Imaging Unit Mismatch [41.Xy]
108
Cartridge Low [88.Xy]
108
Cartridge Nearly Low [88.Xy]
109
Cartridge very Low, [X] Estimated Pages Remain [88.Xy]
109
Change [Paper Source] to [Custom Type Name] Load [Orientation]
109
Change [Paper Source] to [Custom String] Load [Orientation]
109
Change [Paper Source] to [Paper Size] Load [Orientation]
109
Change [Paper Source] to [Paper Type] [Paper Size] Load [Orientation]
109
Check Tray [X] Connection
110
Close Front Door
110
Close Flatbed Cover and Load Originals if Restarting Job [2Yy.XX]
110
Complex Page, some Data May Not Have Printed [39]
110
Configuration Change, some Held Jobs Were Not Restored [57]
111
Defective Flash Detected [51]
111
Disk Full [62]
111
Disk Must be Formatted for Use in this Device
111
Disk Near Full. Securely Clearing Disk Space
111
Error Reading USB Drive. Remove USB
111
Error Reading USB Hub. Remove Hub
111
Fax Memory Full
112
Fax Partition Inoperative. Contact System Administrator
112
Fax Server 'To Format' Not Set Up. Contact System Administrator
112
Fax Station Name Not Set Up. Contact System Administrator
112
Fax Station Number Not Set Up. Contact System Administrator
112
Imaging Unit Low [84.Xy]
112
Imaging Unit Nearly Low [84.Xy]
112
Imaging Unit very Low, [X] Estimated Pages Remain [84.Xy]
112
Incompatible Tray [X] [59]
113
Incorrect Paper Size, Open [Paper Source] [34]
113
Insufficient Memory to Collate Job [37]
113
Insufficient Memory for Flash Memory Defragment Operation [37]
113
Insufficient Memory, some Held Jobs Were Deleted [37]
113
Insufficient Memory, some Held Jobs will Not be Restored [37]
113
Insufficient Memory to Support Resource Save Feature [35]
114
Load [Paper Source] with [Custom Type Name] [Paper Orientation]
114
Load [Paper Source] with [Custom String] [Paper Orientation]
114
Load [Paper Source] with [Paper Size] [Paper Orientation]
114
Load [Paper Source] with [Paper Type] [Paper Size] [Paper Orientation]
115
Load Manual Feeder with [Custom Type Name] [Paper Orientation]
115
Load Manual Feeder with [Custom String] [Paper Orientation]
115
Load Manual Feeder with [Paper Size] [Paper Orientation]
115
Load Manual Feeder with [Paper Type] [Paper Size] [Paper Orientation]
115
Maintenance Kit Low [80.Xy]
116
Maintenance Kit Nearly Low [80.Xy]
116
Maintenance Kit very Low, [X] Estimated Pages Remain [80.Xy]
116
Memory Full [38]
116
Memory Full, Cannot Print Faxes
116
Memory Full, Cannot Send Faxes
116
Network [X] Software Error [54]
116
No Analog Phone Line Connected to Modem, Fax Is Disabled
117
Non-Lexmark [Supply Type], See User's Guide [33.Xy]
117
Not Enough Free Space in Flash Memory for Resources [52]
117
Paper Changes Needed
117
Parallel Port [X] Disabled [56]
118
Printer Had to Restart. Last Job May be Incomplete
118
Remove Defective Disk [61]
118
Remove Paper from Standard Output bin
118
Replace Defective Imaging Unit [31.Xy]
118
Replace Cartridge, 0 Estimated Pages Remain [88.Xy]
118
Replace Imaging Unit, 0 Estimated Pages Remain [84.Xy]
118
Replace Maintenance Kit, 0 Estimated Pages Remain [80.Xy]
118
Replace All Originals if Restarting Job
119
Reinstall Missing or Unresponsive Cartridge [31.Xy]
119
Reinstall Missing or Unresponsive Imaging Unit [31.Xy]
119
Replace Unsupported Cartridge [32.Xy]
119
Replace Unsupported Imaging Unit [32.Xy]
119
Restore Held Jobs
120
Scanner Automatic Feeder Cover Open
120
Scanner Disabled by Admin [840.01]
120
Scanner Disabled. Contact System Administrator if Problem Persists. [840.02]
120
Scanner Jam, Remove All Originals from the Scanner [2Yy.XX]
120
Scanner Jam, Remove Jammed Originals from the Scanner [2Yy.XX]
120
Serial Port [X] Disabled [56]
120
SMTP Server Not Set Up. Contact System Administrator
120
Some Held Jobs Were Not Restored
121
Standard Network Software Error [54]
121
Standard USB Port Disabled [56]
121
Supply Needed to Complete Job
121
Too Many Flash Options Installed [58]
121
Too Many Trays Attached [58]
121
Unformatted Flash Detected [53]
122
Unsupported Disk
122
Unsupported Option in Slot [X] [55]
122
USB Port [X] Disabled [56]
122
Weblink Server Not Set Up. Contact System Administrator
122
User Attendance Messages
123
User Attendance Messages (0-99.99)
123
Unresponsive Toner Cartridge Service Check
125
Unsupported Toner Cartridge Service Check
126
Printer/Cartridge Mismatch Service Check
126
Unsupported Imaging Unit Service Check
127
Imaging Unit Smart Chip Contact Service Check
127
Toner Smart Chip Compatibility Service Check
128
Imaging Chip Compatibility Service Check
128
Supplies Mismatch Service Check
129
Flash Full Service Check
129
Maintenance Kit Service Check
129
Insufficient Memory Service Check
130
Imaging Unit Low Service Check
130
Toner Cartridge Low Service Check
131
Printer Hardware Errors
131
111 Errors
132
121 Errors
135
126 Errors
137
132 Errors
138
Errors
139
140 Errors
140
146 Errors
141
155 Errors
142
171 Errors
143
Procedure before Starting the 9Yy Service Checks
144
900 Errors
146
912 Errors
151
94Y Errors
151
950-958 Errors
152
959 Errors
154
96Y Errors
155
97Y Errors
156
98Y Errors
157
99Y Errors
158
Adf/Scanner Hardware Errors
159
8Yy Error Messages
159
Scanner Disabled Error Service Check
160
Scanner Carriage Failure Service Check
161
ADF Service Check
162
Scanner Configuration Error Service Check
163
Scan/Fax/Copy Symptoms
163
Black or Blank Page Copy Service Check
164
CCD Service Check
165
Flatbed Motor Service Check
165
Flatbed Home Position Service Check
166
ADF Rattling Noise Service Check
166
Flatbed Legal Scan Service Check
167
ADF Streak Service Check
167
ADF Feed Errors Service Check
168
ADF Duplex Service Check
169
Modem/Fax Card Service Check
170
Blank Spaces on Incoming Fax Service Check
171
Stretched Words on Incoming Fax Service Check
171
Fax Reception Service Check
171
Fax Transmission Service Check
173
Fax Error Log Codes
175
Escalating a Fax Issue to Second-Level Support
179
Input/Output Option Hardware Errors
180
321-344 Errors
180
381 Errors
185
Other Symptoms
185
Base Printer Symptoms
185
Dead Machine Service Check
186
Controller Board Service Check
187
Control Panel Service Check
188
Toner Starvation Service Check
189
USB Print Service Check
190
Front Door Not Closed Service Check
191
Network Service Check
192
Bin Full Service Check
195
Service Menus
197
Understanding the Printer Control Panel
197
Using the Printer Control Panel
197
Understanding the Colors of the Indicator and Sleep Button Lights
197
Understanding the Home Screen
198
Using the Touch-Screen Buttons
200
Menus List
201
Diagnostics Menu
202
Entering the Diagnostics Menu
202
Registration
202
Scanner Calibration
203
Print Tests
204
Print Quality Pages
204
Hardware Tests
205
Duplex Tests
207
Input Tray Tests
209
Output bin Tests
210
Finisher Tests
211
Base Sensor Test
211
Device Tests
212
Printer Setup
213
Ep Setup
215
Reports
217
Event Log
217
Scanner Tests
218
Exit Diags
222
Configuration Menu
223
Entering the Configuration Menu
223
Reset ADF Maintenance Kit Counter
223
Maintenance Counter Value
223
Reset Maintenance Counter
223
Print Quality Pages
224
Reports
224
Panel Menus
224
PPDS Emulation
225
Download Emuls
225
Safe Mode
225
Factory Defaults
225
Energy Conserve
226
Fax Low Power Support
226
Min Copy Memory
226
Num Pad Job Assist
226
Format Fax Storage
227
ADF Edge Erase
227
Flatbed Edge Erase
227
Scanner Manual Registration
227
Disable Scanner
229
Paper Prompts
229
Envelope Prompts
229
Action for Prompts
230
Jobs on Disk
230
Disk Encryption
231
Wipe All Settings
231
Font Density
231
Font Sharpening
231
Reduced Curl
231
Require Standby
232
A5 Loading
232
UI Automation
232
LES Applications
233
Key Repeat Initial Delay
233
Key Repeat Rate
233
Clear Supply Usage History
233
Clear Custom Status
234
USB Speed
234
Automatically Display Error Screens
234
USB Pnp
234
Restore Factory Defaults
235
Entering Invalid Engine Mode
235
Entering Recovery Mode
236
Accessing the Network SE Menu
236
Service Engineer Menu
236
Accessing the Service Engineer (SE) Menu
236
Service Engineer (SE) Menu
236
Fax Service Engineer (SE) Menu
237
Repair Information
239
Removal Precautions
239
Data Security Notice
239
Handling ESD-Sensitive Parts
240
Controller Board/Control Panel Replacement
240
Restoring the Printer Configuration after Replacing the Controller Board
241
Restoring Solutions, Licenses, and Configuration Settings
244
Updating the Printer Firmware
245
Backing up Esf Solutions and Settings
246
Ribbon Cable Connectors
247
Zero Insertion Force (ZIF) Connectors
247
Horizontal Top Contact Connector
248
Horizontal Bottom Contact Connector
251
Vertical Mount Contact Connector
254
Horizontal Sliding Contact Connector
257
Low Insertion Force (LIF) Connector
260
Printhead Assembly Adjustments
261
Removal Procedures
264
Left Side Removals
264
Left Cover Removal
264
Main Drive Gearbox Removal
266
MPF Solenoid Removal
268
MPF Gearbox Removal
270
Reverse Solenoid Removal
273
Cartridge Gearbox Removal
274
Duplex Gear Assembly Removal
275
Right Side Removals
277
Right Cover Removal
277
Memory Access Door Removal
280
Tray Present Sensor Removal
280
Cooling Fan Removal
281
Controller Board Removal
282
Controller Board Shield Removal
284
Toner Cartridge Smart Chip Contact Removal
286
Modem Removal
288
Front Side Removals
289
Left Front Mount Removal
289
Right Front Mount Removal
290
Transfer Roll Removal
292
Cartridge Plunger Removal
293
Name Plate Cover Removal
295
Front bin Cover Removal
297
Control Panel Assembly Removal
298
UICC Removal
302
USB Cable Bracket Removal
304
Speaker Removal
304
Cave Light Lens Removal
305
Interface Card Removal
306
Control Panel Cover Removal
307
Display Removal
308
Keypad Assembly Removal
310
MPF Tray Removal
311
MPF Pick Roller Cover Removal
314
MPF Pick Roller Removal
314
Bail Removal
315
Jam Access Cover Removal
315
Front Access Cover Removal
316
Front Door Sensor Removal
318
Front Input Guide Removal
318
Separator Pad Removal
320
Bottom Side Removals
323
Power Supply Removal
323
Power Supply Shield Removal
323
Duplex Removal
324
Duplex Sensor and Input Sensor Removal
325
Index Sensor Removal
328
Media Present Sensor Removal
328
Toner Density Sensor Removal
330
Trailing Edge Sensor Removal
331
Media Present Sensor Flag Removal
332
ACM Assembly Removal
336
Pick/Lift Motor Gearbox Removal
338
Tray Guide Removal
339
Rear Side Removals
341
Dust Cover Removal
341
Rear Exit Door Removal
342
Rear Cover Removal
343
Redrive Assembly Removal
343
Redrive Shaft Removal
345
Fuser Removal
346
Stapler Cable Removal
347
Diverter Spring Removal
349
Diverter Cover Removal
350
Top Side Removals
351
Top Cover Removal
351
Bin Full Sensor/Lens Removal
352
Bin Full Sensor Cable Removal
354
Laser Scanning Unit (LSU) Removal
355
Adf/Scanner Removals
359
ADF Separator Roll Removal
359
Flatbed Cushion Removal
360
Scanner Front Cover Removal
361
ADF Input Tray Removal
362
ADF Unit Removal
362
Scanner Assembly Removal
365
ADF Top Cover Assembly Removal
367
ADF Cable Removal
368
USB Cable Removal
369
USB Wireless Cable Removal
370
ADF Hinge Removal
371
Flatbed Assembly Removal
372
Control Panel Ribbon Cable Removal
372
Speaker Cable Removal
372
Restraint Pad Removal
374
550-Sheet Option Tray Removals
375
Pick Roller Removal
375
Separator Roll Assembly Removal
376
ACM Assembly Removal
378
Staple Finisher Option Removals
381
Staple Finisher Option Removal
381
Stapler Cartridge Access Door Removal
382
Staple Roll Holder Removal
383
Stapler Right Cover Removal
384
Stapler Left Cover Removal
385
Stapler Rear Door Removal
386
Sensor (Stapler Access Door) Removal
387
Stapler Carriage Assembly Removal
387
Stapler Door Close Limit Switch Removal
389
Stapler Paddle Motor Removal
393
Stapler Rear Cover Removal
393
Sensor (Stapler Rear Cover) Removal
394
Trapped Staple Access Door Removal
396
Stapler Service Cover Removal
397
Stapler Controller Card Removal
397
Stapler Left Tamper Motor Removal
397
Stapler Right Tamper Motor Removal
398
Stapler Rear Cover Close Limit Switch Removal
399
Stapler Cooling Fan Removal
401
Stapler Power Supply Unit Removal
401
Stapler Interface Cable Removal
403
Stapler Top Cover Removal
405
Sensor (Stapler bin Full Receive) Removal
408
Sensor (Stapler bin Full Send) Removal
410
Sensor (Stapler Pass Through) Removal
413
Tamper Main Assembly Removal
415
Tamper Sub-Assembly Removal
416
Tamper Drive Belt Removal
418
Diverter Gearbox Removal
419
Stapler Accumulator Assembly Removal
422
Sensor (Stapler Right Tamper HP) Removal
422
Sensor (Stapler Left Tamper HP) Removal
423
Sensor (Stapler Paddle HP) Removal
424
Component Locations
427
Exterior Locations
427
Front View
427
Rear View
428
Connectors
429
Controller Board
429
Power Supply
437
Maintenance
439
Inspection Guide
439
Scheduled Maintenance
440
Maintenance Kits
440
Resetting the Maintenance Counter
440
Lubrication Specification
441
Cleaning the Printer
441
Cleaning the Scanner Glass
442
Parts Catalog
444
Legend
444
Assembly 1: Covers
445
Assembly 2: Imaging
447
Assembly 3: Control Panel
449
Assembly 4: Electronics 1
451
Assembly 5: Electronics 2
455
Assembly 6: Frame
458
Assembly 7: Option Trays
461
Assembly 8: Staple Finisher Option
463
Assembly 9: Staple Finisher (Right)
465
Assembly 10: Staple Finisher (Top)
467
Assembly 11: Staple Finisher (Rear)
469
Assembly 12: Staple Finisher Exit Assembly
471
Assembly 13: Staple Finisher Tamper Assembly
473
Assembly 14: Staple Finisher Accumulator Assembly
475
Assembly 15: Maintenance Kits
477
Assembly 16: Power Cords
479
Assembly 17: Miscellaneous
481
Appendix A: Printer Specifications
483
Appendix A: Printer Specifications
483
Electrical Specifications
483
Operating Clearances
483
Acoustics
483
Operating Environment
484
Scanner Specifications
484
Fax Specifications
485
Enabling the Security Reset Jumper
486
Appendix B: Options and Features
487
Available Internal Options
487
Media Handling Options
487
Appendix C: Theory of Operation
489
POR Sequence
489
Printer Control
489
Paper Path Information
489
Input Tray
489
Multipurpose Feeder (MPF)
490
Simplex Printing
490
Duplex Printing
491
Media Handling Components
492
Main Drive Gearbox
492
Autocompensator Mechanism (ACM)
492
Key Components
493
Sensors
493
Other Key Components
494
Electrophotographic Process (EP Process)
496
ADF Theory
499
ADF Theory of Operation
499
Appendix D: Acronyms
503
Acronyms
503
Index
505
Part Number Index
515
Part Name Index
521
Advertisement
Lexmark MX61 SERIES Administrator's Manual (52 pages)
Embedded Web Server-Security: Administrator's Guide
Brand:
Lexmark
| Category:
Printer
| Size: 0.53 MB
Table of Contents
Table of Contents
2
Security Devices Covered in this Guide
4
Simple Security Devices
4
Advanced Security Devices
4
Using Security Features in the Embedded Web Server
5
Understanding the Basics
5
Authentication and Authorization
5
Groups
7
Access Controls
7
Security Templates
7
Limiting Access with Basic Security Setup
8
Configuring Building Blocks
8
Creating a Password for Advanced Security Setup
8
Creating a Password through Web Page Password Protect
9
Creating a PIN for Advanced Security Setup
9
Creating a PIN through Panel PIN Protect
10
Setting up Internal Accounts
10
Connecting Your Printer to an Active Directory Domain
11
Using LDAP
13
Using LDAP+GSSAPI
15
Configuring Kerberos 5 for Use with LDAP+GSSAPI
17
Setting up a CA Certificate Monitor
19
Downloading the CA Certificates Immediately
19
Securing Access
19
Setting a Backup Password
19
Setting Login Restrictions
20
Using a Security Template to Control Function Access
20
Managing Certificates and Other Settings
22
Installing a Certificate Authority Certificate on the Device
22
Configuring the Device for Certificate Information
23
Creating a New Certificate
24
Viewing, Downloading, and Deleting a Certificate
24
Setting Certificate Defaults
25
Configuring Confidential Printing
25
Enabling and Disabling USB Devices
26
Erasing Temporary Data Files from the Hard Disk
27
Configuring Security Audit Log Settings
27
Connecting the Printer to a Wireless Network Using the Embedded Web Server
29
Configuring 802.1X Authentication
29
Setting up SNMP
31
Configuring the TCP/IP Port Access Setting
32
Configuring Ipsec Settings
32
Enabling the Security Reset Jumper
33
Securing the Hard Disk and Other Installed Memory
33
Statement of Volatility
33
Erasing Volatile Memory
34
Erasing Non-Volatile Memory
34
Configuring out of Service Erase
35
Completely Erasing Printer Hard Disk Memory
36
Configuring Printer Hard Disk Encryption
36
Scenarios
38
Scenario: Printer in a Public Place
38
Scenario: Standalone or Small Office
39
Scenario: Network Running Active Directory
39
Appendix
41
Administrative Menus
43
Notices
46
Glossary of Security Terms
50
Index
51
Advertisement
Related Products
Lexmark MX610 Series
Lexmark MX611 Series
Lexmark MX6500e 6500e
Lexmark MX810 Series
Lexmark MX410 Series
Lexmark MX826ade
Lexmark MX-C357F
Lexmark MX-B707P
Lexmark MX417de
Lexmark MX-B557P
Lexmark Categories
Printer
All in One Printer
Printer Accessories
Software
Print Server
More Lexmark Manuals
Login
Sign In
OR
Sign in with Facebook
Sign in with Google
Upload manual
Upload from disk
Upload from URL