Sign In
Upload
Manuals
Brands
Avaya Manuals
Server
G600
Avaya G600 Manuals
Manuals and User Guides for Avaya G600. We have
9
Avaya G600 manuals available for free PDF download: Manual, Maintenance Procedures, Installing Manual, Hardware Manual, Quick Start Manual, Configuration Note, Job Aid, Application Notes
Avaya G600 Manual (1262 pages)
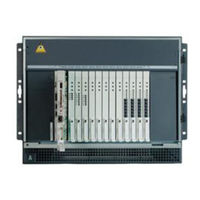
Media Servers and Gateways
Brand:
Avaya
| Category:
Server
| Size: 10.51 MB
Table of Contents
Table of Contents
3
Backing up Translations
26
Changing the IP600 Control Chassis to a Port Network
26
Installing TN771 Maintenance/Test Circuit Pack
26
Replacing the Processor Circuit Pack
26
Replacing the TN799C C-LAN Circuit Pack
26
Busying out Previously Busied out Trunks
27
Checking the Link Status
27
Returning Replaced Equipment
27
Testing the Installation
27
Troubleshooting the Migration
27
Upgrading Firmware
27
Verifying Circuit Pack Insertion
27
Verifying the IP Addresses
27
Changing the Ip600 Control Chassis to a Port Network/Busying out Previously Busied out Trunks
28
Chapter 1: Introduction
51
Port Network Connectivity
51
Reliability and Availability
52
Resources
54
How this Book Is Designed and Organized
56
Upgrades
63
Additional Documentation
64
Firmware Upgrades
64
Chapter 2: Upgrading Software on Media Servers
65
Upgrades that Can Affect Service
66
Common Prerequisites for All Upgrades
67
Checklist of Tasks to Perform before You Go on Site
68
Generating and Retrieving License and Authentication Files
70
License and Avaya Authentication Files
70
Caution about Platform/Pnc License Settings for the S8700-Series Media Server
71
Logins and Passwords
71
Upgrade Modules
73
Upgrading Communication Manager from 1.X to 3.1
75
Introduction
75
On an S8300 Media Server
75
Pre-Requisites
76
Pre-Upgrade Service Pack Requirements
77
Tasks Checklist
78
Upgrading Communication Manager from 2.X to 3.1
83
Introduction
83
On an S8300 Media Server
83
Prerequisites
84
Tasks
85
Upgrading Communication Manager on Avaya S8500
89
Media Server or S8500 ESS Using Maintenance Web Interface
89
Prerequisites
90
The Need to Restore IP Telephone Files
90
Busying out Previously Busied out Trunks
115
Enabling Scheduled Maintenance with SAT
115
Post-Upgrade Tasks
115
Restoring the 4600-Series IP Telephone Configuration File, if any (Main Server Only)
115
Backing up Recovery System Files
116
Checking for Translation Corruption
116
Resolving Alarms
116
Releasing Alarm Suppression (Optional)
117
Starting Call Processing on the Lsps and Esss, if any (Main Server Only)
117
Logging off All Administration Applications
118
Registering Avaya Communication Manager
118
Media Server from R2.X/R3.0 to R3.1 or from R3.1 to R3.1.X Using the Upgrade Tool
119
Upgrading Communication Manager on Avaya S8500
119
About Use of the Upgrade Tool
120
Prerequisites
121
SAMP Card Boot Timeout if Upgrading with Remastering Program
121
Which Devices the Upgrade Tool Can Upgrade
121
Overview of the Upgrade Process
122
Preupgrade Service Pack for Upgrades Starting from R2.X Only
122
TN2312AP/BP IPSI Circuit Pack Upgrades
122
The Need to Restore IP Phone Files
124
Upgrade Tasks
124
Connecting to the Media Server
126
Preupgrade Tasks
126
Starting a SAT Session
126
Upgrading the SAMP Firmware (S8500B Only)
126
Checking Link Status with SAT (Main Server Only)
127
Checking Synchronization with the SAT (Main Server Only)
127
Recording All Busyouts
127
Checking for Translation Corruption
128
Disabling Scheduled Maintenance with the SAT (Main Server Only)
128
Saving a Copy of the 4600-Series Telephone Configuration File, if any (Main Server Only)
128
Accessing the Media Server Maintenance Web Interface
129
Copying the Service Pack Files to the Media Server, Only if Starting from R2.X
129
Installing the Preupgrade Software Service Pack Only if Starting from R2
130
Copying Files to the Media Server
131
Resolving Alarms
131
Backing up Recovery System Files
132
Suppressing Alarming
132
Verifying the Backup
132
Inserting the Communication Manager CD-ROM into the Media Server
133
Copying Communication Manager to the Media Server
134
Removing the CD-ROM from the CD-ROM Drive
135
Upgrade Tasks
135
Starting the Upgrade Tool
136
Installing Avaya Authentication Files (if Required)
137
Verifying Software Operation
137
Checking System Status
138
Setting the Processor Ethernet
138
Copying IP Telephone Firmware to the Media Server, if Necessary (Main Server Only)
139
Post-Upgrade Tasks
139
Restoring the 4600-Series IP Telephone Configuration File, if any (Main Server Only)
139
Busying out Previously Busied out Trunks
140
Checking for Translation Corruption
140
Enabling Scheduled Maintenance with SAT
140
Resolving Alarms
140
Backing up Recovery System Files
141
Logging off All Administration Applications
141
Releasing Alarm Suppression (Optional)
141
Postrequisites
142
Registering Avaya Communication Manager
142
Upgrading the G150 Media Gateways, if Used
142
Media Server from R1.X to R3.1
143
Upgrading Communication Manager on Avaya S8700
143
Prerequisites
144
Preupgrade Service Pack
144
TN2312AP/BP IPSI Circuit Pack Upgrades
144
Upgrade of Lsps and Media Gateways, if Being Used
145
Upgrade Tasks
147
Upgrading Firmware on Media Gateways and Media Modules
147
Connecting to the Active Media Server
151
Preupgrade Tasks
151
Stopping Call Processing on the Lsps or Esss if Being Used (Main Server Only)
151
Checking Link Status with SAT (Main Server Only)
152
Starting a SAT Session
152
Checking Synchronization with the SAT (Main Server Only)
153
Disabling Scheduled Maintenance with the SAT (Main Server Only)
153
Recording All Busyouts
153
Accessing the Media Server Maintenance Web Interface
154
Busying out MMI Circuit Packs with SAT for a Duplicated Control Network Only (Main Server Only)
154
Checking for Translation Corruption
154
Backing up Recovery System Files on the Active Server
155
Resolving Alarms
155
Disconnecting from the Active Media Server
156
Suppressing Alarming
156
Verifying the Backup
156
Accessing the Media Server Maintenance Web Interface
157
Clearing the ARP Cache on the Laptop Computer
157
Connecting to the Standby Media Server
157
Backing up Files on the Standby Media Server
158
Copying Preupgrade Service Pack(S) to the Standby Media Server
158
Verifying the Backup
158
Suppressing Alarming
159
Upgrade Tasks (First Media Server)
159
Busying out the Standby Media Server
159
Checking the Software Release on the Standby Media Server
160
Installing the Preupgrade Service Pack
160
Backing up the System Files with Linux Migration-Backup
161
Verifying Connectivity to Customer Network Server
161
Setting Telnet Parameters
163
Erasing the MBR on the Media Server
164
Inserting the Communication Manager CD-ROM into the Media Server
164
Rebooting the Standby Media Server
165
Verifying Reboot Progress
165
Installing Communication Manager
166
Accessing the Media Server Maintenance Web Interface
167
Copying Files to the Media Server
168
Verifying Software Operation
168
Configuring the Network Parameters (Optional)
169
Selecting Media Server Type
169
Installing Postupgrade Service Pack, if Any, on Media Server
171
Verifying Connectivity to the Network Server (Optional)
171
Verifying Installation of the Service Pack
172
Restoring the Linux Migration Backup Files
173
Verifying Date and Time
174
Checking System Status
175
Interchanging the Media Servers
175
Releasing the Standby Media Server
175
Verifying Software Operation
175
Installing the New License and Avaya Authentication Files on Newly Active Media Server
176
Disconnecting from the Active Media Server
177
Upgrade Tasks (Second Media Server)
177
Busying out the Standby Media Server
177
Connecting to the Standby Media Server
177
Copying Preupgrade Service Pack(S) to the Standby Media Server
177
Installing the Preupgrade Service Pack
178
Verifying Software Operation
178
Backing up the System Files Using Linux Migration-Backup
179
Verifying Connectivity to Customer Network Server (Optional)
179
Erasing the MBR on the Standby Media Server
181
Inserting the Communication Manager CD-ROM into the Media Server
182
Rebooting the Standby Media Server
182
Verifying Reboot Progress
182
Installing Communication Manager
183
Accessing the Media Server Maintenance Web Interface
184
Copying Files to the Media Server
185
Selecting Media Server Type
185
Verifying Software Operation
185
Configuring the Network Parameters (Optional)
186
Installing Postupgrade Service Pack, if Any, on Media Server
188
Verifying Connectivity from the Network Server
188
Verifying Connectivity to the Network Server (Optional)
188
Verifying Service Pack Installation
189
Restoring the Linux Migration Backup Files
190
Verifying Date and Time
191
Verifying Software Operation
191
Checking System Status
192
Disconnecting from the Standby Media Server
192
Releasing the Standby Media Server
192
Checking for Translation Corruption
212
Accessing the Media Server Maintenance Web Interface
213
Saving a Copy of the 4600-Series Telephone Configuration File, if any (Main Server Only)
213
Backing up Recovery System Files
214
Copying Files to the Media Server
214
Resolving Alarms
214
Suppressing Alarming
215
Verifying the Backup
215
Clearing the ARP Cache on the Laptop Computer
216
Connecting to the Standby Media Server
216
Disconnecting from the Active Media Server
216
Accessing the Media Server Maintenance Web Interface
217
Copying Files to the Media Server
217
Backing up Files on the Standby Media Server
218
Suppressing Alarming
218
Verifying the Backup
218
Tasks to Preserve Connections When Starting from R3.0.1 Only (Main Server Only)
219
Accessing the Media Server Maintenance Web Interface
219
Connecting to the Active Media Server
219
Disconnecting from the Standby Media Server
219
Selecting the Preupgrade Step to Preserve Calls
220
Disconnecting from the Active Media Server
221
Upgrade Tasks for the First Media Server
221
Busying out the Standby Media Server
221
Checking the Software Release on the Media Server, if Starting from R2.X Only
221
Connecting to the Standby Media Server
221
Activating the Preupgrade Service Pack on the Media Server (R2.X Only)
222
Copying Communication Manager to the Media Server
223
Inserting the Communication Manager CD-ROM into the Media Server
223
Installing Communication Manager on the Media Server
225
Rebooting the Media Server
227
Verifying Reboot Progress
228
Checking System Status
229
Making the Upgrade Permanent on the Media Server
229
Verifying Software Operation
229
Installing Postupgrade Service Pack, if Any, on Media Server
230
Releasing the Standby Media Server
230
Interchanging the Media Servers
231
Disconnecting from the Newly Active Media Server
232
Installing the New License and Avaya Authentication Files on Newly Active Media Server
232
Upgrade Tasks for the New Standby Media Server (Second Server)
233
Accessing the Media Server Maintenance Web Interface
233
Busying out the Standby Media Server
233
Connecting to the Standby Media Server
233
Activating the Preupgrade Service Pack on the Media Server (R2.X Only)
234
Checking the Software Release on the Media Server (R2.X Only)
234
Copying Communication Manager to the Media Server
235
Inserting the Communication Manager CD-ROM into the Media Server
235
Installing Communication Manager on the Media Server
236
Rebooting the Media Server
239
Verifying Reboot Progress
240
Checking System Status
241
Making the Upgrade Permanent on the Media Server
241
Verifying Software Operation
241
Installing Postupgrade Service Pack, if Any, on Media Server
242
Releasing the Standby Media Server
242
Connecting to the Active Media Server
243
Copying IP Telephone Firmware to the Media Server, if Necessary (Main Server Only)
243
Disconnecting from the Standby Media Server
243
Verifying the Operation of the Media Servers
243
Post-Upgrade Tasks
244
Restoring the 4600-Series IP Telephone Configuration File, if any (Main Server Only)
244
Busying out Previously Busied out Trunks
245
Checking for Translation Corruption with SAT (Main Server Only)
245
Enabling Scheduled Maintenance with SAT
245
Releasing MMI Circuit Packs in Duplicated Control Network Using SAT, (Main Server Only)
245
Backing up Translations
246
Resolving Alarms
246
Connecting to the Standby Media Server
247
Disconnecting from the Active Media Server
247
Logging off All Administration Applications on the Active Media Server
247
Releasing Alarm Suppression (Optional)
247
Backing up Files on the Standby Media Server
248
Releasing Alarm Suppression (Optional)
248
Starting Call Processing on the Lsps and Esss, if any (Main Server Only)
248
Logging off All Administration Applications
249
Registering Avaya Communication Manager
249
Using the Upgrade Tool to Upgrade Communication Manager on Avaya S8700-Series Media Server
251
About Use of the Upgrade Tool
252
Upgrade Using the Upgrade Tool
253
The Need to Restore IP Telephone Files
255
Prerequisites
255
Preupgrade Service Pack for Upgrades Starting from R2.X Only
255
TN2312AP/BP IPSI Circuit Pack Upgrades
255
Overview of the Upgrade Process
256
Upgrade Tasks
257
Current Configuration Tasks
259
Connecting to the Active Media Server
259
Starting a SAT Session
259
Checking Link Status with SAT (Main Server Only)
260
Checking Synchronization with the SAT (Main Server Only)
260
Recording All Busyouts Using SAT
260
Busying out MMI Circuit Packs with SAT for a Duplicated Control Network Only (Main Server Only)
261
Disabling Scheduled Maintenance with the SAT (Main Server Only)
261
Checking for Translation Corruption with SAT (Main Server Only)
262
Saving a Copy of the 4600-Series Telephone Configuration File, if any (Main Server Only)
262
Accessing the Media Server Maintenance Web Interface
263
Backing up Recovery System Files on the Active Server
263
Resolving Alarms
263
Suppressing Alarming
264
Verifying the Backup
264
Accessing the Media Server Maintenance Web Interface
265
Backing up Files on the Standby Media Server
265
Connecting to the Standby Media Server
265
Disconnecting from the Active Media Server
265
Disconnecting from the Standby Media Server
266
Suppressing Alarming
266
Verifying the Backup
266
Accessing the Media Server Maintenance Web Interface
267
Connecting to the Active Media Server
267
Advertisement
Avaya G600 Maintenance Procedures (426 pages)
Brand:
Avaya
| Category:
Gateway
| Size: 5.13 MB
Table of Contents
Procedure
2
Reset Level
4
Table of Contents
5
About this Book
15
Overview
15
Audience
15
Downloading this Book
16
Downloading this Book and Updates from the Web
16
Safety and Security-Alert Labels
16
Electromagnetic Interference
17
Related Resources
17
Safety Precautions
17
International
18
Technical Assistance
18
Within the United States
18
How to Use this Document
19
Organization
19
Sending Us Comments
19
Trademarks
19
Conventions Used in this Document
20
Useful Terms
21
1 Maintenance Strategy
23
Maintenance Objects
23
Maintenance Testing
24
Background Testing
24
Demand Testing
25
Co-Resident DEFINITY LAN Gateway Maintenance
25
Processor C-LAN Maintenance
25
Administration and Maintenance
26
Media Processor (DEFINITY ONE)
26
Alarm and Error Logs
27
Alarm and Error Reporting
27
Alarm Reporting
28
Power Interruptions
29
Nominal Power Holdover
30
Power Interruption Effects
30
External Alarm Leads
31
Protocols
31
OSI Layers
32
Usage
33
Protocol States
35
Connectivity Rules
36
Disconnect Supervision
37
Signaling
37
Transmission Characteristics
38
Service Codes
42
Facility Interface Codes
43
Multimedia Interface (MMI)
44
S8300 and G700 Maintenance Strategy
44
Media Module Maintenance
45
Access to the G700 Media Gateway and S8300 Media Server
46
G700 Media Gateway Processor CLI
46
S8300 Media Server Web Interface
46
DEFINITY Equivalent Elements
47
G700 Server-Controlled Maintenance
47
Layer 2 Switching Processor CLI
47
Capacity Constraints and Feature Limitations
48
Testing
54
Maintenance Features for the G700
57
2 Access and Login Procedures
59
Connection Overview
59
Laptop Settings and Connections
60
Laptop Settings
61
Laptop Connections
64
Connecting through an External Modem
66
Login Methods
71
Logging in to the S8300 Web Interface from Your Laptop
72
Logging in Using a Telnet Session on Your Laptop
72
Logging in to Communication Manager (SAT Screens)
76
Logging in to the Layer-2 Switching Processor
77
Customer Access
79
Logins and Passwords on the S8100
79
Windows 2000 Logins for the Customer
80
Windows 2000 Login Types for the Customer
81
Enabling Windows 2000 Customer Logins
82
Communication Manager Logins for the Customer
83
Avaya Site Administration Configuration
86
Navigating the Command Line Interface
87
Accessing the S8100 Media Server for Maintenance
88
Telnet Session
88
Web Browser Interface
88
Avaya Site Administration
89
3 License and Authentication Files
91
Installing License and Authentication Files
91
Downloading the License and Authentication Files
91
Installing License and Authentication Files
92
License Files for Different Configurations
93
S8300 Media Server
93
S8700 Media Server
93
License File Modes
94
License-Error
94
License-Normal
94
Survivable Configuration
94
License and Options Forms Interactions
95
No-License
95
4 Hardware Configurations
97
Multicarrier Cabinets
97
PNC Cabling Fiber-Optic Hardware
97
EI-To-EI or EI-To-SNI Intercabinet Fiber-Optic Cables
97
EI-To-SNI or EI-To-EI Intracabinet Metallic Cabling
99
DS1 CONV Cabling
99
Circuit Packs
101
Duplication for Reliability
102
Basic Server and IPSI Connections
102
High Reliability Connectivity
102
Critical Reliability Connectivity
103
Standard and High Reliability Configurations
103
Critical Reliability Configuration
107
S8100 Media Server Components and Functionality
107
TN2314 Processor Circuit Pack
107
Virtual Boards and Devices
108
Windows 2000 Platform
108
Backup Procedures
109
GUI Operation
109
G600 and CMC1 Media Gateways Design
112
CMC1 Media Gateway Cabinets
114
G600 Media Gateway Cabinet
116
Ups
117
Circuit Packs
118
G700 with a Media Server System
118
How Does the G700 Fit into Your System
118
5 Server Initialization, Recovery, and Resets
119
S8700 Initialization
119
Active Server's Initialization
120
Standby Server's Initialization
120
S8100 Initialization
121
LED Boot Sequence
121
Communication Manager Initialization
122
Shutdown
123
S8100 Recovery
124
Communication Manager Resets
127
Recovery from Fatal Errors in the S8100
128
Resolving Alarms
129
Link Recovery
130
H.248 Server-To-Gateway Link Recovery
131
H.323 Gateway-To-Endpoint Link Recovery
139
System Resets
152
Reset Level 1 (Warm Restart)
153
Reset Level 2 (Cold-2 Restart)
154
Reset Level 3 (Communication Manager Reboot)
155
Reset Level 5 (Extended Communication Manager Reboot)
156
S8100 System Reset
156
S8300/G700 System Reset
157
6 Troubleshooting
159
Safety Precautions
159
Removing and Restoring EMBEDDED AUDIX Power
160
Electrostatic Discharge
161
Suppressing Alarm Origination
162
Troubleshooting Duplicated Servers
163
Determining the Time of a Spontaneous Interchange
164
Troubleshooting Trunks with Automatic Circuit Assurance
164
Using Busy Verification of Terminals and Trunks
164
LA85 Port Tester
165
Trunk Group Busy/Warning Indicators to Attendant
165
Trunk Identification by Attendant
165
Fiber Link Fault Isolation
167
Isolating Fiber Faults with Loopback Tests
171
Troubleshooting SNI/EI Links with Manual Loop-Back
171
Troubleshooting ATM
173
Initial LED Inspection
174
A500 Switch Diagnostics
176
ATM Administration
178
A500 Administration
182
TN230X Circuit Pack(S)
186
Physical Layer
188
SONET Layer
190
Q.SAAL (Data Link) Layer
191
Q.93B (Network) Layer
192
ATM Call Control
195
Capro Layer
196
Unusual ATM Trouble Conditions
199
Expansion Services Module
201
Troubleshooting Multimedia Call Handling (MMCH)
201
Troubleshooting ISDN-PRI
207
Troubleshooting ISDN-PRI Endpoints (Wideband)
209
Troubleshooting ISDN-BRI / ASAI
212
Troubleshooting ISDN-PRI Test Calls
215
Asynchronous Method
216
Synchronous Method
216
Troubleshooting the Outgoing ISDN-Testcall Command
218
7 Packet and Serial Bus Maintenance
219
Isolating and Repairing Packet-Bus Faults
219
Remote Versus On-Site Maintenance
220
What Is the Packet Bus
220
Packet-Bus Faults
221
Packet Bus Connectivity
221
Circuit Packs that Use the Packet Bus
222
Effects of Circuit-Pack Failures on the Packet Bus
223
Packet Bus Maintenance
224
General Fault Correction Procedures
226
Maintenance/Test Circuit Pack (TN771D)
226
Packet Bus Fault Isolation Flowchart
234
Troubleshooting Procedures
239
Systems with Nonduplicated Spes
243
S8100 Packet Bus Fault Isolation and Repair
245
Remote Versus On-Site Maintenance
246
Packet Bus
247
Tools for Packet Bus Maintenance
247
Circuit Packs that Use the Packet Bus
248
Packet Bus Maintenance
250
Maintenance/Test Circuit Pack (TN771D)
252
Packet Bus Fault Isolation Flowchart
259
S8100 Packet Bus Fault Correction
264
G650 Serial Bus Fault Detection and Isolation
271
Procedure 1
273
Avaya G600 Installing Manual (274 pages)
Media Gateway
Brand:
Avaya
| Category:
Server
| Size: 3.66 MB
Table of Contents
Configure Media Server
1
Power up Media Server
1
Disconnect from Media Server
1
Laptop to Media Server
1
Installing the Avaya™ S8700 Media Server with Avaya™ G600 Media Gateway
5
Table of Contents
5
Installing the Avaya™ S8700 Media Server with Avaya
13
G600 Media Gateway
13
Pre-Installation Setup
15
High Level Overview of Installation Process
16
Install and Configure the S8700 Media Server Complex
16
Customize the S8700 Media Server
16
Installation of the Media Gateways
16
Cable the Media Gateways
17
Connect the Media Gateway to the Server Complex
17
Connect to the Customer's LAN
17
Install and Wire Telephones
17
Complete the Installation
17
Testing the Complete Configuration
17
Download License and Avaya Authentication Files
18
RFA Information Requirements for New Installations
18
Go to the RFA Web Site
19
Mounting Hardware in the Rack
21
Connect the USB Modems
21
Co-Located Servers
21
Separated Servers
21
Configuring the Hardware in the Rack
22
Set Product ID
24
Connect and Log into the Web Interface
25
Using Netscape
26
Using Internet Explorer
27
Set Date and Time
27
Verify Software Version
27
Set Media Server Configuration Type
28
Upgrade Media Server Software (if Necessary)
28
Continue Server 1 Configuration
29
Install License and Avaya Authentication Files
33
Copy License and Avaya Authentication Files from
33
Install the License and Avaya Authentication Files
34
Verify Media Server 1 Connection to Customer's LAN (if Provided)
35
Test Media Server 1 Leds
37
Configure SNMP Traps
38
Connect Duplication Cables
40
Collocated Media Servers
40
Separated Media Servers
40
Configure Media Server 2
41
Verify Software Version
42
Set Server Configuration Type
42
Upgrade Media Server Software (if Necessary)
42
Continue Server 2 Configuration
43
Configuring Manually
45
Copy Settings
45
Update System
46
Verify Media Server 2 Connection to Customer's LAN (if Provided)
46
Test Media Server 2 Leds
47
Disconnect from Media Server 2
47
Connect UPS Ethernet Cables to Ethernet Switch
48
Configure the SNMP Modules in the Upss
49
Duplex Reliability Configurations
51
Setting Selected Traps (Alarming)
51
Configure the SNMP Subagent in the Avaya Ethernet Switch (if Used)
52
Customize the Active Media Server
54
Start Terminal Emulation
54
Input Translations
55
Reset Media Server
55
Add Media Gateways
55
Administer and Enable the IP Server Interface
56
Add IPSI Translations to Communication Manager
57
Install the Media Gateways
59
Check and Inspect the Order
61
Check Customer's Order
61
Unpack and Inspect the Media Gateways-G600
61
Unpack and Inspect the Media Gateways-MCC1
61
Unpack and Inspect the Media Gateways-SCC1
61
Check Circuit Packs
63
Correct Shipping Errors
65
Connect AC Power and Ground
66
Approved Grounds
66
Installing the Avaya G600 Media Gateway
67
Set the Carrier Address ID
69
Mount the Avaya G600 Media Gateway in the Rack
70
Approved Grounds
76
Check AC Power
76
Uninterruptible Power Supply
76
Media Gateway Power Switch
77
Connect Media Gateway Grounds and Other Grounds
78
Connect the Power Cords
80
Cabling the G600 Media Gateways
82
Cabling 2 Media Gateways
82
Cabling 3 Media Gateways
87
Cabling 4 Media Gateways
87
Install Circuit Packs in G600
88
Set Ringing Option for Avaya G600
94
Installing the Avaya G700 Media Gateway
95
Install Patch Panels
97
Cross-Connect the Media Gateway to the Patch Panels
97
Install Main Distribution Frame
100
Space Requirements and Layout
101
Installation Space Requirements
101
Layout
102
Install Main Distribution Frame Hardware
104
MDF Cross-Connect Fields
107
Placing the Main Distribution Frame
107
Main Distribution Frame Labels
109
Mount 110A- or 110P-Type Terminal Blocks on the Wall
110
Mount 110P-Type Terminal Blocks on a Frame
112
Install Cable Slack Managers
114
Connect the Media Gateway to the MDF
117
Equipment Room Cabling Labels
117
Cable Routing Guidelines
118
Control Carrier Outputs Cable Installation
118
Trunk Cables Among Network Interface, Sneak Fuse Panel, and Media Gateway
119
Install Cables between Media Gateway and MDF
121
Install Connector Cables between Auxiliary Cabinet (if Used) and MDF
122
Connect the MDF to Stations and PSTN
123
Station (Telephone) Wiring Design
123
Information Outlets
123
Station Cables
123
Closets
125
Satellite Locations
125
Site Locations
126
Station Circuit Distribution from Equipment Room
126
3-Pair to 4-Pair Station Circuit Distribution
127
4-Pair Station Circuits
127
Connected Cable Station Adapters
131
Complete Provisioning Plan
134
Install Sneak Current and off Premise Protection
136
Install Sneak Fuse Panels
139
Install the Coupled Bonding Conductor
140
Install Coupled Bonding Conductor Wires
140
Install Coupled Bonding Conductor
142
Install and Administer the Patch Cord/Jumper
143
Label Expansion Control Carrier Cable (MCC1 Only)
145
Connect Expansion Control Carrier Outputs Cable (MCC1 Only)
146
Connect Trunk Pairs Using Concentrator Cables
146
Connecting to the Ipsis
150
Connect the Ethernet Switch Cables to the IPSI Circuit Packs
150
Set IPSI Static IP Addresses
150
Administering the Static IP Address
151
Reusing a TN2312AP Circuit Pack
151
Verify that Ipsis Are Translated
154
Verify Connectivity to Media Servers
154
Upgrade IPSI Firmware Version (if Necessary)
155
Enable Control of Ipsis
155
Verify License Status
156
Connecting to the Customer's Network
157
Avaya S8700 Media Server
157
TN799DP Control LAN
158
The TN2302AP IP Media Processor
159
The TN801B MAP-D LAN Gateway
159
TN2501 Voice over the LAN (VAL)
159
Caveats
160
Important File Specifications
160
Installing and Wiring Telephones
162
Wiring Telephones
162
Connect Telephones
163
Connectable Telephones and Consoles
163
Connecting a Typical Telephone
164
Connect Adjunct Power
165
Connect an Analog Station or 2-Wire Digital Station
166
Analog Tie Trunk Example
167
Digital Tie Trunk Example
168
DS1 Tie Trunk Example
169
Collocated DS1 Tie Trunks
169
DS1 Tie Trunks Using T1 Channel Service Unit
169
Auxiliary Connector Outputs (MCC1 and SCC1 Media Gateways Only)
172
Three-Pair and Four-Pair Modularity
175
Adjunct Power Connection Locations
176
Attendant Console Example
177
Attendant Console Cabling Distances, Local and Phantom Power
177
Task List: Attendant Console Procedures
177
Auxiliary Power
178
Dual Wiring of 2-Wire and 4-Wire Endpoints
179
Hard-Wire Bridging
179
Install the Attendant Console
179
Install the 26B1 Selector Console
180
Connect External Alarm Indicators and Auxiliary Power
180
Connect Power Distribution Unit External Alarm Wires
181
Install Off-Premises Station Wiring
184
Off-Premises or Out-Of-Building Stations
184
Off-Premises Connections
185
Off-Premises Protection Requirements
187
Digital Out-Of-Building Telephone Protection
188
Telephone Restrictions for Exposed Environments
188
Emergency Transfer Units and Associated Telephones
190
Emergency Transfer Panel and Telephone Installation Examples
191
Install the 808A Emergency Transfer Panel
193
Install Telephones Used Only for Emergency Transfer (Trunk/Auxiliary Field)
198
Install Telephones Used for Emergency Transfer and as Normal Extension (Trunk/Auxiliary Field)
199
Install External Ringing
200
Install the Queue Warning Indicator
201
Installing and Wiring Telephone Power Supplies
202
1145B2 Power Supply
202
Important Warning for 1145B2 Power Supply
203
Mounting the 1145B2/1146B2 Power Supply
204
Install the Wall-Mounting Plates
206
Install the Battery Mounting/Wiring
207
Mount the 1146B2 Power Distribution Unit
207
Install the Expanded Power Distribution Unit
208
Power up and Test the Power Supply
209
Wire the 1146B2 Power Distribution Unit
210
Reset Leds on Power Distribution Unit
211
1152A1 MID-Span Power Distribution Unit
211
Important Safety Instructions
211
Connect the 1152A1 PDU
212
Using the 1152A1 PDU
212
Connect the Cables
213
P333T-PWR Power over Ethernet Stackable Switch
215
P333T-PWR Switch Important Safety Instructions
215
Connect the P333T-PWR Switch
216
Using the P333T-PWR Switch
216
1151B1 and 1151B2 Power Supplies
217
Important Safety Instructions for 1151B1 and 1151B2 Power Supplies
218
Using 1151B1 and 1151B2 Power Supplies
218
Connect the 1151B1 or 1151B2 Power Supplies
219
Completing the Installation Administration
220
Verify Translations
220
Set Daylight Savings Time Rules
220
Set Locations (if Necessary)
221
Verify Date and Time
222
View Alarms
223
Enable and Disable Ethernet Switch Ports
224
Back up the Media Server to PCMCIA Flashcard
225
View Alarms
227
Set Product ID
227
Add INADS Phone Numbers
228
Enable Alarms to INADS Via Modem
228
Enable Alarms to INADS Via SNMP
229
Register the System
229
Accessing the Avaya S8700 Media Server
230
Connecting to the Avaya S8700 Media Server Directly
230
Connecting to the Avaya S8700 Media Server Remotely over the Network
232
Connecting to the Avaya S8700 Media Server Remotely over a Modem
232
Setting up a Dial-Up Connection
232
Dialing up to the Media Server
233
Finding the Active Media Server IP Address
233
Using the Various Interfaces
233
Maintenance Web Interface
233
Avaya Site Administration
234
Command Line Interface
234
Installing Avaya Site Administration
235
Logins
236
Network Configuration
236
Windows 2000/XP Instructions
236
Windows 95/98/NT4.0/ME Instructions
236
Testing the Complete Configuration
238
Testing Port Network Equipment
239
Check Port Network Status for each Media Gateway
239
Check Circuit Pack Configuration
240
Test Media Server Interchange
240
Test License File
241
Test the IPSI Circuit Pack
241
Advertisement
Avaya G600 Installing Manual (236 pages)
Media Server with Media Gateway
Brand:
Avaya
| Category:
Server
| Size: 3.62 MB
Table of Contents
Table of Contents
5
Configure Media Server
1
Power up Media Server
1
Laptop to Media Server
1
Table of Contents
5
Installing the Avaya S8700 Media Server with G600 Media Gateway
13
Pre-Installation Setup
15
High Level Overview of Installation Process
17
Install and Configure the S8700 Media Server Complex
17
Customize the S8700 Media Server
17
Installation of the Media Gateways
17
Cable the Media Gateways
18
Connect the Media Gateway to the Server Complex
18
Connect to the Customer's LAN
18
Install and Wire Telephones
18
Complete the Installation
18
Testing the Complete Configuration
18
Download License and Avaya Authentication Files
19
RFA Information Requirements for New Installations
19
Go to the RFA Web Site
20
Mounting Hardware in the Rack
21
Configuring the Hardware in the Rack
22
Set Product ID
23
Configure Media Server 1
23
Connect and Log into the S8700 Media Server Web Interface
24
Using Netscape
25
Using Internet Explorer
26
Verify Software Version
26
Set Date and Time
27
Set Media Server Configuration Type
27
Upgrade Media Server Software (if Necessary)
28
Continue Server 1 Configuration
28
Install License and Avaya Authentication Files
30
Copy License and Avaya Authentication Files from
30
Install the License and Avaya Authentication Files
31
Verify Media Server 1 Connection to Customer's LAN (if Provided)
31
Test Media Server 1 Leds
33
Configure SNMP Traps
34
October
35
Connect Duplication Cables
37
Configure Media Server 2
38
Verify Software Version
38
Set Server Configuration Type
39
Continue Server 2 Configuration
40
Verify Media Server 2 Connection to Customer's LAN (if Provided)
41
Update System
41
Test Media Server 2 Leds
42
Busy out Standby Media Server
43
The Following Administration Uses the Services Laptop Computer Connected to Media Server 2
43
And Uses the Media Server Web Interface
43
Connect UPS Ethernet Cables to Ethernet Switch
44
Configure the Upss
45
Note
45
Duplex Reliability Configurations
47
Configure the Avaya Ethernet Switch (if Used)
49
Customizing the Active Media Server
51
Directly through a Dedicated Services Port
51
Set up Avaya Site Administration
51
Remotely over the Network
52
Starting Avaya Site Administration
52
Add Media Gateways
53
Input Translations
53
Reset Media Server
53
Administer and Enable the IP Media Server Interface
54
Add IPSI Translations to Multivantage Software
55
Installing the Avaya G600 Media Gateway
57
Check and Inspect the Order
59
Check Circuit Packs
61
October
62
Correct Shipping Errors
63
Set the Carrier Address ID
63
Mount the Avaya G600 Media Gateway in the Rack
64
Mount One Media Gateway
65
Mount Two to Four Media Gateways
69
Check AC Power
70
Check AC Power and Ground for Avaya G600
70
Approved Grounds
71
Uninterruptible Power Supply
71
Media Gateway Power Switch
72
Connect Media Gateway Grounds and Other Grounds
73
Install Coupled Bonding Conductor
74
Connect the Power Cords
75
Installing the Avaya G700 Media Gateway
77
Cabling the G600 Media Gateways
79
Cabling Multiple Media Gateways
79
Cabling 2 Media Gateways
80
Cabling 3 Media Gateways
84
Cabling 4 Media Gateways
84
Install Circuit Pack Adapters
85
Connecting Media Gateways to the Phone Network
85
Install the Main Distribution Frame (MDF) Hardware
86
Cross-Connect the Media Gateway to the Patch Panels
91
Install Patch Panels
91
Install Equipment Room Hardware for Avaya G600
94
Install Circuit Packs
94
Install Off-Premises Circuit Protection
100
Install Sneak Fuse Panels
100
Set Ringing Option for Avaya G600
102
Connecting the Hardware
105
Set IPSI Static IP Addresses
105
Administering the Static IP Address
106
Reusing a TN2312AP Circuit Pack
106
Connect the Ethernet Switch Cables to the IPSI Circuit Packs
108
Verify Connectivity to Media Servers
108
Verify IPSI Firmware Version
109
Enable Control of Ipsis
109
Verify License Status
109
Connect the USB Modems
109
Co-Located Servers
109
October
110
Separated Servers
110
Connecting to the Customer's Network
111
Avaya™ S8700 Media Server
111
TN799DP Control LAN
112
Check Your Shipment
113
Install a TN799DP C-LAN
113
Install the Cables
113
Install the Circuit Packs
114
Administer the TN799DP
115
Test the External Connection to the LAN
116
The TN2302AP IP Media Processor
118
Check Your Shipment
118
Install a TN2302AP IP Media Processor
119
Install the Cables
119
Install the Circuit Packs
120
Administer the IP Media Processor
121
Test the External Connection to the LAN
123
The TN801B MAP-D LAN Gateway
124
TN2501 Voice over the LAN (VAL)
125
Caveats
125
Important File Specifications
125
Installing VAL
126
Install the TN2501AP Circuit Pack
128
Administer the TN2501AP
129
Test the IP Connections
132
Avaya R300 Remote Office Communicator
133
Avaya G600 Hardware Manual (64 pages)
Brand:
Avaya
| Category:
Gateway
| Size: 0.71 MB
Table of Contents
Table of Contents
5
Install the Circuit Packs
8
Install and Administer IP Connectivity Hardware
9
TN799DP Control LAN
9
Check Your Shipment
9
Install a TN799DP C-LAN
10
Install the Cables
10
Install the Circuit Packs
11
Administer the TN799DP
12
Test the External Connection to the LAN
14
TN2302AP IP Media Processor
16
Check Your Shipment
16
The Following Sections Describe the Process
16
Inspect the Shipping Carton for Damage before Opening It. if the Box Is Damaged, Do Not Open It. Inform the Shipping Company, and Ask for Instructions on Filing a Claim
16
If the Box Is Undamaged, Check the Contents against the Packing Slip. Check the Condition
16
Should Contain the Items in ''Required Hardware
16
Read and Follow any Directions Inserted into the Package by the Factory
16
Install a TN2302AP IP Media Processor
17
Install the Cables
17
Install the Circuit Packs
18
Administer the IP Media Processor
19
Test the External Connection to the LAN
21
TN2501 Voice over the LAN (VAL)
22
Important File Specifications
22
Caveats
22
Install a TN2501AP VAL
23
Install the Circuit Packs
23
Administer the TN799DP
23
Test the External Connection to the LAN
29
Replace the WP Cables
29
Install and Administer Trunks and Lines
32
List of Analog and Digital Trunk and Line Circuit Packs
32
Add TN464GP/TN2464BP with Echo Cancellation
33
Add CO, FX, WATS, and PCOL
36
Add DID Trunks
37
Add Analog Tie Trunks
38
Add Digital DS1 Tie Trunks and OPS
40
Add TTC Japan 2-Mbit Trunk
40
Add CAMA/E911 Trunk
41
Installing the Circuit Pack
42
Adding the Trunks
43
Changing the Feature Access Code
44
Changing the ARS Digit Analysis
45
Changing the Route Patterns
46
Changing the CAMA Numbering and Class of Restriction
47
Add ISDN-PRI
48
North American
48
International
49
Add Circuit Packs
49
Connect Cables
49
Administer the Circuit Pack
49
Resolve Alarms
50
Save Translations
50
Add TN1654 DS1 Converter (Multi-Connect Only)
51
Set Circuit Pack Switches
51
Installing and Cabling the TN1654 Circuit Pack (T1 Only)
54
Installing a 75-Ohm E1 Interface Adapter
59
Mounting the 127A (TN1654 DS1 Converter)
61
Avaya G600 Configuration Note (21 pages)
UCC/Avaya one-X Speech
Brand:
Avaya
| Category:
PBX
| Size: 0.29 MB
Table of Contents
Cable Pinout
2
Optional Features
6
System Parameters Call Coverage / Call Forwarding
8
Trunk Group
8
Trunk Features
9
Ds1 Circuit Pack
9
Signaling Group
10
Coverage Path
13
Remote Call Coverage Table
13
Avaya G600 Quick Start Manual (22 pages)
for Hardware Migration Media Server in an Media Gateway
Brand:
Avaya
| Category:
Server
| Size: 0.75 MB
Table of Contents
Process and Specifications
3
Verifying the Equipment
5
Installing the Hardware: SNMP Module
10
Installing the Hardware: Mounting Brackets
10
Configuring the UPS
18
Powering up the System
21
Troubleshooting
22
Avaya G600 Job Aid (14 pages)
Replacing the Hard Drive, With Media Gateway
Brand:
Avaya
| Category:
Server
| Size: 0.16 MB
Avaya G600 Application Notes (10 pages)
Brand:
Avaya
| Category:
Server
| Size: 0.27 MB
Advertisement
Related Products
Avaya GuestWorks, Definity Enterpris
Avaya G700
Avaya G650
Avaya one-X Quick Edition G11 Global Analog Gateway
Avaya G860
Avaya G150
Avaya one-X G10 PSTN
Avaya GXV3240
Avaya G250-DCP
Avaya Definity G3V5
Avaya Categories
IP Phone
Telephone
Server
Switch
Gateway
More Avaya Manuals
Login
Sign In
OR
Sign in with Facebook
Sign in with Google
Upload manual
Upload from disk
Upload from URL