Table of Contents
Advertisement
Quick Links
Advertisement
Table of Contents

Subscribe to Our Youtube Channel
Related Manuals for Lightspeed Redcat


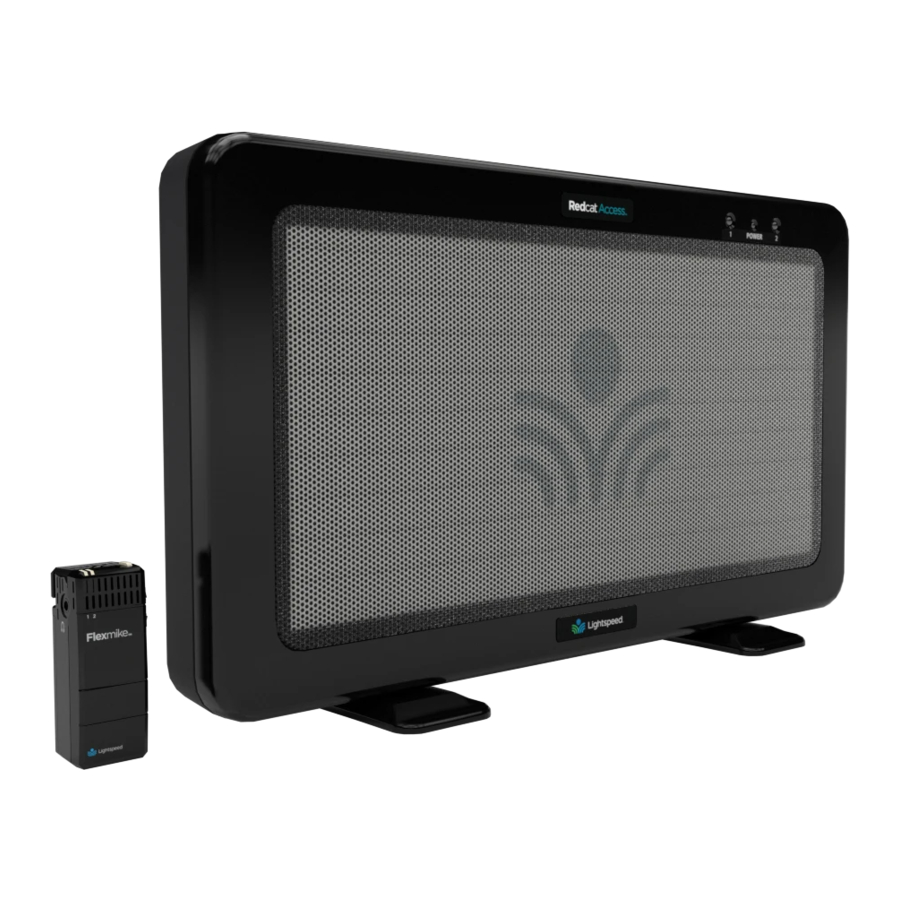
Summary of Contents for Lightspeed Redcat
- Page 1 Classroom Audio System CH A CH B U s e r M a n u a l...
-
Page 3: Table Of Contents
TABLE OF CONTENTS SECTION 1: System Components and Unpacking Overview Optional Components Front Panel Indicators Top Panel Controls Side Panel Controls and Connections Rear Panel Controls and Connections Redmike Controls and Connections Cradle Charger Controls and Connections SECTION 2: Step 1. Determine Set-up Location Set-up &... -
Page 4: Important Safety Instructions
IMPORTANT SAFETY INSTRUCTIONS 1. Read these instructions. 13. Unplug this apparatus during lightning storms or when unused for 2. Keep these instructions. long periods of time. 3. Heed all warnings. 14. Refer all servicing to qualified 4. Follow all instructions. service personnel. -
Page 5: Section 1
SECTION 1: OVERVIEW SYSTEM COMPONENTS AND UNPACKING The standard configuration of the Redcat® will contain: CH A CH B Redcat® Infrared Receiver/Amplifier and Power Supply Redmike® Classroom Microphone Cradle Charger and Power Supply... -
Page 6: Optional Components
OPTIONAL COMPONENTS Optional equipment which may be part of your Redcat system: Redmike® VC Volume Control Microphone Redmike® Share Handheld Mic & Charging Cable STANDARD COMPONENTS Redcat all-in-one receiver/amplifier/speaker with power supply 24V-1.75-NA Power supply for Redcat 24V-1.75-_ Power supply for Redcat, specify country... -
Page 7: Front Panel Indicators
FRONT PANEL INDICATORS 1. POWER ON INDICATOR: The power LED will glow blue when power is applied. 2. CH A & CH B: Illuminate red when the audio for the corresponding microphone is received. CH A CH B TOP PANEL CONTROLS 1. -
Page 8: Rear Panel Features
Controls the volume level of the audio output. 4. POWER SWITCH: This switch is used to turn the Redcat on or off. The front panel blue LED lights when power is on. 5. DC POWER INPUT JACK: Plug the power supply (24V/1.75A) into this jack. -
Page 9: Redmike Controls And Connections
The for selection between Channel battery should only be replaced A or B. If you are using a single by a Lightspeed AA rechargeable microphone, we recommend using sensing battery (part # NH2A27). Channel A. 4. YELLOW PROTECTIVE TAB: Slide 7. - Page 10 Redmike Share is sensed, (Redmike Yellow microphone here. Protective Tab may not have been completely removed—see page 10, item 4.) A blinking green LED means a non- Lightspeed battery has been installed (possibly an alkaline battery).
-
Page 11: Section 2
SECTION 2: SET-UP & USE 1. DETERMINE SET-UP LOCATION The Redcat is shipped with feet to stand on a cabinet or tabletop. Alternatively, the feet can be used as wall mount brackets. Advantages of either include: Tabletop (recommended): Wall-mount: • Virtually no setup time •... -
Page 12: B. To Set-Up Mounted On A Wall
Next, find a location as far away as the class. Having the teacher’s mic possible from the teacher who will too close to the Redcat can result in be using the mic. The best place is feedback. centered on the long wall opposite... - Page 13 3. Drill pilot holes 4. Insert anchors 5. Remove feet from Redcat and place over anchors 6. Insert and secure screws through the Redcat feet into the anchors 7. If using optional security bracket, mount on wall using the provided screws and anchors...
-
Page 14: Connecting The Power Supply
DC power supply. Power On 2. Insert the DC connector into the “DC INPUT” connector on the Redcat and plug the other end to an electrical outlet. 3. Power on the Redcat by pressing the power button. -
Page 15: Audio Integration
3. AUDIO INTEGRATION The next step in setting up your Redcat system is to connect it to the other elements of your audio system. Audio systems have varying elements – you may have a computer, television, DVD/VCR player, a visual projection system or other devices. -
Page 16: Charging The Redmike
Redmike incorporates alkaline protection into the microphone design. Always use a Lightspeed rechargeable sensing battery. Replacement AA NiMH batteries may only be purchased through Lightspeed Technologies (part # NH2A27). Do not attempt to charge alkaline batteries. They can overheat and expand creating a significant hazard and damaging the microphone (this is not covered by warranty). -
Page 17: Operating The Redmike
5. OPERATING THE REDMIKE Once the Redmike is charged, follow these steps to set it up for use. 1. Turn the Redcat power on. The blue LED will glow. 2. Remove the Redmike from the charging cradle and turn it on. - Page 18 DEVICE (ALD) 1. Turn the ALD (Assistive Listening of the Redcat. Device) volume control 4. With the Redcat and ALD turned on the Redcat side panel on, speak into the Redmike and counterclockwise all way the down. slowly adjust the ALD volume 2.
- Page 19 To determine which Redmike is set to Channel B, you can look at the switch on the back of the mike or speak into one of the mics and watch which set of LED’s glow on the front panel of the Redcat (A Volume or B Volume correspond to Channels A or B).
-
Page 20: Section 3
Channel A. The battery should only be 7. VOLUME CONTROLS (UP - replaced by a Lightspeed AA DOWN) rechargeable sensing battery (part # NH2A27). 8. CHARGER CONTACTS (+ -): These contacts interface with the 4. - Page 21 Redmike to setup the Redmike VC. NOTE: A nominal volume level must be set on the Redcat before adjusting controls on the Redmike VC. The teacher can now use the controls on the Redmike VC to adjust the volume level from anywhere in the room.
-
Page 22: Redmike Share: Controls And Connections
REDMIKE SHARE: Controls and Connections 1. POWER SWITCH 2. POWER/CHARGE INDICATOR: this light glows blue when turned on and turns off to indicate low battery level. When charging, the light glows red. 3. AUDIO INPUT: plug a laptop, MP3 player or other audio device into this jack to wirelessly transmit the audio signal to be played through the system. - Page 23 REDMIKE SHARE: Charging 1. Ensure that the Redmike Share is 3. Plug the other end into the turned off. charging jack on the rear of the cradle charger. 2. Make sure the cradle charger is plugged into a wall outlet. 4.
-
Page 24: Redmike Share: Initial Set-Up
REDMIKE SHARE: Initial Set-up 1. Ensure the Redcat is on. The blue LED on the front panel will glow. 2. Turn on the Redmike Share by sliding the switch to the top position. 3. Grip the barrel in the center section. - Page 25 DVD players) adjust the volume at the iRMC. CH A CH B C. If the first two options do not give optimum volume level, the last place to adjust the volume is the CH. B volume on the Redcat.
- Page 26 OPTIONAL IR MEDIA CONNECTOR AUDIO INTEGRATION The iRMC is designed to integrate with the Redcat and multiple audio sources, allowing other instructional technologies to be clearly heard throughout the classroom. Video In Projector Projector CH A CH B Teacher Microphone...
-
Page 27: Section 4
Channel A. If you review these instructions and still have questions, write down the serial number and model number of your system and call Lightspeed Technical Services at 800.732.8999, 5 a.m. – 5 p.m., PST. Customers outside the U.S. should contact their local reseller. - Page 28 TIPS TO OBTAIN OPTIMUM AUDIO PERFORMANCE • Speak in a natural voice. A normal conversational speech level will provide an adequate signal. It is not necessary to increase the intensity of your voice—the audio system provides adequate amplification (approximately 5 – 10 dB) above ambient room noises.
-
Page 29: Section 5
FIVE (5) YEARS, beginning at the date of the purchase invoice. If such malfunction occurs, the product will be repaired or replaced (at Lightspeed’s option) without charge during the warranty period. -
Page 30: Safety Warnings And Certifications
European Union Directives: 2004/108/EC Electromagnetic Compatibility (EMC) and 2006/95/EC Low Voltage Directive (LVD). Lightspeed Technologies launched a formal product recycle program in Europe that complies with the European Union Directive 2002/96/EC on Waste Electrical and Electronic Equipment (“WEEE Directive”). - Page 31 Européenne suivantes : 2004/108/EC Electromagnetic Compatibility (EMC) and 2006/95/EC Low Voltage Directive (LVD). Lightspeed Technologies a lancé un programme de recyclage de produits en Europe conformément à la directive de l’Union Européenne 2002/96/CE relative aux déchets d’équipements électriques et électroniques (directive «...
- Page 32 This device complies with part 15 of the FCC Rules. Operation is subject to the fol- lowing two conditions: (1) This device may not cause harmful interference, and (2) this device must accept any interference received, including interference that may cause undesired operation.
- Page 33 Product: REDCAT SERIES Model Number(s): REDCAT (RC2) Conforms to the following EU Directives and the standards stated: Low Voltage Directive: 73/23/EEC and amendments; UL/lEC 60065...
-
Page 34: System Specifications
SYSTEM SPECIFICATIONS OVERALL SPECIFICATIONS Power Output 20 Watts Amplifier Frequency Response 120 Hz – 13 kHz Signal-to-Noise Ratio >77 dB Dynamic Range > 73 dB Overall Dimensions (W x D x H) 16” x 9.5” x 1.75” (406.4 mm x 241.3 mm x 44.5 mm) Weight 3.23 lbs. - Page 36 L I G HT SPE E D T EC H N OL OG I ES 1 1 509 S W HER M AN RO A D / TU A L ATIN , O R 9 7 0 6 2 T O LL FRE E: 8 00. 7 32. 8 9 9 9 / P HO NE : 5 0 3 .6 8 4 .5 5 3 8 / FAX : 503 .684.3 197 L I G HT SPEED -T EK.
Need help?
Do you have a question about the Redcat and is the answer not in the manual?
Questions and answers