Lexicon RV-8 User Manual
8-channel audio and video control center
Hide thumbs
Also See for RV-8:
- Service manual (248 pages) ,
- User manual (238 pages) ,
- Software upgrade instructions (12 pages)
Table of Contents
Advertisement
Quick Links
Advertisement
Table of Contents
Troubleshooting

Related Manuals for Lexicon RV-8


Summary of Contents for Lexicon RV-8
- Page 1 RV-8 Receiver User Guide...
-
Page 2: Important Safety Instructions
IMPORTANT SAFETY INSTRUCTIONS Read these instructions. Keep these instructions. Heed all warnings. Follow all instructions. Do not use this apparatus near water. Clean only with a dry cloth. Do not block any ventilation openings. Install in accordance with the manufacturer’s instructions. Do not install near any heat sources such as radia- tors, heat registers, stoves, or another apparatus (including amplifiers) that produces heat. - Page 3 Hammerhead is a trademark of Analog Devices, Inc. Telephone: 781-280-0300 Lexicon, Logic 7 and the L7 logo are registered trademarks of Harman International Industries, Inc. U.S. Patent Nos. D454,553; Sales Fax: 781-280-0495 D454,860; 5,796,844; 5,870,480 and other worldwide patents issued and pending. Lexicon LIVE is a trademark of Harman Interna-...
-
Page 4: Documentation Conventions
Introduction DOCUMENTATION CONVENTIONS This document contains general safety, installation and operation instructions for the RV-8 Receiver. It is important to read this user guide before attempting to use the product. Pay particular attention to safety instructions. The following symbols are used in the document:... -
Page 5: Table Of Contents
RV-8 Table of Contents Documentation Conventions... ii Getting Started About the RV-8... 1-2 Highlights ... 1-4 Product Registration ... 1-5 Installation Considerations... 1-5 Remote Control Battery Installation ... 1-6 Basic Operation Front-Panel Overview ... 2-2 Rear-Panel Overview... 2-6 Tuner Overview... 2-10 Selecting a Station ... - Page 6 Specifications ...A-2 Declaration of Conformity ...A-4 Appendix B Menu Tree...B-2 Appendix C Remote Control Programming... C-2 Device Activation ...C-2 Macro Operations ...C-3 Remote Programming Overview ...C-4 Programming Macro Buttons ...C-10 Three-digit Preprogrammed Codes... C-18 Appendix D Installation Worksheet ... D-2 Lexicon...
-
Page 7: Getting Started
Getting Started About the RV-8... 1-2 Highlights ..........1-4 Product Registration ... -
Page 8: Specifications
The rear panel also includes one removable access panel to accom- modate connectors for emerging technologies. More than just an audio and video control center, the RV-8 features the latest version of Lexicon’s critically acclaimed Logic 7 decoding, which creates 7.1-channel output from stereo, and 5.1-and 6.1-channel sources. - Page 9 In addition, a third DSP engine is dedicated to decoding multichannel compressed audio sources. The RV-8 is one of the most advanced audio and video control centers available. High-precision 24-bit/96kHz A/D converters can be used to convert stereo analog audio input signals to digital signals, allowing the RV-8 to provide the benefits of precise digital signal processing without sacrificing signal integrity.
-
Page 10: Highlights
One component video output • Logic 7 decoding • Two 32-bit DSP engines Lexicon • LIVE! (Lexicon Intelligent Variable Environment) • Dolby Digital Surround EX, Dolby Pro Logic IIx, and Dolby Pro Logic decoding • DTS 96/24, DTS NEO:6, and DTS-ES (discrete and matrix) decoding •... -
Page 11: Product Registration
Pay particular attention to instructions below and to other precautions that appear throughout this user guide. install the RV-8 on a solid, flat, level surface such as a table or shelf. The RV-8 can also be installed in a standard 19-inch equipment rack using an optional rack-mount kit available from an authorized Lexicon dealer. -
Page 12: Remote Control Battery Installation
When battery power is low, the remote control enters a low-voltage condition, preventing it from operating the RV-8. When this occurs, replace the batteries. Normal operation will resume when new batteries are installed. To replace the remote control batteries: 1. -
Page 13: Basic Operation
Front-Panel Overview ... 2-2 Rear-Panel Overview ... 2-6 Tuner Overview ... 2-10 Selecting a Station...2-10 Direct Station Access ...2-10 Tune/Seek Access ...2-10 Scan Mode ...2-11 Loading Presets ...2-11 Saving Presets...2-11 Editing Presets ...2-12 Autoload ...2-12 Amplifier Overview ... 2-12 Amplifier Channel Status ...2-13 Making Connections With the Amplifier Output ...2-13 Headphone Overview ... -
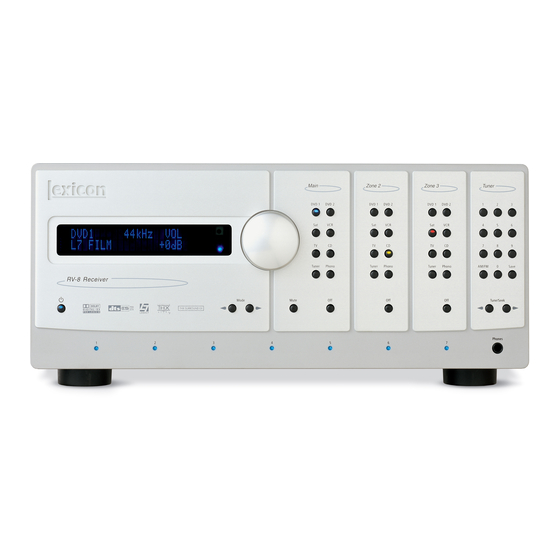
Page 14: Front-Panel Overview
Basic Operation FRONT-PANEL OVERVIEW The RV-8 is shown below. The numbers in the front-panel illustrations correspond with the numbered items in the text. Lexicon... -
Page 15: Volume Knob
The 2 x 20 character display also functions as a display for messages and menus, one line at a time. Note: Power is still supplied to the RV-8 when standby mode is activated. 2 IR RECEIVER The IR receiver receives infrared commands from the RV-8 remote control. -
Page 16: Standby Button
Toggles the RV-8 between on and standby. When the RV-8 is powered on, pressing this button places the RV-8 into standby and lights the red LED on the button. Power is supplied to the RV-8 when in standby. When the RV-8 is in standby, pressing the button turns the unit on and activates all zones that were active in the previous operating session. -
Page 17: Mute Button
RV-8 11 MUTE BUTTON Mutes or restores the RV-8 Main Zone volume to its original level. Press the Mute button to mute volume level; “MUTE ON” appears in the on-screen and front-panel displays. Press the Mute button again to restore the volume to its original level. The VOLUME CONTROL SETUP and MUTE LEVEL parameter can be used to set mute levels. -
Page 18: Rear-Panel Overview
Basic Operation Lexicon REAR-PANEL OVERVIEW The RV-8 is shown below. The numbers in the rear-panel illustrations correspond with the numbered items in the text. 16 17 18 CAUTION! Never make or break connections to the RV-8 unless the RV-8 and all associated components are powered off. -
Page 19: Amplifier Outputs
RV-8 1 AMPLIFIER OUTPUTS Provide audio outputs to the speakers. The Center channel output and all Right channel outputs are located on the left-hand side of the rear-panel. All Left channel outputs are located on the right- hand side of the rear-panel. This organizaion facilitates making speaker connections. - Page 20 The PWR connector (the power trigger output connector) is not configurable. It is activated when the RV-8 is powered on, and deactivated when the RV-8 is powered off from the rear panel or by Lexicon...
-
Page 21: Ac Input Connector
When the RV-8 is powered off, standby mode is not available. In the event of a power outage, the RV-8 will display a BROWNOUT, CYCLE POWER message. To turn the unit back on, use the rear- panel power switch. -
Page 22: Tuner Overview
For example: WABC/90.90 FM or Preset 02/10.30 AM. Two antennas are supplied with the RV-8: one for AM and one for FM stereo. At a minimum, use of the supplied antennas is recommended to ensure consistent tuner performance. -
Page 23: Scan Mode
This feature is only accessible via the remote control. SAVING PRESETS The RV-8 has 40 presets available for storing AM or FM stations. The presets are divided into four banks with ten presets per bank. It is possible to store a combination of AM and FM stations in each bank. -
Page 24: Editing Presets
Preset23 in the menu. EDITING PRESETS It is possible to customize the name of each preset on the RV-8. To edit the preset name: 1. Select TUNER PRESETS from the MAIN MENU. The TUNER PRESETS menu contains a list of preset pages. -
Page 25: Amplifier Overview
AMPLIFIER OVERVIEW The RV-8 features a 7-channel power amplifier with 140W per channel. The RV-8 can be configured so that all amplifier channels are dedicated to the Main Zone or so that outputs 3 and 7 (labeled Rear Right and Rear Left) are used for Zone 2 or Zone 3. Heavy duty gold plated 5-way binding posts are provided for speaker connections. -
Page 26: Headphone Overview
• For optimal performance, position the remote control at a 30-degree angle no more than 40 to 60 feet (12.2m to 18.3m) from the RV-8. Placing the RV-8 inside a smoked glass cabinet will reduce the remote control range. •... -
Page 27: Main Menu
B-2. The table below indicates the navigation commands that the remote-control buttons perform when the Main Zone command bank is activated. Note: The DVD1 device has been preprogrammed to control the Lexicon RT-10 and RT-20 disc players. Arrow Navigation Functions •... -
Page 28: Menu Options
A / V S Y N C D E L AY O F F C U S T O M N A M E O F F O F F arrows to increase or decrease the setting in the desig- Lexicon... -
Page 29: Remote Control Buttons
RV-8 REMOTE CONTROL BUTTONS 1. SYSTEM POWER OFF 2. Displays the name of the selected device. 3. POWER ON 4. Device and function buttons 5. Light 6. Displays page number/currently selected device 7. LCD page change 8. FAVORITE 9. HOME menu 10. -
Page 30: Command Matrix
The command matrix describes the commands that the remote control buttons perform when each command bank is active. BUTTON HOME MAIN PAGE1 MAIN PAGE2 ZONE2 PAGE1 Enters RV-8 standby mode. Activates the RV-8. Displays the MAIN Zone Displays the command bank, which... - Page 31 RV-8 BUTTON ZONE3 PAGE1 ZONE3 PAGE2 Enters RV-8 standby mode. Activates the RV-8. Displays the Status of Resets the AUDIO Zone 3. CONTROLS menu BASS, TREBLE, and TILT EQ parameter to +0.0dB. Deactivates Zone 3. Decreases the AUDIO CONTROLS menu Main Zone BASS parameter in.5dB increments.
- Page 32 Music Surround input for Zone 2. ON SCREEN listening mode. DISPLAY parameter. Toggles between Selects the Phono Deactivates the RV-8. setting the input input for Zone 2. to auto, analog or digital. Selects Page 1 of Selects Page 2 of...
- Page 33 RT-20 Subtitle bar. RT-20 search mode. Opens the RT-10 or Activates the RT-10 or RT-20 Audio bar. RT-20 program mode. Displays DVD1 Page 2 Displays DVD1 Page 1 command bank. command bank. Increases RV-8 Main volume level in 1dB increments 2-21...
- Page 34 History-dependent* Scrolls downward through listening modes. History-dependent* If the RV-8’s built-in tuner is the currently selected input, press next available preset. History-dependent* Activates the Trigger output connector labeled 1. History-dependent* If the RV-8’s but-in tuner is the currently selected input, press to next available preset.
- Page 35 Zone 3 volume to its original level. Increases Subwoofer output in 1dB increments. Decreases Subwoofer output in 1dB increments. If the RV-8’s built-in tuner is the currently selected input, press to skip back to the next available preset.
- Page 36 HOME PAGE1 History-dependent* If the RV-8’s built-in tuner is the currently selected input, press to the next available tuner frequency. Pressing for 2 seconds activates seek mode, which searches for the next available radio station. To enter Scan Mode, press and hold...
- Page 37 RV-8 BUTTON ZONE3 PAGE1 ZONE3 PAGE2 If the RV-8’s built-in tuner is the currently selected input, press o nce to tune to the next available tuner frequency. Pressing for 2 seconds activates seek mode, which searches for the next available radio station. To enter...
- Page 38 History-dependent* If the RV-8’s built-in tuner is the currently selected input, pressing this button will save the currently selected tuner frequency into a preset slot. Also use this button when programming the remote. See page C-4 for additional information.
- Page 39 RV-8’s built-in tuner is the currently selected input. If the RV-8 built-in tuner is the currently selected input, toggles between AM/FM frequency bands. If the RV-8’s built-in tuner is the currently selected input, saves the currently selected tuner frequency as a preset.
-
Page 40: Understanding The Zones
Basic Operation UNDERSTANDING THE ZONES The RV-8 features three zones of operation: the Main Zone, Zone 2 and Zone 3. The Main Zone controls audio and video signals in the primary listening space. Zone 2 controls digital and analog audio and composite or S-Video signals for a second zone or recording device. -
Page 41: Tuner Status
RV-8 ZONE 3 TWO-LINE STATUS Opens in the on-screen and front-panel displays whenever the RV-8 detects a Zone 3 status change. The Zone 3 two-line status indicates the current input, input source and volume level selected in Zone 3. TUNER STATUS The Tuner status indicates the current frequency, band, listening mode and volume level. - Page 42 +0.0dB, –3.0dB, –6.0dB See “STATUS Menu Parameter Descriptions” on page 2-34 for detailed information. D STATUS D STATUS INPUT SAMPLE RATE MODE 2.0 ENCODING CHANNELS DIALOG OFFSET BIT RATE MIX ROOM EX ENCODED CENTER MIX LVL SL SR SURR MIX LVL Lexicon...
- Page 43 RV-8 STATUS Provides information about DTS(-ES) input sources. Includes L, C, R, SL, SR, SB and LFE level meters. The SB level meter appears when a 6.1-channel input source is present, or when a 5.1-channel input source is present and the ES DECODING parameter is set to ON.
-
Page 44: Digital Status
Parameter Possible Settings INPUT The current input MODE The current listening mode INPUT TYPE SAMPLE RATE 44.1kHz, 48kHz, 88.2kHz, 96kHz See “STATUS Menu Parameter Descriptions” on page 2-34 for detailed information. DIGITAL STATUS INPUT MODE INPUT TYPE SAMPLE RATE Lexicon... -
Page 45: Analog Status
RV-8 5.1 ANALOG STATUS Provides information about 5.1-channel analog input sources. Parameter Possible Settings INPUT The current input MODE The current listening mode INPUT TYPE ANLG SAMPLE RATE 96kHz See “STATUS Menu Parameter Descriptions” on page 2-34 for detailed information. -
Page 46: Status Menu Parameter Descriptions
(–27dBFS). When the dialog normalization value of the incoming signal is higher or lower, the DIALOG OFFSET parameter indicates the amount of adjustment the RV-8 makes to normalize dialog to –27dBFS. ES ENCODING Indicates whether or not a DTS-ES-encoded source is detected. -
Page 47: Input Type
RV-8 INPUT Indicates the selected input (e.g., DVD1). INPUT TYPE Indicates the input source that is present. When the parameter setting is ANLG, a 2-channel analog audio source is present and the MAIN ADV menu 2-CH ANLG BYP parameter is set to OFF. When the parameter setting is BYP (Bypass), a 2-channel analog audio source is present and the 2-CH ANLG BYP parameter is set to ON. -
Page 49: Setup
Setup ...3-2 Input Setup...3-4 Changing Input Names... 3-5 Assigning Audio and Video Input Connectors ... 3-7 Selecting Preferred Listening Modes... 3-12 Configuring Advanced Input Settings... 3-17 INPUT SELECT Parameter Settings... 3-19 ZONE2 in Parameter Settings... 3-22 Speaker Setup ...3-25 Setting Crossover Points... 3-25 Speaker Setup Parameters... -
Page 50: Setup
Main Zone, Mute, Zone 2, Zone 3 and Headphone volume levels. See “VOLUME CONTROL SETUP” on page 3-68 for more information. TRIGGER SETUP TRIGGER Opens the TRIGGER SETUP menu, which is used to configure the trigger output connector labeled 1. See ”TRIGGER SETUP” on page 3-70 for more information. Lexicon... -
Page 51: Power Management
Opens the POWER MANAGEMENT menu, which is used to automat- ically put the RV-8 into standby mode during brownouts. When set to ON, the RV-8 detects low voltage levels or a momentary loss of power and puts the device in standby mode. In the event of a power brown out, the RV-8 will display a BROWN OUT!! PRESS STANDBY message. -
Page 52: Input Setup
DVD1 SPEAKERS DVD2 I/O CONFIG DISPLAYS VOLUME CONTROLS TRIGGER TUNER SETUP TUNER LOCK OPTIONS PHONO LIVE! CALIBRATION POWER MANAGEMENT Lexicon DVD1 INPUT SETUP NAME DVD1 DIGITAL IN COAX-1 ANALOG IN NONE ANLG IN LVL AUTO VIDEO IN S-VIDEO-1 COMPONENT IN... -
Page 53: Changing Input Names
RV-8 CHANGING INPUT NAMES Selecting the INPUT SETUP menu NAME parameter opens the INPUT NAME menu, which is used to customize or restore the factory-default name of the selected input. Factory-default input names correspond to front-panel and remote-control input selection button labels. - Page 54 4. When this message appears, press the the factory-default name of the selected input and close the message. (Press the without restoring the factory-default name of the selected input.) Lexicon DVD1 INPUT NAME PRESS MENU V TO RESTORE INPUT NAME...
-
Page 55: Assigning Audio And Video Input Connectors
ASSIGNING AUDIO and VIDEO INPUT CONNECTORS The RV-8 has eight configurable inputs, each of which can be assigned to its eight digital audio, eight analog audio, the built-in tuner, the phono input, five composite video, five S-Video or three component video input connectors. - Page 56 ANALOG IN Opens the ANALOG IN menu, which is used to assign an analog audio input connector for the selected input. The RV-8 has eight configurable inputs, each of which can be assigned to any of its eight analog audio input connectors.
- Page 57 Despite attempts at standardization, analog audio sources have a wide range of levels. To compensate for this, the RV-8 allows independent input level adjustment for each of its stereo and multichannel analog audio input connectors, phono input and the internal tuner.
-
Page 58: Level Meters
Provides automatic adjustment of analog audio input levels. When set to ON, the RV-8 automatically monitors and optimizes input levels. When the input signal is too high, the RV-8 quickly decreases input levels to avoid overload. When the input signal is too low, the RV-8 slowly increases input levels to maximize signal-to-noise ratio and dynamic range. - Page 59 VIDEO IN Opens the VIDEO IN menu, which is used to assign a composite or S-Video input connector for the selected input. The RV-8 has eight configurable inputs, each of which can be assigned to any of its five composite or five S-Video input connectors.
-
Page 60: Selecting Preferred Listening Modes
The RV-8 allows five preferred listening modes for each Main Zone input: one listening mode each for 2-channel, Dolby Digital, DTS(-ES), 5.1a and MIC (LIVE!) sources. The table to the right indicates the INPUT SETUP menu parameters that can be used to select preferred listening modes. - Page 61 DTS NEO:6 MUSIC Modes that Do Not Appear in the Input Setup Menu The RV-8 features the ability to assign preferred listening modes for each input and incoming audio format. However, not all listening modes will appear in the Input Setup Menu. Listening modes that do...
- Page 62 SELECTING PREFERRED LISTENING MODES The Use Last Parameter When the RV-8 is set to use a preferred listening mode for a selected input, selecting another mode from the Mode scroll list replaces the preferred selection. However, this newly selected mode will be lost when switching between inputs.
- Page 63 2-channel source is present. When the 2-CH parameter is set to USE LAST: The RV-8 activates the listening mode that was activated the last time a 2-channel source was present The remote control 2 CH button toggles between the 2-CHANNEL listening mode and the previous listening mode, and ignores the USE LAST setting.
- Page 64 DTS(-ES) source was present • The RV-8 activates the DTS THX MUSIC listening mode if it was activated the last time a DTS(-ES) source was present. Since DTS THX MUSIC is a dynamic listening mode, it cannot be selected as the preferred listening mode for DTS(-ES) sources.
-
Page 65: Configuring Advanced Input Settings
INPUT SELECT parameter settings. Note: When the INPUT SELECT parameter is set to AUTO, the RV-8 will not select the assigned analog audio input connector when a valid digital audio input source is present. Some DVD and CD players output digital signals (data) when the player is paused or stopped or when the player is powered on and the disc drawer is empty. -
Page 66: Analog Bypass
DVD1 MAIN ADVANCED When set to ON, the RV-8 passes the analog input signal to the Main Zone audio output connectors. For stereo analog sources, the input is sent to the FRONT L/R outputs. For a 5.1-channel analog source, the (L) input is sent to the FRONT L output. -
Page 67: Input Select Parameter Settings
Main Zone audio output connectors, based on the input source that is present. For example: • When a 2-channel PCM, Dolby Digital or DTS(-ES ) source is presen t, th e RV-8 automatically selects the assigned digital audio input connector. • When an SACD... - Page 68 When OFF, the display device does not show the on-screen display, including the two-line status. Note: When the ON-SCREEN DISPLAY menu BACKGROUND parameter is OFF, the display device using the component video output connector will not show the on-screen display. INPUTS DVD1 MAIN ADVANCED COMPONENT OSD Lexicon ON, OFF...
- Page 69 MAIN ADVANCED When video played back from a VCR is converted to component video by the RV-8, the resulting picture quality depends on both the quality of the VCR playback and the capabilities of the component display device. The LEGACY VIDEO menu item has two selections, A and B.
-
Page 70: Zone2 In Parameter Settings
ZONE2 IN parameter to DIGITAL when the ANALOG IN parameter is set to NONE. • The RV-8 sends the assigned D I G I TA L c o n n e c t o r • specified in the INPUT SETUP... - Page 71 INPUTS Allows adjustment of analog audio input levels for input signals sent to the Zone 2 digital audio output connectors. The RV-8 applies these adjustments to input signals before passing them to the Zone 2 digital audio output connectors. This parameter can be adjusted when an input source is present to prevent the internal A/D converter from overloading.
- Page 72 Controls the sample rate of analog input signals sent to the Zone 2 digital audio output connectors. When a value is selected, the RV-8 runs the Zone 2 A/D converters at the selected sample rate. It is recommended to set the DIG OUT RATE parameter to the appropriate value when using a recording format that operates on a single sample rate, such as CD-R format (44.1kHz).
-
Page 73: Speaker Setup
RV-8 SPEAKER SETUP SETUP SPEAKERS Select the SPEAKER SETUP menu to configure the Main Zone audio output connectors for the desired speaker setup. The Main Zone includes eight audio output connectors labeled Front L/R, Center, Subwoofer, Side L/R and Rear L/R. - Page 74 Low frequencies between the Subwoofer and any or all of the other speaker channels can be duplicated. To do this, select the FULL + SUB crossover setting for the front, center, side or rear speakers. Making this selection can result in excessive bass. Lexicon CUSTOM SETUP FRONT L/R 40 Hz...
- Page 75 RV-8 In general, low frequencies will be redirected from speakers with the highest crossover points to speakers with the lowest crossover points. Low- frequency signals lower than the lowest crossover point will be redirected to the subwoofer. If the lowest crossover point is FULL, low frequency signals, excluding LFE information, will not be redirected to the subwoofer.
- Page 76 80Hz 80Hz 80Hz When a THX speaker setup is selected, the RV-8 applies a THX 80Hz crossover point with a 12dB-per-octave filter to the Front L/R, Center, Side L/R and Rear L/R output connectors. The RV-8 applies a THX 80Hz crossover point with a 24dB-per-octave filter to the Subwoofer output connector.
-
Page 77: Speaker Setup Parameters
RV-8 SPEAKER SETUP PARAMETERS SETUP SPEAKERS SET CROSSOVERS CUSTOM SETUP The table below indicates the speaker setup parameters for config- uring the Main Zone audio output connectors for the desired speaker setup. These parameters are available in the CUSTOM SETUP and THX SETUP menus. - Page 78 90Hz 1 0 0 Hz 1 0 0 Hz 1 1 0 Hz 1 1 0 Hz 1 2 0 Hz 1 2 0 Hz NONE NONE Lexicon CUSTOM SETUP FRONT L/R 40Hz CENTER 60Hz SIDE L/R 60Hz REAR L/R...
- Page 79 RV-8 FRONT L/R FULL, FULL + SUB, 30 to 120HZ, THX 80HZ SETUP SPEAKERS SET CROSSOVERS CUSTOM SETUP Assigns a crossover point for the Main Zone audio output connectors labeled Front L/R when a custom speaker setup is selected. Opens the FRONT L/R SPEAKERS menu to select a crossover point for the Front L/R output connectors.
- Page 80 When the speaker setup does not include rear speakers, select NONE to redirect rear channel signals to the Side L/R output connectors. If the SIDE L/R parameter is also set to NONE, the RV-8 redirects surround channel signals to the Front L/R output connectors.
- Page 81 THX SETUP Assigns a crossover point for the Main Zone audio output connector labeled Subwoofer. When set to FULL, the RV-8 sends a full-range audio output signal to this connector. Otherwise, the RV-8 activates a crossover point at the selected setting. Choose the setting equal to the lowest setting of the other speakers.
- Page 82 THX SETUP 60Hz 60Hz 40Hz 60Hz 40Hz 40Hz 60Hz 60Hz CUSTOM SETUP FRONT L/R CENTER APART SIDE L/R CLOSE REAR L/R SUBWOOFER ULTRA2 SUB ULTRA2 SUB Lexicon 40 Hz 60 Hz 60 Hz 60 Hz 40 Hz APART ON, OFF...
- Page 83 When the remote control 7/5 button is used to toggle between 7 and 5-channel playback: • ASA processing is not available during 5-channel playback. • The RV-8 automatically switches between the 5.1 THX ULTRA2 and 5.1 THX or DTS THX ULTRA2 and DTS THX listening modes. Setup APART, CLOSE, TOGETHER 3-35...
-
Page 84: Automatic Calibration
Setup AUTOMATIC CALIBRATION The RV-8 offers automatic calibration of speaker distances, output level, or both. The table below indicates available automatic calibration options. A successful microphone check is required before automatic calibration can be performed. Automatic Options Details MICROPHONE CHECK •... -
Page 85: Connecting The Microphones
To connect the microphones: 4. Make sure the RV-8 is powered off OR in standby mode. 5. Connect the microphones included in the Lexicon Microphone Kit to the microphone input connectors on the RV-8 rear panel. Make sure the microphone cable plug is fully inserted for a solid connection. - Page 86 All of the microphones are positioned as close together as possible in an unobstructed location that is equidistant from the front left and right speakers. 3-38 Rear Left Side Left Rear Right Side Right Microphone Front Right Lexicon Front Left Center Subwoofer...
- Page 87 RV-8 IMPROPER microphone positioning for the microphone check During the microphone check, DO NOT: 7 Separate the microphones 7 Scatter the microphones throughout the listening space 7 Obstruct the line-of-sight path between the micro- phones and the speakers 7 Position the microphones on the floor, on seat...
- Page 88 RV-8 determines the relative noise level of the listening space and the internal noise level of the microphones. After eliminating microphones that are not detected or not functioning, the RV-8 calculates an average level for all microphones. CUSTOM SETUP CHECK MICROPHONES...
- Page 89 The RV-8 uses the calibration noise signal to eliminate micro- phones that register the signal at a level that is too low or too high. Then, the RV-8 determines the appropriate output level for the calibration noise signal used during automatic calibration.
- Page 90 • Examine microphone input connections to ensure that the microphones are properly con- nected to the RV-8 and that microphone cable plugs are fully inserted for a solid connection. • The microphone may be damaged. Contact an authorized Lexicon dealer for assistance.
- Page 91 The microphones are positioned as close together as possible in a single listening position, allowing the RV-8 to calibrate optimal speaker distances and output levels for that position. Rear Left...
- Page 92 Each micro- phone is positioned in a single listening position within a single row, allowing the RV-8 to calibrate optimal speaker distances and output levels for that row at the expense of a single listening position.
- Page 93 Each micro- phone is positioned in a single listening position within a row, allowing the RV-8 to calibrate optimal speaker distances and output levels for a larger listening area at the expense of a single listening position.
- Page 94 The microphones are positioned on the floor along the perimeter of the listening space, making it difficult for the RV-8 to calibrate optimal speaker distances and output levels for the actual listening positions.
- Page 95 RV-8 IMPROPER microphone positioning for automatic calibration During the automatic calibration, do not: 7 Arrange the microphones along the perimeter of the listening positions or space 7 Position the microphones at spots where the listeners’ heads will not be during listening...
- Page 96 The following AUTO SPEAKER SETUP messages are displayed before automatic calibration begins: • The !CAUTION! HIGH AUDIO LEVELS message indicates that the RV-8 generates loud calibration noise signals during automatic calibration. If the sig- nals become too loud, press the menu.
- Page 97 RV-8 calculates a distance for the corresponding speaker. As it finishes each parameter, the RV-8 enters the calibrated value or an ERROR message to the right of the parameter label. • Because of the way low-frequency signals propagate in most listening spaces, automatic speaker dis- tance calibration often produces unreliable results for subwoofers.
- Page 98 ERROR AUTO VALUES APPLIED PRESS TO VIEW DETAILS When the RV-8 is finished calibrating speaker distances and output levels, if there was a calibration error, the AUTO SPEAKER SETUP screen is displayed, indicating the results for each calibration procedure. • An OK message indicates that no errors occurred during the calibration proce- dure.
- Page 99 RV-8 STEP DISTANCES SET DISTANCES AUTO DISTANCES AUTO DISTANCES FRONT LEFT ORIGINAL DISTANCES CENTER FRONT RIGHT SIDE RIGHT R SR REAR RIGHT 0.0ft 0.0ft 0.0ft REAR LEFT SIDE LEFT 0.0ft SUBWOOFER SL RL 0.0ft 0.0ft 0.0ft 0.0ft Use the SET DISTANCES menu to select the desired speaker distances.
- Page 100 • • Set the corresponding CUSTOM or THX SETUP menu parameter to include the selected speaker in the speaker setup. (The RV-8 only calibrates values for speakers that are included in the speaker setup.) • Examine speaker/associated amplifier connections to ensure that speaker wires are not crossed.
-
Page 101: Manual Calibration
RV-8 MANUAL CALIBRATION SETUP SPEAKERS MANUAL Selecting the SPEAKER SETUP menu MANUAL option displays the MANUAL SPEAKER SETUP menu, to manually calibrate speaker distances and output levels. The table below indicates available manual calibration options. MAIN MENU MODE ADJUST AUDIO CONTROLS... - Page 102 SIDE RIGHT 0.0ft REAR RIGHT 0.0ft 0.0 to 30.0ft or 12.0m REAR LEFT 0.0ft 0.0ft 0.0ft SIDE LEFT 0.0ft SUBWOOFER 0.0ft UNITS FEET SL RL 0.0ft 0.0ft arrow buttons to set the parameter to the closest available Lexicon METERS FEET...
- Page 103 RV-8 PERFORMING MANUAL OUTPUT LEVEL CALIBRATION SETUP SPEAKERS MANUAL LEVELS CALIBRATION Selecting the MANUAL SPEAKER SETUP menu LEVELS CALIBRATION option displays the LEVELS CALIBRATION menu shown below, to manually calibrate output levels. SETUP MAIN MENU INPUTS MODE ADJUST SPEAKERS AUDIO CONTROLS...
- Page 104 Press the button to skip the internal noise test. During the internal noise test, the RV-8 sends calibration noise signals to each speaker in the order shown on the SPEAKER LEVEL ADJUST menu. The cursor automatically scrolls through output level param- eters, highlighting each parameter as the RV-8 sends the calibration noise signal to the corresponding speaker.
-
Page 105: Input Source
The external noise test requires an external calibration source such as an audio calibration disc. When the external noise test is conducted, the RV-8 activates a listening mode based on the current Main Zone input source. Refer to the table below for more information about external noise test listening mode activation. - Page 106 The BASS PEAK LIMITERS option displays the BASS PEAK LIMITERS menu, to set amplitude limits on low-frequency signals sent to the Main Zone audio output connectors, including the Subwoofer. The RV-8 is equipped with an internal limiter to prevent low-frequency signals from exceeding a designated output level.
- Page 107 RV-8 LIMITER SETUP SPEAKERS MANUAL LEVELS CALIBRATION LIMITER Limits low-frequency signals sent to the subwoofer or redirected to other speakers. To set the LIMITER parameter: • Select ON to restrict the output level of the low-frequency signals to the LIMIT ADJ parameter setting.
-
Page 108: I/O Config
• Input sources that were assigned to the 5.1 ANLG (3-5) and 5.1 ANLG (6-8) are reassigned to the stereo connectors labeled 3 and 6, respectively. Lexicon REAR PANEL CONFIG 8 STEREO INPUTS 5 ST. & (1) 5.1 ANLG 2 ST. & (2) 5.1 ANLG... - Page 109 RV-8 5 ST. & (1) 5.1 ANLG SETUP I/O CONFIG ANALOG INPUTS 5 ST. & (1) 5.1 ANLG Configures the analog audio input connectors as five stereo connectors and one 5.1-channel configuration. When the analog audio input connectors are configured as five stereo and one 5.1-channel configuration:...
- Page 110 Main Zone when the 5.1 MAIN & ZONE3 2.0 setting is chosen. Press the right menu button to confirm the change. Pressing any other button will cancel the change. Lexicon AMP OUTPUTS MAIN 7.1 MAIN 5.1 & ZONE2 2.0 MAIN 5.1 &...
-
Page 111: Display Setup
RV-8 DISPLAY SETUP SETUP DISPLAYS Selecting the SETUP menu DISPLAYS option opens the DISPLAY SETUP menu, which is used to customize the on-screen and front-panel displays, restore audio/video synchronization, and activate and create a custom unit name. MAIN MENU MODE ADJUST... -
Page 112: On-Screen Display Setup
When set to ALWAYS ON, the on-screen display remains on at all times. When set to 2 SECONDS, the on-screen display appears for 2 seconds whenever the input source changes or the RV-8 receives a command. When set to ALWAYS OFF, the on-screen display remains off at all times. - Page 113 RV-8 POSITION SETUP DISPLAYS ON-SCREEN DISPLAY Controls the vertical position of the two-line status on the display device screen. When set to TOP, the two-line status appears near the top of the display device screen. When set to CENTER, the two-line status is centered on the display device screen.
-
Page 114: Front-Panel Display Setup
ON, the front-panel display remains on at all times. When set to 2 SECONDS, the front-panel display appears for 2 seconds whenever the input source changes or the RV-8 receives a command. When set to ALWAYS OFF, the front-panel display remains off at all times. -
Page 115: A/V Sync Delay
RV-8 is activated. When set to ON, the custom name scrolls across the on-screen and front-panel displays when the RV-8 is activated. When set to OFF, the custom name does not appear when the RV-8 is activated. The custom name can be entered in the DISPLAY SETUP menu EDIT CUSTOM NAME menu. -
Page 116: Volume Control Setup
-30dB FULL MUTE MAX VOL +12dB Z2 PWR ON -30dB HEADPHONE -30dB MAX VOLUME +12dB –40dB, –30dB, –20dB, –10dB, FULL MUTE VOLUME CONTROLS MUTE LEVEL LAST LVL, –80 to +12dB VOLUME CONTROLS ZONE PWR ON Lexicon -10dB -20dB -30dB -40dB... -
Page 117: Max Volume
ZONE PWR ON Sets the Headphone volume level that will be selected whenever headphones are plugged in to the RV-8. When set to LAST LVL, the headphones will activate at the last volume level that was selected LAST LVL, –80 to +12dB when they were last plugged in. -
Page 118: Trigger Setup
12V DC trigger output connectors. The connector labeled PWR – the power trigger output connector – is not configurable. It is activated when the RV-8 is activated, and deactivated when the RV-8 is deactivated. The trigger output connector labeled 1 can be configured for remote or program operation. - Page 119 RV-8 PROGRAM OPERATION PARAMETERS SETUP TRIGGER (PROGRAM OPERATION PARAMETER) Configure the trigger output connector labeled 1 for program operation. All TRIGGER SETUP menu parameters– except the REMOTE ONLY parameter–are considered program operation parameters. The connector can be associated with multiple inputs and listening modes at the same time.
-
Page 120: Tuner Setup
Note: The tuner user interface will not allow illegal frequencies to be entered. It will always set at the closest valid frequency. For example, if the RV-8 has USA set as the current region, entering 107.8MHz will result in 107.9MHz being the actual tuner frequency. -
Page 121: Tuner Region Band Limit And Increments
RV-8 MAIN MENU MODE ADJUST AUDIO CONTROLS TUNER PRESETS SETUP SCAN SENS TUNER SETUP REGION SETUP Selects the Scan Sensitivity parameter, which can be used to set the threshold the system will use to tune to a new station. The default setting is LOW sensitivity (only the strongest station frequencies will tune). - Page 122 AUTOLOAD function preserves any existing presets, consider using the CLEAR ALL function before using AUTOLOAD. Note that some channels may be repeated in the preset section if AUTOLOAD is used more than once since the last CLEAR ALL. PRESS RIGHT TO START AUTOLOAD Lexicon...
-
Page 123: Clear All
RV-8 MAIN MENU MODE ADJUST AUDIO CONTROLS TUNER PRESETS SETUP CLEAR ALL SETUP TUNER SETUP CLEAR ALL Clears all of the presets. When this option is highlighted, press the right ( ) arrow to select. The message “PRESS RIGHT ALL PRESETS” will appear in the on-screen and front-panel displays. - Page 124 Program Service (PS) name, such as a text messaging feature similar to Radio Text (RT). This can make it difficult to identify the station. You may wish to select PRESET NAME instead of an RSD NAME in this instance. Lexicon RDS NAME PRESET NAME...
-
Page 125: Radio Text
RV-8 MAIN MENU MODE ADJUST AUDIO CONTROLS TUNER PRESETS SETUP RADIO TEXT SETUP TUNER SETUP RADIO TEXT Activates the RADIO TEXT (RT) feature. Radio Text is presented as scrolling text in the bottom row of the front-panel and on-screen displays. Radio text can contain up to 64 characters and whatever text the station broadcasts - such as the title and performer of the current song, the station call letters or the station byline. - Page 126 • The channel identification of the alternate frequency is an exact match of the currently selected frequency. • The alternate frequency detected has a stronger signal strength than the currently selected frequency. • The AUTO FREQUENCY feature is ON. Lexicon...
-
Page 127: Lock Options
RV-8 LOCK OPTIONS SETUP LOCK OPTIONS Selecting the SETUP menu LOCK OPTIONS option opens the LOCK OPTIONS menu, which is used to protect MODE ADJUST, AUDIO CONTROLS and SETUP menu branch parameter settings from accidental changes. MAIN MENU MODE ADJUST... -
Page 128: Live! Calibration
1. Make sure the RV-8 is powered off or in standby mode. 2. Connect the Lexicon microphones to the microphone input 1 and 2 connectors on the RV-8 rear panel. Connector 1 is for the left microphone, connector 2 is for the right. Make sure each microphone cable plug is fully inserted for a solid connection. - Page 129 RV-8 POSITIONING THE MICROPHONES FOR LIVE! Refer to the microphone placement examples below to position the microphones for LIVE! PROPER microphone positioning for LIVE! Position the microphones: 3 On or near opposite side walls 3 Approximately halfway between the front and...
- Page 130 7 Place the microphones within 2 feet (0.61m) of any speaker The illustration to the right provides an example of improper microphone placement for LIVE! calibration or for a permanent location. 3-82 Rear Left Rear Right Side Right Microphone Front Right Lexicon Side Left Front Left Center Subwoofer...
- Page 131 1. Select SETUP LIVE! CALIBRATION as shown above. 2. The !CAUTION! HIGH AUDIO LEVELS message appears to indicate that the RV-8 generates loud calibration noise signals during LIVE! calibration. If the signals become too loud, press the cancel LIVE! calibration. Press the button to begin calibration.
- Page 133 Audio Controls Audio Controls ...4-2...
-
Page 134: Audio Controls Audio Controls
Main Zone audio output connectors labeled Front L/R and Center. The TREBLE Parameter Settings graph on the next page indicates the frequency response of all TREBLE parameter settings. -3.0 to +3.0dB -6.0 to +6.0dB –6.0dB to +6.0dB BASS –6.0dB to +6.0dB TREBLE Lexicon... - Page 135 RV-8 BASS Parameter Settings The BASS parameter controls the amount of low-frequency boost or cut applied to the Main Zone audio output connectors labeled Front L/R, Center and Sub. TREBLE Parameter Settings The TREBLE parameter controls the amount of high-frequency boost or cut applied to the Main Zone audio output connectors labeled Front L/R and Center.
- Page 136 LOUDNESS parameter is set to ON and Main Zone volume level is adjusted. AUDIO CONTROLS BASS TREBLE TILT EQ LOUDNESS BALANCE FADER ZONE2 BALANCE ZONE3 BALANCE LOUDNESS Lexicon ON, OFF...
- Page 137 RV-8 TILT EQ Parameter Settings The TILT EQ parameter controls the amount of tilt equalization applied to the Main Zone audio output connectors labeled Front L/R, Center and Sub. LOUDNESS Parameter Settings The LOUDNESS parameter controls the amount of low-frequency boost that is automatically applied to the Main Zone audio output connectors labeled Front L/R, Center and Sub.
- Page 138 AUDIO CONTROLS Controls the left-to-right balance of the Zone 3 audio output connectors. AUDIO CONTROLS L< ZONE2 BALANCE >R BASS TREBLE TILT EQ LOUDNESS BALANCE FADER ZONE2 BALANCE ZONE2 BALANCE L< <|> >R ZONE2 BALANCE L< <|> >R ZONE3 BALANCE Lexicon...
- Page 139 Tuner Presets Tuner Presets ...5-2...
-
Page 140: Tuner Presets Tuner Presets
EDIT PRESET 1 STATION LOADED FREQUENCY 0.00 BAND EDIT STATION NAME LISTEN TO PRESET NAME BUTTONS TO EDIT UP TO 8 CHARACTERS CLEAR PRESET BUTTON TO ADVANCE PRESS MENU TO CLEAR PRESET arrows until the desired arrow to open the Lexicon... -
Page 141: Clear Preset
RV-8 LISTEN TO PRESET TUNER PRESETS PAGE 1 LISTEN TO PRESET Loads the current preset station. Press the menu the station preset. The front panel and on-screen display will display “STATION LOADED.” NAME TUNER PRESETS PAGE 1 NAME Edits the station name. The station name can be up to 8 characters long. - Page 143 Mode Adjust Mode Adjust ...6-2 Listening Mode Activation...6-2 Listening Mode Descriptions ...6-4 Listening Mode Menu Option and Parameter Descriptions...6-39 Mode – Parameter Relationships ...6-47...
-
Page 144: Listening Mode Activation
LISTENING MODE ACTIVATION Listening modes are available for 2-channel, Dolby Digital, DTS(-ES), MIC and analog input sources. The RV-8 allows listening mode selection for all Main Zone sources. In some cases, the RV-8 automatically activates a listening mode in response to certain commands. For this reason, it is important to understand the three methods through which listening mode activation occurs. -
Page 145: Preferred Listening Mode Selection
Dynamic listening modes are only available under certain condi- tions. For example, many of the dynamic modes are only available when the RV-8 is configured for seven main output channels and source material with specific encoding is played. All dynamic listening modes are available through the remote control or front panel Mode button. -
Page 146: Listening Mode Descriptions
MODE ADJUST This listening mode is designed for playback of 2-channel stereo or matrix-encoded television broadcast sources. Logic 7 TV is a proprietary Lexicon listening mode based on the Logic 7 FILM listening mode, but specifically tailored for broadcast sources. - Page 147 MODE ADJUST MUSIC This listening mode is designed for playback of 2-channel stereo or matrix-encoded music sources. Logic 7 MUSIC is a proprietary Lexicon listening mode based on the Logic 7 FILM listening mode, but specifically tailored for music sources. Parameter...
- Page 148 2-channel Dolby Surround-encoded source, then select DOLBY PLIIx + THX using the front-panel or remote control Mode buttons. When the 2-CH parameter is set to USE LAST, the RV-8 will automat- ically activate the DOLBY PLIIx + THX listening mode if this listening mode was activated the last time a 2-channel Dolby Surround- encoded source was present.
- Page 149 DOLBY PLIIx MOV listening mode using the front-panel or remote control Mode buttons. When the 2-CH parameter is set to USE LAST, the RV-8 will automat- ically activate the DOLBY PLIIx MOV listening mode if this listening mode was activated the last time a 2-channel Dolby Surround- encoded film source was present.
- Page 150 PLIIx MUS listening mode using the front-panel or remote control Mode buttons. When the 2-CH parameter is set to USE LAST, the RV-8 will automat- ically activate the DOLBY PLIIx MUS listening mode if this listening mode was activated the last time a 2-channel Dolby Surround- encoded film source was present.
-
Page 151: Dolby Pro Logic
RV-8 DOLBY PL + THX MODE ADJUST PL + This mode is designed for playback of Dolby Surround-encoded sources and decodes four channels: three front channels and one mono surround channel with a high-frequency rolloff above 7kHz. This mode is recommended for home theaters with THX-certified speakers. - Page 152 To select either of these listening modes, use the remote control or front-panel Mode button. When the 2-CH parameter is set to USE LAST, the RV-8 will automatically activate a DTS Neo:6 listening mode if this mode was activated the last time a 2-channel source was present.
-
Page 153: Concert Hall
The NIGHTCLUB mode is a superior room simulation listening mode because it uses a proprietary reverb algorithm inherited from Lexicon professional products. Parameter Default Setting CENTER DEPTH SPEECH DETECT... - Page 154 – such as churches and chambers – with long rever- beration time relative to their sizes. The CHURCH mode is a superior room simulation listening mode because it uses a proprietary reverb algorithm inherited from Lexicon professional products. Parameter Default Setting CENTER DEPTH...
- Page 155 MODE ADJUST PANORAMA The PANORAMA mode is designed for playback of stereo and matrix-encoded sources. PANORAMA uses proprietary Lexicon algorithms to move the stereo image outward from the front speakers, producing a wider stereo field with greater depth. Sound quality depends on proper location of the listening position and front speakers.
- Page 156 • Select the AUTO SPEAKER SETUP menu DISTANCES option to have the RV-8 automatically calibrate speaker distances. • Measure the distance between the primary listening posi- tion and the front baffle of each speaker. Then, set the cor- responding SPEAKER DISTANCES menu parameters to the closest available value.
-
Page 157: Mono Logic
MONO LOGIC MODE ADJUST This mode, designed for playback of mono sources, uses proprietary Lexicon reverb algorithms to realistically expand mono sources to use all channels. This dramatically increases the perceived width and sense of envelopment of the listening space. -
Page 158: Mono Surround
6-16 5.1 L7 FILM MODE ADJUST The 5.1 L7 FILM mode is a proprietary Lexicon listening mode designed for playback of 5.1-channel Dolby Digital-encoded film sources, and provides remarkable improvement compared to other decoders. It derives seven channels from 5.1-channel input sources with enhanced front steering. - Page 159 RV-8 5.1 L7 TV MODE ADJUST This proprietary Lexicon listening mode is designed for playback of 5.1-channel Dolby Digital-encoded broadcast sources. Based on the 5.1 L7 FILM listening mode, 5.1 L7 TV derives seven channels from 5.1-channel input sources with enhanced front steering.
- Page 160 Input Source 5.1-Channel THX Surround EX Dolby Digital (Flagged) THX SurEX THX SurEX THX SurEX THX ULTRA2 Lexicon 5.1-Channel THX Surround EX Dolby Digital (Non-Flagged) THX ULTRA2 THX SurEX THX ULTRA2...
- Page 161 Activate this listening mode with the front-panel or remote control Mode buttons. When the DOLBY D parameter is set to USE LAST, the RV-8 will automat- ically activate a THX UL2Cin listening mode if this mode was activated the last time a Dolby Digital source was present.
- Page 162 To activate this listening mode, use the front-panel or remote control Mode buttons. When the DOLBY D parameter is set to USE LAST, the RV-8 will automatically activate the dynamic 5.1 PLIIx MOV listening mode if this listening mode was activated the last time a Dolby Digital source was present.
- Page 163 To activate this listening mode, use the front-panel or remote control Mode buttons. When the DOLBY D parameter is set to USE LAST, the RV-8 will automatically activate the dynamic 5.1 PLIIx MUS listening mode if this listening mode was activated the last time a Dolby Digital source was present.
- Page 164 CUSTOM Refer to page 6-37 Note: The RV-8 cannot detect Dolby Digital Surround EX encoding in non- flagged 5.1-channel Dolby Digital input sources because they do not include information in the input signal that identifies Dolby Digital Surround EX encoding.
- Page 165 This dramatically increases the perceived width and sense of envelopment of the listening space. Note that: When a 1.0 Dolby Digital source is present, the RV-8 automatically Possible Settings activates the 5.1 MONO LOGIC listening mode. –25 to +5dB –5 to +5dB...
- Page 166 Parameter Default Setting SUB LEVEL +0dB CUSTOM Refer to page 6-37 See “Listening Mode Menu Option and Parameter Descriptions” on page 6-39 for detailed descriptions. Lexicon Possible Settings OFF, –30 to +12dB...
- Page 167 RV-8 DTS-ES DECODING The DTS, DTS-ES, and DTS-ES Discr listening modes are designed for, at a minimum, playback of 5.1-channel DTS, 5.1-channel matrix-encoded DTS-ES and 6.1-channel discrete-encoded DTS-ES sources. The DTS, DTS-ES, and DTS-ES Discr listening mode names differ depending on the encoding present in the input source, the DECODING parameter setting and the speaker setup.
- Page 168 MODE ADJUST FILM FILM These proprietary Lexicon listening modes use an advanced matrix to decode seven channels from 5.1- and 6.1-channel film sources with enhanced front steering. When both side and rear speakers are present, the DTS-ES L7 FILM listening mode also increases the perceived length and sense of envelopment of the listening space.
- Page 169 RV-8 DTS-ES THX & DTS THX UL2Cin MODE ADJUST UL2Cin The DTS THX UL2Cin (ULTRA2 CINEMA) and DTS-ES THX listening modes allow 7-channel playback of 5.1-channel DTS sources that lack DTS-ES encoding. They are designed for playback of 5.1-channel DTS, 5.1-channel matrix-encoded DTS-ES, or 6.1-channel DTS-ES discrete-encoded film sources.
- Page 170 Refer to page 6-25 for more information. Option/Parameter LFE MIX ES DECODING OUTPUT LEVELS CUSTOM See “Listening Mode Menu Option and Parameter Descriptions” on page 6-39 for detailed descriptions. Lexicon 6.1-Channel Discrete-Encoded DTS-ES DTS-ES THX DTS-ES THX DTS THX UL2Cin Discr Default Setting Possible Settings +0.0dB...
- Page 171 5.1a L7 FILM MODE ADJUST The 5.1a LOGIC7 FILM listening mode is a proprietary Lexicon lis- tening mode that uses LOGIC7 decoding to derive seven channels from 5.1-channel analog film sources with enhanced front steering. This listening mode allows 5.1-channel analog sources to use bass management, speaker crossovers, speaker distance calibration, and audio controls (tone controls).
- Page 172 SURROUND EX parameter setting, and the speaker setup. -10.0 to +0.0dB The table at the top of the next page indicates the conditions in which THX Ultra2 and THX Surround EX decoding are activated. 5.1a UL2Cin 5.1a SurEX 5.1a Lexicon...
- Page 173 RV-8 Parameter Setting 5.1-Channel Analog SURROUND EX: ON 5.1a THX SurEX SURROUND EX: OFF 5.1a THX ULTRA2 The 5.1a THX UL2Cin listening mode The 5.1a THX UL2Cin listening mode is available when both side and rear speakers are present and THX Ultra2 decoding is active.
- Page 174 Side L and Rear as well as Side R and Rear R. Parameter Possible Settings OUTPUT LEVELS -10.0 to +0.0dB CUSTOM See “Listening Mode Menu Option and Parameter Descriptions” on page 6-39 for detailed descriptions 5.1a STANDARD Refer to page 6-37 Refer to page 6-37 Lexicon...
- Page 175 RV-8 5.1a 2-CHANNEL MODE ADJUST 5.1a 2-CHANNEL This mode downmixes 5.1-channel analog input signals into 2-channel LOGIC7-encoded output signals. It sends these signals to the front speakers and the subwoofer. It is recommended for recording purposes, particularly for recording from a DVD-A or multi-channel SACD player to a CD-R or another 2-channel record- ing format.
- Page 176 HEADPHONE L7 MODE ADJUST HEADPHONE HEADPHONE L7 is a proprietary Lexicon listening mode designed for enhanced playback of 2-channel sources through headphones. This listening mode uses LOGIC7 processing and Head Related Transfer Functions to realistically increase the perceived sense of envelopment when listening through headphones.
- Page 177 HEADPHONE DTS MODE ADJUST HEADPHONE HEADPHONE DTS is a proprietary Lexicon listening mode designed for enhanced playback of DTS(-ES)-encoded music or film sources through headphones. This listening mode uses LOGIC7 processing and Head Related Transfer Functions to realistically increase the perceived sense of envelopment when listening through headphones.
- Page 178 0 to 4 SHAPE 0% to 100% SPREAD 4m to 60m SIZE See “Listening Mode Menu Option and Parameter Descriptions” on page 6-39 for detailed descriptions. Lexicon Default Setting Possible Settings 4.71s 115ms to 30.8s 4.71s 23ms to 30.8ms 3.1kHz 500Hz to 20kHz 2.4kHz...
- Page 179 RV-8 OUTPUT LEVELS Listening Mode OUTPUT LEVELS MODE ADJUST Opens the OUTPUT LEVELS menu, which is OUTPUT LEVELS used to adjust output levels for the Main CENTER +0dB Zone audio output connectors labeled SIDE L/R +0dB REAR L/R +0dB Center, Subwoofer, Side L/R and Rear L/R.
-
Page 180: Reset Mode
When the CUSTOM menu RESET MODE option is selected to restore the factory-default version of the selected listening mode, the corre- sponding TRIGGER SETUP menu listening mode parameter is automatically set to OFF. arrow button to restore the factory-default version of arrow button to close the Lexicon... -
Page 181: Listening Mode Menu Option And Parameter Descriptions
LISTENING MODE MENU OPTION and PARAMETER DESCRIPTIONS 5 SPKR ENHANCE Simulates 7-channel playback in 5-channel speaker configurations. When set to ON, the RV-8 provides an increased sense of spaciousness and envelopment through the surround speakers. This enhancement is most noticeable when the surround speakers are positioned to the side of the primary listening position, or when the primary listening position is located against the rear wall. - Page 182 When set to REAR, the sound field is balanced toward the rear of the listening space. Available in Dolby PLII MUSIC and Dolby PLIIx MUSIC modes. Lexicon MIN, 1 to 6, MAX FRONT, NEUTRAL, REAR...
- Page 183 5.1-channel Dolby Digital source recorded with or without Dolby Digital Surround EX encoding is detected. Note: The RV-8 cannot automatically detect Dolby Digital Surround EX encoding in non-flagged 5.1-channel Dolby Digital sources. A non-flagged input source does not identify Dolby Digital Surround EX encoding in the input signal.
-
Page 184: Input Balance
–20.0 or -10.0 to +0.0dB LOW FREQ WIDTH Applies low-frequency spatial correction to the input signal. This correction is applied to uncorrelated input signals below 60Hz. Available in PANORAMA mode. (continued) Lexicon –127 to +127 30ms to 20.2s –25 to +25dB... -
Page 185: Master Level
Simulates high-frequency rolloffs that occur in movie theaters. When set to ON, the RV-8 applies a high-frequency filter. When set to OFF, the RV-8 does not apply a high-frequency filter. It is recom- mended that you set this parameter to ON for film sources, as many films are mixed for movie theaters and might sound too bright when played back in home theaters without re-equalization. - Page 186 When set to REAR, Side L/R and Rear L/R output levels are not attenuated, preserving the intended balance of the sound field. Available in all Logic 7 modes. Lexicon –30 to +12dB, OFF 4 to 20 or 30m FRONT, NEUTRAL, REAR...
- Page 187 SURR ROLLOFF Applies high-frequency attenuation control to the audio output connectors labeled Side L/R and Rear L/R. This filter is only applied to output signals generated by the RV-8. Available in all Logic 7 modes. 10 to 90deg SURROUND DLY Increases the perceived depth of the listening space by delaying the arrival time of signals from the side and rear speakers.
- Page 188 THX Surround EX encoding is detected. Note: The RV-8 cannot automatically detect THX Surround EX encoding in non- flagged 5.1-channel Dolby Digital sources. A non-flagged input source does not include information in the input signal that identifies THX Surround EX encoding.
-
Page 189: Mode - Parameter Relationships
RV-8 MODE – PARAMETER RELATIONSHIPS The following table lists each parameter and the modes in which it is used. The parameter... Is used in these modes 5 SPKR ENHANCE All L7 modes ACADEMY FILTER MONO LOGIC and 5.1 MONO LOGIC... - Page 190 All modes REVERB LVL All LIVE! modes ROLLOFF NIGHTCLUB, CONCERT HALL, CHURCH, CATHEDRAL and all LIVE! modes SHAPE All LIVE! modes SIDE L/R All except 2-CHANNEL, MONO, 5.1 2-CHANNEL, 5.1 MONO, DTS(-ES) 2-CHAN, 2CH BYPASS and LIVE! modes 6-48 (continued) Lexicon...
- Page 191 RV-8 The parameter... Is used in these modes SIZE NIGHTCLUB, CONCERT HALL, CHURCH, CATHEDRAL and all LIVE! modes SOUND STAGE All L7 modes SOURCE PANORAMA CALIBRATION SPEAKER ANGLE PANORAMA CALIBRATION SPEECH DETECT NIGHTCLUB, CONCERT HALL, CHURCH and CATHEDRAL SPREAD All LIVE! modes SUB &...
-
Page 193: Troubleshooting And Maintenance
Troubleshooting and Maintenance Troubleshooting...7-2 Routine Maintenance ...7-4 Restoring Factory-Default Settings...7-4... -
Page 194: Troubleshooting
4. Make sure the RV-8 is receiving an audio signal. To do this, follow the instructions that begin on page 2-29 to open the STATUS menu for the current input source. -
Page 195: Installation Worksheet
RF interference is present in the audio or video. 1. Make sure the RV-8 is not positioned near unshielded TV or FM antennas, cable TV decoders and other RF-emitting devices. 2. Replace unshielded cables with shielded cables wherever possible. -
Page 196: Routine Maintenance
Do not use a cloth made with steel wool or metal polish. If the RV-8 is exposed to a dusty environment, a RESTORING FACTORY-DEFAULT SETTINGS When factory-default settings are restored, all parameters and user- defined values are restored to their factory-default settings. -
Page 197: Declaration Of Conformity
Appendix Specifications ... A-2 Declaration of Conformity ... A-4... -
Page 198: Appendix A Specifications
Video Input & Output Connectors Video Inputs Five composite (RCA), five S-Video and three component video (RCA) Video Outputs Two composite (RCA, one monitor and one Zone 2), two S-Video (one monitor and one Zone 2) and one component (RCA) Lexicon... - Page 199 RV-8 Composite & S-Video Performance Compatibility NTSC, PAL and SECAM Switching Active Output Level 1.0V peak-to-peak Impedance 75Ω Input Return Loss >40dB Differential Gain <0.5% Differential Phase <0.5° Bandwidth >25MHz K Factor <0.3% Gain ±0.15dB Signal-to-Noise Ratio >65dB Frequency Response 10Hz to 10MHz + 0.1/–0.3dB...
-
Page 200: Declaration Of Conformity
3 Oak Park Bedford, MA 01730-1413 USA The equipment identified here conforms to the Direc- tive(s) and Standard(s) specified above. Type of Equipment: Digital Controller Model: Lexicon RV-8 Date: August 2005 Harman Specialty Group Vice President of Engineering 3 Oak Park... -
Page 201: Menu Tree
Appendix Menu Tree ...B-2... -
Page 202: Appendix B Menu Tree
-30dB +12dB !CAUTION! HIGH AUDIO LEVELS YOU WILL HAVE 10 SEC TO LEAVE THE ROOM OR SIT QUIETLY PRESS ssTO BEGIN COUNTDOWN continued on page B-14 Lexicon TRIGGER SETUP TRIGGER SETUP REMOTE ONLY DVD1 MUSIC DVD2 2-CHAN 5.1a FILM 5.1a MUSIC 5.1a... - Page 203 RV-8 SETUP MENU: INPUTS MAIN MENU SETUP INPUTS MODE ADJUST AUDIO CONTROLS SPEAKERS I/O CONFIG TUNER PRESETS SETUP DISPLAYS VOLUME CONTROLS TRIGGER TUNER SETUP LOCK OPTIONS LIVE! CALIBRATION POWER MANAGEMENT DVD1 INPUT SETUP NAME DVD1 DIGITAL IN COAX-1 ANALOG IN...
- Page 204 DIGITAL BYPASS 5.1a DIG OUT RATE 5.1a STANDARD RECORD 5.1a 2-CHANNEL HEADPHONE 5.1a USE LAST DVD1 MIC MODE LIVE! SMALL LIVE! MED LIVE! LARGE USE LAST Lexicon AUTO DIGITAL ANALOG AUTO DIGITAL AUTO NORMAL FAST +0dB 44.1kHz ENABLED BLOCKED ENABLED -18 to +12dB 44.1kHz...
- Page 205 RV-8 SETUP MENU: SPEAKERS MAIN MENU SETUP MODE ADJUST INPUTS AUDIO CONTROLS SPEAKERS TUNER PRESETS I/O CONFIG SETUP DISPLAYS VOLUME CONTROLS TRIGGER TUNER SETUP LOCK OPTIONS LIVE! CALIBRATION POWER MANAGEMENT CUSTOM SETUP FRONT L/R 80 Hz CENTER 80 Hz SIDE L/R...
- Page 206 (MICROPHONE) Then, press the OUT OF RANGE button to view more details about the error. (MICROPHONE) One of the messages TOO MUCH ROOM NOISE shown to the left will appear in the on-screen display. Lexicon arrow...
- Page 207 PRESS APART TO BEGIN COUNTDOWN When the RV-8 is finished calibrating speaker dis- tances and output levels, the AUTO SPEAKER SETUP results screen shown at the left will open in the on-screen display, indicating the results for each calibration procedure. If there is an error,...
- Page 208 ERROR CENTER +0.0dB (SPEAKER) FRONT RIGHT +0.0dB SPKR OUTPUT TOO LOW SIDE RIGHT +0.0dB REAR RIGHT +0.0dB (SPEAKER) REAR LEFT +0.0dB 0.0dB 0.0dB SIDE LEFT +0.0dB SUBWOOFER +0.0dB AUTO LEVELS SL RL APPLIED 0.0dB 0.0dB Lexicon PRESS TO SKIP COUNTDOWN...
- Page 209 RV-8 MAIN MENU SETUP MODE ADJUST INPUTS SPEAKERS AUDIO CONTROLS TUNER PRESETS I/O CONFIG SETUP DISPLAYS VOLUME CONTROLS TRIGGER TUNER SETUP LOCK OPTIONS LIVE! CALIBRATION POWER MANAGEMENT SPEAKER DISTANCES CUSTOM SETUP FRONT LEFT 0.0ft CENTER 0.0ft FRONT RIGHT 0.0ft SIDE RIGHT 0.0ft...
- Page 210 CUSTOM NAME ON-SCREEN DISPLAY EDIT CUSTOM NAME 2 SECONDS STATUS POSITION EDIT CUSTOM NAME FORMAT NTSC RV-8 BACKGROUND BUTTONS TO EDIT UP TO 20 CHARACTERS BUTTON TO ADVANCE Lexicon REAR PANEL CONFIG 8 STEREO INPUTS 5 ST. & (1) 5.1 ANLG 2 ST.
- Page 211 RV-8 SETUP MENU: TUNER SETUP MAIN MENU SETUP MODE ADJUST INPUTS SPEAKERS AUDIO CONTROLS TUNER PRESETS I/O CONFIG SETUP DISPLAYS VOLUME CONTROLS TRIGGER TUNER SETUP LOCK OPTIONS LIVE! CALIBRATION POWER MANAGEMENT EUROPE JAPAN E. EUR HIGH SETUP MENU: LIVE! CALIBRATION...
-
Page 212: Main Menu: Audio Controls
EDIT STATION NAME Each tuner preset page allows up to 10 preset stations. BUTTONS TO EDIT UP TO 8 CHARACTERS BUTTON TO ADVANCE B< FADER >F STATION LOADED PRESS MENU TO CLEAR PRESET -3.0 to +3.0dB -6.0 to +6.0dB Lexicon... - Page 213 RV-8 MAIN MENU: MODE ADJUST MAIN MENU MODE ADJUST FILM MODE ADJUST AUDIO CONTROLS MUSIC TUNER PRESETS MUSIC SURR SETUP PLIIx + PLIIx MOV* PLIIx MUS* PLII+ PLII MOVIE PLII MUSIC PL + PRO LOGIC MUSIC NIGHTCLUB CONCERT HHALL CHURCH...
- Page 214 PRE DELAY 10ms ADVANCED CUSTOM +0.0dB LIVE! SMALL ADVANCED REVERB LVL +0dB EARLY RFLX LVL -13dB BASS XOVER 156Hz +0.0dB SHAPE SPREAD SIZE Lexicon 1.84s 2.76s 2.4kHz 3.1kHz 18ms -4dB -14dB 156Hz 4.71s 4.71s 3.1kHz 2.4kHz 20ms -6dB -17dB 156Hz...
- Page 215 RV-8 Selecting the listening mode menu CALIBRATION, OUTPUT LEVELS or CUSTOM option opens the corresponding menu path shown below. The CALIBRATION option is available for the PANORAMA listening mode. The OUTPUT LEVELS and CUSTOM options are available for most listening modes. These menus are identical regardless of which listening mode is selected.
- Page 216 LEFT & RIGHT LEFT ROLLOFF SPEAKER ANGLE 500Hz to 20.0kHz, OFF 10 to 90deg SIDE L/R OFF, -30 to 12dB Lexicon SPEECH DETECT SURROUND DLY 0 to 15ms SUB LEVEL SURROUND EX OFF, -30 to 12dB AUTO SUB L/R LVL...
- Page 217 RV-8 MAIN MENU: RESTORE DEFAULTS FACTORY SETTINGS FACTORY SETTINGS EXIT HAVE BEEN RESTORED RESTORE DEFAULTS PRESS ANY KEY TO RESTART STATUS MENUS STATUS STATUS INPUT WORD LENGTH MODE SAMPLE RATE CHANNELS BIT RATE ENCODING SL SR Refer to the Status Menus section that begins on page 2-29 for more information.
- Page 219 Appendix Remote Control Programming ... C-2 Three-Digit Preprogrammed Codes ... C-18...
-
Page 220: Remote Control Programming
Appendix C REMOTE CONTROL PROGRAMMING The RV-8 remote control has been designed to provide a new standard in remote control technology offering a very powerful and flexible preprogrammed and learning product. The RV-8 remote control can operate up to 10 home entertainment... -
Page 221: Macro Operations
However, these buttons can be programmed with any desired macro. Up to 50 favorite channel buttons can be programmed into the RV-8 remote. Each of these buttons can send out up to 10 commands. Refer to “Programming Favorite Channels”... -
Page 222: Remote Programming Overview
An “activity-based” configuration centers on what you are doing at the time. If you are watching a DVD on your TV, and are using the RV-8 to control the sound, you may want to start by setting up the DVD device... - Page 223 LCD screen, etc. Use DVD2, not DVD1, to access the DVD code library. DVD1 has been preprogrammed to control the Lexicon RT-10 Disc Player. 6. The remote will be flashing “ENTER NUMBER.” Refer to the tables starting on page C-18 and find the manufacturer/brand of your device.
- Page 224 If you passed the one that turned off the device, manually turn the device back on, and reverse your UP or DOWN one press at a time, until the unit turns off. There is no way of knowing which Lexicon...
-
Page 225: Important Points To Remember
Apart from the PAGE, HOME and FAV buttons, which cannot be taught, the RV-8 remote has the capability of learning up to 530 commands. Note: Function buttons are buttons that can be assigned a command to control a particular action for a device. -
Page 226: Programming The Function Buttons
5. Place the original remote control head to head with the RV-8 remote about 2 inches apart on a flat surface. 6. Press the button on the RV-8 remote you wish to program. Only the three HOME, PAGE and FAV buttons cannot be programmed. -
Page 227: Programming Favorite Channels
DVD. Now you want to quickly adjust the picture on the TV. If the TV device button is pushed, it will change the input on the RV-8 to TV and you will not be able to adjust the picture for the DVD. In this case, it would be better to not program a code to the TV device. -
Page 228: Programming Macro Buttons
The HOME button can be used at any other step in a macro. 6. Be sure to end your macro on the Device page that you would like to remain on when the macro is sent in normal use. Lexicon... - Page 229 This example assumes the names of the devices have not been changed and that the “punch through” technique was used to assign the VOL to the RV-8. If the labels have been changed, insert the changed names into the example.
- Page 230 2. Press the ERASE button next to the LCD screen. 3. Press the MACRO button. 4. To erase all of the macro buttons in the RV-8 remote, press the ALL button and then press the SURE? button at the next LCD screen.
- Page 231 2. Press the ERASE button next to the LCD screen. 3. Press the FAV button. 4. To erase all the favorite channel buttons in the RV-8 remote, press the ALL button and then press the SURE? button at the next LCD screen.
- Page 232 ERASING LEARNED BUTTONS To erase learned buttons: 1. Go to the SETUP mode by pressing both the HOME and ENT buttons simultaneously for three seconds. 2. Press the ERASE button next to the LCD screen. 3. Press the LEARN button. Lexicon...
- Page 233 RV-8 4. If you wish to erase all the learned functions in the RV-8 remote, press the ALL button and then press the SURE? button at the next LCD screen. 5. To erase all the buttons in a single device or an individual button in the device, press the DEVICE button.
-
Page 234: Adjusting The Lcd Contrast
The LCD screen is breakable glass. Do not tap the LCD screen to activate devices. Use the rubber buttons beside the labels on the screen. The RV-8 remote control is not waterproof. Never immerse it in water. Keep the LCD screen dry. Immediately wipe off any spilled liquid. - Page 235 Select the MAIN zone button. 5. The remote should flash ENTER NUMBER. The correct (default) audio codes for the RV-8 zones are as follows: MAIN zone is 001, ZONE 2 is 302 and ZONE 3 is 303. 6. Enter the correct code.
-
Page 236: Three-Digit Preprogrammed Codes
026 066 145 146 181 190 197 192 182 199 151 222 180 005 280 KINERGETICS 220 140 KOSS KRELL 150 072 KYOCERA LEXICON 120 235 236 237 LINN LUXMAN 137 139 052 165 115 004 009 076 056 MAGNAVOX 038 164 152 208... - Page 237 RV-8 AUDIO Manufacturer Codes PANASONIC 032 195 219 177 PARASOUND 129 130 132 261 PHAST PHILIPS 249 250 251 063 PIONEER 014 033 039 044 045 050 069 159 168 116 035 078 198 PROCEED 144 268 010 048 117 156 067...
- Page 238 023 026 075 087 088 090 107 130 137 TOSHIBA 002 127 TOWN & COUNTRY 023 026 UNIDEN 016 025 042 043 044 045 048 049 078 079 080 086 101 135 136 VIEWSTAR WINEGARD 128 146 ZENITH 081 082 083 084 091 120 Lexicon...
- Page 239 RV-8 Manufacturer Codes AIWA 034 161 AKAI 016 043 046 124 125 146 AMPRO ANAM AUDIO DYNAMICS 012 023 039 043 BROOKSONIC 035 037 129 CANON 028 031 CAPEHART CRAIG 003 040 135 CURTIS MATHES 031 041 DAEWOO 005 007 010 065 108 110 111 112 116 117 119...
- Page 240 004 016 043 044 076 103 114 125 127 143 DAYTRON 004 143 DWIN DYNASTY DYNATECH EIKI ELECTROHOME 024 076 143 196 EMERSON 197 004 005 028 043 047 048 050 051 076 096 143 151 153 154 155 FISHER 007 057 Lexicon...
- Page 241 RV-8 Manufacturer Codes FUJITSU FUNAI 028 043 FUTURETECH 197 008 009 034 056 073 074 130 144 155 160 161 165 004 091 157 183 GOLDSTAR 004 102 106 112 113 116 119 127 143 HALL MARK HITACHI 004 009 010 011 012 023 075 143 158 163 166 072...
- Page 242 050 185 134 008 FRABA GENEXXA 010 069 102 GOLDSTAR HAITAI HARMAN KARDON 018 033 047 208 HITACHI 042 175 INKEL 130 143 144 JC PENNEY 014 061 092 141 JENSEN 004 022 136 163 213 214 242 243 Lexicon...
- Page 243 RV-8 Manufacturer Codes KENWOOD 185 007 023 055 071 072 142 137 KOSS KRELL KYOCERA LOTTE LUXMAN 011 028 070 076 MAGNAVOX 044 107 MARANTZ 027 041 044 051 077 107 209 MCINTOSH 014 073 092 MEMOREX MISSION 044 107...
- Page 244 160 187 PIANO DISC PLUS PHILIPS POLK AUDIO REPLAY RUSSOUND SCIENTIFIC ATLANTA 156 163 SIMA SOLO ELECTRONICS SOMFY 078 079 SONY 104 164 165 166 STARCOM TURBOSCAN VELODYNE X-10 093 183 XANTECH 168 169 170 171 172 188 189 Lexicon...
- Page 245 RV-8 CABLE Manufacturer Codes 103 003 004 039 042 046 053 AMERICAST ANTRONIX ARCHER 005 007 014 BELL SOUTH CENTURION CENTURY CITIZEN COMBANO 080 081 COMSAT COMTRONICS DIGICABLE EAGLE 020 030 040 EASTERN 057 066 ECHOSTAR ELECTRICORD GEMINI 008 054...
- Page 246 026 057 131 175 181 SHERWOOD 038 004 028 030 033 034 SONY 020 022 052 084 089 TEAC 009 059 212 TECHNICS 007 010 076 088 109 122 199 TOSHIBA VICTOR YAMAHA 021 026 031 067 040 C-28 Lexicon...
- Page 247 Appendix Installation Worksheet ... D-2...
-
Page 248: Installation Worksheet
ANLG IN LVL VIDEO IN COMPONENT IN 2-CH 5.1a MAIN ADVANCED INPUT SELECT ANLG BYP S-VIDEO 16:9 S-VIDEO 4:3 OSD COMPONENT OSD LEGACY VIDEO ZONE2 IN ZONE2 ADVANCED ANLG IN LVL DIGITAL BYPASS DIG OUT RATE RECORD DVD2 TUNER Lexicon PHONO... - Page 249 RV-8 SPEAKER SETUP CUSTOM SETUP FRONT LEFT/RIGHT CENTER SIDE LEFT/RIGHT REAR LEFT/RIGHT SUBWOOFER ULTRA2SUB UNITS BASS PEAK LIMITERS CAL NOISE SUB LIMITER LIMIT ADJ I/O CONFIG Analog Inputs 8 STEREO INPUTS Amplifier Outputs THX SETUP SPEAKER DISTANCES THX 80Hz THX 80Hz...
- Page 250 CHURCH HEADPHONE 5.1 CATHEDRAL HEADPHONE PANORAMA HEADPHONE 5.1a CH SURROUND LIVE! SMALL CHANNEL LIVE! MED MONO LOGIC LIVE! LARGE MONO SURROUND Lexicon TUNER SETUP REGION SCAN SENS LOCK OPTIONS MODES AUDIO CNTRL SETUP AUDIO CONTROLS BASS TREBLE TILT EQ LOUDNESS...
- Page 251 Appendix D RV-8 3-DIGIT PREPROGRAMMED CODES WORKSHEET COMPONENT MANUFACTURER CODE(S) USED DVD1 DVD2 PHONO...
- Page 252 RIGHT SELECT SELECT PLAY STOP , MENU MENU , GUIDE GUIDE O, EXIT EXIT II, INFO INFO DISPLAY DISPLAY ENTER ENTER Lexicon INPUT PROG T-SPE DISP SLOW COUNT A-TRK VCR-P SLOW+ RESET A-CH F. ADV SLOW- CLEAR XPLA EJECT T-REC...
- Page 253 RV-8 INPUT P-ON P-OFF SLEEP A-CH SWAP STILL SOURC LOCAT CC-SN DELET POSI FREEZ RESET PAGE 2 PAGE 1 SYSTEM-OFF POWER ON/OFF VOL UP VOL UP VOL DN VOL DN CH UP SKIP+ CH DN SKIP- MUTE MUTE PRE-CH PRE CH...
- Page 255 5.1a THX UL2Cin listening mode, 6-30 5.1-channel connectors, 2-7 8 STEREO INPUTS option, 3-60 A/V SYNC DELAY parameter, 3-63, 3-67, D-4 about the RV-8, 1-2 AC input connector, 2-9 ACADEMY FILTER parameter, 6-15, 6-23, 6-39 adjusting the LCD contrast, C-16...
- Page 256 HEADPHONE 5.1 listening mode, 6-34 HEADPHONE 5.1a listening mode, 6-35 HEADPHONE DTS listening mode, 6-35 HEADPHONE L7 listening mode, 6-34 headphone output, 2-5 headphone overview, 2-14 HEADPHONE parameter, 3-69 highlights, RV-8, 1-4 high-pass filter, 3-28, 3-28 horizontal bar graphs, 2-16...
- Page 257 RV-8 I/O CONFIG SETUP menu, 3-2 INPUT BALANCE parameter, 6-13, 6-42 input connectors, 2-7 microphone, 2-8 INPUT NAME menu, 3-5 INPUT parameter, 2-35 INPUT SELECT parameter, 3-17, 3-19, D-2 input selection buttons, 2-4 remote control, 2-18 INPUT SETUP menu, 3-2, 3-4, D-2...
- Page 258 Rear L/R output connector, 2-7 REAR L/R parameter, 3-29, 3-32, 6-37, 6-44 rear-panel overview, 2-6 RV-8, 2-6 recalling zone audio codes, C-16 RECORD parameter, 3-23, 3-24 RE-EQUALIZER parameter, 6-4, 6-6, 6-9, 6-10, 6-16, 6- 17, 6-19, 6-26, 6-27, 6-29, 6-30, 6-31, 6-43...
- Page 259 RV-8 9 parameter, 3-17, 3-18 S-VIDEO OSD 4 3 parameter, 3-17, 3-20 S-Video output connectors, 2-8 three-digit preprogrammed codes, C-18 THX listening mode, 6-18 THX MUSIC listening mode, 6-19 THX SETUP Menu, 3-29 THX SPEAKER SETUP screen, 3-28, 3-28 THX SurEX listening mode, 6-18...
-
Page 261: Limited Warranty
Fax 781-280-0495 (Sales) Fax 781-280-0499 (Service) PRODUCT REGISTRATION Please register this product within 15 days of purchase. To do so, complete and return this card or register online at www.lexicon.com. Retain the sales receipt for proof of coverage. Mrs. Miss Single... - Page 262 A Harman International Company Part No. 070-15838 | Rev 1 | 01/06...
Need help?
Do you have a question about the RV-8 and is the answer not in the manual?
Questions and answers