Table of Contents
Advertisement
Quick Links
Advertisement
Table of Contents
Troubleshooting

Related Manuals for Ametek BROOKFIELD HPQA Series


Summary of Contents for Ametek BROOKFIELD HPQA Series
- Page 2 PROPRIETARY RIGHTS NOTICE This manual contains valuable information and material developed by AMETEK Brookfield for use with the Helipath Quick Action Stand. No part of this manual can be reproduced or transmitted in any form or by any means, electronic, mechanical, or otherwise. This...
-
Page 3: Table Of Contents
TABLE OF CONTENTS 1. INTRODUCTION ..............................5 1.1 Components..................................6 1.2 Utilities ....................................6 1.3 Component Diagram ..............................7 Specifications ................................. 8 1.5 Installation ..................................9 Safety Symbols and Precautions ..........................10 Preventative Maintenance and Cleaning ............................11 2. GETTING STARTED ............................12 2.1 Power up ......................................12 2.2 Start Up Screen ................................ - Page 4 3.2 Helipath Test Run ................................. 18 3.3 Quick Action Test Run ..............................21 3.4 Joystick Calibration Procedure..........................23 3.5 Firmware Update ................................. 24 APPENDIX A – HPQA ASSEMBLY & HANDLING INSTRUCTIONS ..........25 UNPACKING ..................................26 ASSEMBLY ........................................26 VISCOMETER MOUNTING ............................26 STORAGE ....................................
-
Page 5: Introduction
For viscosity/consistency measurement of gels, pastes, creams, putty, gelatin, and other non-flowing substances, an AMETEK Brookfield Viscometer or Rheometer is mounted on the Helipath Quick Action Lab stand and a T-bar spindle is attached to the viscometer using a special threaded or magnetic coupling. When a Helipath test is initiated, the drive motor slowly lowers or raises the viscometer at a rate of 0.39 mm/s so that the T-bar spindle creates a... -
Page 6: Components
Please check to be sure that you have received all components and that there is no damage. If you are missing any parts, please notify AMETEK Brookfield or your local authorized dealer immediately. Any shipping damage must be reported to the carrier. -
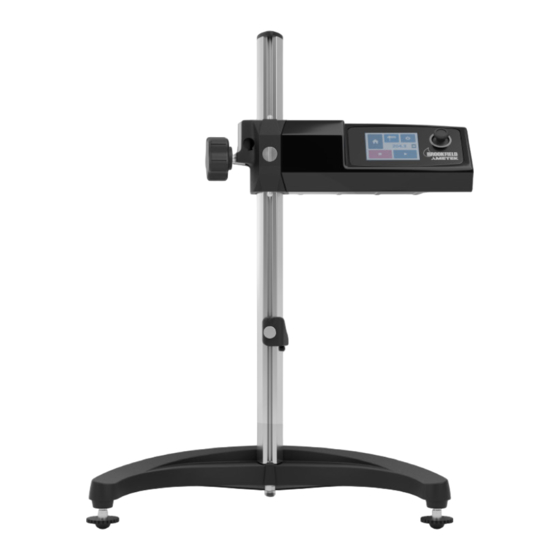
Page 7: Component Diagram
1.3 Component Diagram " 213.4mm 9 11 " 246.5mm 3" 76.2mm 19 3 " 501.2mm 13 15 GV-1201 " LAB STAND BASE ASSEMBLY 354.1mm Figure 1-3. 1 M-HPQA-001 H E L I PAT H Q U I C K A C T I O N L A B O R AT O R Y S TA N D - O P E R AT I O N A L M A N U A L... -
Page 8: Specifications
Users within the European Union: Please contact your dealer or the local authorities in charge of waste management on how to dispose of this product properly. All AMETEK Brookfield offices and our network of representatives and dealers can be found on our website: www.brookfieldengineering.com. -
Page 9: Installation
1.5 Installation Assemble the Helipath Quick Action Stand by bolting the extrusion to the base with the provided bolt and washer. (Refer to assembly instructions in Appendix A of Figure 1.5.2) 2. Slide the Viscometer mounting handle into the clamp on the Helipath Quick Action stand until it stops 3. -
Page 10: Safety Symbols And Precautions
Safety Symbols and Precautions Safety Symbols: The following explains the safety symbols that may be found in this operating manual. Indicates hazardous voltages may be present. Refer to the manual for specific warning or caution information to avoid personal injury or damage to the instrument. -
Page 11: Preventative Maintenance And Cleaning
Preventative Maintenance and Cleaning Make sure that the device is in a clean, dry working environment (dust-free, moderate temperature, low humidity, etc.). Make sure hands are clean when operating the Helipath to prevent build up on the screen or joystick. Be sure gear rack assembly is free of debris and any spilled test materials. -
Page 12: Getting Started
2. GETTING STARTED 2.1 Power up The Helipath Quick Action Laboratory Stand will go through a Power Up sequence when the power switch is turned on. The touch screen will display a Splash screen for 5 seconds. The Splash screen is shown below (Figure 2. 1 ) and includes the model number, the firmware version number, and the serial number. -
Page 13: Main Menu & Joystick
2.3 Main Menu & Joystick The Main Menu of the Touch screen and Joystick are the primary control methods for the Helipath Quick Action stand. Touch Screen Joystick Figure 2.3 2.3.1 Homing • The Home position is located at the very top of the stand and defines the zero position of the travel of the instrument •... -
Page 14: Stop
2.3.3 Stop • The Stop Button will stop the motion of the Helipath Quick Action stand at any time • Pressing the Stop button will cancel all automated movements including Homing, returning to programmed Test Positions, and Helipath Test operations. These actions will need to be restarted from the beginning 2.3.4 Play/Pause •... -
Page 15: Direction Icon
2.3.8 Direction Icon • The direction icon indicates the current movement direction • A gray circle indicates no movement • A green arrow indicates movement in the direction of the arrow 2.4 Settings Menu The Settings Menu can be accessed from the main menu be pressing the settings icon. The Settings Menu can be seen below and provides control of the screen brightness, firmware updates, product registration, Joystick calibration. -
Page 16: Screen Brightness
2.4.3 Screen Brightness • The screen brightness button leads to a screen to change the screen brightness • The brightness can be set from 10 to 100 in increments of 10 • The plus button increases brightness, and the minus button decreases brightness 2.4.4 Firmware Update •... -
Page 17: Operation
3. OPERATION 3.1 Helipath Quick Action Stand Setup 3.1.1 Helipath Setup • Assemble the HPQA Laboratory Stand (refer to assembly instructions in Appendix A of this manual) • Insert the viscometer mounting handle into the lab stand clamp and tighten Do not tighten the knob without a viscometer installed;... -
Page 18: Product Registration
• Turn on the HPQA by using the power switch on the rear of the instrument • Perform the Homing procedure as described in section 2.2. Do not autozero or run a test on the viscometer while the HPQA is Homing 3.1.3 Product Registration Press the Settings Icon, then press the Scan Icon to open the QR code to register your product and receive information on how to download the operating instructions. - Page 19 2. Attach the appropriate spindle to your Viscometer/Rheometer and lower the black Lower Mechanical Stop to its lowest position 3. Place your test sample below the spindle and carefully lower the Spindle into the fluid to the desired bottom position (not closer than ¼” to the bottom of the container) for your oscillating Helipath test using the joystick 4.
- Page 20 5. Use the Joystick to raise the Helipath head and spindle to the desired starting test position 6. Start the desired test on your Viscometer/Rheometer Press the Play/Pause button to start the HPQA descent. An Arrow Icon will appear on the right side of the screen confirming the HPQA direction of travel 8.
-
Page 21: Quick Action Test Run
3.3 Quick Action Test Run The Helipath Quick Action laboratory stand can be used as a motorized quick action replacement for any standard AMETEK Brookfield lab stand. Traditional Viscosity test can be run with ease with automated one touch movements. •... - Page 22 • Use the joystick to lower the spindle to the proper immersion depth • Begin the test on your instrument by pressing the RUN button on viscometer/rheometer. • At completion of the test, a single press of the Home button will automatically raise the head to the Home position for cleaning and sample setup M-HPQA-001...
-
Page 23: Joystick Calibration Procedure
If lower mechanical stop is preventing your spindles from reaching proper immersion depth, the stop limiting bolt can be removed with a 7/64” hex key wrench. This will allow the lower stop to be moved down and allow additional downward travel. Please be careful to prevent driving spindles into bench top or the bottom of your sample containers. -
Page 24: Firmware Update
5. Release the joystick until the downward arrow turns green. Hold the joystick in the downward direction until color changes back to grey and central part of the calibration icon highlights in the green color Upon successful completion of the Joystick Calibration, pop-up appears with “check” mark along with back arrow button ... -
Page 25: Appendix A - Hpqa Assembly & Handling Instructions
APPENDIX A – HPQA ASSEMBLY & HANDLING INSTRUCTIONS Figure A-1: HPQA Laboratory Stand Item Part No. Description Quantity 1 Upright Rod with attached HPQA 1 3 GV-1201 Base, includes 2 GV-1203 leveling screws 1 5 50S252040E540 Screw, 1/4-20, 1-1/4 Long, Flanged Hex Head 1 ... -
Page 26: Unpacking
UNPACKING We recommend our customers to save the packaging material and reuse it while shipping for servicing/repairs. Check carefully to see that all the components are received with no concealed damage: • 1 Base, GV-1201, with 2 Leveling Screws • 1 Upright Rod with attached HPQA •... -
Page 27: Storage
Do not tighten the clamp knob unless the Viscometer mounting rod is inserted in the clamp assembly. Only install AMETEK Brookfield Viscometers and Rheometers in the HPQA. Overloading or installation of incompatible instruments may cause unwanted movement or tipping. STORAGE... -
Page 28: Appendix B - Fault Diagnosis And Troubleshooting
APPENDIX B - FAULT DIAGNOSIS AND TROUBLESHOOTING Error # Description RTC BATTERY VOLTAGE LOW RTC RESET OCCURRED SUPPLY VOLTAGE LOW EEPROM INIT FAILED RTC INIT FAILED ACCEL INIT FAILED STEPPER MOTOR DRV INIT FAILED TORQUE SENSOR INIT FAILED RTD INIT FAILED INSTRUMENT RESET DUE TO HARD FAULT EXCEPTION INSTRUMENT RESET DUE TO MEMORY FAULT EXCEPTION INSTRUMENT RESET DUE TO BUS FAULT EXCEPTION... - Page 29 LOWER LIMIT SWITCH HIT UNEXPECTEDLY LIMIT SWITCH ENGAGED ON STARTUP ACCELEROMETER TEMPERATURE BELOW THRESHOLD ACCELEROMETER TEMPERATURE ABOVE THRESHOLD LOWER LIMIT SWITCH READ ERROR UPPER LIMIT SWITCH READ ERROR LEVEL CALIBRATION NOT VALID SAVE OF LEVEL CALIBRATION DATA FAILED READ OF LEVEL CALIBRATION DATA FAILED READ OF ACCELEROMETER DATA FAILED LEVEL CALIBRATION FAILED.
-
Page 30: Tech Support
TECH SUPPORT Information about the device such as model number, firmware build, and serial number can be found on the main Settings screen. Please access the support information through the Main Menu, using the Settings button. TROUBLESHOOTING Stall Behavior • If the HPQA stalls (motor trying to turn but no physical motion) the following steps should be taken •... - Page 31 False Tip Warning • If an Error 105 occurs and the instrument is not titled past 7.5 degree a false detection has occurred. To resolve this issue check the following: • Vibration of the instrument is the most likely cause of a false tip detection. Ensure the HPQA is on a stable platform Instrument becomes “stuck”...
-
Page 32: Appendix C - Online Help And Additional Resources
AMETEK Brookfield has its own YouTube channel. Videos posted to our website can be found here as well as other “homemade” videos made by our own technical sales group. More Solutions to Sticky Problems Learn more about viscosity and rheology with our most popular publication. -
Page 33: Appendix D - Warranty Repair And Service
Transportation is at the purchaser’s expense. The Viscometer should be shipped in its carrying case together with all spindles originally provided with the instrument. If returning to AMETEK Brookfield, please contact us for a return authorization number prior to shipping. - Page 34 Tel : +66(0)83 820 5872 | Fax: +66 (0)2 012 7501 Email (Sales): brookfield-thailand.sales@ametek.com | Email (Service): brookfield-thailand.service@ametek.com store.brookfieldengineering.asia Onsite service at your facility is available from AMETEK Brookfield. Please contact our Service Department in the United States, United Kingdom, Germany, India, Thailand, or China for details. M-HPQA-001...
Need help?
Do you have a question about the BROOKFIELD HPQA Series and is the answer not in the manual?
Questions and answers