Table of Contents
Advertisement
Quick Links
Isokinetic Line
Genu Iso – Genu Plus
User's Manual
Rev. C of the 16/07/2020
(Based on Italian Version F)
Easytech S.r.l.
EASYTECH s.r.l.
Via della Fangosa, 32- 50032 Borgo San Lorenzo (FI) Italy
tel. +39 055 8455216 - fax +39 055 8454349
info@easytechitalia.com
e-mail:
Direct Technical Service number: +39 348 2316323
GENU ISO
GENU PLUS
This apparatus is compliant to 93/42/CEE directive for medical equipments. Conformity has been
tested according to CEI EN 60601-1 directive.
Easytech s.r.l. – Genu Iso/Plus User's Manual
rev. C
Pag. 1 di 97
Advertisement
Table of Contents

Related Manuals for easytech Isokinetic Genu Iso

Summary of Contents for easytech Isokinetic Genu Iso
- Page 1 Direct Technical Service number: +39 348 2316323 GENU ISO GENU PLUS This apparatus is compliant to 93/42/CEE directive for medical equipments. Conformity has been tested according to CEI EN 60601-1 directive. Easytech s.r.l. – Genu Iso/Plus User’s Manual rev. C Pag. 1 di 97 ...
- Page 2 No part of this manual can be neither copied, nor transmitted, nor translated in any language, nor recorded through any type of equipment, without authorization in written by EASYTECH S.r.l. EASYTECH S.r.l. reserves the right to embody changes or improvements in this manual and the product without prior notice. Version: 16/07/2020 Title: Genu ISO e Genu PLUS User’s Manual...
-
Page 3: Table Of Contents
FIRST START-UP AND START OF THE PROGRAM ................19 MECHANICAL APPROACH ........................20 4.3.1 Patient’s positioning and leverages ....................20 4.3.2 Adjustments for dynamic exercises ....................23 4.3.3 Adjustments for static exercises ....................... 25 Easytech s.r.l. – Genu Iso/Plus User’s Manual rev. C Pag. 3 di 97 ... - Page 4 SETUP OF SERIES ............................78 TROUBLESHOOTING ....................80 MAINTENANCE ....................... 81 CLEANING THE EXTERNAL SURFACES ....................81 PERIODICAL INSPECTION AND LIFE OF THE DEVICE ..............81 Easytech s.r.l. – Genu Iso/Plus User’s Manual rev. C Pag. 4 di 97 ...
- Page 5 START PROGRAM WITH ERROR MESSAGE ..................91 APPENDIX 2: EXTERNAL TOOLS ................. 94 12.1 IsoDateExSync .............................. 94 12.2 IsoExportDB ..............................94 12.3 Report Customization ..........................94 Easytech s.r.l. – Genu Iso/Plus User’s Manual rev. C Pag. 5 di 97 ...
-
Page 6: Introduction
1.3 RESPONSIBILITIES OF EASYTECH Easytech reserves the right to make changes and/or improvements to this manual and its products without prior notice. At the same time the manufacturer declines any whatsoever responsibility for damages or inconveniences arising from typographical errors contained in this manual. - Page 7 The device is not used for the intended use or in accordance with the instructions ▪ provided in this manual. The device has been tampered with by unauthorized personnel. ▪ Easytech s.r.l. – Genu Iso/Plus User’s Manual rev. C Pag. 7 di 97 ...
-
Page 8: Safety Prescriptions
Only use the power cord supplied with the device or, in all cases, the spare power cords supplied by Easytech. Although it is possible to purchase similar cable that offer good performances, their characteristics are not suitable to guarantee the compliance with standards according to which the device has been manufactured. -
Page 9: Warnings Concerning Usage
If the device has fallen to the ground or the external casing is damaged or you ▪ reasonably suspect that the performance of the device has degraded, disconnect it from the power supply and contact the technical support of Easytech. If the connection cable is damaged or liquid has penetrated inside the device, ▪... - Page 10 100% dip, 1 period it is recommended that the device be 30% dip, 25/30 powered from an uninterruptible power EC 61000-4-11 periods supply or a battery. Easytech s.r.l. – Genu Iso/Plus User’s Manual rev. C Pag. 10 di 97 ...
- Page 11 (in Watt) according to the manufacturer; “E” is the level of immunity; “*” is the multiplication symbol, “ “ means square root. Interference may occur near devices marked with the following symbol: Easytech s.r.l. – Genu Iso/Plus User’s Manual rev. C Pag. 11 di 97 ...
-
Page 12: Special Prescriptions For Operators
Disconnect the device from the power supply and contact the technical support of ▪ Easytech if the connection cable is damaged or if liquid has penetrated in the device. 2.6 SPECIAL PRESCRIPTIONS FOR THE PATIENT 2.6.1 Contraindications At present, Genu/Prima can be used by anyone provided that the physician/therapist defines the type, intensity and limits of the exercises in function of the ability and conditions of each patient. -
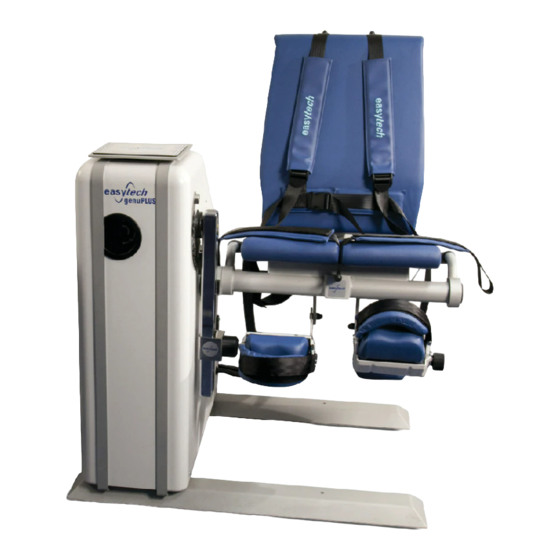
Page 13: Description Of Genu
PC station must be positioned outside the patient area. If the therapist does not consider this warning enough, it is necessary to equip the PC with additional ground. Easytech s.r.l. – Genu Iso/Plus User’s Manual rev. C Pag. 13 di 97... -
Page 14: Frame And Patient Accommodation
➢ The oleo-dynamic isokinetic brake can be locked at fixed angles using the special mechanical selector for isometric measurements and exercises. ➢ The control level of the selector is situated on the front of the device. Easytech s.r.l. – Genu Iso/Plus User’s Manual rev. C Pag. 14 di 97... -
Page 15: Personal Computer And Software
▪ dimensions: m. 1.10 x 1.10 x 1.32. ▪ weight: Kg 150 (190Kg GENU Plus) Environmental operating conditions: ▪ ➢ temperature 10°C – 40°C ➢ relative humidity 0% - 75% without condensed moisture. Easytech s.r.l. – Genu Iso/Plus User’s Manual rev. C Pag. 15 di 97 ... - Page 16 ▪ Video Board minimum requirements: 1024x768pixel 24bit ▪ Monitor: Compatible with video board. ▪ Printer: Color graphic compatible with personal computer & operating system ▪ USB port Easytech s.r.l. – Genu Iso/Plus User’s Manual rev. C Pag. 16 di 97 ...
-
Page 17: Description Of The Device Functions
Shown with guards removed for demonstration purposes only: NEVER WORK WITH THE GUARDS REMOVED! (7) Lever with standard ankle pad (right and left) or Lever with Anti Shear device (optional) Easytech s.r.l. – Genu Iso/Plus User’s Manual rev. C Pag. 17 di 97 ... -
Page 18: Connection To Grid, First Turn On And Start Program
Is it intact? device. Check the power cord and eventually replace it. Is the main fuse good? - Check the main fuse and replace if necessary. Easytech s.r.l. – Genu Iso/Plus User’s Manual rev. C Pag. 18 di 97 ... -
Page 19: First Start-Up And Start Of The Program
If, after all checks are performed, the device still doesn’t power on, refer to Easytech Technical assistance. 4.2 FIRST START-UP AND START OF THE PROGRAM If the PC (Unit A) was bought from Esaytech to be used with Genu Unit, the software for device management is already pre-installed. -
Page 20: Mechanical Approach
It is essential that seat and backrest are adjusted as required to have the knee rotation fulcrum coincide with the lever rotation fulcrum. The back of the knee (popliteal region) must rest on the front seat edge. Easytech s.r.l. – Genu Iso/Plus User’s Manual rev. C Pag. 20 di 97... - Page 21 Replace the setscrew on the lever placed at the lower end of the graduated shaft. Easytech s.r.l. – Genu Iso/Plus User’s Manual Pag. 21 di 97 rev. C...
- Page 22 Lever with Anti Shear device A clamping device is installed under the seat. It is used to hold the unused limb in case of isokinetic exercise of one limb only. Easytech s.r.l. – Genu Iso/Plus User’s Manual rev. C Pag. 22 di 97...
-
Page 23: Adjustments For Dynamic Exercises
For dynamic exercises, it is possible to limit the movement range for the exercises by tightening the knobs in the position that corresponds to the desired movement range. Easytech s.r.l. – Genu Iso/Plus User’s Manual rev. C Pag. 23 di 97... - Page 24 Per accedere ai pomelli è necessario rimuovere la protezione leva, Pulsante di emergenza utilizzando l’apposito attrezzo Protezione trasparente contro urti o schiacciamenti NON RIMUOVERE Easytech s.r.l. – Genu Iso/Plus User’s Manual rev. C Pag. 24 di 97 ...
-
Page 25: Adjustments For Static Exercises
In case of communication error between Pc and Genu unit, the following error will be displayed and in the program screen there will be a red writing in the upper right corner under the Easytech logo (Device not Connected): Easytech s.r.l. – Genu Iso/Plus User’s Manual rev. C Pag. 25 di 97 ... - Page 26 In these cases, write down the message on a note pad, and continue operating by pressing the “Continue” button. Contact customer service if the error repeats frequently. Easytech s.r.l. – Genu Iso/Plus User’s Manual rev. C Pag. 26 di 97...
-
Page 27: Procedure For Air Elimination
This will open the following window. Click on “0 Air” and follow the instructions on the screen. NB: Make sure that the device is connected and switched on before starting the procedure. 0Air Easytech s.r.l. – Genu Iso/Plus User’s Manual rev. C Pag. 27 di 97 ... -
Page 28: Procedure For Torque Offset Reset
Through the following message the program notifies the operator of the error resolution. Click the "OK" button and proceed with a normal working session. If the error persists, contact our service center. Easytech s.r.l. – Genu Iso/Plus User’s Manual rev. C Pag. 28 di 97 ... -
Page 29: Procedures For Performing The Exercises
15. Speed indications Controls can be selected with the mouse, with the function keys and through the touchscreen. These options are available also for subsequent controls. Easytech s.r.l. – Genu Iso/Plus User’s Manual rev. C Pag. 29 di 97 ... -
Page 30: Patient Selection
Entering a part of the patient's last name or SSN in their respective fields in the following window can be invoked by a patient in the archive. Easytech s.r.l. – Genu Iso/Plus User’s Manual rev. C Pag. 30 di 97... - Page 31 If the search finds more than one match, select the desired patient among the listed ones. Easytech s.r.l. – Genu Iso/Plus User’s Manual rev. C Pag. 31 di 97 ...
-
Page 32: Concentric Exercise
MUSCLES SEGMENT MOVEMENTS INVOLVED Knee Flexor and extensor Flexion/extension muscles Easytech s.r.l. – Genu Iso/Plus User’s Manual rev. C Pag. 32 di 97 ... - Page 33 SYNCRO – The extension/flexion values will be the same. To move to the next step, select LIMITS SETTING or COMPENSATION 5.3.1.2 Setting the limits Easytech s.r.l. – Genu Iso/Plus User’s Manual rev. C Pag. 33 di 97 ...
- Page 34 BACK arrow and thus return to the main screen of the concentric exercise. From here it is possible to access the COMPENSATION tab through the relative button. This will open the following window: Easytech s.r.l. – Genu Iso/Plus User’s Manual rev. C Pag. 34 di 97...
- Page 35 The actual exercise starts when the patient makes the first movement. During the exercise, the system displays in real time the histograms of the maximum torque values (peak torque) applicable to each movement. Easytech s.r.l. – Genu Iso/Plus User’s Manual rev. C Pag. 35 di 97...
- Page 36 X and Y axes, as shown in the following charts. ANGLE/TIME CHART TORQUE/TIME CHART Easytech s.r.l. – Genu Iso/Plus User’s Manual rev. C Pag. 36 di 97 ...
- Page 37 The operating procedures are identical at the beginning of any exercise: the limb, the type of motion and any limits must be identified and the exercise must be started by pressing the TEST or SERIES button. Easytech s.r.l. – Genu Iso/Plus User’s Manual rev. C Pag. 37 di 97...
- Page 38 The start of exercise is identical to the case of single exercise. At the end of each SERIES or TEST exercise, a waiting rest time window will appear. Easytech s.r.l. – Genu Iso/Plus User’s Manual rev. C Pag. 38 di 97...
-
Page 39: Concentric Isotonic Exercise
The settings relating to the LIMITS and the COMPENSATION, as well as the analysis of graphics, the exercise SERIES and the TEST mode, are like the case of isokinetic exercise (see paragraph 5.3.1 and related sub-paragraphs). Easytech s.r.l. – Genu Iso/Plus User’s Manual rev. C Pag. 39 di 97... -
Page 40: Concentric Hydrodynamic Exercise
Time – Sets the duration time of each exercise. Move the cursor until the desired number displays and move the mouse to the right or left in increments of units for a fine adjustment. Easytech s.r.l. – Genu Iso/Plus User’s Manual rev. C Pag. 40 di 97... - Page 41 Once all the settings have been completed, press the arrow at the bottom right to access the page relating to the exercise. Press START, wait for the device to issue an acoustic/visual signal, then start the exercise. Easytech s.r.l. – Genu Iso/Plus User’s Manual rev. C Pag. 41 di 97 ...
- Page 42 The operating procedures are identical at the beginning of any exercise: the limb, the type of motion and any limits must be identified and the exercise must be started by pressing the TEST or SERIES button. Easytech s.r.l. – Genu Iso/Plus User’s Manual rev. C Pag. 42 di 97...
- Page 43 The start of exercise is identical to the case of single exercise. At the end of each SERIES or TEST exercise, a waiting rest time window will appear. Easytech s.r.l. – Genu Iso/Plus User’s Manual rev. C Pag. 43 di 97...
- Page 44 By pressing button 1, it is possible to immediately move to the following exercise ignoring the rest period. At the end of the series or TEST, the obtained results are automatically saved. Easytech s.r.l. – Genu Iso/Plus User’s Manual rev. C Pag. 44 di 97...
-
Page 45: Eccentric Exercise
So if the selected limb is the knee it is called the flexion and extension. Easytech s.r.l. – Genu Iso/Plus User’s Manual rev. C Pag. 45 di 97... -
Page 46: Gravity Compensation
BACK arrow and thus return to the main screen of the concentric exercise. From here it is possible to access the COMPENSATION tab through the relative button. This will open the following window: Easytech s.r.l. – Genu Iso/Plus User’s Manual rev. C Pag. 46 di 97... -
Page 47: Setting The Limits
Clicking on the right arrow you proceed with the execution of the exercise, passing through the page of the range of motion setting (ROM). 1 – GONIOMETER THAT INDICATES THE ANGLE- check the correct indication Easytech s.r.l. – Genu Iso/Plus User’s Manual rev. C Pag. 47 di 97 ... -
Page 48: Exercise In Progress
(peak torque) of each movement. Depending on the type of motion is set to have different results. Easytech s.r.l. – Genu Iso/Plus User’s Manual rev. C Pag. 48 di 97... - Page 49 In the case EXC - extensors + flexors we have the following type of diagram: In the case Extensors - EXC + CONC we have the following type of diagram: Easytech s.r.l. – Genu Iso/Plus User’s Manual rev. C Pag. 49 di 97...
-
Page 50: End Of Exercise And Review Of The Graphics
'relative angle. Patient’s name and limb; click here for contro- Red Chart: Angle Blue Chart: Torque lateral limb Show/Hide Show/Hide Show/Hide Show/Hide Angle Performance Histogram Torque Easytech s.r.l. – Genu Iso/Plus User’s Manual rev. C Pag. 50 di 97 ... - Page 51 The above example is related to the case EXC - extensors + flexors, the CONC + EXC extensors and EXC + CONC flexors are similar and shown below. Easytech s.r.l. – Genu Iso/Plus User’s Manual rev. C Pag. 51 di 97...
-
Page 52: Series Of Exercises And Test
Click OK to confirm. The start procedure is the same as the one for single exercises. Easytech s.r.l. – Genu Iso/Plus User’s Manual rev. C Pag. 52 di 97... - Page 53 By pressing button 1, it is possible to immediately move to the following exercise ignoring the rest period. At the end of the series or TEST, the obtained results can be saved with the appropriate button. Easytech s.r.l. – Genu Iso/Plus User’s Manual rev. C Pag. 53 di 97 ...
-
Page 54: Passive Movement Exercise (Pm)
5.5.2 Setting the limits Clicking on the right arrow you proceed with the execution of the exercise, passing through the page of the range of motion setting (ROM). Easytech s.r.l. – Genu Iso/Plus User’s Manual rev. C Pag. 54 di 97... - Page 55 Its default is the maximum value of the previous exercise. Click on the arrow at the bottom right to continue with the exercise. Easytech s.r.l. – Genu Iso/Plus User’s Manual rev. C Pag. 55 di 97 ...
-
Page 56: Exercise In Progress
SERIES After selecting the SERIES as described above, the program opens a navigation screen where it is possible to select the desired file. Click OK to confirm. Easytech s.r.l. – Genu Iso/Plus User’s Manual rev. C Pag. 56 di 97... -
Page 57: Management Of Databases
Each column represents an exercise, while the rows contain the fields with the stored data. Easytech s.r.l. – Genu Iso/Plus User’s Manual rev. C Pag. 57 di 97 ... -
Page 58: Analysis And Comparison Of The Outlines
Angle/time chart of the two exercises Torque/time chart of the two exercises Image obtained by pressing the blue chart Image obtained by pressing the red chart Easytech s.r.l. – Genu Iso/Plus User’s Manual rev. C Pag. 58 di 97 ... - Page 59 Image obtained by pressing button 1 on the double chart 1 Display of the two overlapped exercises with X axis Display of two overlapped exercises with Y axis changed changed Easytech s.r.l. – Genu Iso/Plus User’s Manual rev. C Pag. 59 di 97 ...
- Page 60 Angle and torque of all the repetitions of the 2 overlapped exercises exercises Angle and torque of all the repetitions of the 2 different exercises displayed with a different scale Easytech s.r.l. – Genu Iso/Plus User’s Manual rev. C Pag. 60 di 97 ...
- Page 61 By clicking the torque scale, it is possible to change the scale and select a value with sign instead of an absolute value by clicking box 1. above the slider for the torque scale adjustment. Easytech s.r.l. – Genu Iso/Plus User’s Manual rev. C Pag. 61 di 97...
-
Page 62: Tables Printouts
5.6.4.1 Isokinetic test report An isokinetic test generally includes two exercises: • A first exercise on the healthy limb • A second exercise on the sick limb Easytech s.r.l. – Genu Iso/Plus User’s Manual rev. C Pag. 62 di 97 ... - Page 63 Toggles the display with the time on the X axis and the angle on the Y axis Displays/hides the charts Displays/hides the torque curve Displays/hides the angle curve Toggles the display with overlapped exercises and two separate exercises Easytech s.r.l. – Genu Iso/Plus User’s Manual rev. C Pag. 63 di 97 ...
- Page 64 Exercise performed with the sick limb being examined Exercise performed with the reference contralateral limb Percentage differences between the sick and contralateral limbs Ratio between the values of the sick and contralateral limbs Easytech s.r.l. – Genu Iso/Plus User’s Manual rev. C Pag. 64 di 97 ...
- Page 65 Easytech s.r.l. – Genu Iso/Plus User’s Manual rev. C Pag. 65 di 97 ...
- Page 66 The lines represent the second exercise done in order of time, namely that relating to the muscles you want to analyze. Easytech s.r.l. – Genu Iso/Plus User’s Manual rev. C Pag. 66 di 97...
- Page 67 Exercise ECCENTRIC: FLX / EXT = ECCENTRIC EXTENSORS / ECCENTRIC FLEXOR Exercise extensor muscles: FLX / EXT = ECCENTRIC EXTENSORS / CONCENTRIC EXTENSORS Exercise flexors: FLX / EXT = CONCENTRIC FLEXORS / ECCENTRIC FLEXOR Easytech s.r.l. – Genu Iso/Plus User’s Manual rev. C Pag. 67 di 97 ...
- Page 68 This is the case shown in the box at the top left side in the Legend (see page 65), in the intersection between CNC-2 and CNC-1 Easytech s.r.l. – Genu Iso/Plus User’s Manual rev. C Pag. 68 di 97...
- Page 69 As seen in the Legend (page 65), the boxes of the diagonal compare exercises homogeneous with each other (two concentric and two eccentric, two extensors or flexors). We now see the case of other two diagonal boxes. Easytech s.r.l. – Genu Iso/Plus User’s Manual rev. C Pag. 69 di 97 ...
- Page 70 The following example is related to a test that compares two exercises both on EXTENSORS (Concentric + Eccentric) Easytech s.r.l. – Genu Iso/Plus User’s Manual rev. C Pag. 70 di 97 ...
- Page 71 VARIOUS PARAMETERS MEASURED ON THE JOINTS INVOLVED. THE ROLE OF THE DOCTOR OR THERAPIST IS TO DECIDE ON THE EXERCISE TO BE CARRIED OUT FIRST AND SECOND, IN ORDER TO ACHIEVE THE DESIRED RESULTS. Easytech s.r.l. – Genu Iso/Plus User’s Manual rev. C Pag. 71 di 97...
- Page 72 The final operation consists in opening the Database table and selecting one of the tests performed in order to view it or print the report. Easytech s.r.l. – Genu Iso/Plus User’s Manual rev. C Pag. 72 di 97...
- Page 73 By clicking or touching the header of a column and in particular the description “TEST”, it is possible to select all 4 test exercises (see figure) Button in the lower left side enables to display the charts. Easytech s.r.l. – Genu Iso/Plus User’s Manual rev. C Pag. 73 di 97 ...
- Page 74 To accurately compare the extensor and flexor muscles of each limb, it is necessary to enable the display of absolute values (on the left of the chart) and click or touch the small rectangles above the scale control slider. Easytech s.r.l. – Genu Iso/Plus User’s Manual rev. C Pag. 74 di 97...
- Page 75 Extension and flexion of the contralateral limb • Extension of the limb being examined and the contralateral limb • Flexion of the limb involved in the exercise Easytech s.r.l. – Genu Iso/Plus User’s Manual rev. C Pag. 75 di 97 ...
- Page 76 Click the printer icon in the upper right to print the report Click the small cross on the far right to close the page. Easytech s.r.l. – Genu Iso/Plus User’s Manual rev. C Pag. 76 di 97 ...
- Page 77 Click the printer icon in the upper right to print the report Click the small cross on the far right to close the page. Easytech s.r.l. – Genu Iso/Plus User’s Manual rev. C Pag. 77 di 97 ...
-
Page 78: Setup Of Series
Confirm by pressing “ADD” (1) and repeat the operation until the desired series is created. To delete an exercise from the series, select the exercise to be deleted, press “DELETE” (2) and confirm as shown in the following image. Easytech s.r.l. – Genu Iso/Plus User’s Manual rev. C Pag. 78 di 97 ... - Page 79 The “UPDATE” button (5) allows the operator to update the data of a selected exercise. To recall a previously saved series, press “OPEN” (4). A window will appear from which it is possible to recall the series of interest. Easytech s.r.l. – Genu Iso/Plus User’s Manual rev. C Pag. 79 di 97...
-
Page 80: Troubleshooting
USB cable – switch on device and the PC the PC (leave the operating system start) – switch on the device – start the program Easytech s.r.l. – Genu Iso/Plus User’s Manual rev. C Pag. 80 di 97 ... -
Page 81: Maintenance
Easytech or by an authorized service center. Easytech guarantees the maintenance of the device for 5 years after its sale (law provision). Easytech s.r.l. – Genu Iso/Plus User’s Manual rev. -
Page 82: Packaging And Transportation Of The Device
In this case, it is necessary to make sure that the person who collects the unit is aware of the content and able to dispose of it accordingly. Easytech s.r.l. – Genu Iso/Plus User’s Manual rev. C Pag. 82 di 97... -
Page 83: Label
The device that is no longer usable must be disposed Production year of in accordance with current regulation for electrical and electronic equipment (WEEE Directive Manufacturer 2012/19/UE) Easytech s.r.l. – Genu Iso/Plus User’s Manual rev. C Pag. 83 di 97 ... - Page 84 Easytech s.r.l. – Genu Iso/Plus User’s Manual rev. C Pag. 84 di 97 ...
-
Page 85: Appendix 1: Software Installation
Open file on folder – (the last numbers may change depending on the software release) when you double click this folder it shows you the folowing Easytech s.r.l. – Genu Iso/Plus User’s Manual rev. C Pag. 85 di 97... - Page 86 Note: it is suggested not to change the default destination folder in order to guarantee the proper working!!! On the next window, check the checkbox and then click “Next”: Easytech s.r.l. – Genu Iso/Plus User’s Manual rev. C Pag. 86 di 97...
- Page 87 On the following window click “Install” and wait for the installation process to complete: When the process is completed, click on “Finish” to start the installation of the exercise extraction tool from a common Isocine3 archive. Easytech s.r.l. – Genu Iso/Plus User’s Manual rev. C Pag. 87 di 97...
- Page 88 If the installer requests to choose the installation folder, leave the default one then click on Next. In the next step, leave the checkmark on “Create a desktop shortcut” then click on Next. Easytech s.r.l. – Genu Iso/Plus User’s Manual rev. C Pag. 88 di 97...
- Page 89 In the next step, click on Install. As the tool installation is completed, click on Finish. The Isocine3 software installation is now completed. Easytech s.r.l. – Genu Iso/Plus User’s Manual rev. C Pag. 89 di 97 ...
-
Page 90: Start Program
11.2 START PROGRAM Start Isocine3 program. Open the program by double clicking on desktop icon: Now open the program configuration panel to complete the installation: Easytech s.r.l. – Genu Iso/Plus User’s Manual rev. C Pag. 90 di 97 ... -
Page 91: Start Program With Error Message
If running the program Isocine3 for the first time, you receive the following error message, it means that device is not connected. In the picture below there is a red font on the right top below the easytech logo (Device connected). - Page 92 Close the program, then open the software again. See picture below (status icon) in order to verify the device connection. Now open the program configuration panel to complete the installation: Easytech s.r.l. – Genu Iso/Plus User’s Manual rev. C Pag. 92 di 97...
- Page 93 PLEASE READ THE USER MANUAL CAREFULLY. TO OPEN THE ONLINE USER MANUAL CLICK WITH LE LEFT BUTTON OR TOUCH THE SCREEN BY SELECTING THE QUESTION MARK IN THE UPPEN RIGHT CORNER. Easytech s.r.l. – Genu Iso/Plus User’s Manual rev. C Pag. 93 di 97...
-
Page 94: Appendix 2: External Tools
Now user have simply to change the value of a certain item to display it (value=1) or hide it (value=0). Please refer to the user's manual in the folder itself: C:\Easytech_Isocine3\Utilities\Isocine3 _ Report Customization.xls Easytech s.r.l. – Genu Iso/Plus User’s Manual rev. C Pag. 94 di 97 ... - Page 97 EASYTECH s.r.l. Via della Fangosa, 32 – 50032 Borgo S. Lorenzo Firenze – Italy Tel.: +39 055 8455216 – Fax: +39 055 8454349 E-Mail: info@easytechitalia.com www.easytechitalia.com Direct number of Easytech Technical Support: +39 348 2316323...
Need help?
Do you have a question about the Isokinetic Genu Iso and is the answer not in the manual?
Questions and answers