Table of Contents
Advertisement
Quick Links
Advertisement
Table of Contents

Related Manuals for CUMMINS ALLISON JetScan iFX i100


Summary of Contents for CUMMINS ALLISON JetScan iFX i100
- Page 1 JetScan iFX ® i100 Scanner Operating Instructions for All Models...
-
Page 2: Power Specifications
High-voltage levels may be present. Risk of electric shock. Turn power OFF and unplug power cord from machine before cleaning. Do not attempt repairs. Repairs must be made by authorized Cummins Allison personnel. Plug three-prong grounded plug (supplied) into properly grounded three-prong outlet. -
Page 3: Statement Of Agency Compliance
Statement of Agency Compliance This device complies with part 15 of the FCC rules. Operation is subject to the following two conditions: (1) this device may not cause harmful interference, and (2) this device must accept any interference received, including interference that may cause undesired operation. FCC Class A Compliance Statement Radio frequency present. -
Page 4: Table Of Contents
STATEMENT OF AGENCY COMPLIANCE ............1 FCC CLASS A COMPLIANCE STATEMENT ............1 SAFETY COMPLIANCE ..................1 ® GETTING TO KNOW YOUR JETSCAN iFX i100 SCANNER ....... 4 THE JETSCAN iFX i100 SCANNER ..............5 ....................6 ACHINE IAGRAM ........................7 OPPER Required Hopper Guides for Check Processing ........ - Page 5 HOW TO USE STRANGER MODE ..............51 ....................52 TRANGER ECORD ADD K ................. 53 EY AND ATCHES ....................53 ACING OCUMENTS ..................54 RIENTING OCUMENTS HOW TO USE OPTIONAL EXTERNAL DEVICES FOR DATA ENTRY ....55 ............... 55 XTERNAL EYBOARD AND EYPAD Key Compatibility ..................
-
Page 6: Getting To Know Your Jetscan Ifx ® I100 Scanner
Getting to Know Your JetScan iFX i100 Scanner ® Thank You ® Thank you for selecting the JetScan iFX i100 scanner from Cummins Allison. For Your Records Please fill in the following information for easy reference. Model No. Serial No. Address:... -
Page 7: The Jetscan Ifx I100 Scanner
The JetScan iFX i100 Scanner ® The JetScan iFX i100 scanner processes U.S. banknotes, international banknotes and bar-coded tickets. Select models also process checks, deposit slips and other financial institution MICR documents that meet U.S. standard specifications. The machine features: •... -
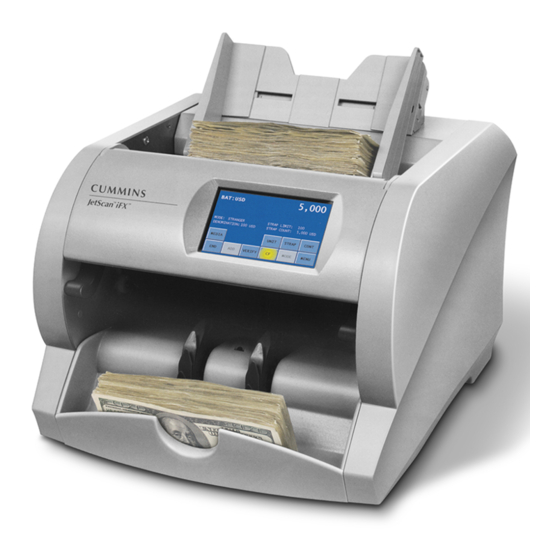
Page 8: Machine Diagram
Machine Diagram Thickness adjustment dial located behind hopper extension Feed roller Feed roller Adjustable hopper guides Power switch Hopper on back of unit Touch-screen display Display panel Release lever Release lever Stacker wheels Stacking sensor Pocket Pocket sensor Pocket mirror JetScan iFX ®... -
Page 9: Hopper
MICR documents that meet U.S. standard specifications. Additional hopper guides are required for check processing. The stationary guides are installed in the hopper. Contact a Cummins Allison representative for more information. When the adjustable hopper guides are raised for check processing, the stationary hopper guides keep checks aligned as they enter the feeder. -
Page 10: Thickness Adjustment Dial
Thickness Adjustment Dial The dial located on the top of the machine adjusts the tightness of the feeder through which documents pass during operation. The dial has positive and negative adjustment numbers, with 0 at the center of the adjustment range. For normal feeding, start with 0 at the top of the dial. -
Page 11: Communication Port Diagram
Communication Port Diagram The following diagram shows the communication ports located on the back of the machine. Ethernet port DB9 serial port FireWire port Two USB ports (non-functional) Radio frequency present. Install ferrite bead on all external communication cables; position ferrite bead near external port. -
Page 12: The Basics
Read and understand all instructions before use. Only use Cummins Allison supplied power adapter. Use of any other power adapter may damage equipment. To turn the machine ON, set the rocker switch located in the lower-left rear corner when facing the front of the machine to the ON position (I). -
Page 13: Touch-Panel Display: Main Screen Description
Touch-Panel Display: Main Screen Description All operations are performed using the touch-panel display. The display panel can be tilted to adjust the viewing angle for good visibility. The main screen is the starting point for using the machine to process documents. Configuring the machine’s software features can impact the main screen’s appearance. - Page 14 Main Screen Key Description Press to process MICR-encoded documents. When multiple document types are CHECK activated, press CRNCY to prompt the SELECT NEW CURRENCY screen and press the CHECK key. Press to prompt the SELECT NEW CURRENCY screen which is used activate the preferred currency, checks or bar-coded tickets for processing.
-
Page 15: Password Entry
The machine may be set up to require entry of a four-digit password to view the SPECIAL MODE MENU, which includes machine functions such as setup parameters, diagnostics for trained Cummins Allison personnel, and defaults. (For details, see Setup Password.) -
Page 16: Operating Mode Descriptions
Operating Mode Descriptions The machine provides four modes of operation for processing documents. The SETUP menus provide options for enabling/disabling the modes. Only the modes enabled in SETUP appear on the MODE-SELECTION screen; disabled modes are not available for use. When the machine is turned ON, it defaults to the mode it was in when last turned OFF. - Page 17 Mode Key Description Note processing: Scans all denominations and is best used when notes are presorted by denomination and then stacked together. When the machine encounters a change in denomination, it is called a denomination change. A grand total is provided. Check processing: Scans checks and stops on non-check documents with a SORT prompt to enter a MICR number.
-
Page 18: Machine Features
Machine Features This section describes a variety of machine features, including memory levels and the verify function. Memory Levels The machine has four memory levels. Memory Level Description STRAP Strap limits can be set from 1 - 100 or infinite (INF). The machine stops when it (Note Strapping, Check Batching, reaches a strap limit. -
Page 19: How To Use The Verify Function
How to Use the Verify Function The verify function runs documents “off-line” without adding them to machine totals and is intended for use in recounting and reconciling any count suspected of being incorrect. The verify function provides a unique day total that only tracks documents processed while using this function. -
Page 20: Strap Counts And Strap Limits
Strap Counts and Strap Limits To view current strap limits and counts, press STRAP on the main screen. The STRAP- SETTINGS screen is displayed. Configuring the machine’s software features can impact the screen’s appearance. Examples are shown below. Note Processing Enabled Check and Ticket Processing Enabled Strap limits may be set for denominations and documents in all operating modes, except for MIXED, MIXED/FACE or MIXED/ORIENTATION. -
Page 21: How To Clear Strap Counts
How to Clear Strap Counts To clear a document’s strap count to 0, select the document using or and then press CLEAR. To clear all document strap counts to 0, press CLEAR followed by ALL. If STRAPS CLEAR is set to ENDBT in SETUP, then ending a batch automatically clears all strap counts. -
Page 22: Main Sub-Menu Functions
Main Sub-Menu Functions Pressing MENU on the main screen prompts the MAIN SUB-MENU below. FILE EXPORT MENU appears when FILE EXPORT is ON in SETUP. IMS CONNECTION appears when IMS MENU is ON in SETUP. Main Sub-Menu Key Description EXIT Press EXIT to return to the main screen When TICKET SCAN is active: •... -
Page 23: Report Menu
Report Menu Pressing REPORT MENU on the MAIN SUB-MENU prompts the REPORT MENU below. DOC DATA PRNT REPRT is only available on machines with imaging options activated (serial-number, check or ticket capture). Report Menu Key Description EXIT Press EXIT to return to the MAIN SUB-MENU. ©... - Page 24 Report Menu Key Description Prompts the DAY TOTALS screen shown below. The DENOM column lists denominations. The TICKET line appears if the machine is set to process tickets. The COUNT line appears if the machine is set for COUNT mode. A CHECK line appears if the machine is set to process checks.
- Page 25 Report Menu Key Description 2. Do one of the following: • Press OK to clear all day totals to 0 and return to the DAY TOTALS DAY REPORT screen. (Continued) • Press CANCEL to return to the DAY TOTALS screen without clearing totals.
- Page 26 Report Menu Key Description Prompts the SUB-BATCH TOTALS screen shown below. SUB-BATCH REPRT The DENOM column lists denominations. The TICKET line appears if the machine is set to process tickets. The CHECK line appears if the machine is set to process checks. The COUNT line appears if the machine is set for COUNT mode.
- Page 27 Report Menu Key Description 2. Press END on the main screen. When SBAT ENABLE is ON and set to CLEAR in SETUP, the sub-batch ends and the total on the main screen resets to 0 when documents are removed from the pocket. SUB-BATCH REPRT may be used to view or print totals after the sub-batch total is cleared to 0 on the main screen.
- Page 28 Report Menu Key Description DOC DATA PRNT REPRT is only available on machines with imaging options activated (serial- number, check or ticket capture). Prompts the DOC DATA PRINT REPORTS screen shown below. DOC DATA PRNT REPRT If an optional printer is connected, press one of the keys above to print data reports by day, batch or sub-batch.
-
Page 29: Adjustment Menu
Adjustment Menu Pressing ADJUSTMENT MENU on the MAIN SUB-MENU prompts the ADJUSTMENT MENU below. DOC CORRECT ADJ is only available on machines with imaging options activated (serial-number, check or ticket capture). Adjustment Menu Key Description EXIT Press EXIT to return to the MAIN SUB-MENU. Prompts the COUNTERFEIT ADJUSTMENT screen shown below. - Page 30 Adjustment Menu Key Description Press ◄ or ► to select a counterfeit-sensitivity level to adjust. To view additional sensitivity levels, press the double right arrows or the double down arrows. Use + and – to select a level (1 - 10 or OFF). The lower the number, the less sensitive the setting is.
- Page 31 Adjustment Menu Key Description Prompts the DENSITY ADJUSTMENT screen shown below. DENSITY ADJ Density levels, or doubles-detection sensitivity, may be set for documents and the COUNT mode. These settings should be adjusted before (Density Adjustment) processing. To change density levels: 1.
- Page 32 Adjustment Menu Key Description DOC CORRECT ADJ is only available on machines with imaging options activated (serial-number, check or ticket capture). Prompts one of the following DOCUMENT DATA CORRECTION ADUSTMENT screens, depending on activated options. These screens are used to configure and prompt the SERIAL-NUMBER CORRECTION,...
- Page 33 Adjustment Menu Key Description To activate the SERIAL-NUMBER, BAR-CODE or MICR-LINE CORRECTION screens: 1. Press or to select the desired document type. 2. Press ON or OFF to enable or disable the correction screen for the DOC CORRECT ADJ selected document type.
- Page 34 Adjustment Menu Key Description Prompts one of the following SET DATE AND TIME screens. DATE/TIME ADJ (Date and Time Adjustment) These screens are used to set the date, time and format that appear on printed reports. To set the date, time and format: 1.
-
Page 35: File Export Menu
File Export Menu FILE EXPORT MENU appears on the MAIN SUB-MENU when FILE EXPORT is ON in SETUP. Users must configure settings on the DOC DATA EXPORT CONFIGURATION screen DOCUMENT DATA STORAGE screen BEFORE attempting to export a comma- delimited file. Do not insert a USB flash drive into the USB port on the back of the machine until the machine is POWERED ON and initialization is complete. - Page 36 File Export Menu Key Description Prompts the DOC DATA EXPORT CONFIGURAITON screen below. About FILE EXPORT NAME: To customize the name of a file that will be exported: 1. Press SET to prompt the keypad. Press SHIFT to toggle the keypad between capital letters, lower-case letters, and numbers and symbols.
- Page 37 File Export Menu Key Description If a specific target directory is not needed on the flash drive, simply press DONE. The root-directory symbol ( \ ) is still displayed by default. When configuration is complete, press DONE to return to the DOC DATA EXPORT CONFIGURATION screen.
-
Page 38: Ims Connection
IMS Connection IMS CONNECTION is only available on machines connected to the optional JetScan iFX Image Management Software (IMS). Pressing IMS CONNECTION on the MAIN SUB-MENU prompts the IMS CONNECTION screen below, which is used to enable or disable connection to the IMS server. IMS Connection Key Description EXIT... -
Page 39: Printed Reports
Printed Reports An optional printer can be connected to a port located on the back of the machine. The printer is configured during the setup process. (To configure a printer, see Setup Main Menu Batch and Sub-Batch Reports When a printer is connected, batch and sub-batch reports can be produced: •... - Page 40 SUB-BATCH REPORT BATCH REPORT AUDIT: 00005-0014-001 AUDIT: 00007-0014-000 01/31/2013 11:45:21 01/31/2013 14:12:00 ACCOUNT# ACCOUNT# BATCH# BATCH# SLOT# SLOT# BOX# BOX# DENOM UNIT VALUE DENOM UNIT VALUE TICKET TICKET TOTAL TOTAL DENOM TICKET DENOM TICKET 98765F321988029175 987654321988029176 98765F321988029175 987654321988029176 987654321988029294 987654321988029295 987654321988029294 987654321988029295 987654321988029296...
-
Page 41: Day Totals Report
Day Totals Report When a printer is connected, a day totals report can be produced: • Automatically when day totals are cleared by pressing CLEAR on the DAY TOTALS screen. • As needed (on demand) by pressing MENU on the main screen followed by REPORT MENU. -
Page 42: Setup Report
Setup Report To generate a printed report listing all current defined setup parameters, as well as current machine settings: 1. Ensure one communication port is set to GENERIC PRINTER. 2. Go to SETUP MAIN MENU 5. 3. Press SET at SETUP REPORTS to prompt the SETUP REPORTS screen. 4. -
Page 43: How To Use Count Mode
How to Use Count Mode In COUNT mode, the machine counts pieces of paper; documents are not scanned. Counterfeit detection is not available in COUNT mode. To set strap limits, see Strap Counts and Strap Limits. This section provides instructions for using COUNT mode. This mode counts any type of media that complies with document size and density-setting specifications. - Page 44 To piece count, press COUNT. To value count, press the appropriate denomination value key. To count checks, press the COUNT CHECK key. Press EXIT to return to the main screen. Piece-Count Screen Value-Count Screen When using value count: The piece count may be viewed by pressing UNIT on the main screen. The piece count •...
-
Page 45: The Add Key And Sub-Batches
Prepare documents for processing, as described below: • Ensure documents are unfolded and neatly stacked. • Align and justify documents to the wide horizontal edge. • Facing and orientation are not required. Align and justify documents to the wide horizontal edge. •... -
Page 46: How To Use Mixed Mode
How to Use Mixed Mode Counterfeit detection is available in MIXED mode. Strapping cannot be performed in MIXED mode. Select i100-series models process checks, deposit slips and other financial institution MICR documents that meet U.S. standard specifications. At this time, notes and checks cannot be processed together in MIXED mode. This section provides instructions for using the MIXED mode. -
Page 47: The Add Key And Sub-Batches
When processing checks, press CRNCY on the main screen and then press CHECK. Press ADD on the main screen to accumulate batch totals if desired. Machine is auto-start capable. Feed rollers in hopper rotate inward. Entanglement and drawing-in hazard. Do not operate with exposed long hair, neckties, jewelry or loose clothing. Prepare documents for processing, as described below: •... -
Page 48: Facing Documents
An example of a MIXED mode main screen is shown below. The ADD key is ON, and SBAT ENABLE is ON in SETUP. Facing Documents To face documents, select MIXED and FACE on the MODE-SELECTION screen. Make certain the bottom document in the stack is faced in the direction desired for all documents. The machine uses the bottom document as a reference and stops on all documents faced in the opposite direction. -
Page 49: How To Use Sort Mode
How to Use Sort Mode Counterfeit detection is available in SORT mode. To set strap limits, see Strap Counts and Strap Limits. Select i100-series models process checks, deposit slips and other financial institution MICR documents that meet U.S. standard specifications. This section provides instructions for using the SORT mode. - Page 50 5. When processing tickets, press CRNCY on the main screen and then press TICKET. When processing checks, press CRNCY on the main screen and then press CHECK. 7. Press ADD on the main screen to accumulate batch totals if desired. 8.
-
Page 51: The Add Key And Sub-Batches
The ADD Key and Sub-Batches A sub-batch is a deposit processed from one or several sources and treated as sub-groups within a batch. This memory level tracks documents within a sub-batch. To accumulate sub-batches, ensure SBAT ENABLE is ON in SETUP and ADD is selected on the main screen. -
Page 52: Orienting Documents
Orienting Documents To orient documents, select SORT and ORIENTATION on the MODE-SELECTION screen. Make certain the bottom document in the stack is oriented in the desired direction. The machine uses the bottom document as a reference and stops on all documents oriented in the opposite direction. -
Page 53: How To Use Stranger Mode
How to Use Stranger Mode Counterfeit detection is available in STRANGER mode. To set strap limits, see Strap Counts and Strap Limits. Select i100-series models process checks, deposit slips and other financial institution MICR documents that meet U.S. standard specifications. This section provides instructions for using the STRANGER mode. -
Page 54: Stranger Record
5. When processing tickets, press CRNCY on the main screen and then press TICKET. 6. When processing checks, press CRNCY on the main screen and then press CHECK. Press ADD on the main screen to accumulate batch totals if desired. Set strap limits if desired. -
Page 55: The Add Key And Sub-Batches
The ADD Key and Sub-Batches A sub-batch is a deposit processed from one or several sources and treated as sub-groups within a batch. This memory level tracks documents within a sub-batch. To accumulate sub-batches, ensure SBAT ENABLE is ON in SETUP and ADD is selected on the main screen. -
Page 56: Orienting Documents
Orienting Documents To orient documents, select STRANGER and ORIENTATION on the MODE-SELECTION screen. Make certain the bottom document in the stack is oriented in the desired direction. The machine uses the bottom document as a reference and stops on all documents oriented in the opposite direction. -
Page 57: How To Use Optional External Devices For Data Entry
How to Use Optional External Devices for Data Entry The following optional data-entry devices are available from Cummins Allison: a USB mini QWERTY keyboard, a USB 18-key numeric keypad, and a bar-code scanner with a USB cable. Most USB keyboards and USB keypads in the marketplace are also compatible with the machine. -
Page 58: Special Mode Menu
Only connect Ethernet cable to Ethernet port. Use of any other cable may damage equipment. The SPECIAL MODE MENU is intended for use by trained Cummins Allison personnel only. Incorrect use can negatively affect machine operation. - Page 59 Closes the SPECIAL MODE MENU and prompts the main screen. Pressing LANGUAGE leads to a menu where the preferred language is LANGUAGE selected for machine operation. SETUP Prompts SETUP MAIN MENU 1. DIAGNOSTICS Setting for use by trained Cummins Allison service personnel only. © 2013 Cummins-Allison Corp.
- Page 60 Press RESTORE FACTORY DEFAULTS to return machine settings to the factory-default settings (all communication ports OFF, all modes active, all keys ON, ADD key OFF, and sub-batch OFF). UPDATE SOFTWARE Setting for use by trained Cummins Allison service personnel only. JetScan iFX ® i100 Scanner...
-
Page 61: Setup Main Menu 1
Setup Main Menu 1 Pressing SETUP on the SPECIAL MODE MENU prompts SETUP MAIN MENU 1: Setup Main Menu 1 Key Description MORE Prompts SETUP MAIN MENU 2. EXIT Prompts the SPECIAL MODE MENU. Pressing SET prompts the MODE ENABLE SELECTION MENU, where operating modes can be turned ON or OFF. - Page 62 Setup Main Menu 1 Key Description CF, ADD or VERIFY may be locked ON or OFF. To lock a key ON: 1. On the main screen, turn the CF, ADD or VERIFY key ON. 2. Enter SETUP. Go to SETUP MAIN MENU 1 and press SET beside KEY STATUS.
- Page 63 Setup Main Menu 1 Key Description Pressing SET prompts the ALARM ENABLE SELECTION MENU below. The audio alarm can be turned ON or OFF for these stopping conditions: • STRNGR (stranger detect) • NOCALL (no call) AUDIO ALARM • CF (suspect document) •...
- Page 64 Setup Main Menu 1 Key Description Pressing SET prompts the DENOM KEY USAGE ENABLE SELECTION MENU shown below. DENOM KEY USAGE Press ON or OFF to enable or disable denomination value keys for no calls (NO CALL) and suspect documents (SUSPECT DOC). When NO CALL is ON, users can add no calls to recorded totals by pressing the denomination value key that corresponds to the top note in the pocket.
- Page 65 Setup Main Menu 1 Key Description Radio frequency present. Install ferrite bead on all external communication cables; position ferrite bead near external port. Only connect Ethernet cable to Ethernet port. Use of any other cable may damage equipment. Pressing SET prompts the SELECT DEVICE TO CONFIGURE screen shown below.
- Page 66 • JETSORT. • WEDGE and WEDGE2 (JetWedge hardware or software). • REMOTE DISPLAY. When connecting a printer using the Cummins Allison approved cable, FLOW CONTROL must be set to RTS/CTS. If EXIT is pressed before SAVE, settings are not retained.
-
Page 67: Setup Main Menu 2
Setup Main Menu 2 Pressing MORE on SETUP MAIN MENU 1 prompts SETUP MAIN MENU 2: Setup Main Menu 2 Key Description BACK Returns to SETUP MAIN MENU 1. MORE Prompts SETUP MAIN MENU 3. EXIT Returns to SETUP MAIN MENU 1. When the ADD function is ON and SBAT ENABLE is ON, the machine automatically records sub-batches. - Page 68 Setup Main Menu 2 Key Description Pressing SET prompts the MEDIA ENTRY SETUP screen below. Repeatedly pressing AUTO toggles between AUTO and AUTO BLANK. Repeatedly pressing HOLD NONE toggles between HOLD NONE, HOLD BAT and HOLD BOTH. MEDIA ENTRY Enabling labels activates the MEDIA ENTRY screen, where users enter data into custom-titled fields —...
- Page 69 Setup Main Menu 2 Key Description To assign titles to labels: 1. Press TITLE. Depending on the label selected, the LABEL A TITLE, LABEL B TITLE, LABEL C TITLE, or LABEL D TITLE screen appears. Use of these characters is prohibited in data entry: ‘...
-
Page 70: Setup Main Menu 3
Setup Main Menu 3 Pressing MORE on SETUP MAIN MENU 2 prompts SETUP MAIN MENU 3. Setup Main Menu 3 Key Description BACK Returns to SETUP MAIN MENU 2. MORE Prompts SETUP MAIN MENU 4. EXIT Returns to SETUP MAIN MENU 1. Machine is auto-start capable. - Page 71 Setup Main Menu 3 Key Description The DOCUMENT CAPTURE buttons are only available on machines with imaging options activated (serial-number, check or ticket capture). These settings are used to configure image file and storage parameters. DOCUMENT CAPTURE Press SETUP to prompt the DOCUMENT CAPTURE SETUP MENU, which is described in...
-
Page 72: Document Capture: Setup
Document Capture: Setup The DOCUMENT CAPTURE buttons are only available on machines with imaging options activated (serial-number, check or ticket capture). Pressing SETUP at DOCUMENT CAPTURE on SETUP MAIN MENU 3 prompts the following screen. This screen is used to enable document capture options and prompt sub-menus for configuring document capture settings. - Page 73 Buttons on these screens are described in the following chart. When configuration of an IMAGE SETUP MENU is complete, press SAVE to retain settings. If EXIT is pressed before SAVE, the CONTINUE AND ABANDON CHANGES screen appears. Press NO to prompt the active IMAGE SETUP MENU and retain changes by pressing SAVE.
- Page 74 Image Setup Menu Key Description These settings are used to define the level of detail captured on images. For notes, checks and tickets: • Select 256 for the highest image quality. These images consume the most storage space. GRAY VALUES •...
-
Page 75: Document Capture: Storage Setup
Document Capture: Storage Setup The DOCUMENT CAPTURE buttons are only available on machines with imaging options activated (serial-number, check or ticket capture). These settings determine which document values are collected for reports and file exporting. Pressing STORAGE SETUP at DOCUMENT CAPTURE on SETUP MAIN MENU 3 prompts one of the following screens, depending on the active option. -
Page 76: Setup Main Menu 4
Prompts SETUP MAIN MENU 5. EXIT Returns to SETUP MAIN MENU 1. Setting for use by trained Cummins Allison personnel only. IMAGE RECEIVER Setting configures the connection between the machine and the optional JetScan iFX Image Management Software (IMS) or another host system. - Page 77 Setup Main Menu 4 Key Description Contact a Cummins Allison representative for information on obtaining the feature selection code to activate purchased options. To enter a feature selection code: 1. Press SET to prompt the FEATURE KEY ENTRY screen below.
-
Page 78: Setup Main Menu 5
Setup Main Menu 5 Pressing MORE on SETUP MAIN MENU 4 prompts SETUP MAIN MENU 5: Setup Main Menu 5 Key Description BACK Returns to SETUP MAIN MENU 4. MORE Prompts SETUP MAIN MENU 6. EXIT Returns to SETUP MAIN MENU 1. This feature is for USD notes only. - Page 79 Setup Main Menu 5 Key Description When SERIES 1 or SERIES 2+3 is selected, and these notes are encountered during processing, the following screen appears. SEPARATE SERIES (Continued) The screen shows the denomination and the selected note series. Press ACCEPT to add the note to the total. Press REJECT to exclude the note from the total.
- Page 80 Setup Main Menu 5 Key Description 3. The REPEAT PASSWORD screen appears. Enter the four-digit password again. Press ENTER. 4. When the two password entries match, SETUP MAIN MENU 5 appears. The password now is active. When the two password entries do not match, the PASSWORDS DO SETUP PASSWORD NOT MATCH screen appears.
-
Page 81: Setup Main Menu 6
Setup Main Menu 6 Configuring the machine’s software features can impact the screen’s appearance. Two screen examples are shown below. Ticket Capture Option Activated When a ticket capture option is activated, pressing MORE on SETUP MAIN MENU 5 prompts the following SETUP MAIN MENU 6: Setup Main Menu 6 Key Description BACK... - Page 82 Setup Main Menu 6 Key Description The settings on this screen should be configured by authorized Cummins Allison personnel only. Press SET to prompt the BARCODE SETUP MENU below. BARCODE SETUP Bar-code configuration options are described below: • BARCODE ENABLED: Select ON to enable bar-code reading on the machine.
-
Page 83: Serial-Number Capture Option Activated
Serial-Number Capture Option Activated When the serial-number capture option is activated, pressing MORE on SETUP MAIN MENU 5 prompts the following SETUP MAIN MENU 6: Setup Main Menu 6 Key Description BACK Returns to SETUP MAIN MENU 5. EXIT Returns to SETUP MAIN MENU 1. ON: Select to disable automatic report generation. -
Page 84: Setup Main Menu 7
BACK Returns to SETUP MAIN MENU 6. EXIT Returns to SETUP MAIN MENU 1. Setting for use by trained Cummins Allison personnel only. CHECK SETUP Press SET to prompt check processing configuration menus described in Check Setup Menu 1 Check Setup Menu JetScan iFX ®... -
Page 85: Check Setup Menu 1
Check Setup Menu 1 Settings on this screen should be configured by authorized Cummins Allison personnel only. Pressing SET at CHECK SETUP on SETUP MAIN MENU 7 prompts the following screen. This screen is used to configure parameters for capturing and formatting MICR data. -
Page 86: Check Setup Menu 2
Check Setup Menu 2 Settings on this screen should be configured by authorized Cummins Allison personnel only. Pressing MORE on CHECK SETUP MENU 1 prompts the following screen. This screen is used to configure parameters for maintaining item order when an error occurs during check processing. - Page 87 Check Setup Menu 2 Key Description Setting for use by trained Cummins Allison personnel only. ON: Select to manually override a doubles error and allow thicker documents, such as rebate checks, to pass through the device without reprocessing. When a thicker document is detected, the machine stops...
-
Page 88: Reference
Reference Daily Cleaning Procedures Daily cleaning of i100-series machines is recommended to ensure maximum productivity and reliability. Recommended Cleaning Materials Simple Green, the recommended cleaning agent, can be an eye irritant. Avoid eye contact. If eye contact occurs, flush eye(s) with cool water for 5 minutes – remove contact lenses if present –... - Page 89 Turn power OFF (rocker panel to 0). Grasp release sleeve on power- cord connector. Disconnect power cord from machine. Release sleeve Lift adjustable hopper to the upright position. Use a dry microfiber towel to clean the black start sensor at the top, middle of the feeder plate (shown at left).
- Page 90 Vacuum underneath the upper-transport plate (shown at left), as well as the top of the lower-transport plate (shown at right). Image sensor Use a dry microfiber towel to wipe buildup off the image sensors shown at left. Image sensor Use a dry microfiber towel to clean the stacking sensor. Next, use a dry microfiber towel to clean the stacking-sensor reflector, which is located on the upper-transport plate directly above the stacking sensor.
-
Page 91: Stopping Conditions And Recovery Steps
Stopping Conditions and Recovery Steps The following conditions cause the machine to stop and require action by the user. Condition Action The machine detected documents Remove all documents from the pocket and put them on the hopper. Press that were not adequately spaced CONT. - Page 92 Condition Action The machine identified a note that Remove all notes from the pocket. Separate the top note from the remaining is different than those it has been notes. Put the top note in the location for that denomination. Put all the other processing while using SORT mode.
- Page 93 Condition Action The machine may have processed Remove all documents from the pocket and put them on the hopper. Press two or more documents as one. CONT. If an alarm repeatedly occurs, adjust the gray thickness dial on top of the machine behind the hopper extension.
- Page 94 This screen only appears on machines with: The serial-number, check or ticket capture option. • NOTES, CHECKS or TICKETS ON in the DOCUMENT CAPTURE SETUP MENU. • Low Memory Error Condition Action The data to be exported Press YES to export a non-sorted version of the data that does not contain label exceeds the memory information.
- Page 95 To resolve errors one and two: Perform the required task or maintenance. To resolve errors three, four, five and six: First try turning the machine OFF and then ON. If the error was not resolved, call a Cummins Allison representative. © 2013 Cummins-Allison Corp.
- Page 96 Condition Action The machine identified a The MACHINE START WARNING screen will identify errors, including: hardware problem upon • DENSITY SENSOR IS DIRTY OR BLOCKED. startup. Corrective action should be taken. If the error cannot be resolved, call a Cummins Allison representative.
- Page 97 Select i100-series models process checks, deposit slips and other financial institution MICR documents that meet U.S. standard specifications. These screens only appear on machines with: • The check capture option. • The DOCUMENT DATA CORRECTION ADJUSTMENT settings configured. • CHECKS ON in the DOCUMENT CAPTURE SETUP MENU.
- Page 98 No Call Screen MICR-Line Correction Screen Condition Action A no call occurred, and the Do one of the following: machine could not identify the • Press CHECK on the NO CALL screen to prompt the MICR-LINE CORRECTION check MICR line. screen.
- Page 99 Condition Action Turn the machine OFF and remove the USB flash drive. Restart the machine. A USB flash drive was plugged into one of the machine’s USB ports when the machine was turned ON. Condition Action The machine cannot Inspect the top note in the pocket. Do not remove all notes from the pocket. recognize the denomination To count the note, keep the note in the pocket and then enter its denomination and has stopped.
- Page 100 These screens only appear on machines with: • The ticket capture option. • The DOCUMENT DATA CORRECTION ADJUSTMENT settings configured. • TICKETS ON in the DOCUMENT CAPTURE SETUP MENU. No Call: Ticket Bar-Code Correction Screen Verify Bar Code Screen Condition Action The machine cannot read the Correct the unidentified characters and include the ticket in the count by following...
- Page 101 Condition Action 4. When DONE is pressed and some or all of the characters in the string have not been corrected, the VERIFY BAR CODE screen appears. Do one of the following: • Return to the BAR-CODE CORRECTION screen by pressing EDIT BARCODE. •...
- Page 102 SBAT ENABLE OFF in SETUP SBAT ENABLE ON in SETUP Condition Action The number of documents in Remove documents from the pocket. the pocket reached the pocket limit selected in The machine automatically will continue processing if additional documents SETUP. remain in the hopper.
- Page 103 These screens only appear on machines with: The serial-number capture option. • NOTES ON in the DOCUMENT CAPTURE SETUP MENU and the DOCUMENT DATA • STORAGE screen configured for all or select denominations. DOCUMENT DATA CORRECTION ADJUSTMENT screen configured for all or •...
- Page 104 Serial-Number Correction – No Call Screen Serial Number Is Incomplete Screen Condition Action A no call occurred, and the To return the note to the hopper for reprocessing: machine could not identify the 1. Press DONE on the SERIAL-NUMBER CORRECTION screen to prompt the note serial number.
- Page 105 Condition Action The machine detected Remove all documents from the pocket and place them in the hopper. Press CONT. documents that were not If the alarm repeatedly sounds, adjust the gray thickness dial on top of the adequately spaced apart. machine behind the hopper extension.
- Page 106 Condition Action The number of documents in Remove documents from the pocket. the pocket reached the preset The machine automatically continues processing if additional documents remain strap limit. in the hopper. JetScan iFX ® i100 Scanner All Models...
- Page 107 Condition Action Inspect the top note in the pocket. Next there are three options: Sensors detected a possible counterfeit note. The • If the note is deemed genuine, return it to the pocket and press ACCEPT. The machine stopped with this machine restarts, and this note will be added to the count.
- Page 108 Do not use tools or metal devices to remove jammed documents from paper path. Use of tools or metal devices could cause machine damage and void existing warranty. For proper removal of jammed documents, follow the steps listed below. Condition Action Notes, documents or foreign To clear a jam, follow these procedures:...
- Page 109 Condition Action The REPROCESSING; RETURN DOCUMENTS TO HOPPER screen will appear, as shown below. Place documents in the hopper, and the machine automatically will continue processing. How to Manually Remove Documents from the Transport Path: Lift display panel to the upright position.
-
Page 110: Check Order Integrity Processes
Settings available on CHECK SETUP MENU 2 are used to configure check order integrity processes. Consult a Cummins Allison representative before changing these settings. Check order integrity processes maintain item order if an error occurs during check processing. These procedures: •... -
Page 111: Example No. 1: Ordered Recovery On
Example No. 1: Ordered Recovery ON These screens only appear on machines with: The check capture option. • ORDERED RECOVERY ON in CHECK SETUP MENU • BANK AND PRESENT ON in CHECK SETUP MENU 2. • ACCEPT DOUBLES ON in CHECK SETUP MENU 2. •... - Page 112 Condition Action 5. When REJECT is pressed, the following screen appears. Since ORDERED RECOVERY is ON, observe the orientation of the checks in the hopper, and then remove the checks from the hopper and place them to the side. 6. When the machine senses that the hopper is empty, a CONT key appears on the screen.
-
Page 113: Example No. 2: Ordered Recovery Off
Example No. 2: Ordered Recovery OFF These screens only appear on machines with: The check capture option. • ORDERED RECOVERY OFF in CHECK SETUP MENU • BANK AND PRESENT ON in CHECK SETUP MENU 2. • ACCEPT DOUBLES ON in CHECK SETUP MENU 2. •... - Page 114 Condition Action 4. When REJECT is pressed, the following screen appears. Since ORDERED RECOVERY is OFF, press CONT to eject the piggyback check(s) from the transport path. MISS-FEED DETECTED: ORDERED RECOVERY OFF 5. After the checks are ejected into the pocket, return them to the stack in the (Continued) hopper.
-
Page 115: Machine Specifications
Weight 20 lbs with power supply; 18 lbs without power supply Communication Ports One RS232 serial port, two USB ports and one Ethernet connection Only use Cummins Allison supplied power adapter. Use of any other power adapter may damage equipment. -
Page 116: Glossary
Machine Options Serial-number capture JetScan iFX Deposit Balancing Manager (DBM) Check capture Ticket capture External devices for data entry: mini QWERTY keyboard, 18-key numeric keypad, and bar-code JetScan iFX Image Management Software (IMS) scanner Glossary Safety Messages and Advisories Icon Definition Warning indicates a hazardous situation which, if not avoided, could result in death or serious injury. - Page 117 Term Definition Used to reset accumulated totals for batches, sub-batches, day totals and straps Clear to zero. It is done by pressing CLEAR and then pressing the key corresponding to the total to be cleared. Users can set different infrared (IR), ultraviolet (UV), fluorescence (FL), and magnetic sensitivity levels by denomination for the detection of suspect Counterfeit (CF) documents.
- Page 118 Term Definition It is the area at the bottom front of the machine where processed documents Pocket are delivered. These fields are used to define the machine’s operating parameters. The Setup Fields parameters remain set, even if the machine is turned OFF, unless they are changed by re-entering the setup process.
-
Page 119: Warranty Information
Warranty Information Equipment Warranty The Equipment shall conform to the specifications set forth in SELLER’s Quotation or published specification sheets. No changes in specifications shall be made without the written consent of SELLER. SELLER WARRANTS ALL NEW EQUIPMENT TO BE FREE FROM DEFECTS IN MATERIAL AND WORKMANSHIP UNDER NORMAL USE AND SERVICE FOR THE SPECIFIED WARRANTY PERIOD. -
Page 120: Disclaimer And Limitation Of Liability
TO SELLER AT BUYER’S EXPENSE AND RECEIVE A REFUND OF THE PURCHASE PRICE LESS A REASONABLE ALLOWANCE FOR BUYER’S USE. Disclaimer and Limitation of Liability The warranties herein shall be applicable only if the Equipment shall be the property of the original purchaser or user and shall have been properly used, operated and maintained in accordance with the manual or instructions provided with the Equipment and for the purpose for which sold. - Page 122 Cummins-Allison Corp. has endeavored to make the content of this document accurate and complete, but this information is subject to correction or change without prior notice. This manual contains proprietary information of Cummins-Allison Corp. It is intended solely for the information and use of parties authorized by Cummins Allison to maintain the equipment described herein.
Need help?
Do you have a question about the JetScan iFX i100 and is the answer not in the manual?
Questions and answers
Machine freezes when turning on. Will not go further than this screen
The CUMMINS ALLISON JetScan iFX i100 may freeze when turning on due to hardware problems detected during startup. The MACHINE START ERROR screen may show errors such as:
1. Dirty, blocked, or non-working density sensor
2. Upper transport not closed
3. Hardware not configured
4. S5 sensor not working
5. Image sensor not ready
6. ACF board not responding
When these errors occur, the machine's motors will not run until corrective action is taken. Pressing OK removes the error screen temporarily, but the machine will freeze again if the issue is not resolved.
This answer is automatically generated