Weinmann ACCUVAC Basic Description And Operating Instructions
Hide thumbs
Also See for ACCUVAC Basic:
- Quick start manual (2 pages) ,
- Service and repair instructions (32 pages) ,
- Description and operating instructions (56 pages)
Table of Contents
Advertisement
Quick Links
Advertisement
Table of Contents

Related Manuals for Weinmann ACCUVAC Basic


Summary of Contents for Weinmann ACCUVAC Basic
- Page 1 Description and Operating Instructions ACCUVAC Basic Aspirator WM 10700 WM 10709...
-
Page 2: Table Of Contents
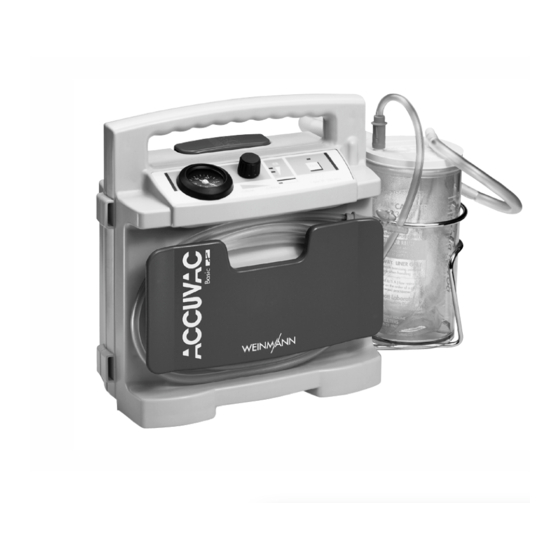
4.3 After aspiration ..16 9. Product and accessories ..33 4.4 Charging ACCUVAC Basic . . 16 9.1 Standard product ..33 9.2 Accessories . - Page 4 ACCUVAC Basic from front with disposable collection canister 5 Membrane keyboard 6 Release catch 7 Disposable canister -0,6 -0,4 -0,2 -0,8 -1,0 2 Vacuum control 4 On/Off switch 1 Pressure gage 3 Voltage indicator 8 Motor unit 9 Tube holder plate...
- Page 5 ACCUVAC Basic interior Disposable collection canister 15 Fuse F116 Fuse F2 (hidden) 19 Aspiration tube with fingertip 20 Intermediate tube 21 Disposable bag 22 Vacuum tube 23 T-piece 24 Collection canister 11 Adapter/charger plug 25 Holder 18 Plug X1 17 Power pack...
-
Page 6: Description
1. Description 1.1 Purpose ACCUVAC Basic is a mobile and portable electrically powered aspirator (suction pump). It is used for: • aspirating accumulations of blood, secretions and food from the oral cavity, the nose and throat region and the bronchial system;... -
Page 7: Function
1.2 Function An electrically operated diaphragm pump generates the vacuum necessary for aspiration. Use the vacuum control to set the desired vacuum, which is continuously variable between –0.05 bar -0,6 -0,4 and –0.8 bar. You can read off the set value on the -0,2 -0,8 pressure gage... - Page 8 Power supply Power for operating the appliance and charging the power pack can be drawn: • from the built-in power pack • from a 12-volt electrical cable system, using the connecting cable WM 10650 which is available as an accessory. •...
-
Page 9: Safety
Please read these operating instructions carefully. They belong to the appliance and must be kept available at all times. • Before working with ACCUVAC Basic, you must understand how to use it. • Be sure to observe these operating instructions when working with ACCUVAC Basic. - Page 10 To avoid infection or contamination with bacteria please read section “5. Hygienic preparation” on page 19. • ACCUVAC Basic may only be used by trained staff instructed in aspiration techniques. Incorrect use can cause serious bodily harm. • ACCUVAC Basic must be used for the designated purpose only (see “1.1 Purpose”...
- Page 11 • To eliminate the risk of fully discharging the power pack, ACCUVAC Basic must never be stored in an uncharged condition. Always recharge the power pack first as described in “4.4 Charging ACCUVAC Basic” on page 16.
-
Page 12: Assembly
3. Assembly ACCUVAC Basic is supplied ready for use. Important Before using ACCUVAC Basic for the first time, fully charge the power pack (see “4.4 Charging ACCUVAC Basic” on page 16). 3.1 Assembly with wall bracket To mount ACCUVAC Basic on a wall, use wall bracket WM 15208, available as an accessory. - Page 13 If ACCUVAC Basic appliance is switched off, it will automatically be charged up from the DC power source. 9. To remove the ACCUVAC Basic from the bracket ready for use, press the release catch and lift ACCUVAC Basic out of the wall bracket.
-
Page 14: Fitting A Re-Usable Collection Canister
3.2 Fitting a re-usable collection canister Instead of the disposable collection canister supplied as standard, you can also fit a sterilizable re-usable collection canister with holder , available as an accessory. This conversion kit is available under order number WM 15261. 1. -
Page 15: Fitting An Accessory Bag
3.3 Fitting an accessory bag The accessory bag WM 10655 is available as an optional extra. It is used to hold aspiration catheters and other small parts. The accessory bag cannot be fitted at the same time as a rinsing glass (see “3.4 Fit- ting a rinsing glass”... - Page 16 2. Fix the holder to the left side of the appliance. 3. Push the rinsing glass into the holder. Assembly...
-
Page 17: Operation
LED for the button lights up. O / I Do not switch on ACCUVAC Basic while there is still a vacuum. This would cause the pump motor to draw too much current when switching on, which could actuate fuse F2 4. -
Page 18: Aspiration
To release the suction all you have to do is lift your thumb. Important Make sure that ACCUVAC Basic is always upright during operation so that the overflow valve filter inte- grated in the disposable collection bag is not wet- ted by secretion. - Page 19 Disposal of disposable collection bag 1. Pull the end of the aspiration tube with fingertip off the port. 2. Detach the intermediate tube from the T-piece of the collection canister 3. Push the free end of the intermediate tube onto the connection for the aspiration tube.
-
Page 20: After Aspiration
4.3 After aspiration After aspiration: 1. Switch off ACCUVAC Basic by pressing the button marked O/I. 2. Fit a new disposable collection bag (see “ Disposal of disposable collection bag” on page 15). 3. Clean ACCUVAC Basic (see “5. Hygienic prepa- ration”... - Page 21 When the top LED lights up, the power pack is approx. 75 % charged. Please charge the battery for another two 2 hours at least. Charging with wall bracket 1. Switch off ACCUVAC Basic. 2. Insert ACCUVAC Basic in the wall bracket. Operation...
- Page 22 2 hours at least. Refresher charging Regular refresher charging extends the service life of the power pack. Leave ACCUVAC Basic connected to the external power supply even after the power pack is fully charged. This cannot overcharge the pow- er pack provided the charging voltage is kept within the range 12.0 –...
-
Page 23: Hygienic Preparation
We recommend GIGASEPT FF for immersion disinfection and TERRALIN for wipe disinfection. Never immerse the ACCUVAC Basic motor unit in dis- infectant or other liquids. Always disinfect simply by wiping with disinfectant. Otherwise you may damage the device and thereby endanger users and patients (see “5.2 Cleaning, disinfecting and sterilizing”... -
Page 24: Cleaning, Disinfecting And Sterilizing
5.2 Cleaning, disinfecting and sterilizing Hygienic preparation of the ACCUVAC Basic and the accessories used should be performed as described in the following table. Observe the instructions regarding use of disinfectant. For immersion disinfection we recommend GIGASEPT FF and TERRALIN for wipe disinfection. - Page 25 You are recommended to wear suitable gloves (e.g. household or disposable gloves) during disinfection procedures. Rinse in Part Cleaning Disinfecting washing Sterilization machine Hot steam Rinse at up to sterilization Collection canister In warm water Immerse in dilute 95 °C up to 121 °C with mild house- solution...
-
Page 26: Reassembling The Disposable Collection Canister
5.3 Reassembling the disposable collection canister After cleaning, disinfection or sterilization, reassemble the parts as follows: 1. Refit tube holder plate by sliding it to the right. 2. Insert the collection canister in its holder 3. Use the vacuum tube to connect the T-piece of the collection canister to the suction port... -
Page 27: Functional Check
• Aspiration tube with fingertip WM 10733 6.1 Intervals To ensure that a properly functioning ACCUVAC Basic is always available, it is essential to observe the following intervals. Before every use • Perform a functional check (see “6.2 Performing the functional check” on page 25). - Page 28 Every 3 months • Check the charge level of the power pack switching on ACCUVAC Basic and reading the voltage indicator . If the top LED of the voltage in- dicator does not light up, the power pack should be recharged (see “4.4 Charging ACCUVAC Basic”...
-
Page 29: Performing The Functional Check
7. Switch on the aspirator and select the maximum vacuum of –0.8 bar by turning vacuum control fully to the right. ACCUVAC Basic must reach this vacuum in not more than 20 seconds. If the aspirator takes more than 20 seconds to reach this vacuum, its suction capacity is reduced. -
Page 30: Troubleshooting
7. Troubleshooting Fault Cause Remedy Appliance does not start, O/I indicator and voltage Have repairs carried out by factory or Faulty pump indicator show ready for by expert personnel. operation Fuse F1 or F2 in appliance defective Fit new fuse (7.2, page 29) Fuse in vehicle plug defective Fit new fuse (7.2, page 29) Perform several charge/discharge... -
Page 31: Power Pack
Have repair carried out at factory or Pump defective by expert personnel 7.1 Power pack ACCUVAC Basic is fitted with a high-grade lead cell power pack. Changing power pack Important Never touch the circuit board, as this can damage the electronic system. - Page 32 4. Unscrew the holder for the disposable collec- tion canister 5. Open the case by unscrewing the 6 cross-head screws. When opening the case, be careful not to damage the silicone sealing cord. 6. Carefully disconnect the power pack connector (X1) from the circuit board.
-
Page 33: Changing Fuses
Changing fuse F1 or F2 Important Never touch the circuit board, as this can damage the electronic system. 1. Unscrew the case of ACCUVAC Basic (see “ Changing power pack” on page 27). 2. Remove the faulty fuse . The fuses are iden- tified on the circuit board. - Page 34 Caution: Check the vehicle plug for correct polarity. Reversed polarity can damage ACCUVAC Basic. 2. Change the faulty fuse. Use only approved fuses (see “10. Technical Data” on page 37). 3. Screw the vehicle plug together again.
-
Page 35: Changing The Muffler
7.3 Changing the muffler 1. Use a screwdriver to unscrew the cover plate (2 cross-head screws). 2. Remove the old muffler 3. Insert a new muffler. 4. Refit the cover plate. Make sure that the pad stuck to the cover plate is pressing against the muffler. 5. -
Page 36: Maintenance
8. Maintenance 8.1 Intervals The ACCUVAC Basic requires no maintenance, but please observe the intervals specified for regular func- tional checks (see “6.1 Intervals” on page 23). We recommend that you have any servicing, such as inspections and repair work, carried out by the manu- facturer –... -
Page 37: Product And Accessories
9. Product and accessories 9.1 Standard product 1. ACCUVAC Basic with disposable canister ACCUVAC Basic WM 10700 consisting of: – Aspirator unit (disposable canister) WM 10710 – AC adapter/charger plug, complete WM 10750 2. ACCUVAC Basic with re-usable canister ACCUVAC Basic... -
Page 38: Accessories
9.2 Accessories The following accessories are not part of the standard product and must be ordered separately: 1. Mains/charger unit WM 2645 2. Connection cable WM 10650 3. Accessory bag WM 10655 4. Wall bracket incl. fixing kit WM 15208 5. - Page 39 10. Aspiration catheter, sterile pack CH. 06, diam. 2.0 mm, 50 cm long, pack of 2 WM 5155 – Set I: 10 x WM 5156 WM 15314 – Set II: 20 x WM 5156 WM 15315 – Set III: 30 x WM 5156 WM 15316 11.
-
Page 40: Spare Parts
9.3 Spare parts 1. Disposable collection canister WM 10730 consisting of: – Collection canister WM 10731 – Disposable collection bag WM 10732 – T-piece WM 10738 – Aspiration tube with fingertip WM 10733 – Vacuum tube WM 10740 2. Holder set for disposable collection canister WM 15172 consisting of:... -
Page 41: Technical Data
10. Technical Data ACCUVAC Basic ACCUVAC Basic EN 60601-1, Appliance class Norms complied II b EN ISO 10079-1, with EN 1789 Dimensions 385x280x140 WxHxD in mm 8 A, DIN 72581, Vehicle plug fuse identification color white Weight approx. 5.4 kg... -
Page 42: Safe Distances
10.1 Safe distances The ACCUVAC Basic is intended for operation in an electromagnetic environment in which high-frequency interference variables are controlled. The customer or user of the ACCUVAC Basic can help avoid electro- magnetic interference by maintaining the minimum safe distance between portable and mobile high-fre-... -
Page 43: Warranty
Weinmann reserves the right to decide whether to elimi- nate defects, to deliver a defect-free item or to reduce the purchase price by a reasonable amount. • If Weinmann rejects a claim against the warranty, it as- sumes no expense for transport between customer and manufacturer. •... - Page 48 For decades Weinmann has been developing, producing and marketing medical devices for markets around the world. In cooperation with our partners we design economic health systems for diagnosis and therapy in Sleep Medicine, Home Mechanical Ventilation, Oxygen Medicine and Emergency Medicine.
Need help?
Do you have a question about the ACCUVAC Basic and is the answer not in the manual?
Questions and answers