Table of Contents
Advertisement
Quick Links
© Barco Lighting Systems, 2014, All Rights Reserved
Information and specifications in this document are subject to change without notice. High End Systems, Inc.
assumes no responsibility or liability for any errors or inaccuracies that may appear in this manual.
Trademarks used in this text: High End Systems, Wholehog, and LithoPatterns are registered trademarks; and
Collage, Collage Generator, Hog iPC, the High End Systems globe logo and the Hog logo are trademarks of
High End Systems, Inc. or High End Systems Europe Ltd. Belden is a registered trademark of Belden, Inc.
Microsoft, DirectX, and Windows are either registered trademarks or trademarks of Microsoft Corporation in the
United States and/or other countries. Super HAD and Sony are registered trademarks or trademarks of Sony
Corporation in the United States and/or other countries. Art-Net is a registered trademark of Artistic License
Corporation. Lightwave 3-D is a registered trademark of Newtek. Mac OS is a trademark of Apple Computer, Inc.
registered in the U.S. and in other countries.
Other trademarks and trade names may be used in this document to refer to either the entities claiming the
marks and names or their products. High End Systems disclaims any proprietary interest in trademarks and
trade names owned by others.
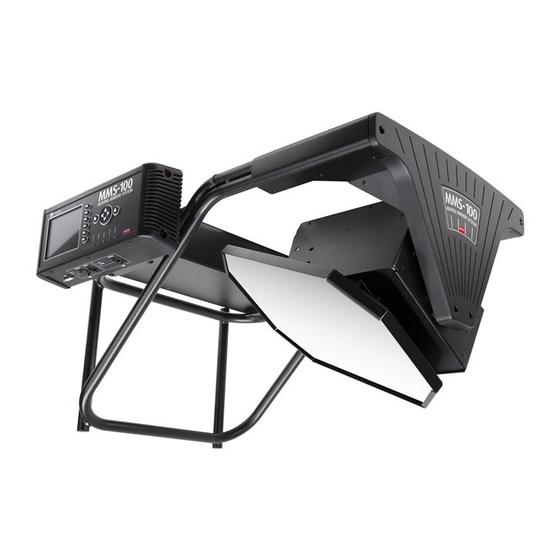
MMS100
MMS100 User Manual
Software Release 1.0
MMS100 User Manual
September 2014
Advertisement
Table of Contents

Related Manuals for High End Systems MMS100


Summary of Contents for High End Systems MMS100
-
Page 1: Table Of Contents
Trademarks used in this text: High End Systems, Wholehog, and LithoPatterns are registered trademarks; and Collage, Collage Generator, Hog iPC, the High End Systems globe logo and the Hog logo are trademarks of High End Systems, Inc. or High End Systems Europe Ltd. Belden is a registered trademark of Belden, Inc. -
Page 4: Table Of Contents
Hardware Components ................ 30 Hardware Setup ................... 31 Connection Ports ................. 32 Powering on the MMS100 ..............33 MMS100 Mirror Head Homing ............. 34 Mounting the MMS100 to a Projector ........... 35 MMS100 - DMX and Ethernet Links ............. 39... - Page 5 Verifying MMS-100 Software Version ..........43 MMS100 Software Upgrade ..............45 Configuration Options - MMS100 ............51 Menu System Setup - MMS100 ............52 CMA Setup - MMS100 ................. 54 DMX Control, Start Channel and DMX Footprint ......... 55 DMX Control Setup and Test ............... 56 Verifying Operation ................
- Page 6 Auto-Image Rotation and Pan Position ..........82 MSpeed (Motor Speed Translation) ............. 83 Output Connection Requirements ............89 Mirror Position - Fine Correction ............90 Graphics Engine Protocol Definitions ........... 91 Graphics Pipeline Hierarchy ..............92 Graphics Engine Function ..............93 Graphics Engine Opacity and Intensity ..........
- Page 7 Global Masking Framing ..............119 Global Masking Framing Fade Edge ..........120 Global Keystone Correction ............... 121 Global Keystone XY Ratio ..............122 Global Auto Image Rotation ............... 123 Collage Overview ................124 Creating Custom Content for a Collage ..........125 Creating a Collage Example ..............
- Page 8 Color Cycle ..................155 Color De-Converge ................156 Colorize - Gray Scale ................. 157 Color to Alpha Channel ..............158 Color to Alpha Channel Inverted ............159 Color to Black and White ..............160 Dot-P and Re-Sample Effect .............. 161 Edge Detect - Black and White ............
- Page 9 RGB Color Shift - Add to All 2 ............183 RGB Color Shift - Add to Non-Black ..........184 RGB Color Shift - Invert ..............185 RGB Color Effect - Invert and Swap RGB -> BRG ......186 RGB Color Effect - Invert and Swap RGB -> GBR ......187 RGB Color Shift - Scale ..............
- Page 10 Effect Film Burn ................. 211 Effect Film Noise ................212 Effect Film Roll ................... 213 Effect Flip ................... 214 Effect Fuzzifier ................... 215 Effect Gaussian Blur ................216 Effect Gaussian Halo ................. 217 Effect Horizontal Mirror ..............218 Effect Image Scale and Rotate ............219 Effect Lens Grid .................
- Page 11 CMA - User Content ................257 CMA - Stock and User Object Files ........... 260 CMA - Deleting User Content ............261 MMS100 Protocol ................262 Control Card Replacement ..............274 Mechanical Specifications ..............278 Glossary ..........Error! Bookmark not defined.
-
Page 12: Contacting High End Systems
Contacting High End Systems ® Sales Department High End Systems, Inc. 2105 Gracy Farms Lane Austin, TX 78758 USA voice:512.836.2242 fax:512.837.5290 Toll Free: 800.890.8989 Customer Service High End Systems, Inc. 2105 Gracy Farms Lane Austin, TX 78758 USA voice:800.890.8989 fax: 512.834.9195 toll free: 800.890.8989... -
Page 13: Patents
Patents This High End Systems product is protected by patents and pending patent applications. Patents owned or licensed by High End Systems include: US 4,392,187; US 4,602,321; US 4,688,161; US 4,701,833; US 4,709,311; US 4,779,176; US 4,800,474; US 4,962,687; US 4,972,306; US 4,980,806; US 5,010,459; US 5,031,078; US 5,073,847; US 5,078,039; US 5,186,536;... -
Page 14: Declaration Of Conformity
Declaration of Conformity... -
Page 15: Fcc Information
FCC Information... -
Page 16: Battery Risks
Battery Risks RISK OF EXPLOSION IF BATTERY IS REPLACED BY AN INCORRECT TYPE. DISPOSE OF USED BATTERIES ACCORDING TO THE INSTRUCTIONS Please contact service if there is any question about the type or procedure to replace the CMOS battery on the motherboard of the graphics server. -
Page 17: Product Modification Warning
Product Modification Warning... -
Page 18: What You Should Know About Copyright
What You Should Know About Copyright The following FAQ can help you understand copyright laws and how they apply to content used with the DLHD, MMS100, Axon HD, Axon HD Pro, Axon, and DL3 media servers. By Suzy Vaughan Associates for High End Systems. - Page 19 The answer depends entirely on what material you want to use and how you plan to use it. Prices can range from hundreds of dollars for photography content to thousands of dollars for a highly desirable film/video clip. Since price is content-sensitive, the best thing to do is to contact a clearinghouse like Suzy Vaughan Associates and let them find out for you.
-
Page 20: Warranty Information
Any Product unit or parts returned to High End Systems must be packaged in a suitable manner to ensure the protection of such Product unit or parts, and such package shall be clearly and prominently marked to indicate that the package contains returned Product units or parts and with an RMA number. -
Page 21: Packaged Media Notice
Packaged Media Notice Any use of this product other than consumer personal use in any manner that complies with the MPEG-2 Standard for encoding video information for packaged media is expressly prohibited without a license under applicable patents in the MPEG-2 patent portfolio, which license is available from MPEG LA, L.L.C., 250 Steele Street, Suite 300, Denver Colorado 80206. -
Page 22: Symbols
Symbols... -
Page 23: Mms100 Product Overview
MMS100 Product Overview This section gives a general overview of the MMS100 including the Hardware, Graphics Engine, The Content Management Application and related Accessories... -
Page 24: System Overview
System Overview • Axon HD Graphics engine utilizes Windows 7 Embedded and DirectX technology • Powerful Content Management and Configuration software can remotely manage multiple DLHD, and Axon HD servers over an Ethernet network • Allows importing of custom content including: 3D objects, media files, still images. •... -
Page 25: Hardware Overview
Hardware Overview • Full color display and menu functions • Mechanical mirror rotation (196 degrees total) in Pan direction • Mechanical mirror rotation (102 degrees total) in Tilt direction • Powered by an Intel Core i7 3.4 Ghz processor with 4 GB DDR3 RAM, a 256 GB SanDisk solid state hard drive, Radeon HD7750 video card. -
Page 26: Graphics Engine Overview
Graphics Engine Overview Supports simultaneous playback of up to nine discrete media streams on separate 2D/3D objects Object parameters give you graphic controls for each individual media stream including: • A choice of multiple play modes and play speeds • The ability to define any segment of a video loop including Scrub capability •... -
Page 27: Content Management Application Overview
Content Management Application Overview • Available for Windows operating systems • Communicates with other DLHD, Axon HD and Axon HD Pro media servers over an Ethernet network • Configures the DLHD, Axon HD and Axon HD Pro media servers, locally and remotely •... -
Page 28: Related Accessories
Related Accessories Please contact High End or your local distributor for related Accessories for the MMS100. • Mounting Kits for other projectors • Replacement safety cable kits • DMX and Ethernet cabling for professional installations. -
Page 29: Unpacking The Mms 100
High End Systems® assumes no responsibility for products that are damaged during transport. Return a product for repair in its original packaging. Before sending anything to the factory, call your High End Systems dealer/distributor for a Return Material Authorization (RMA) number. The factory cannot accept any goods shipped without an RMA number. -
Page 30: Hardware Components
Hardware Components The MMS100 contains various components not found in conventional robotic fixtures. These include: 1. Moving Mirror Assembly 2. Skeleton Mounting frame 3. Integrated Media Server... -
Page 31: Hardware Setup
Hardware Setup The MMS100 comes fully assembled from the factory. Depending on the specific projector, you may need • Adjust Projector Frame mounting options • Connect to an Ethernet Network for remote configuration and content management • Connect to DMX network for control from a lighting console. -
Page 32: Connection Ports
Connection Ports Connection ports on the MMS100 allow for control flexibility and system design flexibility. At times, all ports may not be used. Connection ports: • 5-pin DMX Data In and Data Out • Ethernet to connect to other fixtures and your computer running the Content Management Application (CMA) •... -
Page 33: Powering On The Mms100
Be sure no mirror can move freely and will not strike anything. CAUTION: Always isolate MMS100 fixtures from generators with a UPS or good quality power conditioner to prevent damage. Specific damage can occur due to generator drop-outs, sharp voltage and... -
Page 34: Mms100 Mirror Head Homing
MMS100 Mirror Head Homing When the MMS100 fixture is connected to an appropriately-rated power source, it will automatically begin a homing procedure to verify its orientation. The mirror will move through a number of moves to determine the its precise location relative to its full range of travel. -
Page 35: Mounting The Mms100 To A Projector
The alignment of the MMS100 mirror to the projector's optical path is critical for good performance. In addition, the physical attachment of the MMS100 must be correct to not cause damage to the projector nor the fixture nor cause bodily harm. - Page 36 Mounting to a Barco FLM - (Mounted, Clamps closed) Mounting to a Barco HDX (Un-mounted, Clamps open)
- Page 37 Mounting to a Barco HDQ (Un-mounted, Clamps open)
-
Page 39: Mms100 - Dmx And Ethernet Links
MMS100 - DMX and Ethernet Links The MMS100 can be used with a standard DMX512 link for control by a DMX desk as well as an Ethernet link for networked configuration functions via the CMA. In addition, the Ethernet link can be used to control the fixture via Art-Net. - Page 40 Example DMX Link with Ethernet Link Example Art-Net Link Configuration...
-
Page 42: Cma - Install And Launch
CMA - Install and Launch The latest version of Content Management Application software that is available on the High End Systems website that communicates remotely with all MMS100, Axon HD, Axon HD Pro and DLHD's over an Ethernet network to: •... -
Page 43: Verifying Mms-100 Software Version
Verifying MMS-100 Software Version It is recommended to verify the Software version that the MMS100 is using before show programming. Please ensure that the latest version is being used by checking the High End Systems Website. Current Software: Current Software Version... - Page 44 • Navigate to the Version in the menu System • Verify the Version by looking at the Software Version box. (Note: beta SW version shown in image)
-
Page 45: Mms100 Software Upgrade
MMS100 Software Upgrade Software Upgrades are completed via the CMA with an attached computer on the same network as the MMS100. Process outline • Launch CMA from a network attached computer. • Choose server to upgrade • Choose upgrade file •... - Page 46 Choose the .HES file that was obtained from the HES website. Press Open (Ver. 1.0.2 b355 shown here) Verify the correct file is selected and press Next...
- Page 47 Verify the Correct Server is selected.
- Page 48 Progress Bar will give feedback...
- Page 49 Process will complete automatically. Press Finish when completed.
-
Page 51: Configuration Options - Mms100
• Selecting the number of Graphic Layers, this will determine the DMX channel footprint size. • Selecting a Fixture ID number to uniquely identify the MMS100 on a fixture link (required if you will be synchronizing output between fixtures). •... -
Page 52: Menu System Setup - Mms100
Menu System Setup - MMS100 Using the Menu System on the MMS100 will allow all basic configuration setting to be made from one screen. The Control Screen located on the DMX Tab below is shown below. All Menu navigation is completed by using the Directional button, the Select Button, and Enter Button located on the front panel. -
Page 54: Cma Setup - Mms100
CMA Setup - MMS100 Using the Content Management Application (CMA) with the MMS100 allows all configuration setting to be made from a network connected computer. Start Channel Select the Start Channel Drop-Down Box. DMX Footprint determines Start Channel options. (More Info.) Control Source Select the Source Drop-Down Box. -
Page 55: Dmx Control, Start Channel And Dmx Footprint
Example. If the start channel is set to 1 on the MMS100. The Motion fixture will patched in a DMX universe starting at channel 1 on the control console, the Global Portion will be patched at DMX 8, and DMX 65 for the first Layer. -
Page 56: Dmx Control Setup And Test
Set the Media Folder and File parameters to 1, which will choose the first image file in the content library. NOTE: If you have trouble viewing output and you are not using a lighting console from High End Systems, check that the library for your desk has the correct default settings for all DMX channels. -
Page 57: Verifying Operation
At times it is helpful to verify the operation of the fixture from the fixture itself. This process will help with troubleshooting other areas of the setup by validating the MMS100 is working correctly. To verify that the Motion Portion of the MMS100 is working. - Page 58 • Be sure to return Video Test Pattern to OFF, this field will override incoming DMX To verify that DMX values are being received by the MMS100 • Ensure that there is a DMX source connected and sending data. •...
-
Page 60: Mms100 Shutdown
MMS100 Shutdown The shutdown of the MMS100 server requires no careful consideration, however take note of the shutdown procedure of the attached projector. Projection lamp life can be greatly shorten if a propper shutdown procedure is not followed. It is possible to reset various portions of the system menu buttons. -
Page 61: Mms100 Menu Display
MMS100 Menu Display The MMS100 display panel gives access to the fixture’s on board menu system. Please see the Menu System Section detailed descriptions of functionality. Tip: Most configuration features are also available through the Content Management Application (CMA) -
Page 62: Lcd Menu Navigation
LCD Menu Navigation The LCD Menu is subdivided into various parts. Navigation is accomplished with the Tab-Select Buttons and the Navigation Button. See below for more Navigation tips. LCD Menu Navigation • Select any Menu tab by pressing the corresponding button to the side of the display. •... -
Page 63: Mms100 Menu Options
MMS100 Menu Options The menu display consists of a set of top-level tabbed screens and their associated sub tabs. Below is a chart for quick reference. Sub-section Fields Options Section Control Source DMX 512 Art-Net Art-Net Universe Art-Net Subnet Protocol... - Page 64 Delete User Content Delete...
-
Page 65: Dmx Control Screen
DMX Control Screen This screen shows all configuration settings for incoming data with regards to the external control source. Source Drop Down Box • DMX 512 • Art-Net Version (referring to the incoming control source protocol version) • • Layers (referring to the number of available graphics layers) •... -
Page 66: Dmx Motion Screen
DMX Motion Screen The DMX Motion screen reflects the data that has been parsed out of the DMX stream and passed into the fixture as motion information DMX - Protocol - Motion... -
Page 67: Dmx Global Layer Screen
DMX Global Layer Screen The DMX Global screen reflects the data that has been parsed out of the DMX stream and applied to the video server as the Global Layer DMX - Protocol - Global... -
Page 68: Dmx Layer Screen
DMX Layer Screen The DMX Layer screen reflects the data that has been parsed out of the DMX stream and applied to the video server on a Graphic Layer DMX - Protocol - Layer... -
Page 69: Dmx Raw View
DMX Raw View The DMX - Raw view shows all incoming DMX traffic, and the current refresh rate of the DMX signal. The image below reflect no incoming DMX traffic and a refresh rate of zero. This is correct, the image was produced on a fixture with no data connected. -
Page 70: Set - Fixture Screen
Set - Fixture Screen This screen shows all configuration settings for the motions system as well as the embedded LCD screen. Pan Invert • • On (pan will reverse direction as compared to incoming DMX) Tilt Invert • • On (tilt will reverse direction as compared to incoming DMX) Pan / Tilt Swap •... -
Page 72: File (Menu System)
File (Menu System) This screen shows a preview of content and allows navigation on the content library. Folder View Box • Navigate to box, select box to navigate into • Navigate to folder and select File View Box • Navigate to box, select box to navigate into •... -
Page 73: Info - Hours
Info - Hours This screen shows current Fixture hours, and allows a Reset to zero hours. Fixture Hours - Reset • Navigate to reset Button, select to zero Fixture hours. Info - Hours... -
Page 74: Info Version Screen
Info Version Screen This screen shows current Software versions of various sub-components. Use this information when choosing an update from the HES support website. Software Version • This number refers to the graphics system application software, it can be upgraded as a standalone process. Firmware Version •... -
Page 76: Info Status Screen
Info Status Screen This screen shows current system status and error messages, take note of any items when contacting support Info - Status... -
Page 77: Info Hardware Screen
Info Hardware Screen This screen shows current installed system hardware. It is for informational purposes. Info - Hardware... -
Page 78: Home Screen
Home Screen This screen allows access to the fixture homing procedure. Motion All • Home (this will start the fixture homing procedure by rebooting the motion system) Test - Home... -
Page 79: Self Test Screen
Self Test Screen This screen allows access to the fixture self testing procedures. Self-Test Pan / Tilt • This will start the pan / tilt self test. De-Select to stop test Video Test Pattern • 1 - Internal Test • 2 - Internal Test •... -
Page 80: Reset
Reset This screen allows access to the system reset procedures. Reboot Media Server • Select Restart to reboot the internal media server. Delete User Content • Select Delete to remove all user content from the media server. Upgrade Factory Content •... -
Page 81: Pan And Tilt Motion Function
Pan and Tilt Motion Function The MMS100 Pan and Tilt system allows the optical grade mirror to reposition the image output in a wide range of motion. Pan Function • Allows 196 degrees of rotation. • Allows for 16 bit position accuracy •... -
Page 82: Auto-Image Rotation And Pan Position
Auto-Image Rotation and Pan Position The MMS100 has an Auto-Image Rotation feature built into the graphic server. This feature uses the commanded pan position to rotate the image as the mirror is moving. This rotation is necessary due to the folded optical path the projected image follows. -
Page 83: Mspeed (Motor Speed Translation)
MSpeed (Motor Speed Translation) The MSpeed parameter allows the motion system to calculate positional data with a finer resolution than what a DMX data stream can provide. MSpeed movement is extremely smooth because the fixture controls movements in a way that is independent of DMX refresh rates. - Page 84 4.52 4.78 5.06 5.34 5.64 5.94 6.25 6.56 6.89 7.22 7.56 7.91 8.27 8.63 9.00 9.39 9.77 10.17 10.58 10.99 11.41 11.84 12.28 12.72 13.17 13.63 14.10 14.58 15.07 15.56 16.06 16.57 17.09 17.61 18.14 18.68 19.23 19.79 20.36 20.93 21.51 22.10 22.70...
- Page 85 29.80 30.49 31.19 31.90 32.62 33.34 34.08 34.82 35.57 36.33 37.09 37.87 38.65 39.44 39.44v 40.23 41.04 41.85 42.68 43.50 44.34 45.19 46.04 46.90 47.77 48.65 49.54 50.43 51.33 52.24 53.16 54.09 55.02 55.96 56.91 57.87 58.84 59.81 60.79 61.78 62.78 63.79 64.80...
- Page 86 76.49 77.60 78.71 79.84 80.98 82.12 83.27 84.43 85.59 86.77 87.95 89.14 90.34 91.55 92.76 93.98 95.21 96.45 97.70 98.95 100.22 101.49 102.77 104.05 105.35 106.65 107.96 109.28 110.61 111.94 113.28 114.63 115.99 117.36 118.73 120.12 121.5v 122.91 124.31 125.73 127.15 128.58 130.02...
- Page 87 149.46 151.01 152.57 154.14 155.71 157.30 158.89 160.49 162.09 163.71 165.33 166.96 168.60 170.25 171.91 173.57 175.24 176.92 178.61 180.30 182.01 183.72 185.44 187.17 188.90 190.65 192.40 194.16 195.92 197.70 199.48 201.28 203.08 204.88 206.70 208.52 210.36 212.19 214.04 215.90 217.76 219.63 221.51...
- Page 88 242.72 244.70 246.68 248.68 250.68 246.68 248.68 250.68 252.68...
-
Page 89: Output Connection Requirements
DVI connector. The server must sense a valid EDID for proper start-up. Tip: If the attached projector is not being driven by the MMS100 media server, a standard computer display or an EDID management device can be connected to allow the motion system to properly operate. (ie. DVI Dectitive, DVI Parrot... -
Page 90: Mirror Position - Fine Correction
Mirror Position - Fine Correction The MMS100 motion system allows for the 2 positional modes, Fine Correction Enabled, Fine Correction Disabled. By default Fine Correction is disabled, due to the behavior that the mirror makes a small correction update at the end of travel - this can be seen as an error without fully understanding the system. -
Page 91: Graphics Engine Protocol Definitions
The latest generation of the Digital Lighting products produced by High End Systems use the HD Protocol for communication. The Axon HD, Axon HD Pro media servers as well as the DLHD Digital light and the MMS100 have limited backwards compatibility for the V2 protocol. -
Page 92: Graphics Pipeline Hierarchy
Graphics Pipeline Hierarchy There is a hierarchy to the DMX control parameters. In general, object control parameters render individual graphic images. Global control parameters act upon the composite image created by combining multiple objects. Motion parameters control the fixture movement and projection. It is especially important to keep this in mind when applying graphical effects. -
Page 93: Graphics Engine Function
Graphics Engine Function The Graphics Engine is responsible for converting the incoming control commands into the video signal being sent out the DVI connector. It also applies all live effect, organizes the video content and functions as the video source for all attached displays. -
Page 94: Graphics Engine Opacity And Intensity
Graphics Engine Opacity and Intensity Adjusting an object’s opacity allows one object to “show through” another. You can adjust the opacity of an individual 3-D object from completely transparent to full opacity using this parameter. Increase opacity from not visible at a value of zero to full opacity at a value of 255. -
Page 95: Image Optimization Parameters
Image Optimization Parameters The Graphics Serve allows for adjustment of live video in real time. The Black Level and the Contrast can be adjust to precisely match the projection to the intended results. Precise adjustment does not necessarily need to happen before rendering, this can save a large amount of time when matching individual pieces of content together. -
Page 96: Effect Mode Parameters
Effect Mode Parameters Three Effect Mode parameters are available for each individual 3-D object, each with three Modifier parameters. Both Effect parameters have an identical list of color and visual effect options. This lets you apply a dual-effect combination to the selected 3-D object. - Page 97 Pixel Twist swirls a portion of the texture Twist Center - X Twist Center - Y Direction and Amount of twist Picture-in-picture duplicates the texture and Subpicture Center Subpicture Center Subpicture Size overlays it on the original on X-Axis on Y-Axis Magnifying Lens - virtual convex lens that Lens center - X Lens center - Y...
- Page 98 the image unchanged "HS to Gray retains selected hue and saturation, Hue Coordinate Saturation Tolerance and turns everything else gray." Coordinate "HS to Transparent retains selected hue and Hue Coordinate Saturation Tolerance saturation, and turns everything else Coordinate transparent." HS Selected To Transparent makes selected hue Hue Coordinate Saturation Tolerance...
-
Page 99: Content Selection
3D object files for playback on the media server. For a quick overview on developing your own custom User content, see the High End Systems Website for detailed information offering assistance and the latest software and techniques for creating and encoding custom content. -
Page 100: Content Playback Mode
Content Playback Mode A Playback Mode parameter for each layer allows several playback options. -
Page 101: Content Selection - In-Frame And Out-Frame
Content Selection - In-Frame and Out- Frame You can select any segment of a media file for playback by assigning an In Frame value as a start point and an Out Frame as an end point. NOTE: DMX parameter values for these parameters do not correspond to a particular “frame”. They are defined as a percentage of the movie length. -
Page 103: Content Playback Scrubbing
Content Playback Scrubbing Scrubbing displays the selected frame of the media file. While scrubbing the In Frame, the frame selected by the In Frame coarse and fine channels will be displayed. Likewise, scrubbing the Out Frame will display the frame selected by the Out Frame coarse and fine channels. -
Page 104: Content Playback Speed Control
Content Playback Speed Control The Playback Speed parameter controls the speed of the selected media file’s Playback Mode. The Playback Speed for a media file is used whenever the Playback Mode Parameter’s DMX value is assigned to any Play Forward option. Default DMX Value: 128 = Playback at normal speed. -
Page 105: Layer Overview
The organizing principle of the graphics engine is the Graphics Layer which lives inside a Global 3D world. There are up to 9 graphics layers that can video content can be displayed upon in the MMS100. By default the content is displayed on a flat plane, there are other 3D objects that can be used to display the content upon. -
Page 106: Content 3D Object
Content 3D Object The 3D object used in the graphics engine is used to map content onto. By default this 3D object is a simple plane sized for the correct aspect ratio of the attached output. A full library of 3D objects are available to be used for creative programming, and user creatable objects can be used as well. -
Page 107: Content Layer Rotation
Content Layer Rotation The Rotation parameters for each object control 3-D object rotation with 16-bit precision. You can rotate a 3-D object up to 720° in either a clockwise or counterclockwise direction around the X, Y and/or Z axis. The X, Y or Z Rotation parameter rotates the selected Graphic Object around the its axis with 16-bit precision. You can index the rotation or set a continuous rotation creating a vertical flip at variable speeds. - Page 108 When the DMX value for a rotation parameter is greater than the 720° limit in either direction, the object begins rotating continuously. Additional adjustment to the DMX values increases the speed of continuous rotation. NOTE:Global and Graphic Effects Mode parameters contain a Pre-rotation Translation effect option. When a Global or Graphic Effects Mode DMX value = 102, you can use the Effect Modifier parameters to locate the image in a virtual three dimensional space.
-
Page 109: Content Layer Position
Content Layer Position You can reposition each 3-D object’s position in 3-D space by moving it along the X, Y and Z axes. The following parameters act on an individual object. Use these parameters to position 3-D images in relation to each other. X Position The X Position parameter moves your object along the X axis with 16-bit precision. -
Page 110: Content Layer Scale
Content Layer Scale You can scale an Graphic Object along the X, Y and/or Z axis to adjust the object size. The Scale parameter adjusts the size of the object’s image up to approximately 10x its original size. At a DMX value of zero, the image shrinks to a dot. -
Page 111: Layer Opacity
Layer Opacity Adjusting an object’s opacity allows one object to “show through” another. You can adjust the opacity of an individual 3-D object from completely transparent to full opacity using this parameter. Increase opacity from not visible at a value of zero to full opacity at a value of 255. -
Page 112: Global Intensity
Global Intensity The Global Intensity parameter provides an adjustment to the combined image. This global control parameter controls intensity levels on the overall image. When you have multiple objects in relation to each other, the Global Intensity parameter is the best way to apply a fade to the composite image. Default DMX Value: 0 = Completely Dark... -
Page 113: Global Control On Screen Stats
Global Control On Screen Stats Spherical Control Statistics When the Global Control parameter is set to a DMX value = 252, Spherical Control Statistics are displayed and the Global Control Modifier parameter selects text color. Performance Statistics When the Global Control parameter DMX value = 254, performance statistics are projected on screen. These are a subset of the statistics shown when Global Control = 255. -
Page 114: Global Control All In One
Global Control All in One All-in-One Control Option When the Global Control parameter is set to a DMX value = 253, you can use the Global Control Modifier parameter to control the All-in-One control option. This option helps you visualize what the graphics engine is doing. The All-in-One option maps the media file content of Collage and Curved Surface support effects as well as up to three effects applied to graphics objects and displays it in a multi-quadrant grid. -
Page 115: Global Masking Shape
Global Masking Shape The Mask Select parameter lets you choose a mask to frame or overlay a composite image. You can choose to apply a mask to an image when you don't want an entire image to be seen or you want to transition from an image to black or a solid color without fading intensity. -
Page 116: Global Masking Size
Global Masking Size The Mask Size parameter defines mask size for all mask shapes. Default DMX Value: 255 (100%) = no masking effect When this parameter is set at a value of 255 (100%), the mask is sized to leave the image 100% visible. When Mask Size is set at 0, the mask totally covers the composite image. -
Page 117: Global Masking Fade Edge
Global Masking Fade Edge The Mask Edge Fade parameter operates differently depending on the value of the Mask Select parameter. Default DMX Value: 0 = no adjustment to mask When the Mask Select parameter value = 0 to 127 (49%), Mask Edge Fade adjusts the amount of fading from a DMX value of 0 = no edge fade to 255 (100%)= maximum edge fade. -
Page 118: Global Masking Strobe
Global Masking Strobe A strobing version of each simple mask shape is defined in the 128-255 (51-100%) DMX value range. When a strobing mask is selected, the strobe rate is controlled by the Mask Edge Fade parameter from the slowest = 0 to the fastest = 255 (100%). -
Page 119: Global Masking Framing
Global Masking Framing Eight Framing parameters allow you to clip an image from each corner in horizontal and vertical directions. Default DMX Value: 0 = no effect applied. Each corner has an x and a y value that adjust and correct scale of the projection from any corner toward the image center on that axis. -
Page 120: Global Masking Framing Fade Edge
Global Masking Framing Fade Edge Four Image Edge Fade parameters let you control the Edge Fade for individual sides of your object (top, bottom, left and right). When projecting abutting images, adjusting the Edge Fade parameter lets you smooth the line between two images and also allows you to change an object’s boundary. -
Page 121: Global Keystone Correction
Global Keystone Correction When you output an image from a projector at an angle, the image may appear skewed. Eight Keystone parameters adjust the image shape and compensate for this effect. You can control each of the four corners of the graphics output to reshape your image to a form that projects correctly. -
Page 122: Global Keystone Xy Ratio
Global Keystone XY Ratio Keystone X Ratio The Keystone X Ratio Parameter shapes the output to adjust for keystone effects created in certain output situations. This parameter adjusts the output by compressing or expanding the image horizontally. Default DMX Value: 128 (50%) = no adjustment DMX value settings below the midpoint of the range compress the image horizontally from maximum compression at a value of 0 to no compression at a value of 128. -
Page 123: Global Auto Image Rotation
Global Auto Image Rotation Please see the Auto-Image Rotation and Pan Position in the Motion section of this document... -
Page 124: Collage Overview
Collage Overview The Collage Generator system is part of the graphics engine that allows multiple devices to work together to create a larger, virtually seamless image. The graphics engines of multiple servers can work together to create this much larger image. -
Page 125: Creating Custom Content For A Collage
Creating Custom Content for a Collage Please see online documentation for creating custom collage content. If you are using a Multi-Pane collage, please see the online sizing tool to help determine image resolution. -
Page 126: Creating A Collage Example
Creating a Collage Example The new Axon HD offers multiple types of blending, and this example focuses on building a standard 2x2 collage using four Axon HD media servers and a lighting console based on Hog 4 software. Setup the Collage effect: Select the same content on four media servers. - Page 127 Select ALL GLOBAL LAYERS; under Alignment Control select Pattern Normal Blend. This will bring up the standard alignment grid. Under Edge Blend Horz.; set the value to 50%. (This will set a blend size) Align the grid using the following: •...
-
Page 128: Collage Type
Collage Type The Collage Type global parameter has eighteen collage options including 14 Collage+ modes: In Standard Collage and Standard Collage with 360° Wrap options, the content is automatically divided into cell segments by the graphics engine after you define the array size. This yields good results in situations where moderate output resolution is suitable. -
Page 129: Collage Layout Configuration
Collage Layout Configuration The Collage Config Selection parameter selects which type of Collage array to use from DMX Values 1-127. The selected size displays in the upper right corner of the grid pattern. A DMX value of 0 = No collage. DMX Values of 126-255 are reserved and default to No collage. -
Page 130: Collage Cell Selection
Collage Cell Selection The Collage Cell Selection parameter selects which cell of the grid a particular Axon server or DL fixture will display. DMX values 0 up to 127 are used to step through grid pattern you selected with the Modifier 1 channel. As you dial through Modifier 2, the selected cell in the grid is highlighted. -
Page 131: Collage Edge Blending
Collage Edge Blending Variable Edge Blending parameters are used in conjunction with the Collage Generator parameters and allow for on-the- fly adjustment of blend overlap between projectors. These parameters allow more flexibility for sizing a collage to a given screen or projection surface, as well as smoother blending if wider blend regions are used. Horizontal and vertical blend regions can be controlled independently of one another. -
Page 132: Collage Edge Blending Curve Adjustment
Collage Edge Blending Curve Adjustment The Collage Blending Adjustment parameter lets you select from a variety of blend curves to control the edge blending of the adjacent projections. -
Page 133: Collage Cell Alignment Pattern
Collage Cell Alignment Pattern The Adjustment Pattern Control parameter lets you determine how to view the cell as you apply the selected blend curve. You can also display grid overlays that show your selections for Collage Config and Collage Cell Selection parameters. -
Page 134: Network Synchronization Overview
• All video content to be used in a Synchronization scenario MUST adhere to the High End Systems requirements for encoding custom content. If the content is not encoded correctly Network Synchronization not function. Specifically all image information must be present at all frame locations. -
Page 135: Sync To
Sync To To program synchronization, first start by deciding which fixture/server will be the master server. This can be any server on the network. However, in a case of mixed computer hardware in the servers, the lowest performing server should be chosen as the master. This will ensure that all of the servers have the ability to slow their playback to match the playback rate of the master server. - Page 136 • Setting a Graphic Object to sync to itself will have no effect There are three sync mode options available for each of the Graphic Object layers: • Synchronize to Graphic movie time • Synchronize to Object rotation • Synchronize to Graphic movie time and Object rotation Synchronizing a Server to Itself Movie playback and effects can be synchronized between a Graphic Object on a single fixture (for example, making sure all Graphic Objects on a single fixture are playing back in sync with one another).
-
Page 137: Curved Surface Correction
Curved Surface Correction Effect Mode parameter DMX value = 135-149 Curved Surface Support corrects for shape distortions that occur when you project onto surfaces that aren’t flat. This Global effect facilitates projecting onto convex or concave cylinders, angular screens, spheres, and disk shaped surfaces. You can apply this correction to any media server output including multi-fixture image panoramas created with the Collage Generator Effect, Use these adjustments in conjunction with Keystone parameters and Ratio parameters to refine the output shape on any... - Page 138 Modifier 2: In situations where you are projecting from any angle other than perpendicular to the surface, you can use the Modifier 2 to adjust the vertical center of the image. A DMX value of 128 (50%) = no adjustment. Adjusting toward 0 moves the vertical center down to the bottom of the image.
-
Page 139: Digital M-Speed
Digital M-Speed Digital MSpeed allows an incoming DMX value to be used to specify a control time value. In the motion system, using MSpeed to control mirror position will produce smoother moves due to the update frequency of the DMX stream is much lower as compared to the internal motion control system. The much higher refresh rate will allow the motors to run in a smoother mode. - Page 140 3.52 3.76 4.00 4.25 4.52 4.78 5.06 5.34 5.64 5.94 6.25 6.56 6.89 7.22 7.56 7.91 8.27 8.63 9.00 9.39 9.77 10.17 10.58 10.99 11.41 11.84 12.28 12.72 13.17 13.63 14.10 14.58 15.07 15.56 16.06 16.57 17.09 17.61 18.14 18.68 19.23 19.79 20.36...
- Page 141 27.10 27.76 28.43 29.11 29.80 30.49 31.19 31.90 32.62 33.34 34.08 34.82 35.57 36.33 37.09 37.87 38.65 39.44 39.44v 40.23 41.04 41.85 42.68 43.50 44.34 45.19 46.04 46.90 47.77 48.65 49.54 50.43 51.33 52.24 53.16 54.09 55.02 55.96 56.91 57.87 58.84 59.81 60.79...
- Page 142 72.13 73.20 74.29 75.38 76.49 77.60 78.71 79.84 80.98 82.12 83.27 84.43 85.59 86.77 87.95 89.14 90.34 91.55 92.76 93.98 95.21 96.45 97.70 98.95 100.22 101.49 102.77 104.05 105.35 106.65 107.96 109.28 110.61 111.94 113.28 114.63 115.99 117.36 118.73 120.12 121.5v 122.91 124.31...
- Page 143 143.33 144.85 146.38 147.92 149.46 151.01 152.57 154.14 155.71 157.30 158.89 160.49 162.09 163.71 165.33 166.96 168.60 170.25 171.91 173.57 175.24 176.92 178.61 180.30 182.01 183.72 185.44 187.17 188.90 190.65 192.40 194.16 195.92 197.70 199.48 201.28 203.08 204.88 206.70 208.52 210.36 212.19 214.04...
- Page 144 234.90 236.84 238.79 240.75 242.72 244.70 246.68 248.68 250.68 246.68 248.68 250.68 252.68...
-
Page 145: Digital M-Speed2
Digital M-Speed2 Digital MSpeed and Digital MSpeed 2 Effect Mode parameter DMX value = 103 and 105 In an effort to smooth DMX data for rotation, scaling and position values at the Graphic Object level, historically a cross- fading algorithm has been applied to these values. Digital MSpeed allows you to set a cross-fade speed to these values to achieve smoother fading. -
Page 146: Pin Cushion And Barrel Distortion Adjustment
Pin Cushion and Barrel distortion adjustment Please see protocol documentation for details. This effect will allows the graphics engine to correct for lens aberrations either in a 'pincushion' direction or a 'barrel' direction to account for optical errors in the lens construction. The effect range of this adjustment is minimal, and should only be used for know lens issues. -
Page 147: Layer Pre-Rotation And Translation
Layer Pre-Rotation and Translation Pre-Rotation Translation Effect Mode parameter DMX value = 102 Rotation parameters rotate the center of an image around the x, y or z axis. The Prerotation Translation Effect Mode option allows you to position the image in a virtual 3-dimensional space. Then, when the Rotation parameters for the object are applied, the image will orbit around each axis from this new position. -
Page 148: Spherical Mapping Correction
Spherical Mapping Correction Delete this text and replace it with your own content. -
Page 149: All Or Nothing
All or Nothing All or Nothing Effect Mode parameter DMX value = 15 This effect reduces all color values to full saturation or no color based on comparison to a set threshold. This effect creates an image with fully saturated color. •... -
Page 150: Background Color
Background Color Background Color Effect Mode parameter DMX value = 131 There is a default black background behind every composite image. You cannot rotate, scale or position the background and it is visible from every viewpoint and position. This effect allows you to apply color to the background. This background color will not affect any of the Graphic Object effects selected. -
Page 151: Background Color Cycle
Background Color Cycle Effect Mode parameter DMX value = 132 There is a background behind every composite image. You cannot rotate, scale or position the background and it is visible from every viewpoint and position. This effect allows you to cycle a color sequence on the background controlling the transition speed. -
Page 152: Cmy Color Modification
CMY Color Modification Effect Mode parameter DMX value = 1 This parameter simulates CMY color by inverting RGB color components. Use this parameter when you want to color mix with a CMY color model instead of RGB color model. • Modifier 1: Increases cyan color component from 0 = no adjustment to 255 (100%) = maximum cyan saturation. -
Page 153: Cmy Modification - Add All Pixels
CMY Modification - Add All Pixels CMY Add All Pixels Effect Mode parameter DMX value = 2 This effect increases color values across all pixels including black pixels. • Modifier 1:Increases cyan color component from 0 = no adjustment to 255 (100%) = maximum cyan saturation. •... -
Page 154: Cmy Modification - Add Non-Black Pixels
CMY Modification - Add Non-Black Pixels CMY Add Non-black Pixels Effect Mode parameter DMX value = 3 This effect increases color values across all pixels except black pixels. • Modifier 1:Increases cyan color component from 0 = no adjustment to 255 (100%) = maximum cyan saturation. •... -
Page 155: Color Cycle
Color Cycle Color Cycle Effect Mode parameter DMX value = 14 The image’s color components cycle through RGB, black, and white. When no Red Green or Blue is added, image fades from full white, to normal image, to black. When RGB/CMY is added the image fades from the RGB value, to the image with color added. -
Page 156: Color De-Converge
Color De-Converge Color De-Converge Effect Mode parameter DMX value = 39 This effect separates the different color components of an image and offsets them from the original image position. • Modifier 1:Moves the image’s red component up from 0= no adjustment to 255 (100%) = maximum distance from original position. -
Page 157: Colorize - Gray Scale
Colorize - Gray Scale Colorize Gray Scale Effect Mode parameter DMX value = 44 This effect maps a selected pixel intensity to a selected color scheme. A variety of color schemes simulate effects like thermography. This is especially effective effect when applied to input from the internal camera. •... -
Page 158: Color To Alpha Channel
Color to Alpha Channel Color to Alpha Effect Mode parameter DMX value = 49 This parameter varies the transparency level of an image’s component color values. • Modifier 1: Increases the red component opacity or intensity from 0 = no adjustment to 255 (100%) = full red opacity (intensity). -
Page 159: Color To Alpha Channel Inverted
Color to Alpha Channel Inverted Color to Alpha, Inverted Effect Mode parameter DMX value = 50 This parameter varies the transparency level of the inverse of an image’s component color values. • Modifier 1: Increases the inverse red component opacity or intensity from 0 = no adjustment to 255 (100%) = full green and blue opacity (intensity). -
Page 160: Color To Black And White
Color to Black and White Color to B/W Effect Mode parameter DMX value = 111 Begins with a white screen and fades to the original image in black and white. All color is converted. • Modifier 1:Transitions the image from full white at a DMX value of 0 to black and white at a value of 128 (50%). Increasing values above 50% reveals more of the image in black and white to complete at a value of 255 (100%). -
Page 161: Dot-P And Re-Sample Effect
Dot-P and Re-Sample Effect DotP and Resample Effect Mode parameter DMX value = 13 This effect applies an algorithm that pixelates, and solarizes the image. It also makes the surface of some 3D objects appear reflective. Modifiers 1, Modifier 2 and Modifier 3 parameters work together to adjust the algorithm. -
Page 162: Edge Detect - Black And White
Edge Detect - Black and White Edge Detect Black and White Effect Mode parameter DMX value = 21 This effect displays only the edges of image components. Edges appear white, everything else is black. • Modifier 1:Adjusts horizontal edge search size from 0= no adjustment to 255 (100%) = maximum adjustment. •... -
Page 163: Edge Detect - Black And White 2
Edge Detect - Black and White 2 Edge Detect Black and White 2 Effect Mode parameter DMX value = 92 This effect displays only the edges of image components as either black or white. • Modifier 1:Adjusts sample distance from 0= no adjustment to 255 (100%) = maximum adjustment. •... -
Page 164: Edge Detect - Color
Edge Detect - Color Edge Detect Color Effect Mode parameter DMX value = 20 This effect displays only the edges of image components with their color values. • Modifier 1:Adjusts horizontal edge search size from 0= no adjustment to 255 (100%) = maximum adjustment. •... -
Page 165: Edge Detect - Color 2
Edge Detect - Color 2 Edge Detect Color 2 Effect Mode parameter DMX value = 104 This effect displays only the edges of image components with their color values with a scaler applied. • Modifier 1:Adjusts the sample distance from 0= no adjustment to 255 (100%) = maximum adjustment. •... -
Page 166: Fade Edge And Mask - Color Change
Fade Edge and Mask - Color Change Fade Edge Color Effect Mode parameter DMX value = 129 This effect applies color to a selected Fade Edge parameter, (see Image Edge Fade). • Modifier 1: Increases red color component from 0 = no adjustment to 255 (100%) = maximum red saturation. •... -
Page 167: Exposure
Exposure Exposure Control Effect Mode Parameter DMX value = 114 Exposure Control adjusts the image Black level and Contrast to optimize the projected image for your performance environment. You can use it to easily modify the black level and contrast for a specific application. •... -
Page 168: Fire Gradient Color Shift
Fire Gradient Color Shift Fire Gradient Effect Mode Parameter DMX value = 112 This option maps image colors to a Red-to-Yellow gradient creating a fiery effect. • Modifier 1: Maps the image color values from no adjustment at a value of 0 to all red to yellow tones at a value of 255 (100%). -
Page 169: 3D Object - Edge Glow
3D Object - Edge Glow Glow Effect Mode parameter DMX value = 73 Glow colorizes and creates a glow on the 3-D object separate from the media texture on it. You can apply this effect to any 3-D object no matter which media file texture is applied to it. This parameter provides an option to view a 3-D object without displaying the associated texture. -
Page 170: 3D Object - Edge Glow Color Cycle
3D Object - Edge Glow Color Cycle Glow Color Cycle Effect Mode parameter DMX value = 74 Glow colorizes and creates a glow on the 3-D object separate from the media texture on it. You can apply this effect to any 3-D object no matter which media file texture is applied to it. -
Page 171: Gray Maker - Color Shift
Gray Maker - Color Shift Gray maker 1 Effect Mode Parameter DMX value = 108 This effect gradually transitions the color image to a gray scale image. Use the Gray Maker effect when you want to add an undertone of grey to the colors in an image. NOTE:If content is already gray scale, there is no effect applied but Modifier 2 can still affect image contrast. -
Page 172: Gray Maker 2 - Color Shift
Gray Maker 2 - Color Shift Gray maker 2 Effect Mode Parameter DMX value = 109 This option converts a color image to gray scale and then lets you adjust black level and contrast. • Modifier 1: Adjusts the black level of the gray scale image from a DMX value of 0 = Full brightness to 255 = completely black •... -
Page 173: Hue Saturation To Gray Scale
Hue Saturation to Gray scale HS to Gray Effect Mode parameter DMX value = 87 This effect Maps a selected color coordinate to an HSI color space and turns everything else gray. • Modifier 1: Adjusts the Hue color component from 0 = no adjustment to 255 (100%) = maximum hue. •... -
Page 174: Hue Saturation Selected To Transparent
Hue Saturation Selected to Transparent HS Selected to Transparent Effect Mode parameter DMX value = 89 Maps a selected color coordinate to a HSI color space and turns it transparent and shows graphic objects “behind” it. Everything else is unchanged. •... -
Page 175: Hue Saturation To Transparent
Hue Saturation to Transparent HS to Transparent Effect Mode parameter DMX value = 88 Maps a selected color coordinate to a HSI color space and turns everything else transparent and shows graphic objects “behind” it. • Modifier 1: Adjusts the Hue color component from 0 = no adjustment to 255 (100%) = maximum hue. •... -
Page 176: Key On Intensity
Key on Intensity Intensity Key Effect Mode parameter DMX value = 45 This effect turns pixels of a selected intensity transparent or applies the reverse effect. • Modifier 1: Selects intensity from a DMX value of 0 = no intensity to 255 (100%) = full intensity. •... -
Page 177: Mask Color - Change
Mask Color - Change Mask Color Effect Mode parameter DMX value = 128 This effect applies color to a selected mask shape • Modifier 1: Increases red color component from a DMX value of 0 = no adjustment to 255 (100%) = maximum red saturation. -
Page 178: Negative Art - Color Shift
Negative Art - Color Shift Negative Art Effect Mode Parameter DMX value = 113 This option provides a negative of the image and then lets you adjust the amount of color and the red and green color components. • Modifier 1: Adjusts the color level from full at a DMX value of 0 to the lowest level at a DMX value of 255. •... -
Page 179: Posterizer - Color Effect
Posterizer - Color effect Posterizer Effect Mode Parameter DMX value = 110 This effect uses the associated Modifier 1 parameter to posterize by replacing each color in an image with the highest values of that color but expanding it only to the border of that color. There is no bleeding or blending of colors. •... -
Page 180: Push To Sepia - Color Effect
Push to Sepia - Color Effect Push to Sepia Effect Mode Parameter DMX value = 106 This option converts all color in the image to sepia tones. • Modifier 1: Fades from original color at a DMX value = 0 to a range of sepia shades at a value of 255 (100%) •... -
Page 181: Push To Red - Color Effect
Push to Red - Color Effect Push to Red Effect Mode Parameter DMX value = 107 This option reduces colors in the selected image to all Red values • Modifier 1: Fades from original color at a DMX value = 0 to a range of red tones at a value of 255 (100%) •... -
Page 182: Rgb Color Shift - Add To All
RGB Color Shift - Add to All RGB Add, All Pixels Effect Mode parameter DMX value = 4 This effect adds color to all pixels including black using the RGB color model. • Modifier 1:Increases red color component from a DMX value of 0 = no adjustment to 255 (100%) = maximum red saturation. -
Page 183: Rgb Color Shift - Add To All 2
RGB Color Shift - Add to All 2 RGB Add2, All Pixels Effect Mode parameter DMX value = 5 This effect adds color to all pixels including black using an alternate RGB color algorithm. • Modifier 1: Increases red color component from a DMX value of 0 = no adjustment to 255 (100%) = maximum red saturation. -
Page 184: Rgb Color Shift - Add To Non-Black
RGB Color Shift - Add to Non-Black RGB Add to Non-black Pixels Effect Mode parameter DMX value = 6 This effect adds color to all pixels except black using the RGB color model. • Modifier 1:Increases red color component from a DMX value of 0 = no adjustment to 255 (100%) = maximum red saturation. -
Page 185: Rgb Color Shift - Invert
RGB Color Shift - Invert RGB Invert Effect Mode parameter DMX value = 17 This effect inverts color values to transition the image from an RGB to a CMY color model. • Modifier 1: Transitions the red component from no adjustment at a DMX value = 0 to cyan at a value of 255 (100%) •... -
Page 186: Rgb Color Effect - Invert And Swap Rgb -> Brg
RGB Color Effect - Invert and Swap RGB -> BRG RGB Invert and Swap to BRG Effect Mode parameter DMX value = 19 This effect swaps the color values from RGB to an inverted BRG color model. • Modifier 1:Transitions the red component from no adjustment at a value of 0 to yellow at a value of 255 (100%) •... -
Page 187: Rgb Color Effect - Invert And Swap Rgb -> Gbr
RGB Color Effect - Invert and Swap RGB - > GBR RGB Invert and Swap to GBR Effect Mode parameter DMX value = 18 This effect swaps the color values from RGB to an inverted GBR color model. • Modifier 1: Transitions the red component from no adjustment at a DMX value = 0 to magenta at a value of 255 (100%) •... -
Page 188: Rgb Color Shift - Scale
RGB Color Shift - Scale RGB Scale Effect Mode parameter DMX value = 47 Reduce and increase color components in the image as a part of the overall color range. NOTE: the maximum of Mod1, Mod2 and Mod3 sets overall color range. •... -
Page 189: Rgb Color Shift - Swap Rgb -> Bgr
RGB Color Shift - Swap RGB -> BGR RGB Swap to BGR Effect Mode parameter DMX value = 41 This effect allows you to swap colors. All red values become green and all blue values become red. Green values are unaffected. -
Page 190: Rgb Color Shift - Swap Rgb -> Bgr
RGB Color Shift - Swap RGB -> BGR RGB Swap to BRG Effect Mode parameter DMX value = 8 This effect allows you to swap colors. All red values become blue, all green values become red and all blue values become green. -
Page 191: Rgb Color Shift - Swap Rgb -> Gbr
RGB Color Shift - Swap RGB -> GBR RGB Swap to GBR Effect Mode parameter DMX value = 7 This effect allows you to swap colors. All red values become green, all green values become blue and all blue values become red. -
Page 192: Rgb Color Shift - Swap Rgb -> Grb
RGB Color Shift - Swap RGB -> GRB RGB Swap to GRB Effect Mode parameter DMX value = 43 This effect allows you to swap colors. All red values become green and all green values become blue. Blue values are unaffected. -
Page 193: Rgb Color Shift - Swap Rgb -> Rbg
RGB Color Shift - Swap RGB -> RBG RGB Swap to RBG Effect Mode parameter DMX value = 42 This effect allows you to swap colors. All green values become blue and all blue values become green. Red values are unaffected. -
Page 194: Scan Line
Scan Line Scan Line Effect Mode parameter DMX value = 32 Maps image color intensities to the colors in a single horizontal line of the selected texture. • Modifier 1:Selects a line of the media file to scan • Modifier 2:Adjusts the mapping transition •... -
Page 195: Sharpen
Sharpen Sharpen Effect Mode parameter DMX value = 82 Manipulates edges of image components to sharpen contrast between them. • Modifier 1:Selects a sample distance from a minimum at a DMX value = 0 to a maximum at a DMX value = 255 •... -
Page 196: Solarize Mode 1
Solarize Mode 1 Solarize 1 Effect Mode parameter DMX value = 9 Each of the Solarize effects remaps colors to a narrow value range and inverts the color below a set threshold using different algorithms. Solarize effects can create strong highlights. •... -
Page 197: Solarize Mode 2
Solarize Mode 2 Solarize 2 Effect Mode parameter DMX value = 10 Each of the Solarize effects remaps colors to a narrow value range and inverts the color below a set threshold using different algorithms. Solarize effects can create strong highlights. •... -
Page 198: Solarize Mode 3
Solarize Mode 3 Solarize 3 Effect Mode parameter DMX value = 11 Each of the Solarize effects remaps colors to a narrow value range and inverts the color below a set threshold using different algorithms. Solarize effects can create strong highlights. •... -
Page 199: Solarize Mode 4
Solarize Mode 4 Solarize 4 Effect Mode parameter DMX value = 12 Each of the Solarize effects remaps colors to a narrow value range and inverts the color below a set threshold using different algorithms. Solarize effects can create strong highlights. •... -
Page 200: Uv To Gray
UV to Gray UV to Gray Effect Mode parameter DMX value = 84 Maps a selected color coordinate to a YUV color space and turns everything else gray. • Modifier 1:Adjusts the U color component from 0 = no adjustment to 255 (100%) = maximum. •... -
Page 201: Uv Selected To Transparent
UV Selected to Transparent UV Selected to Transparent Effect Mode parameter DMX value = 86 Maps a selected color coordinate to a YUV color space and turns it transparent. Everything else is unchanged. • Modifier 1:Adjusts the U color component from 0 = no adjustment to 255 (100%) = maximum. •... -
Page 202: Uv To Transparent
UV to Transparent UV to Transparent Effect Mode parameter DMX value = 85 Maps a selected color coordinate to a YUV color space and turns everything else transparent. • Modifier 1:Adjusts the U color component from 0 = no adjustment to 255 (100%) = maximum. •... -
Page 203: Yxy Luminance Scaling
YXY Luminance Scaling Yxy Luminance Scaling Effect Mode parameter DMX value = 101 Mapping the mage to a Luminance Chrominance color space allows brightness adjustment without changing image color. • Modifier 1:Scales luminance. Values below the midpoint decrease luminance from 127 to 0 = black. Settings above the midpoint increase luminance from 128 to 255 (100%) = white. -
Page 204: Graphics Engine - Distortion Effect Modes
Graphics Engine - Distortion Effect Modes Cartoon Edge Effect Mode parameter DMX value = 38 Outlines the edges of image components to create a rendered effect. • Modifier 1:Adjusts Color reduction from 0= no adjustment to 255 (100%) = maximum. •... -
Page 205: Effect Chroma Shift
Effect Chroma Shift Chroma Shift Effect Mode parameter DMX value = 60 This effect shifts the red, blue, and green component colors in an image. You can offset color components vertically and or horizontally. • Modifier 1:The default DMX value of 128 (50%) = no adjustment. Values below the midpoint shift the color components right to a maximum at a value of 0. -
Page 206: Effect Downward Vertical Streaks
Effect Downward Vertical Streaks Downward Vertical Streaks Effect Mode parameter DMX value = 80 This effect lets you convert a portion of the image into vertical streaks. You can also rotate the angle of the streak and fade from the original image to the image with the streak effect applied. •... -
Page 207: Drop Shadow
Drop Shadow Drop Shadow Effect Mode parameter DMX value = 58 This effect creates a black plane behind the selected media file texture on a flat rectangular object. You can bring the plane from behind positioning it to form a drop shadow. You won’t see the shadow until you select a Modifier 1 or 2 DMX value above or below 128 (50%). -
Page 208: Effect Edge Frame Profile
Effect Edge Frame Profile Edge Frame Profiles Effect Mode parameter DMX value = 133 This effect contains three modes that modify the Global Image Edge Fade parameters to frame the global composite image. Modifier 2 and Modifier 3 adjustments vary depending which of the framing modes is selected with Modifier 1. NOTE:If the Global Image Edge Fade DMX values are set to Zero, the Framing output will be unseen in modes 0 and 1. -
Page 209: Effect Faux Led
Effect Faux LED Faux LED Effect Mode parameter DMX value = 55 This effect divides the image into a grid of circles that mimic an LED wall. The color of the center pixel in each cell defines the solid color for that circle. You can control “LED” size, background and color peaking. •... -
Page 210: Effect Faux Tile
Effect Faux Tile Faux Tile Effect Mode parameter DMX value = 56 This effect divides the image into a grid of tiles with simulated lighting at the edges. The color of the center pixel in each cell defines the solid color for that tile. You can control the number and spacing of tile, choose between a black and white grid and adjust color peaking. -
Page 211: Effect Film Burn
Effect Film Burn Film Burn/Unburn Effect Mode parameter DMX value = 93 This effect creates multiple burn patterns over the image. • Modifier 1: Adjust the burn-through rate. A DMX value of 65 begins creating a burn pattern with flames from 64 = slowest to 127 = fasted rate. -
Page 212: Effect Film Noise
Effect Film Noise Film Noise Effect Mode parameter DMX value = 94 This effect creates the effect of scratches on film. You can adjust the amount of “noise” as well as the tint and “jitter” to give the image an aged film effect. •... -
Page 213: Effect Film Roll
Effect Film Roll Film Roll Effect Mode parameter DMX value = 53 This effect scrolls the media file texture horizontally or vertically independent from the 3-D object it overlays, and allows you to control the scrolling speed and image scaling. •... -
Page 214: Effect Flip
Effect Flip Flip Effect Mode parameter DMX value = 83 This effect flips the media file texture horizontally or vertically independent from the 3-D object it overlays. • Modifier 1: DMX values from 0-127 have no effect. DMX values of 128 (50%) to = 255 (100%) flips the image horizontally. -
Page 215: Effect Fuzzifier
Effect Fuzzifier Fuzzifier Effect Mode parameter DMX value = 57 This effect offsets multiple images of the media file texture to blur the image, and lets you control image scaling at the same time. • Modifier 1: The default DMX value of 0 = no adjustment. Increasing DMX values blur the image horizontally to a maximum at a DMX value of 255 (100%). -
Page 216: Effect Gaussian Blur
Effect Gaussian Blur Gaussian Blur Effect Mode parameter DMX value = 81 More precise than Fuzzifier effect, this effect creates a true blur effect utilizing a Gaussian curve. Modifiers 1 and Modifier 2 combine to create the effect. When Modifiers 1 and 2 both have a value less than 0, there is no Blur. -
Page 217: Effect Gaussian Halo
Effect Gaussian Halo Gaussian Halo Effect Mode parameter DMX value = 99 This effect blurs the content from around a circular area in the center of the image toward the edges. NOTE:Adjusting Mod 3, then Mod 1 and finally Mod 2 will give the best results with the least CPU demand. •... -
Page 218: Effect Horizontal Mirror
Effect Horizontal Mirror Horizontal Mirror Effect Mode parameter DMX value = 40 This effect duplicates the image vertically and mirrors the image alongside its original. • Modifier 1: The default DMX value of 128 (50%) sets the center point of the edge where the duplicate images meet at the center of the screen. -
Page 219: Effect Image Scale And Rotate
Effect Image Scale and Rotate Image Scale and Rotate Effect Mode parameter DMX value = 52 This effect lets you scale and rotate the media file texture applied to a 3-D object’s surface independent of Graphic Object rotation you set with the Rotation parameters. This allows scaling and rotating outside the bounds of the 3D object. •... -
Page 220: Effect Lens Grid
Effect Lens Grid Lens Grid Effect Mode parameter DMX value = 91 This effect lets you view the image through a grid of virtual convex lenses. You can adjust the number, magnification and edge shading of the lenses over the image. •... -
Page 221: Effect Magnifying Lens
Effect Magnifying Lens Magnifying Lens Effect Mode parameter DMX value = 36 This effect applies spherical overlay that magnifies a portion of the texture to create a virtual convex lens effect over a portion of the image. You can adjust the size of the lens and move it over different areas of the image. •... -
Page 222: Effect Magnifying Lens 2
Effect Magnifying Lens 2 Magnifying Lens 2 Effect Mode parameter DMX value = 37 This effect applies spherical overlay that magnifies a portion of the texture to create a doubled virtual convex lens over a portion of the image. You can adjust the size of the lens and move it over different areas of the image. •... -
Page 223: Effect Matte
Effect Matte Mattes Effect Mode parameter DMX value = 144 The Global Effect lets you select from a variety of provided patterns to superimpose over the composite image. Modifier parameters select the pattern and effects for a matte. Modifier 1 Value Dmx Value = Black transparent, use matte color Dmx Value =... -
Page 224: Effect Pan And Scan
Effect Pan and Scan Pan and Scan Effect Mode parameter DMX value = 255 This effect Zooms into a still image and then, by changing position, you can pan across the image horizontally and vertically. It only functions on image sizes greater than 1024 x 1024 in at least one direction. •... -
Page 225: Effect Picture In Picture
Effect Picture in Picture Picture in Picture Effect Mode parameter DMX value = 35 This effect creates a window in the image containing a scaled down version of the same image and then lets you position it anywhere on the output plane. •... -
Page 226: Effect Pixelate
Effect Pixelate Pixelate Effect Mode parameter DMX value = 54 This effects divides the image into rectangles using the center pixel color of each “box” as its color. You can control the number of boxes, and adjust the vertical and horizontal dimensions. •... -
Page 227: Effect Pixel Twist
Effect Pixel Twist Pixel Twist Effect Mode parameter DMX value = 34 This effect introduces a twisted area to the image and allows to you size it and move it in the image. • Modifier 1:Controls the horizontal position of the twisted area’s centerpoint from 0=left edge to 255 (100%) = right edge of output. -
Page 228: Effect Prism
Effect Prism Prism Effect Mode parameter DMX value = 98 This effect imitates looking at the image through a prism that you define with the Modifier parameters. • Modifier 1: Sets the number of facets. A DMX value of 0 = no facets. The number of facets increase from 10 = three facets to 255 (100%) = maximum 16 facets. -
Page 229: Effect Raindrop
Effect Raindrop Raindrop Effects Mode parameter DMX value = 46 This effect simulates a raindrop distortion on a surface. • Modifier 1:Controls the drop size from 0 = no drop to 255 (100%) = maximum size. • Modifier 2:Sets the random number generator seed number. This lets you create a repeatable random sequence that will synchronize correctly when using the Collage Generator effect, see page 137. -
Page 230: Effect Scene Change
Effect Scene Change Scene Change Effect Mode parameter DMX value = 100 This effect creates transparency in video content based on the change in pixel color from one frame to the next. Modifiers 1 and 2 use the color difference between the current frame and the previous frame to derive an alpha value for the output frame. -
Page 231: Effect Shakenbake
Effect ShakeNBake ShakeNBake Effect Mode parameter DMX value = 61 This effect randomly vibrates the image. You can control the horizontal and vertical frequency. • Modifier 1:Adjusts random horizontal “shake” from the shortest refresh rate at a value = 0 to to a maximum at a DMX value of 255 (100%). -
Page 232: Effect Sinewave Wobbulation Circularx
Effect SineWave Wobbulation CircularX Sinewave, Circular Sinewave, Circular w/X Axis Wobbulation Effect Mode parameter DMX value = 64 Sinewave, Circular w/Y Axis Wobbulation Effect Mode parameter DMX value = 65 Sinewave, Circular w/Z Axis Wobbulation Effect Mode parameter DMX value = 66 These effects create a circular sinewave pattern and then vary the boundaries of the underlying object along the designated axis without affecting the media file that is applied as a texture. -
Page 233: Effect Sinewave Wobbulation Hozizontalx
Effect SineWave Wobbulation HozizontalX Sinewave, Horizontal Sinewave, Horizontal w/X Axis Wobbulation Effect Mode parameter DMX value = 67 Sinewave, Horizontal w/Y Axis Wobbulation Effect Mode parameter DMX value = 68 Sinewave, Horizontal w/Z axis Wobbulation Effect Mode parameter DMX value = 69 These effects create a horizontal sinewave pattern and then vary the boundaries of the underlying object along the designated axis without affecting the media file that is applied as a texture. -
Page 234: Effect Sinewave Wobbulation Verticalx
Effect SineWave Wobbulation VerticalX Sinewave, Vertical Sinewave, Vertical w/X Axis Wobbulation Effect Mode parameter DMX value = 70 Sinewave, Vertical w/Y Axis Wobbulation Effect Mode parameter DMX value = 71 Sinewave, Vertical w/Z Axis Wobbulation Effect Mode parameter DMX value = 72 This effect creates a Vertical sinewave pattern and then varies the boundaries of the underlying object along the X axis without affecting the media file that is applied as a texture. -
Page 235: Effect Slats Vertical
Effect Slats Vertical Vertical Slats Effect Mode parameter DMX value = 62 Horizontal Slats Effect Mode parameter DMX value = 63 These effects render the image in offset slats. • Modifier 1:Adjusts the number of slats from from a DMX value of 0 = no slats to 255 = the maximum number of slats. -
Page 236: Effect Texture Mixing
Effect Texture Mixing Texture Mixing Effect Mode parameter DMX value = 51 Use Texture Mixing to mix two media file outputs on one object. With this effect, you can cross fade the texture (media file content) from one active Graphic Object to the texture of another Graphic Object. When the Texture Mixing effect is selected in the example to the right, the media file output of Graphic Object 1 (minus applied effects) is selected and mixed to Graphic Object 2 with opacity = 50%. -
Page 237: Effect Texture Ripple
Effect Texture Ripple Texture Ripple, Asymmetrical Circular Effect Mode parameter DMX value = 25 This effect varies the distance of reference points to the applied media file texture around the Z axis without affecting the underlying object to create an effect of wavy ripples moving out from the object’s center. •... -
Page 238: Effect Texture Ripple Circular
Effect Texture Ripple Circular Texture Ripple, Circular Effect Mode parameter DMX value = 24 This effect varies the distance of reference points to the applied media file texture around theZ axis without affecting the underlying object. This creates an effect of concentric rippling out from the object center. •... -
Page 239: Effect Texture Ripple Horizontal
Effect Texture Ripple Horizontal Texture Ripple, Horizontal Effect Mode parameter DMX value = 22 This effect varies the distance of reference points to the applied media file texture around theX axis without affecting the underlying object. • Modifier 1:Adjusts the size (amplitude) of the ripple from 0 = no adjustment to 255 (100%) = maximum size. •... -
Page 240: Effect Texture Ripple Vertical
Effect Texture Ripple Vertical Texture Ripple, Vertical Effect Mode parameter DMX value = 23 This effect varies the distance of reference points to the applied media file texture around theY axis without affecting the underlying object. • Modifier 1:Adjusts the size (amplitude) of the ripple from 0 = no adjustment to 255 (100%) = maximum size. •... -
Page 241: Effect Texture Shift
Effect Texture Shift Texture Shift Effect Mode parameter DMX value = 88 This effect creates offset image elements by shifting the texture based upon selected color values. • Modifier 1:Shifts the texture left to right • Modifier 2:Shifts the texture up to down •... -
Page 242: Effect Tilingon
Effect TilingOn Tiling On Effect Mode parameter DMX value = 48 Tiling varies the number of times a media file is applied as a texture to an object. This effect works best on objects that have an undistributed surface area. •... -
Page 243: Effect Transparent Wipe
Effect Transparent Wipe Transparent Wipes Effect Mode parameter DMX value = 33 Transparent wipes let you open one graphic to reveal another graphic behind it. You can select from six options and the center line of the effect. • Modifier 1:Adjusts the area of the wipe from the smallest at a value of 0 to the largest at a value of 255 (100%). •... -
Page 244: Effect Zoom Blur
Effect Zoom Blur Zoom Blur Effect Mode parameter DMX value = 59 Zooms into a position on the image with a mult-image blurring effect. You can control the position of the zoom center on the image. • Modifier 1:The default DMX value of 128 (50%) = no adjustment. Values below the midpoint move the horizontal center of the zoom right to 0 = maximum. -
Page 245: Cma - Install And Launch
CMA - Install and Launch The latest version of Content Management Application software that is available on the High End Systems website that communicates remotely with all MMS100, Axon HD, Axon HD Pro and DLHD's over an Ethernet network to: •... -
Page 246: Cma - Server Configuration
CMA - Server Configuration Server Tab Display Connectors... - Page 247 ArtNet and I/O...
- Page 248 Info...
-
Page 251: Cma - Server Id
CMA - Server ID The Fixture ID is a unique number used in the control protocol to identify specific fixtures for synchronization functions. -
Page 252: Cma - Network Auto Discovery
CMA - Network Auto Discovery When a DL.3, DL.2 fixture, an Axon or AxonHD media server is connected to an Ethernet network, it sends out “Discovery” messages. These messages are received by other media servers on the link as well as the CMA software. The messages contain information that allows the media servers to communicate with each other, and the CMA to communicate with all the units on the network. -
Page 253: Cma- Viewing The Dmx Patch Summary
CMA- Viewing the DMX Patch Summary The DMX Summary lets you view all the content for a single server in a table format with the following details: • Whether the content is a User Media file/folder, a Stock Media file/folder, or a Object •... -
Page 254: Cma - Server Configuration (All View)
CMA - Server Configuration (All View) To view configuration information for all Servers on the network, select All Configurations in the left pane. The right pane now displays configuration values for all the media servers on the fixture link in a sortable table. Click in the column heading to sort by that column’s values. -
Page 255: Cma - User Content Management
CMA - User Content Management User Content is added via the CMA application. -The CMA allows addition to the User Content folder on the internal Drive -The CMA allows Folders to be created, with an applied DMX value -The CMA allows Files to be imported into the User Created folders by copying and pasting -Once files are copied, DMX values are assigned to the files to allow for recall. -
Page 256: Cma - User Content Scanning
CMA - User Content Scanning Incorrectly encoded content can cause issues with playback performance, network synchronization, and graphics engine stability. To prevent this, the CMA automatically scans content locally on your computer (or the Axon media server) before actually loading it. If no warnings or errors are found, the content is loaded on to the server. If warnings or errors are found, a dialog box describes specific content problems. -
Page 257: Cma - User Content
CMA - User Content Naming and Deleting User Content Files and Folders You can Rename any user content folder or file displayed in the right pane of the CMA window using the pull down Media Folders, Objects, or 3D Warp menu or with a right click selection. Use the standard Windows operating system naming conventions. - Page 258 Moving User Content Files and Folders User content can be easily moved between fixtures or between your local drive and fixtures. Which method you use depends on: • How much content you want to move • What existing server content you want to preserve •...
-
Page 260: Cma - Stock And User Object Files
CMA - Stock and User Object Files The Object parameter selects the 3-dimensional object component of an image. Object files are the 3-D object shapes used to build a total image. The graphics engine supports a combined total of 255 stock and user-created object files. Stock Objects have a fixed DMX value and cannot be edited. -
Page 261: Cma - Deleting User Content
CMA - Deleting User Content To delete ALL User Content from a server: • In the CMA Client Window select All Server in the left pane. • Select the Server with the content you want to delete in the right pane. •... -
Page 262: Mms100 Protocol
MMS100 Protocol (version 1.1 JM 01/01/15) Reference the sections below for DMX channel assignments. (Click Section Title to expand or collapse the section) Motion Protocol Motion Protocol DMX Channel Name Note Default Range Action 1 + 2 Pan Coarse 16 bit Channel... - Page 263 Effect 4 Modifier 1 0 thru Effect 4 Modifier 2 0 thru Effect 4 Modifier 3 0 thru Sync To Indexed. No Sync Target, Output is Free- running 1 thru Fixture ID to use as a Sync target fixture ID Collage Type Indexed.
- Page 264 Framing Bottom Right Y 0 thru barn door, bottom right y Framing Bottom Left X 0 thru barn door, bottom left x Framing Bottom Left Y 0 thru barn door, bottom left y Framing Fade Top 0 thru Applies Gradient to Framing Shutters Framing Fade Right 0 thru Applies Gradient to Framing Shutters...
- Page 265 1 thru 40 defined sync modes 41 thru reserved, defaults to 0, no selection Black Level 0 thru 255 Contrast 0 thru 255 Effect 1 Indexed. Note 0 thru 255 0 Default safe, no effect selected Effect 1 0 thru 255 Modifier 1 Effect 1 0 thru 255...
- Page 266 32769 0 degrees absolute … variable rotation angle 49151 720 degrees absolute 49152 rotation stop 49153 rotation cw slow … 65535 rotation cw fast 96 + 97 89 + 90 X Scale Coarse 32768 0 max small 1:10 X Scale Fine 32786 65535 max large 10:1...
- Page 267 97 - 127, increase intensity with 127 maximum intensity increase. 128 - 255 Reserved.Defaults to 0. Note 3 - Alignment Pattern Control Note 3 Alignment Pattern Control Graphics out. Normal blending per selected blend adjustment. Graphics out. Blend area defaulted to black. Graphics out.
- Page 268 Direction Asymmetric Circular Texture Amplitude Frequency Phase Speed and Ripple. Direction Transparent Color, Fine Green Blue Transparent Color, Medium Green Blue Transparent Color, Coarse Green Blue Inverse Transparent Color, Fine Red Green Blue Inverse Transparent Color, Green Blue Medium Inverse Transparent Color, Green Blue Coarse...
- Page 269 Particle system 2, (reserved) (reserved) (reserved) (reserved) Particle system 3, (reserved) (reserved) (reserved) (reserved) Prism Number of Facets Index of Refraction Rotation Gaussian Halo Sample Distance Number of Filter Shape of Curve Passes Scene Change Scale RGB RGB to Alpha Scale Color After Alpha YXY Luminance Scaling Luminance Scale...
- Page 270 Horizontal Corner Opening Towards Geometry Correction - Correction Horizontal Center Vertical Center Horizontal Corner Opening Away Warp Map Output Warp Number Horizontal Scale Vertical Scale Optical Lens Aberration Pincushion / Barrel Pincushion / Barrel (reserved) Correction Correction Correction Auto Z-rotation. Rotation Mode 16bit rotation value 16bit rotation value...
- Page 271 Toon Edge Color Reduction Contrast Enhancement Edge Detection Sensitivity Color Deconverge Red Pixels Up Green Pixels Down Blue Pixels Down Left Right Horizontal Mirror, Mirror Center (not used) (not used) Swap Color RGB to BGR Green Blue Swap Color RGB to RBG, Green Blue Swap Color RGB to GRB...
- Page 272 HS to Gray Saturation Tolerance (Min to Max) HS to Transparent Saturation Tolerance (Min to Max) HS Selected to Transparent Saturation Tolerance (Min to Max) Texture Shift Horizontal Shift Vertical Shift Color and Scale Lens Grid Magnification Edge Shading Number of Lens EdgeDetect BW 2 Sample Distance Edge Threshold...
- Page 273 sync to layer 4 movie time and rotation sync to layer 5 movie time and rotation sync to layer 6 movie time and rotation sync to layer 7 movie time and rotation sync to layer 8 movie time and rotation sync to layer 9 movie time and rotation sync to layer 10 movie time and rotation 31 thru 255...
-
Page 274: Control Card Replacement
Control Card Replacement There are two control cards in the electronics housing on the MMS100. To replace these you will need to open the electronics box, unplug all connections to the boards and un-mount the cards. Opening the Electronics housing •... - Page 275 • Be sure to note all wiring connections. Check that the wiring harness is labeled, and matches the labels on the board before removing. • Remove the connectors carefully. • Remove the 4 mounting screws that mount the Box Card to the lid. (See Photo) •...
- Page 276 Head Card Removal • The Head Card is mounted to the chassis side, and interfaces with the DMX connectors among other components. • Remove the DMX daughter board is required, as this allows for access to the lower mounting screw of the Head Card.
- Page 277 Installation. • Follow the above steps in reverse order. • Install the Head Card, attach all connectors • Install the DMX Daughter Card, attach connectors • Install the Box Card, Install all connectors • Close lid, note wire routing and wire pinch points •...
-
Page 278: Mechanical Specifications
Mechanical Specifications Fixture Dimensions: 834mm x 581mm x 663mm (33.2in x 22.9in x 26.1in) Weight: 24.5 kg (54 lbs) Shipping Pallet Dimensions: 711mm x 737 mm x 1168mm ( 28in x 29 in x 46 in) Weight (Fixture + Shipping Pallet): 43kg (95 lbs)
Need help?
Do you have a question about the MMS100 and is the answer not in the manual?
Questions and answers