Table of Contents
Advertisement
Quick Links
Advertisement
Table of Contents

Related Manuals for High End Systems SolaFrame 3000


Summary of Contents for High End Systems SolaFrame 3000
- Page 1 Automated Luminaire User Manual Version 1.3 — Revision A...
- Page 2 United States, China, the European Union, the Madrid Protocol, and Russia. High End Systems is registered in the United States and is pending registration in the European Union, the United Kingdom, and the Madrid Protocol. The High End Systems globe logo is pending registration in the United States and China.
-
Page 3: Table Of Contents
Table of Contents Introduction Contacting High End Systems Headquarters Technical Support Patents Terms and Conditions and Warranty Information Product Modification Warning Mise En Garde Contre La Modification Du Produit Produktmodifikationswarnung Avvertenza Sulla Modifica Del Prodotto Advertencia De Modificatión Del Producto... - Page 4 DMX Address Info Menu Set Menu Test Menu Preset Menu Error Codes Cleaning and Maintenance SolaFrame 3000...
-
Page 5: Introduction
24-hour emergency support is available. Contact High End Technical Services at +1 (512) 836-2242. Patents NOTICE OF INTELLECTUAL PROPERTY RIGHTS High End Systems, Inc. products are protected by one or more patents listed on the High End Systems, Inc. website: https://www.highend.com/patents and/or are subject to one or more pending patents. -
Page 6: Mise En Garde Contre La Modification Du Produit
Sicherheitsnormen verstoßen. Avvertenza Sulla Modifica Del Prodotto I prodotti di High End Systems sono stati progettati e fabbricati per soddisfare i requisiti delle normative di sicurezza statunitensi ed internazionali. Qualsiasi modifica al prodotto potrebbe pregiudicare la sicurezza e rendere il prodotto non conforme agli standard di sicurezza pertinenti. -
Page 7: Important Safety Information
Please read all instructions prior to assembling, mounting, and operating this equipment. Continued and safe operation of this fixture is the responsibility of the operator. This manual will give tips for that continued safe operation. At any time please contact High End Systems technical support for any safety concerns. -
Page 8: Fixture Overview
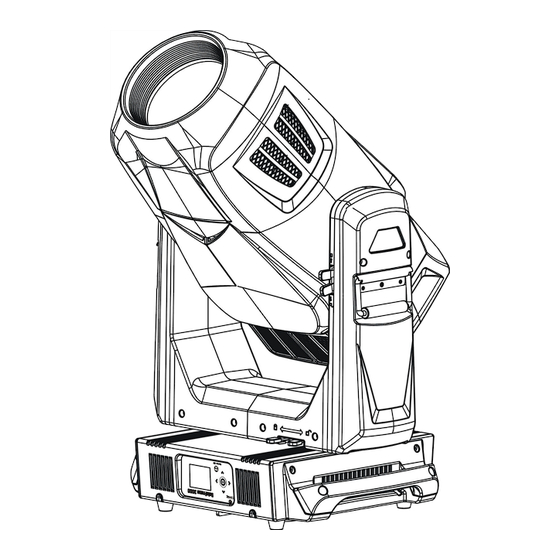
Fixture Overview For technical specifications of the SolaFrame 3000 fixture, see the technical data sheet: https://www.highend.com/documentation/SolaFrame 3000/SolaFrame3000-TDS.pdf 1: Lens 2: Tilt lock 3: Retractable yoke handle 4: Pan lock 5: Display 6: [MODE/ESC] button 7: Left button 8: Down button 9: [Enter] button... -
Page 9: Dimensions
Dimensions Dimensions shown are listed as inches [millimeters]. Fixture Overview... -
Page 10: Safety Considerations
In order to ensure safe operation, follow the safety instructions and warning notes in this user manual and any instructions from the manufacturer representative. The SolaFrame 3000 fixture is intended for professional use only. Not for residential use. • Read the entire manual before using this equipment. -
Page 11: General Operation And Use Guidelines
The light source of this fixture is not replaceable. When the light source reaches its end of • life, replace the fixture. If you do not provide power to the fixture, the battery on the SolaFrame 3000 may drain • fully after 7–10 days. After you provide power to the fixture, the battery will recharge within 3–4 hours. -
Page 12: Install The Fixture
CAUTION: Follow all local codes and recommended practices by the Authority Having Jurisdiction. The installation must only be carried out by a qualified person. You can install the fixture in any of the orientations shown below. SolaFrame 3000... - Page 13 Assemble the third-party clamp or Omega clamp to the Omega bracket and secure together using appropriately sized hardware (not provided). Align the assembled Omega bracket and quick-lock fasteners into the respective holes on the bottom of the fixture upper enclosure. Tighten each of the quick-lock fasteners fully, turning clockwise.
-
Page 14: Power
0.99 1.51 1316 1324 0.98 1.50 CAUTION: Using this fixture below 100V on a 15 A breaker may cause the breaker to trip. Ensure that the circuit can handle the fixture's maximum potential draw before you connect it. SolaFrame 3000... -
Page 15: Dmx Control
DMX Control The SolaFrame 3000 fixture operates on standard DMX512 control bus, controlled by a DMX console. A SolaFrame 3000 fixture requires 49 channels of DMX512. Attach the fixture to the control bus using a two-core, shielded cable with a 5-pin XLR connector (Belden 9729 is preferred). -
Page 16: Connect Dmx Cables To Fixture
Connect the female XLR connector of the DMX data cable to the DMX In connector of the first fixture on the DMX control run. Continue linking the remaining fixtures connecting a cable from the DMX Out connector of each fixture to the DMX In connector of the next fixture on the control run. SolaFrame 3000... -
Page 17: Terminate Dmx
1, you could set the second fixture to 50 (49+1), the third to 99 (49+50), and so on. DMX Channels The most current DMX Control Protocol data for the SolaFrame 3000 can be found on the High End Systems, Inc. website: https://www.highend.com/documentation/SolaFrame 3000/SolaFrame3000-protocol.pdf... -
Page 18: Configure The Fixture
Configure the Fixture Configure SolaFrame 3000 fixtures through the onboard user interface. Navigate the User Interface Press and hold the [MODE/ESC] button until the display flashes. (The display is powered by battery when the fixture has no power.) Browse the menu by pressing the up, down, left, or right navigation buttons. -
Page 19: Set Fixture Parameters
Set Fixture Parameters This section provides instructions to configure and set up the SolaFrame 3000. See Navigate the User Interface on the previous page for information on the navigation buttons. Provide power to the fixture before configuring it. If you do not provide power, the fixture will use battery power to power the user interface. - Page 20 Displays the Ethernet IP address for the fixture. You can modify this value in the Set menu. See Access Service Settings on page 18. View Software Version Navigate: Main Menu → Info → Software Ver Displays the software version for the fixture. SolaFrame 3000...
-
Page 21: Set Menu
Set Menu Set the Status Options Navigate: Main Menu → Set → Status Parameter Value Description Close • Hold Control mode when DMX is absent. The default • No DMX Mode value is Hold. Auto • Music • Reverse the pan movement of the fixture. The •... - Page 22 Default setting is off. Set the Fans Mode Navigate: Main Menu → Set → Fans Mode Setting Select the fan mode for the fixture: Standard • Studio (reduces fan noise, but decreases fixture output by ~30%) • Continuous • SolaFrame 3000...
- Page 23 Update Fixture Firmware Using the USB Port Navigate: Main Menu → Set → USB Update Fixture firmware updates are available on the High End Systems, Inc. website at highend.com. Save the firmware update file to a USB stick. Insert the stick in the fixture base (see Fixture Overview on page 4...
-
Page 24: Test Menu
100%. Re-Calibrate an Individual Feature Navigate: Main Menu → Test → Calibration Please contact technical support at High End Systems, Inc. before using this parameter. See Contacting High End Systems on page 1. You must enter the Calibration PIN to access this parameter. The default Calibration PIN is 050. -
Page 25: Preset Menu
Master fixture. Preset programming requires one fixture to act as the Master. All other SolaFrame 3000 fixtures that are connected to the designated Master fixture can then receive Auto Programs from the Master fixture. - Page 26 Edit a Scene or Capture (Record) a Scene Navigate: Main Menu → Preset → Edit Scenes The SolaFrame 3000 fixture provides 250 pre-programmed Scenes that you can use or edit to build an Auto Program. Each Scene is a snapshot of a set of fixture parameters (for example, color, beam quality and pattern, intensity, focus, etc.) that you can assign to a step in an Auto...
-
Page 27: Error Codes
Error Codes When you turn on the fixture, it runs a self-test and displays any errors. Animation Wheel This message displays after the reset of the fixture if any of the following conditions exist: Animation_Rot Wheel This message displays after the reset of the fixture if any of the following conditions exist: if the magnetic-indexing circuit malfunctions (optical or magnetic sensor failure) •... - Page 28 (optical or magnetic sensor • failure) if the stepper motor is defective or the related IC driver on the main PCB has failed • if the Prism_Rot movement is not located in the default position after the reset • SolaFrame 3000...
- Page 29 Tilt movement This message displays after the reset of the fixture if any of the following conditions exist: if the fixture head magnetic-indexing circuit malfunctions (optical or magnetic sensor • failure) if the stepper motor is defective or the related IC driver on the main PCB has failed •...
-
Page 30: Cleaning And Maintenance
Have an approved electrician check the fixture each quarter to ensure that circuit contacts are in good condition. This prevents poor circuit contacts and the overheating that results from it. SolaFrame 3000... - Page 31 Cleaning and Maintenance...
- Page 32 Tel +512 836 2242 n Fax +512 837 5290 n 24 Hour Urgent Support: +512 836 2242 Web: highend.com n © 2018 Electronic Theatre Controls, Inc. Product information and specifications subject to change. ETC intends this document to be provided in its entirety. SolaFrame 3000 User Manual n Version 1.3 n Rev A n Released 2018-07...
Need help?
Do you have a question about the SolaFrame 3000 and is the answer not in the manual?
Questions and answers