Otto Bock Kimba Neo Instructions For Use Manual
Hide thumbs
Also See for Kimba Neo:
- Instructions for use manual (56 pages) ,
- Service manual (44 pages) ,
- Instructions for use manual (56 pages)

Related Manuals for Otto Bock Kimba Neo


Summary of Contents for Otto Bock Kimba Neo
- Page 1 Kimba Neo, Kimba Cross, Kimba Inline Instructions for use ....................
- Page 2 Kimba Neo, Kimba Cross, Kimba Inline...
-
Page 3: Table Of Contents
............................6.1.2.1 Equipment package ..........................6.1.3 Kimba Inline ............................Retrofitting the respirator platform (Kimba Neo only) ................6.2.1 Installation with a seat facing opposite to direction of travel ..............6.2.2 Installation with a seat facing in the direction of travel ................ - Page 4 Seating unit ............................8.4.2 Seating shell interface ......................... 8.4.3 Adjusting the seat tilt ........................... 8.4.4 Push bar ............................8.4.4.1 Adjusting the push bar ......................... 8.4.5 Wheel lock ............................8.4.5.1 Engaging the wheel lock ........................Kimba Neo, Kimba Cross, Kimba Inline...
- Page 5 8.4.7 Disassembly and transport ........................8.4.8 Use in vehicles for transporting persons with reduced mobility ..............Care ..............................8.5.1 Detaching/attaching the frame padding for cleaning (Kimba Neo only, option) ..........8.5.2 Cleaning ............................8.5.2.1 Cleaning by hand ..........................8.5.2.2 Cleaning in a washing chamber ......................
-
Page 6: Foreword
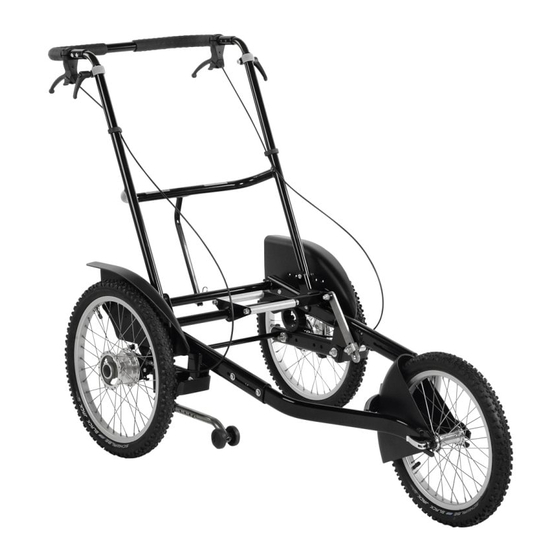
2.2.1 Kimba Neo INFORMATION The Kimba Neo outdoor mobility base is available with and without separate seat angle adjustment (see fig. 1 and ##03432). On an outdoor mobility base without separate seat angle adjustment (##03432), the Kimba Neo seat ing unit must be used in order to use the seat tilt. - Page 7 Product description Kimba Neo – outdoor mobility base for alternative seating systems with “swivelling” front wheels option 1 Plug-on rear wheel 6 Adjustable push bar 2 “Swivelling” front wheel (option) 7 Release handle, folding mechanism 3 Swivel lock 8 Separate seat angle adjustment on frame...
-
Page 8: Kimba Cross
Product description 2.2.2 Kimba Cross Kimba Cross – outdoor mobility base for Kimba Neo seating unit and alternative seating systems 1 Frame 2 Front wheel (swivelling) 3 Front wheel (fixed) 4 Plug-on rear wheel/drum brake 5 Push bar Kimba Neo, Kimba Cross, Kimba Inline... -
Page 9: Kimba Inline
Intended use 2.2.3 Kimba Inline Kimba Inline – outdoor mobility base for Kimba Neo seating unit and alternative seating systems 1 Frame 2 Front wheel (swivelling) 3 Drum brake 4 Push bar 3 Intended use The safe use of the product can only be ensured in case of intended use in accordance with the information con... -
Page 10: Indications
► Do not modify the settings established by the qualified personnel. Only the settings described in the section “Use” in these instructions for use may be adjusted independently. ► In case of problems with the settings, please contact the qualified personnel who adjusted your product. Kimba Neo, Kimba Cross, Kimba Inline... - Page 11 Tipping over, falling of the user due to shift in centre of gravity ► Please note that any additional load may have a negative impact on the stability of the rehab buggy. ► Do not hang heavy bags or the like on the push bar/push handles. Kimba Neo, Kimba Cross, Kimba Inline...
- Page 12 ► Pay attention to diligent skin care and pressure redistribution during interruptions in using the product. ► If skin damage or other problems occur during use, stop using the product. Consult the qualified personnel. Kimba Neo, Kimba Cross, Kimba Inline...
- Page 13 Lack of maintenance User falling or tipping over due to lack of maintenance ► Check that the product is working correctly before each use. ► Observe the specified maintenance intervals (see Page 53, "Maintenance" section). Kimba Neo, Kimba Cross, Kimba Inline...
-
Page 14: Side Effects
YYYY = year of manufacture; MM = month of manufacture; DD = day of manufacture UDI-PI to GS1 standard; UDI = Unique Device Identifier, PI = Product Identifier UDI-DI to GS1 standard; UDI = Unique Device Identifier, DI = Device Identifier Kimba Neo, Kimba Cross, Kimba Inline... -
Page 15: Kimba Cross, Kimba Inline
4.6.2 Warning labels Label Meaning Attention: Please observe the maximum load capacity of the outdoor mobility base! (See the section "Technical data".) Fixation point to attach the product in vehicles for transporting persons with reduced mobility Kimba Neo, Kimba Cross, Kimba Inline... -
Page 16: Delivery
The standard model can be fitted to the user's personal requirements thanks to a large range of options. For use of these options: see Page 25 ff. 5.3 Storage 5.3.1 Storage during daily use The product should always be stored so it is protected against external influences. Kimba Neo, Kimba Cross, Kimba Inline... -
Page 17: Storage During Extended Disuse
1) Unfold the push bar (see fig. 5, item 1). To unfold the push bar: see Page . 2) Unfold the rehab buggy by pulling on the push bar (see fig. 5, item 2; see fig. 6). → The release handles of the folding mechanism engage automatically after unfolding (see fig. 5, item 3). Kimba Neo, Kimba Cross, Kimba Inline... -
Page 18: Kimba Cross
4) Adjust the desired angle of the push bar using the hole in the back brace (see fig. 9). 5) Insert the locking pin through the hole in the back brace and through the lug of the adapter. 6) Secure with the clip (see fig. 10). Kimba Neo, Kimba Cross, Kimba Inline... -
Page 19: Equipment Package
2) Close the eccentric lever of the quick-release axle. Optional: Adjust the clamping pressure by turning the quick-release lever or the counter nut. 6.1.2.1 Equipment package The equipment package includes: • Roll bar • Pennant • Lighting (taillight red; rear reflector red) • Reflectors, self-adhesive, white • Spoke reflectors Kimba Neo, Kimba Cross, Kimba Inline... -
Page 20: Kimba Inline
1) Fold the push bar forward (see fig. 106). 2) Pull up the lock slide and allow it to engage on the frame (see fig. 105). 6.2 Retrofitting the respirator platform (Kimba Neo only) WARNING Improper use in vehicles for transporting persons with reduced mobility Severe accidental injuries caused by use with untested product combinations ►... -
Page 21: Installation With A Seat Facing Opposite To Direction Of Travel
2) As shown in the image, glue the hook strap onto the angle tabs of the T2 respirator platform (see fig. 19). 3) Set the T2 respirator platform onto the front frame tube and axle tube (see fig. 20). Kimba Neo, Kimba Cross, Kimba Inline... - Page 22 4) Set the T1 respirator platform onto the front frame tube (see fig. 24, item 1). 5) Engage the supports of the T1 respirator platform in the lashing points and install (see fig. 25; see fig. 24 item 2). → The T1 respirator platform is installed (see fig. 24). Kimba Neo, Kimba Cross, Kimba Inline...
-
Page 23: Installation With A Seat Facing In The Direction Of Travel
1) As shown in the image, glue the hook strap onto the angle tabs of the T1 respirator platform (see fig. 19). 2) Screw the supports in place under the T1 respirator platform (see fig. 29, see fig. 30). Kimba Neo, Kimba Cross, Kimba Inline... -
Page 24: Delivery
The instructions for use must be given to the user/attendant upon delivery of the wheelchair. Depending on equipment: The supplied instructions for use for accessories have to be handed over in addi • tion. Kimba Neo, Kimba Cross, Kimba Inline... -
Page 25: Use
Serious injuries to the user due to faulty operation ► The product can be equipped with the Kimba Neo seating unit or alternative seating systems. Observe the information in the separate instructions for use for the seating unit/seating system in all cases. -
Page 26: Alternative Seating Systems Without Own Seat Angle Adjustment
With alternative seating systems that do not have a seat angle adjustment feature, the seat angle can be adjusted using a rotary knob on the Kimba Neo outdoor mobility base. The alternative seating system can be adjusted as needed within the range from –10° to +40 1) Stand to the left of the rehab buggy and hold on to the back support for safety reasons (see fig. 36, item 1). -
Page 27: Seating Shell Interface
647G250=* seating shell interface. ► Operation when using the outdoor mobility base with a Kimba Neo seating unit is described in more detail in the 647H893=* instructions for use. -
Page 28: Push Bar
► Before the user gets in or out, always engage and check the wheel lock. ► Engage the wheel lock to prevent the rehab buggy from moving on uneven ground or during transfers (e.g. into a car). Kimba Neo, Kimba Cross, Kimba Inline... -
Page 29: Operating The Wheel Lock
→ Counterclockwise: the suspension becomes softer. 2) Check that the adjustment rings are positioned the same on both sides. The 4 marks can be used for orienta tion (see fig. 44, item 2; see fig. 45, item 1). Kimba Neo, Kimba Cross, Kimba Inline... -
Page 30: Additional Options
2) Twist the hook-and-loop strap down and push the frame padding over the folding mechanism all the way to the release handles. INFORMATION: Before folding up the outdoor mobility base, remove the frame pad ding, so that the folding mechanism is clear. Kimba Neo, Kimba Cross, Kimba Inline... -
Page 31: Storage Bag
The buggy board (see fig. 50) allows children to ride safely while standing on their own feet and offers sufficient standing room. All information about the use, attachment and adjustment of the buggy board is contained in the manufacturer's instructions for use enclosed with the product. Kimba Neo, Kimba Cross, Kimba Inline... -
Page 32: Platform For Respirator
(see Page 56). The respirator platform is for attaching respiration equipment. This is secured with straps using the slots on the respirator platform. The option has been installed in the following way, depending on the order: Kimba Neo, Kimba Cross, Kimba Inline... -
Page 33: Cup Holder
Damage to the product, problems with unfolding due to improper loading ► Never place heavy objects onto the folded product. ► Make sure that objects placed in the storage bag cannot be crushed while folding. Kimba Neo, Kimba Cross, Kimba Inline... -
Page 34: Use In Vehicles For Transporting Persons With Reduced Mobility
INFORMATION The product can be equipped with the Kimba Neo seating unit or alternative seating systems. In this case, please observe the information in the separate instructions for use for the seating system. The rehab buggy must be prepared for transport in a passenger vehicle: 1) Pull the release handle of the folding mechanism up (see fig. 57). -
Page 35: Required Accessories
8.2.9.1 Required accessories To secure the Kimba Neo outdoor mobility base for use in a vehicle for transporting persons with reduced mobility, four vehicle side restraint belts are attached to the lashing points. •... -
Page 36: Using The Product In A Vehicle
► If necessary, instruct the qualified personnel on the following information. Further information on using the product Kimba Neo in a vehicle for transporting persons with reduced mobility is found in the sections that follow. 8.2.9.3 Adjusting the seating unit Before using the product in a vehicle for transporting persons with reduced mobility, the seating unit must be adjusted in the driving direction (so the user faces forward in the direction of travel). -
Page 37: Alternative Seating Systems
(see fig. 68, item 2). 3) Turn the bottom rotary knob to the right to secure the back angle without the back securing bolt (see fig. 66; Adjusting the backrest angle). Kimba Neo, Kimba Cross, Kimba Inline... -
Page 38: Alternative Seating Systems
7) For “swivelling” front wheel option only: turn the caster wheels to face forwards for improved stability (see fig. 71). 8) Remove all prohibited components from the product (see Page 40). 9) Adjust the suspension to “firm” (see Page 29). → The restraint belts are correctly attached (see fig. 71). Kimba Neo, Kimba Cross, Kimba Inline... -
Page 39: Securing The User In The Product
30° and 45° to the horizontal can also be chosen (see fig. 75). 3) Secure the shoulder harness on the mounting point/pin provided on the lap belt (see fig. 76). Kimba Neo, Kimba Cross, Kimba Inline... -
Page 40: Restrictions For Use
► Stow all dismantled options securely in the vehicle for transporting persons with reduced mobility. The following options must be detached from the Kimba Neo outdoor mobility base and from the Kimba Neo seat ing unit and securely stowed prior to transport in a vehicle for transporting persons with reduced mobility: •... -
Page 41: Seating Shell Interface
647G250=* seating shell interface. ► Operation when using the outdoor mobility base with a Kimba Neo seating unit is described in more detail in the 647H893=* instructions for use. -
Page 42: Adjusting The Push Bar Height
1) Pull the wheel lock levers to apply the drum brakes (see fig. 81, item 1). 2) By simultaneously moving the small wheel lock levers down, lock the wheel locks (see fig. 81 item 2). 3) Activate the wheel lock levers again to release the wheel locks (see fig. 81 item 1). Kimba Neo, Kimba Cross, Kimba Inline... -
Page 43: Adjusting The Wheel Lock
2) Push in or pull out the front frame to adjust it in the range of 800 mm to 920 mm (see fig. 84 and see fig. 85). 3) Reposition and tighten the two Allen screws of the oval tube front frame on both sides. Kimba Neo, Kimba Cross, Kimba Inline... -
Page 44: Use As A Bicycle Trailer
8) Screw the adjustment nut of the quick-release mechanism onto the clamp axle by at least 5 turns. INFORMATION: Observe the instructions for use of your bicycle and/or quick-release mechanism. Kimba Neo, Kimba Cross, Kimba Inline... -
Page 45: Coupling The Trailer To The Bicycle
2) Insert the splash guard adapter and screw it in place (see fig. 89, item 1). 3) Insert the splash guard into the receiving holes (see fig. 90). 4) Insert and lock the rear wheels. 8.3.8.3 Anti-tipper The anti-tipper prevents the mobility base from tipping too far backward. Kimba Neo, Kimba Cross, Kimba Inline... -
Page 46: Storage Bag
► Never place heavy objects on the folded product. INFORMATION The product can be equipped with the Kimba Neo seating unit or alternative seating systems. In this case, please observe the information in the separate instructions for use for the seating system. -
Page 47: Use In Vehicles For Transporting Persons With Reduced Mobility
► Information on the current status of our measures is available from the qualified personnel. The product Kimba Cross has not been approved by the manufacturer for use as a seat in a vehicle for transporting persons with reduced mobility. Kimba Neo, Kimba Cross, Kimba Inline... -
Page 48: Kimba Inline
647G250=* seating shell interface. ► Operation when using the outdoor mobility base with a Kimba Neo seating unit is described in more detail in the 647H893=* instructions for use. -
Page 49: Adjusting The Seat Tilt
1) Loosen the clamping lever on both sides (see fig. 100). 2) Press the two buttons on both sides simultaneously (see fig. 100, item 1). 3) Move the push bar to the desired position. 4) Tighten the clamping lever (see fig. 100). Kimba Neo, Kimba Cross, Kimba Inline... -
Page 50: Wheel Lock
2) Screw in the adjustment screw (see fig. 103, item 2) until the scraping noise at the rear wheel disappears and the wheel runs freely. 3) Tighten the counter nut (see fig. 103, item 1) until the adjustment screw is fixed. → The braking force of both rear wheels must be adjusted equally. Kimba Neo, Kimba Cross, Kimba Inline... -
Page 51: Adjusting The Wheelbase
► Never place heavy objects on the folded product. INFORMATION The product can be equipped with the Kimba Neo seating unit or alternative seating systems. In this case, please observe the information in the separate instructions for use for the seating system. -
Page 52: Use In Vehicles For Transporting Persons With Reduced Mobility
► Check the driving behaviour of the product after cleaning it. 8.5.1 Detaching/attaching the frame padding for cleaning (Kimba Neo only, option) The frame padding can be removed for care and maintenance of the product. 1) Open the hook-and-loop closure on the frame padding. -
Page 53: Cleaning
The product may not be used if defects are noted. This applies in particular in case of instability of the product or altered driving characteristics as well as problems with the user's seating position or the stability of the seat. Inform the qualified personnel promptly for the rectification of defects. Kimba Neo, Kimba Cross, Kimba Inline... -
Page 54: Maintenance Intervals
(sewing machine oil). • The piston rods of the springs should be lightly oiled with a resin-free, thin oil regularly (Kimba Neo only). • If the rehab buggy gets wet, it should be rubbed dry again. -
Page 55: Information On Re-Use
The design, manufacturing and requirements for the intended use of the product are based on the expected life time. These also include the requirements for maintenance, ensuring effectiveness and the safety of the product. Kimba Neo, Kimba Cross, Kimba Inline... -
Page 56: Technical Data
Please note: the load may differ between the outdoor mobility base and the seating unit. For the combination of the Kimba Neo outdoor mobility base and Kimba Neo seating unit: Maximum user weight of the seating unit (40 kg) plus the weight of the seating unit itself (7 kg, for •... -
Page 57: Kimba Inline
900x640x480 Please note: The load may differ between the outdoor mobility base and the seating unit. Combination of the Kimba Inline outdoor mobility base and Kimba Neo seating unit: • Permitted load for the seating unit (max. 40 kg) + own weight of the seating unit, size 1 (7.5 kg) = 47.5 kg. - Page 58 Maximum inclination angle on which the product will 6 (dynamic stability in all directions) remain stable [°] 9 (static stability in all directions, also when wheel lock engaged) Kimba Neo, Kimba Cross, Kimba Inline...
- Page 59 · www.ottobock.de 143441 Moscow Region/Krasnogorskiy Rayon info@ottobock.com.co · www.ottobock.com.co Russian Federation Otto Bock Healthcare Products GmbH Otto Bock de Mexico S.A. de C.V. T +7 495 564 8360 · F +7 495 564 8363 Brehmstraße 16 · 1110 Wien · Austria Prolongación Calle 18 No. 178-A info@ottobock.ru · www.ottobock.ru F +43 1 5267985...
- Page 60 Ihr Fachhändler | Your specialist dealer Otto Bock Mobility Solutions GmbH Lindenstraße 13 · 07426 Königsee/Germany www.ottobock.com...
Need help?
Do you have a question about the Kimba Neo and is the answer not in the manual?
Questions and answers