Otto Bock Kimba Neo Instructions For Use Manual
Hide thumbs
Also See for Kimba Neo:
- Instructions for use manual (60 pages) ,
- Service manual (44 pages) ,
- Instructions for use manual (32 pages)

Related Manuals for Otto Bock Kimba Neo


Summary of Contents for Otto Bock Kimba Neo
- Page 1 Kimba Neo Instructions for Use (User) ..................
- Page 2 2 | Ottobock Kimba Neo...
-
Page 3: Table Of Contents
Storage ............................... Preparation for Use ............................Assembly ..............................................................Information on use ..........................Basic functions of the Kimba Neo seating unit ..................6.2.1 Removing and mounting the seating unit ....................6.2.2 Rotating the seating unit ........................6.2.3 Adjusting the tilt-limiting mechanism after rotating the seat ............... - Page 4 Detaching/attaching the grab rail cover (option) ..................Cleaning ............................Maintenance/Repair ............................Maintenance ............................7.1.1 Maintenance intervals .......................... Disposal ................................Disposal Information ..........................Legal Information .............................. Service Life ............................Liability .............................. CE Conformity ............................ Warranty ............................Trademarks ............................Technical data ..............................4 | Ottobock Kimba Neo...
-
Page 5: Foreword
(depending on the size and weight of the child). It is operated by an attendant (conveyance by another person). This seating unit for a rehab buggy can be used indoors and outdoors. It is fully adjustable to provide an optimised, individual fitting. Kimba Neo Ottobock | 5... -
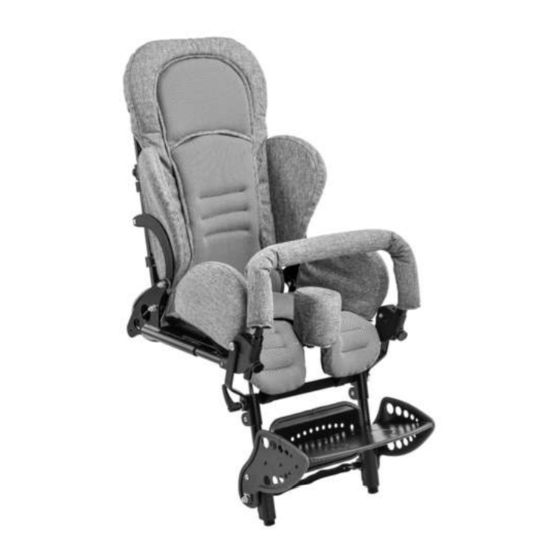
Page 6: Product Overview
Safety 2.2 Product Overview Kimba Neo seating unit 1 Angle adjustable backrest 2 Removable seat with lateral supports 3 Adjustable footrest 4 Back angle adjustment 5 Seat angle adjustment 3 Safety 3.1 Explanation of Warning Symbols Warning regarding possible serious risks of accident or injury. -
Page 7: General Safety Instructions
3.3 Safety Instructions for Use INFORMATION The seating unit is intended for use with the Kimba Neo outdoor mobility base. Observe safety information in the 647G891 Instructions for Use. Hazards during preparation for use... -
Page 8: Further Information
CE marking – product safety in accordance with EU directives the backrest of the seat. 4 Delivery 4.1 Scope of Delivery The scope of delivery includes: • Kimba Neo seating unit • Options according to the order • Adjustable footrest •... -
Page 9: Use
Tipping over, rolling over of the user due to failure to observe specifications ► Using a rehab buggy beyond normal conditions may be dangerous. ► Do not exceed the maximum load capacity (see the section "Technical Data"). Kimba Neo Ottobock | 9... -
Page 10: Basic Functions Of The Kimba Neo Seating Unit
1) Verify firm locking of the seat and back angle adjustment mechanism. 2) Verify the functionality of all belt buckles on the safety belts and/or positioning aids. 6.2 Basic functions of the Kimba Neo seating unit INFORMATION Adjusting the seat and back angle is not possible in combination with the Kimba Cross and Kimba Inline mobility bases. -
Page 11: Rotating The Seating Unit
► After each modification of the back angle, check the tilt stability. To do so, hold the product with both hands by the push handle/push bar. The backrest can be adjusted as needed in a range from 90° to 180°: 1) Twist the lower knob counterclockwise to release the back angle adjustment (see Fig. 11). Kimba Neo Ottobock | 11... -
Page 12: Adjusting The Seat Angle
The function of the upper knob for the adjustment mechanism is not available on all outdoor mobility bases. The procedure described below refers to the functions of the Kimba Neo seating unit when it is ordered and delivered together with the Kimba Neo mobility base. Deviating from this, the seat angle adjustment release can be moun... -
Page 13: Adjusting The Footrest
1) Hold the edge of the footrest (see Fig. 16, item 1) and fold it up (see Fig. 16, item 2). 2) The footrest can be unfolded again by pressing down on it. Angle-adjustable footrest (optional) 1) Pull the release strap (see Fig. 17). Kimba Neo Ottobock | 13... -
Page 14: Additional Options
► Under no circumstances may the belt system be used as part of a restraint system when transporting the user in a vehicle for transporting the disabled. ► Note that the belt system is only intended as additional stabilisation for the user sitting in the rehab buggy. 14 | Ottobock Kimba Neo... -
Page 15: Lap Belt
→ The four-point belt is adjusted correctly when the closed belt buckle lies against the child's abdomen (see Fig. 24). Using the belt 1) Press the release button to open the belt (see Fig. 23, item 1). 2) Move the shoulder/lap belt straps to the side. 3) Sit the user into the seat. Kimba Neo Ottobock | 15... -
Page 16: Five-Point Belt
3) Adjust the shoulder straps using the clip buckles at the base of the backrest (see Fig. 27, item 1 and item 2). → The five-point belt is adjusted correctly when the closed belt buckle lies against the child's abdomen (see Fig. 24). 16 | Ottobock Kimba Neo... -
Page 17: Positioning Aids
The seating unit can be equipped with positioning systems. 6.3.3.1 Thoracic supports The seating unit can be equipped with thoracic supports that provide additional support to the upper body for cer tain indications (see Fig. 30). The option has been preset by qualified personnel. Kimba Neo Ottobock | 17... -
Page 18: Abductor
The seating unit can be equipped with a chest and shoulder support that secures the trunk in the seat for certain indications (see Fig. 34). It is used to achieve upright symmetrical position of the pelvis and trunk. 18 | Ottobock Kimba Neo... -
Page 19: Fixation Vest
Adjusting the fixation vest The adjustment of the final belt tension takes place when putting it on by adjusting the belt length at the six clip buckles on the back of the seat (see Fig. 39). Kimba Neo Ottobock | 19... -
Page 20: Groin Strap
2) Open the two clips at the leg straps by pressing on the fastener tabs (see Fig. 43, item 1). 3) Place the user on the groin strap and thread the leg straps between the legs and over the thighs to the outside (see Fig. 41). 20 | Ottobock Kimba Neo... -
Page 21: Neck Support
The option has already been installed by qualified personnel. 6.3.3.8 Lumbar padding The shaped padding offers additional support for the lumbar spine. The option has been positioned and fastened below the seat padding by qualified personnel. Kimba Neo Ottobock | 21... -
Page 22: Hook-And-Loop Foot Straps
► Please note that the tray can be used only when the seat is facing forward. The seating unit can be equipped with a tray on which objects can be placed directly next to the seat. The tray is mounted on the seating unit and secured against rotation. 22 | Ottobock Kimba Neo... -
Page 23: Canopy
2) Hold the canopy at the front support and change the angle by pressing or pulling on the support. The setting joint locks into place automatically (see Fig. 55, item 3). Removing the canopy 1) Move the backrest to an upright position. Kimba Neo Ottobock | 23... -
Page 24: Rain Canopy
1) Move the backrest to an upright position. 2) Release the locking tongues for the rain canopy from the buckle by pressing lightly (see Fig. 55, item 2). 3) Pull the locking tongues out and remove the rain canopy. 24 | Ottobock Kimba Neo... -
Page 25: Rain Cover
The rehab buggy can be equipped with a summer/winter slip sack (see Fig. 58). The warming winter part can be inserted/removed using snap fasteners. Fastening the slip sack 1) Place the slip sack in the rehab buggy. Kimba Neo Ottobock | 25... -
Page 26: Seat Depth Reducer
Crushing, pinching due to incorrect handling ► When folding out the backrest, only grip by the specified components. The seat depth of the Kimba Neo seating unit in size 1 can be reduced by 50 mm to 140 mm with the seat depth reducer. -
Page 27: Incontinence Cover
6.3.10 Incontinence cover The incontinence cover (see Fig. 63) protects the padding of the Kimba Neo seating unit. The incontinence cover can be removed for washing. Close the hook-and-loop straps before washing. Attaching the incontinence cover 1) Remove the seat padding and the back padding from the seating unit (see Page 31 et seq.). -
Page 28: Armrests
The removable armrests have been attached to the seating unit and secured against rotation. Removing/mounting the armrests 1) Press in the tripod spring (see Fig. 69). 2) Pull the armrest up and out or insert the armrest into the adapter. 28 | Ottobock Kimba Neo... -
Page 29: Grab Rail
► Never place heavy objects on the folded product. INFORMATION The product can be equipped with the Kimba Neo seating unit or alternative seating systems. In this case, please observe the information in the separate instructions for use for the seating system. -
Page 30: Use In A Wheelchair Accessible Vehicle
Incorrect transport weight when using in a wheelchair accessible vehicle Serious injuries in case of accidents due to exceeding the allowable load capacity ► During use in a wheelchair accessible vehicle, the maximum user weight in the Kimba Neo seating unit is lim ited to 40 kg. -
Page 31: Care
3) Put the back padding in place and pull it through between the back and seat bottom. 4) Close the twist lock (see Fig. 74). 5) Slide the back padding under the lateral supports (no illustration). Kimba Neo Ottobock | 31... -
Page 32: Detaching/Attaching The Covers
→ Pull the cover over the support with the help of the lug (see Fig. 78, item 2). → Before fastening the hook-and-loop closure, push and fold down the lug (see Fig. 79). 5) Put the seat padding or back padding back into place. 32 | Ottobock Kimba Neo... -
Page 33: Detaching/Attaching The Grab Rail Cover (Option)
6) Before storing or using the seating unit again, verify that it is dry. Wipe wet components with a cloth as needed. 7) Ensure that all labels (nameplate and warnings) are still legible. Otherwise replace these labels. Kimba Neo Ottobock | 33... -
Page 34: Maintenance/Repair
If the service life is reached, the user or a responsible attendant should contact the qualified personnel who fitted the product or the manufacturer's service (see inside rear cover or back page for address). 34 | Ottobock Kimba Neo... -
Page 35: Liability
Should trademarks used in this document fail to be explicitly identified as such, this does not justify the conclusion that the denotation in question is free of third-party rights. 10 Technical data Kimba Neo seating unit Size 1 Size 2 Seat width 200 –... - Page 36 36 | Ottobock Kimba Neo...
- Page 37 Kimba Neo Ottobock | 37...
- Page 38 38 | Ottobock Kimba Neo...
- Page 39 T +49 5527 848-3455 · F +49 5527 848-1510 Otto Bock France SNC healthcare@ottobock.de · www.ottobock.de 4 rue de la Réunion - CS 90011 Industria Ortopédica Otto Bock Unip. Lda. 91978 Courtaboeuf Cedex · France Av. Miguel Bombarda, 21 - 2º Esq. Otto Bock HealthCare Deutschland GmbH T +33 1 69188830 · F +33 1 69071802 1050-161 Lisboa ·...
- Page 40 Ihr Fachhändler | Your specialist dealer Otto Bock Mobility Solutions GmbH Lindenstraße 13 · 07426 Königsee-Rottenbach/Germany www.ottobock.com Ottobock has a certified Quality Management System in accordance with ISO 13485.
Need help?
Do you have a question about the Kimba Neo and is the answer not in the manual?
Questions and answers