Otto Bock Kimba Neo Instructions For Use Manual
Hide thumbs
Also See for Kimba Neo:
- Instructions for use manual (60 pages) ,
- Service manual (44 pages) ,
- Instructions for use manual (56 pages)
Table of Contents
Advertisement
Quick Links
See also:
Service Manual
Advertisement
Table of Contents

Related Manuals for Otto Bock Kimba Neo


Summary of Contents for Otto Bock Kimba Neo
- Page 1 Kimba Neo, Kimba Cross, Kimba Inline Instructions for use ....................
- Page 2 2 | Ottobock Kimba Neo, Kimba Cross, Kimba Inline...
-
Page 3: Table Of Contents
............................6.1.2 Kimba Cross ............................6.1.3 Kimba Inline ............................Retrofitting the respirator platform (Kimba Neo only) ................6.2.1 Installation with a seat facing opposite to direction of travel ..............6.2.2 Installation with a seat facing in the direction of travel ................ - Page 4 7.4.3 Push bar ............................7.4.3.1 Adjusting the push bar ......................... 7.4.4 Wheel lock ............................7.4.4.1 Engaging the wheel lock ........................7.4.4.2 Adjusting the wheel lock ........................7.4.5 Adjusting the wheelbase ........................4 | Ottobock Kimba Neo, Kimba Cross, Kimba Inline...
- Page 5 ........................7.4.7 Use in vehicles for transporting persons with reduced mobility ..............Care ..............................7.5.1 Care instructions ..........................7.5.2 Detaching/attaching the frame padding for cleaning (Kimba Neo only, option) ..........7.5.3 Cleaning ............................Maintenance and repair ........................... Maintenance ............................8.1.1 Maintenance intervals ..........................
-
Page 6: Foreword
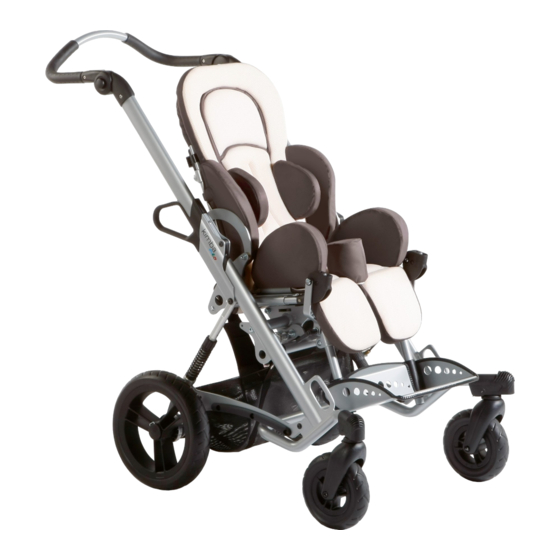
2.1.1 Kimba Neo INFORMATION The Kimba Neo outdoor mobility base is available with and without separate seat angle adjustment (see fig. 1 and see fig. 2). On outdoor mobility bases without separate seat angle adjustment (see fig. 2), the Kimba Neo seating unit has to be chosen so that the seat tilt feature can be used. - Page 7 Product description Kimba Neo – outdoor mobility base for alternative seating systems with "swivelling" front wheels option 1 Plug-on rear wheel 6 Adjustable push bar 2 "Swivelling" front wheel (option) 7 Release handle, folding mechanism 3 Swivel lock 8 Separate seat angle adjustment on frame...
- Page 8 Product description Kimba Neo – outdoor mobility base for Kimba Neo seating unit with "fixed" front wheels option 1 Plug-on rear wheel 5 Adjustable push bar 2 Plug-on "fixed" front wheel 6 Release handle, folding mechanism 3 Front lashing ring...
-
Page 9: Kimba Cross
Product description 2.1.2 Kimba Cross Kimba Cross – outdoor mobility base for Kimba Neo seating unit and alternative seating systems 1 Frame 2 Front wheel (swivelling) 3 Front wheel (fixed) 4 Plug-on rear wheel/drum brake 5 Push bar Kimba Neo, Kimba Cross, Kimba Inline... -
Page 10: Kimba Inline
Application 2.1.3 Kimba Inline Kimba Inline – outdoor mobility base for Kimba Neo seating unit and alternative seating systems 1 Frame 2 Front wheel (swivelling) 3 Drum brake 4 Push bar 3 Application 3.1 Indications for use The outdoor mobility base for a rehab buggy is intended solely for transporting children with walking disabilities or who are unable to walk. -
Page 11: Indications
4.3 Safety Instructions for Assembly CAUTION Improper use of self-locking nuts Tipping, falling over of the user due to screw connections coming loose ► Always replace self-locking nuts with new self-locking nuts after disassembly. Kimba Neo, Kimba Cross, Kimba Inline Ottobock | 11... -
Page 12: Safety Instructions For Use
► Using a rehab buggy beyond normal conditions may be dangerous. ► Please note that this product is not suitable for jogging, running, skating, etc. (not Kimba Cross). ► Do not exceed the maximum load capacity (see the section "Technical data"). 12 | Ottobock Kimba Neo, Kimba Cross, Kimba Inline... - Page 13 Severe injuries if the wheelchair tips over due to overloading, damage to the product ► Do not exceed the maximum load capacity (see the nameplate and section "Technical data"). ► Please note that certain options and add-on components will reduce the remaining load capacity. Kimba Neo, Kimba Cross, Kimba Inline Ottobock | 13...
-
Page 14: Further Information
FS: Rotary knob to activate the seat angle adjustment on the frame. outdoor mobility base KNS: Rotary knob to activate the seat angle adjustment on the seating unit 14 | Ottobock Kimba Neo, Kimba Cross, Kimba Inline... -
Page 15: Kimba Cross
Attention: Please observe the maximum load capacity of the outdoor mobility base! (See the section "Technical data".) Fixation point to attach the product in vehicles for transporting persons with reduced mobility Kimba Neo, Kimba Cross, Kimba Inline Ottobock | 15... -
Page 16: Delivery
The outdoor mobility base is delivered preassembled and with the side panels/rear wheels removed and packed in a crate. The scope of delivery includes: • Frame, folded • Options according to the order • Instructions for use (user) 16 | Ottobock Kimba Neo, Kimba Cross, Kimba Inline... -
Page 17: Storage
CAUTION Non-activated tilt-limiting mechanism Falling out of the user due to user error ► Before rotating a Kimba Neo seating unit, always adjust the tilt-limiting mechanism. Attaching the rear wheels 1) If wheel locks are engaged: disengage wheel locks. 2) Depress the locks on the wheels (see fig. 5, item 1). -
Page 18: Kimba Cross
4) Adjust the desired angle of the push bar using the hole in the back brace (see fig. 11). 5) Insert the locking pin through the hole in the back brace and through the lug of the adapter. 6) Secure with the clip (see fig. 12). 18 | Ottobock Kimba Neo, Kimba Cross, Kimba Inline... -
Page 19: Kimba Inline
6.1.3 Kimba Inline Unfolding the rehab buggy 1) Fold the push bar forward (see fig. 106). 2) Pull up the lock slide and allow it to engage on the frame (see fig. 105). Kimba Neo, Kimba Cross, Kimba Inline Ottobock | 19... -
Page 20: Retrofitting The Respirator Platform (Kimba Neo Only)
Preparation for use 6.2 Retrofitting the respirator platform (Kimba Neo only) WARNING Improper use in vehicles for transporting persons with reduced mobility Severe accidental injuries caused by use with untested product combinations ► Use of the product in vehicles for transporting persons with reduced mobility in combination with the artificial respiration platform option is not permitted. -
Page 21: Installation With A Seat Facing Opposite To Direction Of Travel
4) Set the T1 respirator platform onto the front frame tube (see fig. 24, item 1). 5) Engage the supports of the T1 respirator platform in the lashing points and install (see fig. 25; see fig. 24 item 2). → The T1 respirator platform is installed (see fig. 24). Kimba Neo, Kimba Cross, Kimba Inline Ottobock | 21... -
Page 22: Installation With A Seat Facing In The Direction Of Travel
4) Set the T2 respirator platform onto the front frame tube (see fig. 27, item 1). 5) Engage the supports of the respirator platform in the lashing points and install (see fig. 28; see fig. 27 item 2). → The T2 respirator platform is installed (see fig. 27). 22 | Ottobock Kimba Neo, Kimba Cross, Kimba Inline... - Page 23 3) Set the T1 respirator platform onto the front frame tube (see fig. 31, item 1). 4) Carefully press the clamp fittings of the supports onto the axle tube until they engage (see fig. 31, item 2/3). → The T1 respirator platform is installed (see fig. 32). Kimba Neo, Kimba Cross, Kimba Inline Ottobock | 23...
-
Page 24: Use
Serious injuries to the user due to faulty operation ► The product can be equipped with the Kimba Neo seating unit or alternative seating systems. Observe the information in the separate instructions for use for the seating unit/seating system in all cases. -
Page 25: Alternative Seating Systems
With alternative seating systems that do not have a seat angle adjustment feature, the seat angle can be adjusted using a rotary knob on the Kimba Neo outdoor mobility base. The alternative seating system can be adjusted as needed within the range from -10° to +35°: 1) Stand to the left of the rehab buggy and hold on to the backrest for safety reasons (see fig. 36, item 1). -
Page 26: Push Bar
2) Move the push bar to the desired position (see fig. 39, item 2). 3) Release the buttons. 4) Move the push bar up or down slightly until the joints click audibly into place. 26 | Ottobock Kimba Neo, Kimba Cross, Kimba Inline... -
Page 27: Wheel Lock
→ Counterclockwise: the suspension becomes softer. 2) Check that the adjustment rings are positioned the same on both sides. The 4 marks can be used for orienta tion (see fig. 42, item 2; see fig. 43, item 1). Kimba Neo, Kimba Cross, Kimba Inline Ottobock | 27... -
Page 28: Additional Options
2) Push the rehab buggy forwards until the caster wheels click audibly into the lock casings. Deactivate the caster swivel lock 1) Push the caster swivel lock casing towards the seat (see fig. 45). 2) The caster wheels are now released again. 28 | Ottobock Kimba Neo, Kimba Cross, Kimba Inline... -
Page 29: Tip-Assist
The rehab buggy can be equipped with a storage bag. The storage bag is fastened to the frame via snaps and hook-and-loop fasteners (see fig. 48, item 1; see fig. 49, item 1). The storage bag can be removed for cleaning purposes. Kimba Neo, Kimba Cross, Kimba Inline Ottobock | 29... -
Page 30: Buggy Board
The securing strap can be fastened above the folding lock to the ratchet joint (see fig. 52, item 1). Note on use • The folded-up buggy board must be secured with the securing strap supplied by the manufacturer (see fig. 52, item 2). 30 | Ottobock Kimba Neo, Kimba Cross, Kimba Inline... -
Page 31: Platform For Respirator
1) Only when the tube is vertical: secure the self-adhesive hook-and-loop straps in the desired position and at the correct distance apart. These secure the cup holder when the bottle is full. Kimba Neo, Kimba Cross, Kimba Inline Ottobock | 31... -
Page 32: Disassembly And Transport
► Never place heavy objects on the folded product. INFORMATION The product can be equipped with the Kimba Neo seating unit or alternative seating systems. In this case, please observe the information in the separate instructions for use for the seating system. -
Page 33: Use In Vehicles For Transporting Persons With Reduced Mobility
► The product was tested for use in a vehicle for transporting persons with reduced mobility in combination with a multifunctional seating unit of the Kimba Neo or with a Mygo seating system. Further information can be found in the document "Using your product for transportation in a wheelchair accessible vehicle", order num... -
Page 34: Required Accessories
Before using the product in a vehicle for transporting persons with reduced mobility, the seating unit must be adjusted in the driving direction (so the user faces forward in the direction of travel). Kimba Neo seating unit: To remove/rotate and mount the seating unit, see the instructions for use (user), art •... -
Page 35: Mygo Seating System
2) The locking pins are disengaged (see fig. 65, item 1). The seat angle can now once again be adjusted by twist ing the knob on the upper front part of the frame. 7.2.7.5.3 Alternative seating systems Note the information in the previous section. Kimba Neo, Kimba Cross, Kimba Inline Ottobock | 35... -
Page 36: Adjusting And Securing The Back Angle
Note the information in the separate instructions for use provided for the seating system. 7.2.7.7 Securing the product in the vehicle For transportation in a vehicle for transporting persons with reduced mobility, the rehab buggy must be secured with tie-down straps as follows: 36 | Ottobock Kimba Neo, Kimba Cross, Kimba Inline... -
Page 37: Securing The User In The Product
30° and 45° to the horizontal can also be chosen (see fig. 75). 3) Engage the shoulder belt in the lap belt (see fig. 76). Kimba Neo, Kimba Cross, Kimba Inline Ottobock | 37... -
Page 38: Kimba Cross
Serious injuries to the user due to faulty operation ► The product can be equipped with the Kimba Neo seating unit or alternative seating systems. Observe the information in the separate instructions for use for the seating unit/seating system in all cases. -
Page 39: Push Bar
► Before the user gets in or out, always engage and check the wheel lock. ► Engage the wheel lock to prevent the rehab buggy from moving on uneven ground or during transfers (e.g. into a car). Kimba Neo, Kimba Cross, Kimba Inline Ottobock | 39... -
Page 40: Engaging The Wheel Lock
2) Push down on the spring-loaded knob so that the seat can be moved freely around the axle of the seat adapter. 3) Select the desired seat position. 4) Release the knob and wiggle the seat back and forth slightly to engage it. 5) Tighten the knob (see fig. 82). 40 | Ottobock Kimba Neo, Kimba Cross, Kimba Inline... -
Page 41: Adjusting The Wheelbase
4) Firmly tighten axle and coupling with the wheel nut or quick-release mechanism. 5) Check if the wheel is seated securely. 6) Position the safety cable around the wheel axle and engage it (see fig. 85, item 1). Kimba Neo, Kimba Cross, Kimba Inline Ottobock | 41... -
Page 42: Coupling The Trailer To The Bicycle
(as an alternative to a second red reflector, a combination of rear light plus reflector may be included). 7.3.7.3.3 Rollover bar 1) Attach the rollover bar on the push bar (see fig. 87). 2) Insert and tighten the Allen head screws (see fig. 87). 42 | Ottobock Kimba Neo, Kimba Cross, Kimba Inline... -
Page 43: Pennant
7.3.8.2 Splash guard for rear wheels/clothing protectors 1) Press the central bolts of the quick-release axles and remove the rear wheels. 2) Insert the splash guard adapter and screw it in place (see fig. 91, item 1). Kimba Neo, Kimba Cross, Kimba Inline Ottobock | 43... -
Page 44: Anti-Tipper
2) Attach the side with 2 snap fasteners to the right and left of the base frame. 7.3.8.5 Spoke protector ► Attach the spoke protector to the spokes with mounting elements. 44 | Ottobock Kimba Neo, Kimba Cross, Kimba Inline... -
Page 45: Disassembly And Transport
► Never place heavy objects on the folded product. INFORMATION The product can be equipped with the Kimba Neo seating unit or alternative seating systems. In this case, please observe the information in the separate instructions for use for the seating system. -
Page 46: Use In Vehicles For Transporting Persons With Reduced Mobility
Serious injuries to the user due to faulty operation ► The product can be equipped with the Kimba Neo seating unit or alternative seating systems. Observe the information in the separate instructions for use for the seating unit/seating system in all cases. -
Page 47: Wheel Lock
Reduce the braking force: Screw in the adjustment screw. • 1) Loosen the counter nut (see fig. 103, item 1) and back off the adjustment screw until a scraping noise can be heard when the rear wheel is rotated. Kimba Neo, Kimba Cross, Kimba Inline Ottobock | 47... -
Page 48: Adjusting The Wheelbase
► Never place heavy objects on the folded product. INFORMATION The product can be equipped with the Kimba Neo seating unit or alternative seating systems. In this case, please observe the information in the separate instructions for use for the seating system. -
Page 49: Use In Vehicles For Transporting Persons With Reduced Mobility
• Use in saltwater is not permitted. 7.5.2 Detaching/attaching the frame padding for cleaning (Kimba Neo only, option) The frame padding can be removed for care and maintenance of the product. 1) Open the hook-and-loop closure on the frame padding. -
Page 50: Cleaning
• Dirty springs should be cleaned with a soft, dry brush to prevent wear. Cleaning in a washing chamber (Kimba Neo only) 1) Remove the padding and covers, and follow the washing instructions for each article. 2) Wash the rehab buggy at max. 60 °C for max. 10 minutes. -
Page 51: Maintenance And Repair
(sewing machine oil). • The piston rods of the springs should be lightly oiled with a resin-free, thin oil regularly (Kimba Neo only). • If the rehab buggy gets wet, it should be rubbed dry again. -
Page 52: Information On Re-Use
All brands, trade names or company names may be registered trademarks and are the property of the respective owners. Should trademarks used in this document fail to be explicitly identified as such, this does not justify the conclusion that the denotation in question is free of third-party rights. 52 | Ottobock Kimba Neo, Kimba Cross, Kimba Inline... -
Page 53: Technical Data
Front wheel diameter [mm/inch] 200/7.9 Rear wheel diameter [mm/inch] 250/9.8 Push handle height (min./max.) [mm] 930/1030 Seat tilt (seating unit angle (min./max.)) [°] -30/+40 [kg] Max. load capacity Weight of mobility base [kg] 10.6 Kimba Neo, Kimba Cross, Kimba Inline Ottobock | 53... - Page 54 Outdoor mobility base (max. 50 kg) – fully loaded seating unit (2x) (35 kg) = 7.5 kg for other accessor ies + weight in storage bag Folded dimensions of the outdoor mobility base with fixed front wheels: 970x600x530 mm. 54 | Ottobock Kimba Neo, Kimba Cross, Kimba Inline...
- Page 55 · www.ottobock.com.au Otto Bock Bulgaria Ltd. info@ottobock.sk · www.ottobock.sk 41 Tzar Boris III‘ Blvd. · 1612 Sofia · Bulgaria Beijing Otto Bock Orthopaedic Industries Co., Ltd. T +359 2 80 57 980 · F +359 2 80 57 982 Otto Bock Sava d.o.o. B12E, Universal Business Park info@ottobock.bg · www.ottobock.bg Industrijska bb ·...
- Page 56 Ihr Fachhändler | Your specialist dealer Otto Bock Mobility Solutions GmbH Lindenstraße 13 · 07426 Königsee-Rottenbach/Germany www.ottobock.com Ottobock has a certified Quality Management System in accordance with ISO 13485.
Need help?
Do you have a question about the Kimba Neo and is the answer not in the manual?
Questions and answers