
Related Manuals for Cardiac Science Eclipse Premier


Summary of Contents for Cardiac Science Eclipse Premier
- Page 1 Operating Instructions Eclipse™ Premier Electrocardiograph Part No. 070-1149-01 Rev. B...
- Page 2 Copyright © 2007 Cardiac Science Corporation. All rights reserved. Cardiac Science Corporation 3303 Monte Villa Parkway Bothell, WA 98021, USA MDSS GmbH Schiffgraben 41 Toll Free: +1.800.426.0337 D-30175 Hannover Telephone: +1.425.402.2000 Germany Email: techsupport@cardiacscience.com Tel: +49 511 62 62 86 30 Website: www.cardiacscience.com...
- Page 3 PHOTOCOPY THIS PAGE AS NEEDED 070-1149-01 B...
- Page 4 070-1149-01 B...
-
Page 5: Table Of Contents
Configuring the USER SETUP Menus ......4-6 Acquire Printout of Eclipse Premier Program Settings ....4-17 Chapter 5 Patient Preparation . - Page 6 Chapter 7 Managing Patient Records ..... 7-1 Using the DIRECTORY Menu ....... . .7-1 Accessing Saved Files .
-
Page 7: Intended Use
Under the supervision of a qualified physician trained in the subject of ECG interpretation, the Eclipse Premier can be used to record the electrical activity of the heart for the purpose of correlating the resultant waveforms with the health of the heart muscle tissue structures. -
Page 8: Warnings, Cautions & Notices
IEC 601-1. In addition, the enclosure leakage current of non-medical equipment connected to the Eclipse Premier should not be allowed to exceed 500µA in fault condition. To maintain a proper enclosure leakage current, provide additional protective earth grounding, use an additional isolating transformer or use a floating power supply. - Page 9 WARNING: Position the Eclipse Premier away from other equipment. If it is necessary to use the Eclipse Premier adjacent to or stacked with other equipment, then observe the Eclipse Premier to verify normal operations. WARNING: Use of accessories or cables other than those specified, with the...
- Page 10 NOTICE: Because the Eclipse Premier offers different lead configurations, always ensure that the appropriate lead placement is employed for the lead configuration selected. NOTICE: Waveforms displayed on the Eclipse Premier screen are not intended to be used for diagnostic purposes. Use displayed waveforms to assess signal quality only.
-
Page 11: Definitions Of Symbols Used
Definitions of Symbols Used Safety Symbols Attention. Consult accompanying documents. Danger! High voltage. Hazardous voltage. Defibrillation-Protected Type CF Equipment. Equipotentiality (used to label the grounding lug). Meets or exceeds Council Directive 93/42/EEC, MDD, Class IIa. Labeling Symbols Alternating Current (AC) Automatic Operation Custom Lead Triplet Frequency Response... - Page 12 I0I0 Serial port Battery Compartment Battery Charge Status Modem Modem RJ11 Polarity of DC power connector. viii 070-1149-01 B Eclipse Operating Instructions...
-
Page 13: General Information
General Information Congratulations on your purchase of a top quality Eclipse Premier electrocardiograph. By listening to our customers, we have designed the Eclipse Premier to suit your specific needs, incorporating features that people like yourself have requested. Your business is important to us. If you would like more information or if you have any questions, contact your local representative or Eclipse Technical Support at (800) 426- 0337 or (425)402-2695. -
Page 14: General Description
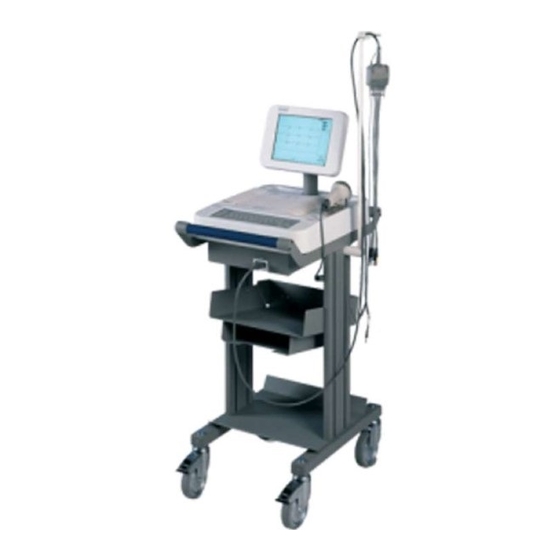
Chapter 1 General Information General Description Figure 1-1 Eclipse Premier Portable; may be operated from battery or AC line power. ● Features an active-matrix color LCD. ● Prints using a thermal printer and thermosensitive, Z-fold paper. ● Operates in manual and automatic modes. -
Page 15: Interpretive Analysis Program
Interpretive Analysis Program About the program The Eclipse Premier includes an interpretive analysis program. This analysis program is widely regarded as one of the most accurate available today. It was developed in the 1980s by Prof. Peter MacFarlane, of the University of Glasgow, who has been involved in computerized ECG interpretation since its inception in the 1960s. -
Page 16: Safety Features
Consult a qualified technician before using multiple electrical apparatus in this patient environment. The Eclipse Premier patient leads are electrically isolated from ground and the device meets the most stringent IEC and ANSI/AAMI medical standards for leakage currents. 070-1149-01 B... - Page 17 Using Multiple Electrical Apparatus However, a potential hazard may occur if the enclosure leakage currents from multiple pieces of equipment combine and are inadvertently routed directly to a patient’s heart via a catheter or pacemaker lead. Only equipment which is certified to IEC and ANSI/AAMI medical standards should be used in this environment.
- Page 18 Chapter 1 General Information 070-1149-01 B Eclipse Operating Instructions...
-
Page 19: Equipment Setup
Chapter Equipment Setup WARNING: Trip hazard. Route all cables away from main work areas to minimize risk of tripping and injury. NOTE: For patient safety, all equipment in patient environment should be EN 60601-1 approved. Figure 2-1 Back Panel AC power connector Connect the supplied power cord here. -
Page 20: Patient Cable
Patient Cable Connector Patient Cable Make sure the connector on the cable is arrow-side-up then firmly push the connector until the arrow point is aligned with the edge of the Eclipse Premier. Grounding WARNING: Electrical shock hazard. Operate the unit from its battery supply if the integrity of the protective earth conductor is in doubt. -
Page 21: Loading Recording Paper
Loading Recording Paper NOTE: Damage caused by using unapproved recording paper may void your warranty. 1. Turn the Eclipse Premier on. 2. Open the paper compartment door by lifting and sliding it out to the left. 3. Remove any remaining paper from the paperwell. -
Page 22: Turning The Unit On
Connect the unit to AC line power to recharge the battery. The battery fully recharges in about 4.5 hours. You may operate the Eclipse Premier from AC line power while the battery is charging. However, this will increase charging time. - Page 23 2. The Eclipse Premier displays the message, “POWERING DOWN” and then shuts off after 5 seconds. 3. The Eclipse Premier beeps 3 times or displays the message, “Battery Low-Please Charge” when powering up. In this condition, the Eclipse Premier may not have enough battery charge to power up.
- Page 24 Equipment Setup Completely discharge a fully charged battery: 3. Unplug the Eclipse Premier from AC line power. 4. Press ON/STBY to turn the Eclipse Premier on. 5. Press M to go to the Main menu. Press B, then press Enter.
-
Page 25: Keyboard And Displays
Chapter Keyboard and Displays Normal operation of the Eclipse Premier occurs through use of the keyboard and LCD display. Alphabetic and numeric keys are used to enter information and are also used as hot keys, to make selections in certain screens. Other keys, such as the ECG key and the arrow keys, provide additional functions, as described in this chapter. -
Page 26: Chapter 3 Keyboard And Displays
Chapter 3 Keyboard and Displays Use the “1” and “2” keys to select pre-programmed lead triplets for the display; the displayed leads will also be printed on Manual Rhythm and Auto Rhythm reports. In the PREVIEW screen, use the “1” and “2” keys with the Shift key to select either User 1 or User 2. - Page 27 The Keyboard Use the right and left arrows to enter and exit menus and lists. (G) ENTER Use the Enter key to accept the current selection. (H) SPACE Use this key to insert a space. (I) ALPHABETIC Use the alphabetic keys to enter information, when required. These keys may also be THROUGH used as hot keys for specific operations (see “Hot Keys”...
-
Page 28: The Preview Screen
Chapter 3 Keyboard and Displays The PREVIEW Screen After the Eclipse Premier has been turned on and performs self-tests, the PREVIEW screen is displayed (see Figure 3-2). General features are described below. Figure 3-2 The Preview Screen I D : 0 1 2 3 4 5 6 7 8 9... - Page 29 NOTE: Refer to Chapter 10, “Troubleshooting” for information on correcting signal problems. (I) ECG WAVEFORMS NOTICE: Waveforms displayed on the Eclipse Premier screen are not intended to be used for diagnostic purposes. Use displayed waveforms to assess signal quality only.
-
Page 30: A Sample Menu-The Edit Id Menu
Keyboard and Displays A sample menu—the EDIT ID menu Most of the Eclipse Premier displays consist of menus. For example, the EDIT ID menu is used to enter patient demographics. The ENTER ID selection is automatically highlighted when you enter the PREVIEW screen (see Figure 3-2 on pg. -
Page 31: Using Menus
Every field has a default setting. For example, if you skip the *Age Format field it will be filled in with “YEARS.” Unless you make another choice, the Eclipse Premier always uses defaults. Most often, fields are left blank. 070-1149-01 B... -
Page 32: Lists And System Notes
Chapter 3 Keyboard and Displays Lists and System Notes LISTS Lists give you all the choices for a particular field. For example, scroll to Medication 1. A list appears (see Figure 3-4). The field may be filled with any choice from this list. After you make a selection, the next field becomes active. - Page 33 Not in range: 0 - 364. Press the Enter key to acknowledge the note and continue. You have just practiced the basics of using the Eclipse Premier. More information accompanies sections for specific functions such as acquiring an Auto ECG.
- Page 34 Chapter 3 Keyboard and Displays 3-10 070-1149-01 B Eclipse Operating Instructions...
-
Page 35: System Setup And User Setup
Premier general settings, and set the internal calendar & clock. Setting options are listed in “SYSTEM SETUP Fields” on pg. 4-2. NOTE: Default settings for Eclipse Premier are given on page 9-2. Go to SYSTEM SETUP menu 1. Press the On/Standby key to power up to the PREVIEW screen. -
Page 36: Chapter 4 System Setup And User Setup
Eclipse units. If you are using a management system, be sure to consult your System Administrator so that you can setup your Eclipse Premier to be compatible with the management system. For more information on sending and receiving records, see “Sending and Receiving Records”... - Page 37 PYRAMIS System. Device Id [Up to 5 numeric characters] Identifies the Eclipse Premier unit with a unique number. The Device Id is used by the PYRAMIS system to identify which electrocardiograph acquired each ECG record. Phone # [Up to 25 numeric characters.
- Page 38 60 Hz Labels ECG records with the frequency of the AC line power which is connected to the Eclipse Premier unit. This is used by the PYRAMIS System to identify the line frequency in the area where the records are acquired.
- Page 39 Configuring SYSTEM SETUP Menu Ethernet or 802.11 Wireless Communication NOTE: The following four fields should be configured as a part of the Eclipse Premier wireless communication setup for the wireless device that is being installed. The instructions provided with your wireless device contain additional details and information.
-
Page 40: Configuring The User Setup Menus
All USER SETUP settings can be customized for both User 1 and User 2 (for more information, see “User 1-2 Select” on pg. 4-2). NOTE: Default settings for Eclipse Premier are given on page 9-2. Go to the USER SETUP menus 1. - Page 41 Configuring the USER SETUP Menus Figure 4-2 ID:0123456789 PRESS A USER SETUP Menu—The MAIN MENU POWER-UP DEFAULTS POWER-UP DEFAULTS Menu S p e e d : 25 mm/s SPEED G a i n : 10 mm/mV A r t i f a c t F i l t e r : 40 Hz 10 mm/s 25 mm/s 50 mm/s...
- Page 42 The fields in this menu affect paper speed and waveform printing. The settings in this menu are in effect whenever the Eclipse Premier is powered on with the On/Standby key. When changes are made in the POWER-UP DEFAULTS menu, changes go into effect the next time the Eclipse Premier is powered on.
- Page 43 Configuring the USER SETUP Menus AUTO ECG SETUP 12 Lead Format STANDARD, 4 CHANNEL (3 channel ECG with 1 rhythm lead) STANDARD, 3 CHANNEL STANDARD, 3 CH. + 3 (3 channel ECG with 3 rhythm leads) STANDARD, 6 CH 5S/LD (5 seconds per lead, 1 page total) STANDARD, 6 CH 10S/LD (10 seconds per lead, 2 pages total) CABRERA, 4 CHANNEL CABRERA, 3 CHANNEL...
- Page 44 Chapter 4 System Setup and User Setup Number Of Copies [Numeric. Range = 0-5] Sets the number of complete report copies to print in addition to the automatic printout. Median Complex Page Enables Median Complex printout as part of every Auto ECG report. Print Mode AUTO MANUAL...
- Page 45 Standard or Cabrera configurations are acceptable for this purpose. Do not select Frank or Nehb if you want a rhythm page as part of an Auto ECG. NOTICE: Because the Eclipse Premier offers different lead configurations, always ensure that the appropriate lead placement is employed for the lead configuration selected.
- Page 46 Chapter 4 System Setup and User Setup Channel 1 through When programming Custom Lead 1, select 1 lead for each channel. The lead Channel 6 options for each format are listed below. NOTE: Lead availability is affected by the selected lead configuration. Standard Cabrera Frank...
- Page 47 BAZETT FRIDERICIA FRAMINGHAM Selects QTc formula. Eclipse Premier prints the QTc formula selection on the bottom of each ECG printout (for example, QTc = Hodges). For additional information on the QTc formulas, see “QT Interval” on page 4-3 of the Physician’s Guide.
- Page 48 Until the information is typed over, the EDIT ID menu will keep the information in these fields even if the Eclipse Premier is turned off. For example, you may want every patient record to be labeled with the same Department name.
- Page 49 Configuring the USER SETUP Menus *V3 Placement ON, CLEAR ON, HOLD Used for pediatric recording of V4R only. Last Name First Name *D.O.B. *Age *Age Format *Sex *Race *Medication 1 *Medication 2 * Class 1 * Class 2 Height Weight Systolic BP Diastolic BP Department...
- Page 50 You can connect to the PYRAMIS ECG Data Management System in three ways: using a Direct Connection, using a wireless connection with the Cardiac Science Corporation 802.11b transmitter, or using a Remote Connection (this requires an Eclipse Premier with either an internal or external modem).
-
Page 51: Acquire Printout Of Eclipse Premier Program Settings
11. Press the “G” key to receive the Custom Header and automatically configure the Eclipse Premier to use those patient demographic fields. Acquire Printout of Eclipse Premier Program Settings Program settings include all settings configured in the SYSTEM SETUP menu and in the USER SETUP menus. - Page 52 Chapter 4 System Setup and User Setup 4-18 070-1149-01 B Eclipse Operating Instructions...
-
Page 53: Patient Preparation
The Eclipse Premier is a high fidelity instrument which responds to the minute voltages of the heart. Since it is such a sensitive instrument, take care to avoid interference which can be produced by muscle tremor and AC signals. - Page 54 Chapter 5 Patient Preparation Preparing the Skin Refer to the “Resting ECG Lead Placement & Coding Chart” on pg. 5-3 for details on where sensor sites are located. NOTE: For information on alternate chest lead and other lead placements, see “Alternative Lead Placements” on pg. 5-7. If the patient has oily or sweaty skin, or has recently applied lotion to their skin, clean the sensor sites with warm, soapy water.
-
Page 55: Resting Ecg Lead Placement & Coding Chart
Resting ECG Lead Placement & Coding Chart Resting ECG Lead Placement & Coding Chart LEAD CODING AND MEASUREMENTS STANDARD LIMB LEADS STANDARD LIMB LEADS SENSORS SENSORS LEAD CONNECTED / CONNECTED / LEAD MEASURED MEASURED AHA COLOR CODE LEAD I LA-RA LEAD I LEAD BAND... - Page 56 Chapter 5 Patient Preparation Disposable Resting ECG Sensors ® CardioSens disposable sensors are a more effective alternative to bulbs, plates, straps, ® creams, and gels. CardioSens disposable sensors dramatically reduce cross- contamination and infection, while helping to improve diagnostic results. Disposable sensors should be stored according to the guidelines on the packaging and should not be used after the expiration date.
- Page 57 ELECTROLYTE NOTE: Watches and jewelry which could come in contact with electrolyte should be removed to avoid damage. ® Cardiac Science Corporation recommends Liqui-cor for use with reusable sensors. ® Liqui-cor provides excellent conductivity between the skin and sensor. In addition, it is nonabrasive and water soluble for easy cleanup.
- Page 58 Chapter 5 Patient Preparation APPLYING WELSH BULB CHEST SENSORS 1. Connect the 6 Welsh bulb sensors to the V-leads (C-leads) on the patient cable. 2. Locate the 6 V-lead (C-lead) positions on the patient’s chest (see “Resting ECG Lead Placement & Coding Chart” on pg. 5-3). ®...
-
Page 59: Alternative Lead Placements
Alternative Lead Placements Alternative Lead Placements Pediatric Lead Placement When acquiring a pediatric ECG, you may use an alternative to the standard V placement. Place the sensor in the V R (C R) position. This is across the sternum from ). - Page 60 Chapter 5 Patient Preparation Figure 5-4 Frank Lead Placement Lead Measurement Dexter-Sinister Cranial-Caudal Ventral-Dorsal Nehb: Bipolar Leads Attach all the limb sensors, RA, LA, LL and RL (R, L, N, and F). Please see “Resting ECG Lead Placement & Coding Chart” on pg. 5-3 for diagram. Attach the chest sensors according to the following table (see Figure 5-5).
- Page 61 Alternative Lead Placements Alternate Chest Lead Acquire a standard 12-lead ECG according to the “Resting ECG Lead Placement & Coding Chart” on pg. 5-3. For the Alternate Chest Lead ECG, retain the placement of the limb sensors. Reposition the chest sensors using 6 of the placements described in the table below. Configure leads as desired.
- Page 62 Chapter 5 Patient Preparation 5-10 070-1149-01 B Eclipse Operating Instructions...
-
Page 63: Acquiring Ecg Reports
Chapter Acquiring ECG Reports Acquiring and printing ECG reports with an Eclipse Premier is quite simple. Once the patient is hooked up to the Eclipse Premier, an ECG can be acquired at any time by pressing the button. It is a good idea to enter patient demographic information before performing tests. -
Page 64: Acquiring An Auto Ecg
NOTE: Some patient information directly affects ECG analysis. Your patient’s physician uses this information when interpreting ECG reports. Likewise, interpretive Eclipse Premier units provide more accurate and complete analysis statements when you enter patient information thoroughly. This information must be entered prior to acquiring the ECG in order to affect the interpretation. - Page 65 NOTE: To obtain a clean trace with very little noise, ensure that Wait for Good Data is set to ON in the AUTO ECG SETUP menu. If there is a problem during a recording, the Eclipse Premier will display a message. You can override the error message and continue recording by pressing the ECG key again (for more information, see “Wait for...
-
Page 66: Printing Reports
NOTE: To obtain a clean trace with very little noise, ensure that Wait for Good Data is set to ON in the AUTO ECG SETUP menu. If there is a problem during a recording, the Eclipse Premier will display a message. You can override the error message and continue recording by pressing the ECG key again (for more information, see “Wait for... -
Page 67: Temporarily Changing Current Settings
Temporarily Changing Current Settings option of printing at a later time (see “Print All New ECGs” on pg. 7-6). For paper loading instructions see “Loading Recording Paper” on pg. 2-3. Figure 6-1 System Note Regarding a Printing Problem Paper OUT: Reload and continue ? C a n c e l Temporarily Changing Current Settings... -
Page 68: Acquiring An Auto Rhythm Or A Manual Rhythm
NOTE: It is not possible to save Auto Rhythm or Manual Rhythm data. The Eclipse Premier can be set up to automatically print a rhythm page with the 12-lead ECG. If this feature is not selected, or if an additional rhythm strip is required, you can obtain a rhythm strip by simply pressing the “RHYT”... -
Page 69: Acquiring An Ecg Using Alternative Lead Placements
(displayed in the lower right corner of the PREVIEW screen) can be temporarily modified if necessary. See “Temporarily Changing Current Settings” on pg. 6-5. 8. Press the “ECG” function key to record the ECG. Eclipse Premier automatically prints the ECG. 070-1149-01 B Eclipse Operating Instructions... - Page 70 Chapter 6 Acquiring ECG Reports Acquiring an ECG Using Pediatric Lead Placements NOTE: The Eclipse Premier unit can be set up to always acquire ECGs using pediatric lead placement. Refer to “*V3 Placement”in “Enabling Patient Demographic Fields” on pg. 4-14.
-
Page 71: Entering Patient Demographics
✔ Enter age in days for patients younger than 1 month old. NOTE: The Eclipse Premier interpretation criteria uses a default age of 40 years when an age of 120 years or higher (or the equivalent date of birth) is entered, or when age is not entered. - Page 72 PATIENT FIELDS ENABLE menu (see “Enabling Patient Demographic Fields” on pg. 4-14) or because the Eclipse Premier is configured to use a Custom Header (see “Getting Custom Header Information” on pg. 4-16). The EDIT ID fields are described below.
- Page 73 Entering Patient Demographics Patient ID [Up to 20 alphanumeric characters] Last Name [Up to 20 alphanumeric characters] First Name [Up to 20 alphanumeric characters] *D.O.B [Up to 20 alphanumeric characters] (Date Of Birth) Use spaces, hyphens or periods to separate the day, month and year. Some acceptable ways to type the date are: 1.
- Page 74 NOTE: Do not use this field if blank, NO MEDICATION or UNKNOWN is selected for *Medication 1. These entries for *Medication 1 cause the analysis program in interpretive Eclipse Premier units to ignore the *Medication 2 field. *Class 1 blank...
- Page 75 Entering Patient Demographics Technician [Up to 20 alphanumeric characters] Identifies the person acquiring the ECG. Physician [Up to 20 alphanumeric characters] Identifies the patient’s physician. User Field [Up to 15 alphanumeric characters] Use this field to suit your needs. A possible use might be to identify the referring physician.
- Page 76 Chapter 6 Acquiring ECG Reports 6-14 070-1149-01 B Eclipse Operating Instructions...
-
Page 77: Managing Patient Records
Chapter Managing Patient Records Once a patient’s record has been saved, it is possible to reprint, delete and transmit ECG records, as well as edit patient information. It is also possible to create files for one or more patients prior to acquiring any ECGs. NOTE: Speed, gain and/or artifact filter can be changed prior to reprinting a record. -
Page 78: Chapter 7 Managing Patient Records
The record contains an Alternate Chest Lead (non-standard) ECG. On Eclipse Premier units, it is possible to change the status of certain records. With this feature, users can ensure that certain records are sent and other records are not sent when BATCH SEND ECGS is selected in the DIRECTORY menu (for more information, see “Changing Record Status”... -
Page 79: Accessing Saved Files
Accessing Saved Files Automatic deletion when the Directory is full If you create a new record when the Directory is full, the Eclipse Premier deletes an older record to make room for the new record. There are rules based on record status which determine which records are automatically deleted. - Page 80 Chapter 7 Managing Patient Records Printing ECG Reports 1. Locate the desired patient file, highlight it and press the Enter key. The Single ECG Functions list is displayed. 2. If you wish to edit patient information, press the “E” key to access the EDIT ID menu.
- Page 81 Use the left arrow key to exit. Faxing Saved Files NOTE: To use the Fax function, your Eclipse Premier must be equipped with either an internal or an external modem. 1. Locate the desired patient file, highlight it and press the Enter key. The Single ECG Functions list is displayed.
-
Page 82: Additional Functions
Chapter 7 Managing Patient Records Additional Functions Add New Patient If you wish to create one or more patient files prior to recording any ECGs, use the ADD NEW PATIENT selection in the DIRECTORY. This feature allows you to input demographics into the Directory in advance of taking an ECG, which later reduces the time required to acquire the report. - Page 83 Use the left arrow key to exit. Configuring the FAX Menu Eclipse Premier stores up to 4 phone numbers which are listed by their descriptions. Fax numbers and descriptions can be entered or modified from the FAX ECG menu. 1. Locate the desired patient file, highlight it and press the Enter key. The Single ECG Functions list is displayed.
- Page 84 For more information, see “Password” on pg. 4-5. With Eclipse Premier, it is possible to delete all contents in the directory. NOTE: It is not possible to recover erased records. 1. In the DIRECTORY menu, scroll to and select the DELETE ALL RECORDS field by pressing the “D”...
-
Page 85: Sending And Receiving Records
Chapter Sending and Receiving Records NOTE: You may use your Eclipse Premier for a variety of sending and receiving. You may use a remote connection with either an internal or an external modem, a wireless connection with a wireless device, or a direct connection with another Eclipse or a compatible ECG management system. - Page 86 6 feet (1.83 m) beyond the perimeter of the bed, table or chair, and 7 1/2 feet (2.29 m) above the floor. WARNING: NEVER create a direct connection between an Eclipse Premier and a PYRAMIS computer if the Eclipse Premier is already connected to a patient. 070-1149-01 B...
-
Page 87: How Record Status Affects The Sending Operations
How record status affects the sending operations NOTE: For the list of status codes, see “Record Status” on pg. 7-2. Record status affects whether records can be sent from the Eclipse Premier. The following rules apply: Records with status Dm can not be sent. -
Page 88: Setting Up The Unit To Send And Receive
A direct connection is achieved through the use of a cable, which connects the Eclipse Premier unit to either PYRAMIS or another Eclipse unit. A wireless connection is achieved through a wireless transmitter attached to the Eclipse Premier, a wireless access port, and receiver software. A remote connection requires either an internal or external modem connected to a phone line. - Page 89 CONNECTING TO PYRAMIS To send records to PYRAMIS, or to receive requisitions and records from PYRAMIS, the Eclipse Premier must be equipped with either an internal or external modem connected to a phone line. 1. Press the On/Standby key to power up to the PREVIEW screen.
-
Page 90: Receiving Requisitions From Pyramis
Chapter 8 Sending and Receiving Records 2. Both Eclipse units: Press the “M” key to go to the MAIN MENU. 3. Both Eclipse units: Select SYSTEM SETUP by pressing the “S” key. The SYSTEM SETUP menu will appear (see Figure 4-1 on pg. 4-1). 4. -
Page 91: Sending Records To Pyramis
“Setting Up the Unit to Send and Receive” on pg. 8-4). 2. To send more than one ECG, select BATCH SEND ECGS from the DIRECTORY menu. The Eclipse Premier unit will automatically send all of the ECGs that have the appropriate status (see “How record status affects the sending operations”... -
Page 92: Sending And Receiving Records From An Eclipse
Receive ECGS) 3. To send more than one ECG, select BATCH SEND ECGS from the DIRECTORY menu. The Eclipse Premier unit will automatically send all of the ECGs that have the appropriate status (see “How record status affects the sending operations” on pg. 8-3). A message will be displayed indicating the total number of ECGs sent. - Page 93 Receiving records from PYRAMIS Using GET ECG VIA ID When you select GET ECG VIA ID you can search the PYRAMIS database for all the records for a particular patient. You can search the database using: The patient’s ID ● The patient’s name ●...
- Page 94 Chapter 8 Sending and Receiving Records 7. Press the left arrow key to return to GET ECG VIA ID. 8. Select GET ECG(S) to begin receiving all the selected records. HOW PYRAMIS SEARCHES USING THE PATIENT’S NAME PYRAMIS can search using just the Last Name field. All the files with the entered last name are retrieved.
-
Page 95: Sample Printouts
Chapter Sample Printouts Print Directory Report 12.11.2004 070-1149-01 B Eclipse Operating Instructions... -
Page 96: Print Setup Report
Chapter 9 Sample Printouts Print Setup Report The Print Setup Report is a list of all current settings (see “Acquire Printout of Eclipse Premier Program Settings” on pg. 4-17). The example Print Setup Report printout below lists the settings as they are set at the factory. -
Page 97: Standard 12-Lead, 4-Channel Auto Ecg
Standard 12-Lead, 4-Channel Auto ECG Standard 12-Lead, 4-Channel Auto ECG 070-1149-01 B Eclipse Operating Instructions... -
Page 98: Standard 12-Lead, 6-Channel Auto Ecg
Chapter 9 Sample Printouts Standard 12-Lead, 6-Channel Auto ECG 070-1149-01 B Eclipse Operating Instructions... -
Page 99: Standard 3-Channel Rhythm & Manual Ecg
Standard 3-Channel Rhythm & Manual ECG Standard 3-Channel Rhythm & Manual ECG 070-1149-01 B Eclipse Operating Instructions... -
Page 100: Measurement Matrix
Chapter 9 Sample Printouts Measurement Matrix 070-1149-01 B Eclipse Operating Instructions... -
Page 101: Median Complex
Median Complex Median Complex 070-1149-01 B Eclipse Operating Instructions... - Page 102 Chapter 9 Sample Printouts 070-1149-01 B Eclipse Operating Instructions...
-
Page 103: Troubleshooting
Chapter Troubleshooting While the Eclipse Premier has been refined to consistently produce prompt and accurate results, occasionally you may encounter problems with the Eclipse Premier. Refer to the table in this chapter for solutions to common problems. For any additional questions concerning the operation or servicing of your product, contact your local representative or Eclipse Technical Support at (800) 426-0337 or (425)402-2485. -
Page 104: Troubleshooting Trace Problems
Chapter 10 Troubleshooting PROBLEM PROBABLE CAUSE Fax function is not working. - Verify that the phone number and description fields are correctly filled in. These are accessed through the FAX ECG menu. Several functions in the DIRECTORY menu - Verify that the correct connection type is are unavailable and appear gray. -
Page 105: Troubleshooting Printer Problems
Troubleshooting Printer Problems PROBLEM PROBABLE CAUSE Occasional noise or artifact in the waveform - Patient movement. for one or more leads. - Muscle tremor noise. - Improperly applied sensors. - Electrical interference. - Sensors need to sit longer on skin. - Poor sensor contact with skin. -
Page 106: Recognizing And Reducing Ecg Artifacts
Recognizing and Reducing ECG Artifacts “OVERLOAD” message Defibrillating the patient will interfere with the Eclipse Premier sensors. This may result in loss of the trace or erratic trace deflections. An “OVERLOAD” message alerts you that waveforms may not be accurate. - Page 107 Recognizing and Reducing ECG Artifacts Baseline wander Poorly affixed sensors may cause the baseline to wander. Normally, the baseline will stabilize within a few seconds. If the baseline shifts up and down, it may be due to the patient’s breathing or to loose or corroded sensors. Figure 10-2 Poorly Affixed Sensor Artifact Wide baseline...
- Page 108 (even when not in use). Try moving the patient to another place in the room. Sometimes, ✔ electrical wiring in walls and ceilings causes interference. Operate the Eclipse Premier from battery power. ✔ 10-6 070-1149-01 B Eclipse Operating Instructions...
-
Page 109: Maintenance And Service
Calibrating the Battery Regular battery calibration is an important part of Eclipse Premier maintenance. Refer to “Using the Battery” on pg. 2-4 for information on when and how to calibrate the battery. -
Page 110: Testing Equipment
To calibrate the battery pack, perform the steps outlined in “Calibrating the Battery” on pg. 2-5. The battery pack in the Eclipse Premier is not user replaceable. It must be replaced by an authorized service representative. -
Page 111: Notice To Responsible Service Personnel
It is intended for short-term ECG waveform acquisition. There are no audible or visible alarms. CAUTION: Although the Eclipse Premier is designed to meet IEC 601-1-2 EMC immunity requirements, the presence of strong EMI fields generated by electronic, surgical or diathermy instruments in close proximity to the unit may cause trace noise or input overload conditions. - Page 112 A fully discharged battery pack will completely recharge in approximately 5 hours. Heart rate detection The Eclipse Premier heart rate meter is specified to function in the range of 30 to 250 bpm with a tolerance of ±10% or ±5 bpm, whichever is greater. Question marks (???) appear on the printout if the heart rate is out of the specified range.
- Page 113 Performance Disclosures If any of the following appear on the printout or the screen, then pacemaker detection has been suspended due to excessive noise: PS (for Pacer Suspended). This small marking appears in the ✔ lower right corner of the printout. Pacer detection suspended due to external noise - REVIEW ✔...
-
Page 114: Emc Declaration Tables
EMC declaration tables. The Eclipse Premier is intended for use in the electromagnetic environment specified below. The customer or the user of the Eclipse Premier should assure that it is used in such an environment. -
Page 115: Emc Declaration Tables
40% U 40% U lines it is recommended that the Eclipse Premier be (60% dip in U (60% dip in U powered from an uninterruptible power supply or IEC 61000-4-11 for 5 cycles for 5 cycles a battery. - Page 116 If the measured field strength in the location in which the Eclipse Premier is used exceeds the applicable RF compliance level above, then the Eclipse Premier should be observed to verify normal operation. If abnormal performance is observed, additional measures may be necessary, such as reorienting or relocating the Eclipse Premier.
- Page 117 Refer to the following table for recommended separation distances between the Eclipse Premier and portable and mobile RF communications equipment. The Eclipse Premier is intended for use in an electromagnetic environment in which radiated RF disturbances are controlled. The user of the Eclipse Premier can help...
-
Page 118: Technical Specifications
Chapter 11 Maintenance and Service Technical Specifications 43.5cm x 65.1cm x 125.7cm Dimensions (with cart): (17.125" x 25.625" x 49.5") Weight (with cart): 39.5 kg (87 lbs) Power Requirements: Mains Power Requirement 115/230 V AC ±10%, 0.80/0.40 A, 50/60 Hz Battery Operation 16.8 VDC NiCd battery pack Fuses:... - Page 119 Technical Specifications Input/Output: standard RS-232 (9 pin “D”) analog output (DB 25) telephone line interface (RJ11C) ATA compact flash card Adapter Module (optional) non-standard DB-9 female non-standard DB-9 male 5V DC power jack Options (Adapter Module 802.11b/g wireless Ethernet (optional) required) 802.3 Ethernet RJ45 (optional) barcode reader (optional)
- Page 120 Chapter 11 Maintenance and Service 11-12 070-1149-01 B Eclipse Operating Instructions...
-
Page 121: Measurement Matrix
Chapter Measurement Matrix Eclipse Premier models with interpretation or measurement capabilities can be programmed to print the Measurement Matrix after the analysis report. The Measurement Matrix consists of 12 columns which contain measurements for the twelve standard leads. These columns are labeled I, II, III, aVR, aVL, aVF, V1, V2, V3, V4, V5, V6. -
Page 122: Chapter 12 Measurement Matrix
Chapter 12 Measurement Matrix MEASUREMENT DESCRIPTION STAMP ST wave amplitude in microvolts. 2/8STT Amplitude in microvolts at a point which is 2/8 of the ST-T interval. 3/8STT Amplitude in microvolts at a point which is 3/8 of the ST-T interval. T+AMP T+ wave amplitude in microvolts. -
Page 123: Index
Index corrected orthogonal leads faxing reports custom header 4-16 filter frequency AC mains frequency custom lead keys (custom lead 1, custom filter frequency key AC power lead 2) Frank ECG, acquiring acquiring ECG custom lead setup 4-11 Frank lead placement adapter module, connecting frequency response adding patient... - Page 124 pediatric lead placement communications equipment and cables performance disclosures 11-3 menus 11-1 maintenance phone line, connecting setup report printout, sample managing records phone number skin preparation manual key (MAN) phone type 11-10 specifications measurement matrix 12-1 power cable printing speed power indicator printout, sample standby mode...
- Page 125 RENs, contact the telephone company to determine the total REN for the calling area. If your Eclipse Premier™ causes harm to the telephone network, the telephone company will notify you in advance that temporary discontinuance of service may be required. But if advance notice isn’t practical, you will be notified as soon as possible.
- Page 126 IN-4 Eclipse Operating Instructions 070-1149-01 B...
- Page 128 Toll Free: +1.800.426.0337 Telephone: +1.425.402.2000 Cardiac Science Corporation Website: www.cardiacscience.com 3303 Monte Villa Parkway Email: techsupport@cardiacscience.com Bothell, WA 98021, USA 070-1149-01 B...
Need help?
Do you have a question about the Eclipse Premier and is the answer not in the manual?
Questions and answers