Welch Allyn VSM 6000 series Directions For Use Manual
Hide thumbs
Also See for VSM 6000 series:
- Directions for use manual (266 pages) ,
- Care & routine service (2 pages)
Table of Contents
Advertisement
Quick Links
Advertisement
Table of Contents

Subscribe to Our Youtube Channel
Related Manuals for Welch Allyn VSM 6000 series


Summary of Contents for Welch Allyn VSM 6000 series
- Page 1 Welch Allyn Vital Signs Monitor 6000 Series™ Directions for use...
- Page 2 Allyn. No other use, reproduction, or distribution of this publication, or any part of it, is permitted without written permission from Welch Allyn. Welch Allyn assumes no responsibility for any injury to anyone, or for any illegal or improper use of the product, that may result from failure to use this product in accordance with the instructions, cautions, warnings, or statement of intended use published in this manual.
-
Page 3: Table Of Contents
Contents Introduction ..................... 1 Intended use ............................1 Contraindications ..........................1 Symbols ....................3 Screen elements ..................5 About warnings and cautions ..............9 General warnings and cautions ..................... 9 Controls, indicators, and connectors ........... 13 Setup ...................... 17 Supplies and accessories ......................17 Insert the battery .......................... - Page 4 Contents Welch Allyn Vital Signs Monitor 6000 Series™ Navigation ....................29 Home tab ............................29 Device Status area ......................... 29 Content area ............................ 31 Navigation area ..........................32 Profiles ....................35 Select a profile ..........................37 Using the keypad, keyboard, and barcode scanner ......39 Open the numeric keypad ......................
- Page 5 Ethernet messages ........................125 USB messages ..........................125 System messages ......................... 125 Battery power manager messages .................... 126 Configuration Manager messages ..................... 126 Printer messages .......................... 126 Appendix ....................129 VSM 6000 series approved accessories .................. 129 Warranty ............................136...
- Page 6 Contents Welch Allyn Vital Signs Monitor 6000 Series™...
-
Page 7: Introduction
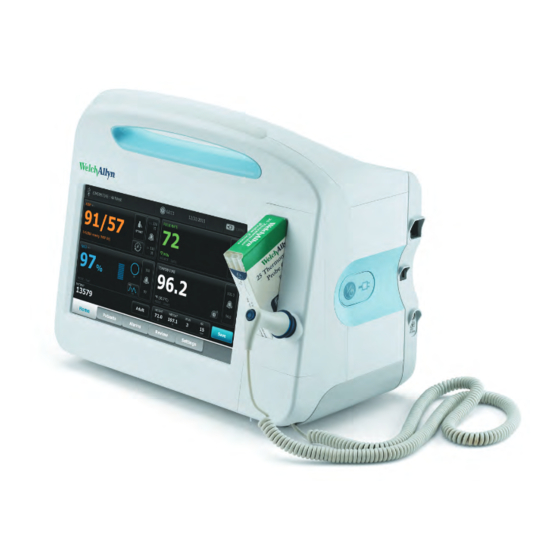
This manual (directions for use) is designed to help you understand the capabilities and operation of the Welch Allyn VSM 6000 series of monitors. The information in this manual, including the illustrations, is based on a monitor configured with noninvasive blood pressure (NIBP), body temperature, pulse oximetry (SpO2), and pulse rate options. - Page 8 2 Introduction Welch Allyn Vital Signs Monitor 6000 Series™...
-
Page 9: Symbols
Symbols Documentation symbols WARNING The warning statements in this manual identify conditions or practices that could lead to illness, injury, or death. Caution The caution statements in this manual identify conditions or practices that could result in damage to the equipment or other property, or loss of data. This definition applies to both yellow and black and white symbols. - Page 10 4 Symbols Welch Allyn Vital Signs Monitor 6000 Series™ Alternating Current (AC) Rechargeable battery Li-ion battery Connectivity symbols Ethernet RJ-45 Wireless signal strength Nurse call • Best (4 bars) • Good (3 bars) • Fair (2 bars) • Weak (1 bar) •...
-
Page 11: Screen Elements
Screen elements Global navigation Select option NIBP NIBP start NIBP stop Intervals status indicators NIBP view toggle Temperature Temperature site control Process indicator Direct mode selector... - Page 12 6 Screen elements Welch Allyn Vital Signs Monitor 6000 Series™ SpO2 and Pulse rate Pulse amplitude bar SatSeconds timer (Nellcor feature only) SpO2 view toggle Response mode selector (touch for Fast mode) Heart rate (in beats per minute) Manual parameters...
- Page 13 Directions for use Screen elements 7 Patients list and review Send patient test reports Print patient test reports Cancel print request Add patient identifiers Settings Save configuration settings Advanced settings Save to USB flash Configure from USB drive flash drive Restore factory default settings...
- Page 14 8 Screen elements Welch Allyn Vital Signs Monitor 6000 Series™...
-
Page 15: About Warnings And Cautions
Do not use the monitor to take measurements on any patient in transit. WARNING Use only Welch Allyn approved accessories. Using unapproved accessories with the monitor can affect patient and operator safety and adversely affect product performance and accuracy. To ensure patient safety and optimal product performance, use only Welch Allyn recommended accessories and supplies (i.e., cuffs, hoses, temperature probes, SpO2 sensors, etc.) and use... - Page 16 10 About warnings and cautions Welch Allyn Vital Signs Monitor 6000 Series™ WARNING Inaccurate measurement risk. Dust and particle ingress can affect the accuracy of blood pressure measurements. Use the monitor in clean environments to ensure measurement accuracy. If you notice dust or lint build-up on the monitor's vent openings, have the monitor inspected and cleaned by a qualified service technician.
- Page 17 WARNING Do not place the monitor in any position that might cause it to fall on the patient. WARNING Welch Allyn is not responsible for the integrity of a facility's power. If the integrity of a facility's power or protective earth conductor is in doubt, always operate the monitor on battery power alone when it is attached to a patient.
- Page 18 Replace the power cord if the strain relief or cord insulation is damaged or begins to separate from the attachment plug. Caution Use only the Welch Allyn USB client cable to connect a computer or power supply to the USB client port.
-
Page 19: Controls, Indicators, And Connectors
Controls, indicators, and connectors Your model may not contain all of these features. Note No. Feature Description Printer Optional. Printer provides a printout of patient and device information. Light bar Provides a visual alarm with red and amber LEDs. Thermometry Optional. - Page 20 14 Controls, indicators, and connectors Welch Allyn Vital Signs Monitor 6000 Series™ No. Feature Description Blood pressure Self-contained module for easy replacement. Supports dual-lumen or single-lumen hoses. SpO2 Optional Nellcor or Masimo pulse oximetry in a self- contained module for easy replacement.
- Page 21 Directions for use Controls, indicators, and connectors 15 No. Feature Description Recess for mounting plate Secures the monitor when mounted on the mobile stand or wall. USB connector door Provides access to host USB connections for optional accessories. Fan intake Speaker Provides an audible alarm (low, medium, or high) and SpO2 pulse tones.
- Page 22 16 Controls, indicators, and connectors Welch Allyn Vital Signs Monitor 6000 Series™...
-
Page 23: Setup
Setup Supplies and accessories For a list of all approved supplies and accessories, see the VSM 6000 Series Approved Accessories in the Appendix. Insert the battery This procedure applies to first-time setup of the monitor. Therefore, the monitor is assumed to be shut down. -
Page 24: Mount The Monitor On A Stand
18 Setup Welch Allyn Vital Signs Monitor 6000 Series™ Do not remove the tab label from the battery. This tab helps you Note remove the battery from the compartment when you need to replace it. Replace the battery cover by inserting one end into the notched access and then pressing firmly on the opposite end. -
Page 25: Attach The Temperature Probe
Directions for use Setup 19 The probe well snaps into place when it is fully seated. Insert the temperature probe into the probe well. Attach the temperature probe Caution The temperature module only operates with the probe well properly in place. -
Page 26: Remove The Temperature Probe And Well
20 Setup Welch Allyn Vital Signs Monitor 6000 Series™ Push it into place until it clicks. Reattach the cover. Use the alignment tab and slide the cover to the left to click it back into place. Remove the temperature probe and well Follow these steps to disconnect the probe cable and remove the probe well. -
Page 27: Disconnect The Nibp Hose
Directions for use Setup 21 Insert the hose connector, pressing firmly until it clicks into place. Disconnect the NIBP hose Place your thumb and forefinger on the hose connector. Always grasp the hose by the connector. Do not pull on the hose Note itself. -
Page 28: Detach An Accessory
22 Setup Welch Allyn Vital Signs Monitor 6000 Series™ Caution Connect cables in a manner that minimizes entangling. Close the door and tighten the screw. Detach an accessory On the rear of the monitor, loosen the screw on the USB door and open it. -
Page 29: Connect Ac Power
Directions for use Setup 23 With one hand, pull lightly on the paper to take up any slack. With the other hand, close the printer door by pushing it down and into place until it clicks. Be certain that the paper does not catch in the printer door. Connect AC power You can use the monitor with AC or battery power (after charging the battery). - Page 30 24 Setup Welch Allyn Vital Signs Monitor 6000 Series™...
-
Page 31: Startup
Startup Power The power button, located on the side of the monitor, performs the following functions: • Powers up the monitor • Sets the monitor into Display power saving mode, except when an alarm condition is active (brief press) • Resets the monitor and sets the monitor into Standby mode (press and hold for 6 seconds) Caution Do not use a long press of to power down the monitor when it is... -
Page 32: Power Up The Monitor
Press to power up the monitor. Following a successful self-test, the monitor displays the Welch Allyn logo, the LED light bar (located on the handle) flashes, and a power-up tone sounds. The startup screen then appears with the following banner across the bottom. -
Page 33: Power Down The Monitor
Directions for use Startup 27 If a system error is detected, the monitor becomes inactive until you press or until the monitor shuts down automatically. The monitor displays a system fault message that contains a wrench icon and a system fault code to aid service and engineers in diagnosing the problem. -
Page 34: Create A Clinician Id
28 Startup Welch Allyn Vital Signs Monitor 6000 Series™ Create a clinician ID Go to the Clinician tab using one of these methods: • Touch the Clinician ID section (left edge) of the Device Status area on the Home tab. -
Page 35: Navigation
Navigation The monitor screen provides the interface that you use to complete your workflow. You access the monitor's features by touching the screen. Home tab The Home tab includes the following areas: Item Area Device Status Content Navigation Device Status area The Device Status area, located at the top of the Home screen, displays the following monitor information, from left to right: •... - Page 36 30 Navigation Welch Allyn Vital Signs Monitor 6000 Series™ • Time and date. Touch this area to navigate to date and time settings. • Connection status (wired or wireless). The icons indicate which connection type, if any, is currently active.
-
Page 37: Content Area
Directions for use Navigation 31 Observe the remaining battery charge in the battery status indicator and plug the Note monitor into a power outlet as soon as you are able. If the information message is dismissed or you do not take any action to charge the battery, a low battery alarm condition results. -
Page 38: Navigation Area
32 Navigation Welch Allyn Vital Signs Monitor 6000 Series™ Save patient data Patient data can be saved to the monitor. After taking a patient reading, touch Save. A message will appear indicating a successful or failed save. You can configure some profiles and settings to automatically save Note measurements. - Page 39 Directions for use Navigation 33 • A title bar with a sliding button and lock icon replaces the Navigation area, located at the bottom of the screen. • Patient information no longer appears at the bottom left of the screen. •...
- Page 40 34 Navigation Welch Allyn Vital Signs Monitor 6000 Series™...
-
Page 41: Profiles
Profiles Profiles are variations of the Home tab. Each profile gives you access to a different set of features. Choose the profile that best suits your needs. The monitor offers multiple profiles—including Monitor, Spot Check, and Triage—based on the model and any upgrade licenses you purchase. Monitor profile The Monitor profile enables you to use alarms and timed intervals. - Page 42 36 Profiles Welch Allyn Vital Signs Monitor 6000 Series™ Spot Check profile The Spot Check profile is optimized for clinicians who take spot-check vitals readings and do not need automatic reading or alarm features. Triage profile The Triage profile allows for vital signs capture without alarms or access to the Patients tab.
-
Page 43: Select A Profile
Directions for use Profiles 37 Profile feature comparison The following table compares the features of the profiles. Feature Monitor Spot Check Triage Take NIBP, SpO2, temperature, and pulse rate readings Configure and use interval timing setting Observe and configure alarm limits Observe and respond to physiological alarms Change patient type... - Page 44 38 Profiles Welch Allyn Vital Signs Monitor 6000 Series™...
-
Page 45: Using The Keypad, Keyboard, And Barcode Scanner
Using the keypad, keyboard, and barcode scanner Open the numeric keypad Touch any field that includes the numeric keypad icon The numeric keypad appears. Numeric keypad The numeric keypad includes the following components: Component Name Description Data field Displays the numbers you enter. The field name appears above and the range of values you can enter appears below this field. -
Page 46: Enter A Number
40 Using the keypad, keyboard, and barcode scanner Welch Allyn Vital Signs Monitor 6000 Series™ Component Name Description Cancel button When touched, the numeric keypad disappears and the selected number does not change. OK button When touched, the numeric keypad disappears and the entered number appears in the associated frame or data field. - Page 47 Directions for use Using the keypad, keyboard, and barcode scanner 41 Component Name Description Data field Displays the characters you enter. Backspace key When touched, removes the rightmost character from the data field. Space bar When touched, enters a space in the data field.
-
Page 48: Enter A Letter Or Number
42 Using the keypad, keyboard, and barcode scanner Welch Allyn Vital Signs Monitor 6000 Series™ Component Name Description OK button When touched, the keyboard disappears and the entered characters appear in the data field. Enter a letter or number With the keyboard open, touch letters or numbers. -
Page 49: Close The Keyboard
Directions for use Using the keypad, keyboard, and barcode scanner 43 Diacritical marks key Language(s) Finnish, Norwegian, Spanish, Swedish Portuguese Polish Greek With the keyboard open, touch the diacritical marks key. This key varies based on the language, as noted above. The keyboard displays diacritical marks for the selected language and therefore varies from one language to another. - Page 50 44 Using the keypad, keyboard, and barcode scanner Welch Allyn Vital Signs Monitor 6000 Series™ Scanning a patient's barcode while on the Home tab will place the scanned ID into Note the Patient frame. Scanning a patient's barcode while the Patients List tab is open requires the following additional steps: •...
-
Page 51: Patient Data Management
You can use a barcode scanner to query existing patient records and perform an ADT patient name match. ® ® If the monitor is connected to the network running Welch Allyn Connex Note software, the monitor can receive a patient name from patient records associated with a scanned ID number. -
Page 52: Select A Patient
46 Patient data management Welch Allyn Vital Signs Monitor 6000 Series™ The Patient ID appears in the Patient frame. Caution Verify patient identity on the monitor after manual or barcode entry and before printing or transferring patient records. Select a patient Touch the Patients tab. -
Page 53: Print Patient Data
Directions for use Patient data management 47 You can configure some profiles and settings to automatically send Note measurements to the network. Patient measurements older than 24 hours are automatically Note deleted from the patient records list on the Review tab. The date and time stamps on saved patient measurements will Note adjust in response to new date and time settings. -
Page 54: Modifiers
48 Patient data management Welch Allyn Vital Signs Monitor 6000 Series™ At the Delete Confirmation window, touch OK to permanently delete the selected patient. Touch Cancel to cancel the deletion. Deleting a patient from the Patients List does not delete saved Note records. -
Page 55: Alarms
Alarms The monitor presents physiological alarms and technical alarms. Physiological alarms occur when vital sign measurements fall outside of set alarm limits, but they occur only in the Monitor profile. Technical alarms occur in all profiles. Alarm types Type Priority Color Alarm audio tone High... - Page 56 50 Alarms Welch Allyn Vital Signs Monitor 6000 Series™ Home tab Home tab notifications Notification Description Device Status area The area changes color and displays a message with an accompanying status icon or button. If the alarm tone is in a pause interval, a timer countdown appears.
-
Page 57: Reset (Pause Or Turn Off) Audio Alarms
Directions for use Alarms 51 Icons in parameter frames Icon Name and status Alarm on. Audio and visual notifications and Nurse Call are enabled. Alarm audio off. Only visual notifications, including Nurse Call, will occur. Alarm audio paused. The audio tone is paused for a period ranging from 90 seconds to 15 minutes. The icon remains until the paused time counts down to 0. -
Page 58: Adjust Vital Sign Alarm Limits
52 Alarms Welch Allyn Vital Signs Monitor 6000 Series™ • If an audio alarm is not paused or turned off after a period of time, a buzzer accompanies the tone. Pause or turn off an audio alarm In the Device Status area, touch •... -
Page 59: Modify Audio Alarm Notification
Directions for use Alarms 53 Caution Loss of power will cause the monitor to return to default settings. Each time you power up the monitor, you must set alarm limits appropriate for your patient. On the Home tab, touch the alarm limits control in the selected parameter frame. For example, to adjust the NIBP alarm limits, touch Adjust vital sign alarm limits. -
Page 60: Alarm Messages And Priorities
54 Alarms Welch Allyn Vital Signs Monitor 6000 Series™ On the General tab, modify audio alarm notification. • To enable or disable audio alarms, select Alarm audio on or Alarm audio off. If you turn off audio alarms, visual alarm signals still occur in the LED light bar, Device Status area, and on the Home tab in parameter frames. - Page 61 Directions for use Alarms 55 Alarm messages Priority Alarm limit exceeded. Temperature HIGH. Alarm limit exceeded. Temperature LOW. Technical alarms Alarm messages Priority Low battery 5 minutes or less remaining. High Searching for pulse signal. High Communications module did not power on properly. Power down the device. High Network not found;...
-
Page 62: Nurse Call
To connect the monitor to a Nurse Call system, you must have a cable that has been adapted to your Nurse Call system (REF 6000-NC), rated 25V AC or 60V DC maximum at 1A maximum. For ordering information, see the VSM 6000 Series Approved Accessories in the Appendix. - Page 63 Directions for use Alarms 57 WARNING Do not rely exclusively on Nurse Call for patient monitoring. Although the Nurse Call option enables remote notification of an alarm condition, it is not intended to replace appropriate bedside patient monitoring by trained clinicians. When a patient alarm occurs, touching the alarm icon in the Device Status area Note pauses the alarm tone for a period ranging from 90 seconds to 15 minutes as...
- Page 64 58 Alarms Welch Allyn Vital Signs Monitor 6000 Series™...
-
Page 65: Patient Monitoring
Patient monitoring NIBP Noninvasive Blood Pressure (NIBP) frame From the NIBP frame, you can measure blood pressure. Located in the upper left corner of the Home tab, the NIBP frame contains data and features relevant to noninvasive blood pressure measurement. The frame provides different features based on the profile you are using. - Page 66 60 Patient monitoring Welch Allyn Vital Signs Monitor 6000 Series™ Buttons The buttons on the right side of the frame enable you to do different tasks depending on the profile you are using. The availability of functions depends on which profile is selected. See the Profiles section for more information.
- Page 67 Wrap the cuff around the patient's bare upper arm and verify that the artery index marker lies somewhere between the two range markings on the cuff. Cuff measurements The following tables provide measurements for Welch Allyn blood pressure cuffs. One-piece cuff measurements Cuff Size...
- Page 68 3.5 – 5.9 Multi-pack 1 of each 1 of each For ordering information, see the see the VSM 6000 Series Approved Accessories in the Appendix. Position the cuff The monitor and cuffs were validated using the bare upper arm site. Note WARNING Patient injury risk.
- Page 69 Device Status area. For neonate patients, set the NIBP settings as follows: Patient = Neonate, Tube type = 1 tube, Algorithm = Step. Welch Allyn uses the following definition of Neonate: Children 28 days or less of age Note...
- Page 70 Welch Allyn Vital Signs Monitor 6000 Series™ Take a manual NIBP measurement WARNING Patient injury risk. Never install Luer Lock connectors on Welch Allyn blood pressure cuff tubing. Using these connectors on blood pressure cuff tubing creates the risk of mistakenly connecting this tubing to a patient's intravenous line and introducing air into the patient's circulatory system.
- Page 71 Directions for use Patient monitoring 65 Automatic intervals You can configure the monitor to take automatic NIBP measurements at consistent intervals. Note An alarm does not turn off intervals. Subsequent automatic measurements continue to occur as scheduled. Start automatic intervals Follow these steps to configure the monitor to take NIBP measurements at consistent intervals.
- Page 72 66 Patient monitoring Welch Allyn Vital Signs Monitor 6000 Series™ Start program intervals Follow these steps to configure the monitor to take automatic NIBP measurements at variable intervals. Properly size the blood pressure cuff and position it around the patient’s bare upper arm.
- Page 73 Directions for use Patient monitoring 67 When you select the Stat option in the Intervals tab, the monitor takes repeated NIBP measurements for 5 minutes, starting a new cycle each time the cuff deflates below safe venous return pressure (SVRP) for 2 seconds. WARNING Patient injury risk.
-
Page 74: Temperature
68 Patient monitoring Welch Allyn Vital Signs Monitor 6000 Series™ On the Home tab, touch The monitor rapidly deflates the cuff, and the screen displays the NIBP cancellation message. If intervals are turned on, the button changes to a timer ( ), which counts down to the next automatic measurement. - Page 75 Directions for use Patient monitoring 69 Temperature measurement display In all profiles, the frame can display temperature in Celsius or Fahrenheit. You can configure the default view in Advanced settings. Site selection Remove the temperature probe and touch the Temperature site control to toggle between sites.
- Page 76 WARNING Probe covers are single-use only. Re-use of a probe cover may result in spread of bacteria and cross-contamination. WARNING Patient injury risk. Use only Welch Allyn single-use disposable probe covers. Never take a temperature measurement without a single-use probe cover securely attached.
- Page 77 Directions for use Patient monitoring 71 WARNING Patient illness or cross-contamination may result from improper placement of oral and rectal temperature probes in the probe wells. • Place only oral probes, identified by a blue ejection button at the top of the probe, in the blue probe wells.
- Page 78 72 Patient monitoring Welch Allyn Vital Signs Monitor 6000 Series™ Provides continual temperature measurements. For oral and rectal measurements, it is recommended to measure temperature until the temperature stabilizes or for 3 minutes. For axillary measurements, it is recommended to measure temperature until the temperature stabilizes or for 5 minutes.
- Page 79 Directions for use Patient monitoring 73 While the measurement is taking place, the temperature frame displays the process indicator. The monitor sounds a tone when the final temperature is reached (in approximately 6 to 15 seconds). The temperature frame continues to display the temperature in degrees Fahrenheit and degrees Celsius even after the probe is returned to the probe well.
- Page 80 74 Patient monitoring Welch Allyn Vital Signs Monitor 6000 Series™ The monitor enters Direct mode by the following methods. • After you complete a Predictive mode measurement, touch to switch from Predictive to Direct mode. The temperature frame (in the lower-left corner) changes to "MODE: Direct..."...
- Page 81 Directions for use Patient monitoring 75 The monitor does not retain Direct mode temperatures in memory. Note Therefore, it is important to note the temperature before removing the probe from the measurement site and then manually record it in the patient record. Remove the probe after the temperature measurement is complete and firmly press the eject button on the top of the probe to release the probe cover.
- Page 82 Do not autoclave the thermometer and probe covers. Ensure that probe covers are disposed of according to facility requirements or local regulations. Caution The thermometer has no user-serviceable parts. If service is required, call your nearest Welch Allyn Customer Service or Technical Support facility.
- Page 83 Directions for use Patient monitoring 77 Caution Store the thermometer and probe covers in a dry location, free from dust and contamination and away from direct sunlight. Keep the ambient temperature at the storage location fairly constant and within the range of 50°F to 104°F (10°C to 40°C).
-
Page 84: Spo2
The battery pack continues to charge while the monitor is in Display power saving Note mode. It is strongly recommended that you use only the Welch Allyn rechargeable battery Note pack in the thermometer because the dock cannot charge other batteries. - Page 85 Directions for use Patient monitoring 79 SpO2 numeric view in Monitor profile SpO2 numeric view in Spot Check and Triage profiles The SpO2 numeric view indicates the SpO2 saturation percentage and the pulse amplitude. The pulse amplitude bar indicates the pulse beat and shows the relative pulse strength. More bars illuminate as the detected pulse gets stronger.
- Page 86 80 Patient monitoring Welch Allyn Vital Signs Monitor 6000 Series™ WARNING The accuracy of the SpO2 measurement can be affected by any of the following: • the presence of significant amounts of dysfunctional hemoglobin, such as carboxyhemoglobin or methemoglobin • the presence of concentrations of some intravascular dyes, sufficient to change the patient's usual arterial pigmentation •...
- Page 87 Directions for use Patient monitoring 81 A range of different sensors is available for different patient sizes Note and measurement sites. Consult the SpO2 sensor manufacturer's directions for use to select the correct sensor based on the patient's weight. Confirm the monitor displays SpO2 and pulse rate data within 15 seconds of being connected to a patient.
- Page 88 82 Patient monitoring Welch Allyn Vital Signs Monitor 6000 Series™ Set Response Mode To set the Response Mode from the Home tab, the monitor must be in the Monitor profile. Touch in the SpO2 frame. The SpO2 frame will display in the lower left corner when Fast mode is selected.
-
Page 89: Pulse Rate Frame
Directions for use Patient monitoring 83 PI is a relative reading of pulse strength at the monitoring site. PI is a numerical value that indicates the strength of the IR (infrared) signal returning from the monitoring site. PI display ranges from .02 percent (very weak pulse strength) to 20 percent (very strong pulse strength). PI is a relative number and varies between monitoring sites and from patient to patient, as physiological conditions vary. -
Page 90: Manual Parameters Frame
84 Patient monitoring Welch Allyn Vital Signs Monitor 6000 Series™ Verify that you are using the Monitor profile, which contains the Alarms tab. Touch the Alarms tab. Touch the Pulse rate tab. Enter the desired upper and lower alarm limits for pulse rate using the up/down arrow keys or the keypad. - Page 91 Directions for use Patient monitoring 85 Touch to confirm settings and return to the Home tab. During intervals, each automatic and manual save of patient measurements clears Note all measurements from Manual parameters frame.
- Page 92 86 Patient monitoring Welch Allyn Vital Signs Monitor 6000 Series™...
-
Page 93: Maintenance And Service
Maintenance and service Perform periodic checks Welch Allyn recommends that each facility conduct periodic checks of each monitor. Check the following at least daily: • Audio (speaker and piezo beeper tones), especially at startup • Fan, especially at startup •... - Page 94 88 Maintenance and service Welch Allyn Vital Signs Monitor 6000 Series™ WARNING Hot surface. Do not touch the printer mechanism. Insert a new roll of paper. Note The paper roll must be installed as illustrated. If the paper roll is not installed correctly, the printer will not print properly.
-
Page 95: Change The Battery
Directions for use Maintenance and service 89 Change the battery Before removing the battery, shut down the monitor. Turn the monitor upside down to access the battery cover. Locate the battery cover, indicated by Insert a coin into the slot and push to open. Choose a coin that fits comfortably in the slot. Pull the battery out by pulling the battery label, which is visible when you open the battery cover. -
Page 96: Clean The Monitor
90 Maintenance and service Welch Allyn Vital Signs Monitor 6000 Series™ New batteries are approximately 30 percent charged. Therefore, connect the Note battery to AC power immediately after inserting a new a battery. WARNING Risk of fire, explosion, and burns. Do not short-circuit, crush, incinerate, or disassemble the battery pack. -
Page 97: Clean The Accessories
Directions for use Maintenance and service 91 Disinfect according to your facility's protocols and standards or local regulations. Note CaviWipes or Sani-Cloth Plus Using CaviWipes or Sani-Cloth Plus, wipe the surface of the monitor to remove all debris. Allow the monitor surface to dry for a minimum of 10 minutes before using the monitor. 70 percent isopropyl alcohol Wipe the monitor with a clean cloth slightly dampened with 70 percent isopropyl alcohol. - Page 98 92 Maintenance and service Welch Allyn Vital Signs Monitor 6000 Series™...
-
Page 99: Specifications
Specifications Physical specifications Protection classifications, all monitor configurations Characteristic Specification Electrical rating 100 – 240 V AC, 50 – 60 Hz, 1.5 – 0.8 A Duty cycle Continuous operation Type of protection against electric Class I equipment (protectively earthed) with double insulation shock Type BF defibrillator proof Degree of protection against electric... - Page 100 94 Specifications Welch Allyn Vital Signs Monitor 6000 Series™ Protection classifications, all monitor configurations Pixel arrangement RGB (red, green, blue) Color depth 16 bits per pixel Speaker volume Output sound pressure 67 dB at 1.0 meter per IEC 60601-1-8 Alarm and pulse tones Pulse frequency (f 150 –...
- Page 101 Directions for use Specifications 95 NIBP specifications Cuff pressure range Meets or exceeds ANSI/AAMI SP10:2002 standards for cuff pressure range Systolic range Adult: 30 to 260 mmHg (StepBP, SureBP) Pediatric: 30 to 260 mmHg (StepBP, SureBP) Neonate: 20 to 120 mmHg (StepBP) Diastolic range Adult: 20 to 220 mmHg (StepBP, SureBP) Pediatric: 20 to 220 mmHg (StepBP, SureBP)
- Page 102 96 Specifications Welch Allyn Vital Signs Monitor 6000 Series™ SureTemp Plus temperature module specifications Standard deviation Does not exceed 0.5°F for oral, axillary, and rectal modes Braun ThermoScan PRO 4000 thermometer specifications (refer to manufacturer's directions for use for additional information) Temperature range 68°F to 108°F (20°C to 42.2°C)
-
Page 103: Environmental Specifications
Operating humidity 15 to 95% noncondensing Storage humidity 15% to 95% noncondensing Monitor radio The monitor's radio operates on Welch Allyn FlexNet™ or other 802.11 networks. IEEE 802.11 b/g, 802.11a Wireless network interface Frequency 802.11 b/g: 2.402 GHz to 2.4835 GHz... -
Page 104: Configuration Options
98 Specifications Welch Allyn Vital Signs Monitor 6000 Series™ Channels Up to 14 in 802.11b/g, up to 24 in 802.11a; country-dependent WPA2/AES (either EAP or PSK authentication) Security/encryption/ authentication Internal multiband PIFA Antenna Wireless data rates 802.11b: 1Mbps or higher during vitals transmission only 802.11a/g: 6Mbps or higher during vitals transmission only... -
Page 105: Patents
Wireless. Includes all Standard features plus an internal 802.11 a/b/g radio. Patents The Welch Allyn VSM 6000 series monitor is covered under the following patents: 6,000,846; 6,036,361; 6,036,718; 6,095,983; 6,544,173; 6,544,174; 6,578,428; 6,616,606; 6,971,790; 6,827,488; 6,988,989; 7,021,824; 7,226,419; 7,255,475; 7,390,299; 7,429,245; 7,439,856; 7,515,043;... - Page 106 100 Specifications Welch Allyn Vital Signs Monitor 6000 Series™...
-
Page 107: Standards And Compliance
Standards and compliance General compliance and standards The monitor complies with the following standards: 21 CFR Subchapter H – Medical Devices – US Food and Drug Administration 2002 No. 236 – Australian Therapeutic Goods Act 93/42/EEC – European Economic Community Medical Devices Directive 2007/47/EC –... -
Page 108: General Radio Compliance
This booklet is available from the U.S. Government Printing Office, Washington, D.C. 20402. Stock No. 004-000-0034504. Welch Allyn is not responsible for any radio or television interference caused by unauthorized modification of the devices included with this Welch Allyn product, or the substitution or attachment of connecting cables and equipment other than specified by Welch Allyn. - Page 109 Cet appareil numérique de la classe B est conform à la norme NMB-003 du Canada. European Union Czech Welch Allyn tímto prohlašuje, ze tento RLAN device je ve shodě se základními požadavky a dalšími příslušnými ustanoveními směrnice 1999/5/ES. Danish Undertegnede Welch Allyn erklærer herved, at følgende udstyr RLAN device overholder de væsentlige krav og øvrige relevante krav i direktiv 1999/5/EF...
- Page 110 Šiuo Welch Allyn deklaruoja, kad šis RLAN device atitinka esminius reikalavimus ir kitas 1999/5/EB Direktyvos nuostatas. Spanish Por medio de la presente Welch Allyn declara que el RLAN device cumple con los requisitos esenciales y cualesquiera otras disposiciones aplicables o exigibles de la Directiva 1999/5/CE Swedish Härmed intygar Welch Allyn att denna RLAN device står I överensstämmelse med de...
-
Page 111: Guidance And Manufacturer's Declaration
• All medical electrical equipment must be installed and put into service in accordance with the EMC information provided in this document and the VSM 6000 Series Directions For Use. • Portable and mobile RF communications equipment can affect the behavior of medical electrical equipment. - Page 112 106 Guidance and manufacturer's declaration Welch Allyn Vital Signs Monitor 6000 Series™ Electromagnetic emissions Voltage fluctuations/ Complies WARNING This equipment/system is intended flicker emissions for use by healthcare professionals only. This IEC 61000-3-3 equipment/ system may cause radio interference or may disrupt the operation of nearby equipment .
- Page 113 Directions for use Guidance and manufacturer's declaration 107 Electromagnetic immunity Portable and mobile RF communications equipment should be used no closer to any part of the monitor, including cables, than the recommended separation distance calculated from the equation applicable to the frequency of the transmitter.
- Page 114 108 Guidance and manufacturer's declaration Welch Allyn Vital Signs Monitor 6000 Series™ Recommended separation distances between portable and mobile RF communications equipment and the monitor 150 kHz to 80 80 MHz to 800 800 MHz to 2.5 GHz Rated max.
-
Page 115: Advanced Settings
Advanced settings The Advanced tab provides password-protected access to the monitor's Advanced settings (or Admin mode), enabling nurse administrators, biomedical engineers, and/or service engineers to configure specific features. The Advanced tab also presents read-only information about the monitor. You cannot enter the Advanced settings if sensors or physiological alarms are Note active or if vital sign measurements are displayed. - Page 116 110 Advanced settings Welch Allyn Vital Signs Monitor 6000 Series™ • To exit the Advanced Settings and return to the Home tab, touch Exit. Specify date and time settings Access the Advanced Settings. Touch the Settings tab. Touch the Advanced tab.
- Page 117 Directions for use Advanced settings 111 Minimum alarm volume Select the minimum alarm volume available. If you High Medium select , then are not available to the clinician. These controls are on the Alarms tab (on the General tab). Nurse call threshold Select the minimum priority alarm that activates a High nurse call relay.
- Page 118 112 Advanced settings Welch Allyn Vital Signs Monitor 6000 Series™ Specify a monitor location You can associate the monitor with a specific location. The location appears in the Device Status area. Access the Advanced Settings. Touch the Settings tab. Touch the Advanced tab.
-
Page 119: Parameters
Directions for use Advanced settings 113 Touch the Demo tab. Specify settings. Setting Action/Description Type Select a type of demonstration mode. Start Touch Start to put the monitor in demonstration mode. Navigate to the Home tab to begin Demo mode. Do one of the following: •... - Page 120 114 Advanced settings Welch Allyn Vital Signs Monitor 6000 Series™ Step If you select the algorithm, touch enter a default cuff inflation target for each type of patient. In the Patients tab on the Summary tab, clinicians can change the CITs from the default CITs that you set here.
- Page 121 Directions for use Advanced settings 115 Touch the Parameters tab. Touch the SpO2 tab. Specify settings. Setting Action/Description Default view Select a numeric view or a waveform view as the primary SpO2 display on the Home tab. Default response Select the default speed of response to changes in SpO2 measurements.
-
Page 122: Data Management
116 Advanced settings Welch Allyn Vital Signs Monitor 6000 Series™ Touch the Parameters tab. Touch the Manual tab. Select up to four parameters and associated units of measure for display in the Manual Parameters frame. If SureTempPlus is connected to the monitor, the Temperature parameter is not available here or in the Manual Parameters frame. - Page 123 Directions for use Advanced settings 117 Secondary label Select a secondary identification label for patients. A secondary label displays only on the Home tab, after the primary label. Require patient ID to save readings Select this option to make entering a patient ID a prerequisite for saving measurements.
-
Page 124: Network
118 Advanced settings Welch Allyn Vital Signs Monitor 6000 Series™ Touch the Settings tab. Touch the Advanced tab. Enter the Advanced settings code. Touch OK. The General tab appears. Touch the Data Management tab. Touch the Clinical Data tab. Specify settings. - Page 125 Directions for use Advanced settings 119 Access the Advanced Settings. Touch the Settings tab. Touch the Advanced tab. Enter the Advanced settings code. Touch OK. The General tab appears. Touch the Network tab. Touch the Radio tab. Specify settings. Setting Action/Description SSID Touch...
-
Page 126: Service
To continue in the Advanced Settings, touch another tab. • To exit the Advanced Settings and return to the Home tab, touch Exit. Service See the Welch Allyn Vital Signs Monitor 6000 Series Service Manual (103500) for service-related advanced settings. -
Page 127: Troubleshooting
Troubleshooting This section presents tables of technical alarm and information messages to help you troubleshoot issues on the monitor. When the monitor detects certain events, a message appears in the Device Status area at the top of the screen. Message types include the following: •... -
Page 128: Spo2 Messages
122 Troubleshooting Welch Allyn Vital Signs Monitor 6000 Series™ Message Possible cause Suggested action Clear the alarm and retry NIBP. Incorrect NIBP cuff size; check The cuff size is not correct Check the patient type. patient type. Clear the alarm and retry NIBP. -
Page 129: Temperature Messages
Directions for use Troubleshooting 123 Message Possible cause Suggested action Replace the SpO2 sensor. The SpO2 sensor is faulty Replace the SpO2 sensor. No SpO2 sensor is connected Connect an SpO2 sensor. Temperature messages Message Possible cause Suggested action Connect temperature probe. No probe is connected Connect a temperature probe and retry. -
Page 130: Radio Messages
124 Troubleshooting Welch Allyn Vital Signs Monitor 6000 Series™ Message Possible cause Suggested action from appearing when new records are saved. Unable to access patient An error occurred when reading the patient Power down and restart the information. list or patient record during startup monitor. -
Page 131: Ethernet Messages
External device not recognized. An unrecognized external device is Disconnect the unrecognized connected device. Incompatible Welch Allyn A communication protocol failure has Call for service. device. occurred System messages Message Possible cause Suggested action Set date and time. -
Page 132: Battery Power Manager Messages
126 Troubleshooting Welch Allyn Vital Signs Monitor 6000 Series™ Battery power manager messages Message Possible cause Suggested action Low battery 5 minutes or less Battery power is extremely low Connect the monitor to AC remaining. (High-priority alarm) power. (If not connected to... - Page 133 Directions for use Troubleshooting 127 Message Possible cause Suggested action Printer too hot; wait to retry. The print head overheated Wait for the print head to cool down and retry. If the problem persists, call for service. Printer not functional. Call for The printer motor is broken Call for service.
- Page 134 128 Troubleshooting Welch Allyn Vital Signs Monitor 6000 Series™...
-
Page 135: Appendix
Appendix VSM 6000 series approved accessories The following tables list approved monitor accessories and documentation. For information about options, upgrades, and licenses, refer to the service manual. FlexiPort cuffs (Latex free) Part Number Model Description Reuse-08 Reusable Cuff, reuse, SM CHILD, 2-tube... - Page 136 130 Appendix Welch Allyn Vital Signs Monitor 6000 Series™ Part Number Model Description 5082-102-1 Disposable Neo-2 disposable cuff, male luer connector (box of 10 cuffs) 5082-103-1 Disposable Neo-3 disposable cuff, male luer connector (box of 10 cuffs) 5082-104-1 Disposable Neo-4 disposable cuff, male luer connector (box of 10 cuffs)
- Page 137 Directions for use Appendix 131 Part Number Model Description LNCS-DCI LNCS Reusable finger sensor - Adult LNCS-DCIP LNCS Reusable finger sensor - Pediatric LNCS-ADTX LNCS Disposable adhesive finger sensor - Adult (20 per case) LNCS-PDTX LNCS Disposable adhesive finger sensor - Pediatric (20 per case) LNC-4 LNCS 4-foot cable with sensor connector...
- Page 138 132 Appendix Welch Allyn Vital Signs Monitor 6000 Series™ Part Number Model Description OXI-A/N OxiMax Oxiband adult/neonatal transducer (1 sensor, 50 wraps) OXI-P/I OxiMax Oxiband pediatric/infant transducer (1 sensor, 50 wraps) SureTemp Plus thermometry Part Number Description 02895-000 Oral probe and well kit (9ft., 2.7M) 02895-100 Rectal probe and well kit (9ft., 2.7M)
- Page 139 Directions for use Appendix 133 Accessories Part Number Description BATT69 Lithium-ion battery 6 Cell BATT99 Lithium-ion battery 9 Cell — Extended Life 6000-100H Carrying case, hard sided 6000-100S Carrying case, soft sided PWCD-B Line cord B, North America PWCD-2 Line cord 2, Europe PWCD-A Line cord A, Denmark PWCD-5...
- Page 140 134 Appendix Welch Allyn Vital Signs Monitor 6000 Series™ Part Number Description 660-0321-00 Patch cable, 50' 660-0320-00 Patch cable, 100' 660-0138-00 Patch cable, 5' 715270 Box set — packaging — empty 6000-50 USB memory stick Service Part Number Description 6000-BT0...
- Page 141 Directions for use Appendix 135 Part Number Description 103654 Directions for Use VSM 6000, Printed Copy, Finnish 103655 Directions for Use VSM 6000, Printed Copy, Greek 103656 Directions for Use VSM 6000, Printed Copy, Norwegian Quick Reference Card 103502 Quick Reference Card VSM 6000, English 103658 Quick Reference Card VSM 6000, French 103659...
-
Page 142: Warranty
Welch Allyn Vital Signs Monitor 6000 Series™ Warranty Welch Allyn warrants the VSM 6000 to be free of defects in material and workmanship and to perform in accordance with manufacturer's specifications for the period of two years from the date of purchase from Welch Allyn or its authorized distributors or agents.
Need help?
Do you have a question about the VSM 6000 series and is the answer not in the manual?
Questions and answers