Table of Contents
Advertisement
Quick Links
Advertisement
Table of Contents

Related Manuals for Welch Allyn VSM 300 Series


Summary of Contents for Welch Allyn VSM 300 Series
- Page 1 VSM 300 Series Training Handbook...
-
Page 3: Table Of Contents
Contents Introduction Page 1 Start Up Page 3 VSM Buttons Page 4 Patient Type, Target Pressure & Temperature Mode Page 5 Configuration Menu & Volume of SpO2 Pulse Tone Page 6 Batch Printing & Limits Page 7 Alarm Suspend Page 8 NIBP Page 9 SpO2 Page 10 Temperature Monitoring Page 11 Review Button, Nurse Call, Erasing Data & Cleaning Page 15 Error Codes Page 16 VSM Competency Checklist Page 17 VSM Competency Test Page 19 VSM Answer Sheet Page 23 VSM Answers & Contact Details Page 25... -
Page 4: Introduction
Introduction... - Page 5 Light Weight and Durable • Weighs approx 5 lbs • Made of heavy plastic Battery • Sealed Lead Acid battery 6 V. • Battery life provides approx 8 hours of continuous monitoring of BP, Temperature and SpO2 • The battery charges to 90% of capacity in 12 hrs • The VSM should be charging, unless it is being used Low Battery Warning • See battery indicator on front panel when the unit is turned on. • When battery is LOW, a warning tone sounds and the low battery indicator flashes. (to avoid shutdown, plug in and connect the AC power) • When the low battery indicator comes on, there is enough charge remaining in order to perform at least ONE of the following functions over the next hour: - 20 NIPB cycles - 30 Minutes of SpO2 - 20 Temperatures - A single printing of 99 stored data sets ...
-
Page 6: Start Up
Start Up The VSM runs a self check on powering up. You will see 888 in various parameter windows. -
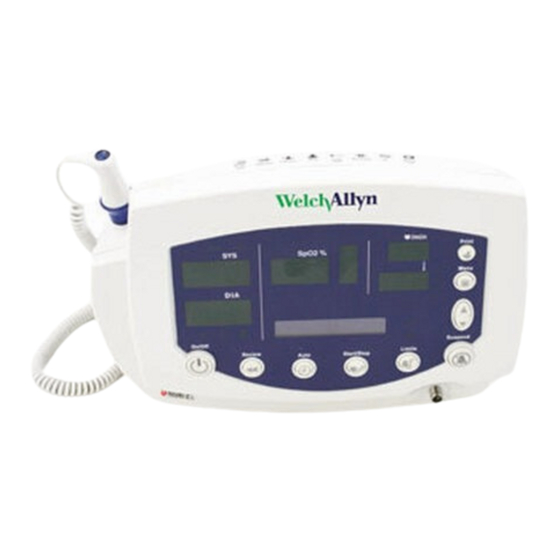
Page 7: Vsm Buttons
VSM Buttons Buttons on the front of the VSM300 face plate as listed: • Turn the VSM on by pressing the on/off switch • Diagnostics screen • Review • Auto • B/P Start/Stop • Limits Suspend • Up/Down arrows • Menu • Print Each time you press the menu button, it will scroll through a series of menus which you can select to change. These include: Patient type - Target Pressure - Temperature Mode - SpO2/HR Tone volume... -
Page 8: Patient Type, Target Pressure & Temperature Mode
Patient Type This allows you to choose: ADULT (ages over 13 years) PAEDIATRIC (ages 29 days - 12 years) NEONATE (ages < 28 days) Press the up/down arrows until you reach the selected mode NOTE: Age group icon on the left above on/off button Adult Neonatal Paediatric To set the displayed new values, don’t do anything for 10 seconds. Target Pressure allows you to change the initial cuff inflation pressure preset for each age group. (This is the nominal starting point, if it is too low to take a measurement, the monitor takes another using a higher initial pressure) • Press arrow to make changes to the target pressure • To set the displayed new values, don’t do anything for 10 seconds Temperature Mode allows you to choose: • F Fahrenheit Predictive: 15 second Adult Axillary & 10 second Paediatric Axillary • F M Fahrenheit Monitored: 3 minute oral, 5 minute axillary, 3 minute rectal monitored temperature • C Celsius Predictive: 15 second Adult Axillary & 10 second Paediatric Axillary • C M Celsius Monitored 3 minute oral, 5 minute axillary, 3 minute rectal monitored temperature Press the arrow to choose the temperature mode you want To set the displayed new values, don’t do anything for 10 seconds... -
Page 9: Configuration Menu & Volume Of Spo2 Pulse Tone
Configuration Menu This menu allows you to make changes such as: • Time & Date • Hour (0 - 23 or 1 - 12) • Minute • Year • Month • Day • MAP Measurement, enabled/disabled. The MAP value will be displayed in the message window • Blood Pressure (measurement units in mmHg or kPa) • Print Mode: - Batch will print all data in memory up to 99 cycles - Stream prints results as soon as each cycle is finished To Change a Configuration Parameter • PRESS and HOLD the MENU button down for 3 or more seconds. • PRESS the MENU button repeatedly until you reach the parameter you wish to change • Now PRESS until you reach the value you wish to change the parameter to Changing the Volume of the SpO2 Pulse Tone The pulse tone can be set from level 00 (volume off) to 05 (volume on full) • PRESS the MENU button repeatedly until VOLUME appears & the pulse tone sounds continuously • PRESS the UP or DOWN arrow depending on whether you want to... -
Page 10: Batch Printing & Limits
• To set the displayed new values, don’t do anything for 10 seconds or press any button other than the or arrows. (Changing the volume of the pulse tone has no effect on the volume or alarm tones) Selecting Stream or Batch Printing (if applicable) • PRESS and HOLD the MENU button for 3 seconds until a message appears on the window that reads PRINT BATCH or PRINT STREAM • PRESS THE arrows to alternate between display, print batch, print stream • To set the displayed new values, don’t do anything for 10 seconds or press any button other than the or keys Limits This feature allows you to make changes to the high & low alarm limits for the following vital signs: • Systolic HIGH & systolic LOW • Diastolic HIGH & diastolic LOW • Pulse rate HIGH & pulse rate LOW • SpO2 HIGH & SpO2 LOW • MAP HIGH & MAP LOW (if applicable) Follow these steps to make changes to the limits: • PRESS LIMITS button • For the selected vital sign, do one of the following: - Leave the limit unchanged or - Press as needed to change the limit to another value or (--) to disable the alarm. • The alarm parameter you are changing, such as HR HIGH, is displayed in the message window • PRESS the LIMITS button to accept alarm limit & advance to next vital sign... -
Page 11: Alarm Suspend
Alarm Suspend Button When an alarm sounds, pressing the suspend button will silence it for only 90 seconds NOTE: You will see a flashing display of the alarmed parameter NIBP Before starting the NIBP measurement, always follow the steps described in the following procedures: • Selecting a cuff (the cuff is the appropriate size, when the artery Index marker lies somewhere between the range markings on the NIBP cuff) • Positioning the cuff (the cuff should always be positioned on a bare arm, midway between the shoulder and the elbow, with the artery index marker over the brachial artery). It should fit comfortably to allow 1-2 fingers space between the cuff and the arm (there should not be room for more than 1-2 fingers). During the NIBP measurement cycle, the patient should have no movement to the extremity and should remain quiet NOTE: If the cuff is not level with the heart, add 1.8 mmHg to the displayed reading for each inch of elevation above the heart, or subtract 1.8 mmHg from the displayed reading for each inch below the heart Follow these steps to take a single BP: • Attach the cuff to the patients arm • Press BP • When the BP cycle is completed, a tone sounds and the NIBP results are displayed in the SYS, DIA, and Pulse rate windows. • If MAP is enabled, the results are displayed in the message window NOTE: If the SpO2 sensor is attached and generating valid pulse data, then the displayed pulse rate is derived from the SpO2 sensor readings... - Page 12 Automatic NIBP—Interval Measurements Cycles will repeat continuously at programmed intervals • Attach the appropriate size cuff to the patient’s arm • Press to set the measurement interval which includes: ST(Stat) & a range of intervals listed below: (Choose between 1,3,4,5,10,15, 30,45,60, 90, 120, 240 minutes) The two dashes ( -- ) in the message window indicate that the automatic mode for NIBP is turned OFF. • Ten seconds after you select an interval, and assuming that safe Venous re turn pressure has been maintained for at least 30 seconds, the monitor starts the first automatic NIBP cycle • When the cycle ends, a tone sounds and the monitor displays the measurement. (The measurement will remain on the screen until, the next measurement cycle begins or either 2 minutes pass, or the NIBP is pressed again. ST/ STAT Measurement If the selected interval is STAT, the VSM monitor takes repeated NIBP measurements for 5 minutes, starting a new cycle each time the cuff deflates below safe venous return pressure (SVRP) for 2 seconds. MAP Measurement This is a calculated figure, available for adults, paediatric and neonates...
-
Page 13: Spo2
SpO2 Monitoring • Verify that the SpO2 sensor is connected to the monitor • Attach the SpO2 sensor to the patient’s index finger. Do not attach the SpO2 sensor to the same limb as the B/P cuff • Within a few seconds, the pulse amplitude indicator reflects the rate and strength of the pulse • Within less than 20 seconds, the SpO2 window displays the SpO2 measurement and a numeric pulse rate value appears... -
Page 14: Temperature Monitoring
Temperature Monitoring Prep Thermometer Probe • Holding the probe handle with your thumb and two fingers on the indentations of the probe handle, withdraw the probe from the probe well • Wait for the 188.8 and the ORL to appear in the temperature screen • Insert the probe into a new probe cover, and press down firmly until a new probe cover engages onto the probe. Taking Oral Temperatures It is IMPORTANT that while taking a 4 second predictive temperature that: • The patient is instructed not to talk or move during the temperature reading process • Place the Probe deep into the patient’s medial posterior sublingual pocket • The nurse holds the probe in place maintaining tissue contact until the temperature is complete... - Page 15 Taking Axillary Temperatures • Holding the probe handle with your thumb and two fingers on the indentations of the probe handle, withdraw the probe from the probe well • Wait for the 188.8 and the ORL to appear in the temperature screen • Press the UP/ DOWN arrows to change the display to: AP( axillary pediatric 17 years and younger) or AA ( axillary adult 18 years and older) • Insert the probe into a new probe cover, and press down firmly until a new probe cover engages onto the probe • Lift the patients arm to fully expose the axilla, place the probe tip as high as possible in the axilla, aligning the probe vertically with the spine and then lower the patients arm down to make maximum contact with the probe tip. The patient should always remain still, maintaining good tissue contact throughout the process.
- Page 16 Taking Rectal Temperatures For rectal temperatures, use only the RECTAL PROBE/with the RED ejection button & the RED probe well • Holding the probe handle with your thumb and two fingers on the indentations of the probe handle, withdraw the probe from the probe well • Wait for the 188.8 and the rEC to appear in the temperature window • Load the probe cover onto the probe • Apply a thin coat of water-based lubricant to the tip of the probe cover (optimal) • Insert the probe tip 5/8 of an inch for adults and approximately ½” for children inside the rectal sphincter • Tilt the probe slightly to ensure good tissue contact ** WARNING** Use extreme care to avoid any risk of bowel perforation • Temperature reading will be displayed for 1 minute on message window • Things that will create interferences with oral measurements for up to 20 minutes: - Ingesting hot or cold liquids 20 minutes prior - Talking - Eating food - Chewing gum or mints - Brushing teeth - Mouth care - Smoking - Performing strenuous exercises NEVER reuse probe covers; reusing covers will give inaccurate temperature readings and may be an infection risk.
- Page 17 Monitored Mode Remember to select correct scale, F M or C M, for Monitor Mode Temperature • Continuous monitoring mode; not recommended for use over 5 minutes. • Measurements are not stored in memory • 3-5 Minute thermometer reading is equivalent to using a glass thermometer. • Useful for double-checking fast predictive readings; i.e. an infant exposed to cool ambient temperatures, or hypothermic patient • To use monitor mode: - Select the correct probe/probe well - Load probe cover • Determine the site for the Temperature reading: Oral, Axillary, or Rectal. • Take the patient’s reading in the appropriate place. Continue to hold the probe in position as the temperature is displayed • Keep the thermometer in place for the required duration: - Oral 3 minutes - Axillary 5 minutes - Rectal 3 minutes • Record the temperature before removing the probe from the site. • Discard the probe cover. Upon returning the probe to the well, the thermometer will stay in present mode used. Change as needed NOTE: The thermometer enters Monitor Mode automatically if it is not used for 60 seconds or if the patient’s temperature is too low to allow the device to predict...
-
Page 18: Review Button, Nurse Call, Erasing Data & Cleaning
Review Button Review button will systematically display all accumulated data starting with the most recent stored set of patient vital signs data. The message window displays READING with data-set sequence number and time of displayed reading. Nurse Call (if applicable) When the cable is connected and operational, the monitor immediately notifies the Nurse Call system when a patient alarm occurs. Erasing Data • If you attempt to change the date and time, the monitor prompts you to confirm that you also want to erase all stored data. • To erase patient data during normal operation, press and hold the Review button for 3 seconds • When the monitor prompts for confirmation, press the Up button to confirm or the Down button to cancel Cleaning Wipe with a damp cloth with one of the following: • 70% isopropyl Alcohol • 10% or less Bleach Solution • Mild detergent and water • Hospital disinfectant that is non-staining Patient Type... -
Page 19: Error Codes
Error Codes • The VSM 300 is equipped with the technology to detect an error in calculating a patients vital sign. The codes will display on the parameter that has the error. • The error code references are located on the right side of the VSM 300 and also on page 74 in the VSM 300 User’s Manual... -
Page 20: Vsm Competency Checklist
Medical Devices: Self-verification of competency This form must be passed to your manager when complete Surname: Forename(s) Title (Mr/Mrs/Miss/Dr etc): Payroll No: Job Title/Designation: Dept/Ward Manager’s Name: Competency Code Description Risk Tick Welch Allyn VSM 5300 Self-verification of competence is undertaken by assessment against the following statements: The statements are designed to indicate competence to use the device. Responsibility remains with the user. If any doubt exists, consult your manager to arrange training. You must be able to answer YES to all applicable statements before considering yourself to be competent You should be aware of the Trusts performance standard for the safe use of medical devices. You should have read and understood the instructions for use... - Page 21 Questions to ask for Self-Verification of competence Do you know? Where the instructions for use are to be found? How to visually check the casing for signs of damage? What the intended use and contraindications are? What functions the different screen elements control? How to startup the device? How to navigate the monitor screen? How to change the monitor profile? How to manage patient data? How to manage alarms? How to monitor a patient? How to clean the unit & what cleaning materials to use? What action to take if the unit appears to be faulty? Statement: I am competent to use the above device without further training: Signature: Date: Statement: I require further training to become competent in the use of the above device Signature: Date:...
-
Page 22: Vsm Competency Test
Vital Signs Monitor 300 Series Competency Test Answer Sheet Located on Page 23 1. True or False: The Vital Signs Monitor 300 Series is intended to be used on adult, paediatric, and neonatal patients? 2. Which of the following is true when positioning the blood pressure cuff: a. The preferred NIBP site for adults and children is the upper arm b. The preferred NIBP site for an infant is the thigh/calf c. Wrap the cuff snugly with room between the cuff and the arm for only one to two fingers, placing the cuff on a bare arm d. When wrapping the cuff, observe the mark on the cuff which must be placed over the brachial artery, insure the hose is not twisted, kinked or compressed and that the connections are tight e. All of the above 3. - Page 23 4. True or False: If the monitor is in the Automatic Blood Pressure Mode, the measured values are kept on display until the next BP measurement is initiated. 5. True of False: If the monitor is in the Manual Blood Pressure Mode, the measured values are displayed for two minutes, after which time the display screen is blanked. 6. Which of the following is true when placing an SPO2 probe for monitoring: a. Do not place the SPO2 sensor on the same extremity as the BP cuff since it will cause inaccurate SPO2 measurements when the cuff is inflated b. It is not recommended for use on the thumb; best placement is the index finger c. Both of the above d. None of the above 7. How can you retrieve the most recent vital sign measurement(s) if it is not displayed? a. By pressing the REVIEW button b. By pressing the select button...
- Page 24 9. How many measurements are available for reviewing and printing: a. b. c. d. 10. When taking an oral temperature, which of the following is the proper placement of the temperature probe: a. Anywhere in the mouth under the front of the tongue b. Posterior medial sublingual pocket c. None of the above d. All of the above 11. True or False: It is necessary to place the temperature probe back into the holder before attempting to take another temperature measurement.
- Page 25 13. How can you determine that the battery charge is weak? a. A solid yellow indicator on the front of the monitor will be displayed by the charging indicator b. An audible alarm will occur c. A yellow indicator light on the front of the monitor will flash continuously as a visual indicator by the low battery indicator d. b and c 14. To obtain a printout of your patient’s vital signs: a. Press the Print button located on the front of the monitor b. Press the Power button located on the face of the monitor c. Press the Review button first, then the Print button d. None of the above...
-
Page 26: Vsm Answer Sheet
VSM 300 Series Competency Test - ANSWER SHEET: Answer Sheet... -
Page 28: Vsm Answers & Contact Details
Contact Details UK Customer Service Welch Allyn UK Ltd Cublington Road, Aston Abbotts, Aylesbury, Bucks, HP22 4ND Tel: 020 7365 6780 Fax: 020 7365 9694 Head of Product Training Ian Mundey Mobile: 07764 139108 E-mail: ian.mundey@welchallyn.com ANSWERS VSM300 Series Test True True True True 10. 11. True 12. 13. 14. a...
Need help?
Do you have a question about the VSM 300 Series and is the answer not in the manual?
Questions and answers