Welch Allyn Spot VS100 In-Service - Quick Reference Manual
Vision screener
Hide thumbs
Also See for Spot VS100:
- Directions for use manual (64 pages) ,
- Setup manual (22 pages) ,
- Basic instructions (17 pages)
Advertisement
Spot VS100 Vision Screener – In-Service Guide
We offer customers that purchase Spot VS100 Vision Screener telephone In-Service to
review menu options and basic function of the unit. This Quick Reference takes you through the
In-Service process step by step.
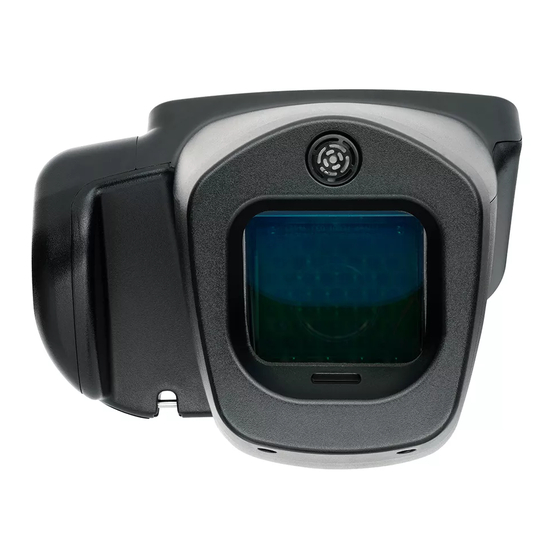
Vision Screener Overview
Do you have your Spot Vision Screener device in front of you?
Stand it up on the round end (the part you point at the subject), so gray asset tag/label is
facing you.
Charging Port
The reason we turn it up this way is to help the customer hold it in proper position to
plug it in and give customer clear sight of how/where to plug in the device
Mention to the customer that: Using force to connect the power charger can damage
the device and will void the warranty . In other words, if they jam the charger in and
break the port, they are responsible for any damage (See page 6 of User Manual)
Power Button: Look at small black power button above green charging light
Press power button once for 2-3 seconds to turn on- unit will take about 30 seconds
to boot up
Need to hold button down for 10 seconds to turn off.
Charging Light (below power button)
Every time you plug in power cord, you should get a solid green light or a blinking
green light.
Plugged in and flashing green light means charging, solid green light means fully
charged
USB port
You need at least 8 gig thumb drive. Any thumb drive will work- just has to be 8 gigs –
that is exactly what the device holds- 8 gigs.
Gray asset tag/label
Spot VS100 Vision Screener In-Service
Customer Support- January 16, 2015
Spot VS100 Vision Screener
In-Service - Quick Reference Guide
Internal Use Only
1 of 5
Page
Advertisement
Table of Contents

Related Manuals for Welch Allyn Spot VS100


Summary of Contents for Welch Allyn Spot VS100
- Page 1 In-Service - Quick Reference Guide Spot VS100 Vision Screener – In-Service Guide We offer customers that purchase Spot VS100 Vision Screener telephone In-Service to review menu options and basic function of the unit. This Quick Reference takes you through the In-Service process step by step.
- Page 2 Spot VS100 Vision Screener In-Service - Quick Reference Guide Spot VS100 Serial Number location. (SN is at right upper corner of label) Vision Screener Menu and Display Now, turn screener over on its belly so screen is facing you, and turn it on by pressing power button once.
- Page 3 This setting is to save battery. ! Do not use None or battery will get used up fast. Spot VS100 Vision Screener In-Service Internal Use Only 3 of 5 Customer Support- January 16, 2015...
- Page 4 (Child may need to sit in parents lap) Be ready to do screening in 30 seconds (default setting) – or increase default setting if needed. (Under ResultsScreening Time Out) Spot VS100 Vision Screener In-Service Internal Use Only 4 of 5...
- Page 5 Queue: This is where import of subject info will be listed. 1. Search/locate subject record, press go and screen. 2. Clear queue when no longer needed Spot VS100 Vision Screener In-Service Internal Use Only 5 of 5 Customer Support- January 16, 2015...
Need help?
Do you have a question about the Spot VS100 and is the answer not in the manual?
Questions and answers