Welch Allyn Spot VS100 Directions For Use Manual
Vision screener
Hide thumbs
Also See for Spot VS100:
- Directions for use manual (64 pages) ,
- Setup manual (22 pages) ,
- Basic instructions (17 pages)
Table of Contents
Advertisement
Advertisement
Table of Contents

Related Manuals for Welch Allyn Spot VS100


Summary of Contents for Welch Allyn Spot VS100
- Page 1 Welch Allyn ® Spot ® Vision Screener Model VS100 Directions for use...
- Page 2 Welch Allyn Spot Vision Screener VS100 © 2015 Welch Allyn. All rights are reserved. To support the intended use of the product described in this publication, the purchaser of the product is permitted to copy this publication, for internal distribution only, from the media provided by Welch Allyn.
-
Page 3: Intended Use
Introduction This Directions for use manual is a comprehensive guide designed to help you understand the capabilities and operation of your Spot Vision Screener VS100. The information in this manual includes all options available with the Spot Vision Screener. The applicability of some sections of this manual depends on the configuration of your particular device. -
Page 4: Documentation Symbols
Consult operating instructions/directions for use (DFU). A copy of the DFU is available on this website. A printed copy of the DFU can be ordered from Welch Allyn for delivery within 7 calendar days. WARNING The warning statements in this manual identify conditions or practices that could lead to loss of data, illness, injury, or death. -
Page 5: User Interface Symbols
Directions for use Introduction The CE mark on this product indicates that it has been tested to and conforms with the provisions noted within the 93/42/ EEC Medical Device Directive. User Interface Symbols Battery status/level indicator Battery charging (Flashing) or charged (Continuous) Wireless On/Off button Connected to the wireless network No wireless network in range... - Page 6 Introduction Welch Allyn Spot Vision Screener VS100 Cannot connect to configured network Sound off Sound on Continue Back Exit Print job in progress...
-
Page 7: Warnings And Cautions
WARNING Lithium ion battery. Risk of fire, explosion, and burns. Do not handle or disassemble the battery pack. WARNING Use only accessories approved by Welch Allyn. Visit www.welchallyn.com. The use of any other accessories can result in inaccurate patient data, can damage the equipment, and can void your product warranty. - Page 8 Caution The device is not waterproof. If you accidentally drop it into liquid or liquid is spilled on the device, contact Welch Allyn Technical Support immediately. If minor water droplets are found on the device, wipe off with a soft dry cloth.
-
Page 9: Contents Checklist
Directions for use Introduction Contents Checklist The main shipping box contains the vision screener, Directions for use, and the Accessory box. The Accessory box contains: AC Power Cord. Power Supply/Charger. Cleaning Cloth. Velcro Cable Straps. NOTE: Please do not discard the box and foam. Damages incurred by shipping the device in non-approved packing material will void the limited warranty (see warranty for details). - Page 10 Introduction Welch Allyn Spot Vision Screener VS100...
-
Page 11: Controls, Display Window, And Connections
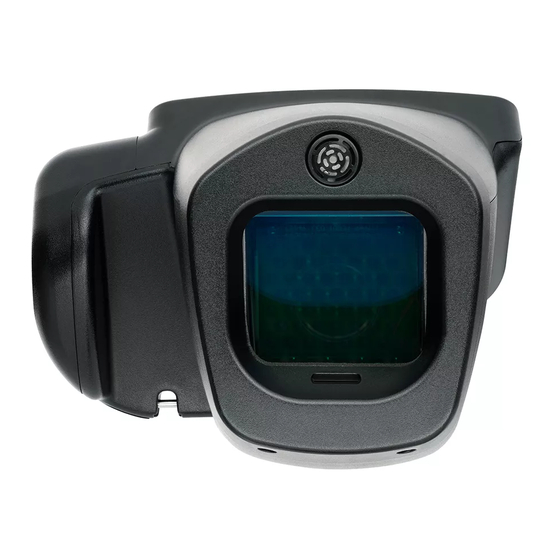
Controls, Display Window, and Connections Drawings and text are representative of the Spot Vision Screener with all available options. Features Rear View of Vision Screener LCD Screen Neck Strap Mount AC Power Connector Power Button Wrist Strap Mount Serial Number Label Tripod Mount Battery Charge Green LED Indicator USB Port... - Page 12 Controls, Display Window, and Connections Welch Allyn Spot Vision Screener Front View of Vision Screener Range Finder Front Glass Speaker...
-
Page 13: Display Window
Directions for use Controls, Display Window, and Connections Display Window When the vision screener is powered on, the main menu or Home Screen will appear. If the vision screener is connected to a network, the network name and IP address will be visible in the upper left corner in the black bar. -
Page 14: Subject Information Screen
Controls, Display Window, and Connections Welch Allyn Spot Vision Screener Subject Information Screen On the subject information screen, confirm all data is correct. You can modify information by touching the field you wish to change. After the change is completed select OK and you will come back to the subject information screen. -
Page 15: Understanding The Results
Directions for use Controls, Display Window, and Connections Understanding the Results Pupillary Distance Pupil Size Indicator Right Eye (OD), Left Eye (OS) Complete refraction SE - Spherical equivalent DS - Sphere DC – Cylinder Axis – Axis Home Cylinder Convention Alignment Indicator Degree, Horizontal, Vertical... - Page 16 Controls, Display Window, and Connections Welch Allyn Spot Vision Screener Tools The Tools menu will allow you to customize and configure the vision screener with the following options: Displays firmware version, software application version and serial number. Also displayed is a quick reference of important the vision screener features, including memory storage...
-
Page 17: Setting Up The Vision Screener
Setting up the Vision Screener Charging Connect the provided DC cord set and power supply/charger together. 2. Gently lift the back of the vision screener to view the available connections. 3. Locate the DC power connector on the vision screener and connect the power supply/charger. -
Page 18: Wireless Network Configuration
Setting up the Vision Screener Welch Allyn Spot Vision Screener • Input Screen—Holding down the Back button on any input (keyboard) screen will delete all data from the field. • Low Battery—When the battery level reaches a very low level, a notice will appear to the User indicating they should insert the power cable or the device will shut down. -
Page 19: Printer Configuration
Directions for use Setting up the Vision Screener Printer Configuration The vision screener is capable of connecting and printing to most network capable Hewlett-Packard (HP) printers. The vision screener also contains some generic PCL drivers that can be used with non-HP printers, as well as a custom driver that supports the Brother QL -720NW label printer. -
Page 20: Adding A Direct Connect (Usb) Printer
Setting up the Vision Screener Welch Allyn Spot Vision Screener Note PCL drivers are available for non-HP printers. It is not guaranteed that every printer will work with the vision screener. 4. Once changes have been made, select Save. 5. Once saved, the Print Test Page will appear dark. -
Page 21: Importing/Exporting Files
Directions for use Setting up the Vision Screener Importing/Exporting Files From the Tools menu, select Import/Export and you will be directed to the Import/ Export screen. 2. Insert a USB storage device into the USB port on the vision screener (Recommended USB size is 8GB or larger). -
Page 22: Custom Banner
Updated criteria files (SpotCriteria.csv) Custom Banner Welch Allyn offers the ability to add a custom banner to the bottom of the printable reports. Please note that Welch Allyn does not supply custom banners. You will need to create your banner using the specifics below: •... -
Page 23: Web Access
4. Send the file titled spot-[serial number].reg to Welch Allyn Support at customerservice@welchallyn.com. Welch Allyn Support will review your registration file and email you a valid license key. Once you receive the key, perform the following: Save the file to the top level (root directory) of a USB Drive. - Page 24 Setting up the Vision Screener Welch Allyn Spot Vision Screener...
-
Page 25: Vision Screener Operation
Vision Screener Operation Screening Environment For optimal screening results, screen in an environment with lower level subdued lighting. Be sure to eliminate or block any sources of sunlight and/or incandescent light from reflecting on the subject’s eyes. Florescent light is acceptable but note that the subject’s pupil size can be affected and can decrease your chances of a successful screening. -
Page 26: How To Focus The Vision Screener
Vision Screener Operation Welch Allyn Spot Vision Screener How to Focus the vision screener Position vision screener approximately 36 inches away from subject. Hold vision screener close to body and lean forward and backward until the screen becomes gray. Make small movements until the spinner appears on the gray screen. -
Page 27: Monocular Mode
Directions for Use Vision Screener Operation Monocular Mode In monocular mode, you will be given the option to choose which eye to screen. This should be attempted when binocular screening does not capture the subjects’ pupils. Touch the side of the screen that corresponds with the eye you would like to screen. (OD = subjects right eye;... - Page 28 Vision Screener Operation Welch Allyn Spot Vision Screener Understanding the Results The figure below outlines the results screen and what it shows you: Pupillary Distance Pupil Size Indicator Right Eye (OD), Left Eye (OS) Complete refraction SE - Spherical equivalent DS - Sphere DC –...
-
Page 29: Vision Screener Criteria
Directions for Use Vision Screener Operation Vision Screener Criteria To modify current screening criteria: Perform an export and insert the USB drive into your PC. 2. Go to the USB drive folder and open the Spot folder that you just exported; select the import folder. - Page 30 Vision Screener Operation Welch Allyn Spot Vision Screener For example: If a subject were 2 years and 10 months old, you would enter 2Y10M. Use numeric and alpha characters. • Gender—Select Male or enter M; select Female or enter F . Alpha characters only;...
-
Page 31: Troubleshooting
Troubleshooting System Restart To power cycle the vision screener - press and hold the On/Off button until a confirmation screen appears. Select Confirm to power off. 2. When the screen turns black, wait 30 seconds and then press the power button to turn the vision screener back on. -
Page 32: System Messages
The system has not been able to read the Power cycle the device. If problem device configuration file. persists, contact Welch Allyn Support. For more information on troubleshooting or error messages, contact Welch Allyn’s support team (refer to the last page of this manual for additional contact information). -
Page 33: Cleaning The Vision Screener
Cleaning the Vision Screener Clean the Vision Screener WARNING Electric shock hazard. Before cleaning the monitor, disconnect the DC power cord from the power outlet and the vision screener. WARNING Liquids can damage electronics inside the vision screener. Prevent liquids from spilling on the vision screener. - Page 34 Cleaning the Vision Screener Welch Allyn Spot Vision Screener...
-
Page 35: Specifications
6 months. • Welch Allyn suggests a battery replacement, at an appointed Welch Allyn repair facility, every 2.5 years at the owner’s expense. The vision screener regular maintenance consists of wiping dust or dirt off the front glass surface and the LCD display as needed. - Page 36 Specifications Welch Allyn Spot Vision Screener Dimensions (in): 8½ x 6¾ x 4¾ (LxWxH) Weight (lbs.): ~2.55 Wireless Network: 802.11 b/g/n Operating Temperatures (°C): +10 to +40 Operating Humidity: 30% to 95% Relative Humidity (non-condensing) Storage/Shipping Temperatures (°C): 0 to +50...
-
Page 37: Environmental Protection
Directions for Use Specifications Environmental Protection This device contains Lithium ion cells and other electronic materials. Please contact your local government authorities for proper electronic waste recycling or disposal methods at end of life. EMC Information This equipment has been tested and found to comply with the limits for a Class B digital devices, pursuant to Part 15 of the FCC Rules. -
Page 38: Emc Table
EMC Table Table 1. Emission Guidance The Welch Allyn vision screener is intended for use in the electromagnetic environment specified below. The operator or the user of the device should assure that it is used in such an environment. Emission Test... - Page 39 Directions for Use Specifications Conducted RF 3 Veff from 150kHz to 80MHz 3 Veff from 150kHz to 80MHz The portable and mobile devices with RF EN 61000-4-6 communication shouldn’t be used near any part of the device, including cables, except when they follow the Radiated RF 3 V/m from 80MHz to 2.5GHz 3 V/m from 80MHz to 2.5GHz...
-
Page 40: Fcc Compliance Statement
Operation of this equipment in a residential area is likely to cause harmful interference in which case the user will be required to correct the interference at his own expense. WARNING Changes or modifications not expressly approved by Welch Allyn could void the user’s authority to operate the equipment. Vision Screener radio The vision screener radio operates on 802.11 networks. -
Page 41: General Radio Compliance
Directions for Use Specifications This product can be used with the following restriction(s): France — Outdoor use is limited to 10 mW EIRP within the band 2454 to 2483.5 MHz. Norway — Does not apply for the geographical area within a radius of 20 km from the center of Ny-Ålesund. -
Page 42: European Union
Undertegnede Welch Allyn erklærer herved, at følgende udstyr RLAN device overholder de væsentlige krav og øvrige relevante krav i direktiv 1999/5/EF. Dutch Bij deze verklaart Welch Allyn dat deze RLAN device voldoet aan de essentiële eisen en aan de overige relevante bepalingen van Richtlijn 1999/5/EC. English Hereby, Welch Allyn, declares that this RLAN device is in compliance with the essential requirements and other relevant provisions of Directive 1999/5/EC. -
Page 43: Warranty
Welch Allyn any other liability in connection with the sale of the Welch Allyn product. Welch Allyn shall not be liable for any loss or damages, whether direct, incidental or consequential, resulting from the... - Page 44 Warranty Welch Allyn Spot Vision Screener...
Need help?
Do you have a question about the Spot VS100 and is the answer not in the manual?
Questions and answers
The screener keeps saying I'm too close to subject when I'm over 6 feet away from the student.
The Welch Allyn Spot VS100 Vision Screener uses a blue screen to indicate that the user is either too close or too far from the subject. If you are over 6 feet away and still receiving this indication, it is likely that you are beyond the device’s optimal capture range. To resolve this, position yourself within the proper distance and adjust your stance by slowly rocking forward and back until the screen turns grey, indicating you are in the correct capture range.
This answer is automatically generated