Table of Contents
Advertisement
Operating Instructions
®
DULCOMETER
DMT
On-site measurement transducer
Measured variables pH/redox/temperature
___ ___ ___ ___ ___ ___ ___ ___ ___ ___ ___ ___
DMTa
Please enter the identity code of the device here.
Please read the operating instructions through completely before
commissioning this equipment! Do not discard!
The operator shall be liable for any damage caused by installation or operating errors!
Part no. 987426
ProMinent Dosiertechnik GmbH · 69123 Heidelberg · Germany
BA DM 163 03/08 GB
Advertisement
Table of Contents

Related Manuals for ProMinent DULCOMETER DMT Series


Summary of Contents for ProMinent DULCOMETER DMT Series
- Page 1 Please read the operating instructions through completely before commissioning this equipment! Do not discard! The operator shall be liable for any damage caused by installation or operating errors! Part no. 987426 ProMinent Dosiertechnik GmbH · 69123 Heidelberg · Germany BA DM 163 03/08 GB...
- Page 2 Publishing details Publishing details: Operating Instructions ® DULCOMETER DMT on-site measurement transducer Measured variables pH/redox/temperature © ProMinent Dosiertechnik GmbH, 2000 Address: ProMinent Dosiertechnik GmbH Im Schuhmachergewann 5-11 69123 Heidelberg Germany Telephone: +49 6221 842-0 Fax: +49 6221 842-419 info@prominent.com www.prominent.com Subject to technical alterations.
-
Page 3: Table Of Contents
Negotiating operating menu ..........20 6.4.1 Calibration menu (pH only) ............ 21 6.4.2 Info display ................21 6.4.3 Menu options ................. 21 6.4.4 Negotiating the menu options ..........21 DMT settings ..................22 Measured variables pH and redox ........23 ProMinent ® Page 3... - Page 4 Spare parts and accessories ............48 Appendix ..................... 49 Conformity declarationdeclaration ............49 Terminal connection plan pH/redox/temperature ........ 50 Wiring example - two wire system ............51 PROFIBUS ® circuit board terminal connection ........52 Index ....................53 ProMinent ® Page 4...
-
Page 5: Device Identification/Identity Code: Measured Variable Ph
Mounting type wall/pipe mounted control panel mounted (not PROFIBUS ® -DMT) Version with ProMinent logo Electrical connection 4-20 mA (two wire) current loop, 24 V DC (16...40 V DC) PROFIBUS ® -DP, 24 V DC (16...30 V DC) Communication interface... -
Page 6: Device Identification/Identity Code: Measured Variable Redox
Mounting type wall/pipe mounted ® control panel mounted (not PROFIBUS -DMT) Version with ProMinent logo Electrical connection 4-20 mA (two wire) current loop, 24 V DC (16...40 V DC) PROFIBUS ® -DP, 24 V DC (16...30 V DC) Communication interface none ®... -
Page 7: Device Identification/Identity Code: Measured Variable Temperature
Mounting type wall/pipe mounted control panel mounted (not PROFIBUS ® -DMT) Version with ProMinent logo Electrical connection 4-20 mA (two wire) current loop, 24 V DC (16...40 V DC) PROFIBUS ® -DP, 24 V DC (16...30 V DC) Communication interface... -
Page 8: General Instructions For Use
Guidelines are intended to make your work easier. and safety instructions: CAUTION Describes a potentially dangerous situation. Non-observance can lead to personal injury or damage to property. IMPORTANT Describes a potentially dangerous situation. Non-observance can lead to damage to property. ProMinent ® Page 8... -
Page 9: Safety
Store and transport the DMT in the original packaging. IMPORTANT • Protect the DMT from damp and the effects of chemicals even when packed. Ambient conditions for storage and transport: Temperature: -20 °C to 70 °C Humidity: max. 95 % relative humidity, non condensing ProMinent ® Page 9... -
Page 10: Assembly And Installation
Hang the DMT onto the top of the bracket (fig. 3, ➀) and push down gently against the bracket (fig. 3, ➁), then push upwards until you hear a click (fig. 3, ➂). Tighten the locking screw to secure more firmly (housing is open). ProMinent ® Page 10... -
Page 11: Pipe Mounting
Pipe mounting Mounting materials (included in delivery): 1 x wall/pipe bracket 2 x cable ties 1 x sealing cap 1 x locking screw (PT) Can be mounted onto pipes of diameters from 25 mm to 60 mm. ProMinent ® Page 11... -
Page 12: Panel Mounting
DMT without buckling. (To achieve enclosure rating IP 54, steel must be at least 2 mm thick; plastic should be correspondingly thicker). NOTE The DMT will protrude from the control panel approx. 30 mm once mounted. Fig. 4 3463_4 ProMinent ® Page 12... -
Page 13: Installation (Electrical)
Can lead to malfunction of DMT. • The hinge between the front and back sections of the housing is not particularly strong. When working on the front section it should be held securely in place. ProMinent ® Page 13... -
Page 14: Wall Mounting
Now proceed according to 4.2.4 Connecting coaxial cable and 4.2.5 Connecting terminals. Then follow the steps below: Tighten the locking screws (fig. 6, ➂) for the threaded connectors. Swing the front section onto the back section. ProMinent ® Page 14... -
Page 15: Pipe Mounting
The cable must be laid in cable ducting on site to minimise stresses. Connect the cable from the back through the cut-out in the control panel: Follow the steps given in 4.2.4 Connecting coaxial cable and 4.2.5 Connecting terminals. ProMinent ® Page 15... -
Page 16: Connecting Coaxial Cable
Fig. 7 Fig. 8 pH/ORP Cl/ClO /O liquid pot. (blk)-U (bl) +U ref.el. glass el. (br) meas.sig. 4to20mA Pt100 + (wth) Pt1000 + Pt100 - (gr) Pt1000 - /sig.gnd. 3459_4 ProMinent ® Page 16... -
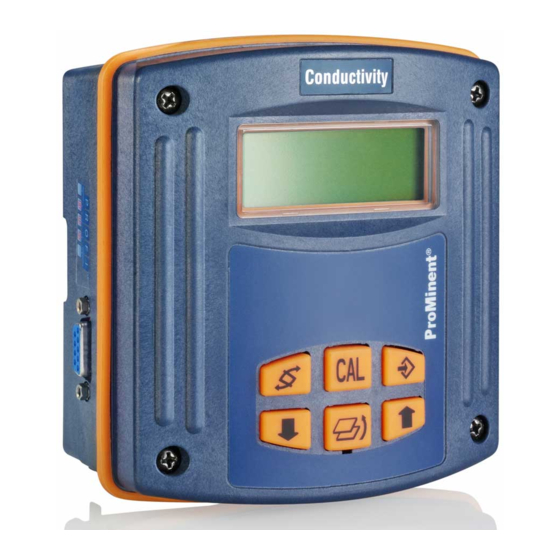
Page 17: Device Overview And Control Elements
Device overview and control elements Device overview and control elements Fig. 9 Measured variable label LC-Display CAL key Change key Enter Key Back key Up key Down key 3456_4 ProMinent ® Page 17... -
Page 18: Function Description
Block circuit diagram EEPROM (parameter memory) Measured FlashROM variable µP temperature (program memory) Signal output 4 ... 20 mA Power supply, current control 16 ... 40 V DC and/or 30 V DC (PROFIBUS ® Keypad LC display variant) ProMinent ® Page 18... -
Page 19: Key Functions
The operating menu comprises: • the permanent display • the calibration menu • the info displays (info level) for the display of pre-set parameters resp. general settings • menu options (settings level) for altering parameters resp. general settings ProMinent ® Page 19... -
Page 20: Negotiating Operating Menu
To access these menu options the access code must be entered when it is requested and confirmed with the enter . Access restriction is reinstated each time you return to the permanent display. • The access code is factory set to 5000 (inactive). ProMinent ® Page 20... -
Page 21: Calibration Menu (Ph Only)
Your entries become active immediately and are stored permanently when you press the enter key If you do not wish to save changes, exit the menu option using the back . You will then return to the info display for that menu. ProMinent ® Page 21... -
Page 22: Dmt Settings
4 mA measured variable at 20 mA • manual (enter value) General settings Measured variable: Settings configuration Access • pH code • ORP (redox) • temperature = Request access code (if activated by the user) ProMinent ® Page 22... -
Page 23: Measured Variables Ph And Redox
20 mA: 12.00 pH 20 mA: 12.00 pH general settings device type general settings DMTaW090P10E0220 !! correct probe ?? language type = pH DMTaW090P10E0220 2.1.06 DMTaW090P10E0220 E = english general settings change access code = 5000 free access ProMinent ® Page 23... -
Page 24: Menu Overview: Measured Variable Redox
20 mA: 1000 mV 20 mA: 1000 mV general settings device type general settings DMTaW090R10E00220 !! correct probe ?? language type = ORP (Redox) DMTaW090R10E0220 2.1.06 DMTaW090R10E0220 E = english general settings change access code = 5000 free access ProMinent ® Page 24... -
Page 25: Parameter Settings (Ph Only)
509 mV faulty probe !! NOTE The output current value is frozen during probe testing at, depending upon the general settings, the last measured value (HOLD) or at 23 mA (see chapter 7.1.7 General settings). ProMinent ® Page 25... -
Page 26: Parameters: Temperature
Select the unit of measurement for temperature C or F under “unit”. Enter the difference ∆t under “offset” to a reference temperature measurement (see chapter 7.5.5 Calibrating the Pt 100 temperature gauge). The actual temperature measured is displayed under “meas. val.”. ProMinent ® Page 26... - Page 27 Enter the process temperature under “T”. Select the temperature unit °C or °F under “unit”. 7.1.5.4 General setting: Temperature measurement = none No info display appears in the operating menu. No temperature measurement is carried out. ProMinent ® Page 27...
-
Page 28: Parameter Output
Under “4 mA” enter the value at which the output current should be 4 mA. Under “20 mA” enter the value at which the output current should be 20 mA. During calibration or checking of the ORP probe, the output current increases to 23 mA. ProMinent ® Page 28... - Page 29 If you have selected meas. value under “output”: Under “4 mA” enter the value at which the output current should be 4 mA. Under “20 mA” enter the value at which the Output current should be 20 mA. ProMinent ® Page 29...
- Page 30 The DMT emits a constant output current of 4 mA. This setting serves as a function check and is selected if the DMT is to be used purely as a display device (current consumption is minimal in this case!). ProMinent ® Page 30...
-
Page 31: General Settings
Language Automatic buffer Temperature Output Other detection measurement settings D = German 0 = ProMinent 0 = automatic 0 = measured variable; 0 = standard E = English buffer set 1 = manual fault 23 mA, F = French D = DIN 19266... - Page 32 . Access protection is reactivated when the DMT returns to continuous display mode. • Deactivate the access code by resetting the code to 5000 in the “change access code” menu option. ProMinent ® Page 32...
-
Page 33: Measured Variable Temperature
20 mA: 100 ˚C 20 mA: 100 ˚C general settings device type general settings DMTaW090T10E0020 !! correct probe ?? language type = temp. DMTaW090T00E0020 2.1.06 DMTaW090T00E0020 E = english general settings change access code: 5000 free access ProMinent ® Page 33... -
Page 34: Parameters Temperature
Under “20 mA”, enter the value at which the output current should be 20 mA. 7.2.3.2 General setting: output current = adjustable (= 1 in the identity code) Under “l”, enter an output current between 4 and 20 mA. This setting is used for the function check. ProMinent ® Page 34... - Page 35 The DMT emits a constant output current of 4 mA. This setting is used for the function check and/or is selected if the DMT is to be used purely as a display device (the power consumption is minimal in this case). ProMinent ® Page 35...
-
Page 36: General Settings
23 mA P = Polish 1 = adjustable output I = Italian 2 = measured variable S = Spanish or adjustable; at fault 23 mA at calibration 23 mA 4 = 4 mA constant current ProMinent ® Page 36... - Page 37 . Access protection is reactivated when the DMT returns to continuous display mode. • Deactivate the access code by resetting the code to 5000 in the “change access code” menu option. ProMinent ® Page 37...
-
Page 38: Operating The Dmt
Optimum range Zero point: Admissible range Optimum range Slope: mV/pH 59,16 Pre-set time: The pre-set time depends upon the temperature and the cable length. Depending on the system the setting time can be more than 60 seconds. ProMinent ® Page 38... -
Page 39: Brightness Of Lc Display
Select a buffer set which is higher than the general setting (see chapter 7.1.7) If V = automatic adjustment has been selected the corrected values are saved and used for buffer detection during the subsequent calibration process. On delivery the program memory contains the ProMinent buffer table as the V-table. ProMinent ®... -
Page 40: The Calibration Process
• Inadmissible values render the ongoing calibration invalid. The previous calibration values are retained. The error messages are explained in chapter 9.2. • Please dispose of spent buffer solution. Calibration menu overview 8.2.2.1 2 point calibration ProMinent ® Page 40... - Page 41 You can change the pH HOLD value under “HOLD”. This setting is only valid during calibration. Remove the pH probe from the liquid sample, rinse and immerse in the first buffer solution. Press the CAL key to start automatic buffer detection: ProMinent ® Page 41...
- Page 42 For a 2 point calibration remove the pH probe from the first buffer solution, rinse and immerse in the second buffer solution. Press the CAL key to restart automatic buffer detection. Buffer detection and calibration take place as described above. ProMinent ® Page 42...
- Page 43 The display changes to permanent display. The calibration is complete. NOTE Inadmissible values render the current calibration process invalid. The previous calibration values are retained. The error messages during calibration are explained in chapter 9.2. ProMinent ® Page 43...
-
Page 44: Troubleshooting
(set temperature measurement to manual if necessary) temp. input error ! -99.9 ° Short circuit Check probe connection (set temperature measurement to manual if necessary) The error message disappears automatically once you have remedied the fault. ProMinent ® Page 44... -
Page 45: Error Messages While Calibrating The Ph Meter
Buffer False buffer value Set correct buffer value * The admissible setting time is: t < 30 s for a value fluctuation ∆U < 2 mV/ IMPORTANT The sensor monitoring is deactivated during the calibration process! ProMinent ® Page 45... -
Page 46: Maintenance And Repair
You should clean the housing with a damp, soapy cloth and then rub dry. IMPORTANT Solvents may attack the surfaces and must not be used. Repair Please return the DMT to ProMinent Dosiertechnik GmbH for repair. Disposal IMPORTANT Electronic waste is treated as special waste! Observe current nationally and locally applicable directives. -
Page 47: Technical Data
-20 °C … 150 °C Measurement deviation: max. 0.3 °C (PT 1000 at 25 °C ambient temperature) max. 0.5 °C (PT 100 at 25 °C ambient temperature) Resolution: 0.1 °C Display Principle: LCD (liquid crystal display) ProMinent ® Page 47... -
Page 48: Spare Parts And Accessories
Pipe clamps for pipe mounting Order no. 1002777 Plug-in power supply 90-264 V AC/24 V DC Order no. 1006100 Probes See product catalogue Probe cable See product catalogue NOTE Please give the identity code when ordering electronic component kits. ProMinent ® Page 48... -
Page 49: Appendix
Conformity declaration ProMinent ® Page 49... -
Page 50: Terminal Connection Plan Ph/Redox/Temperature
Shield to shield clip Shield to shield clip Shield to shield clip Connection variant temperature Output (not PROFIBUS ® Resistance thermometer variants) Internal External ϑ Pt 1000/ Current loop Pt 100 4-20 mA Supply voltage 16-40 V DC ProMinent ® Page 50... -
Page 51: Wiring Example - Two Wire System
• Take into account the sum of the ohmic resistances of all devices in the current loop (excluding power supply). The input voltage of the transducer must never drop below 16 V during operation. The measured value will otherwise be wrong. ProMinent ® Page 51... -
Page 52: Profibus
(plug in the connector on the side of the PROFIBUS ® circuit board with the red edge of the ribbon cable facing upwards (see fig.)). Briefly disconnect from the power supply. ProMinent ® Page 52... -
Page 53: Index
31, 32, 36 Terminal connection plan 49 Key functions 19 Troubleshooting 43 2-wire system 51 Typical wiring for a 2-wire system 51 Language general settings 31 LC display Zero point 25, 42 brightness 39 ProMinent ® Page 53... - Page 54 ProMinent ® Page 54...
- Page 55 Drilling template for DMT 4 x 3.5 mm diam. holes 3460-4.1 3460-4.1 ATTENTION: Photocopying the template can change the scale! ProMinent ® Page 55...
- Page 56 Addresses and delivery information from the manufacturer: ProMinent Dosiertechnik GmbH Im Schuhmachergewann 5-11 69123 Heidelberg Germany Telephone: +49 6221 842-0 Fax: +49 6221 842-419 info@prominent.com www.prominent.com ProMinent ®...
Need help?
Do you have a question about the DULCOMETER DMT Series and is the answer not in the manual?
Questions and answers