Barco ClickShare CSE-800 Installation Manual
Hide thumbs
Also See for ClickShare CSE-800:
- Installation manuals (118 pages) ,
- User manual (72 pages) ,
- How-to (7 pages)
Table of Contents
Advertisement
Quick Links
Advertisement
Table of Contents

Related Manuals for Barco ClickShare CSE-800


Summary of Contents for Barco ClickShare CSE-800
- Page 1 ClickShare CSE-800 Installation manual R5900049/05 19/03/2018...
- Page 2 Software version: 1.5 Barco NV Beneluxpark 21, 8500 Kortrijk, Belgium Phone: +32 56.23.32.11 Fax: +32 56.26.22.62 Support: www.barco.com/en/support Visit us at the web: www.barco.com Registered address: Barco NV President Kennedypark 35, 8500 Kortrijk, Belgium Phone: +32 56.23.32.11 Fax: +32 56.26.22.62 Support: www.barco.com/en/support Visit us at the web: www.barco.com...
- Page 3 ClickShare base unit and button or download of the authorized ClickShare applications (each a “Barco ClickShare Product”). • Term The Software can be used under the terms of this EULA from the date of first use of the Barco ClickShare Product, for as long as you operate such Barco ClickShare Product. •...
- Page 4 Software to be used to perform services for third parties, whether on a service bureau or time sharing basis or otherwise, without the prior written authorization of Barco. You shall not lease, rent, sell or otherwise transfer or grant a security or other interest in...
- Page 5 Barco and its suppliers reserve all rights not expressly granted to you. You may own the carrier on which the Software is provided, but the Software is owned and copyrighted by Barco or by third party suppliers. Your license confers no title or ownership and is not a sale of any rights in the Software or its Documentation.
- Page 6 DRM or otherwise in writing, (i) which condition of the License Agreement (including payment terms) is violated; (ii) allow a period of 8 calendar days to cure such breach, if it can be cured at all; and (iii) inform which part of the functionality Barco intends to reduce (all Software or certain additionally licensed features only;...
- Page 7 Software after termination of this License Agreement. 11.6 Assignment. You are not allowed to assign this Agreement in part or in full to any third party without Barco’s consent. Barco shall be entitled to assign all or any of Barco’s obligations hereunder to a third party and/or any of Barco’s Affiliates.
- Page 8 All knowhow, inventions and works derived by Barco from the Functional Information will be exclusively owned by Barco. Open Source Software provisions This product contains software components released under an Open Source license. A copy of the source code is available on request by contacting your Barco customer support representative.
- Page 9 libassuan ftp://ftp.gnupg.org/gcrypt/libassuan libbsd http://libbsd.freedesktop.org/releases libcap https://www.kernel.org/pub/linux/libs/security/linux-privs/libcap2 libconfig http://www.hyperrealm.com/libconfig libcurl https://curl.haxx.se/download libdaemon http://0pointer.de/lennart/projects/libdaemon libdri2 https://github.com/robclark/libdri2/archive/4f1eef3183df2b270c3d5cbef07343ee5127a6a4 libdrm http://dri.freedesktop.org/libdrm libedit http://www.thrysoee.dk/editline libepoxy https://github.com/anholt/libepoxy/archive/v1.3.1 libestr http://libestr.adiscon.com/files/download libev http://dist.schmorp.de/libev/Attic libevdev http://www.freedesktop.org/software/libevdev libevent https://github.com/libevent/libevent/releases/download/release-2.1.8-stable libfastjson https://github.com/rsyslog/libfastjson/archive/v0.99.4 libffi ftp://sourceware.org/pub/libffi libftdi http://www.intra2net.com/en/developer/libftdi/download libgcrypt https://gnupg.org/ftp/gcrypt/libgcrypt libglib2 http://ftp.gnome.org/pub/gnome/sources/glib/2.50 libglu http://cgit.freedesktop.org/mesa/glu/snapshot libgpg-error ftp://ftp.gnupg.org/gcrypt/libgpg-error libical...
- Page 10 libsha1 https://github.com/dottedmag/libsha1/archive/0.3 libsndfile http://www.mega-nerd.com/libsndfile/files libtool http://ftpmirror.gnu.org/libtool libusb https://github.com/libusb/libusb/releases/download/v1.0.20 libusb-compat http://downloads.sourceforge.net/project/libusb/libusb-compat-0.1/libusb-compat-0.1.5 libv4l http://linuxtv.org/downloads/v4l-utils libva http://www.freedesktop.org/software/vaapi/releases/libva libvdpau http://people.freedesktop.org/~aplattner/vdpau libvorbis http://downloads.xiph.org/releases/vorbis libxcb http://xcb.freedesktop.org/dist libxkbcommon http://xkbcommon.org/download libxml2 ftp://xmlsoft.org/libxml2 libyaml http://pyyaml.org/download/libyaml lighttpd http://download.lighttpd.net/lighttpd/releases-1.4.x linux https://www.kernel.org/pub/linux/kernel/v4.x/ linux-firmware http://git.kernel.org/pub/scm/linux/kernel/git/firmware/linux-firmware.git linux-pam http://linux-pam.org/library lm-sensors http://snapshot.debian.org/archive/debian/20170208T211941Z/pool/main/l/lm-sensors logrotate https://github.com/logrotate/logrotate/archive/3.11.0 lvm2 ftp://sources.redhat.com/pub/lvm2/releases memtester http://pyropus.ca/software/memtester/old-versions mesa3d...
- Page 11 pulseaudio http://freedesktop.org/software/pulseaudio/releases python3 http://python.org/ftp/python/3.5.2 https://pypi.python.org/pack- python-pyyaml ages/4a/85/db5a2df477072b2902b0eb892feb37d88ac635d36245a72a6a69b23b383a https://pypi.python.org/pack- python-serial ages/ce/9c/694ce79a9d4a164e109aeba1a40fba23336f3b7554978553e22a5d41d54d qt5base http://download.qt.io/official_releases/qt/5.6/5.6.3/submodules qt5declarative http://download.qt.io/official_releases/qt/5.6/5.6.3/submodules qt5imageformats http://download.qt.io/official_releases/qt/5.6/5.6.3/submodules qt5multimedia http://download.qt.io/official_releases/qt/5.6/5.6.3/submodules qt5quickcontrols http://download.qt.io/official_releases/qt/5.6/5.6.3/submodules qt5serialport http://download.qt.io/official_releases/qt/5.6/5.6.3/submodules qt5svg http://download.qt.io/official_releases/qt/5.6/5.6.3/submodules qt5websockets http://download.qt.io/official_releases/qt/5.6/5.6.3/submodules qt5x11extras http://download.qt.io/official_releases/qt/5.6/5.6.3/submodules qt5xmlpatterns http://download.qt.io/official_releases/qt/5.6/5.6.3/submodules readline http://ftpmirror.gnu.org/readline rsync http://rsync.samba.org/ftp/rsync/src rsyslog http://rsyslog.com/files/download/rsyslog sazanami-fonts http://sourceforge.jp/projects/efont/downloads/10087 speex http://downloads.us.xiph.org/releases/speex splashutils http://dev.gentoo.org/~spock/projects/gensplash/archive sqlite...
- Page 12 xcb-proto http://xcb.freedesktop.org/dist xcb-util http://xcb.freedesktop.org/dist xcb-util-image http://xcb.freedesktop.org/dist xcb-util-keysyms http://xcb.freedesktop.org/dist xcb-util-wm http://xcb.freedesktop.org/dist xdata_xbitmaps http://xorg.freedesktop.org/releases/individual/data xdriver_xf86-input-evdev http://xorg.freedesktop.org/releases/individual/driver xdriver_xf86-video-amdgpu http://xorg.freedesktop.org/releases/individual/driver xfont_encodings http://xorg.freedesktop.org/releases/individual/font xfont_font-alias http://xorg.freedesktop.org/releases/individual/font xfont_font-cursor-misc http://xorg.freedesktop.org/releases/individual/font xfont_font-misc-misc http://xorg.freedesktop.org/releases/individual/font xfont_font-util http://xorg.freedesktop.org/releases/individual/font xkeyboard-config http://www.x.org/releases/individual/data/xkeyboard-config xlib_libfontenc http://xorg.freedesktop.org/releases/individual/lib xlib_libICE http://xorg.freedesktop.org/releases/individual/lib xlib_libSM http://xorg.freedesktop.org/releases/individual/lib xlib_libX11 http://xorg.freedesktop.org/releases/individual/lib xlib_libXau http://xorg.freedesktop.org/releases/individual/lib xlib_libXaw http://xorg.freedesktop.org/releases/individual/lib xlib_libXcomposite http://xorg.freedesktop.org/releases/individual/lib xlib_libXcursor...
- Page 13 xlib_xtrans http://xorg.freedesktop.org/releases/individual/lib xproto_bigreqsproto http://xorg.freedesktop.org/releases/individual/proto xproto_compositeproto http://xorg.freedesktop.org/releases/individual/proto xproto_damageproto http://xorg.freedesktop.org/releases/individual/proto xproto_dri2proto http://xorg.freedesktop.org/releases/individual/proto xproto_dri3proto http://xorg.freedesktop.org/releases/individual/proto xproto_fixesproto http://xorg.freedesktop.org/releases/individual/proto xproto_fontsproto http://xorg.freedesktop.org/releases/individual/proto xproto_glproto http://xorg.freedesktop.org/releases/individual/proto xproto_inputproto http://xorg.freedesktop.org/releases/individual/proto xproto_kbproto http://xorg.freedesktop.org/releases/individual/proto xproto_presentproto http://xorg.freedesktop.org/releases/individual/proto xproto_randrproto http://xorg.freedesktop.org/releases/individual/proto xproto_renderproto http://xorg.freedesktop.org/releases/individual/proto xproto_resourceproto http://xorg.freedesktop.org/releases/individual/proto xproto_scrnsaverproto http://xorg.freedesktop.org/releases/individual/proto xproto_videoproto http://xorg.freedesktop.org/releases/individual/proto xproto_xcmiscproto http://xorg.freedesktop.org/releases/individual/proto xproto_xextproto http://xorg.freedesktop.org/releases/individual/proto xproto_xf86bigfontproto http://xorg.freedesktop.org/releases/individual/proto xproto_xf86dgaproto http://xorg.freedesktop.org/releases/individual/proto xproto_xf86driproto...
- Page 14 Radio Frequency (RF) Exposure Information The radiated output power of the Barco Wireless Device is below the Industry Canada (IC) radio frequency exposure limits. The Barco Wireless Device should be used in such a manner such that the potential for human contact during normal operation is minimized.
- Page 15 Informations concernant l’exposition aux fréquences radio (RF) La puissance de sortie émise par l’appareil de sans fil Barco est inférieure à la limite d’exposition aux fréquences radio d’Industry Canada (IC). Utilisez l’appareil de sans fil Barco de façon à minimiser les contacts humains lors du fonctionnement normal.
-
Page 17: Table Of Contents
Troubleshooting list ........................75 R5900049 CLICKSHARE CSE-800 19/03/2018... - Page 18 Index........................83 R5900049 CLICKSHARE CSE-800 19/03/2018...
-
Page 19: Introduction To The Installation Guide
Symbol overview The following icons are used in the manual : Caution Warning Info, term definition. General info about the term Note: gives extra information about the described subject Tip: gives extra advice about the described subject R5900049 CLICKSHARE CSE-800 19/03/2018... - Page 20 Menu items are indicated in italic. • Step related notes, tips, warnings or cautions are printed in italic. • Procedure related notes, tips, warnings or cautions are printed in bold between 2 lines preceded by the corresponding icon. R5900049 CLICKSHARE CSE-800 19/03/2018...
-
Page 21: Specifications
• R9861580NA • power cable NEMA 5/15 • 4x R9861500D01 • wall/ceiling mounting brackets • R9861500T01 • antenna extension cables Contact your local sales representative for the correct regional variant to be used in your country. R5900049 CLICKSHARE CSE-800 19/03/2018... -
Page 22: Specifications
2x USB 2.0; 2x USB 3.0 (back); 2x USB 3.0 (front) Audio analog line out on mini jack socket (3.5mm), digital S/PDIF Temperature range Operating: 0°C to +40°C (+32°F to +104°F) Max: 35°C (95°F) at 3000m Storage: -20°C to +60°C (-4°F to +140°F) R5900049 CLICKSHARE CSE-800 19/03/2018... -
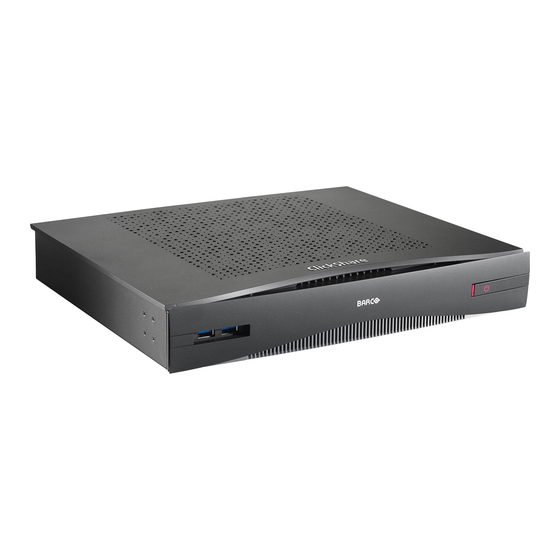
Page 23: About The Base Unit
Front and Top layout of the Base Unit At the front of the Base Unit you can find a standby button and two USB ports. Status LED is mounted at the left of the standby button. Image 2-2 R5900049 CLICKSHARE CSE-800 19/03/2018... - Page 24 firmware are up to date. If not, the Base Unit updates the software and/or firmware. To update the Base Unit software, download the latest version of the software from the Barco website. Copy the file on a USB stick and plug it into the USB port of the Base Unit.
- Page 25 Usage of antennas other than the ones provided with the unit are allowed within the restrictions on usage of other antennas defined by local regulations. Barco does not take responsibility for damage or disturbance of other devices that may be caused by using a different antenna.
-
Page 26: About The Button
50 mm in front of all ventilation grids. Bottom layout of the Base Unit The serial number label containing the Barco part number, the revision number, production date (week-year) and the serial number. The product label with the applicable certification logos. - Page 27 The label at the bottom of the Button contains: • the Barco logo • the Barco part number • the serial number • the revision number • markings for applicable standards • markings for waste regulation • “Made in...” R5900049 CLICKSHARE CSE-800 19/03/2018...
-
Page 28: Mobile Device Support
8008; 8009; 9080 1900; 32768:61000 If Proxy settings are enabled in the Configurator for auto-update functionality, additional ports may be used. 3. Google Cast will pick a random UDP port above 32768 to facilitate video streaming R5900049 CLICKSHARE CSE-800 19/03/2018... -
Page 29: Getting Started
9. If desired, configure CSE-800 via the Configurator. For more information on the different ways to configure CSE-800, see "CSE-800 Configurator", page 27 For more information on using CSE-800, refer to the CSE-800 User Guide. This manual can be found on Barco’s website www.barco.com/clickshare... - Page 30 3. Getting started R5900049 CLICKSHARE CSE-800 19/03/2018...
-
Page 31: Installation
Put the Base Unit directly on the meeting room table. The total weight of the Base Unit is 2.2 kg. Wall mounting About wall mounting Use the mounting brackets, inserted in the CSE-800 box, to mount the Base unit on the wall. R5900049 CLICKSHARE CSE-800 19/03/2018... - Page 32 Note: Mounting screws and plugs are not included in the CSE-800 box . The type of screws and plugs depend on the type of wall (stone, wood, plasterboard, ...) you are mounting the Base Unit to. R5900049 CLICKSHARE CSE-800 19/03/2018...
-
Page 33: Ceiling Mounting
2 mounting screws • 2 plugs • 2 Mounting brackets with fixation screws (included in the CSE-800 box) How to install 1. Install in the same way as for wall mounting. See "Wall mounting", page 15. R5900049 CLICKSHARE CSE-800 19/03/2018... -
Page 34: Rack Mounting
4. Insert the antenna extension cables into the provided holes (3) and turn on the antennas (4). Image 4-4 Mount antennas 5. Repeat for the other side. 6. Mount the Base Unit into a rack. Use 2 mounting screws. Diameter of the mounting holes: 7mm. R5900049 CLICKSHARE CSE-800 19/03/2018... -
Page 35: Recommendations About Antenna Placement And Orientation
For a single screen setup, HDMI connection should be made between the Base Unit and the display. You can use any HDMI output. HDMI Image 4-6 One display For a dual screen setup, 2 HDMI connections should be made between the Base Unit and the displays. R5900049 CLICKSHARE CSE-800 19/03/2018... -
Page 36: Audio Connection
Audio output needs to be selected in the Configurator, for more info, see "Audio settings", page 42. Sound is not sent out In some Windows environments sound is not sent out. This can be solved as follow: R5900049 CLICKSHARE CSE-800 19/03/2018... -
Page 37: Lan Connection
Note: The local variant of the power cable is included in the CSE-800 box. European version Type C and type G Japanese version Type A Chinese version Type I CCC North American version Type A 2. To power on the unit, set the rocker switch to “1”. R5900049 CLICKSHARE CSE-800 19/03/2018... - Page 38 The standby button has the following functions: When the system is awake, a short push triggers the system to go into standby mode. When the system is in standby mode, a short push triggers the system to wake up. R5900049 CLICKSHARE CSE-800 19/03/2018...
-
Page 39: Preparing The Buttons
The Button will always make connection to the Base Unit it was last paired to. To pair a Button to the Base unit 1. Insert the Button in the USB port at the front of the Base Unit you are using. Image 5-1 Pair button R5900049 CLICKSHARE CSE-800 19/03/2018... -
Page 40: Clickshare Extension Pack
Starting the setup 1. Download the ClickShare Extension Pack using the link indicated in "ClickShare Extension Pack", page 24. 2. Unzip the downloaded file. 3. Click ClickShare-Extension-Pack-01.00.01.0003.msi to start the installation. R5900049 CLICKSHARE CSE-800 19/03/2018... - Page 41 In this setup, a user or an IT admin can install the ClickShare Extension pack using the Windows command prompt. Following is an example of a silent installation (version numbers are only given as example, always check Barco’s web for the latest version): Launcher only install: msiexec.exe /i ClickShare-Extension-Pack-01.00.02.0003.msi ACCEPT_EULA=YES INSTALLFOLDER=C:\...
- Page 42 5. Preparing the buttons R5900049 CLICKSHARE CSE-800 19/03/2018...
-
Page 43: Configurator
This configuration wizard can be started at any moment to change your configuration instead of using the menus. To access the Configurator via the LAN 1. Open a browser. Note: Supported browsers are Internet Explorer 10 or higher, Firefox, Google Chrome and Safari. R5900049 CLICKSHARE CSE-800 19/03/2018... - Page 44 A login screen appears. Image 6-1 Login screen 3. To change the language of the Configurator, click on the drop down next to the current selected language and select the desired language. Image 6-2 Configurator lanuguages R5900049 CLICKSHARE CSE-800 19/03/2018...
- Page 45 The screen is split up in 2 panes. Left pane with the selection buttons and a right pane to configure the selected function. The startup screen itself shows: the wired IP address of the primary and secondary interface the wireless IP address the wireless SSID for both frequencies the number of Buttons connected the system state R5900049 CLICKSHARE CSE-800 19/03/2018...
- Page 46 Network integration (not for CS-100) Services Security Compatibility Security levels Passwords System Base Unit Status Date & Time Energy Savers Buttons Support & Updates Firmware Troubleshoot When a setting is changed, always click Save changes to store the changes. R5900049 CLICKSHARE CSE-800 19/03/2018...
-
Page 47: Clickshare Configuration Wizard
All basic settings necessary to configure the Base Unit are covered by the configuration wizard. Once the configuration wizard is finished, the Base Unit is ready to be used. Image 6-4 Configuration wizard To start the wizard, click on Start Configuration. R5900049 CLICKSHARE CSE-800 19/03/2018... - Page 48 See "Date & Time setup, time server", page 63. Security Level settings See "Security, security level", page 59. Password WebUI password See "Security, passwords", page 60. Network Frequency band, channel Wi-Fi passphrase See "WiFi settings", page 43. R5900049 CLICKSHARE CSE-800 19/03/2018...
-
Page 49: On-Screen Language And Text Size
The on-screen language can be set independent of the configurator language. The on-screen text size can be changed between small, medium or large. Language selection 1. Log in to the Configurator 2. Click Personalisation → On-Screen ID. R5900049 CLICKSHARE CSE-800 19/03/2018... - Page 50 1. Log in to the Configurator 2. Click Personalisation → On-Screen ID. 3. Click on the drop down box next to On-screen text size and select the desired font size. The following sizes are possible: Small Medium Large R5900049 CLICKSHARE CSE-800 19/03/2018...
-
Page 51: Meeting Room Information
Checked: LAN information such as wired IP address, hostname are displayed. Also the Wi-Fi IP address and SSID are displayed. Not checked: no LAN nor Wi-Fi information is displayed. 5. Check the check box in front of Show source names. R5900049 CLICKSHARE CSE-800 19/03/2018... -
Page 52: Personalisation, Wallpaper
3. Select one of the available wallpapers and click on Save Changes. Note: By default a general Barco CSE-800 wallpaper and a CSE-800 Quick Start Guide wallpapers are available. They are automatically resized to fit the aspect ratio of the screen. -
Page 53: Personalisation, Personalized Wallpaper
2. Click Personalisation → Wallpaper. The Wallpaper selection pane is shown. The current selected wallpaper is shown with a red border. 3. Hoover your mouse over the free place and click on Choose image. Image 6-11 Personalized wallpaper selection R5900049 CLICKSHARE CSE-800 19/03/2018... - Page 54 Remove personalized wallpaper 1. Hoover your mouse over the current image and click on the trash bin to remove the image. Image 6-13 Remove wallpaper The personalized wallpaper is removed and the default wall paper is activated. R5900049 CLICKSHARE CSE-800 19/03/2018...
-
Page 55: Manage Configuration Files
Base Unit of the same model. When uploading a config file, the history of software updates and paired Buttons is lost. Paired buttons will however remain functional if the Base Unit has not changed from SSID or wireless password. R5900049 CLICKSHARE CSE-800 19/03/2018... -
Page 56: Display Setup, Output
By changing the ClickShare position it is possible to show the content of HDMI1 on display 2 and the content of HDMI2 on display 1. This can be handy when the displays are mounted in a different order. 5. Click on Save changes to apply the new settings. About Display mode Extended mode R5900049 CLICKSHARE CSE-800 19/03/2018... - Page 57 2. Click Display & Audio → Outputs. Image 6-18 Display mode 3. Click on the drop down box and select the desired mode. The following modes are available Extented Clone 4. Click on Save changes to apply the new settings. R5900049 CLICKSHARE CSE-800 19/03/2018...
-
Page 58: Audio Settings
4. To select the audio output, click on the drop down box and select the desired audio output. Jack: audio output via jack. HDMI: audio output via HDMI. SPDIF: digital audio ouput via TOSLINK 5. Click on Save changes to apply the new settings. R5900049 CLICKSHARE CSE-800 19/03/2018... -
Page 59: Display Setup, Inputs
The transmission power of the wireless signal can be reduced. When reducing the transmission power, it is reduced for both fre- quencies. Changing the IP address will require a repairing of the Buttons used with this Base Unit. R5900049 CLICKSHARE CSE-800 19/03/2018... - Page 60 2. Select the channel for the selected frequency. Click on the drop down box and selecting the correct band. If Concurrent is selected you have to select the channel for each frequency. Image 6-22 R5900049 CLICKSHARE CSE-800 19/03/2018...
-
Page 61: Lan Settings
Integrate ClickShare within a network to manage and integrate into a network to share. For integration, one should preferably use the primary network connector as the Buttons can only wake up the Base Unit from network standby using the primary connector. AUTION Both LAN connections must be connected to two different networks. R5900049 CLICKSHARE CSE-800 19/03/2018... - Page 62 Note: An address contains 4 octets with a maximum value of 255. This must NOT be 0.0.0.0 for static IP-Address assignment 3. Click in the Subnet mask input fields and fill out the 4 octets as appropriate for the local subnet. R5900049 CLICKSHARE CSE-800 19/03/2018...
-
Page 63: Network Integration, Activation
The Button or the mobile devices can then connect to a wireless access point that is part of the corporate network. At this point, the Base Unit needs to be connected to the corporate network via the wired Ethernet interface so that the Buttons and mobile devices can share their content on the Base Unit. R5900049 CLICKSHARE CSE-800 19/03/2018... - Page 64 For the Buttons to be able to stream their content to the Base Unit, they must be able to resolve the Base Unit’s hostname within the network. If no DNS is available Buttons will fall back to the IP of the Base Unit at the moment of USB pairing. Because of this R5900049 CLICKSHARE CSE-800 19/03/2018...
- Page 65 The Corporate Network Integration feature is provided “AS IS”, without any liability or obligation of or on be- half of Barco. Barco cannot guarantee that the feature works in your corporate network. The reliability, quality and stability when sharing using the Corporate Network Integration depends on your network infrastructure.
-
Page 66: Network Integration, Eap-Tls Security Mode
Since most companies are using Microsoft Windows Server and its active directory (AD) to manage users and devices our SCEP implementation is specifically targeted at the Network Device Enrolment Service (NDES) which is part of Windows Server 2008 R2 and Windows Server 2012. No other SCEP server implementations are supported. R5900049 CLICKSHARE CSE-800 19/03/2018... - Page 67 If your current setup does not support SCEP or you prefer not to use it but you still want to benefit of the mutual authentication EAP-TLS offers, it is also possible to manually upload the necessary certificates. 4. NDES White Paper: http://social.technet.microsoft.com/wiki/contents/articles/9063.network-device-enrollment-service-ndes-in-active-directory-certificate-services-ad-cs-en-us.aspx R5900049 CLICKSHARE CSE-800 19/03/2018...
-
Page 68: Network Integration, Eap-Ttls Security Mode
LDAP databases, or token systems. Since EAP-TTLS is usually implemented in corporate environments without a client certificate we have not included support for this. If you prefer using client certificates per user we suggest using EAP-TLS. How to start up for EAP-TTLS 1. Log in to the Configurator. R5900049 CLICKSHARE CSE-800 19/03/2018... - Page 69 ClickShare Client log. This log can be enabled by holding shift when starting the Client executable. Look for the lines “EDSUSBDongleConnection::mpParseDongleMessages”. An error code and a short summary of the issue should be logged. R5900049 CLICKSHARE CSE-800 19/03/2018...
-
Page 70: Network Integration, Peap Security Mode
The company domain for which you are enrolling, should match with the one defined in your Active Directory. Identity Identity of the user account in the Active Directory which will be used by the ClickShare Buttons to connect to the corporate network. R5900049 CLICKSHARE CSE-800 19/03/2018... -
Page 71: Network Integration, Wpa2-Psk Security Mode
The key used in WPA2-PSK to authenticate onto the wireless infrastructure. This can be a string of (Pre-shared key) 64 hexadecimal digits or a passphrase of 8 to 63 printable ASCII characters. Click Next to continue. R5900049 CLICKSHARE CSE-800 19/03/2018... -
Page 72: Services, Mobile Devices
To allow sharing content via ClickShare app, check the check box in front of Sharing via ClickShare app. To allow streaming via AirPlay, check the check box in front of Streaming via AirPlay. To allow streaming (mirroring) via Google Cast, check the check box in front of Streaming via Google Cast. R5900049 CLICKSHARE CSE-800 19/03/2018... -
Page 73: Service, Clickshare Api, Remote Control Via Api
Not checked: no remote control via API allowed. 6.20 CMGS Server Integration About the CMGS Server integration The CSE-800 Base unit can be integrated within the company network and controlled via the CMGS server application depending on the user rights. R5900049 CLICKSHARE CSE-800 19/03/2018... -
Page 74: Security, Compatibility
When changing the security level to 2 or 3, a warning message will be display : “This change requires an update of the Button security settings. Please re-pair the Buttons with the Base Unit to transfer the change in security settings.” How to activate 1. Log in to the Configurator. 2. Click Security → Compatibility. R5900049 CLICKSHARE CSE-800 19/03/2018... -
Page 75: Security, Security Level
E.g. when level 3 is set and you change mobile app blocking to allowed, then the security level indication will change to level 2. But all other items initially in level 3 remains in the level 3 state. R5900049 CLICKSHARE CSE-800 19/03/2018... -
Page 76: Security, Passwords
To access the Configurator (WebUI) a user name and password is needed. That password can be changed at any time to protect the ClickShare Configuration settings. The ClickShare API access is password protected. That password can be changed in the configurator. Changing the WebUI password 1. Log in to the Configurator. 2. Click Security → Passwords. R5900049 CLICKSHARE CSE-800 19/03/2018... -
Page 77: Status Information Base Unit
Last used • Current uptime: time since last startup • Lifetime uptime: time used since first startup • Overall status Base Unit restart 1. Log in to the Configurator. 2. Click Support → Base Unit Status. R5900049 CLICKSHARE CSE-800 19/03/2018... -
Page 78: Date & Time Setup, Manually
Image 6-44 Manual time & date update The current time is indicated next to Current time. 3. Select your time zone. Click on the drop down box next to Time zone and select the corresponding time zone. R5900049 CLICKSHARE CSE-800 19/03/2018... -
Page 79: Date & Time Setup, Time Server
As long as there is no synchronization with a time server the status is indicated as disabled. How to setup 1. Log in to the Configurator. 2. Click System → Date & Time. R5900049 CLICKSHARE CSE-800 19/03/2018... -
Page 80: Energy Savers
LAN interface remains active: a detection of HDMI input hot plug or button or app connecting with the Base Unit’s primary LAN interface. How to change the display timeout and standby mode 1. Log in to the Configurator. 2. Click System → Energy Savers. R5900049 CLICKSHARE CSE-800 19/03/2018... -
Page 81: Buttons
Saving information from a blackboard can be enabled or disabled. When enabled, the information is saved on hard disk of all connected Buttons and on the USB sticks connected with the Base Unit. How to change the blackboard setting 1. Log in to the Configurator. 2. Click System → Blackboard. R5900049 CLICKSHARE CSE-800 19/03/2018... - Page 82 6. CSE-800 Configurator Image 6-49 Save annotations Image 6-50 Save annotations Image 6-51 Save annotations R5900049 CLICKSHARE CSE-800 19/03/2018...
- Page 83 6. CSE-800 Configurator Image 6-52 Save annotations Image 6-53 Save annotations Image 6-54 Save annotations R5900049 CLICKSHARE CSE-800 19/03/2018...
- Page 84 6. CSE-800 Configurator Image 6-55 Save annotations Image 6-56 Save annotations Image 6-57 Save annotations R5900049 CLICKSHARE CSE-800 19/03/2018...
- Page 85 3. Check or uncheck the check box in front of Allow saving annotations to connected clients and USB sticks. Checked: annotations on the blackboard can be saved. Unchecked: no annotations on the blackboard can be saved. R5900049 CLICKSHARE CSE-800 19/03/2018...
-
Page 86: Firmware Update
6. CSE-800 Configurator 6.30 Firmware Update About Software update The software of the Base Unit can be updated via the web interface. The latest version of the software is available on Barco’s website. Image 6-61 Firmware update About automatic firmware updates There are 3 ways to configure automatic updates:... -
Page 87: Factory Defaults
If the launcher service is not running : hold down the shift key while double clicking the ClickShare application. The following message appears on the sys tray: Image 6-63 Client logging 6.32 Factory defaults About default settings The ClickShare Base Unit can return to the factory default settings. R5900049 CLICKSHARE CSE-800 19/03/2018... - Page 88 4. If you want to continue, click Yes, remove all settings otherwise click No, I changed my mind. When yes is clicked, the system starts a reboot. Alternative way: The Base Unit can be reset to factory defaults by plugging in the power cable while pressing the reset button. R5900049 CLICKSHARE CSE-800 19/03/2018...
-
Page 89: Software Updates
USB stick To update the Base Unit software by copying the software on a USB stick 1. Download the latest version of the software from Barco’s website, , www.barco.com/clickshare. Click on Visit the ClickShare product page and go to tab Downloads 2. - Page 90 7. Software updates R5900049 CLICKSHARE CSE-800 19/03/2018...
-
Page 91: Troubleshooting
• Some types of USB devices might on the laptop. be blocked as a company policy. • USB port settings on the laptop might limit the usage of high power USB devices when on battery power. R5900049 CLICKSHARE CSE-800 19/03/2018... - Page 92 Briefly push the standby button on the Base Unit or insert a button and run the ClickShare software. Bad WiFi connectivity Use wireless network scan tools to look Congestion of the wireless channel for free or the least congested channels. R5900049 CLICKSHARE CSE-800 19/03/2018...
- Page 93 IP address is not within your LAN range. DHCP is not enabled. No WiFi connection with Base Unit SSID not correct Enter the correct SSID Locate the problem you are experiencing in the table below and apply the solution. R5900049 CLICKSHARE CSE-800 19/03/2018...
- Page 94 8. Troubleshooting R5900049 CLICKSHARE CSE-800 19/03/2018...
-
Page 95: Environmental Information
(Also called RoHS of Chinese Mainland), the table below lists the names and contents of toxic and/or hazardous substances that Barco’s product may contain. The RoHS of Chinese Mainland is included in the MCV standard of the Ministry of Information Industry of China, in the section “Limit Requirements of toxic substances in Electronic Information Products”. - Page 96 Chinese Mainland, marked with the Environmental Friendly Use Period (EFUP) logo. The number inside the EFUP logo that Barco uses (please refer to the photo) is based on the “General guidelines of environment-friendly use period of electronic information products”...
-
Page 97: Importers Contact Information
Note 3:The “—” indicates that the restricted substance corresponds to the exemption. Importers contact information Contact To find your local importer, contact Barco directly or one of Barco’s regional offices via the contact information given on Barco’s web site, www.barco.com. R5900049 CLICKSHARE CSE-800 19/03/2018... - Page 98 9. Environmental information R5900049 CLICKSHARE CSE-800 19/03/2018...
-
Page 99: Index
Configuration files Configurator Access Connecting 19–21 LAN Settings Base Unit 19–21 Language Audio On-screen Display Log settings Ethernet Power Meeting room location Meeting room name Mobile Device Date - time Support Manually Mobile devices Date - Time R5900049 CLICKSHARE CSE-800 19/03/2018... - Page 100 Portable version Button Ports used Software Prepare Upload configuration Button Wall mounting Rack mounting Base unit Base unit Wallpaper 36–37 Personalized WebUI password Welcome text Safety Meeting room Environment condition check WiFi settings Security level WPA2-PSK Services R5900049 CLICKSHARE CSE-800 19/03/2018...
Need help?
Do you have a question about the ClickShare CSE-800 and is the answer not in the manual?
Questions and answers