Cisco Catalyst 3750 Hardware Installation Manual
Hide thumbs
Also See for Catalyst 3750:
- Command reference manual (1154 pages) ,
- Software configuration manual (926 pages) ,
- Hardware installation manual (150 pages)
Table of Contents
Advertisement
Quick Links
You'll be entered into a quarterly drawing for free Cisco Press books by returning this survey! Cisco is dedicated to customer
satisfaction and would like to hear your thoughts on these printed manuals. Please visit the Cisco Product Comments on-line survey at
www.cisco.com/go/crc to submit your comments about accessing Cisco technical manuals. Thank you for your time.
General Information
1
Years of networking experience:
2
I have these network types:
Other:
3
I have these Cisco products:
Other (specify models):
4
I perform these types of tasks:
Network management
5
I use these types of documentation:
Command reference
Other:
6
I access this information through:
% Other:
7
I prefer this access method:
Other:
8
I use the following three product features the most:
Document Information
Document Title:
Catalyst 3750 Switch Hardware Installation Guide
Part Number:
78-15136-03
On a scale of 1–5 (5 being the best), please let us know how we rate in the following areas:
The document is complete.
The information is well organized.
The document is written at my
technical level of understanding.
Please comment on our lowest scores:
Mailing Information
Organization
Contact Name
Mailing Address
City
Country
E-mail
May we contact you further concerning our documentation?
You can also send us your comments by e-mail to bug-doc@cisco.com, or by fax to 408-527-8089.
When mailing this card from outside of the United States, please enclose in an envelope addressed to the location on the back of this card with
the required postage or fax to 1-408-527-8089.
Years of experience with Cisco products:
LAN
Backbone
Switches
Routers
H/W installation and/or maintenance
Other:
H/W installation
H/W configuration
Quick reference
Release notes
% Cisco.com
% CD-ROM
Cisco.com
CD-ROM
S/W Release (if applicable):
The information is accurate.
The information I wanted was easy to find.
The information I found was useful to my job.
State/Province
Phone (
Fax
(
Yes
WAN
S/W configuration
S/W configuration
Online help
% Printed manuals
Printed manuals
Date
Zip/Postal Code
)
Extension
)
No
Advertisement
Table of Contents
Troubleshooting

Related Manuals for Cisco Catalyst 3750


Summary of Contents for Cisco Catalyst 3750
- Page 1 You'll be entered into a quarterly drawing for free Cisco Press books by returning this survey! Cisco is dedicated to customer satisfaction and would like to hear your thoughts on these printed manuals. Please visit the Cisco Product Comments on-line survey at www.cisco.com/go/crc to submit your comments about accessing Cisco technical manuals.
- Page 3 Catalyst 3750 Switch Hardware Installation Guide February 2004 Corporate Headquarters Cisco Systems, Inc. 170 West Tasman Drive San Jose, CA 95134-1706 http://www.cisco.com Tel: 408 526-4000 800 553-NETS (6387) Fax: 408 526-4100 Customer Order Number: DOC-7815136= Text Part Number: 78-15136-03...
- Page 4 You can determine whether your equipment is causing interference by turning it off. If the interference stops, it was probably caused by the Cisco equipment or one of its peripheral devices. If the equipment causes interference to radio or television reception, try to correct the interference by using one or more of the following measures: •...
- Page 5 CCSP, the Cisco Square Bridge logo, Cisco Unity, Follow Me Browsing, FormShare, and StackWise are trademarks of Cisco Systems, Inc.; Changing the Way We Work, Live, Play, and Learn, and iQuick Study are service marks of Cisco Systems, Inc.; and Aironet, ASIST, BPX, Catalyst, CCDA, CCDP,...
- Page 7 Using Express Setup C H A P T E R Taking Out What You Need Powering On the Switch Starting Express Setup Configuring the Switch 1-11 Rerunning Express Setup 1-13 Verifying Switch IP Address 1-13 Catalyst 3750 Switch Hardware Installation Guide 78-15136-03...
- Page 8 Port LEDs and Modes 2-17 Rear Panel Description 2-23 StackWise Ports 2-25 Power Connectors 2-25 Internal Power Supply Connector 2-25 Cisco RPS Connector 2-26 Console Port 2-27 Management Options 2-28 Network Configurations 2-29 Catalyst 3750 Switch Hardware Installation Guide 78-15136-03...
- Page 9 3-19 Removing Screws from the Switch 3-20 Attaching Brackets to the Catalyst 3750G-24TS Switch 3-21 Attaching Brackets to the Catalyst 3750-24TS, 3750G-24T, 3750G-12S, 3750-24PS, 3750-48PS, 3750G-16TD, and 3750-48TS Switches 3-26 Mounting the Switch in a Rack 3-29 Attaching the Cable Guide...
- Page 10 Connecting to a XENPAK Module 3-59 Where to Go Next 3-61 Troubleshooting C H A P T E R Understanding POST Results Clearing the Switch IP Address and Configuration Diagnosing Problems Replacing a Failed Stack Member Catalyst 3750 Switch Hardware Installation Guide viii 78-15136-03...
- Page 11 Stacking the Switches (Optional) Connecting to the Console Port Starting the Terminal Emulation Software Connecting to a Power Source Entering the Initial Configuration Information C-11 IP Settings C-11 Completing the Setup Program C-11 Catalyst 3750 Switch Hardware Installation Guide 78-15136-03...
- Page 12 Redundant Power Supply Connection Warning D-27 Switch Installation Warning D-29 Restricted Area D-30 Ethernet Cable Shielding in Offices D-32 Class 1 Laser Product D-33 Laser Beam Exposure D-35 Laser Radiation D-36 N D E X Catalyst 3750 Switch Hardware Installation Guide 78-15136-03...
- Page 13 Your formal Warranty Statement, including the warranties and license agreements applicable to Cisco software, is available on Cisco.com. Follow these steps to access and download the Cisco Information Packet and your warranty and license agreements from Cisco.com.
- Page 14 Ninety (90) days. Replacement, Repair, or Refund Policy for Hardware Cisco or its service center will use commercially reasonable efforts to ship a replacement part within ten (10) working days after receipt of a Return Materials Authorization (RMA) request. Actual delivery times can vary, depending on the customer location.
- Page 15 Cisco 90-Day Limited Hardware Warranty Terms Complete the information below, and keep it for reference: Company product purchased from Company telephone number Product model number Product serial number Maintenance contract number Catalyst 3750 Switch Hardware Installation Guide xiii 78-15136-03...
- Page 16 Cisco 90-Day Limited Hardware Warranty Terms Catalyst 3750 Switch Hardware Installation Guide 78-15136-03...
- Page 17 Preface Audience This guide is for the networking or computer technician responsible for installing the Catalyst 3750 switches. We assume that you are familiar with the concepts and terminology of Ethernet and local area networking. Purpose This guide documents the hardware features of the Catalyst 3750 family of switches.
- Page 18 Gebruik het nummer van de verklaring onderaan de waarschuwing als u een vertaling van de waarschuwing die bij het apparaat wordt geleverd, wilt raadplegen. BEWAAR DEZE INSTRUCTIES Catalyst 3750 Switch Hardware Installation Guide 78-15136-03...
- Page 19 Vorbeugung vor Unfällen vertraut. Suchen Sie mit der am Ende jeder Warnung angegebenen Anweisungsnummer nach der jeweiligen Übersetzung in den übersetzten Sicherheitshinweisen, die zusammen mit diesem Gerät ausgeliefert wurden. BEWAHREN SIE DIESE HINWEISE GUT AUF. Catalyst 3750 Switch Hardware Installation Guide xvii 78-15136-03...
- Page 20 Utilize o número da instrução fornecido ao final de cada aviso para localizar sua tradução nos avisos de segurança traduzidos que acompanham este dispositivo. GUARDE ESTAS INSTRUÇÕES Catalyst 3750 Switch Hardware Installation Guide xviii 78-15136-03...
- Page 21 Använd det nummer som finns i slutet av varje varning för att hitta dess översättning i de översatta säkerhetsvarningar som medföljer denna anordning. SPARA DESSA ANVISNINGAR Catalyst 3750 Switch Hardware Installation Guide 78-15136-03...
- Page 22 Preface Conventions Catalyst 3750 Switch Hardware Installation Guide 78-15136-03...
- Page 23 Preface Conventions Catalyst 3750 Switch Hardware Installation Guide 78-15136-03...
- Page 24 Preface Conventions Catalyst 3750 Switch Hardware Installation Guide xxii 78-15136-03...
- Page 25 Preface Conventions Catalyst 3750 Switch Hardware Installation Guide xxiii 78-15136-03...
-
Page 26: Related Publications
These documents provide complete information about the switch and are available from this Cisco.com site: http://www.cisco.com/univercd/cc/td/doc/product/lan/cat3750/index.htm Release Notes for the Catalyst 3750 Switch (not orderable but available on • Cisco.com) Before installing, configuring, or upgrading the switch, refer to the release notes Note on Cisco.com for the latest information. -
Page 27: Obtaining Documentation
These sections explain how to obtain technical information from Cisco Systems. Cisco.com You can access the most current Cisco documentation on the World Wide Web at this URL: http://www.cisco.com/univercd/home/home.htm You can access the Cisco website at this URL: http://www.cisco.com... -
Page 28: Documentation Feedback
The Cisco TAC website provides online documents and tools for troubleshooting and resolving technical issues with Cisco products and technologies. The Cisco TAC website is available 24 hours a day, 365 days a year. The Cisco TAC website is located at this URL: http://www.cisco.com/tac... - Page 29 TAC Case Open Tool automatically recommends resources for an immediate solution. If your issue is not resolved using the recommended resources, your case will be assigned to a Cisco TAC engineer. The online TAC Case Open Tool is located at this URL: http://www.cisco.com/tac/caseopen...
-
Page 30: Obtaining Additional Publications And Information
The Cisco Product Catalog describes the networking products offered by • Cisco Systems, as well as ordering and customer support services. Access the Cisco Product Catalog at this URL: http://cisco.com/univercd/cc/td/doc/pcat/ Cisco Press publishes a wide range of general networking, training and •... - Page 31 Preface Obtaining Additional Publications and Information Internet Protocol Journal is a quarterly journal published by Cisco Systems • for engineering professionals involved in designing, developing, and operating public and private internets and intranets. You can access the Internet Protocol Journal at this URL: http://www.cisco.com/ipj...
- Page 32 Preface Obtaining Additional Publications and Information Catalyst 3750 Switch Hardware Installation Guide 78-15136-03...
-
Page 33: Using Express Setup
Express Setup is supported on switches running Cisco IOS Release 12.1(14)EA1 or later. When you are installing a switch, refer to the Cisco IOS release label on the rear panel of the switch to determine the software release. - Page 34 Names of the Simple Network Management Protocol (SNMP) read and write • community strings if you are going to use a network-management program like CiscoWorks • Host name, system contact, and system location Catalyst 3750 Switch Hardware Installation Guide 78-15136-03...
-
Page 35: Taking Out What You Need
Taking Out What You Need Taking Out What You Need Remove the items shown in Figure 1-1 from the shipping container. Figure 1-1 Catalyst 3750 Switch and AC Power Cord SYS T MAS TR STA T DUP LX SPE ED... -
Page 36: Powering On The Switch
Connect the other end of the power cable to a grounded AC outlet. Step 2 As the switch powers on, it begins the power-on self-test (POST), a series of tests that runs automatically to ensure that the switch functions properly. POST lasts approximately 1 minute. Catalyst 3750 Switch Hardware Installation Guide 78-15136-03... - Page 37 When the switch begins POST, the System, the RPS, the Master, the Status, the Duplex, the Speed, and the Stack LEDs turn green. (On the Catalyst 3750-24PS and 3750-48PS switches, the Power over Ethernet [PoE] LED also turns green as POST begins.) The System LED flashes green, and the other LEDs remain...
- Page 38 1-4, until the four LEDs Step 2 above the Mode button turn green. This takes approximately 2 seconds. On the Catalyst 3750-24PS and 3750-48PS switches, the five LEDs above Note the Mode button turn green during this step. Figure 1-4...
- Page 39 Chapter 1 Using Express Setup Starting Express Setup Figure 1-5 Catalyst 3750-24PS and 3750-48PS Switch Mode Button S Y S T R P S M A S T R S T A T D U P L X S P E E D...
- Page 40 PC or workstation. Enter the IP address 10.0.0.1, as shown in Figure 1-7, and press Enter. Step 7 Figure 1-7 Entering the IP Address The Express Setup home page appears, as shown in Figure 1-8. Catalyst 3750 Switch Hardware Installation Guide 78-15136-03...
- Page 41 Ethernet port of the switch and the Ethernet port of the PC or workstation? See the “Identifying a Crossover Cable” section on page B-8 Note instructions on identifying a crossover cable. Catalyst 3750 Switch Hardware Installation Guide 78-15136-03...
- Page 42 10/100, 10/100/1000, or 1000BASE-T SFP module port on the switch, regardless of the type of device on the other end of the connection. The Auto-MDIX feature is enabled by default on switches running Cisco IOS Release 12.2(18)SE or later.
-
Page 43: Configuring The Switch
VLAN ID range for this field is 1 to 1001. Note The Management Interface (VLAN ID) field is only available on switches running Cisco IOS Release 12.1(20)EA1 or 12.2(18)SE or later. Enter the IP address of the switch in the IP Address field. Step 3... - Page 44 (Optional) Click Enable to configure Simple Network Management Protocol Step 12 (SNMP). Enable SNMP only if you plan to manage switches by using Cisco Works or another SNMP-based network-management system. If you enable SNMP, you must enter a community string in the SNMP Read Community field, the SNMP Write Community field, or both.
- Page 45 Launch a web browser on a PC or workstation that is connected the network. Step 1 Step 2 Enter the IP address of your switch (for example: 172.20.139.142.) The switch home page appears, as shown in Figure 1-9. Catalyst 3750 Switch Hardware Installation Guide 1-13 78-15136-03...
-
Page 46: Where To Go Next
Figure 1-9 Switch Home Page Where to Go Next After you have saved your configuration to the switch, you can install the switch or further configure it by using CMS or the CLI. Catalyst 3750 Switch Hardware Installation Guide 1-14 78-15136-03... -
Page 47: Other Switch Home Page Features
Installing or Connecting Devices to the Switch For detailed installation procedures on mounting your switch on or under a desk or on a wall, or connecting devices to the switch, see Chapter 3, “Switch Installation.” Catalyst 3750 Switch Hardware Installation Guide 1-15 78-15136-03... - Page 48 Chapter 1 Using Express Setup Where to Go Next Catalyst 3750 Switch Hardware Installation Guide 1-16 78-15136-03...
-
Page 49: Features
C H A P T E R Product Overview The Catalyst 3750 family of switches—also referred to as the switches—are stackable Ethernet switches to which you can connect devices like Cisco IP Phones, Cisco Wireless Access Points workstations, and other network devices such as servers, routers, and other switches. -
Page 50: Chapter 2 Product Overview
Catalyst 3750G-24T—24 10/100/1000 Ethernet ports – Catalyst 3750G-24TS—24 10/100/1000 Ethernet ports and 4 SFP – module slots Catalyst 3750-48TS—48 10/100 Ethernet ports and 4 SFP module slots – Catalyst 3750G-12S—12 SFP module slots – Catalyst 3750-24PS switch—24 10/100 Power over Ethernet (PoE) ports –... - Page 51 For 10/100 ports, autonegotiates the speed and duplex settings For 10/100/1000 ports, autonegotiates the speed and supports only – full-duplex mode The Catalyst 3750 switches support stacking. You can stack up to nine • switches in a stack by cabling the StackWise ports. StackWise ports are not user-configurable.
-
Page 52: Front Panel Description
Front Panel Description Front Panel Description The Catalyst 3750-24TS 10/100 ports are numbered 1 through 24. The ports are grouped in pairs. The first member of the pair (port 1) is above the second member (port 2), as shown in Figure 2-1. - Page 53 37 50 SER IES 10/100 ports SFP module slots The Catalyst 3750G-12S SFP module slots are numbered 1 through 12. The slots are grouped in three sets of four, as shown in Figure 2-4. Catalyst 3750 Switch Hardware Installation Guide 78-15136-03...
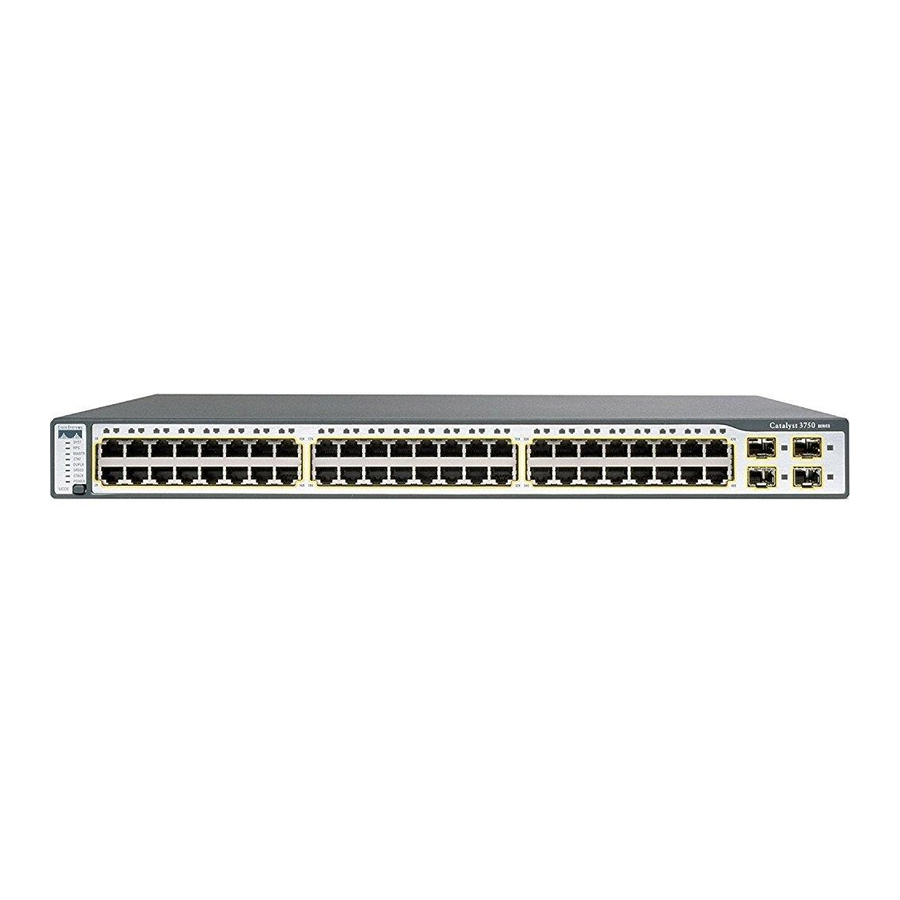
- Page 54 37 50 SER IES SFP module slots The Catalyst 3750-48TS 10/100 ports are numbered 1 through 48. The ports are grouped in pairs. The first member of the pair (port 1) is above the second member (port 2), as shown in Figure 2-1.
- Page 55 Chapter 2 Product Overview Front Panel Description The 10/100 PoE ports on the Catalyst 3750-24PS switch are grouped in pairs. The first member of the pair (port 1) is above the second member (port 2), as shown Figure 2-6. Port 3 is above port 4, and so on. The SFP module slots are numbered 1 and 2.
-
Page 56: Ports
XENPAK module slot 10/100 Ports You can set the 10/100 ports on the Catalyst 3750 switches to operate in any combination of half duplex, full duplex, 10 Mbps, or 100 Mbps. You can also set these ports for speed and duplex autonegotiation, in compliance with IEEE 802.3ab. - Page 57 10/100, 10/100/1000, or 1000BASE-T SFP module port on the switch, regardless of the type of device on the other end of the connection. The Auto-MDIX feature is enabled by default on switches running Cisco IOS Release 12.2(18)SE or later. For releases between Cisco IOS Release 12.1(14)EA1 and 12.2(18)SE, the Auto-MDIX feature is disabled by...
- Page 58 However, when you select the Never setting, the port does not provide power even if a Cisco IP phone or an access point is connected to it. You also can connect a Cisco IP phone or Cisco Aironet Access Point to a Catalyst Note 3750-24PS or Catalyst 3750-48PS switch 10/100 port and to an AC power source.
-
Page 59: Ports
Product Overview Front Panel Description For information about Cisco IP Phones and Cisco Aironet Access Points, refer to the documentation that came with your IP phone or access point. Many legacy powered devices, including older Cisco IP phones and access points Note that do not fully support IEEE 802.3af, might not support PoE when connected to... -
Page 60: Sfp Module Slots
1000BASE-T • CWDM • For a list of the SFP modules that the switches support, refer to the Catalyst 3750 release notes. SFP Modules The Catalyst 3750 switch uses Gigabit Ethernet SFP modules to establish fiber-optic connections. These transceiver modules are field-replaceable, providing the uplink interfaces when inserted in an SFP module slot. -
Page 61: Xenpak Module Slot
For a list of the XENPAK modules that the Catalyst 3750G-16TD switch supports, refer to the Catalyst 3750 release notes. For more information about XENPAK modules, refer to your XENPAK module documentation. The 10-Gigabit Ethernet XENPAK modules are referred to as 10-Gigabit Ethernet Note module ports in the software documentation. - Page 62 Chapter 2 Product Overview Front Panel Description Figure 2-9 Catalyst 3750-24TS, 3750G-24T, 3750G-12S, 3750G-16TD, 3750-48TS, and 3750G-24TS LEDs S Y S T R P S M A S T R S T A T D U P L X S P E E D...
- Page 63 Chapter 2 Product Overview Front Panel Description Figure 2-10 Catalyst 3750-24PS and 3750-48PS LEDs S Y S T R P S M A S T R S T A T D U P L X S P E E D...
-
Page 64: System Led
RPS, and the LED should turn green. If it does not, the RPS fan could have failed. Contact Cisco Systems. Flashing amber The internal power supply in a switch has failed, and the RPS is providing power to the switch (redundancy has been allocated to this device). Catalyst 3750 Switch Hardware Installation Guide 2-16 78-15136-03... -
Page 65: Master Led
Product Overview Front Panel Description For more information about the Cisco RPS 300, refer to the Cisco RPS 300 Redundant Power System Hardware Installation Guide. For more information about the Cisco RPS 675, refer to the Cisco RPS 675 Redundant Power System Hardware Installation Guide. - Page 66 The PoE status. 1. The PoE LED is only on the Catalyst 3750-24PS and 3750-48PS switches. Even if PoE mode is not selected on a Catalyst 3750-24PS or 3750-48PS switch, the PoE LED still shows PoE problems when they are detected.
- Page 67 PoE faults are caused when noncompliant cabling or Caution powered devices are connected to a PoE port. Only standard-compliant cabling can be used to connect Cisco pre-standard IP Phones and wireless access points or IEEE 802.3af-compliant devices to PoE ports. A cable or device that causes a PoE fault must be removed from the network.
- Page 68 Green Port is operating at 100 Mbps. Flashing green Port is operating at 1000 Mbps. When installed in Catalyst 3750 switches, 1000BASE-T Note SFP modules can operate at 10, 100, or 1000 Mbps in full-duplex mode or in half-duplex mode at 10 or 100 Mbps.
- Page 69 StackWise ports (on the switch rear panel) are up, and the representative stack LEDs are amber when the ports are down: SFP port LEDs 1 and 2 on the Catalyst 3750-24TS switch show the status for • StackWise ports 1 and 2, respectively.
- Page 70 RP S MA STR STA T DU PLX SP EE D STA CK MO DE Ca ta lys t 37 50 SER IES Stack member 8 Stack member 4 Stack member 3 Catalyst 3750 Switch Hardware Installation Guide 2-22 78-15136-03...
-
Page 71: Rear Panel Description
StackWise ports. (See Figure 2-12 through Figure 2-13.) Figure 2-12 Catalyst 3750-24TS, 3750G-24T, 3750G-12S, 3750G-16TD, and 3750-48TS Rear Panel S T A C K C O N SO S T A C K DC IN PU TS... - Page 72 1 StackWise ports 4 AC power connector 2 RJ-45 console port 5 RPS connector 3 Fan exhaust Figure 2-14 Catalyst 3750-24PS and 3750-48PS Rear Panel S T A C K C O N SO S T A C K DC IN...
-
Page 73: Stackwise Ports
• Power Connectors The switch is powered through the internal power supply. You can also connect the Cisco RPS 300 or the Cisco RPS 675 to provide backup power if the switch internal power supply should fail. Note The Catalyst 3750 switch and the Cisco RPS 300 or RPS 675 should be connected to the same AC power source. -
Page 74: Cisco Rps Connector
• family of switches. Cisco RPS 300 The Cisco RPS 300 has two output levels: –48V and 12V with a total maximum output power of 300W. Use the supplied RPS connector cable to connect the RPS to the switch. The Cisco RPS 300 does not support the Catalyst 3750G-24TS, 3750-24PS, Note 3750-48PS, and 3750G-16TD switches. -
Page 75: Console Port
Cisco RPS 300, refer to the Cisco RPS 300 Redundant Power System Hardware Installation Guide. Cisco RPS 675 The Cisco RPS 675 has two output levels: –48V and 12V with a total maximum output power of 675W. Use the supplied RPS connector cable to connect the RPS to the switch. -
Page 76: Management Options
Cisco IOS command-line interface (CLI) • The switch CLI is based on Cisco IOS software and is enhanced to support desktop-switching features. You can fully configure and monitor the switch and switch cluster members from the CLI. You can access the CLI either by connecting your management station directly to the switch console port or by using Telnet from a remote management station. -
Page 77: Network Configurations
Chapter 2 Product Overview Management Options Network Configurations Refer to the switch software configuration guide on Cisco.com for network configuration concepts and examples of using the switch to create dedicated network segments and interconnecting the segments through Gigabit Ethernet connections. - Page 78 Chapter 2 Product Overview Management Options Catalyst 3750 Switch Hardware Installation Guide 2-30 78-15136-03...
-
Page 79: Switch Installation
Connecting to the 10/100 and 10/100/1000 Ports, page 3-51 • Connecting to an SFP Module, page 3-55 • • Connecting to a XENPAK Module, page 3-59 Where to Go Next, page 3-61 • Catalyst 3750 Switch Hardware Installation Guide 78-15136-03... -
Page 80: Chapter 3 Switch Installation
AS/NZS 3260 Clause 1.2.14.3 Service Personnel. Only trained and qualified personnel should be allowed to install or replace this Warning equipment. Read the installation instructions before you connect the system to its power Warning source. Catalyst 3750 Switch Hardware Installation Guide 78-15136-03... - Page 81 Do not work on the system or connect or disconnect cables during periods of Warning lightning activity. Ultimate disposal of this product should be handled according to all national Warning laws and regulations. Catalyst 3750 Switch Hardware Installation Guide 78-15136-03...
-
Page 82: Emc Regulatory Statements
Chapter 3 Switch Installation Preparing for Installation Attach only the Cisco RPS (model PWR675-AC-RPS-N1) to the RPS receptacle. Warning Warning Attach only the Cisco RPS (model PWR300-AC-RPS-N1) to the RPS receptacle. Class 1 laser product Warning Avoid direct exposure to the laser beam. -
Page 83: Vcci Class A Notice For Japan
This is a Class A Device and is registered for EMC requirements for industrial Warning use. The seller or buyer should be aware of this. If this type was sold or purchased by mistake, it should be replaced with a residential-use type. Catalyst 3750 Switch Hardware Installation Guide 78-15136-03... -
Page 84: Class A Notice For Hungary
This equipment is a class A product and should be used and installed properly according to the Hungarian EMC Class A requirements (MSZEN55022). Class A equipment is designed for typical commercial establishments for which special conditions of installation and protection distance are used. Catalyst 3750 Switch Hardware Installation Guide 78-15136-03... -
Page 85: Installation Guidelines
1000BASE-LX/LH 1300 62.5 1804 feet (550 m) 1804 feet (550 m) 1804 feet (550 m) 9/10 — 32,810 feet (10 km) 1000BASE-ZX 1550 9/10 — 43.4 to 62 miles (70 to 100 km) Catalyst 3750 Switch Hardware Installation Guide 78-15136-03... - Page 86 5-decibel (dB) or 10-dB inline optical attenuator between the fiber-optic cable plant and the receiving port on the 1000BASE-ZX SFP module. Refer to the Catalyst 3750 release notes for cable stipulations for XENPAK • module connections. Each port must match the wave-length specifications on the other end of the cable, and for reliable communications, the cable must not exceed the stipulated cable length.
-
Page 87: Verifying Package Contents
Carefully remove the contents from the shipping container, and check each item Note for damage. If any item is missing or damaged, contact your Cisco representative or reseller for support. Return all packing material to the shipping container, and save it. -
Page 88: Verifying Switch Operation
To connect the switch console port to a terminal, you need to provide a RJ-45-to-DB-25 female DTE adapter. You can order a kit (part number ACS-DSBUASYN=) containing that adapter from Cisco. For console port and adapter pinout information, see the “Cable and Adapter Specifications”... - Page 89 Attach the DB-9 female DTE adapter of the RJ-45-to-DB-9 adapter cable to a PC, Step 3 or attach an appropriate adapter to the terminal. Start the terminal-emulation program if you are using a PC or terminal. Step 4 Catalyst 3750 Switch Hardware Installation Guide 3-11 78-15136-03...
-
Page 90: Powering On The Switch And Running Post
“Connecting a PC or Terminal to the Console Port” section on page 3-10 information on connecting to the switch console port. Connect one end of the AC power cord to the AC power connector on the switch. Step 2 Catalyst 3750 Switch Hardware Installation Guide 3-12 78-15136-03... -
Page 91: Powering Off The Switch And Disconnecting The Console Port
When the switch begins POST, the System, the RPS, the Master, the Status, the Duplex, the Speed, and the Stack LEDs turn green. (On the Catalyst 3750-24PS and 3750-48PS switches, the PoE LED also turns green as POST begins.) The System LED flashes green, and the other LEDs remain continuous green. -
Page 92: Planning The Stack
If you don’t specify the length of the StackWise cable, the 0.5-meter cable is supplied. If you require the 1-meter cable or 3-meter cable, you can order it from your Cisco supplier. For cable numbers, see the “StackWise Ports” section on page 2-25. -
Page 93: Powering Considerations
The illustrations in this section display cabling configuration examples that show the stack bandwidth and possible stack partitioning. Figure 3-2 shows an example of a stack of Catalyst 3750 switches that provides full bandwidth and redundant StackWise cable connections. Figure 3-2... - Page 94 Chapter 3 Switch Installation Planning the Stack Figure 3-3 shows an example of a stack of Catalyst 3750 switches with incomplete StackWise cabling connections. This stack provides only half bandwidth and does not have redundant connections. Figure 3-3 Example of a Stack with Half Bandwidth Connections...
-
Page 95: Recommended Cabling Configurations
Stacking the Switches in a Vertical Rack or on a Table Using the 0.5-meter StackWise Cable The configuration examples in Figure 3-7 use the 3-meter StackWise cable in addition to the supplied 0.5-meter StackWise cable. This configuration also provides redundant connections. Catalyst 3750 Switch Hardware Installation Guide 3-17 78-15136-03... - Page 96 Chapter 3 Switch Installation Planning the Stack Figure 3-7 Stacking the Catalyst 3750 Switches in a Vertical Rack or on a Table Using 0.5-meter and 3-meter StackWise Cables Side-by-Side Mounting in a Rack or on a Wall Figure 3-8 Figure 3-9 are examples of recommended configurations where the switches are rack- or wall-mounted side-by-side.
-
Page 97: Installing The Switch
Removing Screws from the Switch, page 3-20 • • Attaching Brackets to the Catalyst 3750G-24TS Switch, page 3-21 Attaching Brackets to the Catalyst 3750-24TS, 3750G-24T, 3750G-12S, • 3750-24PS, 3750-48PS, 3750G-16TD, and 3750-48TS Switches, page 3-26 Mounting the Switch in a Rack, page 3-29 •... -
Page 98: Removing Screws From The Switch
Figure 3-10 Figure 3-11 show how to remove the chassis screws in a one-rack-unit (RU) switch. Figure 3-10 Removing Screws from the Catalyst 3750-24TS, 3750G-24T, 3750-24PS, 3750-48PS, 3750G-16TD, and 3750-48TS Switches C a ta ly st 3 7 5 0... -
Page 99: Attaching Brackets To The Catalyst 3750G-24Ts Switch
700-11523-XX; for 24-inch racks, use part number 700-12398-XX. Figure 3-13 through Figure 3-18 show how to attach each type bracket to one side of the switch. Follow the same steps to attach the second bracket to the opposite side. Catalyst 3750 Switch Hardware Installation Guide 3-21 78-15136-03... - Page 100 M A S TR S TA T D U P LX S P E E D S TA C K M O D E 11 X 13 X 12 X 14 X Phillips flat-head screws Catalyst 3750 Switch Hardware Installation Guide 3-22 78-15136-03...
- Page 101 R P S M A S TR S TA T D U P LX S P E E D S TA C K M O D E 11 X 12 X Phillips flat-head screws Catalyst 3750 Switch Hardware Installation Guide 3-23 78-15136-03...
- Page 102 E M O T R S U P S P E C IF P LY IE D IN M A N U + 1 2 v @ 1 7 a Phillips flat-head screws Catalyst 3750 Switch Hardware Installation Guide 3-24 78-15136-03...
- Page 103 3 7 5 0 SE RI ES Phillips flat-head screws Figure 3-18 Attaching Brackets for 24-Inch Telco Racks C at al ys t 3 7 5 0 SE RI ES Phillips flat-head screws Catalyst 3750 Switch Hardware Installation Guide 3-25 78-15136-03...
-
Page 104: Attaching Brackets To The Catalyst 3750-24Ts, 3750G-24T, 3750G-12S 3750-24Ps, 3750-48Ps, 3750G-16Td, And 3750-48Ts Switches
Chapter 3 Switch Installation Installing the Switch Attaching Brackets to the Catalyst 3750-24TS, 3750G-24T, 3750G-12S, 3750-24PS, 3750-48PS, 3750G-16TD, and 3750-48TS Switches The bracket orientation and the brackets you use depend on whether you are attaching the brackets for a 19-inch or a 24-inch rack. For 19-inch racks, use bracket part number 700-8209-XX;... - Page 105 1 0 0 -2 0 0 V ~ M A N U 1 .6 A -0 + 1 2 v > 9 A , 5 @ 8 .5 a 0 -6 0 H Phillips flat-head screws Catalyst 3750 Switch Hardware Installation Guide 3-27 78-15136-03...
- Page 106 @ 8 .5 a 0 -6 0 H Phillips flat-head screws Figure 3-23 Attaching Brackets for 19-Inch Telco Racks C at al ys t 3 7 5 0 SE RI ES Phillips flat-head screws Catalyst 3750 Switch Hardware Installation Guide 3-28 78-15136-03...
-
Page 107: Mounting The Switch In A Rack
Mounting the Switch in a Rack After the brackets are attached to the switch, use the four supplied number-12 Phillips machine screws to securely attach the brackets to the rack, as shown in Figure 3-26 Figure 3-27. Catalyst 3750 Switch Hardware Installation Guide 3-29 78-15136-03... - Page 108 MO DE Ca ta ly st 37 50 SE RIE S Phillips machine screws Figure 3-27 Mounting the Catalyst 3750-24TS, 3750G-24T, 3750G-12S, 3750-24PS, 3750-48PS, 3750G-16TD, and 3750-48TS Switches in a Rack SY ST RP S MA ST R STA T...
-
Page 109: Attaching The Cable Guide
Use the supplied black screw, as shown in Figure 3-28 Figure 3-29 to attach the cable guide to the left or right bracket. Catalyst 3750 Switch Hardware Installation Guide 3-31 78-15136-03... - Page 110 Chapter 3 Switch Installation Installing the Switch Figure 3-28 Attaching the Cable Guide on the Catalyst 3750-24TS, 3750G-24T, 3750G-24TS, 3750G-12S, 3750-24PS, 3750-48PS, and 3750G-16TD Switches SYS T RP S MA STR STA T DU PLX SPE ED STA CK MO DE...
-
Page 111: Wall Mounting
Mounting the Switch on a Wall, page 3-35 • The illustrations in this section show the Catalyst 3750G-24TS switch as an Note example. All the Catalyst 3750 switches are wall-mounted following the same procedures. Attaching the Brackets to the Switch for Wall-Mounting Figure 3-30 shows how to attach a 19-inch bracket to one side of the switch. -
Page 112: Attaching The Rps Connector Cover
SU PP LY SP EC IF IE D IN S T A C K M AN UA +1 2v @ 8. 5a C O N SO Phillips pan-head screws RPS connector RPS connector cover Catalyst 3750 Switch Hardware Installation Guide 3-34 78-15136-03... -
Page 113: Mounting The Switch On A Wall
Mount the switch with the front panel facing up, as shown in Figure 3-33. To comply with safety regulations, mount the switches on a wall with the front Warning panel facing up. Catalyst 3750 Switch Hardware Installation Guide 3-35 78-15136-03... - Page 114 Terminal Emulation Software” section on page C-9. Power on the switch. See the “Connecting to a Power Source” section on • page C-9. If the switches are stacked, see the “Powering Considerations” section on page 3-15. Catalyst 3750 Switch Hardware Installation Guide 3-36 78-15136-03...
-
Page 115: Table Or Shelf Mounting
Terminal Emulation Software” section on page C-9. Power on the switch. See the “Connecting to a Power Source” section on • page C-9. If the switches are stacked, see the “Powering Considerations” section on page 3-15. Catalyst 3750 Switch Hardware Installation Guide 3-37 78-15136-03... -
Page 116: Connecting Stackwise Cable To Stackwise Ports
Insert one end of the StackWise cable into the StackWise port on the back of the Step 2 switch. Always use a Cisco-approved StackWise cable to connect the switches. Note Use the window in the StackWise cable to align the connector correctly. Secure Step 3 the screws tightly. - Page 117 Also make sure that you remove the correct screws from the StackWise port. See Figure 3-35 for correct removal procedures and Figure 3-36 for incorrect removal procedures. Catalyst 3750 Switch Hardware Installation Guide 3-39 78-15136-03...
- Page 118 Connecting StackWise Cable to StackWise Ports Figure 3-35 Correct Removal of the StackWise Cable from a StackWise Port S T A C K C O N S O S T A C K Catalyst 3750 Switch Hardware Installation Guide 3-40 78-15136-03...
-
Page 119: Installing And Removing Sfp Modules
You can use any combination of SFP modules. Refer to the Catalyst 3750 release notes for the list of SFP modules that the Catalyst 3750 switch supports. Each port must match the wave-length specifications on the other end of the cable, and the cable must not exceed the stipulated cable length for reliable communications. -
Page 120: Installing Sfp Modules Into Sfp Module Slots
Attach an ESD-preventive wrist strap to your wrist and to a bare metal surface on Step 1 the chassis. Find the send (TX) and receive (RX) markings that identify the top side of the SFP Step 2 module. Catalyst 3750 Switch Hardware Installation Guide 3-42 78-15136-03... - Page 121 Do not remove the dust plugs from the fiber-optic SFP module port or the rubber Caution caps from the fiber-optic cable until you are ready to connect the cable. The plugs and caps protect the SFP module ports and cables from contamination and ambient light. Catalyst 3750 Switch Hardware Installation Guide 3-43 78-15136-03...
-
Page 122: Removing Sfp Modules From Sfp Module Slots
If the bale-clasp latch is obstructed and you cannot use your index finger to open it, use a small, flat-blade screwdriver or other long, narrow instrument to open the bale-clasp latch. Catalyst 3750 Switch Hardware Installation Guide 3-44 78-15136-03... -
Page 123: Installing And Removing Xenpak Modules
XENPAK module slot on the front panel of the Catalyst 3750G-16TD switch. These field-replaceable transceiver modules provide 10-Gigabit interfaces. Note The 10-Gigabit Ethernet XENPAK modules are referred to as 10-Gigabit Ethernet module ports in the switch software documentation. Catalyst 3750 Switch Hardware Installation Guide 3-45 78-15136-03... -
Page 124: Installing A Xenpak Module
Switch Installation Installing and Removing XENPAK Modules Refer to the Catalyst 3750 release notes for the list of XENPAK modules that the Catalyst 3750G-16TD switch supports. Use only Cisco XENPAK modules on the Catalyst 3750G-16TD switch. Each XENPAK module has an internal serial EEPROM that is encoded with security information. - Page 125 Remove the two Phillips-head retaining screws from the XENPAK module slot Step 2 cover, and store them for later use. Step 3 Remove the cover, as shown in Figure 3-41. Catalyst 3750 Switch Hardware Installation Guide 3-47 78-15136-03...
- Page 126 Align the XENPAK module with the guide rails inside the module slot, and slide Step 5 the module into the opening until the back of the XENPAK faceplate is flush with the switch faceplate. (See Figure 3-42.) Catalyst 3750 Switch Hardware Installation Guide 3-48 78-15136-03...
-
Page 127: Removing A Xenpak Module
Loosen the two captive installation screws that secure the XENPAK module in the Step 3 slot. Carefully pull on the two captive installation screws to disconnect the XENPAK Step 4 module from the slot. Catalyst 3750 Switch Hardware Installation Guide 3-49 78-15136-03... - Page 128 Optical bore dust plug Captive installation screw Use two Phillips-head screws to attach the XENPAK module slot cover to the Step 6 switch front panel, as shown in Figure 3-44. Catalyst 3750 Switch Hardware Installation Guide 3-50 78-15136-03...
-
Page 129: Connecting To The 10/100 And 10/100/1000 Ports
To maximize performance, choose one of these methods for configuring the Ethernet ports: Let the ports autonegotiate both speed and duplex. • Set the port speed and duplex parameters on both ends of the connection. • Catalyst 3750 Switch Hardware Installation Guide 3-51 78-15136-03... - Page 130 You can configure the 10/100 ports on the Catalyst 3750-24PS and 3750-48PS switches either to automatically provide PoE when a Cisco IP Phone, Cisco Aironet Access Point, or end device compliant with IEEE 802.3af is connected or...
- Page 131 10/100, 10/100/1000, or 1000BASE-T SFP module port on the switch, regardless of the type of device on the other end of the connection. The Auto-MDIX feature is enabled by default on switches running Cisco IOS Release 12.2(18)SE or later. For releases between Cisco IOS Release 12.1(14)EA1 and 12.2(18)SE, the Auto-MDIX feature is disabled by...
- Page 132 Chapter 3 Switch Installation Connecting to the 10/100 and 10/100/1000 Ports The Catalyst 3750 switch can connect to a Cisco IP Phone through a Note straight-through, twisted four-pair Category 5 cable. The rear panel of the Cisco IP Phone might have more than one RJ-45 connector. Use the LAN-to-phone connector to connect the IP phone to the switch.
-
Page 133: Connecting To An Sfp Module
For instructions on how to connect to 1000BASE-T SFP modules, see the “Connecting to 1000BASE-T SFP Modules” section. For instructions about how to install or remove an SFP module, see the “Installing and Removing SFP Modules” section on page 3-41. Catalyst 3750 Switch Hardware Installation Guide 3-55 78-15136-03... -
Page 134: Connecting To A Fiber-Optic Sfp Module
If the LED is off, the target device might not be turned on, there might be a cable problem, or there might be problem with the adapter installed in the target device. Chapter 4, “Troubleshooting,” for solutions to cabling problems. Catalyst 3750 Switch Hardware Installation Guide 3-56 78-15136-03... - Page 135 14 X 24 X LC connector If necessary, reconfigure and restart the switch or target device. Step 5 For detailed instructions on removing the SFP modules, refer to your SFP Caution documentation. Catalyst 3750 Switch Hardware Installation Guide 3-57 78-15136-03...
-
Page 136: Connecting To 1000Base-T Sfp Modules
Insert the other cable end in an RJ-45 connector on a target device. Step 2 Observe the port status LED. Step 3 The LED turns green when the switch and the target device have an established link. Catalyst 3750 Switch Hardware Installation Guide 3-58 78-15136-03... -
Page 137: Connecting To A Xenpak Module
(TX) on the cable meets receive (RX) on the XENPAK module connector, and RX on the cable meets TX on the XENPAK module. Insert the fiber-optic cable connector into the XENPAK module ports (see Step 3 Figure 3-48). Catalyst 3750 Switch Hardware Installation Guide 3-59 78-15136-03... - Page 138 Figure 3-48 Connecting to a XENPAK Module Port C a ta ly s t 3 7 5 0 s e ri e s SC connector If necessary, reconfigure and restart the switch or target device. Step 6 Catalyst 3750 Switch Hardware Installation Guide 3-60 78-15136-03...
-
Page 139: Where To Go Next
Use the CLI to configure the switch as a member of a cluster or as an • individual switch from the console. Refer to the Catalyst 3750 Switch Command Reference on Cisco.com for information on using the CLI with a Catalyst 3750 switch. - Page 140 Chapter 3 Switch Installation Where to Go Next Catalyst 3750 Switch Hardware Installation Guide 3-62 78-15136-03...
-
Page 141: Troubleshooting
(CLI), or from a Simple Network Management Protocol (SNMP) workstation. Refer to the software configuration guide, the switch command reference guide on Cisco.com, or the documentation that came with your SNMP application for details. This chapter describes these topics for troubleshooting problems: •... -
Page 142: Chapter 4 Troubleshooting
When the switch begins POST, the System, the RPS, the Master, the Status, the Duplex, the Speed, and the Stack LEDs turn green. (On the Catalyst 3750-24PS and 3750-48PS switches, the Power over Ethernet [PoE] LED also turns green as POST begins.) The System LED flashes green, and the other LEDs remain... -
Page 143: Clearing The Switch Ip Address And Configuration
You can also configure the switch by using the command-line interface (CLI) setup procedure described in these sections: • “Starting the Terminal Emulation Software” section on page C-9 “Entering the Initial Configuration Information” section on page C-11 • Catalyst 3750 Switch Hardware Installation Guide 78-15136-03... -
Page 144: Diagnosing Problems
You can also get statistics from the browser interface, from the CLI, or from an SNMP workstation. Refer to the software configuration guide, the switch command reference guide on Cisco.com, or the documentation that came with your SNMP application for details. -
Page 145: Diagnosing Problems
Bad adapter in attached device • Excessive errors found in port • Run adapter card diagnostic statistics. utility. • STP checking for possible • Wait 30 seconds for the port loops. LED to turn green. Catalyst 3750 Switch Hardware Installation Guide 78-15136-03... - Page 146 • cable is wired incorrectly. connections, be sure to use a twisted four-pair, Category 5 cable. STP checking for possible • Wait 30 seconds for the port • loops. LED to turn green. Catalyst 3750 Switch Hardware Installation Guide 78-15136-03...
- Page 147 AC power source. PoE might be disabled on switch If the port status LED is • port. amber, configure the switch port PoE setting to Auto. PoE is enabled by Note default. Catalyst 3750 Switch Hardware Installation Guide 78-15136-03...
- Page 148 You can also use the Note or IEEE CMS or CLI to search 802.3af-compliant for PoE faults. devices to PoE ports. A cable or device that causes a PoE fault must be removed from the network. Catalyst 3750 Switch Hardware Installation Guide 78-15136-03...
-
Page 149: Replacing A Failed Stack Member
If you need to replace a failed stack member, you can hot swap or replace the switch by following this procedure: Step 1 Get a replacement switch that has the same model number as the failed switch. Power down the failed switch. Step 2 Catalyst 3750 Switch Hardware Installation Guide 78-15136-03... -
Page 150: Replacing A Failed Stack Member
Power on the replacement switch. Step 5 The replacement switch will have the same configuration for all the interfaces as the failed switch and will function the same as the failed switch. Catalyst 3750 Switch Hardware Installation Guide 4-10 78-15136-03... -
Page 151: Technical Specifications
1.2A/0.6A, 50 to 60 Hz + 12V DC input voltages for @13A RPS 300 + 12V DC input voltages for @13A RPS 675 Power consumption 120 W, 409 BTUs per hour Power rating 0.120 kVA Catalyst 3750 Switch Hardware Installation Guide 78-15136-03... - Page 152 10 lb (4.55 kg) Dimensions (H x D x W) 1.73 x 12.83 x 17.5 in. (4.39 x 32.59 x 44.45 cm) Table A-2 Specifications for the Catalyst 3750-24TS Switch Environmental Ranges Operating temperature 32 to 113°F (0 to 45°C) Storage temperature –13 to 158°F (–25 to 70°C)
- Page 153 Appendix A Technical Specifications Table A-2 Specifications for the Catalyst 3750-24TS Switch (continued) Environmental Ranges Physical Dimensions Weight 8 lb (3.6 kg) Dimensions (H x D x W) 1.73 x 11.83 x 17.5 in. (4.39 x 30.05 x 44.45 cm)
- Page 154 Appendix A Technical Specifications Table A-4 Technical Specifications for the Catalyst 3750-24PS Switch Environmental Ranges Operating temperature 32 to 113°F (0 to 45°C) Storage temperature –13 to 158°F (–25 to 70°C) Relative humidity 10 to 85% (noncondensing) Operating altitude Up to 10,000 ft (3049 m)
- Page 155 Appendix A Technical Specifications Table A-5 Specifications for the Catalyst 3750-48PS Switch Environmental Ranges Operating temperature 32 to 113°F (0 to 45°C) Storage temperature –13 to 158°F (–25 to 70°C) Relative humidity 10 to 85% (noncondensing) Operating altitude Up to 10,000 ft (3049 m)
- Page 156 180 W, 615 BTUs per hour Power rating 0.180 kVA Physical Dimensions Weight 12.5 lb (5.68 kg) Dimensions (H x D x W) 1.73 x 17.5 x 16.1 in. (4.39 x 44.45 x 40.89 cm) Catalyst 3750 Switch Hardware Installation Guide 78-15136-03...
- Page 157 190W, 650 BTUs per hour Power rating 0.190 kVA Physical Dimensions Weight 12.5 lb (5.68 kg) Dimensions (H x D x W) 2.59 x 11.60 x 17.5 in. (6.59 x 29.46 x 44.45 cm) Catalyst 3750 Switch Hardware Installation Guide 78-15136-03...
- Page 158 Appendix A Technical Specifications Table A-8 Specifications for the Catalyst 3750-48TS Switch Environmental Ranges Operating temperature 32 to 113°F (0 to 45°C) Storage temperature –13 to 158°F (–25 to 70°C) Relative humidity 10 to 85% (noncondensing) Operating altitude Up to 10,000 ft (3049 m)
- Page 159 Appendix A Technical Specifications Table A-9 Catalyst 3750 Switch Agency Approvals (continued) Safety CE Marking Catalyst 3750 Switch Hardware Installation Guide 78-15136-03...
- Page 160 Appendix A Technical Specifications Catalyst 3750 Switch Hardware Installation Guide A-10 78-15136-03...
-
Page 161: Connector And Cable Specifications
A P P E N D I X Connector and Cable Specifications This appendix describes the Catalyst 3750 switch ports and the cables and adapters that you use to connect the switch to other devices. Connector Specifications These sections describe the connectors used with the Catalyst 3750 switches. -
Page 162: And 10/100 /1000 Ports
Appendix B Connector and Cable Specifications Connector Specifications 10/100 and 10/100 /1000 Ports The 10/100 and 10/100/1000 Ethernet ports on Catalyst 3750 switches use standard RJ-45 connectors and Ethernet pinouts with internal crossovers. Figure B-2 Figure B-1 show the pinouts. -
Page 163: Sfp Module Ports
Connector Specifications SFP Module Ports The Catalyst 3750 switch uses SFP modules for fiber-optic and copper uplink ports. Refer to the Catalyst 3750 release notes for a list of supported SFP modules. Figure B-3 Fiber-Optic SFP Module LC Connector Invisible laser radiation may be emitted from disconnected fibers or Warning connectors. -
Page 164: Xenpak Module Ports
Connector Specifications XENPAK Module Ports The Catalyst 3750G-16TD switch uses XENPAK modules for 10-Gigabit fiber-optic connections to networks. Refer to the Catalyst 3750 release notes for a list of supported XENPAK modules. Fiber-optic XENPAK modules use SC connectors, as shown in Figure B-5. -
Page 165: Cable And Adapter Specifications
Appendix B Connector and Cable Specifications Cable and Adapter Specifications Cable and Adapter Specifications These sections describe the cables and adapters used with Catalyst 3750 switches. Two Twisted-Pair Cable Pinouts Figure B-6 Figure B-7 show the schematics of two twisted-pair cables for 10/100 ports. -
Page 166: Four Twisted-Pair Cable Pinouts For 10/100 Ports
Switch 1 RD+ 1 RD+ 2 RD- 2 RD- 3 TD+ 3 TD+ 6 TD- 6 TD- 4 NC 4 NC 5 NC 5 NC 7 NC 7 NC 8 NC 8 NC Catalyst 3750 Switch Hardware Installation Guide 78-15136-03... -
Page 167: Four Twisted-Pair Cable Pinouts For 1000Base-T Ports
Cable and Adapter Specifications Four Twisted-Pair Cable Pinouts for 1000BASE-T Ports Figure B-10 Figure B-11 show the schematics of four twisted-pair cables for 10/100/1000 ports on Catalyst 3750 switches. Figure B-10 Four Twisted-Pair Straight-Through Cable Schematic for 10/100/1000 Ports Switch Router or PC... -
Page 168: Crossover Cable And Adapter Pinouts
(See Figure B-12.) Figure B-12 Identifying a Crossover Cable Pin 1 on one connector and pin 8 on the other connector should be the same color. Pin 1 Pin 8 Catalyst 3750 Switch Hardware Installation Guide 78-15136-03... -
Page 169: Adapter Pinouts
10/100, 10/100/1000, or 1000BASE-T SFP module port on the switch, regardless of the type of device on the other end of the connection. The Auto-MDIX feature is enabled by default on switches running Cisco IOS Release 12.2(18)SE or later. For releases between Cisco IOS Release 12.1(14)EA1 and 12.2(18)SE, the Auto-MDIX feature is disabled by... - Page 170 The RJ-45-to-DB-25 female DTE adapter is not supplied with the switch. You can Note order a kit (part number ACS-DSBUASYN=) containing this adapter from Cisco. Table B-2 Console Port Signaling Using a DB-25 Adapter Switch...
-
Page 171: Configuring The Switch With The Cli-Based Setup Program
Stacking the Switches (Optional), page C-5 Connecting to the Console Port, page C-7 Starting the Terminal Emulation Software, page C-9 Connecting to a Power Source, page C-9 Entering the Initial Configuration Information, page C-11 Catalyst 3750 Switch Hardware Installation Guide 78-15136-03... -
Page 172: Accessing The Cli
Express Setup is supported on switches running Cisco IOS Release 12.1(14)EA1 Note or later. If you are installing a new switch, refer to the Cisco IOS release label on the rear panel of the switch to determine the release. For switches running releases earlier than Cisco IOS Release 12.1(14)EA1, go to “Taking Out What You Need”... -
Page 173: Accessing The Cli Through The Console Port
“Connecting to the Console Port” section on page C-7 • “Starting the Terminal Emulation Software” section on page C-9 • “Connecting to a Power Source” section on page C-9 • “Entering the Initial Configuration Information” section on page C-11 • Catalyst 3750 Switch Hardware Installation Guide 78-15136-03... -
Page 174: Taking Out What You Need
Taking Out What You Need Taking Out What You Need Remove the items shown in Figure C-1 from the shipping container: Figure C-1 The Catalyst 3750 Switch, Adapter Cable, AC Power Cord, and the StackWise Cable SYST MAS TR STAT... -
Page 175: Stacking The Switches (Optional)
10/100, 10/100/1000, or 1000BASE-T SFP module port on the switch, regardless of the type of device on the other end of the connection. The Auto-MDIX feature is enabled by default on switches running Cisco IOS Release 12.2(18)SE or later. For releases between Cisco IOS Release 12.1(14)EA1 and 12.2(18)SE, the Auto-MDIX feature is disabled by... - Page 176 Insert one end of the StackWise cable into the StackWise port at the back of a Step 1 switch. See Figure C-3. Note Always use a Cisco-approved StackWise cable to connect the switches. Use the window in the StackWise cable to align the connector correctly. Secure Step 2 the screws tightly.
-
Page 177: Connecting To The Console Port
Figure C-4. Attach the DB-9 female DTE of the adapter cable to a PC’s serial port, or attach Step 2 an appropriate adapter to the terminal. Catalyst 3750 Switch Hardware Installation Guide 78-15136-03... - Page 178 SP EC IFIE D IN MA 100 -20 1.6 A-0 0V ~ +12 v NU AL >9A , 50- @8 .5a 60 HZ 1 Catalyst 3750 switches RJ-45-to-DB-9 adapter cable 2 Power cord Catalyst 3750 Switch Hardware Installation Guide 78-15136-03...
-
Page 179: Starting The Terminal Emulation Software
Figure C-4. Connect the other end of the power cable to a grounded AC outlet. Step 2 (Optional) If you have a stack, power on all the switches in the stack. Step 3 Catalyst 3750 Switch Hardware Installation Guide 78-15136-03... - Page 180 Note section on page 3-15 for more information. If you are connecting the switch to a Cisco redundant power system (RPS), refer Note to the documentation that shipped with your RPS. As the switch powers on, it begins the power-on self-test (POST), a series of tests that runs automatically to ensure that the switch functions properly.
-
Page 181: Entering The Initial Configuration Information
Enter. Follow these steps to complete the setup program and to create an initial configuration for the switch: Enter Yes at the following two prompts. Step 1 Catalyst 3750 Switch Hardware Installation Guide C-11 78-15136-03... - Page 182 (Optional) Configure Simple Network Management Protocol (SNMP) by Step 6 responding to the prompts. You can also configure SNMP later through the CLI or CMS interface. To configure SNMP later type no. Configure SNMP Network Management? [no]: no Catalyst 3750 Switch Hardware Installation Guide C-12 78-15136-03...
- Page 183 5 $1$Ulq8$DlA/OiaEbl90WcBPd9cOn1 enable password enable_password line vty 0 15 password terminal-password no snmp-server no ip routing interface Vlan1 no shutdown ip address 10.4.120.106 255.0.0.0 interface FastEthernet1/0/1 interface FastEthernet1/0/2 interface FastEthernet1/0/3 Catalyst 3750 Switch Hardware Installation Guide C-13 78-15136-03...
- Page 184 To use the CLI, enter commands at the Switch> prompt through the console port by using a terminal program or through the network by using telnet. For configuration information, refer to the switch software configuration guide or the switch command reference. Catalyst 3750 Switch Hardware Installation Guide C-14 78-15136-03...
-
Page 185: Translated Safety Warnings
Attaching the Cisco RPS (model PWR300-AC-RPS-N1) Attach only the Cisco RPS (model PWR300-AC-RPS-N1) to the RPS receptacle. Warning Waarschuwing Slechts de Cisco RPS (model PWR300-AC-RPS-N1) aan de RPS contactdoos verbinden. -
Page 186: Appendix D Translated Safety Warning
Attaching the Cisco RPS (model PWR300-AC-RPS-N1) Advarsel! Koble bare Cisco RPS (modell PWR300-AC-RPS-N1) til RPS-stikkontakten. Aviso Anexe o RPS Cisco (modelo PWR300-AC-RPS-N1) apenas ao receptáculo RPS. ¡Advertencia! Sólo conecte el Cisco RPS (modelo PWR300-AC-RPS-N1) al receptáculo RPS. Varning! Koppla endast Ciscos RPS (modell PWR300-AC-RPS-N1) till RPS-uttaget. -
Page 187: Attaching The Cisco Rps (Model Pwr675-Ac-Rps-N1)
Translated Safety Warnings Attaching the Cisco RPS (model PWR675-AC-RPS-N1) Attaching the Cisco RPS (model PWR675-AC-RPS-N1) Warning Attach only the Cisco RPS (model PWR675-AC-RPS-N1) to the RPS receptacle. Slechts de Cisco RPS (model PWR675-AC-RPS-N1) aan de RPS contactdoos Waarschuwing verbinden. Varoitus Kiinnitä... - Page 188 -johtimia. Vältä tällaisia kytkentöjä, elleivät paljaat metalliosat ole rajatussa paikassa. Ilmoita valtuutetuille käyttäjille ja huoltohenkilöille vaarasta. Rajattuun alueeseen pääsee käsiksi ainoastaan erityistyökalua, lukkoa ja avainta tai muuta turvallista menetelmää käyttämällä. Catalyst 3750 Switch Hardware Installation Guide 78-15136-03...
-
Page 189: Shock Hazard From Interconnections
Et område med begrenset tilgang kan bare åpnes ved hjelp av spesialverktøy, nøkkel eller andre sikkerhetstiltak. Catalyst 3750 Switch Hardware Installation Guide 78-15136-03... - Page 190 åtkomst. Användare och servicepersonal som tillåts inom platsen med begränsad åtkomst måste vara medvetna om risken. Ett begränsat område kan bara nås med ett speciellt verktyg eller lås, en speciell nyckel eller någon annan säkerhetsmetod. Catalyst 3750 Switch Hardware Installation Guide 78-15136-03...
- Page 191 Appendix D Translated Safety Warnings Shock Hazard From Interconnections Catalyst 3750 Switch Hardware Installation Guide 78-15136-03...
-
Page 192: Installation Warning
¡Advertencia! Solamente el personal calificado debe instalar, reemplazar o utilizar este equipo. Varning! Endast utbildad och kvalificerad personal bör få tillåtelse att installera, byta ut eller reparera denna utrustning. Catalyst 3750 Switch Hardware Installation Guide 78-15136-03... -
Page 193: Installation Instructions
Leia as instruções de instalação antes de ligar o sistema à fonte de energia. ¡Advertencia! Lea las instrucciones de instalación antes de conectar el sistema a la red de alimentación. Varning! Läs installationsanvisningarna innan du kopplar systemet till strömförsörjningsenheten. Catalyst 3750 Switch Hardware Installation Guide 78-15136-03... -
Page 194: Jewelry Removal Warning
(anneaux, colliers et montres compris). Lorsqu’ils sont branchés à l’alimentation et reliés à la terre, les objets métalliques chauffent, ce qui peut provoquer des blessures graves ou souder l’objet métallique aux bornes. Catalyst 3750 Switch Hardware Installation Guide D-10 78-15136-03... -
Page 195: Jewelry Removal Warning
Tag av alla smycken (inklusive ringar, halsband och armbandsur) innan du arbetar på utrustning som är kopplad till kraftledningar. Metallobjekt hettas upp när de kopplas ihop med ström och jord och kan förorsaka allvarliga brännskador; metallobjekt kan också sammansvetsas med kontakterna. Catalyst 3750 Switch Hardware Installation Guide D-11 78-15136-03... -
Page 196: Stacking The Chassis Warning
Ne placez pas ce châssis sur un autre appareil. En cas de chute, il pourrait provoquer de graves blessures corporelles et d'importants dommages. Achtung Das Gehäuse nicht auf andere Geräte stellen. Wenn das Gehäuse herunterfällt, besteht Gefahr schwerer Personenverletzungen und Geräteschäden. Catalyst 3750 Switch Hardware Installation Guide D-12 78-15136-03... -
Page 197: Stacking The Chassis Warning
No apilar los chasis sobre ningún otro equipo. Si el chasis se cae al suelo puede causar graves lesiones físicas y daños al equipo. Varning Placera inte chassit ovanpå annan utrustning. Om chassit faller kan allvarlig kroppsskada såväl som skada på utrustningen uppstå. Catalyst 3750 Switch Hardware Installation Guide D-13 78-15136-03... -
Page 198: Main Disconnecting Device
El conjunto de clavija y toma ha de encontrarse siempre accesible ya que ¡Advertencia! hace las veces de dispositivo de desconexión principal. Varning! Man måste alltid kunna komma åt stickproppen i uttaget, eftersom denna koppling utgör den huvudsakliga frånkopplingsanordningen. Catalyst 3750 Switch Hardware Installation Guide D-14 78-15136-03... -
Page 199: Grounded Equipment Warning
Questa apparecchiatura deve essere collegata a massa. Accertarsi che il dispositivo host sia collegato alla massa di terra durante il normale utilizzo. Advarsel Dette utstyret skal jordes. Forviss deg om vertsterminalen er jordet ved normalt bruk. Catalyst 3750 Switch Hardware Installation Guide D-15 78-15136-03... -
Page 200: Installing Or Replacing The Unit
Bij installatie of vervanging van het toestel moet de aardverbinding altijd het eerste worden gemaakt en het laatste worden losgemaakt. Varoitus Laitetta asennettaessa tai korvattaessa on maahan yhdistäminen aina tehtävä ensiksi ja maadoituksen irti kytkeminen viimeiseksi. Catalyst 3750 Switch Hardware Installation Guide D-16 78-15136-03... -
Page 201: Installing Or Replacing The Unit
Al instalar o sustituir el equipo, conecte siempre la toma de tierra al principio y desconéctela al final. Varning! Vid installation eller utbyte av enheten måste jordledningen alltid anslutas först och kopplas bort sist. Catalyst 3750 Switch Hardware Installation Guide D-17 78-15136-03... -
Page 202: Overtemperature Warning
45°C. Per evitare una limitazione del flusso dell’aria, lasciare come minimo uno spazio libero di 7,6 cm intorno alle aperture di ventilazione. Catalyst 3750 Switch Hardware Installation Guide D-18 78-15136-03... -
Page 203: Overtemperature Warning
I syfte att undvika överhettning av switchen skall den inte användas i utrymmen vars temperatur överskrider den maximalt rekommenderade omgivningstemperaturen som är 45°C. Kontrollera att det finns minst 7,6 cm fritt utrymme runt ventilationsöppningarna så att luftflödet inte begränsas. Catalyst 3750 Switch Hardware Installation Guide D-19 78-15136-03... -
Page 204: Working During Lightning Activity
Non lavorare sul sistema o collegare oppure scollegare i cavi durante un temporale con fulmini. Advarsel Utfør aldri arbeid på systemet, eller koble kabler til eller fra systemet når det tordner eller lyner. Catalyst 3750 Switch Hardware Installation Guide D-20 78-15136-03... -
Page 205: Product Disposal Warning
Warning laws and regulations. Waarschuwing Het uiteindelijke wegruimen van dit product dient te geschieden in overeenstemming met alle nationale wetten en reglementen. Varoitus Tämä tuote on hävitettävä kansallisten lakien ja määräysten mukaisesti. Catalyst 3750 Switch Hardware Installation Guide D-21 78-15136-03... -
Page 206: Product Disposal Warning
Deitar fora este produto em conformidade com todas as leis e regulamentos nacionais. ¡Advertencia! Al deshacerse por completo de este producto debe seguir todas las leyes y reglamentos nacionales. Varning! Vid deponering hanteras produkten enligt gällande lagar och bestämmelser. Catalyst 3750 Switch Hardware Installation Guide D-22 78-15136-03... - Page 207 Jos laite asetetaan osaksi täytettyyn telineeseen, aloita kuormittaminen sen alaosasta kaikkein raskaimmalla esineellä ja siirry sitten sen yläosaan. • Jos telinettä varten on vakaimet, asenna ne ennen laitteen asettamista telineeseen tai sen huoltamista siinä. Catalyst 3750 Switch Hardware Installation Guide D-23 78-15136-03...
-
Page 208: Chassis Warning For Rack-Mounting And Servicing
• Se il supporto è dotato di dispositivi stabilizzanti, installare tali dispositivi prima di montare o di procedere alla manutenzione dell’unità nel supporto. Catalyst 3750 Switch Hardware Installation Guide D-24 78-15136-03... - Page 209 • Si el bastidor dispone de dispositivos estabilizadores, instalar éstos antes de montar o proceder al mantenimiento del equipo instalado en el bastidor. Catalyst 3750 Switch Hardware Installation Guide D-25 78-15136-03...
- Page 210 • Om ställningen är försedd med stabiliseringsdon skall dessa monteras fast innan enheten installeras eller underhålls på ställningen. • • • Catalyst 3750 Switch Hardware Installation Guide D-26 78-15136-03...
-
Page 211: Redundant Power Supply Connection Warning
Als er geen redundant voedingssysteem (RPS) aan de schakelaar is gekoppeld, dient u een RPS-connectorkapje op de achterkant van de schakelaar te installeren. Varoitus Jos korvautuvaa tehojärjestelmää (redundant power system, RPS) ei ole liitetty kytkimeen, kiinnitä RPS-liittimen suojus kytkimen takapuolelle. Catalyst 3750 Switch Hardware Installation Guide D-27 78-15136-03... -
Page 212: Redundant Power Supply Connection Warning
RPS en la parte posterior del interruptor. Varning! Om ett redundant strömförsörjningssystem (redundant power system, RPS) inte finns anslutet till switchen skall ett RPS-kontaktskydd installeras på switchens baksida. Catalyst 3750 Switch Hardware Installation Guide D-28 78-15136-03... -
Page 213: Switch Installation Warning
For å etterkomme sikkerhetsreglene skal brytere monteres på en vegg med frontpanelet vendt opp. Aviso Para cumprir com os regulamentos de segurança, faça a montagem de switches em uma parede com o painel frontal virado para cima. Catalyst 3750 Switch Hardware Installation Guide D-29 78-15136-03... -
Page 214: Restricted Area
Varoitus Tämä laite on tarkoitettu asennettavaksi paikkaan, johon pääsy on rajoitettua. Tällaiseen paikkaan pääsee vain erikoistyökalua, lukkoon sopivaa avainta tai jotakin muuta turvalaitetta käyttämällä. Catalyst 3750 Switch Hardware Installation Guide D-30 78-15136-03... -
Page 215: Restricted Area
Varning! Denna enhet är avsedd för installation i områden med begränsat tillträde. Ett område med begränsat tillträde kan endast tillträdas med hjälp av specialverktyg, lås och nyckel eller annan säkerhetsanordning. Catalyst 3750 Switch Hardware Installation Guide D-31 78-15136-03... -
Page 216: Ethernet Cable Shielding In Offices
I cavi Ethernet devono essere schermati se utilizzati in un ambiente di ufficio centrale. Advarsel Ethernet-kabler skal være skjermet når de brukes i et sentralt kontormiljø. Aviso Os cabos “Ethernet” deverão estar armados quando usados em ambiente de escritório central. Catalyst 3750 Switch Hardware Installation Guide D-32 78-15136-03... -
Page 217: Class 1 Laser Product
Class 1 laser product. Warning Waarschuwing Klasse-1 laser produkt. Varoitus Luokan 1 lasertuote. Attention Produit laser de classe 1. Warnung Laserprodukt der Klasse 1. Avvertenza Prodotto laser di Classe 1. Advarsel Laserprodukt av klasse 1. Catalyst 3750 Switch Hardware Installation Guide D-33 78-15136-03... -
Page 218: Class 1 Laser Product
Appendix D Translated Safety Warnings Class 1 Laser Product Aviso Produto laser de classe 1. ¡Advertencia! Producto láser Clase I. Varning! Laserprodukt av klass 1. Catalyst 3750 Switch Hardware Installation Guide D-34 78-15136-03... -
Page 219: Laser Beam Exposure
Evitare l'esposizione diretta al raggio laser. Avvertenza Advarsel Unngå direkte eksponering til laserstrålen. Aviso Evite exposição a raios laser. ¡Advertencia! Evite la exposición directa al haz del láser. Varning! Utsätt dig inte för laserstrålning. Catalyst 3750 Switch Hardware Installation Guide D-35 78-15136-03... -
Page 220: Laser Radiation
Laserstrahlung abgeben. Blicken Sie weder mit bloßem Auge noch mit optischen Instrumenten direkt in Laserstrahlen. Avvertenza Le fibre ottiche ed i relativi connettori possono emettere radiazioni laser. I fasci di luce non devono mai essere osservati direttamente o attraverso strumenti ottici. Catalyst 3750 Switch Hardware Installation Guide D-36 78-15136-03... -
Page 221: Laser Radiation
éstos con instrumentos ópticos. Varning! Osynlig laserstrålning kan avges från frånkopplade fibrer eller kontaktdon. Rikta inte blicken in i strålar och titta aldrig direkt på dem med hjälp av optiska instrument. Catalyst 3750 Switch Hardware Installation Guide D-37 78-15136-03... - Page 222 Appendix D Translated Safety Warnings Laser Radiation Catalyst 3750 Switch Hardware Installation Guide D-38 78-15136-03...
- Page 223 10/100 ports four twisted-pair pinout, 1000BASE-T ports AC power identifying connecting to 3-12 two twisted-pair pinout, 10/100 ports connector 2-25 recommended 3-52 specifications A-1 to A-8 adapter cable 3-11 Catalyst 3750 Switch Hardware Installation Guide IN-1 78-15136-03...
- Page 224 1000BASE-T SFP module ports 3-58 accessing by using Express Setup connectivity problems accessing through console port pinout Cluster Management Suite four twisted-pair, 1000BASE-T ports See CMS four twisted-pair 10/100 ports 2-28 command-line interface See CLI Catalyst 3750 Switch Hardware Installation Guide IN-2 78-15136-03...
- Page 225 3-33 10/100/1000 ports 2-11 warning 10/100 ports See also procedures clearance installing or replacing the unit warning D-16 description 2-4 to 2-6 installing SFP modules 3-42 to 3-44 LEDs 2-13 to 2-21 Catalyst 3750 Switch Hardware Installation Guide IN-3 78-15136-03...
- Page 226 POST results performance problems, solving Power over Ethernet 2-18 pinouts 2-16 to 2-17 10/100/1000 ports speed 2-18 10/100 ports stack 2-21 adapters B-8 to B-10 STATUS 2-18 console port B-10 crossover cable Catalyst 3750 Switch Hardware Installation Guide IN-4 78-15136-03...
- Page 227 10/100 pinouts recommended cables 3-52 10/100/1000 qualified personnel warning pinouts recommended cables 3-52 numbering of 10/100 numbering of 10/100/1000 2-11 numbering of SFP module ports 2-7 to 2-8 Catalyst 3750 Switch Hardware Installation Guide IN-5 78-15136-03...
- Page 228 10/100 ports safety SunNet Manager 3-2, D-1 2-28 switch installation warning SC connector D-29 SFP modules switch powering on 3-12 1000BASE-T system LED 2-16 supported speeds 2-20 bale-clasp latch removal 3-44 Catalyst 3750 Switch Hardware Installation Guide IN-6 78-15136-03...
- Page 229 D-1 to D-36 troubleshooting 4-1 to 4-7 wall mounting 3-33 warnings defined installation translated D-1 to D-36 XENPAK modules 2-3, 2-13 connecting to 3-59 to 3-60 installation 3-46 to 3-49 removal 3-49 Catalyst 3750 Switch Hardware Installation Guide IN-7 78-15136-03...
- Page 230 Index Catalyst 3750 Switch Hardware Installation Guide IN-8 78-15136-03...
Need help?
Do you have a question about the Catalyst 3750 and is the answer not in the manual?
Questions and answers