Table of Contents
Advertisement
Quick Links
Advertisement
Chapters
Table of Contents
Troubleshooting

Related Manuals for Panasonic fp2/fp2sh


Summary of Contents for Panasonic fp2/fp2sh
- Page 2 Copyright / Trademarks -This manual and its contents are copyrighted. -You may not copy this manual, in whole or part, without written consent of Panasonic Electric Works SUNX Co., Ltd. -Windows and Windows NT are registered trademarks of Microsoft Corporation in the United States and/or other countries.
-
Page 3: Table Of Contents
........Compatibility of FP2/FP2SH and FP10SH, and Precautions Programming Tool Restrictions . - Page 4 Table of Contents FP2/FP2SH Expansion Memory Unit and ROM (for FP2 CPU) ....2 − 15 FP2SH CPU ...........
- Page 5 FP2/FP2SH Table of Figures 3.2.2 Allocation Example of CPU Backplane ..... . . 3 − 7 3.2.3 Allocation Example of Expansion Backplane .
- Page 6 5 − 6 Chapter 6 FP2/FP2SH Operation FP2 Operation ........... .
- Page 7 FP2/FP2SH Table of Figures 6.7.1 ROM Operation Function ....... . .
- Page 8 Table of System Registers for FP2/FP2SH/FP10SH ... 11 − 4 11.1.2 Table of Special Internal Relays for FP2/FP2SH/FP10SH ..11 − 18 11.1.3 Special Data Registers for FP2/FP2SH/FP10SH/FP3 .
-
Page 9: Before You Start
FP2/FP2SH Table of Figures Before You Start Operating environment (Use the unit within the range of the general specifications when installing) • Ambient temperatures:0 to +55 °C • Ambient humidity: 30% to 85% RH (at 25 °C, non−condensing) • For use in pollution Degree 2 environment. - Page 10 Table of Contents FP2/FP2SH Power supply sequence • In order to protect the power supply sequence, make sure to turn off the PLC before the input/output power supply. If the input/output power supply is turned off before the PLC, or if the PLC is not shut off momentarily, the controller detects change of input level, and might conduct an unexpected operation.
-
Page 11: Special Precautions
FP2/FP2SH Table of Figures Special Precautions With the FP2 The FP2 uses the term “module” when express the size of the unit or backplane. The unit installation sizes come in two sizes: the basic 1-module size, and the 2-module size that is twice as wide. - Page 12 Table of Contents FP2/FP2SH When using the FP3, FP10SH, or Other Units Backplane slot number The backplane for the FP2 is specified by the total number of slots, i.e., 14-module type, including the connectors for the power supply unit and CPU. The number of connectors (or slots) remaining for the I/O units and intelligent units is then the module number of the backplane minus the number of modules for the power supply unit and CPU.
- Page 13 FP2/FP2SH Table of Figures With the FP2SH Programming Tool Restrictions The following tool software is required in order to program the FP2SH. “FPWIN GR” “NPST−GR” Ver. 4.6 or a subsequent version Request Concerning Program Storage To prevent the accidental loss of programs, the user should consider the following measures.
-
Page 14: Compatibility With Cpu Unit, And Precautions
Table of Contents FP2/FP2SH Compatibility with CPU unit, and Precautions Comparison of Specifications Items FP2 CPU FP2SH CPU FP10SH CPU FP2−C1, FP2−C1D, FP2−C2L, FP2−C2, FP2−C1A,FP2−C1SL FP2−C2P,FP2−C3P 6221V3 6211V3 Basic construction Using Backplanes: Max. 768 points (12 Max. 512 points Controllable I/O... -
Page 15: Compatibility Of Fp2Sh And Fp2, And Precautions
FP2/FP2SH Table of Figures Compatibility of FP2SH and FP2, and Precautions Hardware Compatibility Most of the units and related products used with the FP2SH can be used with the FP2, but the following differences should be noted. Some optional memory units cannot be used. -
Page 16: Ic Memory Cards For The Fp2Sh
Table of Contents FP2/FP2SH IC memory cards for the FP2SH The existing model number becomes the one to be discontinued because of the termination of manufacturing IC memory cards by the parts manufacturer. When placing a new order, specify the new product number. -
Page 17: Compatibility Of Fp2/Fp2Sh And Fp10Sh, And Precautions
With the FP10SH and FP2 backplane H type (AFP25**H), up to three expansion boards can be used, and a maximum of 2048 points controlled, but if using the FP2 backplane with the FP2/FP2SH, only one expansion board can be used, and a maximum of 1600 points controlled. -
Page 18: Programming Tool Restrictions
Table of Contents FP2/FP2SH Programming Tool Restrictions Restrictions on usable programming tools depending on the units Type of unit Type of programming tool FP2SH Windows software FPWIN GR Ver.2 Used Used Note 1) Note 1) FPWIN GR Ver.1 Used Used... -
Page 19: Chapter 1 Overview
Chapter 1 Overview... - Page 20 Overview FP2/FP2SH 1 − 2...
-
Page 21: System Configuration
The building block scheme allows you to combine units as desired. Five types of backplanes and Two types of backplanes H types are available for the FP2/FP2SH. A variety of input/output units can be installed as desired on the back- plane. - Page 22 Overview FP2/FP2SH System Configuration Restriction on the number of modules of the backplane (For master backplane) The number of units that can be installed is determined by the number of modules of the backplane used, the power supply unit to be installed, and the CPU.
-
Page 23: Expansion Of Backplane
FP2/FP2SH Overview System Configuration FP2 backplane H type 11−module type 1 module type 8 slots free CPU and 1 module type power supply unit 2 module type 7 slots free CPU and 1 module type power supply unit 1 module type... - Page 24 Overview FP2/FP2SH System Configuration • Do not install a CPU on an expansion backplane. • There is no need to make the number of modules on the ex- pansion backplane equal to the number of modules on the CPU backplane.
- Page 25 FP2/FP2SH Overview System Configuration Restriction on the number of modules of the backplane (For expansion back- plane) The number of units that can be installed is determined by the number of modules of the backplane used and the power supply unit to be installed.
-
Page 26: Unit Types And Combinations
Overview FP2/FP2SH Unit Types and Combinations Unit Types and Combinations 1.2.1 Line-Up of Backplanes and Units Power supply units 100V AC 2.5A type 100 to 240V AC 5A type (FP2−PSA1) (FP2−PSA3) 200V AC 2.5A type 24V DC 5A type (FP2−PSA2) (FP2−PSD2) - Page 27 FP2/FP2SH Overview Unit Types and Combinations Input, Output and I/O mixed units 16-point DC input 32-point DC input 64-point DC input (FP2−X64D2) (FP2−X16D2) (FP2−X32D2) 64-point transistor output NPN type 16-point transistor output 32-point transistor out- (FP2−Y64T) NPN type (FP2−Y16T) put NPN type 64-point transistor output PNP type (FP2−Y32T)
-
Page 28: Combinations That Can Be Used And Restrictions
Overview FP2/FP2SH Unit Types and Combinations 1.2.2 Combinations That Can be Used and Restrictions 1.2.2.1 Restrictions on Unit Types Backplanes and Backplane Backplane Power Input Output H type supply pp y unit mote unit unit mixed units used units used... - Page 29 FP2/FP2SH Overview Unit Types and Combinations Out- Ana- Pulse Posi- Posi- Posi- Posi- Serial Com- S− Ana- High Multi−wire link unit ET− Mul- unit unit mixed tion- tion- tion- tion- data put- LINK − unit unit input unit unit unit...
-
Page 30: Limitations On Current Consumption
Overview FP2/FP2SH Unit Types and Combinations 1.2.2.2 Limitations on Current Consumption Power supply unit Rated current (at 5V) Internal supply power (5V) FP2−PSA1 2.5A passes through the bus of FP2−PSA2 2.5A the backplane to each unit. FP2−PSA3 FP2−PSD2 Commercially available... - Page 31 FP2/FP2SH Overview Unit Types and Combinations Table of current consumption at 5V DC Type Part number Current con- sumption at 5V DC (mA) FP2 CPU FP2 CPU FP2−C1 410 or less FP2−C1D 530 or less FP2−C1SL 630 or less FP2−C1A...
- Page 32 Overview FP2/FP2SH Unit Types and Combinations Type Part number Current con- sumption at 5V DC (mA) Intelligent Intelligent C.C.U. FP2−CCU 60 or less unit S-LINK unit FP2−SL2 130 or less Multi-wire link unit FP2−MW 220 or less Remote I/O Slave Unit FP2−RMS...
-
Page 33: Expansion Function
A maximum of 32 stations can be connected. Since a COM (RS232C) port and TOOL (RS232C) port comes standard on the CPU for the FP2/FP2SH, direct communication with the computer can be achieved without the addition of any intelligent units. - Page 34 Overview FP2/FP2SH Expansion Function Table of specifications Item Description 1:1 communication 1:N communication Communication method Communication method Half duplex Half duplex Half duplex Half duplex Synchronization method Start−stop synchronous system Communication path RS232C cable Two-core cable (VCTF 0.75mm × 2C) Transmission distance Max.
-
Page 35: Connection Of Modem
When the power supply of FP2/FP2SH is turned on, it will verify whether a MODEM is connected, and, if a MODEM is, it will automatically transmit the AT command to set the MODEM for automatic reception. - Page 36 Overview FP2/FP2SH Expansion Function Table of specifications Item Description 1:1 communication 1:N communication Communication method Half duplex Synchronization method Start−stop synchronous system Transmission speed 2,400bps/4,800bps/9,600bps/19,200 9,600bps/19,200bps (Baud rate) Transmission code ASCII Transmission format Character bit: 7 bits, parity check: odd and stop bit: 1 bit...
-
Page 37: Programming Tools
FP series. FP PC cable This cable needed for connection between the FP2/FP2SH and the computer. When connecting to a computer (IBM PC/AT or 100% compatible), use a com- mercially available adapter.( section 1.4.2 ) -
Page 38: Software Environment And Suitable Cable
Note 1) Ver.1.1 must be installed to install the upgrade version. 2) Ver.2.0 can be upgraded to Ver. 2.1 or later free of charge at our web site (http://panasonic−electric−works.net/ac). Conforms to IEC61131−3 programming tool software FPWIN−Pro Ver.6 Type of software Hard disk capacity Product No. -
Page 39: Tools Needed For Rom Creating
FP2/FP2SH Overview Programming Tools 1.4.3 Tools Needed for ROM Creating When Creating ROM with a Commercially Available ROM Writer with Op- tional Memory (FROM) Necessary tools Programming tool software and cable ( section 1.4.1) Use a commercially available computer installed with the programming tool soft- ware and an FP PC cable. - Page 40 Overview FP2/FP2SH Programming Tools When Creating ROM with Programming Tool Software and a Commercially Available ROM Writer Necessary tools Programming tool software ( section 1.4.1) Use a commercially available PC installed with the programming tool software. Optional memory EPROM For FP2, FP2-EM5 (M27C1001−12F1 or equivalent, SGS−THOMSON MI- CROELECTRONICS) For FP2SH, AFP5209 (M27C2001−150F1 or equivalent, SGS−THOMSON MI-...
-
Page 41: Parts And Functions
Chapter 2 Parts and Functions... - Page 42 Parts and Functions FP2/FP2SH 2 − 2...
-
Page 43: Backplane And Expansion Cable
FP2/FP2SH Parts and Functions Backplane and Expansion Cable Backplane and Expansion Cable 2.1.1 Backplane Parts Terminology and Functions Backplane mounting holes for mounting the backplane to the control panel. Use M4 screw for the mounting. Unit guides Align the tab on the unit with this guide when installing the unit to the backplane. - Page 44 Parts and Functions FP2/FP2SH Backplane and Expansion Cable Type of Backplane Type Number of Part Weight module number 5-module type Basic system only FP2−BP05 Approx. 180g 7-module type Basic and expansion FP2−BP07 Approx. 280g system system 9-module type FP2−BP09 Approx. 350g 12-module type FP2−BP12...
-
Page 45: Basic Backplane H Type (Fp2−Bp**Mh)
FP2/FP2SH Parts and Functions Backplane and Expansion Cable 2.1.2 Basic Backplane H Type (FP2−BP**MH) Parts Terminology and Functions Backplane mounting holes for mounting the backplane to the control panel. Use M4 screw for the mounting. Unit guides Align the tab on the unit with this guide when installing the unit to the backplane. -
Page 46: Expansion Backplane H Type (Fp2−Bp**Eh)
Parts and Functions FP2/FP2SH Backplane and Expansion Cable 2.1.3 Expansion Backplane H Type (FP2−BP**EH) Parts Terminology and Functions Backplane mounting holes for mounting the backplane to the control panel. Use M4 screw for the mounting. Unit guides Align the tab on the unit with this guide when installing the unit to the backplane. -
Page 47: Expansion Cable
FP2/FP2SH Parts and Functions Backplane and Expansion Cable 2.1.4 Expansion Cable Order number Length Ferrite core Weight FP2−EC 60 cm Approx. 200 g FP2−EC2 Approx. 400 g Note) With the backplalne H type, the total cable length can be arranged within 3.2 m. -
Page 48: Fp2 Cpu
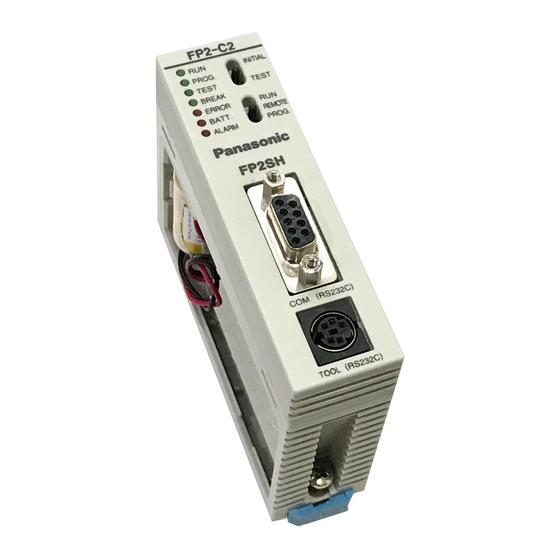
Parts and Functions FP2/FP2SH FP2 CPU FP2 CPU 2.2.1 Standard Type CPU (FP2−C1) Parts Terminology and Functions Status indicator LEDs ( page 2 − 9) display the operating condition and error statuses. Initialize/test switch ( page 2 − 9) is used to clear the errors, initializes the operation memory and set the test operation. - Page 49 FP2/FP2SH Parts and Functions FP2 CPU Status Indicator LEDs These LEDs display the current mode of operatin or the occurrence of error. Description Description RUN (green) This lights in the RUN mode, to indicate that the program is being executed.
- Page 50 Parts and Functions FP2/FP2SH FP2 CPU Mode Selector Use the mode selector to start and stop the operation. For test operations, set the initial- ize/test switch to TEST position. Selector position Selector position Operation mode Operation mode RUN (upward) This sets the RUN mode. The program is executed, and operation begins.
- Page 51 FP2/FP2SH Parts and Functions FP2 CPU COM Port (RS232C) Pin alignment Signal name Signal direction number Destination (Field device) Frame ground Send data → Received data ← Request to send (always on) → Clear to send ← Not used −...
-
Page 52: Cpu With 64 Points Input (Fp2−C1D)
Parts and Functions FP2/FP2SH FP2 CPU 2.2.2 CPU with 64 Points Input (FP2−C1D) Parts Terminology and Functions Status indicator LEDs ( page 2 − 9) display the operating condition and error statuses. Initialize/test switch ( page 2 − 9) is used to clear the errors, initializes the operation memory and set the test operation. - Page 53 FP2/FP2SH Parts and Functions FP2 CPU Memory backup battery for backup of the internal memory (RAM). Part number: AFC8801 (CR2450 or equivalent) Note The settings of the operation condition switches become active when the power is turned on. CPU with 64 Points Input Specifications...
- Page 54 Parts and Functions FP2/FP2SH FP2 CPU Internal Circuit Diagram Input indicator LED Input 5.6kΩ 560Ω 24V DC Pin Layout 24V DC 24V DC The COM pins of each connector are connected internally. 2 − 14...
-
Page 55: Expansion Memory Unit And Rom (For Fp2 Cpu)
FP2/FP2SH Parts and Functions Expansion Memory Unit and ROM (for FP2 CPU) Expansion Memory Unit and ROM (for FP2 CPU) Expansion Memory Unit Parts Terminology Mounting knob Connector (rear side) ROM IC socket (for FP2−EM3, FP2−EM6 and FP2−EM7) Install the optional memory FROM or EPROM. - Page 56 Parts and Functions FP2/FP2SH Expansion Memory Unit and ROM (for FP2 CPU) Installation Procedure Installing the expansion memory unit Procedure: Send the program and data to the personal computer using the program- ming tool software (NPST−GR or FPWIN GR). Save the program and data to the disk.
- Page 57 FP2/FP2SH Parts and Functions Expansion Memory Unit and ROM (for FP2 CPU) Installing the ROM Procedure: Release the lock for the ROM IC socket. Make sure that the lead pitch of the ROM matches that of the socket. Making sure that the orientation is correct, insert the ROM into the socket.
-
Page 58: Fp2Sh Cpu
Parts and Functions FP2/FP2SH FP2SH CPU FP2SH CPU Standard type CPU Small PC card compliant type CPU Type of FP2SH CPU Type Operation Internal Optional memory Function Part Model speed number number Expansion IC card Calendar/ Comment timer memory From 0.03μs... -
Page 59: 32K/60K Step Standard Type Cpu (Fp2-C2L/Fp2-C2)
FP2/FP2SH Parts and Functions FP2SH CPU 2.4.1 32k/60k Step Standard Type CPU (FP2-C2L/FP2-C2) Parts Terminology and Functions Status indicator LEDs ( page 2 − 9) display the operating condition and error statuses. Initialize/test switch ( page 2 − 9) Setting the switch to the ”INITIAL” side clears errors and initializes the operation memory. -
Page 60: Cpu With Ic Memory Card Interface (Fp2-C2P/Fp2−C3P)
Parts and Functions FP2/FP2SH FP2SH CPU 2.4.2 CPU with IC Memory Card Interface (FP2-C2P/FP2−C3P) Parts Terminology and Functions Status indicator LEDs ( page 2 − 9) display the operating condition and error statuses. IC memory card access LED Illuminates when data is being read from or written to the IC memory card. - Page 61 FP2/FP2SH Parts and Functions FP2SH CPU Operation condition switches are used to set the baud rate of the programming tool, to select the program memory and to select the writing operation for the program memory. Memory backup battery for backup of the internal memory (RAM).
-
Page 62: Expansion Memory Unit And Rom (For Fp2−C2L/Fp2-C2)
Parts and Functions FP2/FP2SH FP2SH CPU Expansion Memory Unit and ROM (for FP2−C2L/FP2-C2) Parts Terminology AFP2207(FP2−EM7) AFP2208 Mounting knob Connector (rear side) ROM IC socket Install the optional memory FROM or EPROM. Type of Expansion Memory Unit Type Function Part number... -
Page 63: Ic Memory Card (For Fp2-C2P/Fp2-C3P)
FP2/FP2SH Parts and Functions IC Memory Card (for FP2-C2P/FP2-C3P) IC Memory Card (for FP2-C2P/FP2-C3P) AIC50020, AIC52000 AFP2209 Parts and Functions ① Write protect switch Switch position Purpose ON (right) Read−only of the data OFF (left) Write enable of the data ②... - Page 64 Parts and Functions FP2/FP2SH IC Memory Card (for FP2-C2P/FP2-C3P) Example: A 2MB card can be formatted as 1 MB, with 1 MB being used as a “format field” and the remaining 1 MB being used as an “expanded memory field”.
- Page 65 FP2/FP2SH Parts and Functions IC Memory Card (for FP2-C2P/FP2-C3P) Inserting and Removing the IC Memory Card The IC memory card can be inserted or removed even when the FP2SH power is on. To insert or remove the card when the power is on, be sure to follow the following proce- dure.
- Page 66 Parts and Functions FP2/FP2SH IC Memory Card (for FP2-C2P/FP2-C3P) Set the IC memory card access enable switch to on position. Removal procedure: Verify that the IC memory card access LED is off. Set the IC memory card access enable switch to off position.
- Page 67 FP2/FP2SH Parts and Functions IC Memory Card (for FP2-C2P/FP2-C3P) Precautions when installing/removing the IC memory card Do not try to insert and remove the IC memory card while the IC memory card access enable switch is on. It could lead to damage of the memory contents or a malfunction of CPU.
-
Page 68: Power Supply Units
Parts and Functions FP2/FP2SH Power Supply Units Power Supply Units 2.7.1 Power Supply Specifications Parts Terminology and Functions POWER LED Turns on when power is applied. Power supply terminal is the terminal for power supply wiring. Uses M3 crimping (pressure connection) terminals ( section 4.2.1). - Page 69 FP2/FP2SH Parts and Functions Power Supply Units Specifications Item Description Part number FP2−PSA1 FP2−PSA2 FP2−PSA3 FP2−PSD2 Size of unit 1−module 2−module Input Rated voltage 100 to 120V AC 200 to 240V AC 100 to 240V AC 24V DC Current consumption 0.4A or less...
-
Page 70: Input And Output Units
Parts and Functions FP2/FP2SH Input and Output Units Input and Output Units 2.8.1 Common Specifications of Input and Output Units Parts Terminology and Functions Input and output indicators Indicate the input and output on/off states. Terminal block release lever By lowering this lever, the terminal block can be removed from the unit without removing any of the wiring. - Page 71 FP2/FP2SH Parts and Functions Input and Output Units Table of Input Unit Types Type Number of Connection Description Part number points method DC input 16 points Terminal block 12 to 24V DC, sink/source input FP2−X16D2 type 32 points Connector 24V DC, sink/source input FP2−X32D2...
- Page 72 Parts and Functions FP2/FP2SH Input and Output Units Table of I/O Mixed Unit Types Type Number of Connection Description Part number points method DC input/transistor (NPN 32 input Connector 24V DC, sink/source input, FP2−XY64D2T open collector) output type points/ 32 output 5 to 24V DC, 0.1A...
-
Page 73: Input Units Specifications
FP2/FP2SH Parts and Functions Input Units Specifications Input Units Specifications 2.9.1 16-point Type DC Input Unit Specifications Item Description Part number FP2−X16D2 Insulation method Optical coupler Rated input voltage 12 to 24V DC Rated input current Approx. 8mA (at 24V DC) Input impedance Approx. - Page 74 Parts and Functions FP2/FP2SH Input Units Specifications Pin Layout Input X0 to XF 12 to 24V DC 12 to 24V DC For more information regarding the applicable pressure connection (crimp) terminals and wiring, refer to section 4.5.1. 2 − 34...
-
Page 75: 32-Point Type Dc Input Unit
FP2/FP2SH Parts and Functions Input Units Specifications 2.9.2 32-point Type DC Input Unit Specifications Item Description Part number FP2−X32D2 Insulation method Optical coupler Rated input voltage 24V DC Rated input current Approx. 4.3mA (at 24V DC) Input impedance Approx. 5.6kΩ... - Page 76 Parts and Functions FP2/FP2SH Input Units Specifications Pin Layout Input X0 to X1F 24V DC 2 − 36...
-
Page 77: 64-Point Type Dc Input Unit
FP2/FP2SH Parts and Functions Input Units Specifications 2.9.3 64-point Type DC Input Unit Specifications Item Description Part number FP2−X64D2 Insulation method Optical coupler Rated input voltage 24V DC Rated input current Approx. 4.3mA (at 24V DC) Input impedance Approx. 5.6kΩ... - Page 78 Parts and Functions FP2/FP2SH Input Units Specifications Internal Circuit Diagram Input Input indicator LED Input 5.6kΩ 560Ω 24V DC Pin Layout Input X0 to X1F Input X20 to X3F Pin layout of first 32 points Pin layout of last 32 points...
-
Page 79: 2.10 Output Units Specifications
FP2/FP2SH Parts and Functions 2.10 Output Units Specifications 2.10 Output Units Specifications 2.10.1 16-point Type Relay Output Unit Specifications Item Description Part number FP2−Y16R Insulation method Optical coupler Rated control capacity 2A 250V AC (5A/common), 2A 30V DC (5A/common) Min. load: 100μA, 100mV (resistor load) Response time off →... - Page 80 Parts and Functions FP2/FP2SH 2.10 Output Units Specifications Pin Layout Output Y0 to YF 250V AC 2A 30V DC 2A 250V AC 2A 30V DC 2A 24V DC For more information regarding the applicable pressure connection (crimp) terminals and wiring, refer to section 4.5.1.
-
Page 81: 6-Point Type Relay Output Unit
FP2/FP2SH Parts and Functions 2.10 Output Units Specifications 2.10.2 6-point Type Relay Output Unit Specifications Item Description Part number FP2−Y6R Insulation method Optical coupler Rated control capacity 5A 250V AC (10A/common), 5A 30V DC (10A/common)(* Note) Min. load: 100mA, 10V (resistor load) Response time off →... - Page 82 Parts and Functions FP2/FP2SH 2.10 Output Units Specifications Internal Circuit Diagram Output indicator Output Load Max. 250V AC 5A Output 30V DC 5A 24V DC Pin Layout Output Y0 to Y5 250V AC 5A 30V DC 5A 250V AC 5A...
-
Page 83: 16-Point Type Transistor (Npn) Output Unit
FP2/FP2SH Parts and Functions 2.10 Output Units Specifications 2.10.3 16-point Type Transistor (NPN) Output Unit Specifications Item Description Part number FP2−Y16T Insulation method Optical coupler Rated load voltage 5 to 24V DC Load voltage range 4.75 to 26.4V DC Maximum load current 0.5A (at 12 to 24V DC), 0.1A (at 5V DC) (* Note) - Page 84 Parts and Functions FP2/FP2SH 2.10 Output Units Specifications Internal Circuit Diagram Output indicator Output Load 5 to 24V DC Pin Layout Output Y0 to YF 5 to 24V DC For more information regarding the applicable pressure connection (crimp) terminals and wiring, refer to section 4.5.1.
-
Page 85: 16-Point Type Transistor (Pnp) Output Unit
FP2/FP2SH Parts and Functions 2.10 Output Units Specifications 2.10.4 16-point Type Transistor (PNP) Output Unit Specifications Item Description Part number FP2−Y16P Insulation method Optical coupler Rated load voltage 5 to 24V DC Load voltage range 4.75 to 26.4V DC Maximum load current 0.5A (at 12 to 24V DC), 0.1 A (at 5V DC) (* Note) - Page 86 Parts and Functions FP2/FP2SH 2.10 Output Units Specifications Internal Circuit Diagram Output indicator 3.9kΩ 5 to 24V DC Output Load 2.0kΩ Pin Layout Output Y0 to YF 5 to 24V DC For more information regarding the applicable pressure connection (crimp) terminals and wiring, refer to section 4.5.1.
-
Page 87: 32-Point Type Transistor (Npn) Output Unit
FP2/FP2SH Parts and Functions 2.10 Output Units Specifications 2.10.5 32-point Type Transistor (NPN) Output Unit Specifications Item Description Part number FP2−Y32T Insulation method Optical coupler Rated load voltage 5 to 24V DC Load voltage range 4.75 to 26.4V DC Maximum load current 0.1A (at 12 to 26.4V DC) , 50mA (at 5V DC) (* Note) - Page 88 Parts and Functions FP2/FP2SH 2.10 Output Units Specifications Internal Circuit Diagram Output indicator Output Load 5 to 24V DC Pin Layout Output Y0 to Y1F 5 to 24V DC Although and ⊖ terminals are connected internally with the same connector. It is rec- ommended that they also be connected externally.
-
Page 89: 32-Point Type Transistor (Pnp) Output Unit
FP2/FP2SH Parts and Functions 2.10 Output Units Specifications 2.10.6 32-point Type Transistor (PNP) Output Unit Specifications Item Description Part number FP2−Y32P Insulation method Optical coupler Rated load voltage 5 to 24V DC Load voltage range 4.75 to 26.4V DC Maximum load current 0.1A (at 12 to 26.4V DC), 50mA (at 5V DC) (* Note) - Page 90 Parts and Functions FP2/FP2SH 2.10 Output Units Specifications Internal Circuit Diagram Output indicator 5 to 24V DC Output Load 6.2kΩ Pin Layout Output Y0 to Y1F 5 to 24V DC Although and ⊖ terminals are connected internally with the same connector. It is rec- ommended that they also be connected externally.
-
Page 91: 64-Point Type Transistor (Npn) Output Unit
FP2/FP2SH Parts and Functions 2.10 Output Units Specifications 2.10.7 64-point Type Transistor (NPN) Output Unit Specifications Item Description Part number FP2−Y64T Insulation method Optical coupler Rated load voltage 5 to 24V DC Load voltage range 4.75 to 26.4V DC Maximum load current 0.1A (at 12 to 24V DC) , 50mA (at 5V DC) (* Note) - Page 92 Parts and Functions FP2/FP2SH 2.10 Output Units Specifications Internal Circuit Diagram Output indicator Output Load 5 to 24V DC Pin Layout Output Y0 to Y1F Output Y20 to Y3F Pin layout of first 32 points Pin layout of last 32 points...
-
Page 93: 64-Point Type Transistor (Pnp) Output Unit
FP2/FP2SH Parts and Functions 2.10 Output Units Specifications 2.10.8 64-point Type Transistor (PNP) Output Unit Specifications Item Description Part number FP2−Y64P Insulation method Optical coupler Rated load voltage 5 to 24V DC Load voltage range 4.75 to 26.4V DC Maximum load current 0.1A (at 12 to 24V DC), 50mA (at 5V DC) (* Note) - Page 94 Parts and Functions FP2/FP2SH 2.10 Output Units Specifications Internal Circuit Diagram Output indicator 5 to 24V DC Output Load 6.2kΩ Pin Layout Output Y20 to Y3F Output Y0 to Y1F Pin layout of last 32 points Pin layout of first 32 points...
-
Page 95: 2.11 I/O Mixed Units Specifications
FP2/FP2SH Parts and Functions 2.11 I/O Mixed Units Specifications 2.11 I/O Mixed Units Specifications 2.11.1 32−point Type DC Input/32−point Type Transistor (NPN) Output Unit Specifications Item Description Part number FP2−XY64D2T Input specifica- Insulation method Optical coupler tions Rated input voltage... - Page 96 Parts and Functions FP2/FP2SH 2.11 I/O Mixed Units Specifications Notes • Keep the number of input and output points per common which are simultaneously on within the following range as de- termined by the input voltage and ambient temperature. Input Output 24V DC 26.4V DC...
- Page 97 FP2/FP2SH Parts and Functions 2.11 I/O Mixed Units Specifications Internal Circuit Diagram Input Input indicator LED Input 5.6kΩ 560Ω 24V DC Output Output indicator Output Load 5 to 24V DC Pin Layout 24V DC 5 to 24V DC − The COM pins of each connector are Although ”+”...
-
Page 98: 32−Point Type Dc Input/32−Point Type Transistor (Pnp) Output Unit
Parts and Functions FP2/FP2SH 2.11 I/O Mixed Units Specifications 2.11.2 32−point Type DC Input/32−point Type Transistor (PNP) Output Unit Specifications Item Description Part number FP2−XY64D2P Input specifica- Insulation method Optical coupler tions Rated input voltage 24V DC Rated input current Approx. - Page 99 FP2/FP2SH Parts and Functions 2.11 I/O Mixed Units Specifications Notes • Keep the number of input and output points per common which are simultaneously on within the following range as de- termined by the input voltage and ambient temperature. Input Output...
- Page 100 Parts and Functions FP2/FP2SH 2.11 I/O Mixed Units Specifications Internal Circuit Diagram Input Input indicator LED Input 5.6kΩ 560Ω 24V DC Output Output indicator 5 to 24V DC Output Load Pin Layout 24V DC 5 to 24V DC − Although “+” and “...
-
Page 101: 32−Point Type Dc Input With On Pulse Catch Input Function/ 32−Point Type Transistor Output (Npn) Unit
FP2/FP2SH Parts and Functions 2.11 I/O Mixed Units Specifications 2.11.3 32−point Type DC Input with On Pulse Catch Input Function/ 32−point Type Transistor Output (NPN) Unit Specifications Item Description Part number FP2−XY64D7T Input specifica- Insulation method Optical coupler tions Rated input voltage... - Page 102 Parts and Functions FP2/FP2SH 2.11 I/O Mixed Units Specifications Notes • With a periodical interrupt function (1 ms), it is possible to read an on pulse input signal with a minimum pulse width of 0.4 ms. For detailed information about the on pulse catch input function section 2.11.5...
- Page 103 FP2/FP2SH Parts and Functions 2.11 I/O Mixed Units Specifications Internal Circuit Diagram Input Input indicator LED Input 5.6kΩ 560Ω 24V DC Output Output indicator Output Load 5 to 24V DC Pin Layout Output Y20 to Y3F Input X0 to X1F...
-
Page 104: 32−Point Type Dc Input With On Pulse Catch Input Function/ 32−Point Type Transistor Output (Pnp) Unit
Parts and Functions FP2/FP2SH 2.11 I/O Mixed Units Specifications 2.11.4 32−point Type DC Input with On Pulse Catch Input Function/ 32−point Type Transistor Output (PNP) Unit Specifications Item Description Part number FP2−XY64D7P Input specifica- Insulation method Optical coupler tions Rated input voltage... - Page 105 FP2/FP2SH Parts and Functions 2.11 I/O Mixed Units Specifications Notes • With a periodical interrupt function (1ms), it is possible to read an on pulse input signal with a minimum pulse width of 0.4ms. For detailed information about the on pulse catch input func- tion section 2.11.5...
- Page 106 Parts and Functions FP2/FP2SH 2.11 I/O Mixed Units Specifications Internal Circuit Diagram Input Input indicator LED Input 5.6kΩ 560Ω 24V DC Output Output indicator 5 to 24V DC Output Load Pin Layout Output Y20 to Y3F Input X0 to X1F...
-
Page 107: On Pulse Catch Input Function
FP2/FP2SH Parts and Functions 2.11 I/O Mixed Units Specifications 2.11.5 On Pulse Catch Input Function The I/O mixed unit (FP2−XY64D7T/FP2−XY64D7P) is equipped with “On pulse catch input” function. The on pulse catch input function has a delay circuit built into the input and is used in combination with a periodical interrupt function to make possible the read- ing of on pulses with extremely small widths. - Page 108 Parts and Functions FP2/FP2SH 2.11 I/O Mixed Units Specifications Operation of pulse catch Input signal (input pulse) from external device (* Note 1) (* Note 1) 1 to 5ms Max. 0.2 ms (delay in reception of external signal) Reception of external signal at I/O mixed unit.
-
Page 109: Chapter 3 I/O Allocation
Chapter 3 I/O Allocation... - Page 110 I/O Allocation FP2/FP2SH 3 − 2...
-
Page 111: Fundamentals Of I/O Allocation
FP2/FP2SH I/O Allocation Fundamentals of I/O Allocation Fundamentals of I/O Allocation 3.1.1 I/O Allocation and Registering I/O allocation is the process of assigning an I/O number to each unit. Registering refers to registering the I/O allocations in the system register of the CPU. -
Page 112: How To Count The I/O Numbers And Express The Occupied Points
I/O Allocation FP2/FP2SH Fundamentals of I/O Allocation 3.1.1.3 How to Count the I/O Numbers and Express the Occupied Points How to count the I/O numbers (relay numbers) Since I/O number are handled in units of 16 points, they are expressed as a combination of decimal and hexadecimal numbers as shown below. -
Page 113: Table Of Occupied I/O Points By Unit
FP2/FP2SH I/O Allocation Fundamentals of I/O Allocation 3.1.2 Table of Occupied I/O Points by Unit Name Part number Occupied Number of I/O point occupied slot Standard type CPU FP2−C1 − CPU with 64 points input FP2−C1D CPU with S-LINK FP2−C1SL... - Page 114 I/O Allocation FP2/FP2SH Fundamentals of I/O Allocation Name Part number Occupied Number of I/O point occupied slot Intelligent Intelligent Analog input unit FP2−AD8VI, FP2−AD8X, FP2−RTD 128SX unit Analog output unit FP2−DA4 64SY High−speed counter unit High speed counter unit FP2−HSCT...
-
Page 115: Arbitrary Allocation
FP2/FP2SH I/O Allocation Arbitrary Allocation Arbitrary Allocation 3.2.1 Using Arbitrary Allocation In the case of arbitrary allocation, I/O allocations are decided at the time of system de- sign, and the allocations are registered in the PLC using a programming tool such as NPST-GR/FPWIN GR software. - Page 116 I/O Allocation FP2/FP2SH Arbitrary Allocation Registering with programming tool software Preparations Display the allocation screen. Set the “FPWIN GR” software to OFFLINE mode. On the “Option” menu, select “Allocate I/O Map”. Creating allocations In “No. of Slots”, enter the number of modules(number of slots) to used.
- Page 117 FP2/FP2SH I/O Allocation Arbitrary Allocation When a system is configured with the FP2 backplane H type (AFP25***H), the display is shown as AFP25*** since no exclusive tool display is not available for the H type. The actual system is as shown below. (No indication of the power supply unit and expansion unit.)
-
Page 118: Allocation Example Of Expansion Backplane
I/O Allocation FP2/FP2SH Arbitrary Allocation 3.2.3 Allocation Example of Expansion Backplane 3.2.3.1 When Using FP2 Backplane CPU backplane 16-point type 16-point type DC input unit transistor output unit Backplane: 7-module type backplane Power supply unit: 1 module CPU: 1 module... -
Page 119: When Using Fp2 Backplane H Type
FP2/FP2SH I/O Allocation Arbitrary Allocation 3.2.3.2 When Using FP2 Backplane H Type Backup battery expansion memory CPU unit Basic backplane I/O unit Power supply unit Basic backplane Power supply unit: 1 module I/O units: 16−point type input: 8 units Expansion cable... - Page 120 I/O Allocation FP2/FP2SH Arbitrary Allocation Registering with programming tool software (FPWIN GR) Create allocations In “No. of Slots”, add 16 to the number of modules used on the ex- pansion backplane and enter the result. OE is assigned to each of the specified slots. In this case, enter “24”.
-
Page 121: I/O Mount Allocation
FP2/FP2SH I/O Allocation I/O Mount Allocation I/O Mount Allocation 3.3.1 Using I/O Mount Allocation The I/O allocation state of mounted units is directly registered. If an expansion backplane has been added on the FP2 backplane, the number of slots for I/O units on the CPU backplane is taken as 16 slots. (The FP2 backplane H type occupies 8 slots only.) -
Page 122: Procedure For I/O Mount Allocation
I/O Allocation FP2/FP2SH I/O Mount Allocation 3.3.1.2 Procedure for I/O Mount Allocation Preparations Turn on the power of the PLC and set the mode selector of the CPU to PROG. mode. Set the programming tool software to online monitor. Procedure: On the “Option”... -
Page 123: Automatic Allocation
FP2/FP2SH I/O Allocation Automatic Allocation Automatic Allocation 3.4.1 Using Automatic Allocation After turning on the power, I/O numbers are determined by the I/O unit installation posi- tions and assigned in order beginning from the left side of the CPU backplane. -
Page 124: Procedure For Automatic Allocation
I/O Allocation FP2/FP2SH Automatic Allocation At the expansion backplane, I/O numbers are allocated continuing from the last number allocated to slots that do not actually exist on the CPU backplane. 3.4.1.2 Procedure for Automatic Allocation Automatic allocation is executed when the power is turned on. -
Page 125: Procedure For Clearing Registered Content
FP2/FP2SH I/O Allocation Procedure for Clearing Registered Content Procedure for Clearing Registered Content 3.5.1 Meaning of Clearing Registered Content To repeat the I/O allocation, it is necessary to clear registered content. Registered con- tent is cleared by initializing the system registers. -
Page 126: I/O Numbers Of Free Slots
I/O Allocation FP2/FP2SH I/O Numbers of Free Slots I/O Numbers of Free Slots 3.6.1 I/O Numbers of Free Slots I/O numbers are also assigned to modules (slots) where no units are installed. Program- ming and system construction can be made more efficient by using an appropriate manner of assigning I/O numbers. - Page 127 FP2/FP2SH I/O Allocation I/O Numbers of Free Slots Example of pre-assigning I/O numbers for a 64-point type input unit to a free slot 64-point input 16-point type 16-point type reserved DC input unit transistor output unit backplane Expansion backplane Y100...
-
Page 128: When I/O Mount Allocation Is Used
I/O Allocation FP2/FP2SH I/O Numbers of Free Slots 3.6.2.2 When I/O Mount Allocation is Used When I/O mount allocation is executed, 16 points are uniformly assigned to each free slot. Advantage When the I/O unit that occupy 16 points is added, there is no need to worry about I/O number discrepancies. -
Page 129: When Automatic Allocation Is Used
FP2/FP2SH I/O Allocation I/O Numbers of Free Slots 3.6.2.3 When Automatic Allocation is Used When automatic allocation is executed, 16 points are uniformly assigned to each free slot. With automatic allocation, the contents of allocation are not registered. Assignments are performed each time the power of PLC is turned on based on the units actually mounted. - Page 130 I/O Allocation FP2/FP2SH I/O Numbers of Free Slots 3 − 22...
-
Page 131: Installation And Wiring
Chapter 4 Installation and Wiring... - Page 132 Installation and Wiring FP2/FP2SH 4 − 2...
-
Page 133: Installation
FP2/FP2SH Installation and Wiring Installation Installation 4.1.1 Installation Space and Environment Dimensions DIN rail (DIN EN50022 width: 35/1.378) (unit mm/in.) Type of FP2 backplane Type of FP2 backplane H type L (mm/in.) 5-module type —————— 140/5.512 7-module type —————— 209/8.228 9-module type ——————... - Page 134 Installation and Wiring FP2/FP2SH Installation Installation location Be sure to maintain a sufficient distance from wiring ducts, and other machines below and above the unit for proper ventilation. Do not install the units stacked up or horizontally. Doing so will prevent proper cooling of the unit and cause overheating inside the PLC (programmable controller).
- Page 135 FP2/FP2SH Installation and Wiring Installation Space of Programming Tool Connection Leave a space of at least 170mm/6.693in. from the mounting surface for programming tool connections and wiring. Approx. 110mm/4.331in. FP2/ Peripheral connection cable FP2SH unit 170mm/6.693in. or more Operating environment (Use the unit within the range of the general specifications when installing) Ambient temperatures:0 to +55 °C...
-
Page 136: Backplane
Installation and Wiring FP2/FP2SH Installation 4.1.2 Mounting Method 4.1.2.1 Backplane Mounting Hole Dimensions FP2 backplane Type of backplane Part number L (mm/in.) 5-module type FP2−BP05 130/5.118 7-module type FP2−BP07 199/7.835 9-module type FP2−BP09 255/10.039 12-module type FP2−BP12 339/13.346 14-module type FP2−BP14... - Page 137 FP2/FP2SH Installation and Wiring Installation Installation to a DIN Rail Procedure: Attach the railing on the rear of the backplane to the DIN rail. Push the backplane in the direction of the arrow, as il- lustrated below, so that it attaches securely.
-
Page 138: Units
Installation and Wiring FP2/FP2SH Installation 4.1.2.2 Units Be sure to install the unit according to the following procedures. Notes • Do not remove the dust proofing label that is attached to the upper portion of the unit until the unit is completely installed and the wiring is completed. - Page 139 FP2/FP2SH Installation and Wiring Installation Procedure: Insert the installation tabs on the rear of the unit into the top of the backplane. Push the unit in the direction of the arrow and install onto the backplane. When installing the unit to the backplane, make sure the retaining hook firmly clicks into place and that the unit is properly secured to the backplane.
- Page 140 Installation and Wiring FP2/FP2SH Installation Removing the unit Procedure: Loosen the installation screws. 2 modules type unit Pull out the retaining hook at the bottom of the unit with the tip of a flat-headed screwdriver and remove the unit as illustrated below.
-
Page 141: Connecting Expansion Cable
FP2/FP2SH Installation and Wiring Installation 4.1.3 Connecting Expansion Cable Attaching Connectors Make sure that the expansion cable is firmly connected. Do not subject the expansion cable to any twisting or stress. Connect the expansion cable so that the ferrite core of the expansion cable is situated in close proximity to CPU backplane. - Page 142 Installation and Wiring FP2/FP2SH Installation FP2 backplane H type Three expansion backplanes H type can be added on for expansion. Connect a cable from the connector of the basic backplane to the outside connector of the expansion backplane with the smallest number, and then connect a cable from the inside connector to the outside connector of the next expansion backplane.
-
Page 143: Preparing The Backup Battery
FP2/FP2SH Installation and Wiring Installation 4.1.4 Preparing the Backup Battery With the FP2, be sure to remove the insulating sheet of the backup battery before instal- ling the CPU onto backplane. Insulating sheet With the FP2SH, connect the connector of backup battery. - Page 144 Installation and Wiring FP2/FP2SH Installation Place the battery in the battery holder with the side with a ‘+’ sign facing up. +sign. Insert the battery holder with the battery all the way seated in the IC memory card. * The lock swich is automatically back to the LOCK posi- tion when removing the battery holder.
-
Page 145: Power Supply Wiring
FP2/FP2SH Installation and Wiring Power Supply Wiring Power Supply Wiring 4.2.1 Wiring of Power Supply Pin layout of power supply unit (FP2−PSA1 is used for the example below.) Power supply terminals Supplies 100 to 120V AC. Use separate systems for the power devices and the input devices. - Page 146 Round type 2−N3A 1.04 to 2.63mm Fork type 2−MS3 Use wire that is thicker than 2mm Power supply system Use separate wiring systems for the FP2/FP2SH power supply unit output devices and motorized devices. Breaker Motorized device I/O device Insulated...
-
Page 147: Grounding
(AWG14) and the grounding connection should have a resistance of less than 100Ω. The point of grounding should be as close to the FP2/FP2SH PLC as possible. The ground wire should be as short as possible. If two devices share a single ground point, it may produce an adverse effect. Always use an exclusive ground for each device. -
Page 148: Wiring Input And Output
Installation and Wiring FP2/FP2SH Wiring Input and Output Wiring Input and Output 4.3.1 Input Wiring Before the wiring, carefully confirm the specifications for the units to be wired. Specifi- cally, limitations on the ambient temperature and number of points that can be on simultaneously will differ for different units. - Page 149 FP2/FP2SH Installation and Wiring Wiring Input and Output Connection of LED-equipped Reed Switch With a LED is connected to an input contact such as LED-equipped reed switch, make sure that the voltage value applied to the input terminal of PLC is greater than on voltage value.
- Page 150 Installation and Wiring FP2/FP2SH Wiring Input and Output Connection of LED-equipped Limit Switch With the LED-equipped limit switch, if the input of the PLC is not turned off or if the LED of the limit switch is kept on because of the leakage current, the connection of a bleeder resistor is recommended, as shown below.
-
Page 151: Output Wiring
FP2/FP2SH Installation and Wiring Wiring Input and Output 4.3.2 Output Wiring Before the wiring, carefully confirm the specifications for the units to be wired. Specifi- cally, limitations on the ambient temperature, number of points that can be on simultaneously and load current will differ for different units. -
Page 152: Cautions Regarding Units
Installation and Wiring FP2/FP2SH Wiring Input and Output Connection of Capacitive Loads When connecting the loads with large in-rush currents, be sure to connect a protection circuit such as resistor or inductor in series with the load as shown below. -
Page 153: Wiring The Connector Type I/O Units
FP2/FP2SH Installation and Wiring Wiring the Connector Type I/O Units Wiring the Connector Type I/O Units 4.4.1 Wiring the Connector Type Units Wiring Method There are 4 methods for wiring to a connector type I/O unit. Choose the most appropri- ate method depending on the installation conditions. - Page 154 Installation and Wiring FP2/FP2SH Wiring the Connector Type I/O Units When using cable with pressure connection terminal The connector converted to a pressure connection terminal using the exclusive cable. The I/O numbers and corresponding pressure connection terminal pin numbers are the same as for connector terminals on section 4.4.3.
-
Page 155: Connecting With Connector For Wire-Pressed Terminal Cable
FP2/FP2SH Installation and Wiring Wiring the Connector Type I/O Units 4.4.2 Connecting with Connector for Wire-pressed Terminal Cable Connector for Wire-pressed Terminal Cable This is a connector that allows loose wires to be connected without removing the wire’s insulation. The pressure connection tool is required to connect the loose wires. - Page 156 Installation and Wiring FP2/FP2SH Wiring the Connector Type I/O Units Assembly of Connector for Wire-pressed Terminal Cable The wire end can be directly press-fitted without removing the wire’s insulation, saving labor. Procedure: Bend the contact back from the carrier, and set it in the pressure connection tool.
-
Page 157: Connecting The Terminals
FP2/FP2SH Installation and Wiring Wiring the Connector Type I/O Units 4.4.3 Connecting the Terminals CT-2 Connector Terminal Use a 40-pin type CT-2 connector terminal. For connecting the terminal to the terminal block, use M3-sized pressure connection terminals. Note If using the CT-2 connector terminal for the input, connect be- tween the COM terminals. - Page 158 Installation and Wiring FP2/FP2SH Wiring the Connector Type I/O Units Correspondence table of 32-point type input unit When a 32-point type input unit is next to the standard type CPU on the right side. Terminal Input Terminal Input number number...
- Page 159 FP2/FP2SH Installation and Wiring Wiring the Connector Type I/O Units Correspondence table of 32-point type output unit When a 32-point type output unit is next to the standard type CPU on the right side. Terminal Output Terminal Output number number...
- Page 160 Installation and Wiring FP2/FP2SH Wiring the Connector Type I/O Units Correspondence table of 32-point input/32-point output type I/O mixed unit When the I/O mixed unit is next to the standard type CPU on the right side. Examples for the CN1 group...
- Page 161 FP2/FP2SH Installation and Wiring Wiring the Connector Type I/O Units RT-2 Relay Terminal For 64-point type output unit (FP2−Y64T), you can connect four sets of the RT-2 relay terminals with 16 outputs by using two-branch type cable. For 32−point type output unit (FP2−Y32T) and output connector side of I/O mixed unit (FP2−XY64D2T, FP2−XY64D7T), you can connect two sets of the RT-2 relay terminals...
-
Page 162: Connecting With Flat Cable Connector
Installation and Wiring FP2/FP2SH Wiring the Connector Type I/O Units 4.4.4 Connecting with Flat Cable Connector When connecting with a flat cable connector, the relationship between the cable num- ber and I/O number is shown below. Correspondence table of cable number and I/O number... - Page 163 FP2/FP2SH Installation and Wiring Wiring the Connector Type I/O Units Flat Cable Connection Diagram for the 32−point Type I/O Units, 64-point Type I/O Units and I/O Mixed Unit Cable no.1 side Cable no.1 side Flat Cable Connector Item Part number...
-
Page 164: Wiring The Terminal Block Type I/O Units
Installation and Wiring FP2/FP2SH Wiring the Terminal Block Type I/O Units Wiring the Terminal Block Type I/O Units 4.5.1 Wiring the Terminal Block Type Units Suitable Wires Size Torque AWG22 to AWG14 (0.3mm to 2.0mm 0.5 to 0.6N⋅m Pressure Connection Terminals M3.5 terminal screws are used for the terminals. - Page 165 FP2/FP2SH Installation and Wiring Wiring the Terminal Block Type I/O Units Note Install the terminal block by inserting it all the way to its original position and pressing the lock button on the bottom of the unit. Then confirm that the terminal block is securely attached and cannot be removed.
-
Page 166: Safety Measures
Installation and Wiring FP2/FP2SH Safety Measures Safety Measures 4.6.1 Safety Instructions Precautions Regarding System Design In certain applications, malfunction may occur for the following reasons: Power on timing differences between the PLC system and I/O or motorized devices An operation time lag when a momentary power failure occurs... -
Page 167: Momentary Power Failures
4.6.2 Momentary Power Failures If the duration of the power failure is less than 10 ms, the FP2/FP2SH continues to oper- ate. If the power is off for 10 ms or longer, operation changes depending on the combination of units, the power supply voltage, and other factors. (In some cases, op- eration may be the same as that for a power supply reset.) - Page 168 Installation and Wiring FP2/FP2SH Safety Measures 4 − 38...
-
Page 169: Procedure Until Operation
Chapter 5 Procedure Until Operation... - Page 170 Procedure Until Operation FP2/FP2SH 5 − 2...
-
Page 171: Before Turning On The Power
Before Turning ON the Power 5.1.1 Check Items After wiring, be sure to check the items below before turning on the power supply to the FP2/FP2SH system. Item Description Unit mounting status Does the unit type match the device list during the design stage? -
Page 172: Procedure Up To Operation
Procedure Until Operation FP2/FP2SH Before Turning ON the Power 5.1.2 Procedure Up To Operation After installing and wiring, perform the operation by following procedure. Procedure: Power on 1) Before turning on the power, check the items described on the pre- vious page. -
Page 173: Programming With Programming Tool Software
: 19200 bps on : 9600 bps Set the baud rate of the computer to match that of the CPU. Connecting the FP2/FP2SH to the computer Connect using the FP PC cable. Computer settings Set to asynchronous. For the setting procedure, refer to the operation manual that came with the computer. -
Page 174: Configuration Of Programming Tool Software
Procedure Until Operation FP2/FP2SH Programming with Programming Tool Software 5.2.2 Configuration of Programming Tool Software Depending on the PLC type and conditions of use, it is necessary to set the basic configuration for programming tool software. Be sure to set these parameters of con- figration before beginning programming. - Page 175 FP2/FP2SH Procedure Until Operation Programming with Programming Tool Software Communication Settings Select the Network type or communication format. In case if RS232C [Baud rate] PLC default : 9600 bps [Data length] PLC default : 8 bits [Stop bit] PLC default : 1 bit...
- Page 176 Procedure Until Operation FP2/FP2SH Programming with Programming Tool Software 5 − 8...
-
Page 177: Fp2/Fp2Sh Operation
Chapter 6 FP2/FP2SH Operation... - Page 178 FP2/FP2SH Operation FP2/FP2SH 6 − 2...
-
Page 179: Fp2 Operation
FP2/FP2SH FP2/FP2SH Operation FP2 Operation FP2 Operation 6.1.1 FP2 RAM and ROM Operations 6.1.1.1 Comparison of RAM and ROM Operations With the FP2, either RAM operation or ROM operation can be selected for the execution method of the program. RAM operation: Executes the program written into the internal RAM of the CPU. -
Page 180: Retaining The Data During Power Outages
FP2/FP2SH Operation FP2/FP2SH FP2 Operation 6.1.1.2 Retaining the Data During Power Outages For the operation memory, such as that for internal relays and data registers, the data that is set as hold-type memory is backed up by the backup battery. -
Page 181: Fp2 Ram Operation
FP2/FP2SH FP2/FP2SH Operation FP2 RAM Operation FP2 RAM Operation 6.2.1 RAM Operation Method Verify that the operation condition switches (DIP switches) on the back of the FP2 CPU are set for RAM operation (SW2 off). FP2 CPU rear side Program memory selector... -
Page 182: Fp2 Rom Operation
FP2/FP2SH Operation FP2/FP2SH FP2 ROM Operation FP2 ROM Operation 6.3.1 ROM Operation Method Preparation Turn off the power supply and remove the CPU from the backplane. Install the expan- sion memory unit (FP2−EM3, FP2−EM6 or FP2−EM7) to the CPU. Then install the ROM that writes the program to the expansion memory unit. -
Page 183: Verifying The Rom Contents In Ram Operation
FP2/FP2SH FP2/FP2SH Operation FP2 ROM Operation 6.3.2 Verifying the ROM Contents in RAM Operation When the operation condition switches (DIP switch) on the rear side of the CPU is set for RAM operation, the CPU reads the contents of the internal RAM. To check the con- tents of the ROM, you must first copy the contents to RAM by following the procedure below. -
Page 184: Writing To Rom
FP2/FP2SH Operation FP2/FP2SH Writing to ROM Writing to ROM 6.4.1 Writing to EPROM Using Programming Tool Software This method entails using programming tool software at the computer to send the program directly to any commercially available ROM writer and writing the data to the ROM. - Page 185 FP2/FP2SH FP2/FP2SH Operation Writing to ROM Write the data to the optional memory EPROM (FP2−EM5) with the commercially available ROM writer. The specification of commercially available ROM writer set to EPROM “M27C1001− 12F1 or equivalent” (SGS− THOMSON MICROELECTRONICS). 6 − 9...
-
Page 186: Writing To Eprom Via From
FP2/FP2SH Operation FP2/FP2SH Writing to ROM 6.4.2 Writing to EPROM via FROM Preparation Prepare the optional memory FROM (FP2−EM4), the optional memory EPROM (FP2−EM5), and the expansion memory unit (FP2−EM3, FP2−EM6 or FP2−EM7). Also prepare a commercially available ROM writer. - Page 187 FP2/FP2SH FP2/FP2SH Operation Writing to ROM Verify that the SW2 of operation condition switches (DIP switches) on the back of the CPU are set to RAM opera- tion position (off). FP2 CPU rear side Program memory selector off: RAM operation...
- Page 188 FP2/FP2SH Operation FP2/FP2SH Writing to ROM C. Reading a program from disk Operations using FPWIN GR On the “File” menu, select “Open” and load the program from disk. D. Writing the program from the CPU to the optional memory FROM Operations using FPWIN GR On the “Online”...
-
Page 189: Fp2Sh Operation
FP2/FP2SH FP2/FP2SH Operation FP2SH Operation FP2SH Operation 6.5.1 Comparison of RAM, ROM, and IC Memory Card Operation With the FP2SH, the user can select “RAM operation”, “ROM operation”, or “IC memory card operation” as the method by which programs are to be executed. -
Page 190: Retaining Data If The Power Fails
FP2/FP2SH Operation FP2/FP2SH FP2SH Operation 6.5.2 Retaining Data If the Power Fails Operation Memory Backup Of the internal relays, data registers and other operation memories, data specified as hold−type data in the system registers is backed up by the backup battery. - Page 191 FP2/FP2SH FP2/FP2SH Operation FP2SH Operation Open the “Initial Switch” tab. Delete the check from the “Alarm battery error” check box. Click on “OK” to close the window. The data is downloaded to the PLC. 6 − 15...
-
Page 192: Comment Function
FP2/FP2SH Operation FP2/FP2SH FP2SH Operation 6.5.3 Comment Function The FP2SH is equipped with a function that allows program comments (I/O comments, block comments, remarks) to be stored. Comment Type FP2−C2L, FP2−C2 FP2−C2P, FP2−C3P Storage memory Internal SRAM Internal FROM Storage capacity... -
Page 193: Fp2Sh Ram Operation
FP2/FP2SH FP2/FP2SH Operation FP2SH RAM Operation FP2SH RAM Operation 6.6.1 RAM Operation Method Check to make sure the DIP switches on the back of the CPU have been set to the RAM operation side (SW2 is off). Internal RAM Internal RAM... -
Page 194: Precautions When Operating The Ram
FP2/FP2SH Operation FP2/FP2SH FP2SH RAM Operation 6.6.2 Precautions When Operating the RAM All contents written to the RAM are retained by the backup battery. Please pay close attention to the service life of the backup battery. Note It is recommended to save the programs and data within the CPU in a PC in case that it requires time for the replacement. -
Page 195: Fp2Sh Rom Operation
FP2/FP2SH FP2/FP2SH Operation FP2SH ROM Operation FP2SH ROM Operation 6.7.1 ROM Operation Function The FP2SH is equipped with a function that causes programs, or programs and data, to be stored in a ROM (FROM or EPROM) that does not require backing up. This func- tion also causes operations to be executed based on the contents of that ROM. -
Page 196: Rom Operation Method
FP2/FP2SH Operation FP2/FP2SH FP2SH ROM Operation 6.7.2 ROM Operation Method Preparation Turn off the power supply and detach the CPU. If using the FP2−C2, insert the expansion memory unit (FP2−EM7) into the CPU, and install the master memory (AFP5208) or the memory (AFP5209) containing the pro- grams. -
Page 197: Precautions When Operating The Rom
FP2/FP2SH FP2/FP2SH Operation FP2SH ROM Operation 6.7.3 Precautions When Operating the ROM Precautions Before Turning On the Power Supply At the point when the ROM is installed, be aware that operation differs as described below, depending on the setting of the DIP switches on the back of the CPU. -
Page 198: Checking The Rom Contents While Using Ram Operation
FP2/FP2SH Operation FP2/FP2SH FP2SH ROM Operation 6.7.4 Checking the ROM Contents While Using RAM Operation When the DIP switches on the back of the CPU have been set to the RAM operation side, the CPU reads the contents of the internal RAM in that state. To check the contents (pro- grams) of the ROM, use the procedure described below to send the data to the RAM. -
Page 199: Sending Data From The Ram To The From
FP2/FP2SH FP2/FP2SH Operation FP2SH ROM Operation 6.7.5 Sending Data from the RAM to the FROM The “RAM → ROM Transfer” function in the FPWIN GR is used to send programs and data in the CPU to the ROM. The data range can be specified as any of the following fields: WL, WR, DT, FL, SV, EV, and LD. - Page 200 FP2/FP2SH Operation FP2/FP2SH FP2SH ROM Operation The “ROM & RAM Service” window opens. Select “ROM ← RAM” and press the “Data” button. The “Data Register Range Setup” window opens. Select the data and specify the range. Clicking on the check box in front of the data type speci- fies whether or not that data can be sent.
-
Page 201: Writing Data To The Rom (Afp5209) (Only The Fp2−C2 Can Be
FP2/FP2SH FP2/FP2SH Operation FP2SH ROM Operation 6.7.6 Writing Data to the ROM (AFP5209) (only the FP2−C2 can be installed) The master memory is a flash ROM, and data can be written to it when it is installed in the CPU. However, data can only be written when the memory is an EPROM and when a commercially available ROM writer is used. - Page 202 FP2/FP2SH Operation FP2/FP2SH FP2SH ROM Operation Notes • Refer to the commercially available ROM writer manual re- garding the ROM IC type setting and writing method. If a passwords is on the CPU, it is possible to create a password for master memory.
-
Page 203: Writing Data To The Rom: Using The Fpwin Gr
FP2/FP2SH FP2/FP2SH Operation FP2SH ROM Operation 6.7.7 Writing Data to the ROM: Using the FPWIN GR With this method, programs are sent directly from the personal computer (FPWIN GR tool software) to the ROM writer, and are written to the ROM. With the FP2SH, this meth- od can be used only when the expansion memory unit (FP2−EM7) is used in... - Page 204 FP2/FP2SH Operation FP2/FP2SH FP2SH ROM Operation Install the memory in the commercially available ROM writer and write the data. The ROM writer settings should be specified as those for the M27C2001 (SGS−TOMSON). Notes • Refer to the commercially available ROM writer manual re- garding the ROM IC type setting and writing method.
-
Page 205: Fp2Sh Ic Memory Card Operation (For Fp2−C2P/Fp2−C3P)
FP2/FP2SH FP2/FP2SH Operation 6.8 FP2SH IC Memory Card Operation (for FP2−C2P/FP2−C3P) FP2SH IC Memory Card Operation (for FP2−C2P/ FP2−C3P) 6.8.1 Operating Using the IC Memory Card IC memory cards can be used to back up programs and as operation memories, but they can also be used for operation, with programs that have been written to the card. - Page 206 FP2/FP2SH Operation FP2/FP2SH FP2SH IC Memory Card Operation (for FP2−C2P/FP2−C3P) Executing Programs There are two ways to execute programs written on IC memory cards, described below. Programs are automatically transferred when the power supply is turned on. If the power supply is turned on when the DIP switches on the back of the CPU are set so that both SW2 and SW4 are on, the “Autoexec.spg”...
-
Page 207: Creating Files For Automatically Run Programs
FP2/FP2SH FP2/FP2SH Operation 6.8 FP2SH IC Memory Card Operation (for FP2−C2P/FP2−C3P) 6.8.2 Creating Files for Automatically Run Programs In order to automatically execute programs stored on the card when the power supply is turned on, the following procedure must be used to convert the programs to programs that will run automatically. -
Page 208: How The Ic Memory Card Is Operated
FP2/FP2SH Operation FP2/FP2SH FP2SH IC Memory Card Operation (for FP2−C2P/FP2−C3P) 6.8.3 How the IC Memory Card is Operated Turn off the power supply, and remove the CPU. Have the IC memory card ready that contains programs already written to it. -
Page 209: Transferring Data From The Ram To The Ic Memory Card
FP2/FP2SH FP2/FP2SH Operation 6.8 FP2SH IC Memory Card Operation (for FP2−C2P/FP2−C3P) 6.8.4 Transferring Data From the RAM to the IC Memory Card The “RAM → ROM Transfer” function in the FPWIN GR tool software is used to send programs and data in the CPU to an SRAM type IC memory card. The data range can be specified as any of the following fields: WL, WR, DT, FL, SV, EV, and LD. - Page 210 FP2/FP2SH Operation FP2/FP2SH FP2SH IC Memory Card Operation (for FP2−C2P/FP2−C3P) 6 − 34...
-
Page 211: Chapter 7 Ic Memory Card
Chapter 7 IC Memory Card... - Page 212 IC Memory Card FP2/FP2SH 7 − 2...
-
Page 213: Using The Ic Memory Card
FP2/FP2SH IC Memory Card Using the IC Memory Card Using the IC Memory Card 7.1.1 Types of IC Memory Cards There are two types of IC memory cards, an SRAM type and an FROM type. The user can select the appropriate type for the application at hand. -
Page 214: Using The Ic Memory Card
IC Memory Card FP2/FP2SH Using the IC Memory Card 7.1.2 Using the IC Memory Card The IC memory card is available as an optional memory for the FP2−C2P/FP2−C3P. (It cannot be used with the FP2−C2.) IC memory cards can be used for two types of applications: saving programs and ex- panding the data memory area. - Page 215 FP2/FP2SH IC Memory Card Using the IC Memory Card Using the Card to Expand the Data Memory Area Data written to data registers and other destinations is written to the IC memory card. When the card is used in this way, the IC memory card can be used as an expanded memory area that lets data be written and read using the sequence program.
-
Page 216: Formatting And Erasing
IC Memory Card FP2/FP2SH Formatting and Erasing Formatting and Erasing 7.2.1 Program Memory Field and Expanded Memory Field The area in which sequence programs are stored is called the “program field”, and the area used to expand the data memory is called the “expanded memory field”. The IC memory card must be divided into separate fields, depending on how it is being used. - Page 217 FP2/FP2SH IC Memory Card Formatting and Erasing Using Different Sections of the Card as a Program Memory Field and Expanded Memory Field Any desired settings may be entered for the field to be formatted. Of the entire field, any part of the field not formatted (program memory field) is used to expand the memory field.
-
Page 218: Procedure For Formatting The Ic Memory Card
IC Memory Card FP2/FP2SH Formatting and Erasing 7.2.2 Procedure for Formatting the IC Memory Card Formatting an FROM type When using this type, formatting is done at the same time that the program on the disk is copied to the IC memory card, with the FPWIN GR. - Page 219 FP2/FP2SH IC Memory Card Formatting and Erasing Specifying and running the format size Press the button next to “Format Size” to select the size. Next, click on the “Execute” button to open the “Select File” window. Selecting the file to be copied Select the file to be copied to the IC memory card, and click on “OK”.
- Page 220 IC Memory Card FP2/FP2SH Formatting and Erasing Formatting the SRAM type With this type of card, the IC memory card must be formatted before the program is saved to it, and a “program memory field” must be assured to which the program will be saved.
-
Page 221: Procedure For Erasing The Ic Memory Card
FP2/FP2SH IC Memory Card Formatting and Erasing Specifying and running the format size Press the button next to “Format Size” to select the size. Next, click on the “Execute” button to format the card at the specified size. 7.2.3 Procedure for Erasing the IC Memory Card... -
Page 222: Data Storage Capacity Of Ic Memory Card
IC Memory Card FP2/FP2SH Formatting and Erasing Erasing the card Clicking on the “Execute” button starts erasing the data from the card. It takes approximately 1 minute to erase all the data. *Once erasing the data starts, the “IC memory card ac- cess LED”... -
Page 223: For Use As Program Memory
FP2/FP2SH IC Memory Card For Use as Program Memory For Use as Program Memory 7.3.1 Writing the Program By saving the program to the IC memory card, it is simple to create a backup or transfer it to another CPU. - Page 224 IC Memory Card FP2/FP2SH For Use as Program Memory Method 1: Use the “Copy File to IC Card...” function in the FPWIN GR, directly write the program that is saved on the disk to the IC memory card. (For all...
- Page 225 FP2/FP2SH IC Memory Card For Use as Program Memory Selecting the file to be copied Select the file to be copied to the IC memory card, and click on “OK”. Writing of the file to the IC memory card begins, and the “List of File Copy Results”...
- Page 226 IC Memory Card FP2/FP2SH For Use as Program Memory Setting the file information Enter the “File Name” (name of the file to which the pro- gram is to be written), the “Title”, and the “Author” (name of the person creating the file).
- Page 227 FP2/FP2SH IC Memory Card For Use as Program Memory Method 3: Write a program on the RAM of the CPU into the IC memory card. (For the SRAM type IC memory card) By performing the following procedures, the data on the RAM of the CPU is written to the IC memory card and named “Autoexec.spg”.
-
Page 228: Reading The Program
IC Memory Card FP2/FP2SH For Use as Program Memory 7.3.2 Reading the Program There are four methods of reading the program saved in the IC memory card. Read the program on the IC memory card and directly transfer it into the internal RAM of the CPU at the same time that the power is turned on. - Page 229 FP2/FP2SH IC Memory Card For Use as Program Memory Method 2: Use the programming tool to read the program of the IC memory card and directly transfer it into the internal RAM of the CPU. With simple operation of the programming tool, reads the program saved on the IC memory card, and transfer it to the internal RAM of the CPU.
- Page 230 IC Memory Card FP2/FP2SH For Use as Program Memory Method 3: Use the “Upload Program from IC Card...” of the FPWIN GR, and select one of the programs saved in the IC memory card and read it to the FPWIN GR (memory of personal computer).
- Page 231 FP2/FP2SH IC Memory Card For Use as Program Memory Method 4: Use the F14 (PGRD) instruction to read the program from the IC memory card and directly transfer it into the internal RAM of the CPU. IC memory card instruction...
-
Page 232: For Use As Expansion Memory
IC Memory Card FP2/FP2SH For Use as Expansion Memory For Use as Expansion Memory Outline of Expansion Memory The expansion memory area is an independent area from the internal memory of the CPU that stores word data. Use the F12 (ICRD) and F13 (ICWT) instructions to read and write data to this area. - Page 233 FP2/FP2SH IC Memory Card For Use as Expansion Memory 2) When dealing with many different data or other such applications, you can create a table to store the different control data and easily switch between the data ac− cording to the data type you are using.
- Page 234 IC Memory Card FP2/FP2SH For Use as Expansion Memory 2) Using the remaining DOS formatted field All of the remaining DOS formatted field can be used as expansion memory. Example: When 512 kB is set as the DOS formatted field in a 1 MB card...
-
Page 235: Menus Related To Tool Software
FP2/FP2SH IC Memory Card Menus Related to Tool Software Menus Related to Tool Software The FPWIN GR is equipped with menus that are used for management of the IC memory card. Reading Programs and Data Stored on IC Memory Cards “Upload Program from IC Card...”... - Page 236 IC Memory Card FP2/FP2SH Menus Related to Tool Software Other file management menus “Delete File...” This deletes programs from the IC memory card. This function can also be used to se- lect multiple programs and delete them as a batch, all at once.
-
Page 237: Self-Diagnostic Function And Troubleshooting
Chapter 8 Self-Diagnostic Function and Troubleshoot-... - Page 238 Self-Diagnostic Function and Troubleshooting FP2/FP2SH 8 − 2...
-
Page 239: Self-Diagnostic Function
FP2/FP2SH Self-Diagnostic Function and Troubleshooting Self-Diagnostic Function Self-Diagnostic Function 8.1.1 LED Display for Status Condition Status Indicator LEDs on CPU Condition LED status Description Operation (Program og a execution) PROG. TEST BREAK ERROR BATT. ALARM status Normal Normal operation Operation... -
Page 240: Operation When An Error Occurs
Self-Diagnostic Function and Troubleshooting FP2/FP2SH Self-Diagnostic Function 8.1.2 Operation When an Error Occurs Normally, if an error occurs, the operation stops. There are some instances in which operation continues even if an error occurs, such as with a battery error. -
Page 241: Troubleshooting
FP2/FP2SH Self-Diagnostic Function and Troubleshooting Troubleshooting Troubleshooting 8.2.1 If the ERROR LED Lights Condition The self-diagnostic error occurs. Procedure 1 Replace the backup battery of the CPU when the BATT. LED is on. ( section 9.1.1) Procedure 2 Check the error code using the programming tool. - Page 242 Self-Diagnostic Function and Troubleshooting FP2/FP2SH Troubleshooting Error code is 20 or higher Condition A self-diagnostic error other than a syntax error has occurred. Operation Use the programming tool in PROG. mode to clear the error. Using programming tool software (FPWIN GR) Click “Clear Error”...
-
Page 243: If The Alarm Led Lights
FP2/FP2SH Self-Diagnostic Function and Troubleshooting Troubleshooting 8.2.2 If the ALARM LED Lights Condition The system watchdog timer has been activated and the operation of PLC has been stopped. Procedure 1 Set the mode selector of CPU from RUN to PROG. mode and turn the power off and then on. -
Page 244: If Outputting Does Not Occur As Desired
Self-Diagnostic Function and Troubleshooting FP2/FP2SH Troubleshooting 8.2.4 If Outputting Does Not Occur as Desired Proceed from the check of the output side to the check of the input side. Check of output condition 1 Output indicator LEDs are on Procedure 1 Check the wiring of the loads. -
Page 245: If A Communication Error Message Appears
Depending on the personal computer, there are times when baud rate of 19,200bps or greater are not supported. If problems occur, set both the personal computer and PLC to 9,600bps. If SW1 is on, the baud rate for the FP2/FP2SH PLC is fixed to 9,600bps. 8 − 9... -
Page 246: If A Protect Error Message Appears
Self-Diagnostic Function and Troubleshooting FP2/FP2SH Troubleshooting 8.2.6 If a Protect Error Message Appears When Optional User ROM is Installed in the CPU The program of the internal RAM cannot be modified using the programming tool and a “protect error” occurs. - Page 247 Chapter 9 Maintenance...
- Page 248 Maintenance FP2/FP2SH 9 − 2...
-
Page 249: Replacement Of Spare Parts
FP2/FP2SH Maintenance Replacement of Spare Parts Replacement of Spare Parts 9.1.1 Backup Battery Lifetime of Backup Battery The life of the backup battery will eventually expire and therefore it is important to re- place it with a new battery periodically. The battery lifetime will differ depending on the operating conditions (i.e., ambient temperature) and the type of expansion memory... - Page 250 Maintenance FP2/FP2SH Replacement of Spare Parts Notes • During RAM operation, save the program in the CPU onto disk using programming tool software (FPWIN GR). • Never throw batteries into a fire, disassemble or charge the battery in order to prevent accidents such as bursting, fire or heat generation.
- Page 251 FP2/FP2SH Maintenance Replacement of Spare Parts Procedure for FP2SH Lift up the lead wire. Make sure the lead wire next to the connector insertion area, which is also the battery holder, is lifted out of the hole that secures it in place.
- Page 252 Maintenance FP2/FP2SH Replacement of Spare Parts Procedure for AFP2209: Preparation Backup the data saved in the IC memory card. Note: The saved data is overwritten when replacing the battery. Move to the lock switch to the RELEASE position (to- ward the battery holder).
-
Page 253: Removable Terminal Block For Input And Output Units
FP2/FP2SH Maintenance Replacement of Spare Parts 9.1.2 Removable Terminal Block for Input and Output Units Removable Terminal Block The removable terminal block is used on the terminal block type input and output units. The removable terminal block can be removed while it is still wired. Therefore, if a mal- function or other error occurs, replacement of the unit and other maintenance procedures can be carried out speedily. -
Page 254: Preventive Maintenance
FP2/FP2SH Preventive Maintenance Preventive Maintenance Although the FP2/FP2SH system has been designed in such a way to minimize mainte- nance and offer troublefree operation, several maintenance aspects should be taken into consideration. If preventive maintenance is performed periodically, you will minimize the possibility of system malfunctions. - Page 255 Chapter 10 Specifications...
- Page 256 Specifications FP2/FP2SH 10 − 2...
-
Page 257: Specifications
FP2/FP2SH Specifications 10.1 Specifications 10.1 Specifications General Specifications Item Descriptions Ambient temperature 0 to +55°C/32 to 131°F Storage temperature −20 to +70°C/−4 to +158°F Ambient humidity 30 to 85% RH (at 25°C non-condensing) Storage humidity 30 to 85% RH (at 25°C non-condensing) - Page 258 Specifications FP2/FP2SH 10.1 Specifications Table of Weight Type Part number Weight (Approx.) FP2 CPU FP2 CPU FP2−C1 130g FP2−C1D 220g FP2−C1SL 250g FP2SH CPU FP2SH CPU FP2−C2L 130g FP2−C2 130g FP2−C2P 170g FP2−C3P 170g Backplane Backplane FP2−BP05 180g FP2−BP07 280g FP2−BP09...
-
Page 259: Expanded Construction
FP2/FP2SH Specifications 10.1 Specifications Type Part number Weight (Approx.) Intelligent unit Intelligent unit S-LINK unit FP2−SL2 120g Multi-wire link unit FP2−MW 110g ET−LAN unit, ET−LAN2 unit FP2−ET1, FP2−ET2 125g MEWNET−VE link unit, MEWNET−VE2 link unit FP2−VE, FP2−VE2 125g Remote I/O Slave Unit FP2−RMS... - Page 260 Specifications FP2/FP2SH 10.1 Specifications Item FP2 CPU FP2−C1 (AFP2211), FP2−C1D (AFP2212), FP2−C1SL (AFP2214) Differential points Unlimited number of points Auxiliary timer Unlimited number of points, down type timer (0.01 to 327.67s) Shift register Max. 253 points Master control relay points (MCR)
- Page 261 FP2/FP2SH Specifications 10.1 Specifications Notes 1) The practical usable external input and output points are re- stricted according to the number of the input and output units. The external output relays (Y) that not used at the output unit can be used as internal relays.
-
Page 262: Using Backplanes H Type: Max. 512 Points (8 Modules)
Specifications FP2/FP2SH 10.1 Specifications FP2SH Performance Specifications FP2SH CPU Item FP2−C2L (AFP2221), FP2−C2 (AFP2231), FP2−C2P (AFP2235), FP2−C3P (AFP2255) Program/control method Relay symbol/cyclic operation Controllable Basic Using Backplanes: Max. 768 points (12 modules) construction Using Backplanes H type: Max. 512 points (8 modules) - Page 263 FP2/FP2SH Specifications 10.1 Specifications Item FP2SH CPU FP2−C2L (AFP2221), FP2−C2 (AFP2231), FP2−C2P (AFP2235), FP2−C3P (AFP2255) Differential points Unlimited number of points Auxiliary timer Unlimited number of points, down type timer (0.01 to 327.67s) Shift register Max. 887 points Master control relay points 256 points (For FP2−C3P: 1st program: 256 points/2nd program: 256 points)
-
Page 264: Relays, Memory Areas And Constants
Specifications FP2/FP2SH 10.3 Relays, Memory Areas and Constants 10.2 Relays, Memory Areas and Constants Item Function Numbering FP2SH Relay External input (X) Turn on or off based on external input. 2,048 points 8,192 points relay (X0 to X127F) (X0 to X511F) External output (Y) Externally outputs on or off state. -
Page 265: To 14,333 Words
FP2/FP2SH Specifications 10.3 Relays, Memory Areas and Constants Item Function Numbering FP2SH Memory External input relay (WX) Code for specifying 16 exter- 128 words 512 words area nal input points as one word (WX0 to WX127) (WX0 to WX511) (16 bits) of data. - Page 266 Specifications FP2/FP2SH 10.3 Relays, Memory Areas and Constants Numbering Item Item FP2/FP2SH Control Master control relay points 256 points instruction (MCR) point Number of labels (JP and Total: 256 points LOOP) Number of step ladder 1,000 steps (* Note 4)
-
Page 267: Cable/Adapter Specifications
FP2/FP2SH Specifications 10.3 Cable/Adapter Specifications 10.3 Cable/Adapter Specifications 10.3.1 AFC8503/AFC8503S Mini DIN5 pin (Male) D−SUB9 pin (Female) (Unit: mm) 10.3.2 AFC85305/AFC8531/AFC8532 (For extending for the tool port) (Unit: mm) (Unit: mm) 10 − 13... - Page 268 Specifications FP2/FP2SH 10.3 Cable/Adapter Specifications 10 − 14...
- Page 269 Chapter 11 Appendix...
-
Page 270: System Registers/Special Internal Relays/Special Data Registers
11.1 System Registers / Special Internal Relays / Special Data Registers Precaution for System Registers What is the system register area • System registers are used to set values (parameters) which determine operation ranges and functions used. Set values based on the use and specifications of your program. •... - Page 271 Checking and changing the set value of system register If you are going to use a value which is already set (the value which appears when read), there is no need write it again. Using programming tool software Produce: 1. Set the control unit in the PROG mode. 2.Option ->PLC Configuration 3.When the function for which setting are to be entered is selected in the PLC Configuration dialog box, the value and setting status for the selected system register are displayed.
-
Page 272: 14,333 Words
11.1.1 Table of System Registers for FP2/FP2SH/FP10SH Allocation of user memory (system registers 0, 1 and 2) Available PLC: FP2 The configuration of user memory of FP2 is as follows: Be sure to set the A (using system register 0), B (using system register 1), and C (using system register 2) as even numbers. - Page 273 FP2 (32K) Users memory capacity : 32K words Setting range of A : 2K to 32K words (default value: 12k) Setting range of B : 0 to 30K words (default value: 0) Setting range of C : 0 to 30K words (default value: 0) Allocate so that A + B + C ≦...
- Page 274 (No. 0 to 2999) (No. 3000 to 3071) For FP2/FP2SH, set the system registers 5 and 6 to the same value. This sets the timer to a non-hold type and counter to a hold type. By setting system register 5 to “0”, the whole area becomes the counter. Also, by setting it to the value 1 higher than the last number, the whole area becomes the timer.
- Page 275 For the FP2SH/FP10SH, the index registers can be set to hold type or non-hold type. The register numbers and settings are related as shown below. Bank number Set value for I0 to ID Bank number Set value for I0 to ID Bank 0 0 to 13 Bank 8...
- Page 276 MEWNET-W PC link setting For PC link (W) 0: System registers 40 to 45 For PC link (W) 1: System registers 50 to 55 Regarding the link relays and link data registers, specify the range for communication and divide it up for sending and receiving.
- Page 277 Table of system registers for FP2/FP2SH/FP10SH Add- Default Item Name Descriptions ress value Sequence program area FP2 (16K): 2 to 16K words capacity setting words FP2 (32K): 2 to 32K words Available PLC: FP2 Alloca- Machine language tion of program area capacity...
- Page 278 FP2/FP2SH/FP10SH Add- Default Item Name Descriptions ress value FP2SH/ FP2SH/ Counter starting address FP10SH: FP10SH: 3000 0 to 3072 (setting the number of timers and counters) FP2: FP2: Set the system registers 1000 0 to 1024 5 and 6 to the same...
- Page 279 FP2/FP2SH/FP10SH Add- Default Item Name Descriptions ress value Hold type area starting address setting for 128 to 640 MEWNET-H link relays Available PLC: FP10SH Hold type area starting address setting for MEWNET-H link data 256 to 8448 registers Hold/ Available PLC: FP10SH...
- Page 280 FP2/FP2SH/FP10SH Add- Default Item Name Descriptions ress value 0 to 52428 µs Operation time setting for If the response of the connected 240 µs communication programmable display is show, please processing make the value bigger. Time-out time setting of system watching dog 100 ms 0.4 to 640 ms...
- Page 281 FP2/FP2SH/FP10SH Add- Default Item Name Descriptions ress value Operation settings when connection time error Stop Stop/continuation occurs in the remote slave station Available PLC: FP2SH Enabled: CPU starts operation after all the salve stations are Remote Enabled recognized. Operation mode setting...
- Page 282 FP2/FP2SH/FP10SH Add- Default Item Name Descriptions ress value 0: All data in a scan Processing capacity MEWNET 1 to 65535: Setting processing setting for PC link of (1024 capacity per scan can be obtained MEWNET-H link system bytes per setting using the formula “Capacity”...
- Page 283 In the FP10SH, when the dip switch SW1 on the CPU is off, the baud rate setting is effective. In the FP2/FP2SH, when the dip switch SW1 on the rear of the CPU is Tool port Baud rate setting for the off, the baud rate setting is effective.
- Page 284 Operation of DF instruction between MC and MCE instructions When a leading edge detection instruction (DF instruction) is used with the MC and MCE instructions, the derivative output may change as follows depending on the trigger of MC instruction and input timing of DF instruction.
- Page 285 Example 2: When system register 4 sets 1 (new) Time chart 1 Time chart 2 11-17...
-
Page 286: Table Of Special Internal Relays For Fp2/Fp2Sh/Fp10Sh
11.1.2 Table of Special Internal Relays for FP2/FP2SH/FP10SH FP2/FP2SH/FP10SH Address Name Description Self-diagnostic error Turns on when a self-diagnostic error occurs. R9000 flag The self-diagnostic error code is stored in DT90000. R9001 Not used MEWNET-TR master Turns on when a communication error occurs in the error flag MEWNET-TR master unit or MEWNET-TR network. - Page 287 FP2/FP2SH/FP10SH Address Name Description Turns on for an instant when the compared results become smaller in the “F60 (CMP)/P60 (PCMP), R900C < Flag F61(DCMP)P61(PDCMP), F62 (WIN)/P62 ,(PWIN) or F63 (DWIN)/P63 (PDWIN) comparison instructions.” Turns on when the set time elapses (set value reaches 0) in...
- Page 288 FP2/FP2SH/FP10SH Address Name Description Turns off while the mode selector is set to PROG. R9020 RUN mode flag Turns on while the mode selector is set to RUN. Turns on while the initialize/test switch of the CPU is set to R9021 TEST and mode selector is set to RUN.
- Page 289 FP2/FP2SH/FP10SH Address Name Description Monitors if CPU is in the F145 (SEND)/P145 (PSEND) and F145 (SEND)/P145 F146 (RECV)/P146 (PRECV) instructions executable (PSEND) and F146 condition as follows: R9030 (RECV)/P146 (PRECV) - off: None of the above mentioned instructions can be instruction executing executed.
- Page 290 FP2/FP2SH/FP10SH Address Name Description Monitors if an abnormality has been detected during the F152 (RMRD)/P152 execution of the F152 (RMRD)/P152 (PRMRD) and F153 (PRMRD) and F153 (RMWT)/P153 (PRMWT) instructions as follows: R9036 (RMWT)/P153 - off: No abnormality detected. (PRMWT) instruction - on: An abnormality detected.
- Page 291 FP2/FP2SH/FP10SH Address Name Description When using MEWNET-W link unit or MEWNET-P link MEWNET-W/-P link unit: R9050 transmission error flag - turns on when transmission error occurs at link 1. [W/P LINK 1] - turns on when there is an error in the link area settings.
- Page 292 FP2/FP2SH/FP10SH Address Name Description Turns on when Unit No. 1 is communicating properly in the PC Unit R9060 link mode. Turns off when operation is stopped, when an error No.1 occurs, or when not in the PC link mode. Turns on when Unit No. 2 is communicating properly in the PC...
- Page 293 FP2/FP2SH/FP10SH Address Name Description Unit Turns on when unit No. 1 is in the RUN mode. R9070 No.1 Turns off when unit No. 1 is in the PROG. mode. Unit Turns on when unit No. 2 is in the RUN mode.
- Page 294 FP2/FP2SH/FP10SH Address Name Description Turns on when unit No. 1 is communicating properly in the PC Unit R9080 link mode. Turns off when operation is stopped, when an error No.1 occurs, or when not in the PC link mode. Turns on when unit No. 2 is communicating properly in the PC...
- Page 295 FP2/FP2SH/FP10SH Address Name Description Unit Turns on when unit No. 1 is in the RUN mode. R9090 No.1 Turns off when unit No. 1 is in the PROG. mode. Unit Turns on when unit No. 2 is in the RUN mode.
- Page 296 FP2/FP2SH/FP10SH Address Name Description IC memory card Monitors whether the IC memory card is installed or not: installation flag R9100 - on: IC memory card is installed. (Available PLC: FP2SH/ - off: IC memory card is not installed. FP10SH) IC memory card backup...
-
Page 297: Special Data Registers For Fp2/Fp2Sh/Fp10Sh/Fp3
11.1.3 Special Data Registers for FP2/FP2SH/FP10SH/FP3 FP2/FP2SH/FP10SH/FP3 (A: Available, N/A: Not available) Address FP2/ Read- Writ- Name Descriptions FP2SH FP10SH The self-diagnostic error code is stored Self-diagnostic here when a self-diagnostic error occurs. DT9000 DT90000 error code Monitor the error code using decimal display. - Page 298 FP2/FP2SH/FP10SH/FP3 (A: Available, N/A: Not available) Address Read- Writ- FP2/ Name Descriptions FP2SH FP10SH When an error condition is detected in an intelligent unit, the bit corresponding Abnormal to the slot of the unit will be set to on. DT9006...
- Page 299 FP2/FP2SH/FP10SH/FP3 (A: Available, N/A: Not available) Address Read- Writ- FP2/ Name Descriptions FP2SH FP10SH The address where an operation error occurred is stored. Each time an error occurs, the new address overwrites the previous address. At the beginning of Operation error scan, the addresses 0.
- Page 300 FP2/FP2SH/FP10SH/FP3 (A: Available, N/A: Not available) Address Read- Writ- FP2/ Name Descriptions FP2SH FP10SH The current scan time is stored here. Scan time is Scan time calculated using the display is Scan time formula: DT9022 DT90022 only possible (current value)
- Page 301 FP2/FP2SH/FP10SH/FP3 (A: Available, N/A: Not available) Address Read- Writ- FP2/ Name Descriptions FP2SH FP10SH The value registered using programming tool software is stored. DT9028 Sample trace DT90028 - K0: sampling triggered by F155 (*Note) interval (SMPL)/P155 (PSMPL) instruction - K1 to K3000 (x 10ms): 10ms to 30s...
- Page 302 FP2/FP2SH/FP10SH/FP3 (A: Available, N/A: Not available) Address Read- Writ- FP2/ Name Descriptions FP2SH FP10SH Hour and minute data of the Real-Time Clock(Clock/Calendar) are stored here. This data is read-only data. It cannot be Real-Time Clock overwritten. (Clock/Calendar) DT9053 DT90053 monitor...
- Page 303 FP2/FP2SH/FP10SH/FP3 (A: Available, N/A: Not available) Address Read- Writ- FP2/ Name Descriptions FP2SH FP10SH The Real-Time Clock(Clock/Calendar) is adjusted as follows. When setting the Real-Time Clock (Clock/Calendar) by program By setting the highest bit of DT9058/DT90058 to 1, the time becomes that written to DT9054 to DT9057/DT90054 to DT90057 by F0 (MV) instruction.
- Page 304 FP2/FP2SH/FP10SH/FP3 (A: Available, N/A: Not available) Address Read- Writ- FP2/ Name Descriptions FP2SH FP10SH The system uses this as a communication status when Serial DT9059 communication error occurs. DT90059 communication (*Note) error code Step ladder DT9060 DT90060 process (0 to 15)
- Page 305 FP2/FP2SH/FP10SH/FP3 (A: Available, N/A: Not available) Address Read- Writ- FP2/ Name Descriptions FP2SH FP10SH Step ladder pro- DT9078 DT90078 cess (288 to 303) Step ladder pro- DT9079 DT90079 cess (304 to 319) Step ladder pro- DT9080 DT90080 cess (320 to 335)
- Page 306 FP2/FP2SH/FP10SH/FP3 (A: Available, N/A: Not available) Address Read- Writ- FP2/ Name Descriptions FP2SH FP10SH Step ladder pro- DT9100 DT90100 cess (640 to 655) Step ladder pro- DT9101 DT90101 cess (656 to 671) Step ladder pro- DT9102 DT90102 cess (672 to 687)
- Page 307 FP2/FP2SH/FP10SH/FP3 (A: Available, N/A: Not available) Address Read- Writ- FP2/ Name Descriptions FP2SH FP10SH DT9123 DT90123 Not used DT9124 DT90124 Not used DT9125 DT90125 Not used Forced on/off DT9126 This displays the unit number that has DT90126 operating station (*Note) executed forced on/off operation.
- Page 308 FP2/FP2SH/FP10SH/FP3 (A: Available, N/A: Not available) Address Read- Writ- FP2/ Name Descriptions FP2SH FP10SH The bit corresponding to the station number of the MEWNET-F where an MEWNET-F error is occurring is set to on. Monitor (remote I/O) error using binary display.
- Page 309 Note2) When the system register 46 = K0, First: PC(PLC) link 0, second: PC(PLC) link 1 When the system register 46 = K1, First: PC(PLC) link 1, second: PC(PLC) link 0 Note3) For MEWNET-W system, available PLC type: FP2/FP2SH/FP3/FP10SH For MEWNET-P system, available PLC type: FP3/FP10SH...
- Page 310 Note2) When the system register 46 = K0, First: PC(PLC) link 0, second: PC(PLC) link 1 When the system register 46 = K1, First: PC(PLC) link 1, second: PC(PLC) link 0 Note3) For MEWNET-W system, available PLC type: FP2/FP2SH/FP3/FP10SH For MEWNET-P system, available PLC type: FP3/FP10SH...
- Page 311 Stores the unit No. of link 5. PLC: FP2SH, FP10SH Error flag [W/P link 5] DT90169 Available Stores the error flag of link 5. PLC: FP2SH, FP10SH Note) For MEWNET-W system, available PLC type: FP2/FP2SH/FP3/FP10SH For MEWNET-P system, available PLC type: FP3/FP10SH 11-43...
- Page 312 DT9192 DT90192 Available PLC: FP3, FP10SH Loop operation mode DT9193 DT90193 Available PLC: FP3, FP10SH Loop input status DT9194 DT90194 Available PLC: FP3, FP10SH Note) For MEWNET-W system, available PLC type: FP2/FP2SH/FP3/FP10SH For MEWNET-P system, available PLC type: FP3/FP10SH 11-44...
- Page 313 Send WACK DT9210 DT90210 Send answer DT9211 DT90211 Send answer DT9212 DT90212 Unidentified command Note1) For FP10SH/FP3, using H mode For FP2/FP2SH, using W2 mode Note2) For MEWNET-W system, available PLC type: FP2/FP2SH/FP3/FP10SH For MEWNET-P system, available PLC type: FP3/FP10SH 11-45...
- Page 314 Counts how many times a signal is lost. Counts how many times a synchronous DT9235 DT90235 abnormality is detected. DT9236 DT90236 Send NACK DT9237 DT90237 Send NACK Note) For MEWNET-W system, available PLC type: FP2/FP2SH/FP3/FP10SH For MEWNET-P system, available PLC type: FP3/FP10SH 11-46...
- Page 315 FP10SH) Monitoring COM port station No. Station number BCD (H1 to H32) set for tool DT90256 (Available port is stored here. PLC: FP2SH/ FP10SH) Note) For MEWNET-W system, available PLC type: FP2/FP2SH/FP3/FP10SH For MEWNET-P system, available PLC type: FP3/FP10SH 11-47...
- Page 316 KB. FP10SH) File register bank (current The current value of file register bank is DT90263 value) stored here. (Available PLC: FP2SH) Note) For MEWNET-W system, available PLC type: FP2/FP2SH/FP3/FP10SH For MEWNET-P system, available PLC type: FP3/FP10SH 11-48...
- Page 317 FP2/FP2SH/FP10SH/FP3 (A: Available, N/A: Not available) Address Read- Writ- FP2/ Name Descriptions FP2SH FP10SH File register bank (shelter The shelter number of the file register DT90264 number) bank is stored here. (Available PLC: FP2SH) Free compile Free capacity of compile memory is...
- Page 318 FP2/FP2SH/FP10SH/FP3 (A: Available, N/A: Not available) Address Read- Writ- FP2/ Name Descriptions FP2SH FP10SH The first error alarm relay number which went on is stored. The error has been reset by executing a RST instruction. Example 1: Using RST instruction...
- Page 319 FP2/FP2SH/FP10SH/FP3 (A: Available, N/A: Not available) Address Read- Writ- FP2/ Name Descriptions FP2SH FP10SH Eighth error alarm relay which went on DT90408 (Available PLC: FP2SH/ FP10SH) Ninth error alarm relay which went on DT90409 (Available PLC: FP2SH/ FP10SH) Tenth error...
- Page 320 FP2/FP2SH/FP10SH/FP3 (A: Available, N/A: Not available) Address Read- Writ- FP2/ Name Descriptions FP2SH FP10SH Fifteenth alarm relay which went on DT90415 (Available PLC: FP2SH/ FP10SH) Sixteenth error alarm relay which went on DT90416 (Available PLC: FP2SH/ FP10SH) Seventeenth The error alarm relay number which went error alarm on is stored.
- Page 321 FP2/FP2SH/FP10SH/FP3 (A: Available, N/A: Not available) Address Read- Writ- FP2/ Name Descriptions FP2SH FP10SH Time at which the first error alarm relay (DT90401) The time (minute and second) data at went on (for which the first error alarm relay in...
-
Page 322: Table Of Basic Instructions
ST, ST/, OT, AN, AN/, OR and OR/ instructions, the number of steps is shown in parentheses. Also, in the FP2/FP2SH/FP10SH, when a relay number has an index modifier, the number of steps is shown in parentheses. - Page 323 *6) In the FP2/FP2SH/FP10SH, when timer 256 or higher, or counter 255 or lower, is used, the number of steps is the number in parentheses. Also, in the FP2/FP2SH/FP10SH, when a timer number or counter number has an index modifier, the number of steps is the number in parentheses.
- Page 324 *2) In the FP2/FP2SH/FP10SH, when the number “n” in a jump instruction has an index modifier, the number of steps isthenumber in parentheses. *3) In the FP2/FP2SH/FP10SH, when the number “n” in a loop instruction has an index modifier, the number of steps is the number in parentheses.
- Page 325 : Available, : Not available, : Not available partially *1) Available for FP-e only. *2) In the FP2/FP2SH/FP10SH, when the number “n” of a subroutine program has an index modifier, the number of steps is the number in parentheses. 11-57...
- Page 326 Name Boolean Symbol Description Special setting instructions Communica- SYS1 Change the communication conditions tion condi- for the COM port or tool port based on tions setting the contents specified by the character constant. Password Change the password specified by the setting PLC based on the contents specified by the character constant.
- Page 327 Name Boolean Symbol Description Data compare instructions Begins a logic operation by comparing two 16- 16-bit bit data in the comparative condition “S1=S2”. data Begins a logic operation by comparing two 16- ST<> compare bit data in the comparative condition “S1<S2” (Start) or “S1>S2”.
- Page 328 Name Boolean Symbol Description Begins a logic operation by comparing two 32- 32-bit STD= bit data in the comparative condition “(S1+1, data S1)=(S2+1, S2)”. Begins a logic operation by comparing two 32- compare STD<> bit data in the comparative condition “(S1+1, (Start) S1)<(S2+1, S2)”...
- Page 329 Name Boolean Symbol Description Begins a logic operation by comparing two 32- Floating STF= bit data in the comparative condition “(S1+1, point S1)=(S2+1, S2)”. Begins a logic operation by comparing two 32- type real STF<> bit data in the comparative condition “(S1+1, number S1)<(S2+1, S2)”...
-
Page 330: Table Of High−Level Instructions
: Available, : Not available, : Not available partially *1) This instruction is available for FP2/FP2SH Ver. 1.5 or later.FP10SH cannot be used *2) This instruction is available for FP0 Ver. 2.0 or later and FP-e. 11-62... - Page 331 Ope- Num- Name Boo-lean Description rand 16-bit data D1, D2 (D1)→(D2), (D2)→(D1) exchange PXCH 32-bit data DXCH D1, D2 (D1+1, D1)→(D2+1, D2) exchange PDXCH (D2+1, D2)→(D1+1, D1) Higher/lower SWAP The higher byte and lower byte of “D” byte in 16-bit PSWAP are exchanged.
- Page 332 Num- Boo- Name Description Operand lean BCD arithmetic instructions 4-digit BCD S, D (D)+(S)→(D) data addition 8-digit BCD S, D (D+1, D)+(S+1, S)→(D+1, D) data addition PDB+ 4-digit BCD S1, S2, D (S1)+(S2)→(D) data addition 8-digit BCD S1, S2, D (S1+1, S1)+(S2+1, S2)→(D+1, D) data addition PDB+...
- Page 333 Ope- Num- Boo- Name Description lean rand 32-bit data DWIN S1, S2, (S1+1, S1)>(S3+1, S3)→R900A: on band PDWIN (S2+1, S2)< or=(S1+1, S1)< or=(S3+1, compare S3)→R900B: on (S1+1, S1)<(S2+1, S2)→R900C: on Block data BCMP S1, S2, Compares the two blocks beginning with compare PBCMP “S2”...
- Page 334 Ope- Num- Name Boolean Description rand ASCII code → ABIN S1, S2, Converts the ASCII code specified by 16-bit binary PABIN “S1” and “S2” to 16 bits of binary data data and stores it in “D”. → K-100 Example: H 30 30 31 2D 20 20 0 0 1 - 32-bit binary DBIA...
- Page 335 Ope- Num- Boo- Name Description lean rand 16-bit data distribute DIST S, n, Each of the digits of the data of “S” PDIST are stored in (distributed to) the least significant digits of the areas beginning at “D”. Character→ ASCII S, D Twelve characters of the character code...
- Page 336 Ope- Name Boolean Description -ber rand FIFO instructions F115 FIFO buffer define FIFT n, D The “n” words beginning from “D” are P115 PFIFT defined in the buffer. F116 Data read from FIFR S, D The oldest data beginning from “S” P116 FIFO buffer PFIFR...
- Page 337 Ope- Boo- Name Description -ber lean rand Basic function instruction F137 Auxiliary STMR S, D Turns on the specified output and R900D after 0.01 s × set value. timer (16-bit) Special instructions F138 Hours, min- HMSS S, D Converts the hour, minute and second P138 utes and sec- PHMSS...
- Page 338 : Not available partially *1) The instruction is available for FP0 T32 (V2.3 or later) and FP-e. *2) The instruction is available for FP2/FP2SH Ver. 1.5 or later, and the pulse execution type can be specified. FP10SH cannot be used.
- Page 339 Num- Boo- Name Description Operand lean F167 High-speed HC1R n, S, Yn Turns output Yn off when the counter output elapsed value of the built-in high- reset (with speed counter reaches the target channel value of (S+1, S). specification) F168 Positioning SPD1 S, n...
- Page 340 Num- Name Boolean Description Operand F174 Pulse output SP0H S, n Outputs the pulses from the (Selectable data specified channel according to table control operation ) data table specified by S. F175 Pulse output SPSH S, n Pulses are output from channel, (Linear in accordance with the interpolation)
- Page 341 Num- Boo- Name Description Operand lean High speed counter/Pulse output instruction for FPΣ/FP-X High-speed S, DT90052 Performs high-speed counter counter and and Pulse output controls Pulse output according to controls the control code specified by “S”. The control code is stored in DT90052.
- Page 342 *4) This instruction is available for FP10SH Ver. 3.10 or later. *5) This instruction is available for FPΣ 32k type. *6) This instruction is available for FP-X Ver. 1.13 or later. *7) This instruction is available for FP2/FP2SH Ver. 1.5 or later.FP10SH cannot be used. 11-74...
- Page 343 Ope- Num- Name Boolean Description rand F235 16-bit binary S, D Converts the 16-bit binary data of data → Gray P235 PGRY “S” to gray codes, and the code conversion converted result is stored in the “D”. F236 32-bit binary DGRY S, D Converts the 32-bit binary data of...
- Page 344 Ope- Num- Name Boolean Description rand Integer type data processing instructions F270 Maximum Searches the maximum value in the P270 value (word PMAX S2, D word data table between the “S1” and data (16-bit)) “S2”, and stores it in the “D”. The address relative to “S1”...
- Page 345 Num- Ope- Name Boolean Description rand F286 Upper and DLIMT S1, S2, When (S1+1, S1)>(S3+1, S3), (S1+1, P286 lower limit PDLIMT S3, D S1)→(D+1, D) control When (S2+1, S2)<(S3+1, S3), (S2+1, (32-bit data) S2)→(D+1, D) When (S1+1, S1)<or = (S3+1, S3)<or = (S2+1, S2), (S3+1, S3)→(D+1, D) F287 Deadband...
- Page 346 Ope- Num- Boo- Name Description lean rand F314 Floating-point type S, D SIN(S+1, S)→(D+1, D) P314 data sine operation PSIN F315 Floating-point type S, D COS(S+1, S)→(D+1, D) P315 data cosine PCOS operation F316 Floating-point type S, D TAN(S+1, S)→(D+1, D) P316 data tangent PTAN...
- Page 347 Ope- Num- Name Boolean Description rand F329 Floating-point S, D Converts real number data specified P329 type data to 16-bit PFIX by (S+1, S) to the 16-bit integer data integer con- with sign (rounding the first decimal version (rounding point down), and the converted data the first decimal is stored point down to...
- Page 348 : Not available partially *1) This instruction is available for FPΣ 32k type. *2) This instruction is available for FP-X Ver. 1.13 or later. *3) This instruction is available for FP2/FP2SH Ver. 1.5 or later. FP10SH cannot be used. 11-80...
- Page 349 Ope- Num- Name Boolean Description rand Time series processing instruction F355 PID processing PID processing is performed depending on the control value (mode and parameter) specified by (S to S+2) and (S+4 to S+10), and the result is stored in the (S+3).
-
Page 350: Table Of Error Codes
11.4 Table of Error codes Difference in ERROR display There are differences in the way errors are displayed depending on the model. Model Display Display method FP1,FP-M,FP2,FP3,FP10SH ERROR. Continually lit FPΣ,FP0, FP0R, FP-X ERROR/ALARM Flashes/continually lit FP-e Screen display ERR. - Page 351 -Self-diagnostic Error This error occurs when the control unit (CPU unit) self-diagnostic function detects the occurrence of an abnormality in the system. The self-diagnostic function monitors the memory abnormal detection, I/O abnormal detection, and other devices. When a self-diagnostic error occurs - The ERROR turns on or flashes.
-
Page 352: Table Of Syntax Check Error
11.4.1 Table of Syntax Check Error Opera- Error Name tion Description and steps to take code status A program with a syntax error has been written. Syntax ⇒ Change to PROG. mode and correct the Stops error error. Two or more OT(Out) instructions and KP(Keep) instructions are programmed using the same relay. - Page 353 Opera- Error Name tion Description and steps to take code status The program is too large to compile in the program memory. ⇒ Change to PROG. mode and reduce the Compile total number of steps for the program. memory Stops -FP10SH full error If memory expansion is possible, compilation...
-
Page 354: Table Of Self−Diagnostic Error
11.4.2 Table of Self-Diagnostic Error Opera- Error Name tion Description and steps to take code status Probably a hardware abnormality CPU error Stops ⇒Please contact your dealer. error1 error2 Probably an abnormality in the internal RAM. Stops ⇒Please contact your dealer. error3 error4 error5... - Page 355 Opera- Error Name tion Description and steps to take code status Configu- A parameter error was detected in the ration Stops MEWNET-W2 configuration area. Set a parameter correct parameter. error Interrupt Probably a hardware abnormality. Stops ⇒ Please contact your dealer. error 0 An interrupt occurred without an interrupt request .
- Page 356 Opera Error Name -tion Description and steps to take code status I/O mapping for remote I/O terminal MEWNET-F boards, remote I/O terminal units and I/O link slave I/O is not correct. terminal Stops ⇒Re-configure the I/O map for slave stations mapping according to the I/O points of the slave error...
- Page 357 Opera- Error Name tion Description and steps to take code status An abnormality in an intelligent unit. FPΣ, FP-X: Check the contents of special data register “DT90006” and locate the abnormal FP intelligent unit (application cassette for FP-X). FP2,FP2SH,and FP10SH: Check the contents of special data registers DT90006,DT90007 and locate the abnormal intelligent unit.
- Page 358 Opera- Error Name tion Description and steps to take code status Scan time required for program execution exceeds the setting of the system watching dog timer. System ⇒ Check the program and modify it so that watching Selec- the program can execute a scan within the specified time.
- Page 359 Opera- Error Name tion Description and steps to take code status S-LINK error Occurs only in FP0-SL1 When one of the S-LINK errors (ERR1, 3 or 4) has been detected, error code E46 (remote Selec- I/O (S-LINK) communication error) is stored. Selection of operation status using system table register27:...
- Page 360 Opera- Error Name tion Description and steps to take code status Terminal station setting was not properly MEWNET-F performed. terminal Conti- Check stations at both ends of the station nues communication path, and set them in the error terminal station using the dip switches. Set the INITIALIZE/TEST MEWNET-F selecto1inmjvbgycfrde892 r to the...
-
Page 361: Table Of Mewtocol−Com Communication Error
11.4.3 Table of MEWTOCOL-COM Communication Error Error Name Description code NACK error Link system error WACK error Link system error Unit No. overlap Link system error Transmission format Link system error error Link unit hardware Link system error error Unit No. setting error Link system error No support error Link system error... - Page 362 Error Name Description code An abnormality occurred when loading RAM to ROM/IC memory card. There may be a problem with the ROM or IC memory card. -When loading, the specified contents exceeded the capacity. External memory -Write error occurs. error -ROM or IC memory card is not installed.
-
Page 363: Mewtocol−Com Communication Commands
11.5 MEWTOCOL-COM Communication Commands Table of MEWTOCOL-COM commands Command name Code Description Reads the on and off status of contact. (RCS) - Specifies only one point. Read contact area - Specifies multiple contacts. (RCP) - Specifies a range in word units. (RCC) Turns contacts on and off. -
Page 364: Hexadecimal/Binary/Bcd
11.6 Hexadecimal/Binary/BCD BCD data Decimal Hexadecimal Binary data (Binary Coded Decimal) 0000 00000000 00000000 0000 0000 0000 0000 0001 00000000 00000001 0000 0000 0000 0001 0002 00000000 00000010 0000 0000 0000 0010 0003 00000000 00000011 0000 0000 0000 0011 0004 00000000 00000100 0000 0000 0000 0100 0005... -
Page 365: Ascii Codes
11.7 ASCII Codes 11-97... - Page 366 11-98...
- Page 367 FP2/FP2SH Index Index Connection of LED−equipped reed switch, 4 − 19 Alarm function, 4 − 36 Connection of sensors, 4 − 18 ALARM LED, 8 − 7 Connection of two−wire type sensor, 4 − 19 Alarm output, 4 − 37 Connector, 4 −...
- Page 368 FP2/FP2SH Index Installation location, 4 − 4 Interlock circuit, 4 − 36 Formatting, 7 − 6 Internal circuit diagram, 2 − 14, 2 − 33, Formatting the IC memory card, 7 − 8 2 − 35, 2 − 38, 2 − 39, 2 − 42, 2 − 44, 2 −...
- Page 369 FP2/FP2SH Index Pin layout, 2 − 14, 2 − 34, 2 − 36, 2 − 38, 16−point type transistor (NPN) output unit, 2 − 40, 2 − 42, 2 − 44, 2 − 46, 2 − 48, 2 − 43 2 −...
- Page 370 FP2/FP2SH Index 32−point type transistor (NPN) output unit, 2 − 47 Troubleshooting, 8 − 5 2−module type, 1 − 4 Watchdog timer, 4 − 37 Weight, 10 − 4 Wiring the connector type units, 4 − 23 Wiring the terminal block type units, 4 −...
-
Page 371: Record Of Changes
FP2/FP2SH Record of changes Record of changes Manual No. Date Description of Changes ARCT1F320E/ JUL. 2000 First editions ACG-M320E ARCT1F320E−1/ JUL. 2003 2nd editions ACG-M320E−1 ARCT1F320E−2/ May. 2004 3rd editions ACG-M320E−2 ARCT1F320E−3/ Feb. 2005 4th editions ACG-M320E−3 ARCT1F320E−4/ SEPT. 2006 5th editions ACG-M320E−4... - Page 372 Record of changes FP2/FP2SH R − 2...
Need help?
Do you have a question about the fp2/fp2sh and is the answer not in the manual?
Questions and answers