Table of Contents
Advertisement
Instructions for Use
Air-Shields Resuscitaire
WARNING
To properly use this medical device, the user must
obtain a full understanding of the performance
characteristics of this medical device prior to use
by carefully reading these Instructions for Use.
Radiant Warmer Products
Models WBR82, RW82, and WMRW82
International Version
Advertisement
Table of Contents

Subscribe to Our Youtube Channel
Related Manuals for Dräger WBR82


Summary of Contents for Dräger WBR82
- Page 1 Air-Shields Resuscitaire Radiant Warmer Products WARNING To properly use this medical device, the user must Models WBR82, RW82, and WMRW82 obtain a full understanding of the performance International Version characteristics of this medical device prior to use by carefully reading these Instructions for Use.
- Page 2 This page intentionally left blank.
- Page 3 Trademarks AutoBreath™ is a trademark of Draeger Medical Systems, Inc. Care-For-Me™ is a trademark of Draeger Medical Systems, Inc. Critter Covers® is a registered trademark of Draeger Medical Systems, Inc. Nylok® is a registered trademark of Nylok Fastener Corporation. Resuscitaire® is a registered trademark of Draeger Medical Systems, Inc. VentStar™...
- Page 4 This page intentionally left blank.
-
Page 5: Table Of Contents
Blender Differential Bypass (Optional) ........2-10 Features of the Resuscitaire Birthing Room Warmer (WBR82) ......2-11 Features of the Resuscitaire Radiant Warmer (RW82). - Page 6 Installation ..............4-1 Assembly of the Resuscitaire Birthing Room Warmer (WBR82) ......4-2 Warmer .
- Page 7 (WBR82) shown) ........
- Page 8 PROPRIETARY AND CONFIDENTIAL DRAFT 5 Feb 04 Storage and Handling ............6-10 Storage .
-
Page 9: Section 1: Symbol Definition And Intended Use
PROPRIETARY AND CONFIDENTIAL DRAFT 5 Feb 04 Section 1 Symbol Definition and Intended Use Symbol Definition This manual contains different typefaces and icons designed to improve readability and increase understanding of its content. Note the following examples: • Standard text—used for regular information. •... - Page 10 PROPRIETARY AND CONFIDENTIAL DRAFT 5 Feb 04 • The symbol below indicates a disposable suction bottle: Disposable Suction Bottle • The symbol below indicates a reusable suction bottle with suction line filter: Reusable Suction Bottle • The symbol below indicates a patient: Patient •...
- Page 11 PROPRIETARY AND CONFIDENTIAL DRAFT 5 Feb 04 • The symbol below indicates the Apgar Timer keys: Apgar Timer Keys • The symbol below indicates the Procedural Silence indicator: Procedural Silence Indicator • The symbol below indicates the Silence/Reset key: Silence/Reset Key •...
-
Page 12: Dictionary Of Common Terms
PROPRIETARY AND CONFIDENTIAL DRAFT 5 Feb 04 Dictionary of Common Terms This manual contains some terms that could be confused or can be used interchangeably. This section is designed to increase understanding of its content. Note the following examples: Alarm: may require user intervention, usually includes an audible beep or series of beeps Alert: system information update, may consist of a text message on the display or an audible beep AAP: American Academy of Pediatrics Absolute humidity: pressure exerted by water pressure in the air, measured in mmHG (millimeters of... - Page 13 PROPRIETARY AND CONFIDENTIAL DRAFT 5 Feb 04 Manual Mode: warmer temperature control mode where users determine the heater output to the infant manually Non-shivering Thermogenesis: Premature infants do not shiver. Term infants do, however, have rich mitochondrial areas in brown adipose tissue called "brown fat" which creates heat for the infant metabolically when required.
-
Page 14: Intended Use
Service manuals are available from technical support. The Resuscitaire Birthing Room Warmer (WBR82) is designed especially for labor and delivery use. It consists of a detachable cart and bassinet and a freestanding warmer that provides heat control and monitors skin temperature and includes an Apgar timer. -
Page 15: Section 2: Introduction, Features, And Specifications
Specifications Introduction There are three versions of the Resuscitaire Radiant Warmer product: the Resuscitaire Birthing Room Warmer (WBR82), the Resuscitaire Radiant Warmer (RW82), and the Resuscitaire Wall Mounted Radiant Warmer (WMRW82). Warmer Module A controller provides Pre-Warm Mode, Manual Mode, or Baby Mode (servo skin temperature control) to control the warmer. -
Page 16: Blender Module (Optional)
PROPRIETARY AND CONFIDENTIAL DRAFT 5 Feb 04 the alarm for 10 minutes, verify the infant’s temperature, and press the Silence/Reset key. Failure to acknowledge the Check Patient alarm by pressing the Silence/Reset key within the next 5 min causes the heater to shut down, and an alarm occurs. When operated in Baby Mode, the controller uses a skin temperature probe, connected between the controller input and the infant, to automatically adjust the heater output of the warmer module to maintain a selected set temperature. -
Page 17: Resuscitation Module Without Autobreath™ Infant Resuscitator
PROPRIETARY AND CONFIDENTIAL DRAFT 5 Feb 04 Resuscitation Module without Autobreath™ Infant Resuscitator • Patient Outlet (Resuscitation Module only)—Use the Patient Outlet to provide continuous gas flow to the patient. Controls are provided for Airway Pressure Relief (maximum pressure) and Flow Rate (circuit flow delivering 100% oxygen or blended gas). - Page 18 PROPRIETARY AND CONFIDENTIAL DRAFT 5 Feb 04 WARNING: The internal adjustable airway pressure relief is not functional with a self-inflating bag because the patient supply is connected to the fresh gas reservoir on the self-inflating bag rather than directly to the patient airway. When using a self-inflating bag, always use a suitable external airway pressure relief valve connected to the patient airway.
-
Page 19: Resuscitation Module With Autobreath™ Infant Resuscitator
PROPRIETARY AND CONFIDENTIAL DRAFT 5 Feb 04 Resuscitation Module with AutoBreath™ Infant Resuscitator WARNING: Always use an airway pressure monitor if the AutoBreath™ Infant Resuscitator is to be used unattended. Failure to do so could result in patient injury. • AutoBreath™ Infant Resuscitator—Use the AutoBreath™... - Page 20 PROPRIETARY AND CONFIDENTIAL DRAFT 5 Feb 04 WARNING: The internal adjustable airway pressure relief is not functional with a self-inflating bag because the patient supply is connected to the fresh gas reservoir on the self-inflating bag rather than directly to the patient airway. When using a self-inflating bag, always use a suitable external airway pressure relief valve connected to the patient airway.
-
Page 21: Suction
PROPRIETARY AND CONFIDENTIAL DRAFT 5 Feb 04 Suction A gas-powered, venturi-generated vacuum drives the suction circuit, which provides a negative pressure for suctioning the patient’s airway. This suction device is specifically intended for removal of mucus from neonates post delivery. The suction negative pressure is indicated on the suction gauge. -
Page 22: Suction Line Filter
PROPRIETARY AND CONFIDENTIAL DRAFT 5 Feb 04 Suction Line Filter The Suction Line Filter is a hydrophobic bacterial filter with extension tubing. It is connected in line with the supply connection to the suction bottle. The extension tubing connects to the suction bottle outlet port. Gas Supply Module (Optional) The gas supply module includes an On/Off switch that controls the pipeline and cylinder gas supply to the... -
Page 23: Alarms
PROPRIETARY AND CONFIDENTIAL DRAFT 5 Feb 04 Alarms All alarm indicators are displayed in the upper right corner of the controller panel and illuminate when activated. High Temperature When the skin temperature probe is attached to the infant and the skin temperature exceeds 39°C (102°F), the heater automatically turns off, the High Temp indicator flashes, and the alarm sounds continuously. -
Page 24: Blender Differential Bypass (Optional)
PROPRIETARY AND CONFIDENTIAL DRAFT 5 Feb 04 Blender Differential Bypass (Optional) The factory-installed, optional, blender module alarms whenever the pressure differential between the oxygen and air supplies exceed 207 kPa (30 psi) ± 14 kPa (2 psi). When this condition occurs, the blender continues to supply whichever gas has the higher pressure: either 100% air or 100% oxygen. -
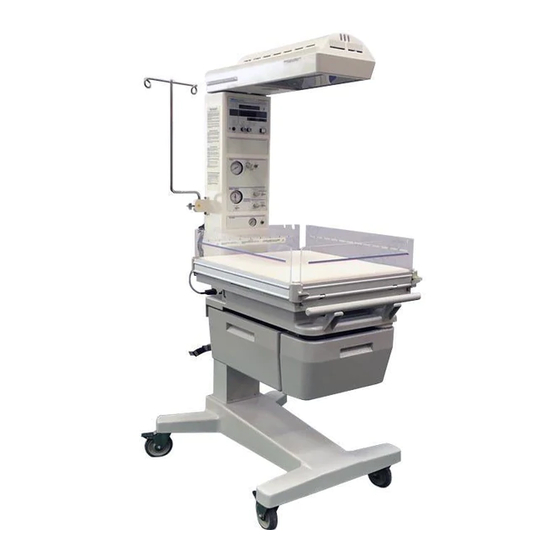
Page 25: Features Of The Resuscitaire Birthing Room Warmer (Wbr82)
PROPRIETARY AND CONFIDENTIAL DRAFT 5 Feb 04 Features of the Resuscitaire Birthing Room Warmer (WBR82) NOTE: Suction bottle not shown. It is located on the lower right side of the warmer column. 2 - 11... -
Page 26: Features Of The Resuscitaire Radiant Warmer (Rw82)
PROPRIETARY AND CONFIDENTIAL DRAFT 5 Feb 04 Features of the Resuscitaire Radiant Warmer (RW82) 2 - 12... -
Page 27: Features Of The Resuscitaire Wall Mounted Radiant Warmer (Wmrw82)
Features of the Resuscitaire Wall Mounted Radiant Warmer (WMRW82) Standard Features Bassinet (Resuscitaire Birthing Room Warmer (WBR82) and Resuscitaire Radiant Warmer (RW82) only) The bassinet provides maximum visibility and access to the infant. The bassinet tilts up in the rear to 5°... -
Page 28: Optional Features (Resuscitaire Birthing Room Warmer (Wbr82) And Resuscitaire Radiant Warmer (Rw82) Only)
PROPRIETARY AND CONFIDENTIAL DRAFT 5 Feb 04 Optional Features (Resuscitaire Birthing Room Warmer (WBR82) and Resuscitaire Radiant Warmer (RW82) only) The following factory-installed options are available: Resuscitation module which contains connections for suction, patient or primary gas delivery (blended air/oxygen or oxygen), auxiliary oxygen delivery, and airway pressure gauge. Two variations of resuscitation modules exist: Resuscitation Module without Autobreath™... - Page 29 PROPRIETARY AND CONFIDENTIAL DRAFT 5 Feb 04 Description Optional instrument trays available for either side of the bed Monitor shelf assembly, birthing room warmer Insert, Drawer Basket assembly Rod, moounting, basket 2 - 15...
-
Page 30: Specifications
Heater Element Life Expectancy 1000 hours of operation DATA PORT 2400 bits/s fixed baud rate, RS-232C compatible MATTRESS TILT (WBR82 and RW82 only) 0, 5, and 10 degrees BASSINET TILT- Vari-tilt (if so equipped) ± 10 degrees from horizontal (WBR82 and RW82 only) - Page 31 PROPRIETARY AND CONFIDENTIAL DRAFT 5 Feb 04 Feature Dimension Width (Side-to-Side) (WBR82) 71.1 cm (28") Width (Side-to-Side) (RW82) 74.9 cm (29.5") Depth (Front-to-Back) (WBR82) (with cart) 121.9 cm (48") Depth (Front-to-Back) (RW82) 114.3 cm (45") Weight w/Warmer and Cart (WBR82) 145.1 kg (320 lbs.) Weight (RW82) 90.7 - 117.9 kg (220 - 260 lbs.)
-
Page 32: Optional Features (Resuscitaire Birthing Room Warmer (Wbr82) And Resuscitaire
PROPRIETARY AND CONFIDENTIAL DRAFT 5 Feb 04 Optional Features (Resuscitaire Birthing Room Warmer (WBR82) and Resuscitaire Radiant Warmer (RW82) only) Feature Dimension Wall Supply Pressure 40 psi (276 kPa) to 75 psi (517 kPa) Cylinder Pressure 3000 psi (20684 kPa) maximum Cylinder Length (with VHA) 70 cm (27.5") - Page 33 PROPRIETARY AND CONFIDENTIAL DRAFT 5 Feb 04 Feature Dimension Auxiliary Supply Pressure Limit (81 400 80T/ 40 cm H O (3.9 kPa) ± 10% maximum MU11373) Auxiliary Flow Circuit Flow Range 0 LPM to 15 LPM Auxiliary Flow Circuit Pressure 40 cm H O (3.9 kPa) ±...
-
Page 34: Accessories (Wbr82 And Rw82 Only)
PROPRIETARY AND CONFIDENTIAL DRAFT 5 Feb 04 Accessories (WBR82 and RW82 only) Feature Dimension Infusion pump/IV pole weight capacity 2.2 kg (4.5 lb) maximum Monitor shelf weight limit capacity 4.5 kg (10 lb) maximum Monitor shelf dimensions 35.6 cm (14.0") x 30.5 cm (12.0") Xray cassette tray weight limit capacity 2.2 kg (4.5 lb) maximum... -
Page 35: Regulations, Standards, And Codes
• Directive 2002/96/EC of the European Parliament and of the Council of 2003-01-27 on Waste Electrical and Electronic Equipment (WEEE) Annex IV, prEN 50419 The Resuscitaire Birthing Room Warmer (WBR82) and the Resuscitaire Radiant Warmer (RW82) meet the following regulations, standards, and codes: •... -
Page 36: Electromagnetic Compatibility (Emc) Guidance And Manufacturer's Declarations
PROPRIETARY AND CONFIDENTIAL DRAFT 5 Feb 04 Electromagnetic Compatibility (EMC) Guidance and Manufacturer’s Declarations Guidance and Manufacturer’s Declaration—Electromagnetic Emissions The Air-Shields Resuscitaire Radiant Warmers are intended for use in the electromagnetic environment specified below. The customer or user of the unit should ensure that the unit is used in such an environ- ment. - Page 37 PROPRIETARY AND CONFIDENTIAL DRAFT 5 Feb 04 Guidance and Manufacturer’s Declaration—Electromagnetic Immunity Resuscitaire Radiant Warmers are intended for use in the electromagnetic environment specified Air-Shields below. The customer or user of the unit should ensure that the unit is used in such an environment. IEC 60601 Test Electromagnetic Environment—...
- Page 38 PROPRIETARY AND CONFIDENTIAL DRAFT 5 Feb 04 Guidance and Manufacturer’s Declaration—Electromagnetic Immunity Resuscitaire Radiant Warmers The Air-Shields are intended for use in the electromagnetic environment specified below. The customer or user of the unit should ensure that the unit is used in such an environment. Immunity IEC 60601 Compliance...
- Page 39 PROPRIETARY AND CONFIDENTIAL DRAFT 5 Feb 04 Recommended Separation Distances Between Portable and Mobile RF Communications Equipment and the Air-Shields Resuscitaire Radiant Warmers Resuscitaire Radiant Warmers are intended for use in the electromagnetic environment in which Air-Shields radiated RF disturbances are controlled. The customer or user of the unit can help prevent electromagnetic inter- ference (EMI) by maintaining a minimum distance between portable and mobile RF communications equipment (transmitters) and the unit as recommended, according to the maximum output power of the communications equipment.
- Page 40 PROPRIETARY AND CONFIDENTIAL DRAFT 5 Feb 04 This page intentionally left blank. 2 - 26...
-
Page 41: Section 3: Precautions And Safety Tips
PROPRIETARY AND CONFIDENTIAL DRAFT 8 Jan 04 Section 3 Precautions and Safety Tips Precautions Federal law restricts the sale of this device to or on the order of a physician. Latex may cause an allergic reaction in some patients and caregivers. This product contains no latex components. - Page 42 PROPRIETARY AND CONFIDENTIAL DRAFT 8 Jan 04 WARNING: For effective heating, ensure that the warmer module is centered above the patient. Failure to do so could result in personal injury. WARNING: Check the infant’s condition at least every 15 min for correct sensor attachment and for signs of overheating.
- Page 43 PROPRIETARY AND CONFIDENTIAL DRAFT 8 Jan 04 WARNING: Air currents across the bassinet area may affect patient thermal balance. Avoid placing the warmer near heating or air conditioning ducts that may blow air across the bassinet. Infant injury could occur. WARNING: Radiant warming increases insensible water loss.
-
Page 44: Electrical Precautions
PROPRIETARY AND CONFIDENTIAL DRAFT 8 Jan 04 WARNING: When raising or lowering the upper post of the variable height warmer, ensure that any attached cables, tubing, or hoses are not compromised. Failure to do so could result in injury to the infant, personal injury or in equipment damage. - Page 45 PROPRIETARY AND CONFIDENTIAL DRAFT 8 Jan 04 WARNING: Compressed gas cylinders, such as oxygen cylinders, can become hazardous projectiles if the gas is released rapidly. Securely fasten cylinders. Failure to do so could result in personal injury and/or equipment damage. WARNING: There are potential hazards associated with the delivery of supplemental oxygen.
-
Page 46: Low-Flow Microblender Precautions
PROPRIETARY AND CONFIDENTIAL DRAFT 8 Jan 04 WARNING: When new or replacement oxygen cylinders are to be installed, clear their outlet ports by cracking the cylinder valve momentarily before attaching them to the equipment. Failure to do so could result in personal injury or equipment damage. WARNING: Cylinder heights may vary. -
Page 47: Resuscitation Precautions
PROPRIETARY AND CONFIDENTIAL DRAFT 8 Jan 04 WARNING: If the blender option is included, confirm that the oxygen/air blender control of the blended gas supply module is correctly set prior to use. Failure to do so could result in infant injury. WARNING: Should any of the control knobs on the resuscitation module or the blender come loose for any reason, do not attempt to refasten them. - Page 48 PROPRIETARY AND CONFIDENTIAL DRAFT 8 Jan 04 WARNING: When using the Resuscitation Module Patient Outlet, use the manufacturer’s patient circuit provided. Failure to do so could result in infant injury. WARNING: When using the Patient Outlet, use the 10 mm tubing offered by the manufacturer, or use infant resuscitation bags with built-in pressure relief during infant resuscitation.
-
Page 49: Autobreath™ Infant Resuscitator Precautions
PROPRIETARY AND CONFIDENTIAL DRAFT 8 Jan 04 WARNING: In the event of a gas failure, the patient may only get room air from the two-way relief valve on the Patient Supply Resuscitation Module. Breathing room air through the two-way relief valve requires extra effort. - Page 50 PROPRIETARY AND CONFIDENTIAL DRAFT 8 Jan 04 WARNING: Do not super-saturate the gas going to the patient. Super-saturation appears as excessive condensation in the tubing, while some condensation droplets on the inner walls of the tubing are normal. Failure to do so could result in patient injury. WARNING: Periodically measure blood gases to ensure proper levels of ventilation.
-
Page 51: Suction Precautions
PROPRIETARY AND CONFIDENTIAL DRAFT 8 Jan 04 WARNING: Ensure that flow resistance does not exceed 6 cm H O at 5 LPM when adding attachments, components, or subassemblies to the breathing system. Failure to do so could cause infant injury. WARNING: When the AutoBreath™... -
Page 52: Electromagnetic Compatibility Precautions
PROPRIETARY AND CONFIDENTIAL DRAFT 8 Jan 04 Electromagnetic Compatibility Precautions General information on electromagnetic compatibility (EMC) according to the international EMC standard IEC 60601-1-2: 2001 Pins of connectors identified with the ESD warning symbol shall not be touched and not be connected unless ESD precautionary procedures are used. -
Page 53: Safety Tips
PROPRIETARY AND CONFIDENTIAL DRAFT 8 Jan 04 Safety Tips WARNING: To prevent injury or damage to the warmer, employ two persons of sufficient strength to adequately control the warmer during transport. Use the handle when moving the equipment. Failure to do so could result in personal injury. WARNING: Use two persons of sufficient strength to lift the upper post. - Page 54 PROPRIETARY AND CONFIDENTIAL DRAFT 8 Jan 04 WARNING: When transporting the infant in the cart and bassinet, place the mattress in the horizontal position. Failure to do so could result in infant injury. WARNING: For patient safety and effective heating, properly dock and latch the cart to ensure correct bassinet positioning.
- Page 55 PROPRIETARY AND CONFIDENTIAL DRAFT 8 Jan 04 CAUTION: To keep the suction tube from being blocked or damaged when installing a disposable suction bottle, position the outlet port parallel to the plate. Make sure the tubing is not kinked. CAUTION: When using AC power, secure the line cord to the back cover to prevent it being removed from the controller chassis.
-
Page 56: Warning Labels
PROPRIETARY AND CONFIDENTIAL DRAFT 8 Jan 04 Warning Labels 3 - 16... - Page 57 PROPRIETARY AND CONFIDENTIAL DRAFT 8 Jan 04 3 - 17...
- Page 58 PROPRIETARY AND CONFIDENTIAL DRAFT 8 Jan 04 3 - 18...
- Page 59 PROPRIETARY AND CONFIDENTIAL DRAFT 8 Jan 04 3 - 19...
- Page 60 PROPRIETARY AND CONFIDENTIAL DRAFT 8 Jan 04 This page intentionally left blank. 3 - 20...
-
Page 61: Section 4: Installation And Assembly
PROPRIETARY AND CONFIDENTIAL DRAFT 5 Feb 04 Section 4 Installation and Assembly Installation The Resuscitaire Birthing Room Warmer (WBR82) is shipped in two cartons. One carton contains the cart and bassinet. The other carton contains the following assemblies: • Upper post assembly • Lower post assembly •... -
Page 62: Assembly Of The Resuscitaire Birthing Room Warmer (Wbr82)
PROPRIETARY AND CONFIDENTIAL DRAFT 5 Feb 04 Assembly of the Resuscitaire Birthing Room Warmer (WBR82) CAUTION: When removing the equipment from the carton, use care not to scratch or otherwise damage unprotected surfaces. Warmer 1. If a monitor shelf is to be installed on the unit, install the weights provided with the monitor shelf in the bottom of the lower post. - Page 63 PROPRIETARY AND CONFIDENTIAL DRAFT 5 Feb 04 10. Install and turn, but do not tighten, the two #10-32 x 3/8" Nylok screws three or four revolutions only in the upper holes on the inside of the upper post. 11. Slowly lower the warmer onto the upper post, and align the slots of the warmer under the two #10-32 x 3/8"...
- Page 64 PROPRIETARY AND CONFIDENTIAL DRAFT 5 Feb 04 17. Mount the controller on the upper post. 18. Install the two #8-32 x ¾" screws that secure the controller to the head support plate. 19. Remove and discard the two #10-32 x 3/8" Nylok screws.
-
Page 65: Cart And Bassinet
PROPRIETARY AND CONFIDENTIAL DRAFT 5 Feb 04 Cart and Bassinet 1. Install the rear and side panels on the bassinet. 2. Raise the front panel from its storage slot, and lock it in place. 3. Engage the cart and bassinet to the warmer: a. -
Page 66: Assembly Of The Resuscitaire Radiant Warmer (Rw82)
PROPRIETARY AND CONFIDENTIAL DRAFT 5 Feb 04 Assembly of the Resuscitaire Radiant Warmer (RW82) NOTE: The required mounting hardware is stored in a bag in the pass-through drawer. Warmer 1. Remove the two #8-32 x ¾" screws that secure the controller to the head support plate. - Page 67 PROPRIETARY AND CONFIDENTIAL DRAFT 5 Feb 04 10. Install and turn, but do not tighten, the two #10-32 x 3/8" Nylok screws three or four revolutions only in the upper holes on the inside of the upper post. 11. Slowly lower the warmer onto the upper post, and align the slots of the warmer under the two #10-32 x 3/8"...
- Page 68 PROPRIETARY AND CONFIDENTIAL DRAFT 5 Feb 04 17. Mount the controller on the upper post. 18. Re-install the two #8-32 x ¾" screws that secure the controller to the head support plate. 19. Remove and discard the two #10-32 x 3/8" Nylok screws.
- Page 69 PROPRIETARY AND CONFIDENTIAL DRAFT 5 Feb 04 a. Connect the line cord to the power connector on the rear of the bassinet/cart assembly. b. Connect the 102 cm (40”) power cord provided between the connector on the front of the bassinet/cart assembly and the power connector on the controller.
-
Page 70: Assembly Of The Resuscitaire Wall Mounted Radiant Warmer (Wmrw82)
PROPRIETARY AND CONFIDENTIAL DRAFT 5 Feb 04 Assembly of the Resuscitaire Wall Mounted Radiant Warmer (WMRW82) WARNING: The wall mount bracket installation must be appropriately certified that it meets or exceeds the pull-out force prior to mounting the Resuscitaire Wall Mounted Radiant Warmer. Failure to do so can result in an unsafe installation that could cause equipment damage or personal or patient injury. - Page 71 PROPRIETARY AND CONFIDENTIAL DRAFT 5 Feb 04 NOTE: Ensure the thick end of the wall mount plate is facing the top of the modified post. 4. Install two #10-32 x 3/8” screws in the upper holes of the modified post. NOTE: Do not tighten the screws.
-
Page 72: Mounting Of The Resuscitaire Wall Mounted Radiant Warmer (Wmrw82)
PROPRIETARY AND CONFIDENTIAL DRAFT 5 Feb 04 Mounting of the Resuscitaire Wall Mounted Radiant Warmer (WMRW82) WARNING: The wall mount bracket installation must be appropriately certified that it meets or exceeds the pull-out force prior to mounting the Resuscitaire Wall Mounted Radiant Warmer. Failure to do so can result in an unsafe installation that could cause equipment damage or personal or patient injury. - Page 73 PROPRIETARY AND CONFIDENTIAL DRAFT 5 Feb 04 2. Install the wall bracket mounting bolts in the wall leaving 1/2" of the mounting bolts exposed. NOTE: The recommended wall bracket mounting bolts are 5/16" diameter. Four bolts are required, but are not supplied with the equipment.
-
Page 74: Operational Checkout Procedure
PROPRIETARY AND CONFIDENTIAL DRAFT 5 Feb 04 Operational Checkout Procedure Perform the operational checkout procedure before each use and after disassembly for cleaning, servicing, or maintenance. If the unit does not perform properly, do not use it and refer it to qualified service personnel. - Page 75 PROPRIETARY AND CONFIDENTIAL DRAFT 5 Feb 04 c. The Heater Power indicator reduces to six segments (60%) for 12 min. d. The Heater Power indicator reduces to three segments (30%). 6. Check Manual Mode: a. Select Manual Mode by pressing the Mode Select key. The Manual indicator lights. b.
-
Page 76: Mechanical Operation
PROPRIETARY AND CONFIDENTIAL DRAFT 5 Feb 04 10. Check the Probe alarm: a. Disconnect the skin temperature probe from the skin temperature probe connector. The Baby Temperature display goes off, the Probe indicator flashes, and the alarm sounds. b. Connect the skin temperature probe to the skin temperature probe connector. 11. - Page 77 PROPRIETARY AND CONFIDENTIAL DRAFT 5 Feb 04 2. Check the Vari-tilt control: a. Rotate the Vari-tilt knob in the front of the bassinet clockwise through the entire range from 0° to 10°. b. Rotate the Vari-tilt knob in the front of the bassinet counter-clockwise through the entire range from 0°...
- Page 78 PROPRIETARY AND CONFIDENTIAL DRAFT 5 Feb 04 5. Check the pass-through drawer (Resuscitaire Birthing Room Warmer shown): a. Slide the pass-through drawer in and out on both sides of the cart and bassinet. b. Return the pass-through drawer to its center position. 6.
-
Page 79: Resuscitation Equipment (Optional)
PROPRIETARY AND CONFIDENTIAL DRAFT 5 Feb 04 8. Check the writing surface (Resuscitaire Birthing Room Warmer only): a. Pull the writing surface out from under the bassinet. b. Return the writing surface to under the bassinet. 9. Check the cart and bassinet docking mechanism and caster locks (Resuscitaire Birthing Room Warmer only). - Page 80 PROPRIETARY AND CONFIDENTIAL DRAFT 5 Feb 04 c. Examine the appropriate cylinder pressure gauges on the front of the Gas Supply Module to ensure that sufficient reserve gas supply is present. d. Set the handle of the Gas Supply On/Off switch to the On position. NOTE: When both wall and tank gas sources are turned on, the system may not always pull gas from the wall source.
- Page 81 PROPRIETARY AND CONFIDENTIAL DRAFT 5 Feb 04 2. With a reusable suction bottle, ensure that a bacterial filter is connected in-line with the supply connection. 3. Connect the desired extension tubing to the outlet of the suction bottle outlet port, and secure the free end of the extension tubing in either tubing retaining slot provided on the front and rear panels of the bassinet.
-
Page 82: Resuscitation Module (Optional)
PROPRIETARY AND CONFIDENTIAL DRAFT 5 Feb 04 Resuscitation Module (Optional) WARNING: For prolonged ventilation, use a heat and moisture exchanger or heated humidification. Failure to do so could result in personal injury. Patient Supply with the 15 mm Outlet For manual resuscitation, use the 15 mm Patient Supply Circuit, or Infant Breathing Circuit (10 mm tubing with a thumb or finger hole at the patient’s end). - Page 83 PROPRIETARY AND CONFIDENTIAL DRAFT 5 Feb 04 a. Set the Airway Pressure Relief control to the desired pressure limit according to the color-coded bands on the Airway Pressure gauge and Airway Pressure Relief control. b. Insert a “T” fitting with an airway pressure monitor into the Patient Outlet port, and connect it to the Airway Pressure port to indicate the breathing circuit pressure.
-
Page 84: Resuscitation Module With Autobreath™ Infant Resuscitator (Optional)
PROPRIETARY AND CONFIDENTIAL DRAFT 5 Feb 04 Resuscitation Module with AutoBreath™ Infant Resuscitator (Optional) WARNING: Always monitor the airway pressure, and set appropriate pressure relief during infant resuscitation. Failure to do so could result in infant injury. Automatic Patient Circuit with 15 mm Outlet For automatic resuscitation, use the Automatic Patient Circuit, (10 mm tubing with exhalation valve and exhalation valve control line tubing). -
Page 85: Blended Gas Supply (Optional)
PROPRIETARY AND CONFIDENTIAL DRAFT 5 Feb 04 13. To check the Inspiratory:Expiratory (I:E) ratio, measure the inspiratory and expiratory phase times, and divide the expiratory phase time by the inspiratory phase time. The result should be approximately 2.0. 14. To check the desired breath rate, count the number of breath cycles per minute. 15. - Page 86 PROPRIETARY AND CONFIDENTIAL DRAFT 5 Feb 04 This page intentionally left blank. 4 - 26...
-
Page 87: Section 5: Instructions For Use
PROPRIETARY AND CONFIDENTIAL DRAFT 5 Feb 04 Section 5 Instructions for Use Instructions for Use Controls, Indicators, and Connectors (Resuscitaire Birthing Room Warmer (WBR82) shown) Controller Front Panel Controls, Indicators, and Connectors Name Description Power key Press to turn the controller and the warmer module on or off. - Page 88 PROPRIETARY AND CONFIDENTIAL DRAFT 5 Feb 04 Name Description Baby Temperature display Digital display of the infant’s temperature in °C or °F, whether in Manual or Baby Mode. If the skin temperature probe is discon- nected from the controller, the display is blank in Manual and Baby Mode.
- Page 89 PROPRIETARY AND CONFIDENTIAL DRAFT 5 Feb 04 Name Description Apgar Timer display When the Apgar Timer is running, the Apgar Timer display shows the elapsed minutes and seconds, and the alert sounds at a 1, 5, and 10 min Apgar time intervals. Baby Temp alarm indicator Flashes with a three-level audible alarm to indicate that the baby’s (located in the upper right section...
- Page 90 PROPRIETARY AND CONFIDENTIAL DRAFT 5 Feb 04 Name Description Procedural Silence indicator Indicates that the unit is in procedural silence. The procedural silence interval is 5 min. During procedural silence, the low Baby Temp alarms are blocked. Silence/Reset key Has 3 functions: silences alarms, resets Manual Mode, and sets procedural silence.
- Page 91 PROPRIETARY AND CONFIDENTIAL DRAFT 5 Feb 04 Controller Rear Panel Controls and Connectors Name Description Circuit breaker Turns the controller on and off when switched by the operator or when excessive system current exists. Power Accepts the AC power cord. Auxiliary port Data port for connection to a printer or host computer system.
- Page 92 PROPRIETARY AND CONFIDENTIAL DRAFT 5 Feb 04 Controls and Power Connections for the VHA Model Name Description Circuit breaker Turns the actuator off when the presence of excessive current is detected. Press to reset the actuator. Power outlet Accepts the 102 cm (40") AC power cord which connects the lower post to the controller.
- Page 93 PROPRIETARY AND CONFIDENTIAL DRAFT 5 Feb 04 Blended Gas Supply Control Name Description Blender % Oxygen control Blends the air and oxygen mixture from 21% to 100% oxygen to the primary patient outlet. NOTE: The Blender Module option changes the Resuscitation Module to add the air pipeline, the tank connections, and also adds an air gauge to the Gas Supply Module.
- Page 94 PROPRIETARY AND CONFIDENTIAL DRAFT 5 Feb 04 Resuscitation Module Controls, Indicators, and Connectors 5 - 8...
- Page 95 PROPRIETARY AND CONFIDENTIAL DRAFT 5 Feb 04 Name Description Suction gauge Displays the suction level from 0 mm Hg (0"H O) to 200 mm Hg (107"H O) of vacuum. Suction control Adjusts the suction level from 0 mm Hg (0"H O) to 150 mm Hg (80"H Suction On/Off switch...
- Page 96 PROPRIETARY AND CONFIDENTIAL DRAFT 5 Feb 04 Resuscitation Module with AutoBreath™ Infant Resuscitator Controls, Indicators, and Connectors 5 - 10...
- Page 97 PROPRIETARY AND CONFIDENTIAL DRAFT 5 Feb 04 Name Description Suction gauge Displays the suction level from 0 mm Hg (0"H O/mbar) to 200 mm Hg (107"H O/mbar) of vacuum. Suction control Adjusts the suction level from 0 mm Hg (0"H O/mbar) to 150 mm Hg (80"H O/mbar).
-
Page 98: Resuscitation Module
PROPRIETARY AND CONFIDENTIAL DRAFT 5 Feb 04 Resuscitation Module 1. To use the Suction feature, turn it on using the On/Off switch. NOTE: The gas supply must be turned on. 2. To adjust suction from 0 kPa to -19.99 kPa,, use the Suction control knob. -
Page 99: Controller
PROPRIETARY AND CONFIDENTIAL DRAFT 5 Feb 04 Controller SHOCK HAZARD: Plug the power cord only into a properly grounded wall receptacle that is approved for hospital use and of the correct voltage. Do not use extension cords or an AC receptacle box for this device. - Page 100 PROPRIETARY AND CONFIDENTIAL DRAFT 5 Feb 04 NOTE: Use Manual Mode only for short-term warming with nursing personnel in constant attendance. NOTE: The patient end of the skin temperature probe must be attached to something or a probe alarm may occur indicating a difference of 0.4°C between the two thermistors in the skin temperature probe.
-
Page 101: Baby Mode
PROPRIETARY AND CONFIDENTIAL DRAFT 5 Feb 04 Baby Mode Use Baby Mode for long-term warming. In the Baby Mode, a temperature probe placed on the infant’s abdomen measures the infant’s skin temperature. The radiant warmer in Baby Mode operates in servo control, or closed loop control. - Page 102 PROPRIETARY AND CONFIDENTIAL DRAFT 5 Feb 04 WARNING: Use only the skin temperature probes with reflective probe covers supplied by the manufacturer. Failure to do so could result in infant injury or equipment damage. WARNING: Do not place objects between the infant and the warmer module that block heat transfer and absorb heat.
-
Page 103: Examination Light
PROPRIETARY AND CONFIDENTIAL DRAFT 5 Feb 04 NOTE: To minimize the effect of direct radiation on the skin temperature probe and obtain a more accurate baby temperature measurement, cover the sensor with a Critter Covers Probe Cover, a Care-For-Me™ Cover, or an equivalent insulating foam or gel cover with a reflective surface facing the warmer module. -
Page 104: Cart And Bassinet
PROPRIETARY AND CONFIDENTIAL DRAFT 5 Feb 04 Cart and Bassinet End and Side Panels CAUTION: Do not attempt to move the cart and bassinet by using the acrylic end and side panels as a handle. Use the rear handle when moving the equipment. Equipment damage could occur. WARNING: When the panels are down, do not leave the infant unattended. -
Page 105: Vari-Tilt Control
2. Rotate the Vari-tilt knob in the front of the bassinet counter-clockwise through the entire range from 0° to 10° reverse Trendelenburg. Docking and Undocking (Resuscitaire Birthing Room Warmer (WBR82) only) WARNING: For patient safety and effective heating, properly dock and latch the cart to ensure correct bassinet positioning. -
Page 106: X-Ray Cassette Tray Accessory (Optional)
PROPRIETARY AND CONFIDENTIAL DRAFT 5 Feb 04 X-Ray Cassette Tray Accessory (Optional) 1. To install an x-ray cassette, perform the following: a. Swing the warmer module to the right or left of center as required to position the x-ray machine. b. -
Page 107: Section 6: Cleaning, Maintenance, Replacement Parts, And Storage And Handling
PROPRIETARY AND CONFIDENTIAL DRAFT 5 Feb 04 Section 6 Cleaning, Maintenance, Replacement Parts, and Storage and Handling Cleaning WARNING: Follow the product manufacturer’s instructions. Failure to do so could result in infant injury, personal injury, or equipment damage. WARNING: If oxygen is in use, make sure that the oxygen supply to the equipment is turned off and disconnected from the oxygen supply during cleaning and maintenance procedures. -
Page 108: General Cleaning
PROPRIETARY AND CONFIDENTIAL DRAFT 5 Feb 04 General Cleaning At a minimum, thoroughly clean and disinfect the radiant warmer upon discharge of an infant. However, depending upon individual facility policy, perform this as often as daily, if desired. Most effectively clean by disassembling the unit and then grouping the parts and assemblies in categories according to the method of cleaning required (see “Disassembly for Cleaning”... -
Page 109: Cleaning Metal Surfaces
PROPRIETARY AND CONFIDENTIAL DRAFT 5 Feb 04 2. Dry with a clean cloth or paper towel. Cleaning Metal Surfaces WARNING: The heater assembly may be hot enough to cause burns. Before cleaning or touching the warmer head, allow 30 minutes for the unit to sufficiently cool after removing power from the unit. -
Page 110: Cold Or Gas (Ethylene Oxide) Sterilization
PROPRIETARY AND CONFIDENTIAL DRAFT 5 Feb 04 Cold or Gas (Ethylene Oxide) Sterilization CAUTION: Do not expose plastic and acrylic to direct radiation from germicidal lamps. Ultraviolet radiation from these sources can cause cracking and crazing of clear plastic and acrylic. Prior to gas sterilization, the entire unit should be thoroughly cleaned as described in the cleaning topics of this section. - Page 111 PROPRIETARY AND CONFIDENTIAL DRAFT 5 Feb 04 3. Remove the bassinet front panel: Release button. a. Raise the bassinet front panel, and then swivel it down. b. At the corners, press up on the release buttons. c. Pull the bassinet front panel straight out, and remove it from the unit.
-
Page 112: Assembly After Cleaning
PROPRIETARY AND CONFIDENTIAL DRAFT 5 Feb 04 6. Remove the suction bottle and filter from the right side of the column or from the front of the bassinet. Assembly After Cleaning 1. Return the mattress to the bassinet. 2. Return the x-ray cassette tray. 3. -
Page 113: Maintenance
PROPRIETARY AND CONFIDENTIAL DRAFT 5 Feb 04 Maintenance WARNING: Only facility-authorized personnel should perform preventive maintenance on the Resuscitaire Radiant Warmer products. Preventive maintenance performed by unauthorized personnel could result in personal injury or equipment damage. NOTE: For disposal of consumable materials, see “Disposal” on page 6-10. Calibration Qualified service personnel should completely check and calibrate the equipment at least annually. -
Page 114: Replacement Parts
PROPRIETARY AND CONFIDENTIAL DRAFT 5 Feb 04 Replacement Parts For a listing of parts that an operator can replace, refer to the table on page 6-8 (refer to Perinatal Care Accessories P/N 90 50 360 for additional parts). Qualified service personnel should replace parts not listed. - Page 115 PROPRIETARY AND CONFIDENTIAL DRAFT 5 Feb 04 Hoses and Cables Part Number Description 17 AZ 104 MU02496 Cable assembly, AC power/lock, domestic, 10' 17 AZ 204 MU02501 Cable assembly, AC power/lock, VDE, 10' 17 AZ 211 MU02507 Cable assembly, AC power/lock, gray, IEC, 40" 78 464 10 MU10475 Air hose with hand-tightened nuts, 10'...
-
Page 116: Storage And Handling
PROPRIETARY AND CONFIDENTIAL DRAFT 5 Feb 04 Storage and Handling Storage Store the warmer under the following conditions: • Temperature range: -40°C (-40°F) to 70°C (158°F) ambient • Humidity range: 5 - 95% relative humidity, non-condensing • Altitude range: 0 - 12 km (0 - 40000') Transport Transport the warmer under the following conditions: •... -
Page 117: Section 7: Troubleshooting
PROPRIETARY AND CONFIDENTIAL DRAFT 5 Feb 04 Section 7 Troubleshooting Troubleshooting WARNING: Only facility-authorized personnel should troubleshoot the Resuscitaire Radiant Warmer products. Troubleshooting by unauthorized personnel could result in personal injury or equipment damage. For troubleshooting of the equipment, refer to the table on page 7-1 and to the table on page 7-3. If you cannot localize the fault, remove the unit from use, and refer it to factory-trained or other qualified service personnel. - Page 118 PROPRIETARY AND CONFIDENTIAL DRAFT 5 Feb 04 Symptom Possible Cause Corrective Action Blender alarm activates. Oxygen and/or air are discon- Connect oxygen and/or air. nected. Oxygen or air pressures are low. Adjust oxygen or air pressure to correct setting. Both tanks may not be opened. Check cylinder gauge.
-
Page 119: System Fail Error Codes
PROPRIETARY AND CONFIDENTIAL DRAFT 5 Feb 04 Symptom Possible Cause Corrective Action AutoBreath™ Infant Resuscita- There is an internal malfunction. Refer the unit to service. tor measured BPM is outside of the specified range. The Inspiratory/Expiratory (I/E) Resuscitation Module has failed. Replace the resuscitation mod- Ratio is Greater Than 1:2.4 and ule or refer the unit to service. - Page 120 PROPRIETARY AND CONFIDENTIAL DRAFT 5 Feb 04 Error Number Explanation Corrective Action Error #22 36° probe calibration error Adjust the temperature sensor of Skin Probe 1 and >0.2°C Skin Probe 2. Error #23 Ambient temperature too high Using an external thermometer, verify the ambient (>32°C) temperature.
- Page 121 This page intentionally left blank.
- Page 122 These Instructions for Use only apply to Air-Shields Resuscitaire Radiant Warmer Products International Version RW82, WBR82 and WMRW82 with the Serial No.: If no Serial No. has been filled in by Dräger, these Instructions for Use are provided for gen- eral information only and are not intended for use with any specific machine or device.
Need help?
Do you have a question about the WBR82 and is the answer not in the manual?
Questions and answers