Table of Contents
Advertisement
Quick Links
Advertisement
Chapters
Table of Contents

Related Manuals for Neopost IS-480


Summary of Contents for Neopost IS-480
- Page 1 User Guide Franking machine IS-480...
- Page 2 CONTROL PANEL DESCRIPTION INSIDE...
- Page 3 CONTROL PANEL...
-
Page 4: Table Of Contents
Table of Contents 1 Read this First What you will Find in this Manual..........3 Safety Requirements..............5 2 Meet Your Mailing System System Layout.................13 Accessories ................15 Control Panel Features ............18 Connections ................21 Power Management ..............25 3 Processing Mail Choosing a Type of Stamp............29 Preparing and Starting your Work Session ......32 Processing [Standard] Mail .............40 Printing [PPI] Mail (if available on the model) ......51... - Page 5 Account Data ................ 144 System Data ................. 148 Advanced Reporting Reports ..........149 7 Online Services Online Services Overview............. 155 Connecting to Online Services ..........156 Uploading Statistics .............. 159 System Online Services............160 8 Configuring your Mailing System Settings Overview ..............163 Logging in / out as the Supervisor ........
- Page 6 12 Specifications 12.1 Mail Specifications..............239 12.2 Recommended Operating Conditions ........241 12.3 General Specifications ............242 12.4 Operating Specifications ............243 Index...
-
Page 8: Read This First
Read this First 1 Read this First This section contains important information about safety precautions and environ- mental recommendations to operate your equipment in the best possible conditions. What you will Find in this Manual..........3 Safety Requirements ..............5 How to Disconnect your Mailing System................9... -
Page 10: What You Will Find In This Manual
What you will Find in this Manual What you will Find in this Manual Section 1: Read this First Make sure your have read and fully understood the safety requirements in this section. This section also includes a list of acronyms and symbols used in the manual. - Page 11 Symbols This manual uses the symbols listed below. This symbol... Indicates... WARNING: indicates a human safety hazard. ATTENTION: brings to your attention a risk for equipment or mail that could result from an action you may perform. NOTE: remark that explains different scenarios or situations. TIP: advice to help save you time when processing your mail.
-
Page 12: Safety Requirements
Safety Requirements Safety Requirements Power Connection Before connection, check whether the Mailing System is suitable for the local AC power voltage; refer to the type plates at the back of each system component. THIS SYSTEM MUST BE GROUNDED • Only connect the power plug to an outlet provided with a pro- tective ground contact. - Page 13 tection by consulting your retailer internet site, or by contacting him. He will inform you of the collection and treatment processes of these machines. CE compliance Products presented in this guide are conform to requirements of directives number 73/23/CEE and 89/336/CEE. This is a class A product.
- Page 14 General Safety Before using your Mailing System, thoroughly read the operating instructions. • To reduce the risk of fire, electric shock and injury to persons, follow normal and • basic safety precautions for office equipment when using your Mailing System. To avoid damage, only use approved supplies (ink, tape, cleaners...).
- Page 15 Telephone and LAN Connections Your Mailing System uses the telephone network to connect to the Postal Services and to your customer online services. You may also use a LAN (high speed internet connection) to connect to your customer Online Services and to a mail accounting software (MAS), located on a separate PC.
- Page 16 Disconnecting your Mailing System How to Disconnect your Mailing System How to Dis- How to First switch your Mailing System to mode (see Turn the Mailing System to OFF Mode p.26). connect your Mailing System Only unplug the power cord when the Mailing System is in mode or Sleep mode to avoid keeping the ink cartridge in an...
-
Page 18: Meet Your Mailing System
Meet Your Mailing System 2 Meet Your Mailing System Get to know your Mailing System in this section. System Layout ..............13 Accessories................15 Control Panel Features ............18 Connections................21 Power Management ............25 How to Turn the Mailing System to Sleep Mode............. 25 How to Turn the Mailing System to OFF Mode............... -
Page 20: System Layout
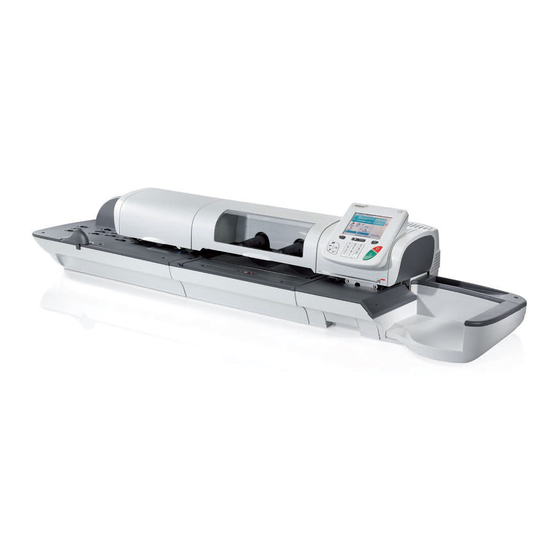
System Layout System Layout System Components Mailing System with dynamic scale: Rear Guide-Wall Guides envelopes into the feeder. Mixed-Size Feeder Automatically feeds the system with envelopes of dif- ferent sizes. Base Prints envelopes (or labels) and controls the Mailing System. Control Panel Allows you to control the Mailing System. - Page 21 Mixed-Size Feeder Automatically feeds the system with envelopes of dif- ferent sizes. Awake/Sleep button Awake/Sleep button of your Mailing System. User Guide Receptacle Stores this User Guide. Label Storage Use this slot to store labels horizontally. Weighing Platform Measures weight of mail pieces. Catch Tray Receives mail pieces after processing.
-
Page 22: Accessories
Accessories Accessories USB Keyboard (option) A USB keyboard can be connected to the mailing system. This keyboard is a standard personal computer keyboard with an additional touchpad. It allows the input of data to your mailing system. To use the numerical keys, ensure that [Num lock] is activated. You can use the shortcuts listed in the table below Keyboard use NAVIGATION KEYS... - Page 23 External Label Dispenser (option) The External Label Dispenser (or ELD) is a remote device connected to the mailing system that prints indicia (stamps) on thermal, self-adhesive paper. It provides an er- gonomic work environment, as the user can place it in the most convenient working position.
- Page 24 Barcode Scanner (option) This scanner is used: to identify accounts through barcodes • to scan tracking numbers on mails and send them to postal server •...
-
Page 25: Control Panel Features
Control Panel Features Control Panel Features See control panel and screen layout on the flap of the manual cover. Display Areas The control panel has a touch screen so most zones are tactile. Tap a zone to open the corresponding screen. Account Displays account currently selected. - Page 26 NAVIGATION KEYS Return Goes back to the previous screen. Home Screen Returns the system to the Home screen. Menu Accesses the menu settings. Validates a selection. SHORTCUT KEYS Funds Accesses funds management. Accesses preset stamp and account memories. These Job memories presets are managed by the supervisor.
- Page 27 Alpha-numeric Custom text Modem settings 2ABCabc 2ABC 3DEFdef DEF3 4GHIghi GHI4 5JKLjkl JKL5 6MNOmno MNO6 7PQRSpqrs PQRS7 8TUVtuv TUV8 9WXYZwxyz WXYZ9 , # / : @ * ? & ! - + \ . , # * + 'Clear' function 'Clear' function 'Clear' function...
-
Page 28: Connections
Connections Connections Connectors Your Mailing System has an Universal Serial Bus (USB) port that allows you to connect to a modem, printer or other USB memory key. Power Connector To wall socket or feeder COM4 Future use COM2/3 To Weighing Platform(s) COM1 To mixed-size feeder or dynamic scale LAN Port... - Page 29 COM1 To the Mixed-Size Feeder COM2 To the Mailing System Base...
- Page 30 Connection Diagram COM1 Feeder to Base connection COM2/3 Base to Weighing Platform(s) connection LAN Port To customer services and/or accounting software on a PC (optional) USB Modem To Telephone Cable Telephone Cable To wall socket (analog telephone line) Wall Socket Power Source With Dynamic Scale...
- Page 31 COM1 (base) Base (COM1) to Dynamic Scale (COM2) COM2/3 (base) Base (COM2 or COM3) to Weighing Platform LAN Port To customer services and/or accounting software on a PC (optional) USB Modem To Telephone Cable Telephone Cable To Wall Socket (Analog Telephone Line) Wall Socket Power Source COM1 (dynamic scale)
-
Page 32: Power Management
Power Management Power Management The System can only use the LAN if the LAN cable is connected BEFORE the power chord is plugged in. Energy Star[reg ] Compliance Office equipment is generally powered on 24 hours a day, so power management features are important for saving energy and reducing air pollution. -
Page 33: How To Turn The Mailing System To Off Mode
How to Turn the Mailing System to OFF Mode How to Turn the Turn your system to 'Sleep' Mode (see How to Turn the Mailing System to Sleep Mode p.25) Mailing System to OFF Mode Be sure that the light located next to the key (at the top right corner of the control panel) is Amber meaning that the Sleep... -
Page 34: Processing Mail
Processing Mail 3 Processing Mail This section describes how you can run mail: choose a type of stamp, select a rate and weighing method, activate sealing and so on, depending on the type of process you need to apply to your mail. Choosing a Type of Stamp...........29 Preparing and Starting your Work Session......32 How to Sort Mail ...................... - Page 35 How to Add (or Cancel) an Ad Die on the Stamp............80 How to Move the Stamp (Print Offset)................81 How to Use an Imprint Memory ..................83 How to Turn the Sealer On/Off ..................84 3.10 External Label Dispenser [mdash ] ELD (optional) ....86 How to Set the ELD Status ..................87 How to Print Using the External Label Dispenser............89...
-
Page 36: Choosing A Type Of Stamp
Choosing a Type of Stamp Choosing a Type of Stamp Customizing Your Stamp To process mail, you must first choose a 'Type of stamp' that corresponds to the type of process you want to apply to your mail: printing postage for different rates, using prepaid imprints, printing 'Received' and the date on incoming mail, etc. - Page 37 Type of Process and Type of Stamp The table below indicates the 'Type of stamp' to choose, depending on the type of process you want to apply to each set of mail. The column on the right indicates, for each Type of stamp, the options available for each type of Stamp.
- Page 38 The system selects [Standard] type of stamp at start up by default. See also Configuring your Mailing System To set default values as supervisor: see p.161. •...
-
Page 39: Preparing And Starting Your Work Session
Preparing and Starting your Work Session Preparing and Starting your Work Session In this section This section recommends a list of preparation steps you should perform to help you run your mail efficiently. Mail preparation involves: Sorting mail by type and task, to make processing faster (p.33) •... -
Page 40: How To Sort Mail
Sorting Mail by Type and Task To save time, sort your mail in groups that have similar characteristics. This will prevent you from having to change the stamp parameters too often and allow you to fully benefit from the automatic features of your Mailing System, particularly the Differential Weighing or dynamic scale options that allow you to process mail much quicker. -
Page 41: How To Log In And Start A Work Session
Turning On Your System and Starting a Work Session Turning the system on automatically starts a work session on the Mailing System. At start-up, depending on specific supervisor settings: The access to the system may be open • You may have to enter a PIN code •... - Page 42 Home Screen [Standard] : If this screen is displayed, no other step is required to navigate through the system. Login Screen: If the Login Screen is displayed, enter your operator PIN code Account Screen: If the Account Screen is displayed, select your account as follows.
-
Page 43: How To Change The Current 'Type Of Stamp
Selecting the Type of Stamp For each stack of mail you have sorted (see p.33), select the type of stamp you need to process your mail as follows. How to Change the Current 'Type of Stamp' How to Change Once you are logged in as user: the Current 'Type Either: of Stamp'... - Page 44 Frequently Asked Questions System check list: Question... Answer Do I have enough postage? Look at the funds counter at the bottom of the screen, or: Press and enter to check your funds bal- ance. How to Add Funds to the PSD To add funds, see (Meter) p.99.
-
Page 45: How To Use The Feeder
Using the Feeder The procedure below describes how to place a stack of mail pieces in the Hopper. Depending on the weighing method you choose to run mail, you may have to insert the envelopes one by one or place a stack of envelopes in the hopper. Each stack may mix envelopes of different thickness and size. - Page 46 Thickness Setting: Depending on the thickness of your envelopes, you may have to adjust the thickness setting of the Feeder. Use this setting if several thin envelopes pass at one time through the feeder or, if thick envelopes are blocked at the entrance of the mail path. Open Feeder Cover.
-
Page 47: Processing [Standard] Mail
Processing [Standard] Mail Processing [Standard] Mail In this Section This section describes how to process [Standard] Mail: Applying postage using different rates • Re-dating mail (depending on your country) • Correcting the postage amount (depending on your country) • See also Choosing a Type of Stamp About the use of the Type of stamp, see p.29. - Page 48 Stamp type To change the type of stamp, select and then Type of stamp select [Standard] in the screen. For more How to Change the Current 'Type of Stamp' details, see p.36. Additionally, you can configure stamp elements from the Customize stamp screen as follows: Check or change the Ad die selection:...
- Page 49 Type a rate number to select a rate or display new rate options Rate History Select to choose a recently selected rate. Rate wizard Select to choose rate options in lists. Selecting a Rate For more details, see p.70. You may also enter the postage amount manually: on the home screen, type directly the amount using the keypad.
-
Page 50: How To Apply Standard Postage (Running Mail)
p.75. You can also apply the optional setting(s): Move the stamp away from the envelope edge for thick en- velopes: see How to Move the Stamp (Print Offset) p.81 Close envelopes using the feeder sealer : see Using the Sealing Function p.84 You are now ready to print. - Page 51 If a mail piece is bigger than mail path maximum thickness (see Mail Specifications p.239), press to print a label. The label is printed. The Mailing System prints postage and the mail piece (or label) is sent to the catch tray. When using sealer, collect the mail piece stack in the catch tray and put stack aside to let envelopes dry.
- Page 52 label) is sent to the catch tray. When sealer is activated, collect the mail piece stack in the catch tray and put stack aside to let envelopes dry. Repeat the previous step for each piece of mail. To quit the process at any time, press When you remove the last object from the Weighing Platform, the Mailing System will ask if you want to print it.
- Page 53 Dynamic weighing In optional mode From the [Standard] home screen: Place the mail pieces stack you want to process on the hopper. Using the Feeder For more details, see p.38. Press to start processing the set of mail pieces. The base prints the stamps and sends the set of mail pieces to the catch tray.
- Page 54 In other modes (Manual weight entry , no weight ...) From the [Standard] home screen: Press . System motors start running. Insert the mail piece into the mail path against the rear-guide wall, side to printed facing upwards. If a mail piece is bigger than mail path maximum thickness (see Mail Specifications p.239), press to print a label.
-
Page 55: How To Correct The Postage Amount (Settings)
Correcting a Postage Amount (if available) Set-Up Requirements The procedure below outlines steps required to correct the postage amount on mail that has already been processed. [Date Correction] Mode (if available) The sequence is identical to (p.40), except for the following: Postage must be set to the desired additional amount, instead of •... -
Page 56: How To Correct The Postage Amount (Running Mail)
Customize You can change the date or date format from the stamp screen as follows: Date Date Select and then select a date option in the advance Today's screen. Select for printing the current date. How to Change the Date For more details, see p.78. - Page 57 LABEL PRINTING: If a mail piece is bigger than mail path maxi- Mail Specifications mum thickness (see p.239), press before you press to print a label. The label is printed. Otherwise, if you want to print several identical labels: Press and enter the number of labels.
-
Page 58: Printing [Ppi] Mail (If Available On The Model)
Printing [PPI] Mail (if available on the model) Printing [PPI] Mail (if available on the model) In this Section This section describes the parameter settings and mail handling sequences for the mail processes that use the [PPI] type of stamp. See also Choosing a Type of To choose the type of stamp to use for each type of mail, see... - Page 59 Select the PPI to use. Selecting a Pre-Paid Imprint (PPI) p.73. Select a weighing mode (if you did not enter any amount) Depending on the quantity and type of mail you have to process, you can choose an efficient weighing method that uses a weighing platform or the dynamic scale (if installed) to Choosing a Weighing Type save time: see...
-
Page 60: How To Process Ppi Mail (Running Mail)
To set the stamp quickly, consider using imprint memories. The imprint memories store stamp characteristics together with rates Using Imprint Memories and, if active, accounts. See p.83. Running Mail To run mail, follow the procedure below after you have completed the sequence in How to Process PPI Mail (Settings) p.51. - Page 61 Differential weighing mode ( From the [PPI] home screen, to print postage on mail pieces: Place the stack of mail you want to process on the weighing platform, and then follow the instructions on the screen or the steps below. Withdraw the first mail piece from the top of the stack.
- Page 62 Withdraw the first mail piece from the top of the stack. The Mailing System displays weight and postage on the home screen, starts motors and prints the label automatically. If you inadvertently remove more than one item from the WP, replace removed items on WP before weight stabilization to avoid printing label (about 1.5 seconds).
- Page 63 Dynamic weighing mode ( ). From the [Standard] home screen, to print postage on mail pieces: Place the mail pieces stack you want to process on the hopper. Using the Feeder For more details, see p.38. Press to start processing the set of mail pieces. The base prints the stamps and sends the set of mail pieces to the catch tray.
- Page 64 In other modes (Manual weight entry , No weight source). From the [PPI] home screen, to print postage on mail pieces: Press . System motors start running. Insert the mail piece into the mail path against the rear-guide wall, side to printed facing upwards.
-
Page 65: Date Correction] Mode (If Available)
[Date Correction] Mode (if available) [Date Correction] Mode (if available) In this Section This section describes the settings and mail handling sequence for the mail process that require the Type of stamp [Date correction]. Use this Type of stamp to correct the postage date [mdash ] for example, to dispatch tomorrow a letter that has already been stamped today. -
Page 66: How To Correct Date On Mail (Running Mail)
Select [Date correction] and press [OK] to validate Change the postage date. Today's date is printed by default. To change the date, press Imprint to access the screen, and then select > Date Date Advance to display the Screen. Select a date. - Press to return to the home screen. - Page 67 If mail piece is bigger than mail path maximum thickness (see Mail Specifications p.239), press before you press print a label. The label is printed. The Mailing System applies postage and the mail piece (or label) is sent to the catch tray. Otherwise, if you want to print several identical labels: Press and enter the number of labels.
-
Page 68: Amount Correction] Mode (If Available)
[Amount Correction] Mode (if available) [Amount Correction] Mode (if available) In this Section This section describes the settings and mail handling sequence for the mail process that require the Type of stamp [Amount correction]. Use this type of stamp to correct the postage amount. Only additions are possible (to increase the postage amount). - Page 69 Select [Amount correction] in the list and press [OK] to va- lidate. Enter the additional postage amount. From the Home screen: Amount - Begin to type in the amount (keys 1 to 9 or dot). The entry screen is displayed. - Type the amount in and press [OK] to validate and return to the home screen.
-
Page 70: How To Correct The Postage Amount (Running Mail)
You are now ready to print the envelopes. Running Mail Set-Up To run mail, follow the procedure below after you have completed the steps in Requirements p.61. How to Correct the Postage Amount (Running Mail) How to Correct To print the additional amount stamp: the Postage Press . -
Page 71: Printing [Received] For Incoming Mail
Printing [Received] for Incoming Mail Printing [Received] for Incoming Mail In this Section This section describes how to use the [Received] type of stamp, to: Print the date on incoming mail, and/or • Print 'Received' on incoming mail. • See also Choosing a Type of Stamp About the use of the Type of stamp, see p.29). -
Page 72: How To Process Received Mail (Running Mail)
Stamp type To change the type of stamp, select and then Type of stamp select [Received] in the screen. For more How to Change the Current 'Type of Stamp' details, see p.36. Additionally, you can : Activate or deactivate printing the date Activate or deactivate printing 'Received'. - Page 73 Insert the mail piece into the mail path against the rear-guide wall, side to printed facing upwards. Mailing System applies the imprint and the mail piece is sent to the catch tray.
-
Page 74: Running [No Printing] Mail
Running [No Printing] Mail Running [No Printing] Mail This section describes how to use the [] type of stamp, for: Sealing envelopes using the auto-feeder sealer (if installed). • Only conveying mail, for counting or testing purposes. • See also Choosing a Type of Stamp About the use of the Type of stamp, see p.29). -
Page 75: How To Process Mail Without Printing (Running Mail)
Stamp type To change the type of stamp, select and then Type of stamp select [No printing] in the screen. For more How to Change the Current 'Type of Stamp' details, see p.36. Press to return to the home screen. If you want to seal envelopes without printing you must turn the sealer lever on: see Using the Sealing Function p.84... -
Page 76: Settings Details
Settings Details Settings Details Changing the Current Account To process a batch of mail pieces using another account (on account-enabled con- figurations), change the account as follows. How to Change Accounts How to Change To change accounts: Accounts As a user: Tap the Account zone on the screen , or Press... -
Page 77: How To Select A Rate
Selecting a Rate Selecting a rate allows the Mailing System to calculate the postage amount when the mail piece weight is available, either from a weighing device or, for big parcels, How to Enter the Weight Manually entered manually (see p.77). - Page 78 select a recently selected rate. Rate wizard [mdash ] Press 8 to select the Follow the instructions on screen and, once you have chosen the rate and services, press [OK] to validate your selection. Postage displayed on the screen is zero as long as the weight is not known (= zero).
-
Page 79: How To Enter Postage Manually
Entering Postage Manually (if available) To enter the postage amount manually, follow the procedure below. How to Enter Postage Manually How to Enter On the home screen: Postage Type directly the first figure of the amount using the keypad. Manually Manual amount screen appears. -
Page 80: How To Select A Ppi
Selecting a Pre-Paid Imprint (PPI) You can select the PPI to use in a list. When selecting the PPI type of stamp, a default PPI is automati- cally selected. See also How to Change the Default PPI p.179. • Managing Prepaid Imprints (PPI) p.203. - Page 81 Choosing a Weighing Type Depending on the accessories and features on your Mailing System, several weighing methods are available. You can also enter the weight manually if you know it: see How to Enter the Weight Manually p.77. Choosing a Weighing Type Depending on the type of mail you want to process, choose a weighing method ac- cording to the recommendations in the table below.
-
Page 82: How To Change The Weighing Type
Manual Weight ( • In this mode, you enter the weight manually (see p.77). Standard Weighing ( • In this mode, each mail piece is manually placed on the Weighing Platform, and then put into the mail path (or print a label). Differential Weighing ( ) (optional) •... - Page 83 Tap zone Weighing type on the screen , or Press and type or select the path: > Job settings > Weighing type Weighing mode screen is displayed. The options actually displayed in the screen depend on the weighing devices that are connected to your Mailing System and on features that are activated.
-
Page 84: How To Enter The Weight Manually
Entering Weight Manually You can enter the weight manually if a mail piece exceeds the weighing capacity of all your weighing platform. If this situation occurs, you will need to print the postage amount on a label to stick onto the mail piece. How to Enter the Weight Manually How to Enter the To enter the weight manually from the home screen, you must... -
Page 85: How To Change The Date
Configuring the Stamp Depending on the current Type of stamp, you can modify the elements printed on mail pieces as follows: Change printed date • Add a pre-loaded Ad die to the left of the stamp • Adding a custom text to the left of the stamp (if allowed). You must first create it in •... -
Page 86: How To Add (Or Cancel) A Text On The Stamp
Customize stamp screen is displayed. Select > Date. Date Advance screen is displayed. Date Advance On the screen, you can configure the printed date as follows: To choose another day, select the corresponding item in the list. icon indicates the current selection. Press [OK] to apply changes and return to the configuration menu. -
Page 87: How To Add (Or Cancel) An Ad Die On The Stamp
Select > Text. Select text screen is displayed. None Select the desired text in the list or select for printing no text. icon indicates the current selection. Customize stamp screen is displayed with updated pa- rameters (home screen: See also Managing Custom Text Messages (if available) p.198 •... -
Page 88: How To Move The Stamp (Print Offset)
None Select the ad die in the list or select for printing no ad die. icon indicates the current selection. See also Managing Ad Die p.200. • Moving the Stamp (Print Offset) You can move the stamp away from the edge of the envelope when printing on thick envelopes with rounded edges. - Page 89 Tap the Offset zone on the screen , or Press and type or select the path: > Job settings > Print position Print position setting screen is displayed. Select the offset and press [OK] to validate.
-
Page 90: How To Use An Imprint Memory
Using Imprint Memories Imprint Memories allow you to create a preset memory that can include the rate, custom text, ad die and date mode for the Type of stamp you would like to use. In account-activated configurations, Imprint Memories allow you assign postage costs to pre-selectedaccounts. -
Page 91: How To Turn The Sealer On/Off
Using the Sealing Function Mixed-Size Feeder Sealer How to Turn You can automatically activate or deactivate the sealing function. See the Sealer On/Off p.84. The Sealing On/Off icon in the home screen indicates the current state of the sealing function. Sealing ON Sealing OFF How to... - Page 92 See also How to Adjust the Sealing Water Flow To adjust sealing dampness, see p.216. •...
-
Page 93: External Label Dispenser [Mdash ] Eld (Optional)
External Label Dispenser [mdash ] ELD (optional) 3.10 External Label Dispenser [mdash ] ELD (optional) Introducing the ELD Presentation The External Label Dispenser (or ELD) is an external printing element dedicated to print indicia on thermal self-adhesive paper with various widths. Power Button Wakes-up or Sleeps the ELD. -
Page 94: How To Set The Eld Status
Configuring the ELD Connecting the ELD ELD / External Label Dispenser Feeder Base Stacker ODS – Dynamic Scale Use a USB cable to connect the ELD to the base (rear left hand side). Connections p.21. Declaring/Undeclaring the ELD To use the ELD, you have to declare the ELD on the mailing sys- tem. - Page 95 Press [Ok] to validate. Press to power OFF the mailing system. Press to power ON the mailing system. If ELD status is set to ELD Connected, the mailing system detects automatically the ELD. If ELD status is set to ELD not Connected, the mailing system does not detect the ELD.
-
Page 96: How To Print Using The External Label Dispenser
Printing Using the External Label Dispenser Make sure to power on the External Label Dispenser before pro- cessing. If the External Label Dispenser is accidentally shut-off during the process, restart the base. How to Print Using the External Label Dispenser How to Print From the home screen: Using the Ex-... - Page 97 feed button.
-
Page 98: Advanced Operations
Advanced Operations 3.11 Advanced Operations Emergency Stop If you want to stop the system in the event of an emergency: How to Enable an Emergency Stop How to Enable To stop the run process immediately: an Emergency Press Stop Using Batch Counters Batch counters allow you to track and report pieces (items) and postage (value) since the last counter reset. -
Page 99: How To Count Mail Pieces By Weighing
Select the counter you wish to reset and press [OK]. Piece Counting This function uses the Weighing Platform to count a stack of identical mail pieces. How to Count Mail pieces by Weighing How to Count To count mail pieces by weighing: Mail pieces by As a user: Weighing... -
Page 100: How To Fill The Automatic Label Dispenser
Filling the Label Dispenser How to Fill the Automatic Label Dispenser How to Fill the To fill the Label Dispenser: Automatic Label Stack the labels and insert them in the dispenser, face to print on the right-hand side and peel-off tab on the top. Dispenser Push the block of labels down until you feel the label “click”... -
Page 102: Money Operations
Money Operations 4 Money Operations This section describes how you can load and manage money in your Mailing System to allow postage operations. Overview ................97 Managing Funds ..............98 How to Check the PSD (Meter) Funds................98 How to Add Funds to the PSD (Meter) ................99 Unlocking the PSD (Postal Inspection) ........ -
Page 104: Overview
Overview Overview The Postal Security Device (PSD) [mdash ] Postage Meter The PSD, located in the base, handles the funds (or money) in your Mailing System. The PSD performs all necessary operations to comply with the postal standards. To do so, regular connections to the Postal Services are necessary. Check that your Mailing System is connected to a telephone line Connections or network (see... -
Page 105: Managing Funds
Managing Funds Managing Funds Checking Funds You can check the total postage used and the remaining funds in the PSD at any time. To check that the funds are available to complete your current task. Remaining funds are continuously displayed at the bottom of the home screen (see Control Panel Features p.18). -
Page 106: How To Add Funds To The Psd (Meter)
Adding Funds You can add funds to your Mailing System at any time by complete the steps listed below. The Mailing System then connects to the Postal Server and validates the operation. How to Add Funds to the PSD (Meter) How to Add To add funds to the PSD: Funds to the PSD... - Page 107 If funding fails, the system displays a failure message and the amount that you may actually add, depending on your postal account balance. In the case of a communication error, the amount previously entered cannot be changed. Check connection settings (see p.188).
-
Page 108: Unlocking The Psd (Postal Inspection)
Unlocking the PSD (Postal Inspection) Unlocking the PSD (Postal Inspection) Manual Call The postal service requires your postage meter (PSD) to periodically connect for postal security regulation. If you have not connected your system after a period your system will automatically be deactivated. If your system is deactivated, you have to perform a connection to the Postal Services to unlock the PSD. - Page 109 The date of the next call is displayed on the screen.
-
Page 110: Managing Accounts And Assigning Rights
Managing Accounts and Assigning Rights 5 Managing Accounts and Assigning Rights This section describes how you can manage accounts as the supervisor to track postage funds usage and/or set access rights to a variety of functions on your Mailing System. Accounting and Assigning Rights Overview ...... -
Page 112: Accounting And Assigning Rights Overview
Accounting and Assigning Rights Overview Accounting and Assigning Rights Overview Postage Tracking and Access Control Your Mailing System allows you to track postage by account/department and to add security to prevent unauthorized use of a variety of functions. Track postage expenditures: the Accounts function •... -
Page 113: Selecting An 'Account Mode
Selecting an 'Account Mode' Selecting an 'Account Mode' Introducing the 'Account Modes' The 'Account mode' allows you to set up both the Accounts and the Access Control Accounting and Assigning Rights Overview functions (see p.105). The table below lists the functional access control for each account mode. Access Control Function 'No account' 'No account with access... -
Page 114: Guidelines To Setup An Account
Guidelines to Setup an Account Guidelines to Setup an Account See also Selecting an 'Account Mode' p.106. • Setting up 'No Account' The 'No Account' mode provides users with unlimited access to the system (self- service type). This is the default mode in your Mailing System. Implementing “No account”... -
Page 115: How To Change A Shared Pin Code
Setting up 'No Account with Access Control' If you want to prevent unauthorized use of the Mailing System and do not want to use accounts, use the “No Account with Access Control” mode. This provides a single PIN code for all authorized users. This is the default mode in your Mailing System. - Page 116 Setting up 'Accounts' In 'Accounts' Mode, users must select an account before they can process their mail. The user can change accounts at any time during mail processing. If only one account is available, the Mailing System automatically selects it at start up. Implementing the “Accounts Mode”...
- Page 117 Setting up 'Accounts with Access Control' In the 'Accounts with Access Control' Mode, users must first enter a PIN code and then select an Account. They can change accounts once they have logged in. The supervisor can restrict accounts for each user. If only one account is available, the Mailing System automatically selects it at start up.
- Page 118 Setting up 'Remote Account Management' 'Remote Account Management', allows you to manage accounts and/or operator PINs from a PC-based software program (MAS). The PC application provides advanced postal and/or shipping expense management in order to monitor, track and control your mailing and shipping costs. You can allow the Mailing System to be used even when not connected to the PC.
-
Page 119: Selecting An 'Account Mode
Selecting an 'Account Mode' Selecting an 'Account Mode' See also Guidelines to Setup an Account p.107. • How to Display and Change the 'Account Mode' How to Display To display and change the 'Account mode': and Change the How to Log in as Supervisor As supervisor (see p.164): 'Account Mode'... -
Page 120: Managing Accounts
Managing Accounts Managing Accounts Selecting an Account Mode You can manage accounts in the following account modes: 'Accounts' • 'Accounts with Access Control'. • Setting up 'Accounts' Setting up 'Accounts Before creating accounts, see p.109 or with Access Control' p.110. If you use a postal expense management software, your accounts are managed by the PC. - Page 121 Account Information The number of accounts you can create is set to 50 by default and can be and can be increased to 300 if required. Every account includes the following information, which is displayed on the account screen: Account Format Description Item...
-
Page 122: How To Create A Group Or A Subgroup
Group Settings Add Group A Group or Subgroup has the following settings, displayed on the screen: Setting Format Description Name 32 Alphanumeric Name that you will use when assigning Groups or characters Subgroups of Accounts to Operators. This name has to be unique. Status Active / Inactive If a Group is not active, the corresponding... -
Page 123: How To View/Edit A Group Or A Subgroup
Select > Add Acct/Group. Select > Add Group (or type Add group window appears. Name Enter the Group by using the keypad. Select the Group Status (active or inactive). The screen then displays the current status of the Group you have selected. Folder To put the current Group into a Subgroup, select the button, select a group in the list and press [OK]. -
Page 124: How To Activate / Deactivate A Group
Press and type 5.2.1 or select the path: > Account management > Manage accounts > Account list Account list screen is displayed. Select the Group (use the double arrows to scroll through the list). A Group that is not in the list is probably a Subgroup: select its Parent Group, press Edit/Del. -
Page 125: How To Delete A Group Or A Subgroup
You can delete a Group to delete all of its content, including Subgroups and Ac- counts. How to Delete a Group or a Subgroup How to Delete a To delete a Group or a subgroup: Group or a How to View/Edit a Group or a Follow the procedure Subgroup p.116. - Page 126 Select > Add Acct/Group and then select > Add account (or type Add account screen is displayed. Number Name Enter the account using the keypad and press [OK]. Select the Account Status (the button displays the current status: Active Inactive Press the screen to change fields.
-
Page 127: How To View / Edit Account Information
How to View / Edit Account Information How to View / To view or edit an account: Edit Account In- How to Log in as Supervisor As supervisor (see p.164): formation Press and type 5.2.1 or select the path: > Account management > Manage accounts > Account list Account list screen is displayed. -
Page 128: How To Activate / Deactivate An Account
Press [OK] to accept the changes. Activating Accounts This function allows you to create accounts in advance and prevent them being used before your account structure is complete. How to Activate / Deactivate an Account How to Activate To activate or deactivate an account: / Deactivate an How to View / Edit Account Information Perform procedure... -
Page 129: How To Export An Account List
Importing/Exporting Account Lists You can import an account list to or export an account list from your mailing machine as a CSV file using OLS or a USB memory key. Imported accounts are created and added to the existing account list as unformatted accounts. -
Page 130: How To Import Accounts
Field delimiter ; (semi-colon) Record delimiter New line To add accounts to your Mailing System, export the current account list and modify it before re-importing it into the Mailing System. See also Account Information Maximum number of accounts: p.114. • How to Import Accounts How to Import To import accounts from a CSV file:... -
Page 131: Managing Operators
Managing Operators Managing Operators Account with Access control Mode and as supervisor, you can create up to 20 'op- Accounting and Assigning Rights erators' that each correspond to a PIN code (see Overview p.105). This section only applies to the Account with Access Control Accounting and Assigning Rights Overview Mode (see p.105) -
Page 132: How To Create An Operator
Operator Management Follow the steps outlined below to create, modify, activate/deactivate or delete op- erators. See also Operator Options p.124. • Operator List Report To print the current list of operators, see p.147. • Creating Operators In order to create an operator you must first set up an “Account with Access Control”... -
Page 133: How To Modify An Existing Operator
Enter the options you wish to provide for this operator. Account List In the screens, select the Accounts (or groups/ subgroups) that the operator will be allowed to use. You can How to Assign Accounts to an complete this step later: see Operator p.127 . -
Page 134: How To Assign Accounts To An Operator
Change the operator options as needed and press [OK] to Operator modification summary display the screen (Use key [C] to clear characters). Press [OK] to accept your changes. Assigning Accounts to Operators You can define the Accounts Access to each operator, by assigning accounts, groups or subgroups of accounts to the operator. -
Page 135: How To Activate / Deactivate An Operator
You can allocate entire groups or subgroups to the operator: select the group and press [OK] (Enable/Disable ). Repeat until all accounts to be assigned are checked Edit / modify Press to return to the screen. Press [OK] to accept the changes. Activating Operators The ability to select the status of an operator allows you to create as many operators as you need in advance. -
Page 136: Advanced Reporting Functions
Advanced Reporting Functions Advanced Reporting Functions Advanced Reporting option enhances account management and provides a variety of reports. Account Management Enhancements Adding Budgets to Accounts Each account can be upgraded with the following feature options: Budget: set the amount the account is allowed to spend in a set period of time •... - Page 137 Budget and Surcharge Preferences Before you can set budgets and surcharges for an account you first have to activate these features and set the global preferences. Budget and Surcharge functions are only available if the Advanced Reporting option has been loaded onto your Mailing System.
-
Page 138: How To Activate/Deactivate Budgets And Surcharges
Setting-up the Budgets and Surcharges The following steps below will help you to activate and set-up the Budget and Sur- charge function. If the Budget and Surcharge function has already been activated on the system, the accounts recover their prior settings when re- activating the function. -
Page 140: Reports
Reports 6 Reports This section explains how you can access and print reports for your Mailing System. Reports Overview ............... 135 Generating a Report ............137 How to Generate a Report (as a User) ................. 137 How to Generate a Report (as Supervisor) ............ -
Page 142: Reports Overview
Reports Overview Reports Overview As a user or supervisor, you can get a range of reports to regularly view, print or store information regarding your Mailing System usage, funds usage, account expen- ditures, etc. Your Mailing System can also upload basic data that can be viewed online. Enhanced online postal expense management reporting can be added as an option. - Page 143 Report name Report description Output Page Devices Account List List of accounts in the system (supervi- p.144 sor only). Tree view of the accounts in groups / sub-groups. Single Account Usage for a specific account selected p.145 in an account list, for a selected period. Multi-Accounts Usage per group/sub-group on all p.146...
-
Page 144: Generating A Report
Generating a Report Generating a Report To generate a report, select the desired report, and choose how you want to display or record the report: On screen • On an external printer (if any) • On a label • On a USB memory key •... -
Page 145: Counter Data
Counter Data Counter Data Batch Data Report This report displays the batch counter and the postage spent for outgoing mail (type of stamp [Standard]) since the last reset. Requirements To generate this report, you have to be logged in as a user. Output: Screen USB printer... - Page 146 Received Batch Data This report displays the batch counter for incoming mail ('Received on') since the last reset. Requirements To generate this report, you must be logged in as a user. You must be in [Received] stamp type to view incoming mail batch counter. Outputs Screen.
-
Page 147: Postage Data
Postage Data Postage Data Daily Usage Report This report displays, for each day of the selected period, usage data such as total items and total postage value. Requirements This report is available as a user or supervisor. You have to specify the Begin date and the End date of the report. When you specify the Begin date, the End date field is filled with a proposed value: Begin date + 31 days. - Page 148 Monthly Usage Report This report displays, in a selected period and per month, the total items and total postage used. Requirements This report is available as user or supervisor. You have to specify the Begin date and an the End date of the report. Use the se- lection of month and year.
-
Page 149: Funds Data
Funds Data Funds Data Funds Summary Report This report displays the information on funds usage since the installation of the system. The content is limited to the history available in the PSD. Requirements This report is available as user or supervisor. Output: On label Screen... - Page 150 Adding Postage Report This report displays the last postage refill operations performed on the machine in a selected period. Requirements For this report, you have to be logged in as a supervisor. Output: Screen USB printer USB memory key Fields Comments Period Default period:...
-
Page 151: Account Data
Account Data Account Data Account List Report This report displays the list of accounts in the system. Requirements To generate this report: You have to be logged in as a supervisor • The current 'Account mode' has to be Account Account with access control •... - Page 152 Single Account Report This report displays postal expenditures for one account over a selected time period. You can select any account from the list. Requirements This report is available as a user or a supervisor. The current account mode has to be 'Accounts' or 'Accounts with access control'. You have to select an account in the list of accounts, then the Begin date and the End date of the report.
- Page 153 Multi Account Report This report displays postal expenditures for all the accounts over a selected time period, sorted by ascending account number. The report displays all the accounts in 'active' status, and accounts 'inactive' or 'deleted' with a postage value. Requirements This report is available as a user or a supervisor.
-
Page 154: How To Generate The Operator List Report
Operator List Report This report displays the operator list with PIN codes. Requirements To generate this report, you have to be logged in as a supervisor (not as a user). • Data Comments For each Operator: There is no time period to enter. -
Page 155: System Data
System Data System Data Machine Configuration Report This report displays all supervisor settings. Requirements To generate this report, you have to be logged in as a supervisor. Outputs: Screen USB printer USB memory key Fields Imprint default settings (Default Text, Default Ad die, Default Rate) Date advance parameters Funds settings (High value, Low Funds) Connections settings (phone numbers) -
Page 156: Advanced Reporting Reports
Advanced Reporting Reports Advanced Reporting Reports Publish Additional Reports Single account Multi account When the Budget and Surcharge function is activated, Account list reports include budget and/or surcharge data if applicable. The Advanced Reporting option includes the following reporting capabilities: Budget consumption: instantaneous budget status for all accounts •... - Page 157 Operator Activity Report This report displays the activity (number of items, postage value) of all operators in the machine in a selected period. Requirements To generate this report, you have to be logged in as a supervisor • The account mode has to be 'Accounts with Access control'. •...
- Page 158 Product Code Report This report displays the consumption per Customer Product Code in the selected period. Requirements To generate this report, you have to be logged in as a supervisor (not as user ). • Fields Comments Period You have to specify the period for the report (Begin date and an End date).
-
Page 160: Online Services
Online Services 7 Online Services Online Services for your Mailing System allow you to very easily achieve tasks such as updating postal rates, system software or optional features, and using services such as mail follow-up online. Online Services Overview........... 155 Connecting to Online Services ........... -
Page 162: Online Services Overview
Online Services Overview Online Services Overview The Online Services simplify the use and the update of your Mailing System. Online Services features and capabilities include: Online reporting: the usage of your machine is available from your personal, • secure web account, simplifying tracking and reporting of your postage expenses. Rate Updates: maintain current postal rates with automatic, electronic, convenient •... -
Page 163: Connecting To Online Services
Connecting to Online Services Connecting to Online Services Automatic calls Automatic calls To fully benefit from the convenience and power of Online Services, your Mailing System should permanently be connected to a live analog telephone line or network connection so that it can link to the Online Server automatically whenever required. For the usage of some services, some automatic calls are scheduled to upload cor- responding data. -
Page 164: How To Call Online Services Manually (As A User)
How to Call Online Services Manually (as a User) How to Call To trigger a generic call Online Services As a user: Manually (as a Press and type or select the path: User) > Online services > Generic call The Mailing System connects to the server and downloads the available elements (rates, ad dies, etc.). -
Page 165: How To Test The Connection To Online Services
Testing the Connection to Online Services You may test the connection to the Online Services server via the commands in the Online Services menu: Ping server • Establishes a connection and checks whether the server answers to a 'ping' command. This test: Connection Settings Validates connection parameters (see p.188) -
Page 166: Uploading Statistics
Uploading Statistics Uploading Statistics This manual call uploads report data to the Online Services server, so that you can display reports that integrate the latest figures on your Online Services web page. Otherwise, automatic calls upload report data to the Online Services server at the end of each month. -
Page 167: System Online Services
System Online Services System Online Services Ink Management Service The Ink Management service sends an electronic message to the Online Services server when the mailing machine’s ink supply is running low. An e-mail message then informs you of that condition so that the ink cartridge can be replaced in time. -
Page 168: Configuring Your Mailing System
Configuring your Mailing System 8 Configuring your Mailing System This section describes the general settings you can apply to your Mailing System. Some of them can be managed directly by all users whereas most of them require access as supervisor . Settings Overview............... - Page 169 Postage Imprint Default Settings........179 How to Change the Default Rate .................179 How to Change the Default PPI ................179 How to Change the Default Text ................180 How to Change the Default Ad Die ..............180 How to Set the Automatic Date Advance Time ............182 How to Set the Default Printing Offset ..............183...
-
Page 170: Settings Overview
Settings Overview Settings Overview This section describes two types of settings that are available on your system: User settings, that only last as long as the user who applies them is logged in • Supervisor settings, sets the default or permanent settings of your Mailing System. •... -
Page 171: Logging In / Out As The Supervisor
Logging in / out as the Supervisor Logging in / out as the Supervisor You need to be logged in as supervisor to configure the Mailing System and perform functions such as managing accounts and access rights, generating certain reports, etc. - Page 172 logged out.
-
Page 173: Changing The Display Language
Changing the Display Language Changing the Display Language You can choose a language among those available in the Mailing System for your mailing session (3 languages maximum). How to Change the Display Language How to Change To change the current display language: the Display As a user: Language... -
Page 174: Enabling/Disabling Sounds
Enabling/Disabling Sounds Enabling/Disabling Sounds You can enable or disable the system beeps separately: Beeps on keys • Beeps on warnings and errors. • How to Enable / Disable the Beeps How to Enable / To enable or disable the beeps: Disable the As a user: Beeps... -
Page 175: Display Settings
Display Settings Display Settings You can adjust the contrast of the display for bright or dark working environments. How to Adjust the Display Contrast How to Adjust To adjust the display contrast: the Display As a user: Contrast Press and type 11.3 or select the path: >... -
Page 176: System Time-Outs And Settings
System Time-outs and Settings System Time-outs and Settings System settings include: System motor time-outs • Sleep mode time-out • System Time-outs The system time-outs are defined as follows: Start The period of time the system waits for an envelope after pressing Once this time-out is reached the system stops. -
Page 177: How To Change System Time-Outs
Press [OK] to exit. This is a user setting that only lasts as long as you are logged in. Setting Default Time-Outs How to Change System Time-Outs How to Change To change the system time-Outs: System Time- How to Log in as Supervisor As Supervisor (see p.164) Outs... -
Page 178: High Value, Low Funds Warnings And Pin Codes (If Present)
High Value, Low Funds Warnings and PIN Codes (if present) High Value, Low Funds Warnings and PIN Codes (if present) Warnings Your Mailing System can warn you that the postage amount that you have typed is higher than a preset value. This high-amount warning prevents you from accidentally printing high postage amounts. -
Page 179: How To Set/Cancel A Funding Pin Code
Funding PIN Code You can create a funding PIN code to control access to only those who are authorized Money Operations to add postage. (see p.95). How to Set/Cancel a Funding PIN Code How to Set/ To set a funding PIN code: Cancel a How to Log in as Supervisor As supervisor (see... -
Page 180: Weighing Settings
Weighing Settings Weighing Settings The weighing settings include: Setting a default weighing type used for mailing • Activating/ De-activating the WP Automatic Selection functionality. • Zeroing the weigh platform • Setting the GEO code that corresponds to the geographical location of the Mailing •... -
Page 181: How To Activate The Automatic Weight Detection On The Wp
Weighing Platform Automatic Selection This functionality shall be implemented for improving the user productivity and the ease of use of the mailing system. The user is able to change the weighing type to the WP standard weighing by putting a mail piece onto the WP. The WP standard weighing is automatically selected when a weight increase is detected on the WP. -
Page 182: How To Zero The Weighing Platform
Zeroing the Weighing Platform You can reset the Weighing Platform in the following ways: Set to zero: resets the weight to zero • Tare: sets the weight to zero with an additional tray on the Weighing Platform • Rezero: physically adjusts the Weighing Platform to zero. •... -
Page 183: How To Tare The Weighing Platform
How to Tare the Weighing Platform How to Tare the To tare the Weighing Platform: Weighing How to Log in as Supervisor As supervisor (see p.164): Platform Press and type 6.1.1 or select the path: > System settings > Weighing functions > Weigh Platform Tare Press [OK] to tare the Weighing Platform. -
Page 184: How To Set Dynamic Scale High Accuracy Mode
Dynamic Scale High Accuracy Mode How to Set Dynamic Scale High Accuracy Mode How to Set To activate the high accuracy setting: Dynamic Scale How to Log in as Supervisor As supervisor (see p.164): High Accuracy Press and type 6.2.1 or select the path: Mode >... -
Page 185: How To Change The Geo Code
GEO Code The Weighing Platform calculates mail piece weights that have to be corrected ac- cording to the geographical location of the Mailing System, as weights can change with the altitude and latitude. The correcting geodesic code may be entered: Automatically with Online Services •... -
Page 186: Postage Imprint Default Settings
Postage Imprint Default Settings Postage Imprint Default Settings The settings of the postage imprint 'by default' include: Stamp default settings: sets the default rate, text and ad die for mailing operations • Automatic Date Advance: enables early date change to continue printing postage •... -
Page 187: How To Change The Default Text
Press and type 3.3.4 or select the path: > Default user settings > Default imprint parameters > PPI Select the default PPI in the list. Press [OK] to validate. See also How to Select a PPI To change the current PPI, see p.73. - Page 188 Press and type 3.3.2 or select the path: > Default User Settings > Default Imprint Parameters > Ad Select the default ad die from the list, or None for no ad die. Press [OK] to validate.
-
Page 189: How To Set The Automatic Date Advance Time
Automatic Date Advance The Automatic Date Advance function automatically changes the date printed on mail pieces at a preset time to the next 'working day' date. Example: You can set the system to change dates at 17:00 hours and set Saturdays and Sundays to be non-working days. -
Page 190: How To Set The Default Printing Offset
Printing Offset The printing offset is the distance between the right edge of the envelope and the imprint. You can increase the distance by about 5 mm or 10 mm. How to Set the Default Printing Offset How to Set the To change the default printing offset: Default Printing How to Log in as Supervisor... -
Page 191: Imprint Memories
Imprint Memories 8.10 Imprint Memories The Imprint Memories are presets for your stamp types. As a user, you can quickly recall a saved setting to simplify operation and save time Using Imprint Memories (see p.83). As supervisor, you can create, edit/modify or delete an Imprint Memory. Each Imprint Memory is identified by a name and a number. -
Page 192: How To Create An Imprint Memory
Managing Imprint Memories How to Create an Imprint Memory How to Create To create an imprint memory: an Imprint As supervisor (see How to Log in as Supervisor p.164): Memory Press and type or select the path: > Predefined imprint management Imprint The current list of imprint memories is displayed in the memories... -
Page 193: How To Delete An Imprint Memory
How to Delete an Imprint Memory How to Delete To delete an imprint memory: an Imprint How to Log in as Supervisor As supervisor (see p.164): Memory Press and type or select the path: > Predefined imprint management Select an imprint memory from the list of saved imprint me- mories. -
Page 194: Default Sealing Mode
Default Sealing Mode 8.11 Default Sealing Mode As supervisor, you can set the default sealing Mode (ON or OFF). This setting is used only if the Mixed-Size Feeder is connected. How to Set the Default Sealing Mode How to Set the To modify the Default Sealing Mode: Default Sealing How to Log in as Supervisor... -
Page 195: Connection Settings
Connection Settings 8.12 Connection Settings Connection to the Postal Services or Online Services To add funds or access Online Services, the Mailing System can use the following networks: An analog / fax telephone line through an analog modem • An Internet access through a high speed LAN (Local Area Network). •... -
Page 196: How To Set The Analog Modem Parameters
Analog Telephone Line and Modem Settings These settings include the modem parameters and the telephone number that the Money Op- Mailing System calls to fund the meter or connect to Online Services (see erations p.95). How to Set the Make sure the telephone line is selected: see Postal/Online Services Connection p.188. -
Page 197: Time And Date Management
Time and Date Management 8.13 Time and Date Management Daylight Savings Time Transitions Your Mailing System normally auto-adjusts to Daylight Savings Time. However, if a manual adjustment is necessary, you can use either of the following procedures to correct the Mailing System time: How to Unlock the PSD As a user: p.101... -
Page 198: Options And Updates
Options and Updates 9 Options and Updates This section describes how you can upgrade your system by adding optional functions and elements of stamp such as latest postal rates, additional texts or ad dies. Options and Updates Process..........193 How to Access the Options and Updates Menu .......... -
Page 200: Options And Updates Process
Options and Updates Process Options and Updates Process You can update your Mailing System by: Adding new options, such as Differential Weighing, Advanced Reporting or in- • creasing the maximum number of accounts Update postal Rates and Prepaid Postal Imprints (PPI) •... -
Page 201: Using The Mailbox
Using the Mailbox Using the Mailbox The mailbox allows you to receive messages from the Mailing System or from customer service via the server. On the home screen, an icon indicates that the mailbox contains unread messages. Unread messages icon on home screen: Mailbox list screen indicates unread messages and allows you to delete read messages. -
Page 202: How To Delete Messages
Delete message Select to erase the message after you have read it. How to Delete Messages How to Delete As a user: Messages Select on display , or Press and type or select the path: > Mailbox Mailbox screen is displayed. Select the message to be deleted and press [OK]. -
Page 203: Managing Options
Managing Options Managing Options Consulting the Option List The option list includes the options actually loaded into your Mailing System and in- dicates the options that are activated. You can also display details for each option. For more information about the options you can add to your Mail- ing System, please contact customer service. -
Page 204: How To Load New Options
Activating New Options Process for Activating Options You can activate new options by connecting the Mailing System to Online Services server. New available options are automatically downloaded into your Mailing System and activated. Contact customer service to have new options ready for down- loading on the Online Services server. -
Page 205: Managing Custom Text Messages (If Available)
Managing Custom Text Messages (if available) Managing Custom Text Messages (if available) You can enhance your mail and increase the “openability” of your mail by adding custom text messages to the left of the stamp. As supervisor, you can: Add custom text messages (and create a name for menu selection) •... -
Page 206: How To Modify Or Delete A Text Message
Enter the name to be displayed on the menu for users, then press [OK]. How to Modify or Delete a Text Message How to Modify To modify or delete text: or Delete a Text How to Display the List of Text Display the list of text. -
Page 207: Managing Ad Die
Managing Ad Die Managing Ad Die The Ad dies are graphical slogans you can add on the left hand side of the stamp printed on mail pieces. As supervisor, you can: Display the list of ad dies • In the list, rename or delete ad dies ... -
Page 208: How To Download New Ad Dies
To change the name of the ad die: Edit Select Change the ad die name using the keypad and press [OK]. The system updates the ad die list. To delete the ad die: Delete Select The system asks for a confirmation. Press [OK] to confirm deletion. -
Page 209: Managing Postal Rates
Managing Postal Rates Managing Postal Rates Your Mailing System uses rate tables to calculate postage amounts. As supervisor, you can: Display the list of rate tables and see which table the system is currently using • Download new postal rate tables. •... -
Page 210: Managing Prepaid Imprints (Ppi)
Managing Prepaid Imprints (PPI) Managing Prepaid Imprints (PPI) As supervisor, you can: Display the list of PPIs in the machine • Add new PPIs using an USB memory key • Delete PPIs • How to Change the Default PPI Set the default PPI (see p.179). - Page 211 Select a PPI to load into the machine an press [OK]. The PPI list is updated with the new PPI. To delete a PPI: Select the PPI to delete and press [OK]. Confirm deletion, otherwise press The system updates the PPI list.
-
Page 212: Updating System Software
Updating System Software Updating System Software Occasionally it will be requested that you download new software for your Mailing System. The software package may include feature enhancements or updates. Also, if you purchase an additional service, you may be required to download the software to support this new service. - Page 213 After downloading The Mailing System indicates it has to be re-started. Disconnect and reconnect the Mailing System power cord Connection Diagram (see p.23. After restarting, the Mailing System calls the server to confirm installation. The Mailing System is ready for use with the new software. No information is lost during the updating process: your data and settings remain unchanged.
-
Page 214: Maintaining Your Mailing System
Maintaining your Mailing System 10 Maintaining your Mailing System This section contains important information about the maintenance of your Mailing System in order to keep it in good condition. 10.1 Maintaining the Ink Cartridge ........... 209 How to Display Ink Level and Cartridge Data ............... 210 How to Display Ink Level and Cartridge Data ............. -
Page 216: Maintaining The Ink Cartridge
Maintaining the Ink Cartridge 10.1 Maintaining the Ink Cartridge About the Ink Cartridge The ink cartridge for printing is located in the Mailing System and contains ink that has been tested and approved by the postal service. The ink cartridge uses ink jet technology. It requires the print head nozzles to be cleaned regularly to provide a good printing quality. -
Page 217: How To Display Ink Level And Cartridge Data
Displaying Ink Level and Cartridge Data You can display the ink level and other cartridge data, such as: Ink consumed in percent • Ink color • Cartridge status (present or not present) • First used date • Best before Also check the date on the cartridge box. -
Page 218: How To Align The Print Heads
Setting the Headset Alignment Aligning the print heads is required if there is an between the top and the bottom of the imprints. Your Mailing System requires the heads to be aligned after each cartridge change. How to Align the Print Heads How to Align the To align the print heads: Print Heads... - Page 219 Repeat the previous step until lines F are aligned.
-
Page 220: How To Clean The Print Heads Automatically
Cleaning the Print Heads If the printing on envelopes or labels looks unclear or dirty in some way, clean the headset to restore the print quality. If the headset has to be cleaned too often, change the automatic cleaning interval as indicated. -
Page 221: How To Change The Ink Cartridge
Changing the Ink Cartridge The Power cord must be plugged in to move the cartridge into the 'replacement' position. How to Change the Ink Cartridge How to Change Open the cover: the ink cartridge moves to the the Ink Cartridge replacement position. - Page 222 Insert the new ink car- tridge, and then push it forward until you hear the click. Close the cover. The alignment process of the printing heads starts automatically.
-
Page 223: Filling And Adjusting The Feeder Sealer
Filling and Adjusting the Feeder Sealer 10.2 Filling and Adjusting the Feeder Sealer Filling the Sealer Bottle The Automatic Feeder uses water for sealing envelopes. If the system is out of water, the mailing process continues but the envelopes will not sealed properly. -
Page 224: Cleaning The Mail Path
Cleaning the Mail Path 10.3 Cleaning the Mail Path Cleaning the mail path includes: Cleaning sealer brushes and sponge • Cleaning feeder belts and rollers (if installed) • Cleaning the Mailing System sensors on the mail path. •... -
Page 225: How To Clean The Brushes And Sponge (Sealer)
Cleaning Brushes and Sponge of the Sealer MAKE SURE YOUR SYSTEM IS DISCONNECTED FROM POWER SOURCE BEFORE CLEANING! How to Clean the Brushes and Sponge (Sealer) How to Clean To clean the brushes and sponge of the feeder: the Brushes and Open the feeder and push the left of the upper Sponge (Sealer) - Page 226 into place. Push down on the upper drive assembly until it locks back into position.
-
Page 227: How To Clean The Feeder Belts And Rollers
Cleaning the Feeder Belts and Rollers Follow the steps below to clean the belts and rollers of the feeder and of the Dynamic Scale (if installed). How to Clean the Feeder Belts and Rollers How to Clean To clean the feeder belts and rollers: the Feeder Belts (with sealer) Open equipment covers;... -
Page 228: Touchscreen Calibration
Touchscreen Calibration 10.4 Touchscreen Calibration Depending on the pointing device you use on the touchscreen (finger, stylus or other pointing accessory), you may want to calibrate the sensitivity of the touchscreen to improve the screen responsiveness. How to Calibrate the Touchscreen How to Calibrate To calibrate the touchscreen: the Touchscreen... -
Page 229: Maintenance Processes
Maintenance Processes 10.5 Maintenance Processes... -
Page 230: How To Run The Installation Wizard
Running the Installation Wizard You may wish to run the installation wizard after a system update. How to Run the Installation Wizard How to Run the To run the installation wizard: Installation How to Log in as Supervisor As supervisor (see p.164): Wizard Press... -
Page 231: How To Run The Registration Update
Performing the Update Registration Procedure to Change your Address This procedure is to be used if you have changed address. First contact your Customer Service to update your details, then you will be instructed to perform the update registration procedure. Updating Registration Check that your Mailing System is connected to the network before starting. -
Page 232: Troubleshooting
Troubleshooting 11 Troubleshooting This section helps you solve problems you may encounter while using your Mailing System. 11.1 Paper Jamming ..............227 How to Clear Mail Jammed in the Base................ 227 How to Clear Mail Jammed in the Mixed-Size Feeder..........228 How to Remove Mail Jammed in the Dynamic Scale ........... -
Page 234: Paper Jamming
Paper Jamming 11.1 Paper Jamming Base Jamming Envelopes are stopped in the transport mechanism of the Base. Possible causes Actions Mailpiece is too thick. 1 Clear the Base as indicated below. • Mail size is incorrect. • 2 Correct the cause indicated in the Envelopes properly •... -
Page 235: How To Clear Mail Jammed In The Mixed-Size Feeder
Mixed-Size Feeder Jamming Some envelopes are blocked in the Mixed-Size Feeder. Possible causes Actions Mail piece is too thick. 1 Unblock the Mixed Size Feeder as • indicated below. Mail size is incorrect. • Too many envelopes are on the •... - Page 236 If necessary, lift up the brush release lever. Remove jammed velopes. Position the brush and push the brush release lever until it snaps into place. Push down on the upper drive assembly until it locks back into position. Close the cover.
-
Page 237: How To Remove Mail Jammed In The Dynamic Scale
Dynamic Scale Jamming Occasionally envelopes can become jammed in the Dynamic Scale. Possible causes Actions Mail size is incorrect. 1 Unblock the Dynamic Scale by fol- • lowing the steps outlined below. Envelopes properly • stacked on the Feed Platform. 2 Correct the cause: Mail Specifi- Mail sizes: see... -
Page 238: Label Jamming
Label Jamming 11.2 Label Jamming A Label is Jammed in the Base Possible causes Actions A label is blocked in the Automatic Clear the label as indicated below. Label-Dispenser or in the transport mechanism of the system base. How to Clear a Label Jammed in the Base How to Clear a To clear a label jammed in the Base: Label Jammed in... -
Page 239: Weighing Problems
Weighing Problems 11.3 Weighing Problems The Weighing Device does not Weigh Properly If the Base does not display a correct weight, complete the following actions to correct the problem. You have to check the weighing device (Weighing Platform or Dynamic Scale) as follows. -
Page 240: Diagnostics And System Data
Diagnostics and System Data 11.4 Diagnostics and System Data Diagnostics allow you to find the root cause of a an issue or a breakdown that may occur during the life of your Mailing System. The system performs tests automatically to diagnose the problem and generate cor- responding reports. -
Page 241: How To Access Diagnostic Data
How to Access Diagnostic Data How to Access To gain access to a diagnostic data: Diagnostic Data How to Log in as Supervisor As supervisor (see p.164): Press and type or select the path: > Maintenance > Diagnostics The system requires you press [OK] to start the diagnostic tests, then displays the list of the tests. -
Page 242: How To Display The Event Lists
How to Display the Event Lists How to Display To display the event lists: the Event Lists How to Log in as Supervisor As supervisor (see p.164): Press and type 7.1.3 or select the path: > Maintenance > System info > Event list Select the >... -
Page 244: Specifications
Specifications 12 Specifications This sections contains the main specifications of your Mailing System. 12.1 Mail Specifications ............239 12.2 Recommended Operating Conditions ....... 241 12.3 General Specifications ............242 12.4 Operating Specifications ........... 243... -
Page 246: Mail Specifications
Mail Specifications 12.1 Mail Specifications Envelope Specifications Envelope Dimensions (note: Your Mailing System can handle the envelope & flap sizes as illustrated below the illustration is not on scale) Envelope Weight 2.83 g 907 g Envelope Thickness 0.2 mm 10 mm... -
Page 247: In The Dynamic Scale
In the Feeder See also How to Use the Feeder p.38. • Envelope Stack Min weight 0.1 oz Max weight 2 lb 10.2 oz Max height 4" The feeder cannot process nested envelopes. In the Dynamic Scale Envelope Thickness 0.008" 0.5"... -
Page 248: Recommended Operating Conditions
Recommended Operating Conditions 12.2 Recommended Operating Conditions Temperature and Relative Humidity Your Mailing System should only be operated in the following conditions: Temperature range Ambient temperature: 50°F - 104°F. Relative humidity 80% max. without condensation. Weighing accuracy To obtain the best weighing results, use a solid and steady table: Away from any doors •... -
Page 249: General Specifications
General Specifications 12.3 General Specifications Dimensions (mm) (Width x Length x Height) Base: 253 x 442 x 321 • Catch tray: 315 x 348 x 127 • Mixed Size Feeder: 260 x 350 x 615 • Dynamic scale: 263 x 350 x 438 •... -
Page 250: Operating Specifications
Operating Specifications 12.4 Operating Specifications Envelope dimensions and weights Max. length: 330 mm • Max. width: 254 mm • Flap max. height: 76 mm • Min. thickness: 0.2 mm Max. thickness (manual feeder): 16 mm Max. thickness (Mixed size feeder) : 12 mm ... -
Page 252: Index
Index Differential weighing auto-tape 54, 74 Access Control 105 Disconnecting 9 Account 18, 118 Dynamic weighing 46 Account Information 114 Dynamic weighing 56, 74 Account Mode 106 Dynamic weighing batch-mode 56, Account level 160 Account structure 113 Accounts 109 Accounts with Access Control 110 ELD / External Label Dispenser 87 Ad die 18, 79, 200 Energy Star[reg ] 25... - Page 253 Job memory 18 Rate Protection 160 Rate Selection 70 LAN 8, 189 Rate Updates 155 Label Indicator 18 Rate Wizard 71 Label Storage 14 Rate tables 202 Rear Guide-Wall 13 Remaining funds 18 Maintenance Processes 222 Remote Account Management 111 Manual Calls 156 Running Mail 43, 49, 65, 68 Manual weight entry 47, 57...
- Page 255 4155902P/B - 01/02/2015...
Need help?
Do you have a question about the IS-480 and is the answer not in the manual?
Questions and answers