Sign In
Upload
Manuals
Brands
Konica Minolta Manuals
All in One Printer
bizhub C3850FS
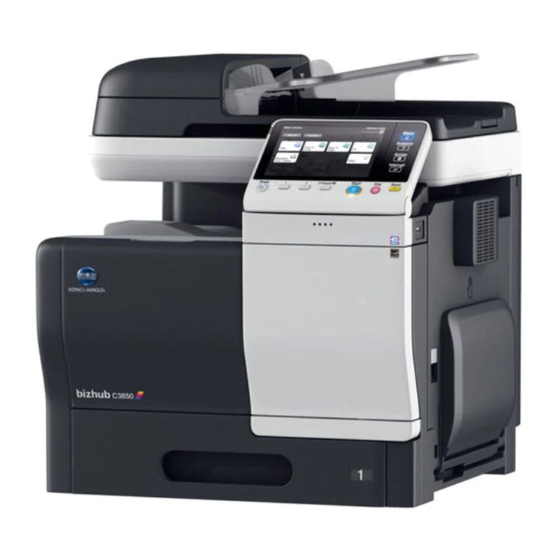
Konica Minolta bizhub C3850FS Manuals
Manuals and User Guides for Konica Minolta bizhub C3850FS. We have
9
Konica Minolta bizhub C3850FS manuals available for free PDF download: User Manual, Quick Start Manual
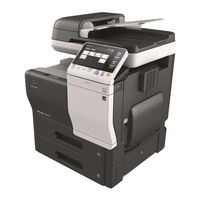
Konica Minolta bizhub C3850FS User Manual (168 pages)
Applied Functions
Brand:
Konica Minolta
| Category:
All in One Printer
| Size: 2.26 MB
Table of Contents
Table of Contents
2
1 Using Web Connection
7
Web Connection
8
Operating Environment
8
Operations Required to Use this Function
9
Configuring Network Environment Settings
9
Assigning an IP Address
9
Confirming the IP Address
9
Checking Web Browser Settings
9
Basic Usage
10
How to Access
10
Web Connection Screen Configuration
10
Status Display
11
Login Methods
12
Login Screen
12
Login Mode
12
Logging in to Administrator Mode
13
Logging in to User Mode
13
Available Operations in User Mode
14
System] Tab
14
Job] Tab
14
Print] Tab
15
Storage] Tab
15
Address] Tab
16
Available Operations in Administrator Mode
17
System] Tab
17
[Device Information]
17
[Counter]
17
[Online Assistance]
17
[Import/Export] - [Authentication]
18
[Import/Export] - [Address]
18
[Date/Time Settings] - [Manual Settings]
18
[Date/Time Settings] - [Time Adjustment Settings]
19
[Date/Time Settings] - [Daylight Saving Time Settings]
19
[Machine Settings]
19
[ROM Version]
20
[Maintenance] - [Clear Settings]
21
[Maintenance] - [Reset]
21
[Notification Settings] - [Status Notification Settings]
21
[Notification Settings] - [Total Counter Notification Settings]
23
[Job Log] - [Job Log Settings]
23
[Job Log] - [Create Job Log]
23
[Job Log] - [Download Job Log]
23
[Job Log] - [Erase Job Log]
24
[Sender Registration]
24
[License Settings] - [Enabler]
24
[QR Code Settings]
24
Security] Tab
25
[Authentication] - [General Settings]
25
[Authentication] - [User List]
26
[Authentication] - [Account Track List]
27
[Authentication] - [External Server List]
27
[Authentication] - [Temporarily Save Authentication Information]
29
[Authentication] - [Scan to Home Settings]
29
[Authentication] - [Default Function Permission]
29
[Authentication] - [Public User Registration]
30
[ID & Print Settings]
30
[Authentication Device Settings] - [General Settings]
31
[Felica (SSFC) Settings]
31
[HID (Iclass) Settings]
31
[PKI Settings] - [Device Certificate]
32
[PKI Settings] - [SSL/TLS Settings]
32
[PKI Settings] - [Protocol Settings]
32
[PKI Settings] - [External Certificate]
38
[PKI Settings] - [Validate Certificate]
38
[Ipsec]
39
[IP Address Filtering]
42
[Ieee802.1X]
43
[Limiting Access to Destination] - [Restrict User Access]
43
[Auto Logout]
44
[Administrator Password]
44
[Address Reference Settings] - [Reference Allowed Group List]
44
Job] Tab
45
[Current Jobs]
45
[Job History]
45
[Communication List]
45
Print] Tab
46
[Default Settings] - [General Settings]
46
[Default Settings] - [Paper Source Settings]
47
[Default Settings] - [Tray Mapping Settings]
47
[Default Settings] - [PCL Settings]
48
[Default Settings] - [Postscript Settings]
49
[Default Settings] - [XPS Settings]
50
[Default Settings] - [Print Quality Settings]
51
[Default Settings] - [OOXML Settings]
52
[Default Settings] - [Page Layout Settings]
52
[Default Settings] - [Barcode Settings]
52
[Font/Form]
53
[Download Font/Form]
53
[Report Types]
53
[Direct Print]
54
Storage] Tab
55
[Scan to HDD]
55
[PC-Fax]
55
Address] Tab
55
[Address Book]
55
[Group]
55
[Program]
55
[Subject]
55
[Text]
56
Network] Tab
56
[General Settings] - [Network Interface Settings]
56
[General Settings] - [Ethernet Settings]
56
[General Settings] - [Wireless LAN Settings]
56
[General Settings] - [Wireless LAN Status]
57
[General Settings] - [Wireless LAN Settings (AP Mode)]
57
[General Settings] - [Local Interface Settings]
59
[TCP/IP Settings] - [TCP/IP Settings]
59
[TCP/IP Settings] - [Ipv4 Settings]
59
[TCP/IP Settings] - [Ipv6 Settings]
60
[TCP/IP Settings] - [RAW Port Settings]
60
[TCP/IP Settings] - [DNS Settings]
61
[E-Mail Settings] - [E-Mail TX (SMTP)]
62
[E-Mail Settings] - [E-Mail RX (POP)]
63
[E-Mail Settings] - [S/MIME]
64
[LDAP Settings] - [LDAP Settings]
64
[LDAP Settings] - [LDAP Server Registration]
65
[HTTP Settings] - [HTTP Server Settings]
66
[IPP Settings]
66
[FTP Settings] - [FTP Server Settings]
67
[FTP Settings] - [FTP TX Settings]
67
[SNMP Settings]
68
[SMB Settings] - [Wins/Netbios Settings]
70
[SMB Settings] - [SMB Client Settings]
70
[SMB Settings] - [Direct Hosting Settings]
70
[Web Service Settings] - [Common Settings]
71
[Web Service Settings] - [Printer Settings]
71
[Web Service Settings] - [Scanner Settings]
71
[Bonjour Settings]
71
[Network Fax Settings] - [Network Fax Function Settings]
72
[Network Fax Settings] - [Internet Fax RX Ability]
72
[Network Fax Settings] - [I-Fax Advanced Setting]
72
[Webdav Settings] - [Webdav Server Settings]
73
[Webdav Settings] - [Webdav Client Settings]
74
[Openapi Settings]
74
[TCP Socket Settings]
75
[LLTD Settings]
76
[Machine Update Settings] - [HTTP Proxy Settings]
76
[Web Browser Settings]
76
[IWS Settings]
77
[Airprint Setting]
77
[SSDP Settings]
78
2 Configuring the Operating Environment of this Machine
79
Configuring the Scan to E-Mail Operating Environment
80
Overview
80
Configuring Basic Settings for Scan to E-Mail
80
Using an SSL/TLS Communication
81
Using SMTP Authentication
81
Using POP before SMTP Authentication
82
Using S/MIME
84
Configuring the SMB Send Operating Environment
85
Overview
85
Configuring Basic Settings for SMB Send
86
Using the WINS Server
86
Using the Direct Hosting SMB Service
87
Resolving the Name Using LLMNR
87
Using in the DFS Environment
87
Configuring the FTP Send Operating Environment
88
Overview
88
Configuring Basic Settings for the FTP Transmission
88
Using the Proxy Server
88
Configuring the Webdav Send Operating Environment
89
Overview
89
Configure Basic Settings for Webdav Send
89
Using the Proxy Server
90
Using SSL Communication
90
Configuring the WS Scan Operating Environment
91
Overview
91
Configuring the Basic Settings for the WS Scan Transmission
91
Using SSL Communication
92
Configuring the WS Print Operating Environment
93
Overview
93
Configuring Basic Settings for the WS Printing
93
Using SSL Communication
94
Configuring the Internet Fax Operating Environment
95
Overview
95
Configuring Basic Settings for Sending and Receiving an Internet Fax
95
Checking a Fax Reception
97
Specifying the Reception Ability of this Machine
98
Using an SSL/TLS Communication
98
Using SMTP Authentication
98
Using POP before SMTP Authentication
99
Searching for a Destination Using the LDAP Server
101
Overview
101
Configuring Basic Settings for the LDAP Search
101
Using SSL Communication
103
Registering a Destination
104
Registering an Address Book
104
Registering E-Mail Addresses
104
Registering an FTP Destination
104
Registering an SMB Destination
105
Registering a Webdav Destination
106
Registering a Fax Destination
107
Registering an Internet Fax Address
108
Registering a Group
108
Registering a Program
109
Employing MFP Authentication
111
Overview
111
Configuring Basic Settings for the User Authentication
111
Employing Active Directory Authentication
113
Overview
113
Configuring Basic Settings for the Active Directory Authentication
113
Employing Account Track
114
Overview
114
Configuring Basic Account Track Settings
114
Using the Certificate of this Machine
115
Creating a Certificate for this Machine to Communicate Via SSL
115
Overview
115
Self-Creating a Certificate
115
Requesting CA for a Certificate Issuance
116
Managing the Certificates for this Machine
116
Exporting a Certificate
116
Importing a Certificate
116
Deleting a Certificate
117
Limiting Access to Destinations for each User
118
Methods to Limit Access to Destinations
118
Managing Destinations at the Reference Allowed Level
118
Reference Allowed Level
118
Specifying the Reference Allowed Level
118
Management Based on the Reference Allowed Group
119
Reference Allowed Group
119
Assigning a Reference Allowed Group
119
Managing Destinations in a Combination Comprising the Reference Allowed Level with the Reference Allowed Group
120
Combining the Reference Allowed Level with the Reference Allowed Group
120
Specifying the Reference Allowed Level and the Reference Allowed Group Simultaneously
121
Associating a Mobile Terminal with this Machine Using the QR Code
122
3 Manually Installing the Printer Driver (for Windows)
123
Checking the Connection Method
124
In Windows Vista/7/8/8.1/Server 2008/Server 2008 R2/Server 2012/Server 2012 R2
124
In Windows Server 2003
125
Using Lpr/Port9100 Connection for Installation
126
Operations Required to Use this Function (for Administrators)
126
Installing the Printer Driver by Automatically Detecting the Printer
126
In Windows 8/8.1/Server 2012/Server 2012 R2
126
In Windows Vista/7/Server 2008/Server 2008 R2
128
Installing the Printer Driver by Creating a New Port
129
In Windows 8/8.1/Server 2012/Server 2012 R2
129
In Windows Vista/7/Server 2008/Server 2008 R2
131
In Windows Server 2003
132
Using IPP Connection for Installation
134
Operations Required to Use this Function (for Administrators)
134
In Windows 8/8.1/Server 2012/Server 2012 R2
134
In Windows Vista/7/Server 2008/Server 2008 R2
135
In Windows Server 2003
137
Using the Web Service Connection for Installation
138
Web Service
138
Operations Required to Use this Function (for Administrators)
138
Installation Methods
138
Using USB Connection for Installation
139
In Windows Vista/7/8/8.1/Server 2008/Server 2008 R2/Server 2012/Server 2012 R2
139
In Windows Server 2003
139
Updating the Printer Driver
140
Manually Uninstalling the Printer Driver
141
Advertisement
Konica Minolta bizhub C3850FS User Manual (99 pages)
Brand:
Konica Minolta
| Category:
All in One Printer
| Size: 4.23 MB
Table of Contents
Table of Contents
2
1 Introduction
5
Welcome
6
User's Guides
7
Booklet Manuals
7
User's Guides Included in User's Guide CD-ROM
7
Notations and Symbols Used in this Manual
8
Procedural Instruction
8
Symbols Used in this Manual
8
Product and Key Names
8
Notations of Application Names
8
Safety Information
9
Warning and Precaution Symbols
9
Meaning of Symbols
9
Legal Restrictions on Reproduction
14
Regulation Notices
15
For EU Member States Only
15
2 Before Using this Function
16
CD-ROM Supplied with this Machine
17
Driver & Utilities CD-ROM
17
User's Guide CD-ROM
17
Installation Location and Environment
18
Installation Location
18
Front View
18
Right View
19
Right View (with Optional Devices Installed)
19
Installation Environment
20
3 About this Machine
21
Checking the Name of each Part
22
Front Side
22
Rear Side
25
Checking the Option Configuration
26
List of Optional Components
26
Front View (with Optional Devices Installed)
27
How to Use Finisher FS-P03
28
Extending the Output Tray of the Finisher (Bizhub C3850FS Only)
29
4 Turning the Power on or off
31
About Power Supply
32
Turning the Power Switch on or off
33
Using the Power Key
34
When Using the Power Key as a Power Save Key
34
When Using the Power Key as a Sub Power off Key
35
5 Loading the Original
36
Loading the Original into the ADF
37
Original Available for ADF
37
Loading the Original Onto the Original Glass
39
Original Available on the Original Glass
39
6 Loading Paper
40
Paper
41
Checking the Available Paper Types
41
Checking the Available Paper Sizes
42
Precautions for Correct Operations
43
Unavailable Paper
43
Storing Paper
43
Loading Paper into the Manual Feed Tray
44
How to Load Paper into the Manual Feed Tray
44
Loading Postcards
45
Loading Envelopes
46
Loading Paper into Tray 1
47
Loading Paper into Tray 2/3
49
Loading Letterheads
51
When Using Bizhub C3850FS
51
Loading Letterheads in Portrait Orientation
51
Loading Letterheads in Landscape Orientation
51
When Using Bizhub C3850/Bizhub C3350
52
Loading Letterheads in Portrait Orientation
52
Loading Letterheads in Landscape Orientation
52
7 Control Panel
53
Names and Functions of Control Panel Keys
54
Changing the Angle of the Control Panel
56
Touch Panel
57
Operating the Touch Panel
57
Tap
57
Flick
57
Displaying the Keypad
57
Switching the Entry or Selection Screen
58
Precautions on Using the Touch Panel
58
Entering Characters
59
Screen Layout
60
Main Menu
60
Main Screen
61
Icon Types
62
Icons Indicating the Status of this Machine
62
Icons to Change to Selection Screen
62
Changing the Function Assigned to a Register Key (for Administrators)
63
8 Viewing Active Job and Job Logs
64
Displaying the Job List Screen
65
Viewing the Active Job
65
Viewing Job Logs
66
9 Login Screen
67
Logging in to this Machine
68
Performing User Authentication (MFP Authentication)
68
Performing User Authentication (External Server Authentication)
70
Performing Account Track
72
10 Specifications
73
Checking the Specifications of this Machine
74
Bizhub C3850FS
74
Main Unit
74
Finisher
75
Bizhub C3850/Bizhub C3350
75
Checking the Specifications of Optional Devices
77
Paper Feed Unit PF-P13
77
Fax Kit FK-512
77
Finisher FS-P03
78
Authentication Unit AU-201
78
Authentication Unit AU-201S
79
Standard Operating Life of Consumables and Periodic Replacement Parts
80
Konica Minolta bizhub C3850FS User Manual (69 pages)
Brand:
Konica Minolta
| Category:
Printer
| Size: 1.08 MB
Table of Contents
Table of Contents
2
1 Configuring Settings of this Machine
5
Displaying [Utility]
6
Displaying [Administrator Settings]
8
2 Accessibility]
9
[Key Repeat/Interval]
10
[Message Display Time]
10
[Sound Settings]
10
[Brightness Adjustment]
11
[Double Tap Interval Settings]
11
3 One-Touch/User Box Registration]
12
[E-Mail]
13
[Fax]
13
[Smb]
14
[Confidential RX User Box]
15
[Ftp]
16
[Webdav]
17
[Internet Fax]
17
[Group] - [Scan]
18
[Group] - [Fax]
18
4 User Settings]
19
System Settings]
20
[Language Selection]
20
[Measurement Unit Setting]
20
[Paper Tray]
20
[Auto Color Level Adjustment]
21
[Page Number Print Position]
21
Custom Display Settings]
23
[Scan/Fax Settings]
23
[Display Fax Activity]
23
Copier Settings]
24
[Auto Zoom for Combine]
24
[Default Copy Settings]
24
[Separate Scan Output Method]
24
Scan/Fax Settings]
25
[JPEG Compression Level]
25
[Black Compression Level]
25
[Default Fax Settings]
25
[Default Scan Settings]
25
[Compact PDF Compression Level]
25
[Print Reports]
25
Printer Settings]
26
[Paper Setting]
26
[Print Reports]
27
[OOXML Print Settings]
27
[Layout - Combination]
27
Select Default Start App]
29
QR Code Display]
30
5 Administrator Settings]
31
System Settings]
32
[Power Supply/Power Save Settings]
32
[Date & Time Settings]
33
[Daylight Saving Time]
33
[Weekly Timer Settings]
33
[Restrict User Access]
34
[Expert Adjustment]
34
[List/Counter]
35
[Priority Tray]
35
[Reset Settings]
35
[Folder Settings]
36
[Registered Key Settings]
36
[PDF/A Default Setting]
36
[Page Number Print Position]
36
[Main Menu Default Settings]
38
[Adjust ADF Skew]
38
Administrator/Machine Settings]
39
[Administrator Registration]
39
[Input Machine Address]
39
Address Registration List]
40
[Speed Address List]
40
[Group Address List]
40
[Program List]
40
[E-Mail Subject/Text List]
40
User Authentication/Account Track]
41
[User Name List]
41
[Logout Confirmation Screen Display Setting]
41
[User Account Counter]
41
[Track Account Counter]
41
[Card Authentication]
42
[Scan to Home Settings]
42
Network Settings]
43
[TCP/IP Settings]
43
[HTTP Server Settings]
44
[FTP Settings]
44
[E-Mail Settings]
44
[SNMP Setting]
44
[Bonjour Setting]
44
[DPWS Settings]
44
[Detail Settings]
45
[Ieee802.1X Authentication Settings]
45
[Internet ISW Settings]
45
[Airprint Setting]
45
[Extended Network Settings]
46
[Web Browser Setting]
48
[IWS Settings]
48
Copier Settings]
49
[Specify Tray When APS OFF]
49
[Default Paper Type Settings for Manual Tray]
49
[Letterhead Duplex Print Permission Settings]
49
Printer Settings]
50
[Startup
50
[Auto Continue]
50
[Paper Settings]
50
[Hold Job Timeout]
50
[Quality Settings]
50
[Emulation]
51
[USB Timeout]
52
Fax Settings]
53
[Header Information]
53
[Header/Footer Position]
53
[Line Parameter Setting]
53
[TX/RX Settings]
55
[Function Settings]
55
[PBX Connection Settings]
57
[Report Settings]
57
[Job Settings List]
58
[Confidential RX User Box]
58
[Network Fax Settings]
59
System Connection]
60
[Call Remote Center]
60
[Openapi Settings]
60
[QR Code Setting]
61
Security Settings]
62
[Administrator Password]
62
[Security Details]
62
[Enhanced Security Mode]
63
[HDD Settings]
65
[Stamp Settings]
66
[FIPS Settings]
66
[Quick Security Setting]
67
Paper Empty Alert Display Setting]
68
License Management]
68
[Get Request Code]
68
[Activation]
68
[List of Enabled Functions]
68
[List Output]
68
Openapi Certification Management Setting]
68
[Restriction Code Settings]
68
Delete Authenticated Documents]
68
Advertisement
Konica Minolta bizhub C3850FS User Manual (65 pages)
Fax Functions
Brand:
Konica Minolta
| Category:
All in One Printer
| Size: 2.21 MB
Table of Contents
Table of Contents
2
1 Fax Function
5
2 Preparation for Fax Function (for Administrators)
7
Preparation Flow
8
Operations Required to Use this Function
9
Checking the Modular Cable Connection
9
Specifying the Type of Telephone Line
10
Preparing to Use the Machine in a Private Branch Exchange (PBX) Environment
10
Selecting a Receiving Method
10
Registering TTI
10
Setting the Date and Time for the Machine
10
Option Settings
11
Registering Frequently Used Fax Numbers
11
Using an LDAP Server to Specify Addresses
11
3 How to Send
12
Sending (Basic Operation Flow)
13
Checking the Recipient Status before Sending (Manual Transmission)
15
Manual Transmission
15
Faxing Manually
15
Recalling a Program for Sending
17
Program
17
Registering a Program
17
Specifying a Destination
20
Selecting a Destination from Favorites
20
Selecting a Destination from Address Book
20
Directly Entering Data
21
Selecting a Destination from the History
22
Searching for a Fax Number from the LDAP Server
22
Option Settings for Fax TX
23
Basic Option Settings
23
Specifying the Size of the Original to be Scanned ([Scan Size])
23
Specifying the Resolution to Scan the Original ([Resolution])
23
Scanning both Sides of an Original ([Simplex/Duplex])
23
Specifying the Method to Scan the Original
23
Scanning a Long Original ([Long Original])
23
Specifying a Binding Position ([Binding Position])
23
Scanning a Number of Originals in Several Batches ([Separate Scan])
23
Adjusting Quality/Density
24
Selecting the Appropriate Image Quality Level for the Contents of the Original ([Original Type])
24
Adjusting the Density of the Original to be Scanned ([Density])
24
Adjusting the Background Density of the Original to be Scanned ([Background Removal])
24
Sharpening the Border between Texts ([Sharpness])
24
Viewing the Current Settings
25
4 Sending Options
26
Resending a Fax
27
Auto Resending (Auto Redial)
27
Sending a Fax Without Sender Information
28
Sender Information
28
Operation Flow
28
Specifying the Sending Time ([Timer TX])
29
Timer TX
29
Operation Flow
29
Checking the Destination Fax Number before Sending a Fax ([Check Dest.& Send])
30
Check Dest. & Send
30
Operation Flow
30
Sending a Confidential Fax ([F-Code TX])
31
Confidential Communication
31
Operation Flow
31
Specifying a Relay Station for Sending ([F-Code TX])
32
Relay Distribution
32
Operation Flow
32
Releasing the ECM Mode for Sending ([ECM OFF])
33
Ecm
33
Operation Flow
34
Releasing the Super G3 Mode for Sending ([V34 OFF])
34
V34
34
Sending the Original Page by Page ([Quick Memory Tx])
35
Quick Memory TX
35
Operation Flow
35
Sending a Fax with a Password ([Password TX])
36
Password TX
36
Operation Flow
36
Registering a Polling File ([Polling TX])
37
Polling TX
37
Registering a Polling File
37
Printing or Deleting a File in the Folder
37
5 How to Receive a Fax
39
Receiving a Fax Automatically (Using the Machine in Fax Only Mode)
40
Auto RX
40
Operations Required to Use this Function (for Administrators)
40
Receiving a Fax Manually
41
Manual RX
41
Operations Required to Use this Function (for Administrators)
41
Operation Flow
41
Using the DRPD Service
42
Drpd
42
Operations Required to Use this Function (for Administrators)
42
6 Receiving Options
43
Adding the Received Date and Time for Printing ([Footer Position])
44
Reception Information
44
Operations Required to Use this Function (for Administrators)
44
Saving or Forwarding an Unprintable Fax (In-Memory Proxy Reception)
45
In-Memory Proxy Reception
45
Forwarding Fax Received and Stored in Memory (In-Memory Proxy Reception)
45
Automatically Distributing a Received Fax (TSI Routing)
46
TSI Routing
46
Operations Required to Use this Function (for Administrators)
46
Forwarding a Received Fax to Another Destination (Forward TX)
47
Forward TX
47
Operations Required to Use this Function (for Administrators)
47
Saving a Received Fax to Memory Without Printing (Memory RX)
48
Memory RX
48
Operations Required to Use this Function (for Administrators)
48
Printing or Deleting a Received Fax
48
Downloading a Received Fax
49
Receiving a Confidential Fax (Confidential RX)
50
Confidential Communication
50
Operations Required to Use this Function
50
Printing a Received Fax
50
Restricting Communication Peers with Password (Closed Network RX)
51
Closed Network RX
51
Operations Required to Use this Function (for Administrators)
51
Receiving a Polling File (Polling RX)
52
Polling RX
52
Operation Flow
52
Saving a Received Fax in Memory (PC-Fax RX)
53
PC-Fax RX
53
Operations Required to Use this Function (for Administrators)
53
Printing a Received Fax
53
Downloading a Received Fax
54
Stopping Fax Printing at Night (Night RX)
55
Night RX
55
Operations Required to Use this Function (for Administrators)
55
Printing a Fax on both Sides ([Duplex Print (RX)])
56
Duplex Print (RX)
56
Operations Required to Use this Function (for Administrators)
56
Configuring the Fax Print Settings (for Administrators)
57
Default Print Settings
57
Fixing the Print Paper Size ([Print Paper Size])
57
Fixing the Print Paper Tray ([Tray Selection for RX Print])
57
Splitting a Custom Size (Portrait) Fax for Printing ([Print Separate Fax
57
Konica Minolta bizhub C3850FS Quick Start Manual (68 pages)
Brand:
Konica Minolta
| Category:
All in One Printer
| Size: 3.07 MB
Table of Contents
Table of Contents
2
1 Introduction
4
Welcome
5
User's Guides
6
Manuals
6
User's Guide CD-ROM
7
User's Guides Included in User's Guide CD-ROM
7
Operating Environment
8
Displaying the Top Page
8
For Windows
8
For Mac os
8
Notations and Symbols Used in this Manual
9
Procedural Instruction
9
Symbols and Notations
9
Notations of Application Names
9
Intended Use of Office MFP Devices
10
Intended Use
10
Impermissible Operating Conditions
10
Exclusion of Liability
10
Target Groups
11
2 Overview of this Machine
12
About this Machine
13
Name of each Part
13
Front Side
13
Rear Side
14
Option Configuration
15
About Power Supply
17
Power Switch and Power Key Locations
17
Turning the Power Switch on or off
18
Using the Power Key
19
When Using the Power Key as a Power Save Key
19
When Using the Power Key as a Sub Power off Key
20
Control Panel
21
Operating the Touch Panel
23
Tap
23
Flick
23
Displaying the Keypad
23
Switching to the Entry or Selection Screen
24
Precautions on Using the Touch Panel
24
Main Menu
25
Entering Characters
27
3 Loading Paper
28
Paper
29
Checking the Available Paper Types
29
Checking the Available Paper Sizes
30
Precautions for Correct Operations
31
Unavailable Paper
31
Storing Paper
31
Loading Paper into the Manual Feed Tray
32
Loading Paper into Tray 1
34
4 Initial Settings of this Machine
36
Preparation for Network Connection (for Administrators)
37
Checking a LAN Cable for Connection
37
Assigning an IP Address
37
Preparation for Fax (for Administrators)
38
Checking the Modular Cable Connection
38
Specifying the Type of Telephone Line
38
Preparing to Use the Machine in a Private Branch Exchange (PBX) Environment
38
Selecting a Receiving Method
38
Registering Sender Information
38
Setting the Date and Time for the Machine
38
Security Settings (for Administrators)
39
HDD Settings
39
Configuring [Quick Security Setting]
39
5 Basic Usage
40
Using the Print Function (Windows Environment)
41
Printer Driver
41
Preparation for Printing (Network Connection)
41
Checking a LAN Cable for Connection
41
Checking the Network Settings
41
Installing the Printer Driver
42
Preparation for Printing (USB Connection)
43
Changing the Installation Settings (Windows 7/8/8.1/Server 2008 R2/Server 2012/Server 2012 R2)
43
Installing the Printer Driver
44
Initial Settings of the Printer Driver
46
How to Print
47
Using the Scan Function
48
Available Operations in the Scan Function
48
How to Send
49
Using the Fax Function
51
Fax Function
51
How to Send
51
Introduction of Fax Transmission Function
53
Introduction of Fax Receiving Function
54
Introduction of Internet Fax Function
54
Using the Copy Function
55
How to Copy
55
Introduction of Copy Function
57
Printing a File Stored on USB Memory
58
Supported USB Memory Devices
58
How to Print
58
Registering a Destination
60
Address Book
60
Registering One-Touch Destinations in the Address Book
60
Registering an Address Book in Utility
60
Registering Information on the Main Screen in Scan TX Mode or Fax Mode
64
Konica Minolta bizhub C3850FS User Manual (64 pages)
PC-Fax
Brand:
Konica Minolta
| Category:
Mfp
| Size: 1.07 MB
Table of Contents
Table of Contents
3
1 PC-Fax TX
5
Overview of PC-Fax TX
7
System Environment Requirements
8
Cable Connection Locations on this Machine
9
2 Preparation for PC-Fax TX (Network Connection)
10
Overview
12
Before Installing the Fax Driver (for Administrators)
13
Checking a LAN Cable for Connection
13
Checking the Network Settings
13
Setting up the PC-Fax TX Environment
14
Enabling Device Information to be Obtained from the Fax Driver
14
Easy Installation of the Fax Driver
15
Preparing the Fax Driver CD/DVD-ROM
15
Checking the Operating Systems Compatible with the Fax Driver
15
Installation Procedure
16
Initializing the Fax Driver
17
Configuring the Optional Environment of this Machine
17
Changing the Default Print Settings
17
3 Preparation for PC-Fax TX (USB Connection)
18
Overview
20
Easy Installation of the Fax Driver
21
Preparing the Fax Driver CD/DVD-ROM
21
Checking the Operating Systems Compatible with the Fax Driver
21
Changing the Installation Settings (Windows 7/8/8.1/Server 2008 R2/Server 2012/Server 2012 R2)
22
Installation Procedure
22
Initializing the Fax Driver
24
Configuring the Optional Environment of this Machine
24
Changing the Default Print Settings
24
4 How to Send PC-Fax TX
25
Transmission Flow
27
The [FAX Transmission Popup] Window
28
Available Operations in [FAX Transmission Popup] Window
28
Selecting a Recipient from the Phone Book
29
Selecting a Recipient from the Address Book of this Machine
30
Configuring the Fax Transmission Function
31
Adding a Cover Sheet
31
Easily Recalling the Frequently Used Setting
32
Managing Recipient Information on the Computer (Phone Book)
33
Registering a Recipient
33
Searching for a Recipient
35
Editing Recipient Information
36
Changing the Recipient Group
36
Changing a Group Name
37
Using Folders for Management
37
5 Sending Options
38
Send a Fax with a Cover Sheet
40
Sending a Fax at a Preset Time (Timer Send)
43
Timer Send
43
How to Send
44
Sending a Confidential Fax (Confidential Communication)
44
Confidential Communication
44
Sending a Fax after Specifying a Relay Station (Relay Distribution)
45
Relay Distribution
45
How to Send
45
Sending a Fax with Authentication Information
46
Fax Sending with Authentication Enabled
46
Operations Required to Use this Function
46
How to Send
47
Konica Minolta bizhub C3850FS User Manual (42 pages)
Brand:
Konica Minolta
| Category:
Fax Machine
| Size: 1.21 MB
Table of Contents
Table of Contents
2
1 Internet Fax Function
4
2 Preparation for Internet Fax (for Administrators)
6
Preparation Flow
7
Operations Required to Use this Function
8
Checking a LAN Cable for Connection
8
Checking the Network Settings
8
Configuring the Internet Fax Environment
8
Registering Sender Information
8
Setting the Date and Time for the Machine
8
Option Settings
9
Registering a Frequently Used Destination
9
Using an LDAP Server to Specify Addresses
9
Registering a Subject and Text of the Successfully Received E-Mail Message
9
Using SMTP Authentication
9
Using POP before SMTP Authentication
9
Using an SSL/TLS Communication
9
Checking Fax Reception
9
3 How to Send
10
Sending (Basic Operation Flow)
11
Recalling a Program for Sending
14
Program
14
Registering a Program
14
Recalling a Program for Sending
15
Specifying a Destination
17
Selecting a Destination from Favorites
17
Selecting a Destination from Address Book
17
Directly Entering Data
18
Selecting a Destination from the History
19
Searching for an E-Mail Address from the LDAP Server
19
Option Settings for Fax TX
20
Basic Option Settings
20
Specifying the Size of the Original to be Scanned ([Scan Size])
20
Specifying the Resolution to Scan the Original ([Resolution])
20
Scanning both Sides of an Original ([Simplex/Duplex])
20
Changing the File Name ([File Name/Subject Name/Other])
20
Specifying the Method to Scan the Original
21
Scanning a Long Original ([Long Original])
21
Specifying a Binding Position ([Binding Position])
21
Scanning a Number of Originals in Several Batches ([Separate Scan])
21
Adjusting Quality/Density
22
Selecting the Appropriate Image Quality Level for the Contents of the Original ([Original Type])
22
Adjusting the Density of the Original to be Scanned ([Density])
22
Adjusting the Background Density of the Original to be Scanned ([Background Removal])
22
Erasing Text or Shadows in the Margins of an Original ([Frame Erase])
22
Sharpening the Border between Texts ([Sharpness])
22
Viewing the Current Settings
23
4 How to Receive a Fax
24
Receiving a Fax Automatically
25
Receiving a Fax Manually
25
5 Receiving Options
26
Adding the Received Date and Time for Printing ([Footer Position])
27
Reception Information
27
Operations Required to Use this Function (for Administrators)
27
Forwarding a Received Fax to Another Destination (Forward TX)
28
Forward TX
28
Operations Required to Use this Function (for Administrators)
28
Saving a Received Fax to Memory Without Printing (Memory RX)
29
Memory RX
29
Operations Required to Use this Function (for Administrators)
29
Printing or Deleting a Received Fax
29
Downloading a Received Fax
30
Stopping Fax Printing at Night (Night RX)
31
Night RX
31
Operations Required to Use this Function (for Administrators)
31
Printing a Fax on both Sides ([Duplex Print (RX)])
32
Duplex Print (RX)
32
Operations Required to Use this Function (for Administrators)
32
Configuring the Fax Print Settings (for Administrators)
33
Default Print Settings
33
Fixing the Print Paper Size ([Print Paper Size])
33
Fixing the Print Paper Tray ([Tray Selection for RX Print])
33
Splitting a Custom Size (Portrait) Fax for Printing ([Print Separate Fax
33
Konica Minolta bizhub C3850FS User Manual (31 pages)
Brand:
Konica Minolta
| Category:
All in One Printer
| Size: 1.35 MB
Table of Contents
Table of Contents
2
1 Copy Operations
3
Copying (Basic Operation Flow)
4
Interrupting for Copying
7
Making a Trial Printing (Proof Copy)
8
Recalling a Program for Copying
9
Program
9
Registering a Program
9
2 Specifying the Color and Image Quality for Copying
12
Selecting the Copy Color ([Color])
13
Adjusting the Copy Density ([Density])
13
Selecting the Appropriate Image Quality Level for the Contents of the Original ([Original Type])
13
Adjusting the Background Density of the Original ([Background Removal])
13
Making the Image Glossy ([Glossy])
13
Adjusting the Image Quality According to the Original ([Image Adjust])
14
Enlarging or Reducing an Image for Copying ([Zoom])
14
Adding a Margin on Pages
15
3 Saving the Number of Print Sheets
16
Copying on both Sides of Paper ([Duplex])
17
Copying Multiple Pages on the same Side of a Single Sheet ([Combine])
18
Copying the Front and Back Sides of a Card on the same Side of a Single Sheet of Paper ([ID Copy])
19
4 Specifying the Size or Type of the Paper to be Copied
20
Selecting the Paper Size and Paper Type ([Paper])
21
Copying on Paper of a Special Size ([Custom Size])
21
5 Specifying the Method to Scan the Original and the Method to Output Copy
22
Specifying the Size of the Original to be Scanned ([Original Size])
23
Scanning a Number of Originals in Several Batches ([Separate Scan])
23
Printing out on a Set Basis ([Group/Sort])
24
Outputting by Page Number or by Set ([Offset])
24
Stapling ([Staple])
24
Erasing Text or Shadows in the Margins of an Original ([Frame Erase])
25
6 Adding Text or Images to the Original
26
Adding a Date and Time ([Date/Time])
27
Adding Page Numbers
27
Adding a Stamp ([Stamp])
28
Adding a Water Mark ([Watermark])
28
Adding Distribution Control Numbers ([Distribution Control Number])
28
Konica Minolta bizhub C3850FS User Manual (26 pages)
Advanced Functions
Brand:
Konica Minolta
| Category:
All in One Printer
| Size: 1.04 MB
Table of Contents
Table of Contents
2
1 Advanced Functions
3
2 Registering License Kits
5
License Registration
6
Registering Licenses
7
3 Using the Web Browser
9
Web Browser Function
10
Available Operations with the Web Browser Function
10
Specifications of Web Browser
10
Basic Usage
11
Starting the Web Browser
11
Configuration of Web Browser
12
Screen Layout
12
Description of the Toolbar
12
Displaying a Web Page
13
Specifying a URL
13
Using the Browse History
13
Displaying Favorites
13
Operating the Currently Displayed Page
14
Adding a Favorite (for Administrators)
14
Printing the Currently Displayed Page
14
Operating a Window
14
Displaying a Window on the Full Screen
14
Enlarging or Reducing the Currently Displayed Page
15
Restarting the Web Browser
15
Using a Web File
16
Displaying a Web File
16
Printing a Web File
17
Uploading a File from this Machine
18
Before Using this Function
18
Scanning Original Data for Uploading
18
Configuring an Operating Environment
19
Restricting the Use of Web Browser
20
Restricting the Use of Local Contents
20
4 Associating with the Thinprint System
21
Thinprint Function
22
Operations Required to Use this Function (for Administrators)
23
5 Index
24
Advertisement
Related Products
Konica Minolta Bizhub C3850
Konica Minolta bizhub c3852fs
Konica Minolta BIZHUB C3851FS
Konica Minolta BIZHUB C3851
Konica Minolta BIZHUB C300
Konica Minolta BIZHUB C30P
Konica Minolta bizhub C35
Konica Minolta bizhub C353 (P)
Konica Minolta bizhub C360i
Konica Minolta bizhub C300i
Konica Minolta Categories
All in One Printer
Printer
Digital Camera
Measuring Instruments
Copier
More Konica Minolta Manuals
Login
Sign In
OR
Sign in with Facebook
Sign in with Google
Upload manual
Upload from disk
Upload from URL