Table of Contents
Advertisement
Quick Links
Download this manual
See also:
User Manual
Advertisement
Table of Contents

Related Manuals for Zaxcom Deva 5.8


Summary of Contents for Zaxcom Deva 5.8
- Page 1 Owner’s Manual Deva 5.8 and Deva 16 High Resolution Digital Audio Recorders Revision:5160.001 Date: March 2008 230 West Parkway, Unit 9, Pompton Plains, NJ 07444 USA Tel: 973.835.5000 Fax: 973.835.6633...
-
Page 2: Change History
Deva 5.8 Owner’s Manual Change History Date Changes 2008-03 Initial Deva 5.8 and Deva 16 manual combined. -
Page 3: Table Of Contents
DEVA 5.8 Owner’s Manual What’s in the box ............. . . 1 Options Available . - Page 4 Camera Connector, 10 Pin (Deva 5.8) ........
- Page 5 DEVA 5.8 Owner’s Manual Disk Mix ..............49 Output Mix .
- Page 6 DEVA 5.8 Owner’s Manual T.C. Chase ............. . . 59 Auto-Load .
- Page 7 DEVA 5.8 Owner’s Manual Adjust Delay ..............70 Adjusting the Delay .
- Page 8 DEVA 5.8 Owner’s Manual Stored Notes ..............81 Segment .
-
Page 9: What's In The Box
DVD-RAM, and Flash memory slot. All these make the Deva a complete solution of recording, mixing and effects in one package. Note: Throughout this manual, Deva is used to describe both the Deva 5.8 and Deva 16. Where there are differences, individual names are used. -
Page 10: Features
The direct digital outputs allow input channels to be seamlessly routed to feed external backup recorders. Features o 10 track recording on built-in hard disk, DVD-RAM or CompactFlash media (Deva 5.8) o 16 track recording on built-in hard disk, DVD-RAM or CompactFlash media (Deva 16) o 8 hardware faders o 8 Analog mic/line inputs with 48V phantom power (Deva 5.8) -
Page 11: Hints On Using Your Deva
Chapter 1 Deva 5.8 and Deva 16 Owner’s Manual o Deva allows you to keep your recorded audio on the set, allowing production to instantly reference previous recordings. Disputes with post regarding recording issues can be immediately cleared up and extra copies of recorded audio can be produced in case of lost, damaged or stolen material. -
Page 12: Getting To Know Your Deva Recorder
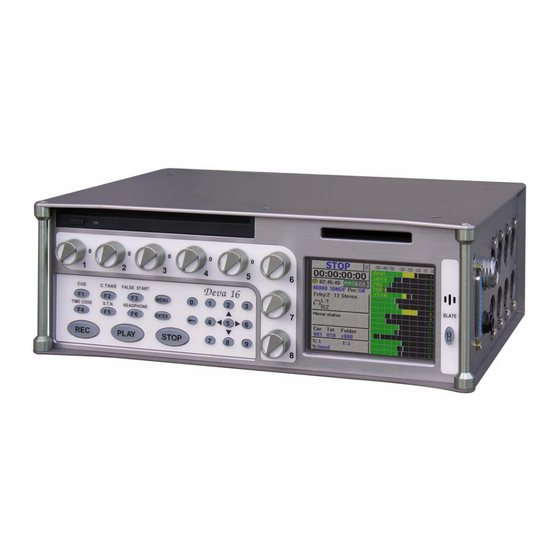
Chapter 1 Deva 5.8 and Deva 16 Owner’s Manual Getting to Know Your Deva Recorder This section describes the physical features and location of items on the Deva recorder. Figure 1 Deva Front panel Front Panel Descriptions DVD-RAM Drive CompactFlash Slot... - Page 13 Chapter 1 Deva 5.8 and Deva 16 Owner’s Manual q F3 —FALSE START Marks a take as a 'False Start' in the metadata file. When this is done, the segment number does not incre- ment when placed into the record mode the next time. This button can be pushed either during or right after the false start record.
-
Page 14: Left Panel Descriptions
This is the standard 5 pin Lemo connector used for Time Code I/O (Lemo part number: EGG.OB.305.CLL) Serial / RS422 connector This 9-pin connector is used for controlling the Deva using an external device such as the Zaxcom Deva MIX-12 mixer. -
Page 15: Right Side Panel Description
Chapter 1 Deva 5.8 and Deva 16 Owner’s Manual 10. Battery Compartment The black knob rotates to lock the battery compartment door. Use NP-1 type batteries with the Deva. You can safely use Li-ion and NiMH NP-1 batteries in the Deva as long as their maximum voltage does not exceed 18 VDC. - Page 16 Chapter 1 Deva 5.8 and Deva 16 Owner’s Manual Headphone Output 1/4-in. Stereo Jack, optimal 100 Ω impedance. Note: Lower headphone impedances result in louder headphone output levels. Analog Outputs 1- 6 25-pin connector outputs 6 channels of line level audio. You can select the channels assigned to these outputs from the Deva menu.
-
Page 17: Power
Deva required to make these connections work. Deva 5.8 has factory default presets so you can power up the machine and start recording. When you power on the Deva, it takes 3-5 seconds to start-up. The default setting has the home screen appear once the Deva has finished its startup sequence, however you can change this using the User Interface Settings. -
Page 18: Battery Chemistry
Chapter 2 Deva 5.8 and Deva 16 Owner’s Manual Warning: When the Deva shuts itself off due to power loss or insufficient power. The audio tracks are left in the “open” state. When the unit is turned back on, it automatically scans these files and close them. However, this process can take several minutes. -
Page 19: Microphone/Analog Line Input
Chapter 2 Deva 5.8 and Deva 16 Owner’s Manual Microphone/Analog Line Input The eight analog input connections can be used with either microphones or with a line level analog input. Caution: Prior to connecting any analog input to the Deva, you should ensure the Microphone/Analog Line Input Connectors are setup correctly in the Analog Input Control menu. -
Page 20: Switching Between Microphone And Line Input
Chapter 2 Deva 5.8 and Deva 16 Owner’s Manual Main Menu > Input Control > Input Channel Figure 7 Single Channel Analog Input Screen Switching Between Microphone and Line Input The Mic/Line button on the Input Control menu allows you to toggle the analog inputs between the microphone and line input. -
Page 21: Enabling The High Pass Filter
Chapter 2 Deva 5.8 and Deva 16 Owner’s Manual Enabling the High Pass Filter (HPFencounteredns encounted with microphones. o Range: 30 Hz - 240 Hz Main Menu > Input Control Figure 9 High Pass Filter Button (Input Control Menu) Setting the High Pass Filter value To set the High Pass Filter value, you must use the HPF button in the Input Channel menu. -
Page 22: Enabling Phantom Power (48 Vdc)
Chapter 2 Deva 5.8 and Deva 16 Owner’s Manual Press the High Pass Filter button again when all channels are enabled. Hint: To quickly disable the High Pass Filter, press the High Pass Filter button on the Input Control menu, and then press the channels you want to disable. -
Page 23: Adjusting The Trim
Chapter 2 Deva 5.8 and Deva 16 Owner’s Manual Adjusting the Trim o Range: -20 dB to +30 dB There are two ways to adjust the input trim on channels. If you have multiple inputs, the Analog Trim Screen allows you adjust all of them from a single screen. However, if you are making individual adjustments to channels the trim can be adjusted using the on-screen fader in the Input Channel menu (shown in Figure 7). -
Page 24: Adjusting Individual Trim Levels Using The Analog Input Channel Menu
Chapter 2 Deva 5.8 and Deva 16 Owner’s Manual Adjusting Individual Trim Levels Using the Analog Input Channel menu Main Menu > Input Control > Input Channel Figure 13 Individual Input Trim Fader The input trim fader works a real fader on a mixing board. You use the Deva touch screen to move the trim fader up and down. -
Page 25: Adjusting The Delay Using The Input Delay Menu
Chapter 2 Deva 5.8 and Deva 16 Owner’s Manual Adjusting the Delay Using the Input Delay Menu Main Menu > Input Control > Analog Input Delay Figure 14 Analog Input Delay To adjust the delay of multiple channels using the Analog Input Delay menu, perform the following: Press the Adjust Delay button on the Input Control menu. -
Page 26: Adjusting Delay Using The Analog Input Menu
The Analog outputs on the Deva go through a DB-25 connector located on the right side of the Deva. There are six outputs available through this connector. A break-out cable can be purchased from Zaxcom as an option, or through many retailers. A wiring diagram is also provided in this manual if you want to manufacture your own break-out cable. -
Page 27: Digital Outputs
Chapter 2 Deva 5.8 and Deva 16 Owner’s Manual Digital Outputs The Deva comes with an AES digital output cable. This cable connects to the left side of the Deva using DB-15 connector. There are eight digital outputs available using this connector. - Page 28 Chapter 2 Deva 5.8 and Deva 16 Owner’s Manual Main Menu > Disk Channel Mix Figure 16 Disk Channel Mix Matrix Each track can have an input be pre- or post-fader, or have the input’s phase inverted. This can be done for both analog or digital signals.
-
Page 29: Setting The Number Of Tracks Recorded
Chapter 2 Deva 5.8 and Deva 16 Owner’s Manual Press input you want change the signal phase inverted on. You can invert the signal on both digital and analog inputs. Figure 17 Sample Routing combinations Setting the Number of Tracks Recorded Once the routing is assigned, you have to enable the tracks to record. -
Page 30: Setting Sampling Rate For Recorded Tracks
Recording at 192 kHz requires large amounts of the Deva’s processing cycles. Because of this, you must enable it when powering on the Deva. Zaxcom recommends that you reduce your recording channels to two, turn off any EQ, and unneeded routing when recording at 192 kHz. -
Page 31: Assigning Inputs To Output Channnels
Chapter 2 Deva 5.8 and Deva 16 Owner’s Manual Assigning Inputs to Output Channnels Assigning the audio inputs to output channels is identical to assigning audio inputs to recording channels. They use the same style matrix and have all the same settings. -
Page 32: Overview Of Output Signals
Chapter 2 Deva 5.8 and Deva 16 Owner’s Manual Overview of Output Signals The Output Meter Menu provides a quick overview of all output signals. This allows you to see where routed signals are going. Main Menu > Deva Setup > Meters > Display Outputs... - Page 33 Chapter 2 Deva 5.8 and Deva 16 Owner’s Manual...
-
Page 34: Storing The Data
Formatting a Drive A new drive must be formatted before it can be used. Drives shipped from Zaxcom are pre-formatted for the Deva, however it is a good idea to format all drives again before using them. When you format a drive, it does a high level format of the drive. -
Page 35: Selecting A Partition
Chapter 3 Deva 5.8 and Deva 16 Owner’s Manual Press the Format Drive button. A dialog appears, which request you to confirm the formatting of the internal hard drive. The formatting status menu appears. Do not remove power from the deva until the formatting process is complete. -
Page 36: Setting The Pre-Record Time
Chapter 3 Deva 5.8 and Deva 16 Owner’s Manual Setting the Pre-Record Time From the point the Deva is powered on, it is always processing data. Any sound coming in from any input is always being processed. When Pre-Record Time is enabled the buffered sound is placed at the beginning of the segment. -
Page 37: Setting The Tone Levels And Outputs
Chapter 3 Deva 5.8 and Deva 16 Owner’s Manual Setting the Tone Levels and Outputs The Deva provides a calibrated tone level, which can be placed on any output channel or recorded track. This tone level is used to calibrate cameras to the audio sent from the Deva, and post-production facilities to ensure all levels are correct. -
Page 38: Enabling Tone
Setting the Number of Meters Range: 4 to 16 (Deva 16), 4 - 10 (Deva 5.8) You can have up to 16 meters shown on your home screen. Any track meter shown on the home screen that is not being recorded on, displays with a line through it. -
Page 39: Setting The Meter Labels
Chapter 3 Deva 5.8 and Deva 16 Owner’s Manual Setting the Meter Labels Range: Labels can be a maximum of 16 characters Meter labels on the Home Screen do more than just provide an easy reference of what is on each track when meters are displayed horizontally. -
Page 40: Changing The Appearance Of The Meters
Chapter 3 Deva 5.8 and Deva 16 Owner’s Manual Changing the Appearance of the Meters There are several adjustments that can be made to the Deva meters, including brightness of meters, and meter orientation on the home screen. Meter Display Options: Vertical, Horizontal, Big Vertical, Big Horizontal Meter Color Schemes: Normal, Black &... -
Page 41: Changing The Meter Orientation From The Home Screen
This flexibility is extended to the headphone monitoring area as well. Many common headphone monitoring options come preset from Zaxcom. You can add up to 12 custom presets in addition to the factory presets. You can also simply build a headphone monitoring configuration on-the-fly without saving it, as well as temporarily monitor a single channel. -
Page 42: Fader 8
Fader 8 Fader 8 serves two purposes on the Deva 5.8 and Deva 16. When no track is assigned to fader 8, it functions as the headphone output volume control. However, when a track is assigned to fader 8, it functions as a normal fader. -
Page 43: Building Your Own Headphone Mix (Working Preset)
Chapter 3 Deva 5.8 and Deva 16 Owner’s Manual Main Menu > Headphone Mix > Get Factory Presets Figure 36 Get Factory Preset Menu Building Your Own Headphone Mix (Working Preset) On the Headphone Mix menu, all tracks marked for recording are displayed in blue. All other tracks have a red slash through them. -
Page 44: Building Your Own Presets
Chapter 3 Deva 5.8 and Deva 16 Owner’s Manual Building Your Own Presets In a lot of cases once you have setup monitoring options, you don’t need to change them that often. But once changed, the Deva allows you to with the push of a button, restore those settings. When stored, these become known as User Presets. -
Page 45: Changing Preset; Get User Presets
Chapter 3 Deva 5.8 and Deva 16 Owner’s Manual The preset name and User Preset number also appears on the home screen in the headphone monitoring area. Changing Preset; Get User Presets The Get User Presets allows you to recall any of the presets you previously stored. -
Page 46: Reader U.b
Chapter 3 Deva 5.8 and Deva 16 Owner’s Manual Reader U.B. Like the Reader T.C., the READER U.B. displays any external source’s User Bits. Generator T.C. The Generator T.C. displays the time code being generated by the Deva. Generator U.B. -
Page 47: Jam Timecode (User Bits)
Chapter 3 Deva 5.8 and Deva 16 Owner’s Manual JAM TIMECODE (USER BITS) This button manually jams an external Time code or User bits into the internal generator. When set to JAM TIME OF DAY it will jam the time code clock to the time of day entered in the Deva SETUP / CLOCK menu. - Page 48 Chapter 3 Deva 5.8 and Deva 16 Owner’s Manual...
-
Page 49: Analog Out - Db25
Chapter 4 Deva 5.8 and Deva 16 Owner’s Manual Chapter 4 Pinouts This section provides the pinouts for the connectors on the Deva. The mating cable connector part num- ber is also provided for the less common connectors. Analog Out - DB25 This is a standard DB-25 connector available at most electronic part stores. -
Page 50: Camera Connector, 10 Pin (Deva 5.8)
Camera Connector, 10 Pin (Deva 5.8) On the Deva 5.8, a Hirose 10-pin connector is provided as a camera output and a camera return into the Deva 5.8 recorder. Balanced analog outputs channels 5 and 6 on pins 1-4. Camera returns 1 and 2 on pins 5 and 7, these are summed to mono in the Deva. -
Page 51: Time Code Connector
Chapter 4 Deva 5.8 and Deva 16 Owner’s Manual Time Code Connector The Time Code connector on the Deva is a Lemo 5 pin connector. The LEMO part number is EGG.OB.305.CLL. Signal Description Ground Time Code In Time Code Out Analog Input Channels 9 through 12 (Deva 16) On the Deva 16 analog input channels 9 through 12 use a 10-pin LEMO connector. -
Page 52: Aes Digital Input
Chapter 4 Deva 5.8 and Deva 16 Owner’s Manual AES Digital Input The Deva uses a DB-15 connector for the AES digital input connnector. Signal Description Signal Description CH 3, CH 4 + Ground CH 1, CH 2 + Ground... - Page 53 Chapter 4 Deva 5.8 and Deva 16 Owner’s Manual...
-
Page 54: Home Screen
Chapter 5 Deva 5.8 and Deva 16 Owner’s Manual Chapter 5 Software Guide The Deva is a very sophisticated recording device. The heart of the system is the software used to operate the device. This section of the manual describes each screen on the Deva and the functions within each screen. -
Page 55: Cur Total Folder
Chapter 5 Deva 5.8 and Deva 16 Owner’s Manual CUR Total Folder The CUR TOTAL FOLDER button opens the INTERNAL DISK FOLDERS menu providing access to the disk directory and labeling functions. Scene Take Notes The bottom button opens the SCENE TAKE NOTES metadata Entry menu. -
Page 56: Time Code Frame Rate
Chapter 5 Deva 5.8 and Deva 16 Owner’s Manual Time Code Frame Rate Next is the TIME CODE FRAME RATE Mirroring button The Mirroring button displays the status or the internal and external mirror drives. Touching this button brings you to the My Deva menu. -
Page 57: Main Menu
Chapter 5 Deva 5.8 and Deva 16 Owner’s Manual Main Menu The MAIN MENU provides access to all the Deva operating functions. Figure 6 Deva Main Menu Disk Mix DISK MIX selects the main routing menu. This Menu includes the MATRIX that routes the 8 Analog and 8 Digital Inputs, plus the Slate Mic and Tone Generator to the 10 Recording Tracks. -
Page 58: My Deva
Chapter 5 Deva 5.8 and Deva 16 Owner’s Manual My Deva MY Deva is similar to the Microsoft Windows convention, 'My Computer'. This menu sets the parameters for all the recording devices, including the internal hard disk, the optional internal DVD drive, and any... -
Page 59: Disk Mix Menu
Chapter 5 Deva 5.8 and Deva 16 Owner’s Manual Disk Mix Menu The DISK CHANNEL MIX matrix routes the 16 inputs, the Slate Mic and the Reference Tone to the 10 recording tracks. This matrix provides a great amount of flexibility for recording. -
Page 60: Phase Invert
Chapter 5 Deva 5.8 and Deva 16 Owner’s Manual Phase Invert PHASE INVERT reverses phase of the selected input. A reversed phase input appears with a bar over the letter A or D. Clear All CLEAR ALL removes all selections and empties the screen. -
Page 61: Output Mix Menu
Chapter 5 Deva 5.8 and Deva 16 Owner’s Manual Output Mix Menu The OUTPUT MIX MENU routes the inputs of the Deva directly to the outputs. This can be used to feed monitors, Video recorders, Comtek transmitters, Ear Wig feeds, additional analog or digital recorders, or any other device that accepts an output. -
Page 62: Fader Assign
Chapter 5 Deva 5.8 and Deva 16 Owner’s Manual Fader Assign FADER ASSIGN opens a matrix that allows you to assign any of the 8 Analog and/or 8 Digital inputs to any or all of the 4 faders. You can assign any of the inputs to either the touch or hardware faders. -
Page 63: Touch Faders Toggle
Chapter 5 Deva 5.8 and Deva 16 Owner’s Manual Touch Faders Toggle Brings up an identical screen allowing the assigning of the touch faders. Figure 12 Touch Fader Screen Time Code This group of Menus allows you to set all the Time Code functions. The READER T.C. displays Time code from any External source coming into the Deva. -
Page 64: Free Run
Chapter 5 Deva 5.8 and Deva 16 Owner’s Manual Free Run Time code runs continuously from either 00:00:00:00: or whatever valid time code number you enter (you can also jam time code from the Deva's 'Time of Day' clock). Record Run Time code starts and stops as you Record and Stop. -
Page 65: Enter Timecode (Or User Bits)
Chapter 5 Deva 5.8 and Deva 16 Owner’s Manual Enter Timecode (or User Bits) This button opens a window that allows you to input Time Code or User bit data. ENTER TIME OF DAY brings you to the CLOCK setup menu in Deva SETUP. -
Page 66: Auto
Chapter 5 Deva 5.8 and Deva 16 Owner’s Manual AUTO In this mode Deva chooses whether it is getting an external reference or not. Record Channels Selects the number of desired recording channels from 1 through 10. Two Track The TWO TRACK button enables tracks one and two. -
Page 67: Operating Mode
Chapter 5 Deva 5.8 and Deva 16 Owner’s Manual Operating Mode This button opens up the Operating Mode Main screen. Figure 15 Operating Mode Main Screen Transport Operation This button toggles through three transport options; normal, T.C. Chase, and Auto-load. -
Page 68: Serial Remote Roll
Chapter 5 Deva 5.8 and Deva 16 Owner’s Manual Serial Remote Roll Enables the control of the Deva using the Serial port. Serial Port Mode Used in conjunction with the Serial Remote Roll, it determines the serial port protocol. The serial port can either be configured as a standard RS-232 or Standard RS-422 port. -
Page 69: Headphone Mix Menu
Chapter 5 Deva 5.8 and Deva 16 Owner’s Manual Headphone Mix Menu This button opens a new screen which displays the full Headphone Matrix. Figure 17 Headphone Mix Screen This screen routes the Recorded Tracks to the headphones. An audio channel can be placed in the left, right, or both headphone channels.The monitoring is E to E. -
Page 70: Meters
Chapter 5 Deva 5.8 and Deva 16 Owner’s Manual METERS The Meters screen provides the options for metering. This includes how many meters are shown on the home screen, the orientation of the meters, and their size. Figure 18 Meters Screen Display # of Home screen Meters. -
Page 71: Display Inputs
Chapter 5 Deva 5.8 and Deva 16 Owner’s Manual Selecting any button opens the following window: Figure 20 Meter Label Menu Enter the text using your finger or a stylus. Touching SHIFT capitalizes the first letter than reverts to lower case. -
Page 72: Display Outputs
Chapter 5 Deva 5.8 and Deva 16 Owner’s Manual Display Outputs Shows all the Deva's outputs. Deva has 6 analog outs, 8 digital outs and 1 headphone output. The SOLO feature is also available in the output menu. Figure 22 Output Meter Menu CLOCK This opens up the Deva's master clock setting menu. -
Page 73: Set Date
Chapter 5 Deva 5.8 and Deva 16 Owner’s Manual Set Date To set the date, you do the same thing, using the Set Date button. Time Mode Toggles between a 12 hour and a 24 hour display. For Time Code purposes leave this setting at 24 HR. -
Page 74: Startup Screen
Chapter 5 Deva 5.8 and Deva 16 Owner’s Manual Startup Screen Allows you to select the first screen you see after the Deva has been powered on. The options are: o Home Screen o Cue Screen o Main Menu o My Deva... -
Page 75: Mix-12
Chapter 5 Deva 5.8 and Deva 16 Owner’s Manual MIX-12 When a Deva MIX-12 is used with the Deva, a new MIX-12 button appears in the Deva Setup. The MIX-12 screen sets the following options. o Mix-12 support o Meter Brightness... -
Page 76: Input Control Menu
Chapter 5 Deva 5.8 and Deva 16 Owner’s Manual Input Control Menu The eight analog inputs parameters are set from the input control menu. Figure 24 Analog Input Control Menu Phantom Power Phantom power works in cooperation with the Mic/Line Level settings. If you have a channel set to Line Level, you cannot turn on phantom power to that channel. -
Page 77: Setting High Pass Frequency
Chapter 5 Deva 5.8 and Deva 16 Owner’s Manual Repeat Step 3 for all channels, to enable the high pass filter. Note: You can set different frequencies for each channel, simply repeat steps 2 and 3 for each frequency. Setting High Pass Frequency Figure 26 Changing High Pass Frequency To set the High Pass Frequency, do the following;... -
Page 78: Adjust Delay
Chapter 5 Deva 5.8 and Deva 16 Owner’s Manual Adjust Delay Opens a window allowing you to set digital delay to any of the analog or digital inputs. Figure 27 Adjust Delay Screen Adjusting the Delay Press the channel you want adjust the delay in. -
Page 79: My Deva Menu
FireWire device with either a DVD-RAM drive or FireWire Hard Drive. Important: There are some known limitations using FireWire hard drives with the Deva 5.8 • FireWire drive must have the Oxford 911 Chipset, other chipsets may not work •... -
Page 80: Internal Hd
Chapter 5 Deva 5.8 and Deva 16 Owner’s Manual Internal HD The Internal HD button opens the Internal Disk Utilities menu, which provides options for managing fold- ers and files on the internal hard drive. Figure 30 Internal Disk Utilities Menu Erase Current Folder Pressing Erase Current Folder both erases and formats the currently selected folder. -
Page 81: Current Folder
Chapter 5 Deva 5.8 and Deva 16 Owner’s Manual Current Folder Opens a directory of all the folders on the internal disk drive called Internal Disk Folders. Figure 32 Internal Disk Folder Menu The Internal Disk Folders is where you manage all folders/directories on the internal hard drive. -
Page 82: Folder Contents
Chapter 5 Deva 5.8 and Deva 16 Owner’s Manual Folder Contents Selecting the folder button brings up the Folder Contents display. Figure 33 Folder Contents Menu To go directly to a Segment you can either scroll through the directory with the UP and DOWN Arrows. -
Page 83: File Type
48000 hz has no effect. o ZAX Files This format is a custom non-lossy format. Creates.ZAX files which require the use of Zaxcom’s ZAX File Utility to convert to standard broadcast wave or MP3 files. -
Page 84: Mirror Mode
Chapter 5 Deva 5.8 and Deva 16 Owner’s Manual Mirror Mode Enables the 'Mirroring' process which writes the audio to the selected drive. Important: You must set the mirroring parameters before you turn on mirroring. Do not change folders while mirroring is on. -
Page 85: Prev Seg
Chapter 5 Deva 5.8 and Deva 16 Owner’s Manual Prev Seg Selects the next previous segment for playback. Next Seg Advances the next segment for playback. Enter Seg Opens a window to enter in any segment number for playback. <<REW Similar to the rewind function on a tape deck. -
Page 86: Headphone Mix
Chapter 5 Deva 5.8 and Deva 16 Owner’s Manual Headphone Mix Selects the basic headphone matrix. Figure 36 Headphone Mix Screen Left Headphone Mix Select the tracks desired for the left side of the headphones. In this menu you are monitoring the audio being recorded. -
Page 87: Store User Presets
Chapter 5 Deva 5.8 and Deva 16 Owner’s Manual Store User Presets You can set and name up to 12 user pre-sets for headphone monitoring. The name is limited to 8 charac- ters. Figure 37 Store User Presets Screen Preset (#) Pressing any Preset button brings up a new screen allowing you to save your headphone configurations. -
Page 88: Scene Take Note
Chapter 5 Deva 5.8 and Deva 16 Owner’s Manual Scene Take Note This menu opens up the Meta-Data entry windows. It can also be accessed using the STN button on the Front Panel. Figure 38 Scene Take Note Screen Scene Opens the Data Entry screen. -
Page 89: Store Note
Chapter 5 Deva 5.8 and Deva 16 Owner’s Manual Store Note Allows you to store custom notes. To store a note do the following: Press Note to open the Note entry area. Press Store Note Press the Note box you want to store the note in. - Page 90 Chapter 5 Deva 5.8 and Deva 16 Owner’s Manual...
-
Page 91: Limiting
Limiting, Equalization, and Compression The Deva 5.8 comes with a built-in limiter, that is available on all channels, and EQ and compression enabled on channels 1 and 2. As an option, you can enable EQ and compression on all channels. Contact Zaxcom for details on enabling EQ an compression. -
Page 92: Compression
Chapter 6 Deva 5.8 and Deva 16 Owner’s Manual Select Entry Mode button. Pressing the Entry Mode button toggles through the four choices; off, Level, Frequency, and Q. Use the number keypad on the Deva or keyboard to change these values. -
Page 93: Diagnostic Menu
Deva that are not usually accessed. This section of the manual covers those items. Diagnostic Menu The Deva 5.8, contain a diagnostic mode which allows you to upgrade the firmware, and perform some basic diagnostic routines. Getting to the 1967 Menu To get to the diagnostic menu perform the following steps: Go to the Main Menu. -
Page 94: Updating The Firmware
Chapter A Deva 5.8 and Deva 16 Owner’s Manual Updating the Firmware Use the steps listed to place the updated firmware on your internal hard drive. The procedure for upgrad- ing the firmware places it first on the internal hard drive, then flashing it to the ROM. This is the safest way to upgrade the firmware since you will always be able to boot the Deva should something go wrong during the firmware update process. -
Page 95: B And *P Diagnostic Flags
On very rare occasions a *B or *P may appear either during the recording process or mirroring process. Both diagnostic flags stay on the Deva’s screen until the unit is powered off. If either of these diagnostic flags occur, you should contact Zaxcom’s technical support department. *B Flag The *B flag means the Deva hit a breakpoint instruction. - Page 96 Chapter A Deva 5.8 and Deva 16 Owner’s Manual...
-
Page 97: Warranty Policy
Products to end users. Please see below for warranty information or obtaining service. No warranty ser- vice is provided unless the Product is returned to Zaxcom Inc. or a Zaxcom dealer in the region where the Product was first shipped by Zaxcom. -
Page 98: Limitation Of Damages
Warranty of Deva hard drive disk carrier shall be 1 year from date of purchase. The internal hard disk is under warranty by Zaxcom for a period of 30 days. After that period the internal disk drive is covered by the warranty of the hard disk manufacturer and must be returned directly to that manufacturer for war- ranty service.
Need help?
Do you have a question about the Deva 5.8 and is the answer not in the manual?
Questions and answers