Table of Contents
Advertisement
Quick Links
Advertisement
Table of Contents

Related Manuals for Zaxcom RX-4


Summary of Contents for Zaxcom RX-4
- Page 1 User Manual Published February 2021 Firmware Version MRX-184 RX-4...
-
Page 2: Table Of Contents
MAIN MENU ............................. 6 ............................. 6 AVIGATING THE ............................6 XITING THE ..............................6 REQUENCY DJUST Adjusting the receive frequency of the RX-4 ..................... 6 ............................6 ENTER REQUENCY DJUST ............................... 6 REQUENCY Single mode scanning ............................7 Selecting a frequency ............................7 ................................ -
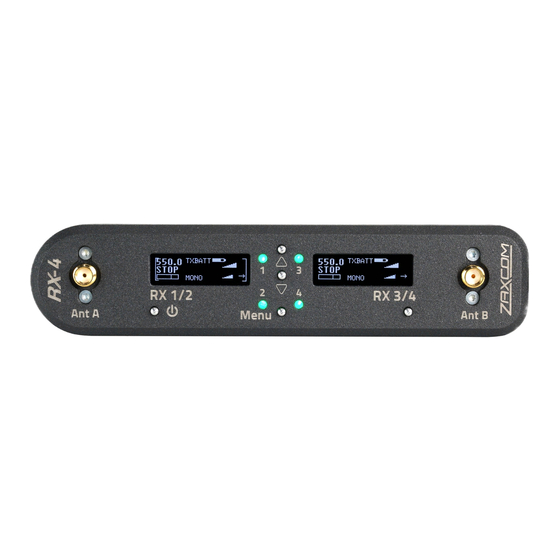
Page 3: Rx-4 Receiver
7. Receiver Select keys (2) -Press to alternate between receivers. The RX 1/2 key will power the RX-4. Press and hold the key for 5 seconds to power down the RX-4. Press the RX 1/2 key to toggle thru receivers when choosing frequencies. -
Page 4: Rear
Zaxcom RX-4 Rear Rear 1. DC Power Input – Hirose 4 pin power input. 2. Audio out connectors (2) - TA5M These connectors will output the audio from the RX-12. The same connectors can be used to output either analog audio or AES audio. -
Page 5: Home Screen
Zaxcom RX-4 Home Screen Home Screen Audio level Indicates the incoming audio level for each receiver, the meter extends from the left to the right. The two vertical bars to the right are the -20dBFS and -10dBFS mark. Transmitter’s battery level The battery diagram displays the transmitter’s battery level. -
Page 6: Main Menu
RX-4 will suggest a clear frequency. That frequency can be accepted by pressing the INC key. Or press the DEC key to skip the first chosen frequency and have the RX-4 suggest another... -
Page 7: Single Mode Scanning
Press the INC key to initiate a scan. SCANNING 568.9 • While the RX-4 is scanning, the frequency being examined is displayed • on the bottom half of the screen and a graphic map of the RF that is found will be displayed with a vertical line extending up from the baseline. -
Page 8: Extended Menu
Single / Dual Mode Select RX MODE: SINGLE SINGLE - This configures the one side of the RX-4 to operate as a single receiver. In single mode the side of the • RX-4 can receive one audio channel from one transmitter. -
Page 9: Output Router
The routing menu is where the TA5 connectors are assigned an output. After changing modes it is necessary to reboot the RX-4. Please note this menu is only in the A receiver but will control both the A and B receiver. -
Page 10: Led On / Off
If an encryption code is set on the transmitter the transmitted audio will be encrypted and can only be listened to if the RX-4 has the same matching encryption code entered. When the codes do not match, all that will be heard is white noise. -
Page 11: Pin Configuration
Zaxcom RX-4 Pin Configuration Pin Configuration Audio Output Connectors There are two TA-5M connectors on the back of the RX-4. Analog Out of TA5 TA5 Out on XLR into Camera or Mixer PIN 1 PIN 1 XLRs on both PIN 2... -
Page 12: Operating Frequencies
Zaxcom RX-4 Operating Frequencies Operating Frequencies UHF - Audio Low 512.0 MHz to 614.0 MHz High 598.0 MHz to 698 MHz... -
Page 13: Antenna Cutting Chart
Zaxcom RX-4 Antenna Cutting Chart Antenna Cutting Chart... -
Page 14: Specifications
RX-4L Tuning Range: 512 - 614 MHz RX-4H Tuning Range: 598 - 698 MHz MRX414 Module Receivers Per Module: 4 Receiver Modulation: Zaxcom Proprietary Digital MRX414-L Tuning Range: 512 - 614 MHz MRX414-M Tuning Range: 536 - 652 MHz MRX414-H Tuning Range: 596 - 698 MHz Power Consumption: 300 ma @ 12 VDC Size: 5"... -
Page 15: Product Support
Download the latest Firmware from: http://zaxcom.com/support/updates/ Download the latest User Manuals from: http://zaxcom.com/support/updates/ Submit Technical Questions at: http://www.zaxcom.com/submit-a-technical-question Submit information for Repair Services at: http://www.zaxcom.com/support/repairs Join the Zaxcom User Forum at: http://www.zaxcom.com/forum/forum.php Join the Zaxcom Face Book User Group at: https://www.facebook.com/groups/682199065139938/... -
Page 16: Zaxcom Warranty Policy And Limitations
Repair Services page. Insure the package, as we cannot be held responsible for what the shipper does. Zaxcom will return the warranty repaired item(s) via two-day delivery within the United States at their discretion. If overnight service is required, a FedEx or UPS account number must be provided to Zaxcom to cover the shipping charges. - Page 18 Connect the equipment into an outlet on a circuit different from that which the receiver is connected • Consult the dealer or an experienced radio/TV technician for help. Changes or modifications to this equipment not expressly approved by Zaxcom, Inc. could void the user’s authority to operate it.
Need help?
Do you have a question about the RX-4 and is the answer not in the manual?
Questions and answers