
Related Manuals for TYAN MicroServer Series


Summary of Contents for TYAN MicroServer Series
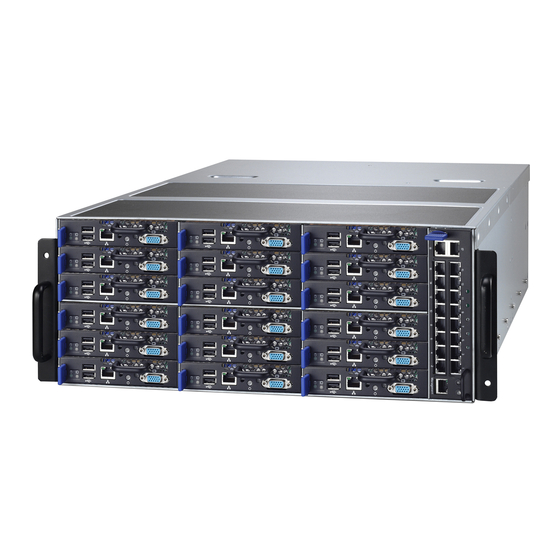
- Page 1 Tyan MicroServer Series FM65-B5519 4U SERVER – 18 NODES User’s Manual http://www.tyan.com...
- Page 2 Neither this manual, nor any material contained herein, may be reproduced without written consent of manufacturer. ® Copyright 2012 MiTAC International Corporation. All rights reserved. TYAN is a registered trademark of MiTAC International Corporation.
-
Page 3: Table Of Contents
Chapter 1: Overview.......................... 6 1.1 About the Tyan MicroServer System.................. 6 1.2 Features..........................6 1.3 Product Models ......................... 11 1.4 Catalog Parts List ....................... 11 Chapter 2: About Your System ......................12 Chapter3: System Overview......................14 3.1 System Front View ......................15 3.2 System Rear View....................... 15 3.3 System Internal View......................16 3.4 Compute Blade Overview....................17 3.5 FM65‐B5519 Blade ......................17 3.5.1 Front View ........................17 3.5.2 Internal View ........................18 3.5.3 Compute Blade LED Behavior..................19 3.6 Mid Plane........................... 20 3.7 Pass‐through‐M1902F65‐CMMPT Overview.............. - Page 4 6.4.3 Compute Blade Modules....................37 6.4.4 Removing a Compute Blade ................... 37 6.4.5 Installing a Compute Blade..................... 37 6.4.6 System Memory ......................38 6.5 Hard Drives ........................41 6.6 Processors ......................... 43 6.6.1 Installing a Processor...................... 45 6.7 Heat‐Sinks.......................... 46 6.7.1 Removing a Heat‐Sink ....................46 6.8 System Board........................48 6.8.1 Removing a Bridge Board ....................48 6.8.2 Installing a Bridge Board ....................48 6.8.3 Removing a System Board....................49 6.8.4 Installing a System Board ....................50 Chapter 7: Chassis Components...................... 51 7.1 Introduction........................51 http://www.tyan.com...
- Page 5 7.2 Disassembly Flowchart...................... 51 7.3 Power Supply Modules...................... 52 7.3.1 Removing a Power Supply Module ................53 7.3.2 Installing a Power Supply Module.................. 53 7.4 Fan Modules ........................54 7.4.1 Removing a Fan Module....................54 7.4.2 Installing a Fan Module ....................54 7.5 Opening and Closing the System..................55 7.6 Pass‐through‐M1902F65‐CMMPT Module ............... 56 7.7 Removing Pass‐through‐M1902F65‐CMMPT Module ............56 7.8 Installing Pass‐through‐M1902F65‐CMMPT Module............56 7.9 Removing an I/O and CMM System Board............... 57 7.10 Installing an Pass‐through‐M1902F65‐CMMPT System Board ........59 Appendix A: Getting Help and Support ................... 60 Appendix B: Safety Information ...................... 61 http://www.tyan.com...
-
Page 6: Chapter 1: Overview
Chapter 1: Overview 1.1 About the Tyan MicroServer System Congratulations on the purchase of the Tyan MicroServer, a highly optimized 4U rack mount system. The Tyan MicroServer is available in two models, the FM65-B5519 featuring the ® Intel Sandy Bridge-DT processor, designed to support 18 compute blades. Up to 32 GB UDIMM DDR3-800/1066/1333 memory can be installed per node. - Page 7 Power Power LED Hard drive activity LED System health/ID LED Form Factor (Compute W128.88 x H28 x D358.8 mm (5.07 x 1.10 x 14.13 inch) Blade) NOTE: Supports 9 mm high hard drive. http://www.tyan.com...
- Page 8 Form Factor: W176.5 mm x L150 mm (6.95 in x 5.91 inch) Bridge Board One(1) SATA connector for 2.5'' SATA/SATAII hard drive (M1708F65-BDG) Form factor: W118.88 mm x L96.8 mm (4.68 in x 3.81 inch) http://www.tyan.com...
- Page 9 System Healthy monitor (Temperature sensors, power status and FAN speed) System Event Log Advance Control Power Fail alert. Power consumption Monitor (AC-in/DC-in/DC-out) IPMI 2.0 MANAGEMENT Through LAN or I2C E-MAIL report Chassis Graceful Shutdown http://www.tyan.com...
- Page 10 Email report Chassis Graceful Shutdown Operating Environment Operating Temperature 10°C to 35°C Non-Operating Temperature FM65-B5519 -40°C to 70°C Operating Humidity FM65-B5519 10% to 80% Non-Operating Humidity FM65-B5519 5% to 95% http://www.tyan.com...
-
Page 11: Product Models
1.3 Product Models The system board within the Tyan MicroServer blades contain different processors and chipsets, which are defined by the following models: FM65-B5519-Intel based platform 1.4 Catalog Parts List 1.4.1 Contents FM65 Chassis Kit (1) 4U Chassis ... -
Page 12: Chapter 2: About Your System
Chapter 2: About Your System Necessary Information Safety Information and Precautions Before installing and using Tyan MicroServer, review the following precautions: Read all instructions carefully. Do not place the unit on an unstable surface, cart, or stand. Do not block the slots and opening on the unit, which are provided for ventilation. -
Page 13: Recycling Information
Recycling Information A lithium battery is included with the Tyan MicroServer. Do not puncture or dispose of battery in fire. There is a danger of explosion if battery is incorrectly replaced. Replace only with the same or equivalent type recommended by manufacturer. Disposal and recycling of used batteries, parts and components should be done in accordance with local regulations. -
Page 14: Chapter3: System Overview
Basic repairs and troubleshooting can be done if authorized in the product documentation or if directed by telephone or online support from Tyan. If damage has occurred due to repairs or services that are not approved by Tyan, the product warranty becomes invalid. Review all safety guidelines that are provided with the Tyan MicroServer. -
Page 15: System Front View
3.1 System Front View Figure 2-2. Front View Table 2-1. System Front View Modules Description Compute Blade (x18) Pass-through-M1902F65-CMMPT 3.2 System Rear View Figure 2-3. Rear View Table 2-2. System Rear View Modules Description Fan Modules (x8) Power Supply Modules (2+1) http://www.tyan.com... -
Page 16: System Internal View
3.3 System Internal View Figure 2-4. Internal View Table 2-3. System Internal View Modules Description Mid Plane (M1247F65-BP): 18x PCI-e x 8 connector) Power Distribution Board (PDB): M1608F65-PDB http://www.tyan.com... -
Page 17: Compute Blade Overview
(4) DDR3 VLP UDIMM slots (up to 32 GB) (2) Internal 2.5” hard drive bays (with connected bridge board) (2) Intel® 82574L Gigabit controllers 3.5 FM65-B5519 Blade 3.5.1 Front View Figure 2-5. FM65-B5519 Blade Front View http://www.tyan.com... -
Page 18: Internal View
3.5.2 Internal View Figure 2-6. FM65-B5519 Blade Internal View http://www.tyan.com... -
Page 19: Compute Blade Led Behavior
Table 2-4. Compute Blade LED Behavior Field Color Behavior HDD Activity Blinking Green Access System normal Solid blue Active System Status Solid Red Alert Normal ID/System Status Blinking blue/red ID located/System Alert System Power Solid Green Power on Power off http://www.tyan.com... -
Page 20: Mid Plane
PCI-E x8 connectors (x18) PCI-E x16 connectors (x2) Figure 2-8. Mid Plane Rear View Table 2-6. Mid Plane Rear View Description 2 x 6 PIN Power connector (x4) 2 x 5 PIN I2C connector 2 x 15 PIN FAN connector http://www.tyan.com... -
Page 21: Pass-Through-M1902F65-Cmmpt Overview
Gigabit Switch Management UI Links H/W Healthy Monitor (Blade/Chassis/PSU module/FAN module): System Healthy Monitor (Temperature sensors, power status and FAN speed) System Event Log Advance Control Power Fail alert. Power consumption Monitor (AC-in/DC-in/DC-out) http://www.tyan.com... -
Page 22: Pass-Through-M1902F65-Cmmpt Led Behavior
(1) VGA port Pass-through / CMM Module Ports (1) RJ45 to support remote management from CMM (1) 2x8 ports RJ45 1000 Base-T port w/ activity LED (1) 2x1 ports RJ45 1000 Base-T port w/ activity LED http://www.tyan.com... -
Page 23: Chapter4: Mounting The System Into A 4-Post Rack
Chapter4: Mounting the System into a 4-Post Rack After installing the necessary components, the Tyan MicroServer can be mounted in a 4-post rack using the optional rail kit. The rail kit includes the following items: (2) Rail kit assemblies ... -
Page 24: Installing The Outer Rail
Use a ruler to ensure that both rails are evenly aligned in a 180 degree angle. 5. Repeat steps1 through4 for the opposite side. Front Cabinet Column Rear Cabinet Outer Rail Column Figure 2-11. Installing the Outer Rail http://www.tyan.com... -
Page 25: Installing The System Using The 4-Post Rack Kit
6. Install the Pass-through-M1902F65-CMMPT module into the chassis. Refer to Installing Pass-through-M1902F65-CMMPT Module. 7. Install the power supply modules. Refer to Installing a Power Supply Module. Outer Rail Inner Rail Figure 2-12. Installing the System to a 4-Post Rack http://www.tyan.com... - Page 26 http://www.tyan.com...
-
Page 27: Chapter 5: Chassis Management Module
5. In the remote computer, open a browser and in the address bar type the BMC IP (See step 6. In the login screen, type in the following username and password for both CMM and BMC. username: root password: superuser Figure 3-1. Login Menu NOTE: NOTE: Passwords are case sensitive. http://www.tyan.com... -
Page 28: Chassis Management Console
5.2 Chassis Management Console Overview This section displays the initial screen information. Figure 3-2. Management Console Menu Table 3-1. Management Console Item Description Options Displays available submenus. Refresh Refresh the current menu. Logout Select to logout. http://www.tyan.com... - Page 29 Displays available field replacement units (FRU) in the MicroServer. Further information for each FRU item is available by clicking on the FRU item. Server Health The Server Health menu provides information about the MicroServer system’s sensor readings and event logs. Figure 3-4. Server Health Console Menu http://www.tyan.com...
- Page 30 Select to view and configure the network settings (DHCP or static). SMTP Select to configure alerts, users and network SMTP settings User List Select to add, modify or delete the current configured users list. Select to modify, enable or disable sensor thresholds. http://www.tyan.com...
- Page 31 The Remote Control menu provides information about the remote management and power status of the MicroServer system. Figure 3-6. Remote Control Console Menu Table 3-5. Remote Control Item Description CMM Controls Select to set the power status of the microserver. NodeBMC Controls Select to manage nodes. http://www.tyan.com...
- Page 32 Select to enter the system’s Update Mode. The Update Mode allows for the updating the firmware. A system reset will follow after the Update Mode. GroupBMC The GroupBMC menu provides information about BMC groups, such as grouped BMC, Node or User lists. Figure 3-8. GroupBMC Console Menu http://www.tyan.com...
- Page 33 Table 3-7. GroupBMC Item Description GroupBMC List Add, delete or scan GroupBMC lists. NodeBMC List Select existing GroupBMC lists to manage respective nodes. Group Login User Select to designate user groups for grouped control functionality. http://www.tyan.com...
-
Page 34: Chapter 6: Compute Blade Components
This chapter explains how to replace components relating to the compute blade module, including the blade blank, system memory, hard drive, heat-sink, processor, bridge board and system board. 6.2 Disassembly Flowchart The following flowchart outlines the disassembly procedures. Figure 4-1. Disassembly Flowchart http://www.tyan.com... -
Page 35: Compute Blade, Power Supply & Fan Module Order Identification
6.3 Compute Blade, Power Supply & Fan Module Order Identification Before installing front components into the chassis, review the compute blade enumeration for each component. Compute Blade Numbering Power Supply Numbering PSU3 PSU2 PSU1 Fan Module Numbering http://www.tyan.com... -
Page 36: Compute Blade Blanks (Option)
Basic repairs and troubleshooting can be done if authorized in the product documentation or if directed by telephone or online support from Tyan. If damage has occurred due to repairs or service that is not approved by Tyan, the product warranty becomes invalid. Review all safety guidelines that are provided with the Tyan MicroServer. -
Page 37: Compute Blade Modules
Basic repairs and troubleshooting can be done if authorized in the product documentation or if directed by telephone or online support from Tyan. If damage has occurred due to repairs or service that is not approved by Tyan, the product warranty becomes invalid. Review all safety guidelines that are provided with the Tyan MicroServer. -
Page 38: System Memory
DIMM A0 (J5) Note: Max Memory combination Single Rank Unbuffered DIMMs with ECC 16GB(4x4GB DIMMs) Dual Rank Unbuffered DIMMs with ECC 32GB(4x8GB DIMMs) When single rank memory, both A0 or A1, B0 or B1 DIMM can be installed first. http://www.tyan.com... - Page 39 Basic repairs and troubleshooting can be done if authorized in the product documentation or if directed by telephone or online support from Tyan. If damage has occurred due to repairs or service that is not approved by Tyan, the product warranty becomes invalid. Review all safety guidelines that are provided with the Tyan MicroServer.
- Page 40 Power down the system. Disconnect all cables and peripherals from the compute blade(s). Remove the compute blade. Refer to Removing a Compute Blade (Figure 4-3). 1. Push the memory slot locking latch outwards. 2. Remove the memory module from the socket. http://www.tyan.com...
-
Page 41: Hard Drives
5. Place the hard drive assembly on the compute blade. Hard Drive Bracket Bracket Flange Figure 4-6. Installing a Hard Drive Module 6. Install and secure the hard drive assembly with two (2) screws. 7. Install the compute blade into the chassis. Refer to Installing a Compute Blade. http://www.tyan.com... - Page 42 Basic repairs and troubleshooting can be done if authorized in the product documentation or if directed by telephone or online support from Tyan. If damage has occurred due to repairs or service that is not approved by Tyan, the product warranty becomes invalid. Review all safety guidelines that are provided with the Tyan MicroServer.
-
Page 43: Processors
Basic repairs and troubleshooting can be done if authorized in the product documentation or if directed by telephone or online support from Tyan. If damage has occurred due to repairs or service that is not approved by Tyan, the product warranty becomes invalid. Review all safety guidelines that are provided with the Tyan MicroServer. - Page 44 3. Remove the processor from the socket. Processor Connector 1 Indicator Connector 1 Indicator Locking Lever Processor Socket Corner Tab Socket Top Plate Figure 4-9. Releasing the Processor Locking Lever http://www.tyan.com...
-
Page 45: Installing A Processor
Always replace the thermal grease/pad before installing a processor. See the manufacturer’s guidelines for your type of thermal grease/pad. 9. Install the heat-sink. See Installing a Heat-Sink. 10. Install the compute blade into the chassis. See Installing a Compute Blade. http://www.tyan.com... -
Page 46: Heat-Sinks
Basic repairs and troubleshooting can be done if authorized in the product documentation or if directed by telephone or online support from Tyan. If damage has occurred due to repairs or service that is not approved by Tyan, the product warranty becomes invalid. Review all safety guidelines that are provided with the Tyan MicroServer. - Page 47 Disconnect all cables and peripherals from the compute blade(s). Remove the compute blade. Refer to Removing a Compute Blade. 1. Loosen four (4) captive screws on the heat-sink. (Figure 4-12) 2. Lift and remove the heat-sink from the system board. Heat-Sink Figure 4-11. Removing the Heat-Sink http://www.tyan.com...
-
Page 48: System Board
Basic repairs and troubleshooting can be done if authorized in the product documentation or if directed by telephone or online support from Tyan. If damage has occurred due to repairs or service that is not approved by Tyan, the product warranty becomes invalid. Review all safety guidelines that are provided with the Tyan MicroServer. -
Page 49: Removing A System Board
Basic repairs and troubleshooting can be done if authorized in the product documentation or if directed by telephone or online support from Tyan. If damage has occurred due to repairs or service that is not approved by Tyan, the product warranty becomes invalid. Review all safety guidelines that are provided with the Tyan MicroServer. -
Page 50: Installing A System Board
4. Secure the system board to the blade housing with the screws (Figure 4-13): B5519 System x 5 screws 5. Install the compute blade into the chassis. See Installing a Compute Blade. http://www.tyan.com... -
Page 51: Chapter 7: Chassis Components
This chapter explains how to replace components relating to the chassis components, including the power supply module, fan module, top cover and Pass-through / CMM module. 7.2 Disassembly Flowchart The following flowchart outlines the disassembly procedures. Figure 5-1. Disassembly Flowchart http://www.tyan.com... -
Page 52: Power Supply Modules
Blink AMBER power, high current, slow fan AC present / Only 12VSB on (PS off) or PS in Smart Redundant state Blink GREEN Output ON and OK AC cord unplugged 0.5Hz Blink GREEN http://www.tyan.com... -
Page 53: Removing A Power Supply Module
Basic repairs and troubleshooting can be done if authorized in the product documentation or if directed by telephone or online support from Tyan. If damage has occurred due to repairs or service that is not approved by Tyan, the product warranty becomes invalid. Review all safety guidelines that are provided with the Tyan MicroServer. -
Page 54: Fan Modules
Basic repairs and troubleshooting can be done if authorized in the product documentation or if directed by telephone or online support from Tyan. If damage has occurred due to repairs or service that is not approved by Tyan, the product warranty becomes invalid. Review all safety guidelines that are provided with the Tyan MicroServer. -
Page 55: Opening And Closing The System
Basic repairs and troubleshooting can be done if authorized in the product documentation or if directed by telephone or online support from Tyan. If damage has occurred due to repairs or service that is not approved by Tyan, the product warranty becomes invalid. Review all safety guidelines that are provided with the Tyan MicroServer. -
Page 56: Pass-Through-M1902F65-Cmmpt Module
Basic repairs and troubleshooting can be done if authorized in the product documentation or if directed by telephone or online support from Tyan. If damage has occurred due to repairs or service that is not approved by Tyan, the product warranty becomes invalid. Review all safety guidelines that are provided with the Tyan MicroServer. -
Page 57: Removing An I/O And Cmm System Board
Basic repairs and troubleshooting can be done if authorized in the product documentation or if directed by telephone or online support from Tyan. If damage has occurred due to repairs or service that is not approved by Tyan, the product warranty becomes invalid. Review all safety guidelines that are provided with the Tyan MicroServer. - Page 58 http://www.tyan.com...
-
Page 59: Installing An Pass-Through-M1902F65-Cmmpt System Board
Pass-through-M1902F65-CMMPT blade. (Figure 5-6) 2. Lower the system board onto the Pass-through-M1902F65-CMMPT blade. 3. Install and secure the system board to the Pass-through-M1902F65-CMMPT blade with the five (5) screws. 4. Install the Pass-through-M1902F65-CMMPT module into the chassis. See Installing Pass-through-M1902F65-CMMPT Module. http://www.tyan.com... -
Page 60: Appendix A: Getting Help And Support
Appendix A: Getting Help and Support Technical Support If a problem arises with the Tyan MicroServer, you should first turn to your dealer for direct support. The system has most likely been configured or designed by the dealer and they should have the best idea of what hardware and software your system contains. -
Page 61: Appendix B: Safety Information
disconnecting switch, or electrical outlet. In the event of an electrical accident, you can operate the switch or unplug the power cord quickly. Do not work alone under hazardous conditions or near equipment that has hazardous voltages. http://www.tyan.com... -
Page 62: Safety Notices
Use caution when lifting. Table 2-1. Safe Lifting Practices Weight Required ≥ 18 kg (39.7 lbs) two individuals ≥32 kb (70.5 lbs) three individuals ≥55 kg (121.2 lbs) four individuals ® TYAN FM65-B5519 User's Manual V1.00 Document No.: D2178-100 http://www.tyan.com...
Need help?
Do you have a question about the MicroServer Series and is the answer not in the manual?
Questions and answers