Reflex Fillcontrol Auto Operating Instructions Manual
Hide thumbs
Also See for Fillcontrol Auto:
- Operating manual (18 pages) ,
- Original operating manual (348 pages)

Related Manuals for Reflex Fillcontrol Auto


Summary of Contents for Reflex Fillcontrol Auto
- Page 1 06.07.2016 - Rev. B Fillcontrol Auto Operating manual Original operating manual...
-
Page 3: Table Of Contents
Function test ......................................29 Use the device to fill the facility system with water ........................30 Starting Automatic mode .................................. 30 Operation ....................................... 31 Operating modes ....................................31 8.1.1 Automatic mode ................................31 Fillcontrol Auto — 06.07.2016 - Rev. B English — 3... - Page 4 Cleaning the dirt trap ..................................44 10.4 Maintenance certificate ..................................45 Disassembly ....................................46 Annex ......................................47 12.1 Reflex Customer Service ..................................47 12.2 Guarantee ......................................47 12.3 Conformity and standards ................................. 47 4 — English Fillcontrol Auto — 06.07.2016 - Rev. B...
-
Page 5: Notes On The Operating Manual
Reflex Winkelmann GmbH accepts no liability for any damage resulting from failure to observe the information in this operating manual. In addition to the requirements set out in this operating manual, national statutory regulations and provisions in the country of installation must also be complied with (concerning accident prevention, environment protection, safe and professional work practices, etc.). -
Page 6: Safety
The sign, in combination with the signal word 'Attention', indicates a situation where damage to the product itself or objects within its vicinity can occur. Note! This symbol, in combination with the signal word 'Note', indicates useful tips and recommendations for efficient handling of the product. 6 — English Fillcontrol Auto — 06.07.2016 - Rev. B... -
Page 7: Personnel Requirements
For use with mineral oils. • For use with flammable media. • For use with distilled water. Note! It is not permitted to make any modifications to the hydraulic system or the circuitry. Fillcontrol Auto — 06.07.2016 - Rev. B English — 7... -
Page 8: Residual Risks
Risk of injury due to heavy weight The devices are heavy. Consequently, there is a risk of physical injury and accidents. • Use suitable lifting equipment for transportation and installation. 8 — English Fillcontrol Auto — 06.07.2016 - Rev. B... -
Page 9: Description Of The Device
An application without system separator tank is possible. – For customised design and adjustment, see chapter 12.1 "Reflex Customer Service" on page 47 . Note! In a solar circuit, you must have installed a system separator tank to ensure a water/glycol mixture for the circuit. -
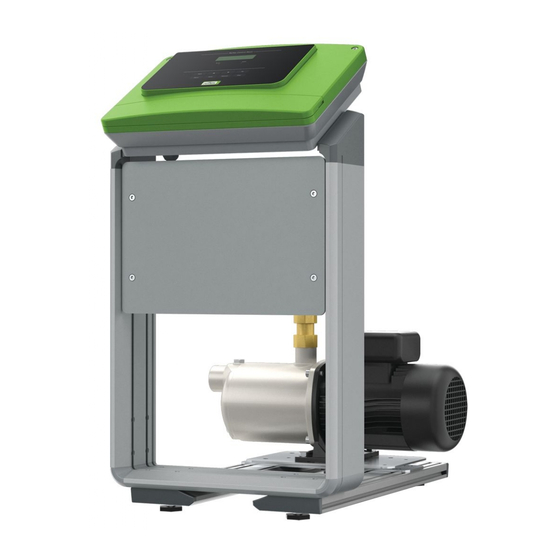
Page 10: Overview
"AV" vent screw "PIS" pressure transducer Pump Shut-off valve to "BV" system WC Connections for the fresh water make-up lines • Intake line to pump • Pressure line to the facility system 10 — English Fillcontrol Auto — 06.07.2016 - Rev. B... -
Page 11: Identification
- Factory-set opening aline pressure of the safety valve at site Set opening pressure of the safety valve 4.3.2 Type code Type code Fillcontrol Auto A 5.5 (pump delivery head) Fillcontrol Auto — 06.07.2016 - Rev. B English — 11... -
Page 12: Function
The controller activates the pump. Fresh water is added to the system from the system separator vessel. The make-up variant is set in the Customer menu,see chapter 9.2.1 "Customer menu" on page 38 . 12 — English Fillcontrol Auto — 06.07.2016 - Rev. B... -
Page 13: Scope Of Delivery
• Expansions for Reflex Basic controllers: – I/O modules – Bus modules: • Lonworks Digital • Lonworks • Profibus DP • Ethernet Note! Separate operating instructions are supplied with accessories. Fillcontrol Auto — 06.07.2016 - Rev. B English — 13... -
Page 14: Technical Data
Permissible operating Operating Type (l/h) pressure pressure gauge pressure temperature (bar) (bar) (bar) (°C) ≤ 4200 ≤ 8.5 Fillcontrol Auto Performance chart Makeup capacity in m /hour Makeup pressure in bar 14 — English Fillcontrol Auto — 06.07.2016 - Rev. B... -
Page 15: Installation
Confirm that installation and start-up have been carried out correctly using the installation, start-up and maintenance certificate. This action is a prerequisite for the making of warranty claims. – Have the Reflex Customer Service carry out commissioning and the annual maintenance. Fillcontrol Auto — 06.07.2016 - Rev. B English — 15... -
Page 16: Installation Conditions
If necessary, provide a DN 15 filling connection according to DIN 1988 T 4. • Electric connection: 230 V~, 50 Hz, 16 A with upstream ELCB: Tripping current 0.03 A. 16 — English Fillcontrol Auto — 06.07.2016 - Rev. B... -
Page 17: Execution
2. Create the water-side connections of the device to the system. – Use connections with the same dimensions at the device for all lines. 3. If required, create the interfaces according to the terminal plan. Fillcontrol Auto — 06.07.2016 - Rev. B English — 17... -
Page 18: Floor Mounting
0" 0" pressure of the "MAG" diaphragm expansion tank, otherwise, you must correct with "hst",see chapter 7.2 "Determining the P minimum operating pressure for the controller" on page 26 . 18 — English Fillcontrol Auto — 06.07.2016 - Rev. B... -
Page 19: Hydraulic Connection
At make-up temperatures > 70 °C and the use in facility systems without system separator tanks, you must plan according to the local conditions, see chapter 12.1 "Reflex Customer Service" on page 47 . Fillcontrol Auto — 06.07.2016 - Rev. B... -
Page 20: Switching And Make-Up Variants
You will avoid an undesired cycling of the make-up. 4. In solar plants, use the "BT" system separator tank to prepare the water/glycol mixture. – Size the system separator tank with at least 1.5 times the system volume. 20 — English Fillcontrol Auto — 06.07.2016 - Rev. B... - Page 21 26 Note! You may combine the device with softening systems (Fillsoft, for example); available as optional accessories, see chapter 4.6 "Optional equipment and accessories" on page 13 . Fillcontrol Auto — 06.07.2016 - Rev. B English — 21...
-
Page 22: Electrical Connection
Note that the fusing for the device connection is to be provided by the user, see chapter 5 "Technical data" on page 14 . Install the cover. Connect the mains plug to the 230 V power supply. Activate the system. The electrical connection is completed. 22 — English Fillcontrol Auto — 06.07.2016 - Rev. B... -
Page 23: Terminal Diagram
Solenoid valve (not for motor ball valve) Pressure analogue input Group message External makeup demand ("Levelcontrol" only) Not used Not used Not used Not used RS-485 interface Mains supply Shielding Fillcontrol Auto — 06.07.2016 - Rev. B English — 23... - Page 24 Contact water meter (in "Fillset Impuls", for example), see chapter 4.6 "Optional equipment and accessories" on page 13 . User, optional • Evaluation of the makeup. • Contact 32/33 closed = meter pulse. Not used. Pre-wired, bridged 24 — English Fillcontrol Auto — 06.07.2016 - Rev. B...
-
Page 25: Rs-485 Interface
All entries in the fault memory. • Communication with control centres. • Communication with other equipment. Note! If required, please request the RS-485 interface protocol from the Reflex Customer Service. • Connection details. • Accessory information and data. 6.5.2.1 Connecting the RS-485 interface Connect the interface as follows: 1. -
Page 26: Commissioning
This action is a prerequisite for the making of warranty claims. – Have the Reflex Customer Service carry out commissioning and the annual maintenance. Requirements for initial commissioning The device will be ready for commissioning when the tasks described in the "Installation" chapter have been completed. Comply with the information below on commissioning: •... -
Page 27: Filling The Device With Water
If necessary, manually turn the pump using a screwdriver at the fan wheel until bubble-free water escapes. Tighten the vent screw and ensure that is does not leak. The device is filled with water. "AV" vent screw Fillcontrol Auto — 06.07.2016 - Rev. B English — 27... -
Page 28: Modifying The Controller's Start Routine
After successful conclusion of the start routine, you are in Stop mode. – Do not yet switch to Automatic mode. Note! Set the "Magcontrol" or "Levelcontrol" make-up variant in the Customer menu, see chapter 9.2.1 "Customer menu" on page 38 . 28 — English Fillcontrol Auto — 06.07.2016 - Rev. B... -
Page 29: Parametrising The Controller In The Customer Menu
Vent the pump, see chapter 7.3 "Filling the device with water" on page 27 . Note! Execute a function test of the system separator tank according to the user-supplied specifications. Fillcontrol Auto — 06.07.2016 - Rev. B English — 29... -
Page 30: Use The Device To Fill The Facility System With Water
Start the automatic mode at the operator panel of the controller: • Press "Auto" for automatic operation. • The "Auto" LED at the operator panel illuminates to visually signal automatic operation. Note! The commissioning process is now concluded. 30 — English Fillcontrol Auto — 06.07.2016 - Rev. B... -
Page 31: Operation
The controller calculates the pressure required for filling. As soon as this value has been attained, the controller automatically stops the filling process. Note! Manual operation can not be performed if safety-relevant parameters are exceeded. – Switching is blocked if safety-relevant parameters are exceeded. Fillcontrol Auto — 06.07.2016 - Rev. B English — 31... -
Page 32: Stop Mode
Use a screwdriver to rotate the pump at the fan wheel of the pump motor before restarting. Note! A jamming of the "PU" pump is prevented during automatic operation thanks to forced starting action (after 24 hours). 32 — English Fillcontrol Auto — 06.07.2016 - Rev. B... -
Page 33: Controller
3. Use "OK" (5) to confirm the parameter. Use the "▼" (7) or "▲" (9) arrow keys to switch to a different menu option. 5. Use "Quit" (11) to switch to a different menu level. Fillcontrol Auto — 06.07.2016 - Rev. B English — 33... -
Page 34: Configuring Settings In The Controller
"Magcontrol" make-up variant. Press "OK" and enter the actuating pressure for the safety valve. 03.0 bar (006) – Refer to the facility system for specifying the actuating pressure of the safety valve. 34 — English Fillcontrol Auto — 06.07.2016 - Rev. B... - Page 35 15. Press "OK" and change the setting for "With softening", if required. With softening – YES: The system offers more queries regarding the softening process. – NO: The system does not offer more queries regarding the softening process. (030) Fillcontrol Auto — 06.07.2016 - Rev. B English — 35...
- Page 36 22. Press "OK" and select a setting for "Floating fault contact": Floating fault contact – YES: For the output of all messages to the floating contact. NO: Output of all messages identified with "xxx" ("01", for example). – 36 — English Fillcontrol Auto — 06.07.2016 - Rev. B...
- Page 37 P0 = xx.x bar – The last 10 entries of the minimum working pressure are stored with date and time. Date | Time Information about the software version Fillcontrol + V1.00 Fillcontrol Auto — 06.07.2016 - Rev. B English — 37...
-
Page 38: Customer Menu
Service menu This menu is protected with a password. It can be accessed only by the Reflex Customer Service. A partial summary of the settings stored in the Service menu is proved in the Chapter Default settings, see chapter 9.2.2 "Service menu" on page 38 . -
Page 39: Messages
Alarm causes can be eliminated by the operator or a specialist workshop. • If required, please contact the Reflex Customer Service. Note! Confirm the elimination of the fault by pressing "Quit" at the controller operator panel. All other alarms are automatically reset as soon as the cause has been eliminated. - Page 40 Inform Reflex Customer Service. • Connection between option card and controller faulty. • Option card defective. EEPROM defective • EEPROM defective. Inform Reflex Customer Service. "Quit" • Internal calculation error. 40 — English Fillcontrol Auto — 06.07.2016 - Rev. B...
- Page 41 Short-circuit of input Check the wiring at the digital faulty voltage. inputs (water meter, for example). Analogue input voltage Short-circuit of input Check the wiring at the analogue faulty voltage. inputs (pressure/level). Fillcontrol Auto — 06.07.2016 - Rev. B English — 41...
-
Page 42: Maintenance
• Reset the maintenance counter in the Customer menu. Note! Maintenance tasks must be carried out only by specialist personnel or the Reflex Customer Service. • Confirm the maintenance tasks, see chapter 10.4 "Maintenance certificate " on page 45 . -
Page 43: Maintenance Schedule
" safety valve pressure. Note! Compare the minimum working pressure with the initial pressure in the diaphragm expansion tank. – If necessary, adjust the initial pressure in the diaphragm expansion tank. Fillcontrol Auto — 06.07.2016 - Rev. B English — 43... -
Page 44: Exterior Leak Test
The dirt trap has been cleaned. Note! Clean all other installed dirt traps in the system (in the Fillset, for example). – Repeat the steps described above for cleaning the dirt trap. 44 — English Fillcontrol Auto — 06.07.2016 - Rev. B... -
Page 45: Maintenance Certificate
Maintenance 10.4 Maintenance certificate All maintenance tasks have been completed according to the Reflex Installation, Operating and Maintenance Manual. Date Service organisation Signature Remarks Fillcontrol Auto — 06.07.2016 - Rev. B English — 45... -
Page 46: Disassembly
Undo all hose and pipe connections between the device and the system and remove them completely. Drain all water from the device. If necessary, physically remove the device from the system. The device is removed. 46 — English Fillcontrol Auto — 06.07.2016 - Rev. B... -
Page 47: Annex
Directive 2014/68/EU. Reflex Winkelmann GmbH Gersteinstraße 19 59227 Ahlen - Germany Telephone: +49 (0)2382 7069-0 Norbert Hülsmann Volker Mauel Fax: +49 (0)2382 7069-9588 Members of the Board of Directors E-mail: info@reflex.de Fillcontrol Auto — 06.07.2016 - Rev. B English — 47... - Page 50 Reflex Winkelmann GmbH Gersteinstraße 19 59227 Ahlen, Germany Telephone: +49 (0)2382 7069-0 Fax: +49 (0)2382 7069-9588 www.reflex.de...
Need help?
Do you have a question about the Fillcontrol Auto and is the answer not in the manual?
Questions and answers