
Related Manuals for Alpha ESS SMILE-G3-S3.6


Summary of Contents for Alpha ESS SMILE-G3-S3.6
- Page 1 Installation, Operation & Maintenance Manual of SMILE-G3-S3.6/S5/B5 Energy Storage System...
-
Page 3: Disclaimer
DISCLAIMER Copyright © AlphaESS Co., Ltd. 2022. All rights reserved. No part of this document may be reproduced or transmitted in any form or by any means without prior written consent of AlphaESS Co., Ltd. The material furnished in this document is believed to be accurate and reliable. The information and recommendations in this document do not constitute commitments or warranties in the form of assignments. -
Page 4: Copyright Statement
COPYRIGHT STATEMENT This manual is under the copyright of Alpha ESS Co., Ltd. with all rights reserved. Please retain this manual and operate the Product in accordance with all safety and operating instructions in this manual. Please do not operate the product before reading through... -
Page 5: Table Of Contents
CONTENT DISCLAIMER ......................1 COPYRIGHT STATEMENT ................... 2 1. INTRODUCTION ....................7 1.1. Content and Structure of this Document ..........7 1.2. Target Group ....................7 1.3. Levels of Warning Messages ..............8 1.4. Definition of Abbreviations and Nouns ..........9 2. - Page 6 4. Storage and Transport .................. 27 4.1. Storage ..................... 27 4.1.1. Inverter Storage ........................27 4.1.2. Battery Storage ......................... 27 4.2. Transport ....................28 5. Mounting ......................29 5.1. Checking the Outer Packing ..............29 5.2. Scope of Delivery ..................29 5.3.
- Page 7 6.5. Electrical Connection Between the Inverter and Battery Packs ..55 6.5.1. Electrical Connection Between the Inverter and Smile-Bat series ..... 55 6.5.2. AUX/LAN/PV-CT/DRM、RRCR/GRID-CT、Meter/RS485/BMS Connection 58 6.6. Mounting the Battery and Inverter decorative........60 7. Installer Account Register and Install New System ........61 7.1.
- Page 8 9.5.2. Check the PV Generation and Discharging Function of the Product ....84 9.5.3. Check the UPS State of the Product ................85 9.6. Instruct the End User to Install the APP ..........85 10. Maintenance and Troubleshooting ............86 10.1.
-
Page 9: Introduction
1. INTRODUCTION 1.1. Content and Structure of this Document This document is valid for the SMILE-G3 Battery Energy Storage System, including the inverter (SMILE-G3-INV) and battery (Smile-G3-BAT). This document describes the mounting, installation, commissioning, configuration, operation, troubleshooting and decommissioning of the product as well as the operation of the product user interface. -
Page 10: Levels Of Warning Messages
1.3. Levels of Warning Messages The following levels of warning messages may occur when handling the product DANGER indicates a hazardous situation which, if not avoided, will result in death or serious injury. WARNING indicates a hazardous situation which, if not avoided, could result in death or serious injury. -
Page 11: Definition Of Abbreviations And Nouns
1.4. Definition of Abbreviations and Nouns alternating current application auxiliary battery battery management system direct current energy management system inverter photovoltaic... -
Page 12: Safety
2. Safety 2.1. Intended Use The inverter, battery packs and the electricity meters together form a system designed to optimise the self-consumption of electrical energy in a household. The inverter transfers energy between AC current and DC current while the battery pack is used for the storage of energy (typically storing surplus energy produced by solar arrays). -
Page 13: Safety Instructions For Battery
2.2. Safety Instructions for Battery 2.2.1. General Safety Precautions Overvoltage or incorrect wiring can damage the battery pack and cause deflagration, which can be extremely dangerous. All types of breakdown of the battery may lead to a leakage of electrolyte or ... -
Page 14: Important Safety Instructions
3. In the case of a fire in the property but where the fire has not yet reached the battery, if it is safe to do so, use an ABC fire extinguisher and prevent the fire from reaching the battery. Firefighting instructions ... - Page 15 Danger to life due to dangerous voltages in the battery pack. There is dangerous voltage at the pin connector for the power cable. Reaching into the pin connector of the power cable can result in lethal electric shock. Do not open the battery pack. ...
- Page 16 Damage to the inverter due to electrostatic discharge. Touching electronic components can cause damage to or destroy the inverter through electrostatic discharge. Ground yourself before touching any component. Damage due to cleaning agents. The use of cleaning agents may cause damage to the product and its ...
- Page 17 Danger to life due to electric shock when touching live system components in case of a ground fault. When a ground fault occurs, parts of the system may still be live. Touching live parts and cables can result in death or lethal injuries due to electric shock. Disconnect the product from voltage sources and make sure it cannot be ...
-
Page 18: Symbols Explanation
2.4. Symbols explanation Symbols on the type label of the inverter: Symbol Explanation Beware of a danger zone This symbol indicates that the product must be additionally grounded if additional grounding or equipotential bonding is required at the installation site. Beware of electrical voltage The product operates at high voltages. - Page 19 Symbols on the type label and warning label of the battery pack. Symbol Explanation Beware of a danger zone This symbol indicates that the battery pack must be additionally grounded if additional grounding or equipotential bonding is required at the installation site. Risk of chemical burns Risk of explosion Read the Product documentation...
-
Page 20: Product Introduction And Application Scenarios
Explanation SMILE Residential system Generation 3 5kW Single-phase hybrid inverter S3.6 3.6kW Single-phase hybrid inverter 5kW Single-phase battery inverter Complete designation Designation in this document SMILE-G3-S5-INV, SMILE-G3-S3.6-INV, Energy storage inverter SMILE-G3-B5-INV SMILE-G3-BAT-10.1P Battery SMILE-G3-S5, SMILE-G3-S3.6, SMILE-G3- System/ Energy storage system... -
Page 21: System Introduction
3.2. System introduction Dimension(W×H×D):610×1168×230mm Object Name Explain Cable Covers Cover for the left wiring area. There are two covers, one for the Battery Module wiring and a second for the Inverter connections. Inverter Inverter Smile-G3-Bat-10.1P Battery Module 3.3. Product Description 3.3.1. - Page 22 Position Designation Grid Connector (AC Supply) Backup Connector Battery Positive (+ve) Power Connector Battery Negative (-ve) Power Connector Battery Breaker* of the Inverter Positive and Negative PV connectors, PV 1/ PV 2 *** PV Switch*** Wi-Fi Port Communication Ports(CAN/RS485,BMS, LAN, Meter/Grid-CT, DRM**, PV-CT, AUX)...
-
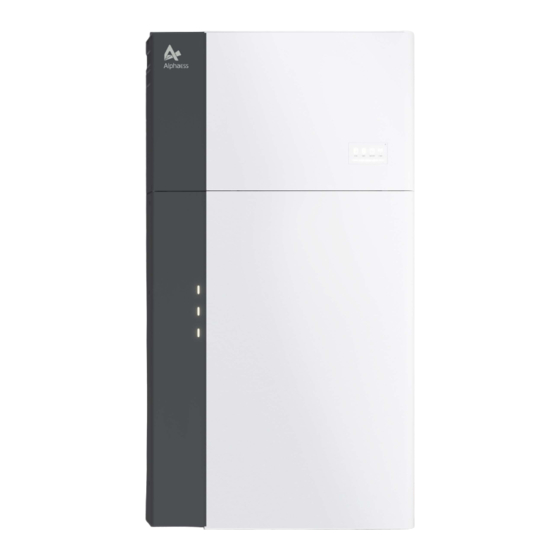
Page 23: Inverter Display Interface Introduction
3.3.2. Inverter Display Interface Introduction LED Display Five LED indicators and one reset button are provided on the display panel. These LED indicators provide information about the operation status of the system. Explanation Status Explanation Status White light White light The battery pack works normally The system works normally No light... - Page 24 The LED indicators provide information about the State of Charge (SOC) status of the battery pack. Description LED Indicator SOC≤5.2% 5.2%<SOC≤9.5% 9.5%<SOC≤25.2% LEDs show the SOC of batteries 25.2%<SOC≤50% 50%<SOC≤75.2% 75.2%≤SOC≤100% Note that the LED lights provide an approximation of the State of Charge and should be read as an indication and not as a set value.
-
Page 25: Battery Introduction
3.3.3. Battery Introduction Battery pack appearance and Dimensions Connection area overview of SMILE-G3-BAT-10.1P Position Designation Battery Power Button... -
Page 26: Application Scenarios
Battery Breaker Battery LED Display Battery Positive (+ve) Power Connector Battery Negative (-ve) Power Connector Grounding BMS COM Ports 3.4. Application Scenarios AlphaESS SMILE-G3 system (Comprised of the inverter SMILE-G3-INV and the bat- tery SMILE-G3-BAT-10.1P) can be connected as a DC-coupled system (mostly new installation), an AC-coupled systems (mostly retrofit), a Hybrid-coupled systems (mostly retrofit, and increase the PV capacity), and Off-grid (with Generator) systems as shown in the following diagrams:... - Page 27 AC-coupled Storage System–Scheme...
-
Page 28: Hybrid-Coupled Storage System
3.4.3. Hybrid-coupled Storage System Hybrid-coupled Storage System – Scheme NOTE: In all cases, Normal Loads and Critical Loads must be appropriately protected by earth fault protection devices (e.g. Type A or Type B RCDs, RCBOs) in accordance with appropriate Standards. -
Page 29: Storage And Transport
4. Storage and Transport 4.1. Storage 4.1.1. Inverter Storage The following requirements should be met if the inverter is not put into immediate use: 1. Do not unpack the inverter. 2. Keep the storage temperature at -40~70°C and the humidity at 5%~95% RH. 3. -
Page 30: Transport
8. Batteries stored for more than 6 months should be assessed and charged periodically. 9. If a lithium battery is stored for a long time, capacity loss may occur. After a lithium battery is stored for 12 months in the recommended storage temperature, the irreversible capacity loss rate is 3%~10%. -
Page 31: Mounting
5. Mounting 5.1. Check the Outer Packaging Before unpacking the product, check the outer packaging for damage, such as holes and signs of mechanical damage or water damage. If any damage is found, do not unpack the product, rather contact your dealer as soon as possible. 5.2. - Page 32 Documenta- tion & Manual (X1) *Only for product SMILE-S3.6/S5; SMILE-G3-BAT-10.1P Battery Pack Wall Anchor Spanner Ring Terminal (X1) ST6*55 (X4) (X1) (x4) Left decoration switch cover Wall bracket Y type terminal plate (X1) (x1) (x1) (x2) Screw M5*10 Battery (BMS) Quick Installation Expansion Bat Communication...
-
Page 33: Requirements For Mounting
5.3. Requirements for Mounting Danger to life due to fire or explosion Despite careful construction, electrical devices can cause fires. Do not mount the system in areas containing highly flammable materials or gases. Do not mount the system in potentially explosive atmospheres. ... -
Page 34: Mounting Structure Requirements
5.3.3. Mounting Structure Requirements Ensure the mounting location and fireproofing meets the requirements of AS5139. The surface to which the Battery System is to be mounted shall be fire-rated where required by local regulations (e.g. AS5139). Out of an abundance of caution, itt is recommended that the system be mounted ... -
Page 35: Mounting Space Requirements
5.3.5. Mounting Space Requirements Reserve sufficient clearance around the product to ensure sufficient space for installation, maintenance and heat dissipation. The side clearance is a recommendation. Keep the clearance as short as you can if there is no influence to the operation and maintenance. Recommended clearances Local Standards may add additional clearance requirements, particularly regarding clearances between the Battery System and other Electrical Appliances. -
Page 36: Preparing Tools And Instruments
5.4. Preparing Tools and Instruments Category Tools and Instruments Hammer drill (with a Ф10 Torque socket wrench Multimeter (DC voltage mm drill bit) SW10 range ≥ 1000 V DC) T20 screwdriver Diagonal pliers Wire stripper (torque range: 0-5 N m) L<200mm Installation Rubber mallet... -
Page 37: Mounting The Product
5.5. Mounting the Product 5.5.1. Mounting the Battery a. Remove the battery from the carton and transport it to the installation site with a trolly or other manual handling aid capable of safely moving the product weight. Se- cure the Product during any movement or transport. b. - Page 38 f. After cleaning the dust and other objects from the two holes, place 2 wall anchors into the holes, then move the battery back into the mounting position and attach the battery wall-securing bracket to the wall using the SW10 hexagon screws provided. Please use a level to ensure that the wall bracket and battery are mounted horizontally and not at any angle.
-
Page 39: Mounting The Inverter
5.5.2. Mounting the Inverter a. Fit the left and right Inverter Positioning side brackets onto the top of the battery b. Attach the inverter to the mounting bracket. The inverter mounting holes should align with the horizontal hosed of the Inverter Positioning Side Brackets. Note that the in- verter mounting sits inside (between) the two brackets and are secured with two screws on the left and right sides of the system. -
Page 40: Mounting The Wifi Module
5.5.3. Mounting the WiFi Module a. Remove the WiFi Silicone dust cover from the left of the inverter. b. Tighten the Wi-Fi module onto the inverter with the M4*10 (X2) Screws provided. (Tool: PH2 screwdriver, torque: 2.0 Nm). -
Page 42: Electrical Connection
OFF. . Damage to the system caused by incorrect cable connections is not covered under warranty. Only certified electricians accredited by Alpha ESS are allowed to connect cables. Appropriate PPE must be worn when Installing or Connecting the Product ... -
Page 43: Cable Requirements For Connection
6.1. Cable Requirements for Connection Cable Type Conductor Cross Outer Source Section Area Range Diameter Standard PV cable: recom- Supplied with the battery Battery mended type: PV1-F 16mm power cable Battery communi- Standard network cable: recom- Supplied with the battery 0.12 ~... -
Page 44: Connecting Additional Grounding
6.2. Connecting Additional Grounding Electric shock hazard Before making any electrical connections, ensure the PV switch & all AC and BAT circuit breakers in the energy storage system are switched OFF and cannot be acci- dentally or unintentionally reactivated. An Earthing point is provided near the battery terminals on the inverter. Prepare M5 Eye/Ring terminals, strip the earth cable insulation, insert the stripped wire into the ring terminal lug and crimp using a crimping tool. -
Page 45: Ac Connection
6.3. AC Connection 6.3.1. Requirements for the AC Connection AC cable requirements as follows: ☐ Conductor type: copper wire (tinned-copper preferred) ☐ Current carrying capacity: AC Supply 21.7A + Backup (total up to 43.4A) Backup Output: 21.7A Note: Account for temperature de-rating and voltage drop/rise when selecting wire di- ameters. -
Page 46: Grid And Backup Connection
Maximum wire gauge is 10mm for the Plug at the Inverter side. Backup Side 21.7A Breaker Type for Smile-G3-S3.6-INV Description Max. Current 31.2A 25A, 32A or 40A - check MCB de-rating Grid Side data for the expected maximum temperatures. - Page 47 Where wire diameter used for the A.C. connection to or from the Battery Inverter exceeds the maximum wire diameter for the plugs below (e.g. if a long cable run is required and Voltage Rise Calculations require a wire of greater than 10mm ), use an intermediary connection point close to the Battery to downsize the wire.
-
Page 48: Ct Connection & Electricity Meter Connection
6.3.3. CT Connection & Electricity Meter Connection Item Current Scenarios 100A DTSU666-3*230V 5(80)A Three phase meter (without CT) DTSU666-3*230V 100A/40mA 100A Three phase meter (with CT) DTSU666-3*230V 250A/50mA 250A Three phase meter (with CT) On the left-hand side of the Inverter, loosen the strain relief of the cable glands on the COM connection cover, and unscrew the 4 screws on the corners to reveal the Grid CT, PV CT and meter communication ports. - Page 49 Step 1: run the CT cables through the cable gland of the COM connection cover but don’t tighten the strain relief of the cable glands yet. Insert the RJ45 plugs into the relevant RJ45 sockets. Step 2: close the magnetic clamp of the Grid CT on the grid-supply cable.
- Page 50 DC-coupled Storage System AC-coupled Storage System and Hybrid-coupled Storage System...
-
Page 51: Chint Meter Connection
6.3.5. Chint Meter Connection If using a Meter instead of the CTs, pass the meter cable through the cable gland of the COM connection cover but don’t tighten the strain relief nut of the cable glands. Insert the RJ45 plugs to the meter communication port. The other steps for meter connection as follows: 1. - Page 52 2. DSTU666-3*230V 100A/40mA, DTSU666-3*230V 250A/50mA: Three phase meter (with CT) connection Wiring at single-phase feed in Wiring at three-phase feed in The connections are marked clearly on the meter. CT Group Grid -> Load PV -> Load Terminal CT Phase Colour White Blue White Blue White Blue White Blue White Blue White Blue...
-
Page 53: Configuring The Chint Meter
Be VERY careful when wiring or checking these connections because the connections appear reversed when the meter is secured in place on the Din Rail. Always physically check the label on the meter when wiring any CTs or grid reference wires. - Page 54 When the meter is used as PV meter, please follow the steps below to complete the address setting (i.e. set Address 2). 2.DTSU666-3*230V 100A/40mA,DTSU666-3*230V 250A/50mA: Three-phase meter (with CT) When the meter is used as Grid meter, please follow the steps below to complete the address setting.
- Page 55 Meter Setting on Alpha APP Step 1: When the system work mode is selected as “DC”, only tick "Meter" icon on the right of the Grid Meter. When the system work mode is selected as “AC” or as “Hybrid”, tick both the "Meter" box on the right of the Grid Meter and of the PV Meter.
-
Page 56: Pv Connection
6.4. PV Connection Please ensure the following before connecting the PV strings to the SMILE-G3-INV: Make sure the open voltage of the PV strings will not exceed the max. DC input voltage (580Vdc). Violating this condition will void the warranty. Make sure the polarity of the PV connectors is correct. -
Page 57: Electrical Connection Between The Inverter And Battery Packs
6.5. Electrical Connection Between the Inverter and Battery Packs 6.5.1. Electrical Connection Between the Inverter and SMILE-Bat series Communication cable connection: a. Remove the battery communication cable from the battery packaging b. Pass the battery communication cable through the cable gland of the COM connection cover of SMILE-G3-INV, don’t tighten the strain relief clamp of the cable glands. -
Page 60: Aux/Lan/Pv-Ct/Drm、Rrcr/Grid-Ct、Meter/Rs485/Bms Connection
6.5.2. AUX/LAN/PV-CT/DRM、RRCR/GRID-CT、Meter/RS485/BMS Connection For other communication (AUX, LAN, RRCR, DRM, Meter, RS485) connections, please follow the steps below. 1. Loosen the cable glands on the COM connection cover, and then unscrew the 4 screws on the COM connection cover. 2. Pass the communication cables through the cable glands of the COM connection cover, don’t tighten the strain relief clamp of the cable glands. -
Page 62: Mounting The Battery And Inverter Decorative
6.6. Mounting the Battery and Inverter decoration plates After completing all electrical connections of the energy storage system: 1. Install the plastic cover on the left side of the Battery 2.Install the top and right covers of the inverter... -
Page 63: Installer Account Register And Install New System
7. Installer Account Registration and Installing a New System 7.1. Register on the APP 7.1.1. Download and Install the Alpha ESS APP 1.Android device users can download the App through major Android application markets such as Google Play. 2.IOS device users can search for “AlphaESS” in the App Store and download the App. -
Page 64: Overview Of Functions For Installer Account
7.1.3. Overview of Functions for Installer Account... -
Page 65: Install New System
7.1.4. Register a new installation – “Install New System” Australian Installer Please click install New system, enter your installer account ID in the “license” field to bind the system to your account and “activate” the system. - Page 66 Enter S/N, check code, license, create time, customer full name, contact number, address, and then click the save button. If you are an Australian installer, you will need to fill in the Street, Suburb and Postcode fields and the Region field, which has six fixed options (NSW, QLD, VIC, SA, TAS, WA).
-
Page 68: Regiter On Alphacoud
The safety standard must be set correctly If you select a safety standard which is not valid for your country and purpose, it can cause a disturbance in the energy storage system and lead to problems with the Network Operator. When selecting the safety standard, you must always observe the locally applicable standards and directives as well as the properties of the PV system (e.g. - Page 69 If not, please register by filling in the following web form;...
-
Page 70: Install New System
In this form, all fields with a red star are compulsory. *Serial number: EMS serial number (please see the nameplate of the inverter) *Username: 5-15 letters / numbers *Password: 5-15 letters / numbers / characters More details are available in the Online Monitoring Web Sever Installers User Manual, which can be downloaded from the AlphaESS homepage. -
Page 71: Powering On The System
8. COMMISSIONING 8.1. Checks Before Powering-On No. Check Item Acceptance Criteria The installation environment is safe and the unit has adequate clearance as per the instruction in this Manual Installation/Mounting as well as in compliance with local Standards. The area environment around the installation should be free from clutter and should not be flood-prone. - Page 72 Switch on the AC breaker between the grid port of the SMILE-G3-INV and the grid (this AC Breaker should be labelled Main Switch Battery ESS Supply or similar). Switch on the AC breaker between the backup port of the SMILE-G3-INV and the ...
- Page 73 Install the plastic on/off switch cover on the right-hand side of the Battery Module Install the plastic inverter cover over the cables and switch on the left side of the inverter. Ensure the fastening screw is used to secure this cover.
-
Page 74: Wifi Module Configuration And Parameter Settings
8.3. WiFi Module Configuration and Parameter Settings 8.3.1. WiFi Configuration This section is for users who have an energy storage system with a WiFi module. The AlphaESS App is used to configure the network, set system basic parameters, monitor system operation status and check configuration information. - Page 75 The system will not be able to connect to the internet without either a physical LAN cable connection or configured WiFi if the WiFi dongle is used.
- Page 76 8.3.1.1 Basic Parameters Settings DC Mode...
- Page 77 AC Mode...
- Page 78 Hybrid Mode...
-
Page 79: Direct Commissioning On Wifi Configuration
The Safety Regulation field must be set correctly If you select a safety standard which is not valid for your country and Network, it will cause a disturbance in the energy storage system and lead to problems with the Network Operator. If you are not sure which safety standard is valid for your location, please contact your Network Operator for information on which safety standard is to be selected. - Page 80 8.3.2.2 Check the Running State of PV and Battery Switch off the AC breaker between the grid port on the energy storage inverter and the grid, and switch off the AC breaker between the backup port on the energy storage inverter and the loads. Press the battery button.
- Page 81 8.3.2.3 Check the UPS State Please connect an essential electrical appliance to the socket of backup load. Or switch on an essential electrical appliance already connected on the backup load port of the inverter. Switch on the AC breaker on the backup port of the energy storage inverter. ...
-
Page 82: Installing New System And Settings On The App
8.4. Installing New System and Settings on the APP 8.4.1. Download and Install the APP 8.4.2. Register as an Installer If you don’t have an installer account, please register first. If you already have an installer account, please log in directly. 8.4.3. - Page 83 Australian Installer Please enter your installer account and click “Install New System” to bind the system to your account and set the system. Enter S/N, check code, license, create time, customer full name, contact number, address, and click the save button. If you are an Australian installer, you will need to fill in the Street (NMI), Suburb (NMI) and Postcode (NMI) fields and add a new Region field, which has six fixed options (NSW, QLD, VIC, SA, TAS, WA).
-
Page 84: Check The Running State On-Line
8.5. Check the Running State On-line If you have completed commissioning as described in section 10.3.2, please ignore this section. You can also commission the system after WiFi configuration. Please make sure the PV switch and battery breakers and all the breakers connecting to the product are ON. - Page 85 Check the running status of the system in “Step 3”. If the operation is normal as described in “Step3”, please remember to deactivate the “Charging/Discharging Setting” by clicking “OFF” and save the changes.
-
Page 86: Check The Pv Generation And Discharging Function Of The Product
8.5.2. Check the PV Generation and Discharging Function of the Product Step1: Please switch off the PV switch on the energy storage inverter and the AC breaker on the PV inverter if there is any. Switch on some larger loads to see the battery discharging status. -
Page 87: Check The Ups State Of The Product
8.5.3. Check the UPS State of the Product Please connect an essential electrical appliance to the socket of backup load. Or switch on an essential electrical appliance already connected on the backup load port of the energy storage inverter. Switch on the AC breaker on the backup port of the energy storage inverter. - Page 88 9. Powering On and Off the System (post-install) 9.1. Powering on the System 1) Switch on the battery breaker which is located on the left-hand side of the SMILE- G3-INV, immediately below the AC supply plug. 2) Switch on the battery breaker of the batteries (located on the right hand side of the Battery Module.
- Page 89 5) Switch off the battery breaker which is on the right-hand side of the Battery Module. 6) press-and-hold the power button of the battery for 6 seconds.
-
Page 90: Maintenance And Troubleshooting
10. Maintenance and Troubleshooting 10.1. Routine Maintenance Normally, the energy storage system need no maintenance or calibration. However, in order to maintain the accuracy of the SOC, it is recommended to perform a full charge calibration for SOC (charging battery until the charging power is 0) on the battery at regular intervals (such as two weeks). -
Page 91: Troubleshooting
10.2. Troubleshooting Inverter Error Troubleshooting Error No. Error description Solution 100000 Grid_OVP 1. Check whether Grid is abnormal. 2. Confirm whether the grid cable connection is 100001 Grid_UVP normal. 100002 Grid_OFP 3. Restart inverter and check whether the fault is 100003 Grid_UFP existing. - Page 92 Confirm that the wiring is normal, and check 100027 Battery_lose whether the battery voltage sampling value is less than 75V. 1.Try to lower the ambient temperature. 2. Make sure that the inverter is installed according to the manual and there is no shelter around the 100028 BAT_OTP inverter.
- Page 93 Bat over-voltage alarm Check that the actual battery voltage is 10V 110000 higher than the battery charging cut-off voltage Bat under-voltage alarm Check that the actual battery voltage is 10V 110001 higher than the battery discharging cut-off voltage output_overload_alarm Check whether the load exceeds 0.95 of the rated 110002 power abnormal_temperature_...
-
Page 94: Inverter Protection Description
10.2.1. Inverter Protection Description Error Description Troubleshooting Display Code dictor DC-Group: Bus Wait for automatical re- soft start failed covery. If the problem is not solved yet, please call the service BUS_OVP1 center. Dc_bus_undervolt Inverter is faulty, SYS red light is on, BAT is off, METER Bus Short... - Page 95 LPE Reverse EMSSCI 12V auxiliary power Fault 1.5V auxiliary power Fault 0.5V auxiliary power Fault Wait for automatic re- NTC Loss covery. If the problem is not solved yet, please call the service center. BAT_UVP BAT_OVP Leakage current test failure...
- Page 96 GFCI_fault INV HCT Fault Load CT Fault PV1 CT Fault Wait for automatic recov- ery. PV2 CT Fault If the problem is not solved yet, please call the service center. Bat1 CT Fault Bat2 CT Fault Grid_relay_fault Bypass Relay Fault...
- Page 97 Load Relay Fault NPE Relay Fault Insulation_fault Wait for automatic recov- ery. DCI Consistency If the problem is not Failure solved yet, please call the service center. WatchDog INV Open Loop Notes: 1. the four LEDs in the first row are system (SYS), battery (BAT), meter (METER), and communication (COM);...
-
Page 98: Battery Protection Description
10.2.2. Battery Protection Description Error Description Troubleshooting Display Code dictor Wait for automatical recovery. If the problem is not be solved yet,please call the service center. Temperature difference Stop discharging and charging until this code is elim- inated and wait for the temperature to drop. High-Tempera- ture Stop discharging until this code is eliminated and... - Page 99 Error Description Troubleshooting Display Code dictor Hardware error Wait for automatic recovery. If the Error 01 problem is not be solved yet, please call the service centre. Hardware error Error 05 Circuit breaker Switch on circuit breaker after power- open ing off...
- Page 100 Total voltage Restart battery and in case the prob- fault lem is not resolved, call for service. Error 15 NOTE: In the case of work mode, if the protection code 09 appears, please press the power button 5 times within 10 seconds, the BMS will be forced to turn on the MOSFET of discharge so that the inverter can detect the battery open voltage and charge the battery.
-
Page 101: Uninstallation & Return
11. Uninstallation & Return 11.1. Removing the Product Procedure Step 1: Power off the energy storage system by following instructions in Chapter 8.2 Powering Off the System. Step 2: Disconnect all cables from the product, including communication cables, PV power cables, battery power cables, AC cables, and PE cables. -
Page 102: Specification
12. Specification 12.1. Datasheet of Inverter SMILE-G3-INV SMILE-G3-S5-INV SMILE-G3-S3.6-INV SMILE-G3-B5-INV Item Input DC (PV side) Recommended max. 7200 PV power 10000 Max. PV input voltage 580 V Rated voltage 360 V Start-up voltage 90 V MPPT voltage range 100 ~ 550 V Max. - Page 103 50/60 Hz Rated Frequency 10 kW 7.2kW 10 kW Rated Input Power 43.5 A 31.3A 43.5 A Max. input current Output AC(Grid side) 5 kW 3.68 kW 5 kW Rated output power 5 kVA 3.68 kVA 5 kVA Max. Apparent Output Power Single phase Operation Phase...
- Page 104 19.5kg Weight Transformerless Topology -25 ~ +60 °C Operation Temperature Range IP65 Ingress Protection <30 dB(A) @1m Noise Emission Natural convection Cooling Concept 3000 m Max. Operation Altitude G98/G99, VDE-AR-N 4105, EN 50549-1,VDE 0126, RD 1699, CEI 0-21, C10/11, NRS 097-2-1, Tor Erzeuger, MEA, PEA, AS/NZW 4777.2, IEEE1547 Grid Connection Standard IEC62040-1, IEC62109-1/-2.AS3100, NB/T 32004,...
-
Page 105: Datasheet Of Battery
12.2. Datasheet of Battery Model SMILE-G3-BAT-10.1P Battery type LFP (LiFePO4) Weight 90 kg 610 * 210 * 790 mm Dimension (W*D*H) Ingress protection IP65 Energy capacity 10.1 kWh Usable capacity 9.6 kWh Nominal voltage 96 V Operating voltage 90 ~ 108 V range Max. - Page 106 Appendix 1: System Overview...
-
Page 109: Appendix 2: Regional Application Standard
13. Appendix 2: Regional Application Standard Please check with your local Network Operator and select the corresponding Regional Application Standard during the commissioning process. The appropriate settings (e.g. power quality modes Volt-var and Volt-Watt) will be applied automatically accord- ing to the Application Standard selected. Note that this requirements is only for regions where AS/NZS 4777.2 safety regula- tions. - Page 110 Alpha ESS Co., Ltd. Alpha ESS Suzhou Co., Ltd. +86 513 806 068 91 +86 512 6828 7609 info@alpha-ess.com info@alpha-ess.com www.alpha-ess.com www.alpha-ess.com Building 10-A, Canal Town Industrial Park, JiuHua Road 888, High-Tech Industrial Development 99 Taihu E Rd, Wuzhong District, Suzhou 215000...
- Page 112 GT Notes: CEC diagrams Testing and CT Checks Split Installer and Owner’s manuals Up to page 77 currently 20/11/22...
Need help?
Do you have a question about the SMILE-G3-S3.6 and is the answer not in the manual?
Questions and answers